> ## Documentation Index
> Fetch the complete documentation index at: https://docs.aipower.org/llms.txt
> Use this file to discover all available pages before exploring further.
# AI Forms
> Create and embed AI-powered forms in WordPress.
## Overview
AI Forms collect visitor input, uploaded files, and uploaded images, insert the submitted values into a prompt, stream the AI response on the page, and can pass results into another AI Form.
Use them for generators, support reply tools, calculators, lead forms, summaries, guided intakes, and multi-form workflows where the visitor provides structured input.
In WordPress admin, go to **AI Puffer > AI Forms**. Use the **Forms** tab to create, search, edit, preview, and publish forms. Use the **Settings** tab for module-wide limits, custom CSS, and frontend model access.
Open example forms built with AI Puffer.
Build fields, layouts, labels, prompt, and AI settings.
Use vector data as context for form responses.
Let supported providers search the web during a response.
Send form submissions and outputs to external apps.
Chain AI Forms together and pass answers between forms.
Edit, duplicate, delete, and organize saved forms.
Embed forms with shortcodes or the WordPress block editor.
Configure the Limits, Custom CSS, and Frontend Models tabs.
Review form requests and generated responses.
## Create a Form
1. Open **AI Puffer > AI Forms > Forms**.
2. Click **Create New Form**.
3. Enter the form title.
4. In the left **Layouts** accordion, drag a layout into the center designer.
5. In the left **Form Elements** accordion, drag fields into the layout columns.
6. Click a field in the designer to edit it in **Element Settings**.
7. In the right **AI** container, select the model.
8. Write the form prompt in the **AI** container.
9. Click **Validate Prompt** to check field placeholders.
10. Click **Save**.
11. Click **Preview** to test the form from the admin screen.
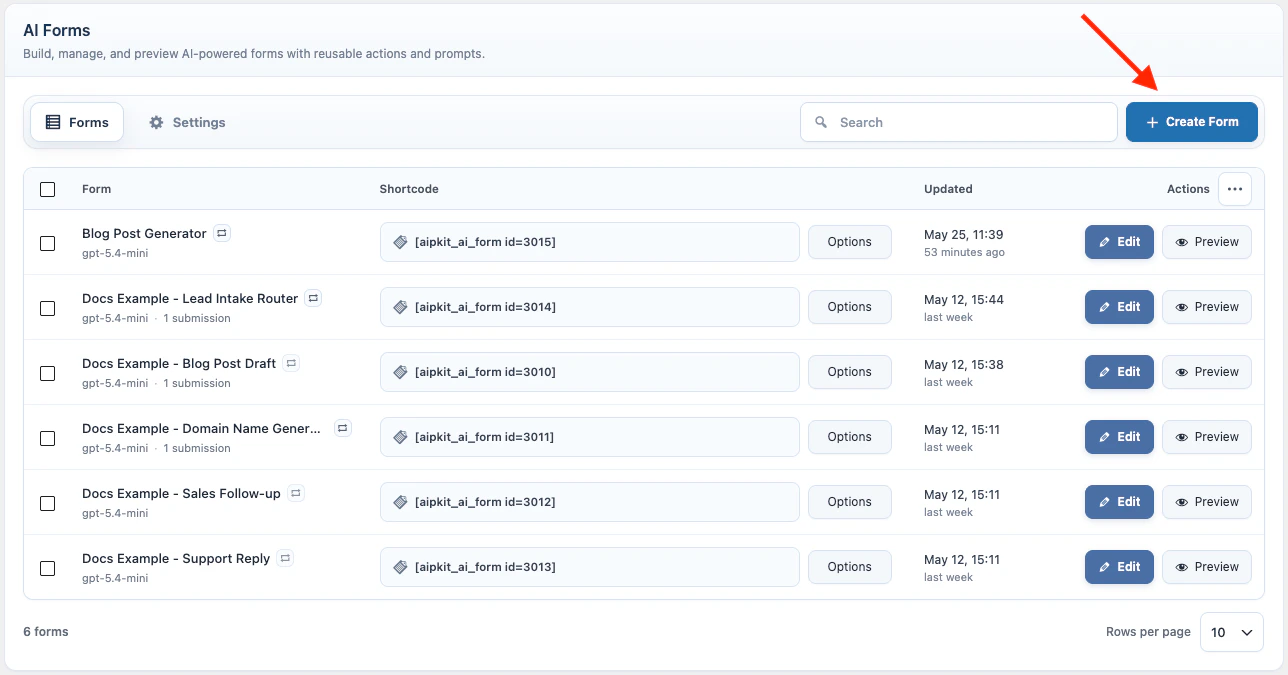 You can also click **Generate with AI** and describe the form you want. AI Puffer drafts the title, fields, layout, and prompt. Review the draft before saving.
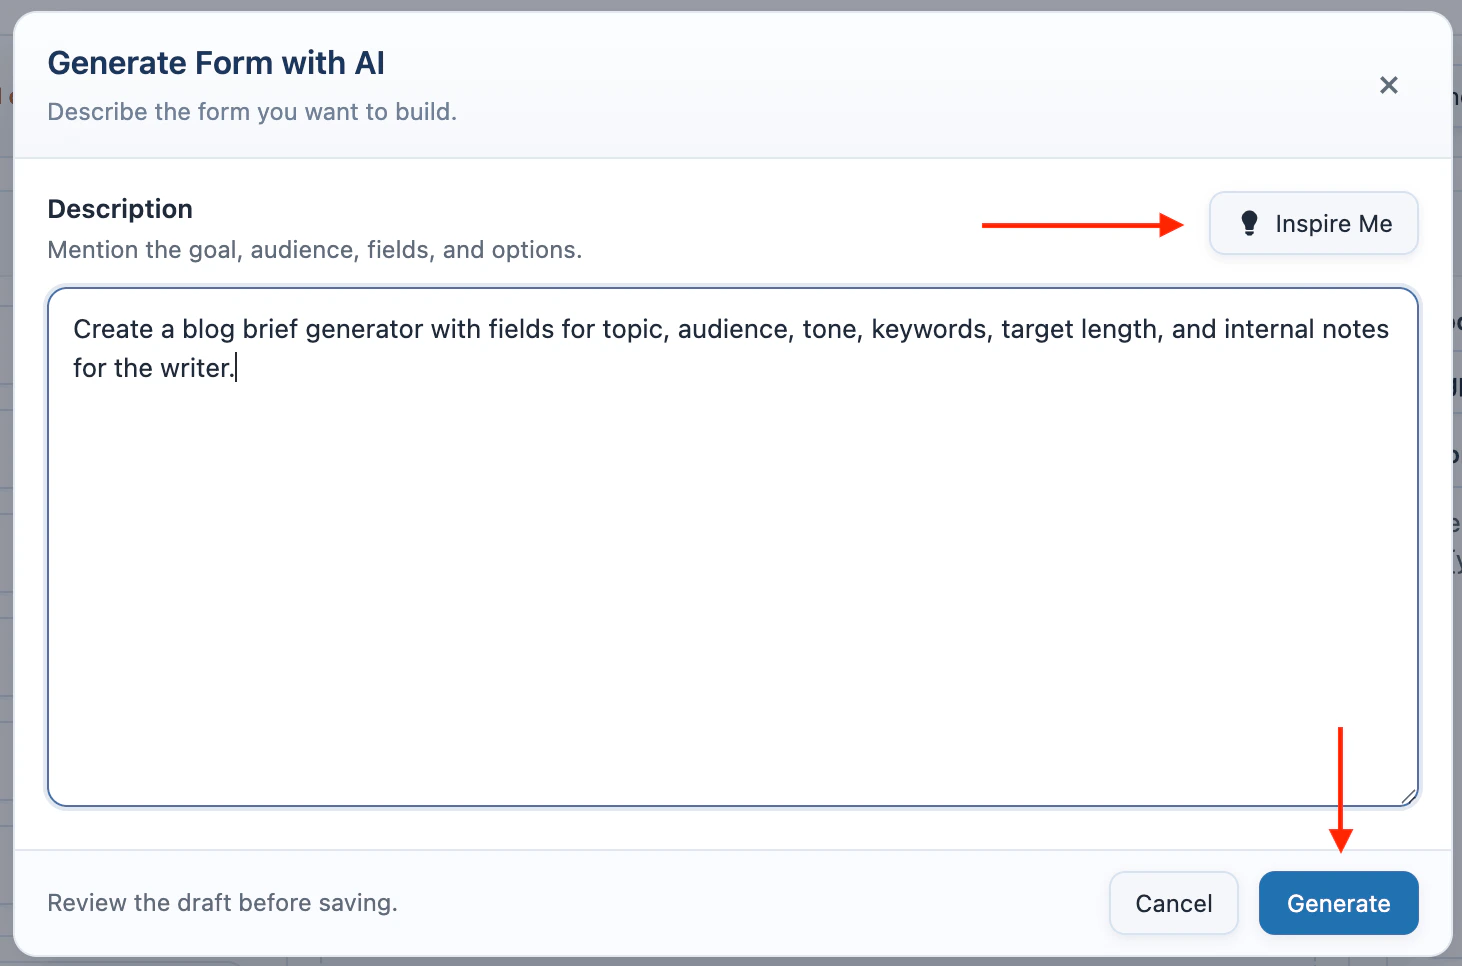 Set up at least one AI provider before creating a form. If the model list is empty, configure and sync a provider in [AI Providers](/ai-providers).
### Form Elements
Form elements collect the values used by the prompt.
Set up at least one AI provider before creating a form. If the model list is empty, configure and sync a provider in [AI Providers](/ai-providers).
### Form Elements
Form elements collect the values used by the prompt.
 | Field | Use it for |
| ----------------- | ----------------------------------------------------------------------------------- |
| **Text Input** | Short text values. |
| **Text Area** | Longer text values. |
| **Dropdown** | One selected option from a list. |
| **Checkbox** | One or more selected options. |
| **Radio Buttons** | One selected option from a visible list. |
| **File Upload** | TXT or PDF upload. The extracted text is passed into the prompt. |
| **Image Upload** | JPG, PNG, or WEBP upload. The image is sent to a vision-capable model for analysis. |
When you click a field, **Element Settings** replaces the left palette. Edit **Label Text**, **Field Variable Name**, placeholder text, required state, help text, and options.
| Field | Use it for |
| ----------------- | ----------------------------------------------------------------------------------- |
| **Text Input** | Short text values. |
| **Text Area** | Longer text values. |
| **Dropdown** | One selected option from a list. |
| **Checkbox** | One or more selected options. |
| **Radio Buttons** | One selected option from a visible list. |
| **File Upload** | TXT or PDF upload. The extracted text is passed into the prompt. |
| **Image Upload** | JPG, PNG, or WEBP upload. The image is sent to a vision-capable model for analysis. |
When you click a field, **Element Settings** replaces the left palette. Edit **Label Text**, **Field Variable Name**, placeholder text, required state, help text, and options.
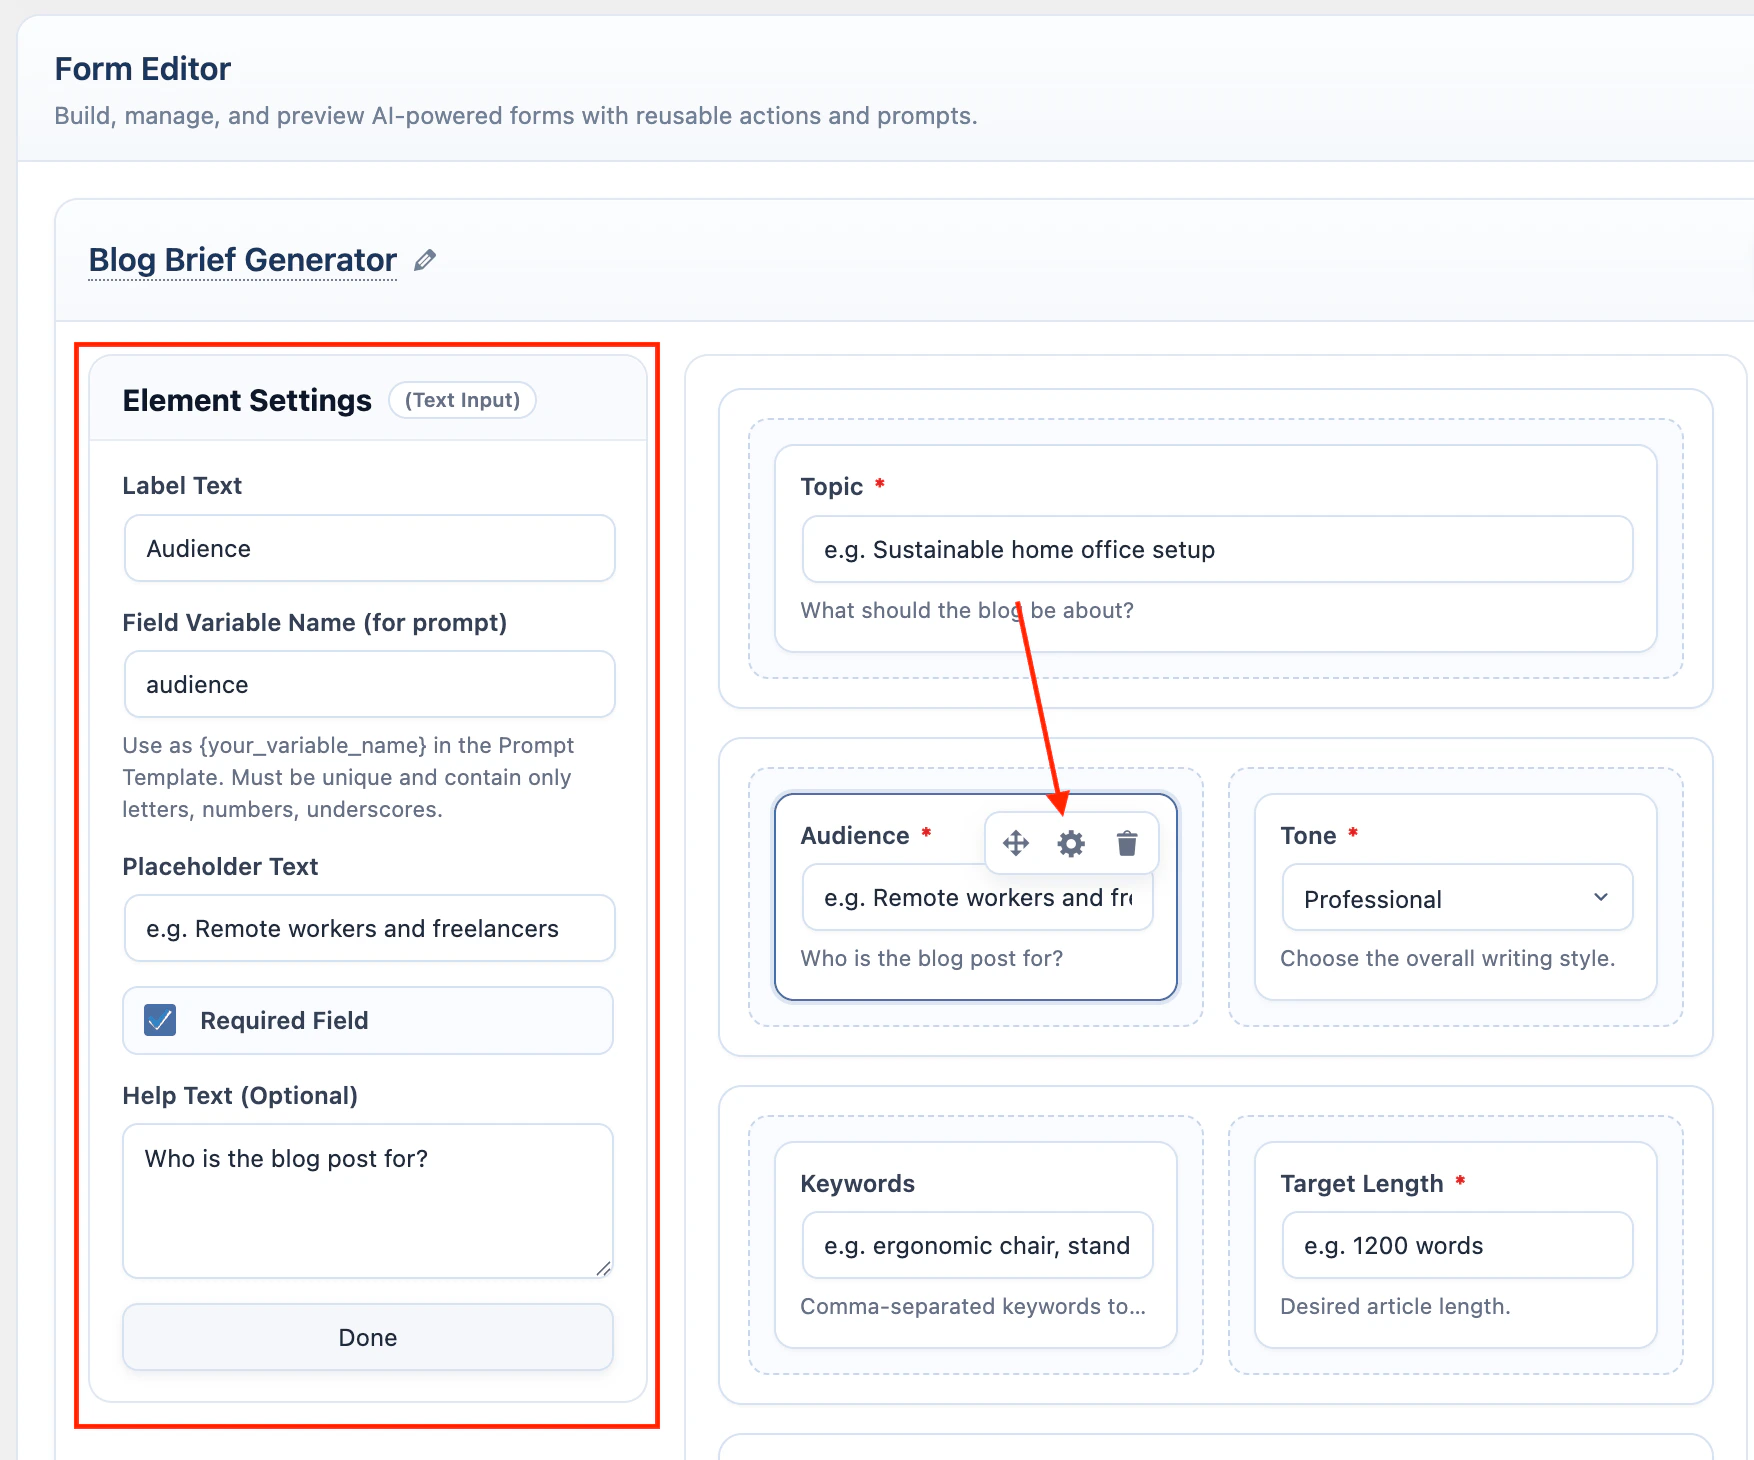 The field variable name is the value you use in the prompt. It can contain letters, numbers, and underscores. It must be unique inside the form.
For **File Upload**, the visitor uploads a TXT or PDF file. AI Puffer extracts the file text during upload and stores that text as the field value.
Add the file field placeholder to the prompt where you want the extracted text to be used.
AI Puffer does not summarize the file before the form runs. If you want a summary, ask for it in the prompt.
File Upload sends extracted text in the prompt. It works with the AI Forms text providers: OpenAI, Google, Anthropic, OpenRouter, Azure, xAI, Ollama, and DeepSeek. It does not use Knowledge Base or vector provider settings.
File Upload is available on Pro plan. It accepts `.txt` and `.pdf` files. Text-based PDFs work best; scanned PDFs may not provide usable text. Large files still count against the selected model's context limit.
For **Image Upload**, the visitor uploads an image and AI Puffer sends it with the form request as image input. Use the prompt to tell the model what to do with the image, such as describe it, extract details, compare it with submitted answers, or generate recommendations from it.
Image Upload works only with providers and models that support image input in AI Forms: OpenAI, Google, Anthropic, OpenRouter, xAI, and Ollama. If the selected model cannot analyze images, the form returns an error instead of silently ignoring the upload.
Image Upload is available on Pro plan. It accepts JPG, PNG, and WEBP images up to 20 MB. Some providers may apply stricter model or file-type rules, such as xAI image analysis using JPG or PNG.
### Layouts
Layouts control the frontend rows and columns.
The field variable name is the value you use in the prompt. It can contain letters, numbers, and underscores. It must be unique inside the form.
For **File Upload**, the visitor uploads a TXT or PDF file. AI Puffer extracts the file text during upload and stores that text as the field value.
Add the file field placeholder to the prompt where you want the extracted text to be used.
AI Puffer does not summarize the file before the form runs. If you want a summary, ask for it in the prompt.
File Upload sends extracted text in the prompt. It works with the AI Forms text providers: OpenAI, Google, Anthropic, OpenRouter, Azure, xAI, Ollama, and DeepSeek. It does not use Knowledge Base or vector provider settings.
File Upload is available on Pro plan. It accepts `.txt` and `.pdf` files. Text-based PDFs work best; scanned PDFs may not provide usable text. Large files still count against the selected model's context limit.
For **Image Upload**, the visitor uploads an image and AI Puffer sends it with the form request as image input. Use the prompt to tell the model what to do with the image, such as describe it, extract details, compare it with submitted answers, or generate recommendations from it.
Image Upload works only with providers and models that support image input in AI Forms: OpenAI, Google, Anthropic, OpenRouter, xAI, and Ollama. If the selected model cannot analyze images, the form returns an error instead of silently ignoring the upload.
Image Upload is available on Pro plan. It accepts JPG, PNG, and WEBP images up to 20 MB. Some providers may apply stricter model or file-type rules, such as xAI image analysis using JPG or PNG.
### Layouts
Layouts control the frontend rows and columns.
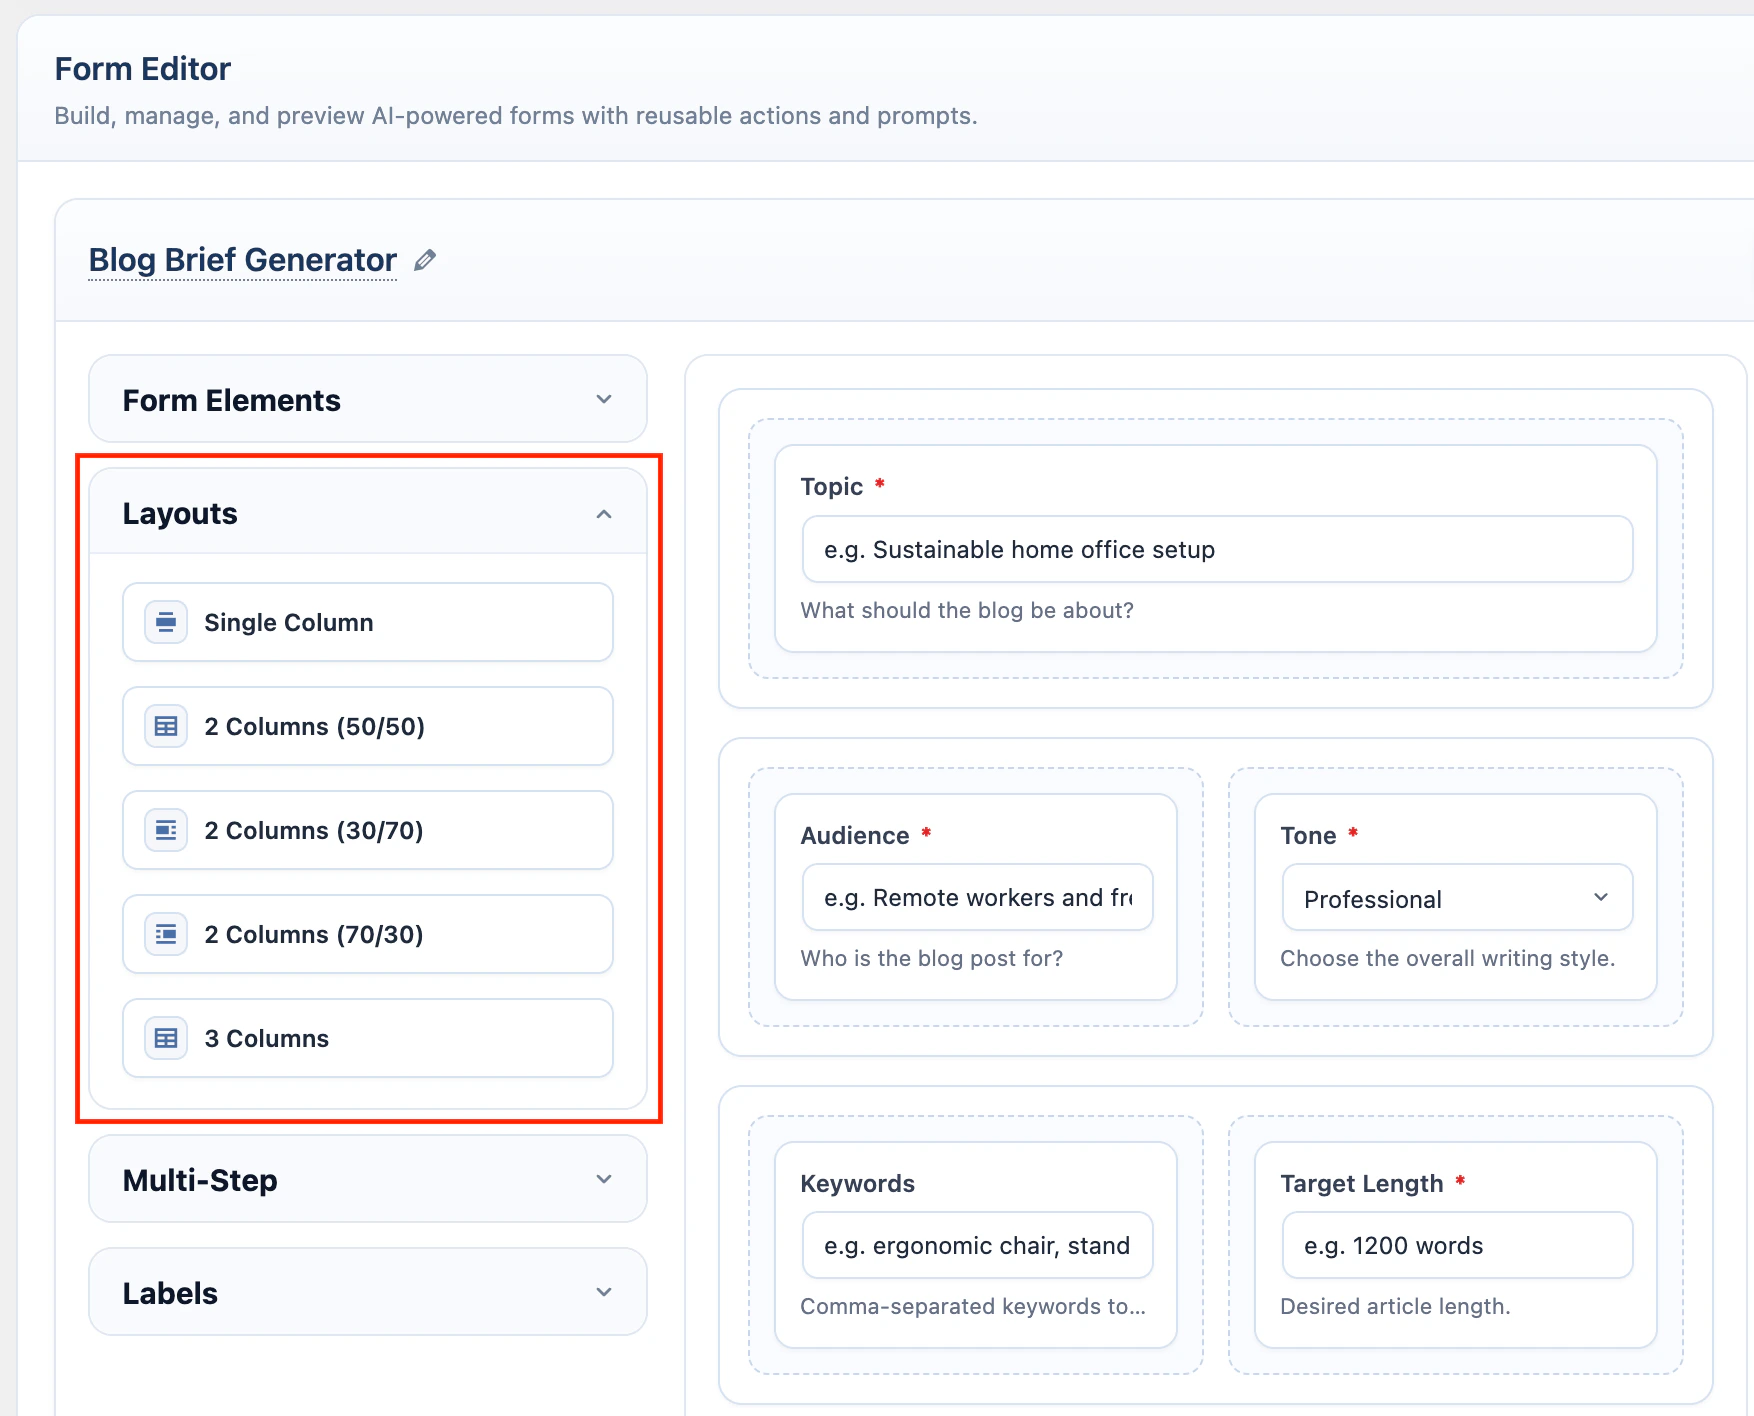 | Layout | Columns |
| --------------------- | ----------------------- |
| **Single Column** | 1 column |
| **2 Columns (50/50)** | 2 equal columns |
| **2 Columns (30/70)** | Narrow left, wide right |
| **2 Columns (70/30)** | Wide left, narrow right |
| **3 Columns** | 3 equal columns |
### Multi-Step
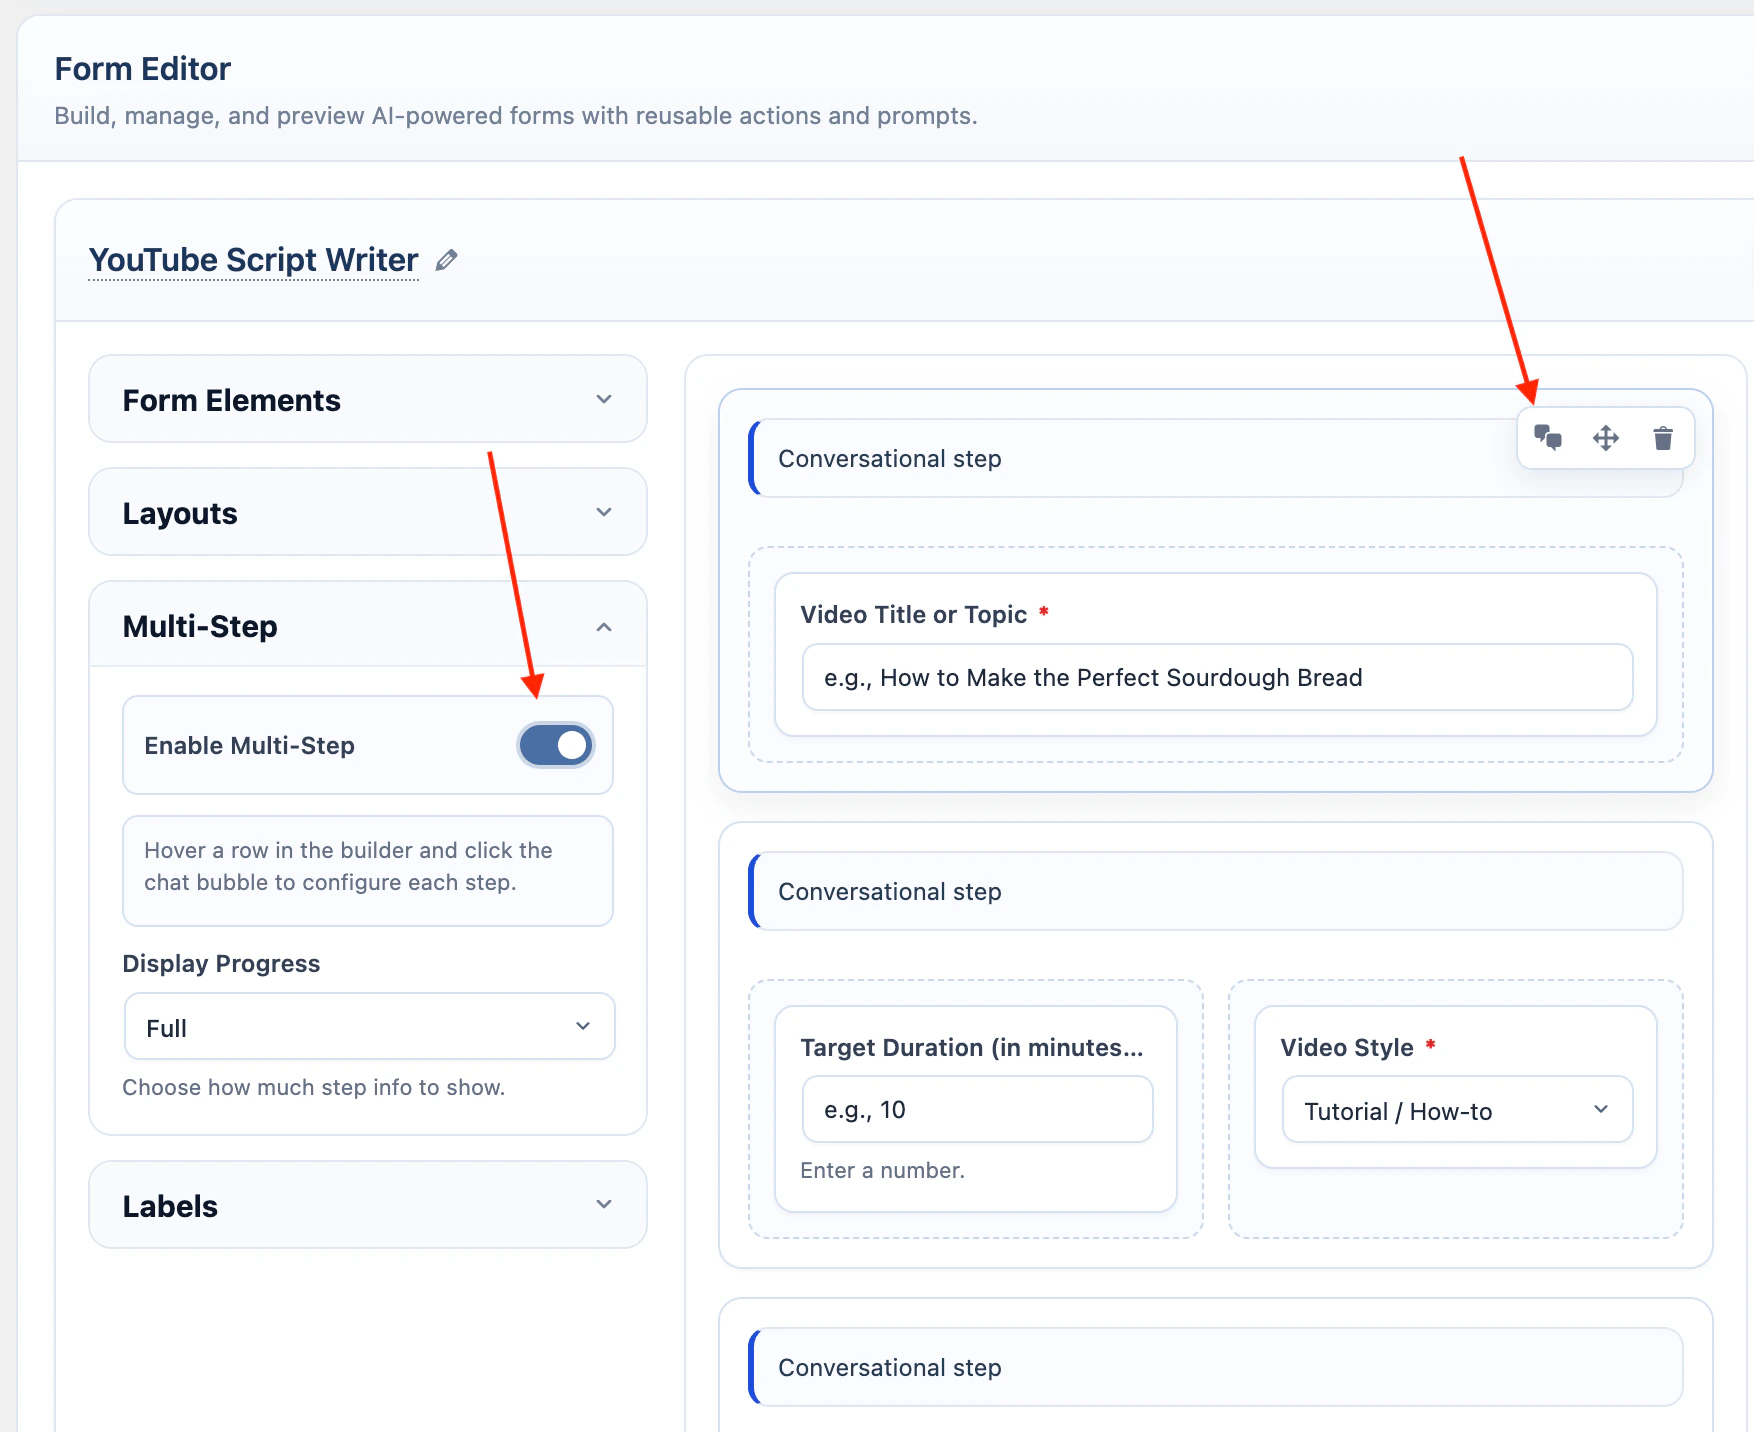
Multi-Step shows one layout row at a time. Use it when the form should feel like a guided flow.
In the left **Multi-Step** accordion:
1. Turn on **Enable Multi-Step**.
2. Choose **Display Progress**.
3. Hover a row in the designer.
4. Click the chat bubble icon to configure that row as a step.
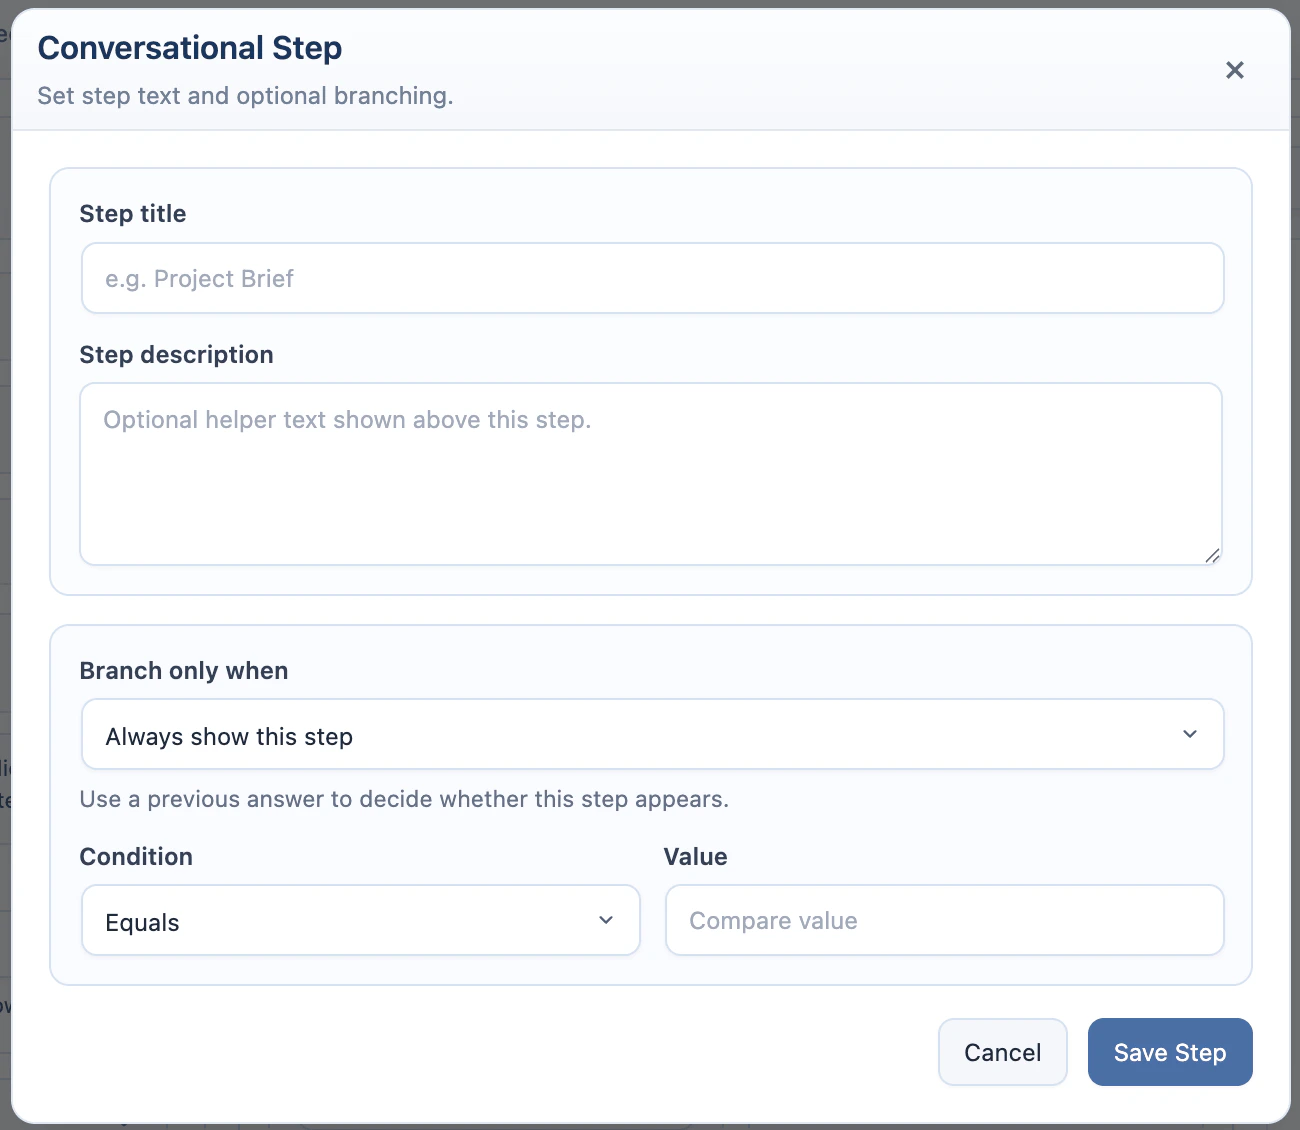
5. Add a step title and description if needed.
6. Add a condition if the step should appear only for specific answers.
7. Save the form.
| Layout | Columns |
| --------------------- | ----------------------- |
| **Single Column** | 1 column |
| **2 Columns (50/50)** | 2 equal columns |
| **2 Columns (30/70)** | Narrow left, wide right |
| **2 Columns (70/30)** | Wide left, narrow right |
| **3 Columns** | 3 equal columns |
### Multi-Step
Multi-Step shows one layout row at a time. Use it when the form should feel like a guided flow.
In the left **Multi-Step** accordion:
1. Turn on **Enable Multi-Step**.
2. Choose **Display Progress**.
3. Hover a row in the designer.
4. Click the chat bubble icon to configure that row as a step.
5. Add a step title and description if needed.
6. Add a condition if the step should appear only for specific answers.
7. Save the form.
 | Progress option | What it shows |
| --------------- | -------------------------------------- |
| **Full** | Step title, description, and progress. |
| **Compact** | Step title and progress. |
| **Minimal** | Step title only. |
| **None** | No step header or progress UI. |
Skipped step inputs are cleared before submission.
Multi-Step can be combined with Workflow. The visitor completes the visible steps in the source form first; after the AI response finishes, the next workflow form appears.
### Workflow
Workflow connects one AI Form to another. Use it when a visitor should complete a source form, review the AI response, and continue with a second form that already contains context from the first result.
Workflow is useful for intake funnels, content pipelines, lead routing, support triage, and any process where one AI output becomes the starting point for another AI task.
| Progress option | What it shows |
| --------------- | -------------------------------------- |
| **Full** | Step title, description, and progress. |
| **Compact** | Step title and progress. |
| **Minimal** | Step title only. |
| **None** | No step header or progress UI. |
Skipped step inputs are cleared before submission.
Multi-Step can be combined with Workflow. The visitor completes the visible steps in the source form first; after the AI response finishes, the next workflow form appears.
### Workflow
Workflow connects one AI Form to another. Use it when a visitor should complete a source form, review the AI response, and continue with a second form that already contains context from the first result.
Workflow is useful for intake funnels, content pipelines, lead routing, support triage, and any process where one AI output becomes the starting point for another AI task.
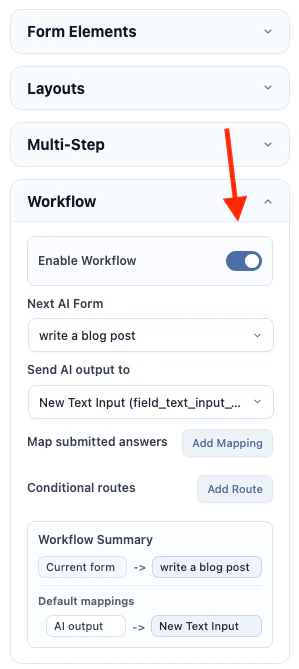 In the left **Workflow** accordion:
1. Create and save the target AI Form first.
2. Edit the source AI Form.
3. Turn on **Enable Workflow**.
4. Choose the default **Next AI Form**.
5. Use **Send AI output to** to prefill a target text field with the source form's AI response.
6. Click **Add Mapping** under **Map submitted answers** to pass source answers into target text fields.
7. Click **Add Route** under **Conditional routes** if different answers should open different target forms.
8. Optional: turn on **Auto-submit next form** if the next form should run as soon as mapped values are filled.
9. Save the source form.
10. Test the source form with **Preview** or its shortcode.
Workflow runs after the source form finishes streaming its AI response. The target form appears below the source result. By default, the visitor can review the prefilled values and submit the target form when ready. If **Auto-submit next form** is enabled and the target form has all required values, AI Puffer submits the target form automatically.
| Control | Use it for |
| ------------------------- | ---------------------------------------------------------------------- |
| **Enable Workflow** | Turns workflow behavior on for the source form. |
| **Next AI Form** | Sets the default target form. |
| **Send AI output to** | Copies the source AI response into one target field. |
| **Map submitted answers** | Copies source field answers into target fields. |
| **Conditional routes** | Opens a different target form when a rule matches. |
| **Auto-submit next form** | Runs the target form automatically after workflow mappings are filled. |
Workflow mappings can target **Text Input** and **Text Area** fields in the next form. File Upload and Image Upload fields are not prefilled into the target form.
Conditional routes can check the AI response or a submitted field value. Route operators are **equals**, **contains**, and **not empty**. Routes are checked from top to bottom; the first matching route wins. If no route matches, AI Puffer uses the default **Next AI Form**.
Workflow does not auto-submit the next form unless **Auto-submit next form** is turned on. Use auto-submit only when the target form can run from mapped text values. If required values are missing, or the target form needs a required upload or multi-step interaction, the target form waits for the visitor.
#### Examples
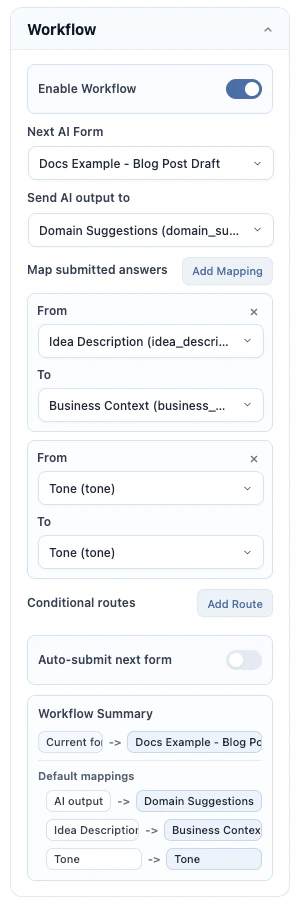
Use this workflow when the first form suggests domain names and the second form turns the selected direction into a launch blog post draft.
Create the target form first:
1. Create **Blog Post Draft**.
2. Add a **Text Area** field named `domain_suggestions`.
3. Add a **Text Area** field named `business_context`.
4. Add a **Text Input** field named `tone`.
5. Write a prompt that chooses a strong domain from `{domain_suggestions}` and writes a blog post using `{business_context}` and `{tone}`.
6. Save the form.
Then create the source form:
1. Create **Domain Name Generator**.
2. Add a **Text Area** field named `idea_description`.
3. Add a **Dropdown** field named `tone`.
4. Write a prompt that suggests domain names from `{idea_description}` and `{tone}`.
5. Open **Workflow**.
6. Turn on **Enable Workflow**.
7. Set **Next AI Form** to **Blog Post Draft**.
8. Set **Send AI output to** to `domain_suggestions`.
9. Add a mapping from `idea_description` to `business_context`.
10. Add a mapping from `tone` to `tone`.
11. Optional: turn on **Auto-submit next form** if you want the blog post draft to start immediately after domain ideas are generated.
12. Save and test the source form.
When the visitor submits the source form, the generated domain ideas appear in the target form. The original business description and tone are also prefilled.
In the left **Workflow** accordion:
1. Create and save the target AI Form first.
2. Edit the source AI Form.
3. Turn on **Enable Workflow**.
4. Choose the default **Next AI Form**.
5. Use **Send AI output to** to prefill a target text field with the source form's AI response.
6. Click **Add Mapping** under **Map submitted answers** to pass source answers into target text fields.
7. Click **Add Route** under **Conditional routes** if different answers should open different target forms.
8. Optional: turn on **Auto-submit next form** if the next form should run as soon as mapped values are filled.
9. Save the source form.
10. Test the source form with **Preview** or its shortcode.
Workflow runs after the source form finishes streaming its AI response. The target form appears below the source result. By default, the visitor can review the prefilled values and submit the target form when ready. If **Auto-submit next form** is enabled and the target form has all required values, AI Puffer submits the target form automatically.
| Control | Use it for |
| ------------------------- | ---------------------------------------------------------------------- |
| **Enable Workflow** | Turns workflow behavior on for the source form. |
| **Next AI Form** | Sets the default target form. |
| **Send AI output to** | Copies the source AI response into one target field. |
| **Map submitted answers** | Copies source field answers into target fields. |
| **Conditional routes** | Opens a different target form when a rule matches. |
| **Auto-submit next form** | Runs the target form automatically after workflow mappings are filled. |
Workflow mappings can target **Text Input** and **Text Area** fields in the next form. File Upload and Image Upload fields are not prefilled into the target form.
Conditional routes can check the AI response or a submitted field value. Route operators are **equals**, **contains**, and **not empty**. Routes are checked from top to bottom; the first matching route wins. If no route matches, AI Puffer uses the default **Next AI Form**.
Workflow does not auto-submit the next form unless **Auto-submit next form** is turned on. Use auto-submit only when the target form can run from mapped text values. If required values are missing, or the target form needs a required upload or multi-step interaction, the target form waits for the visitor.
#### Examples
Use this workflow when the first form suggests domain names and the second form turns the selected direction into a launch blog post draft.
Create the target form first:
1. Create **Blog Post Draft**.
2. Add a **Text Area** field named `domain_suggestions`.
3. Add a **Text Area** field named `business_context`.
4. Add a **Text Input** field named `tone`.
5. Write a prompt that chooses a strong domain from `{domain_suggestions}` and writes a blog post using `{business_context}` and `{tone}`.
6. Save the form.
Then create the source form:
1. Create **Domain Name Generator**.
2. Add a **Text Area** field named `idea_description`.
3. Add a **Dropdown** field named `tone`.
4. Write a prompt that suggests domain names from `{idea_description}` and `{tone}`.
5. Open **Workflow**.
6. Turn on **Enable Workflow**.
7. Set **Next AI Form** to **Blog Post Draft**.
8. Set **Send AI output to** to `domain_suggestions`.
9. Add a mapping from `idea_description` to `business_context`.
10. Add a mapping from `tone` to `tone`.
11. Optional: turn on **Auto-submit next form** if you want the blog post draft to start immediately after domain ideas are generated.
12. Save and test the source form.
When the visitor submits the source form, the generated domain ideas appear in the target form. The original business description and tone are also prefilled.
 Use this workflow when one intake form should route visitors to different next forms based on their request type.
Create the target forms first:
1. Create **Sales Follow-up** with fields named `company_name`, `intake_summary`, and `lead_notes`.
2. Write a prompt that drafts a sales follow-up from those fields.
3. Create **Support Reply** with fields named `company_name`, `intake_summary`, and `customer_message`.
4. Write a prompt that drafts a support reply from those fields.
5. Save both target forms.
Then create the source form:
1. Create **Lead Intake Router**.
2. Add a **Text Input** field named `company_name`.
3. Add a **Dropdown** field named `request_type` with values such as `sales`, `support`, and `partnership`.
4. Add a **Text Area** field named `request_details`.
5. Write a prompt that summarizes the lead from `{company_name}`, `{request_type}`, and `{request_details}`.
6. Open **Workflow**.
7. Turn on **Enable Workflow**.
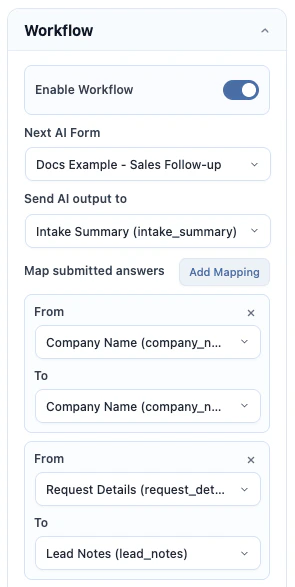
8. Set **Next AI Form** to **Sales Follow-up** as the default route.
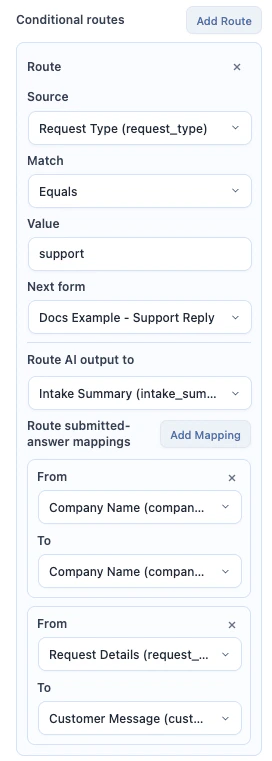
9. Add a route where `request_type` **equals** `support`, then set the target to **Support Reply**.
10. In that route, map AI output to `intake_summary`, `company_name` to `company_name`, and `request_details` to `customer_message`.
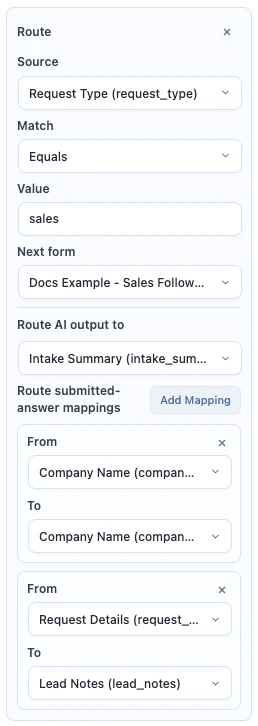
11. Add a route where `request_type` **equals** `sales`, then set the target to **Sales Follow-up**.
12. In that route, map AI output to `intake_summary`, `company_name` to `company_name`, and `request_details` to `lead_notes`.
13. Optional: turn on **Auto-submit next form** if each routed target form has everything it needs from the mappings.
14. Save and test the source form with both request types.
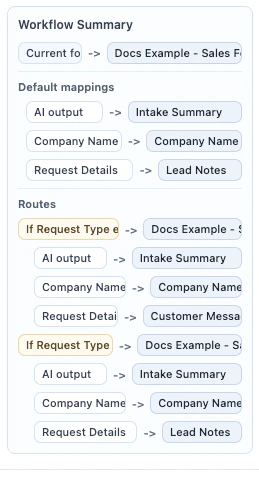
Sales requests open the sales follow-up form. Support requests open the support reply form. Other request types fall back to the default next form.
Use this workflow when one intake form should route visitors to different next forms based on their request type.
Create the target forms first:
1. Create **Sales Follow-up** with fields named `company_name`, `intake_summary`, and `lead_notes`.
2. Write a prompt that drafts a sales follow-up from those fields.
3. Create **Support Reply** with fields named `company_name`, `intake_summary`, and `customer_message`.
4. Write a prompt that drafts a support reply from those fields.
5. Save both target forms.
Then create the source form:
1. Create **Lead Intake Router**.
2. Add a **Text Input** field named `company_name`.
3. Add a **Dropdown** field named `request_type` with values such as `sales`, `support`, and `partnership`.
4. Add a **Text Area** field named `request_details`.
5. Write a prompt that summarizes the lead from `{company_name}`, `{request_type}`, and `{request_details}`.
6. Open **Workflow**.
7. Turn on **Enable Workflow**.
8. Set **Next AI Form** to **Sales Follow-up** as the default route.
9. Add a route where `request_type` **equals** `support`, then set the target to **Support Reply**.
10. In that route, map AI output to `intake_summary`, `company_name` to `company_name`, and `request_details` to `customer_message`.
11. Add a route where `request_type` **equals** `sales`, then set the target to **Sales Follow-up**.
12. In that route, map AI output to `intake_summary`, `company_name` to `company_name`, and `request_details` to `lead_notes`.
13. Optional: turn on **Auto-submit next form** if each routed target form has everything it needs from the mappings.
14. Save and test the source form with both request types.
Sales requests open the sales follow-up form. Support requests open the support reply form. Other request types fall back to the default next form.
 ### Labels
Use the left **Labels** accordion to change frontend button text and field selector labels.
### Labels
Use the left **Labels** accordion to change frontend button text and field selector labels.
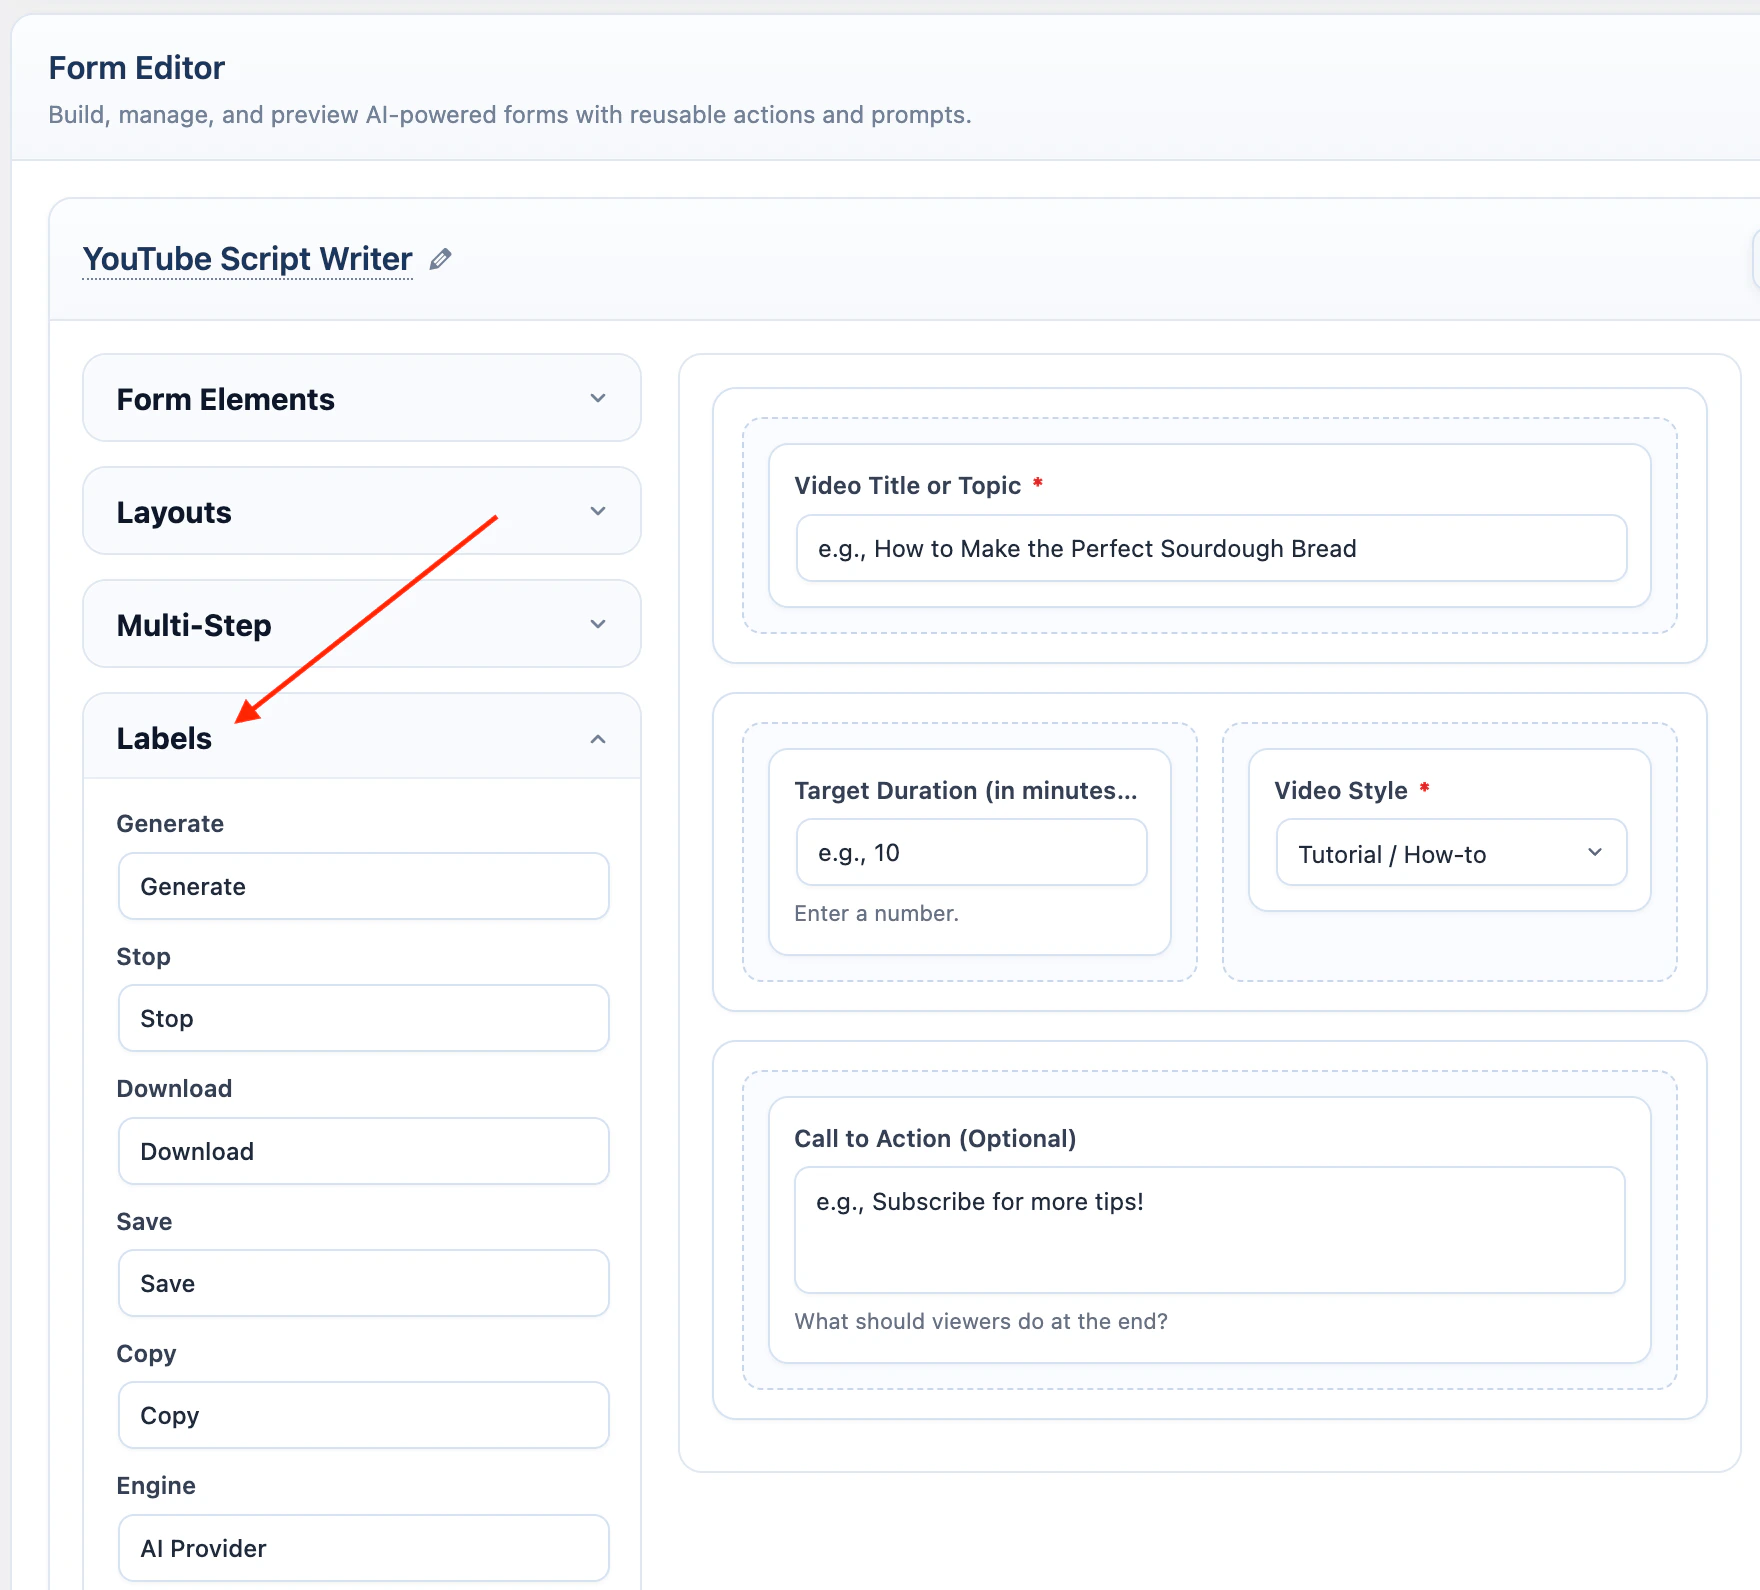 | Label | Default |
| ------------------ | -------------------------------------------- |
| **Generate** | Generate |
| **Stop** | Stop |
| **Download** | Download |
| **Save** | Save |
| **Copy** | Copy |
| **Engine** | Engine |
| **Model** | Model |
| **Back** | Back |
| **Next** | Next |
| **Step Title** | Step `{number}` |
| **Step Progress** | Step `{current} of {total}` |
| **Validation Msg** | Please complete this step before continuing. |
Multi-step labels are used only when Multi-Step is enabled.
### AI
Each form has its own model selection in the right-side **AI** container.
| Label | Default |
| ------------------ | -------------------------------------------- |
| **Generate** | Generate |
| **Stop** | Stop |
| **Download** | Download |
| **Save** | Save |
| **Copy** | Copy |
| **Engine** | Engine |
| **Model** | Model |
| **Back** | Back |
| **Next** | Next |
| **Step Title** | Step `{number}` |
| **Step Progress** | Step `{current} of {total}` |
| **Validation Msg** | Please complete this step before continuing. |
Multi-step labels are used only when Multi-Step is enabled.
### AI
Each form has its own model selection in the right-side **AI** container.
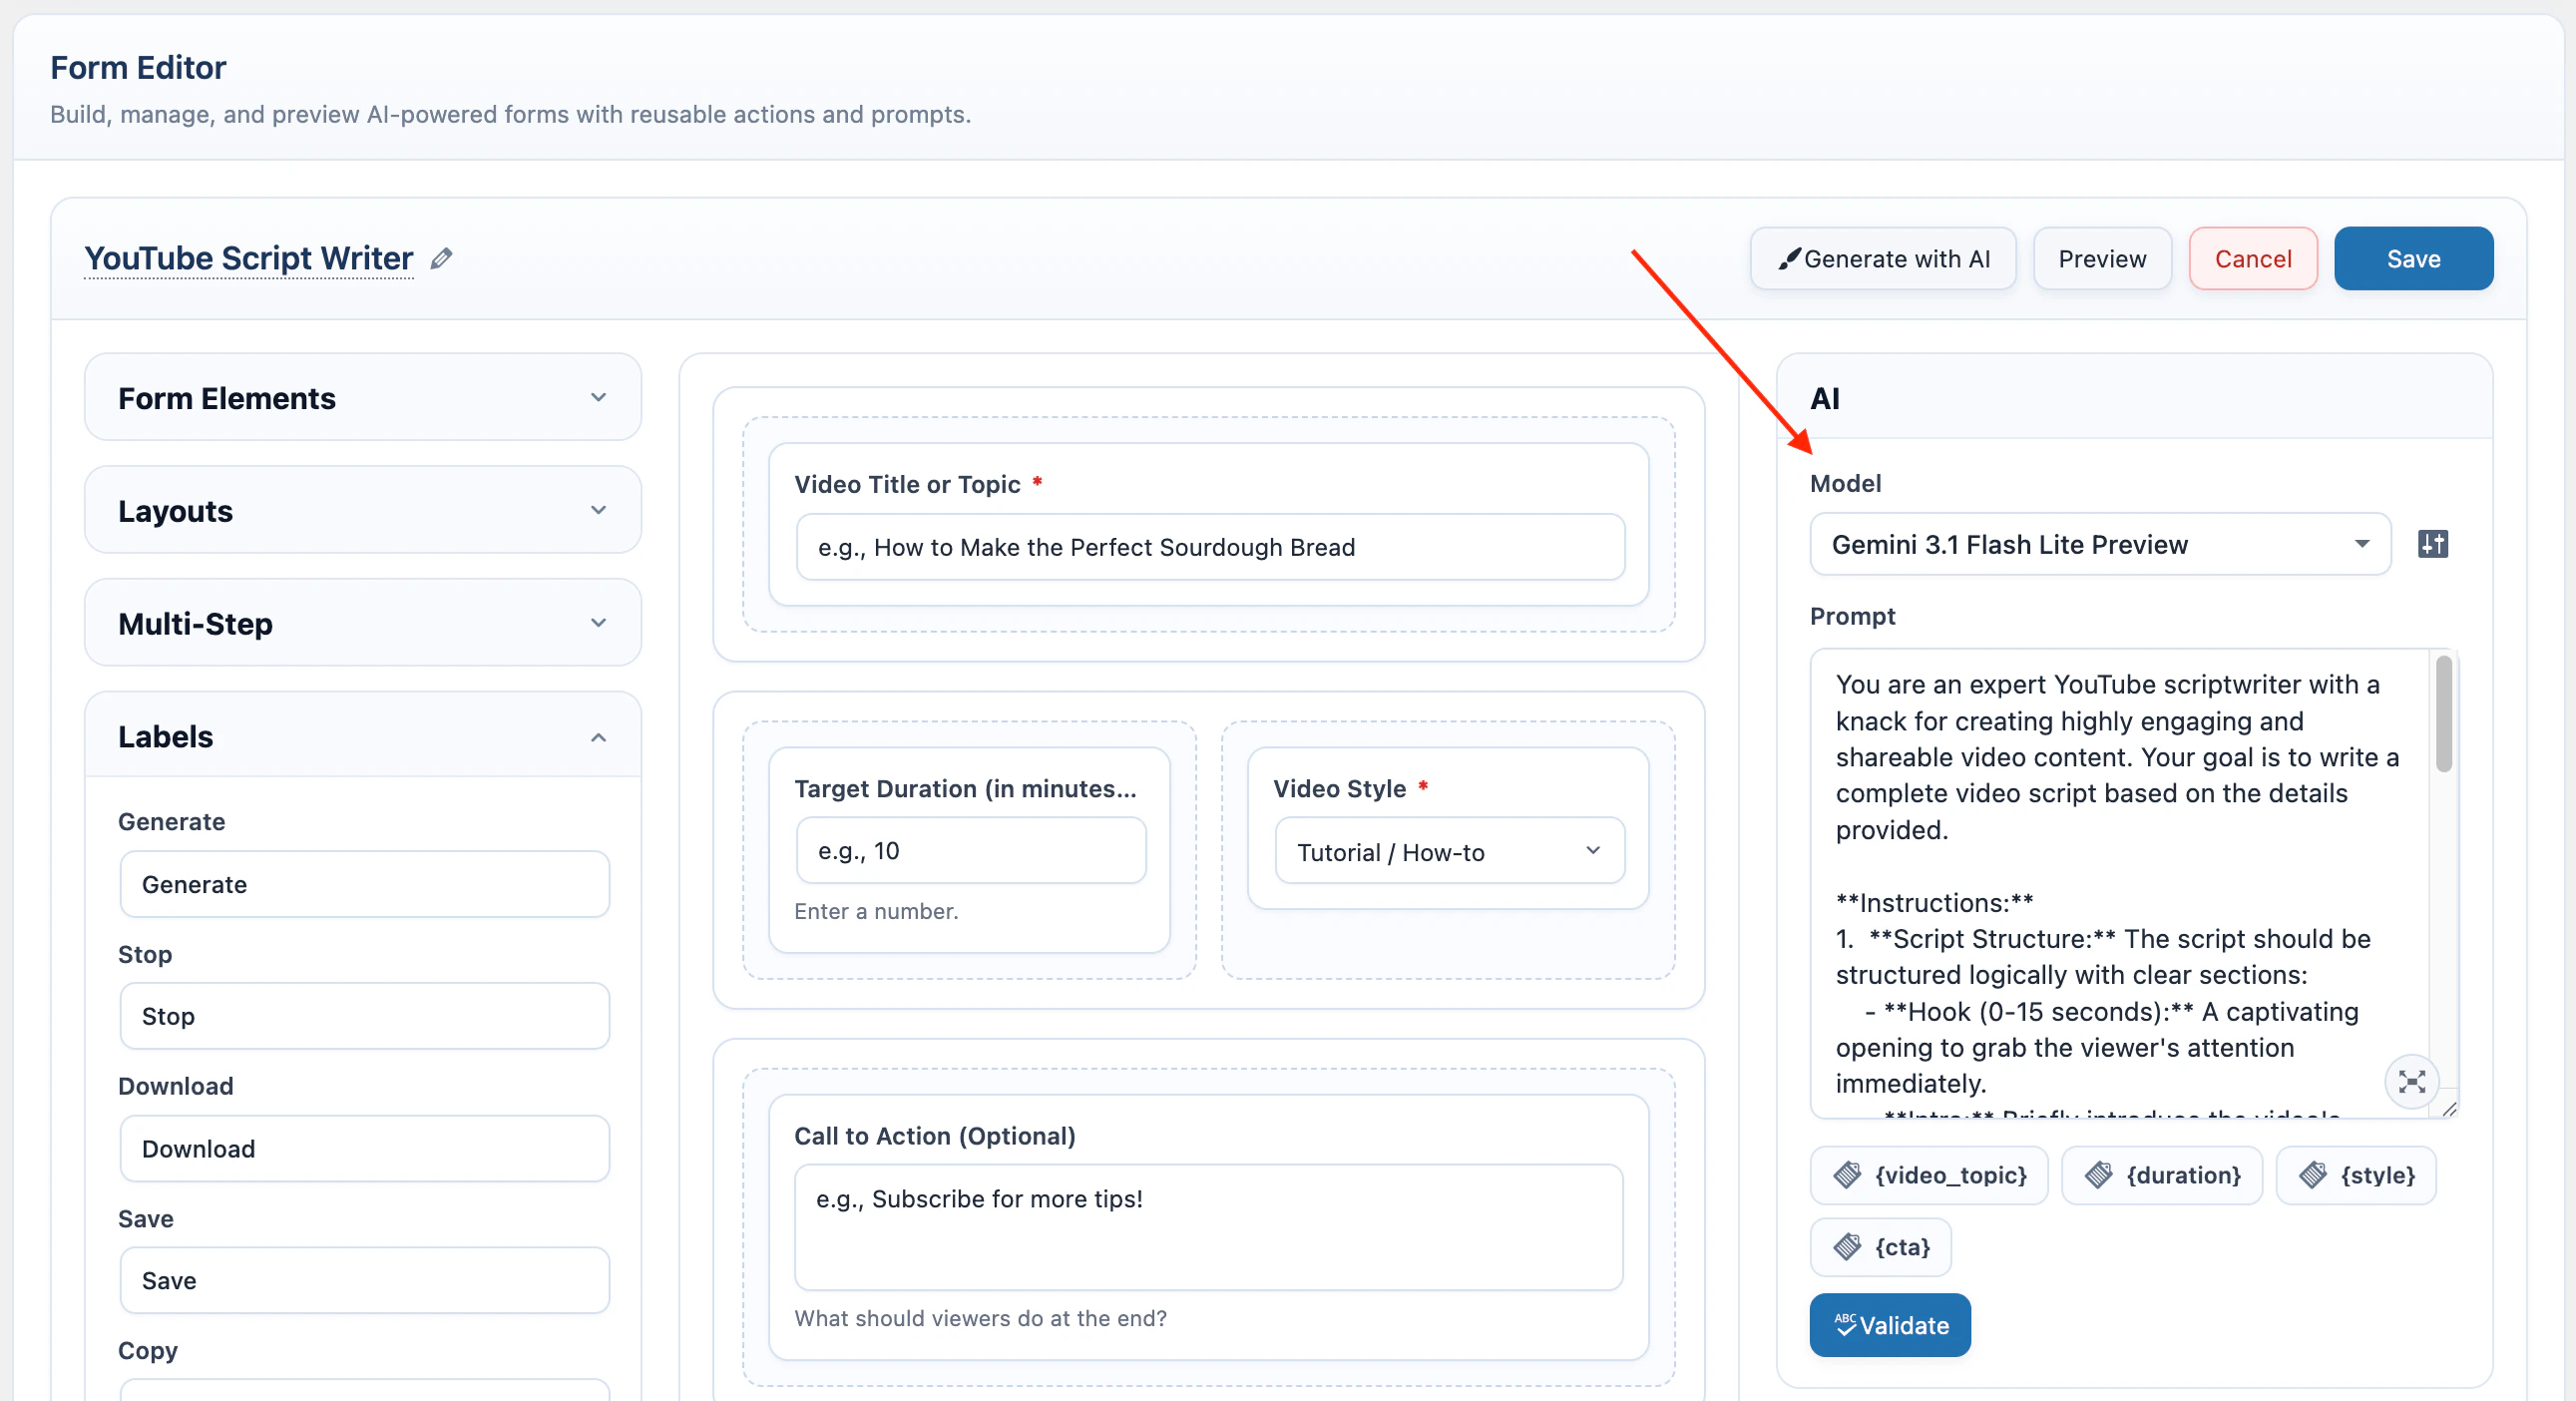 Click the settings icon beside the model list to open **Model settings**.
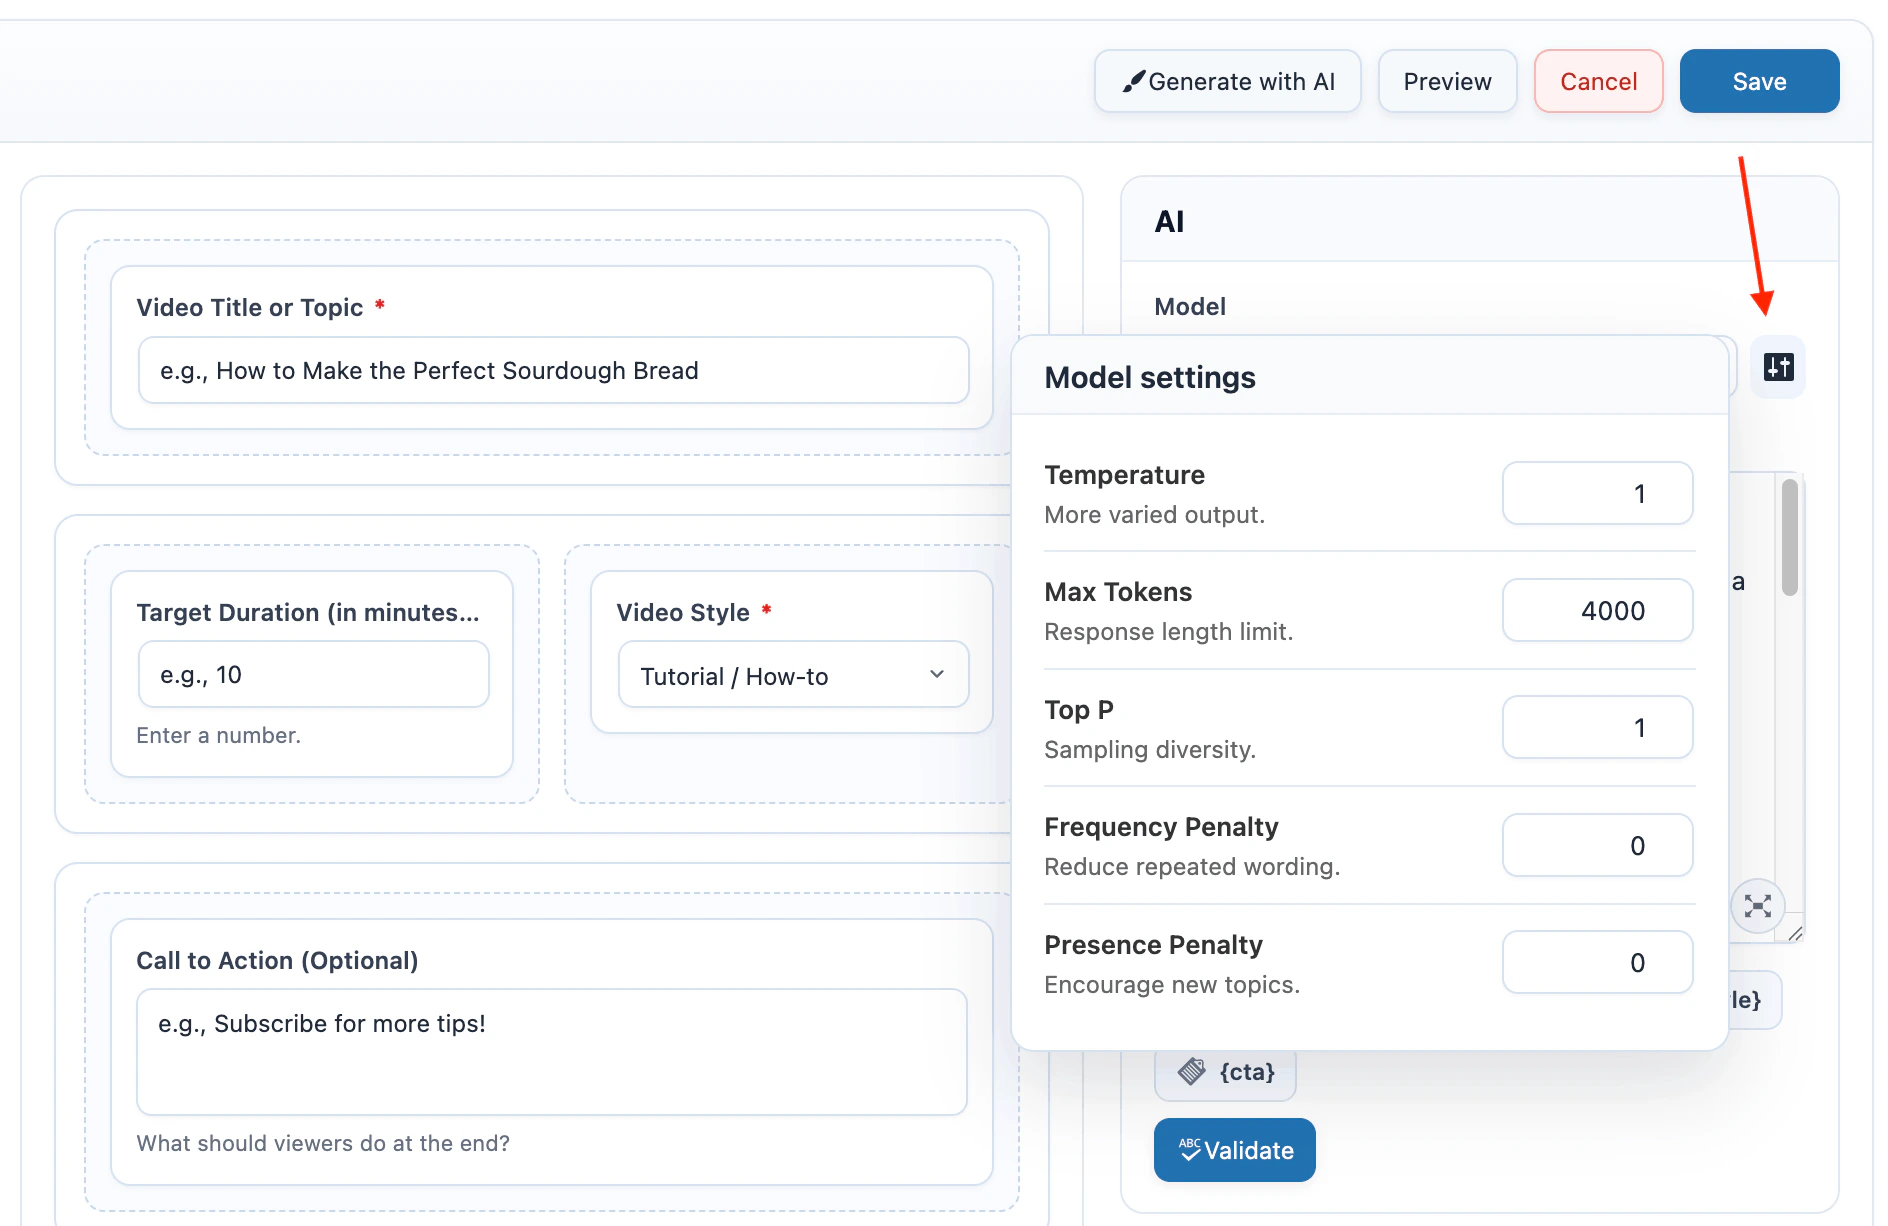 | Setting | Use it for |
| --------------------- | ----------------------------------------------------------------------------------- |
| **Temperature** | Response variation. Lower values are more predictable. |
| **Max Tokens** | Maximum response size. |
| **Top P** | Sampling control. Leave at the default unless you know why you are changing it. |
| **Frequency Penalty** | Reduces repeated wording. |
| **Presence Penalty** | Encourages the model to introduce new wording or topics. |
| **Reasoning Effort** | Reasoning level for supported models. Keep it set to **None** for faster responses. |
### Prompt
AI Forms use field placeholders inside the prompt. Add a field value by wrapping its variable name in braces.
| Setting | Use it for |
| --------------------- | ----------------------------------------------------------------------------------- |
| **Temperature** | Response variation. Lower values are more predictable. |
| **Max Tokens** | Maximum response size. |
| **Top P** | Sampling control. Leave at the default unless you know why you are changing it. |
| **Frequency Penalty** | Reduces repeated wording. |
| **Presence Penalty** | Encourages the model to introduce new wording or topics. |
| **Reasoning Effort** | Reasoning level for supported models. Keep it set to **None** for faster responses. |
### Prompt
AI Forms use field placeholders inside the prompt. Add a field value by wrapping its variable name in braces.
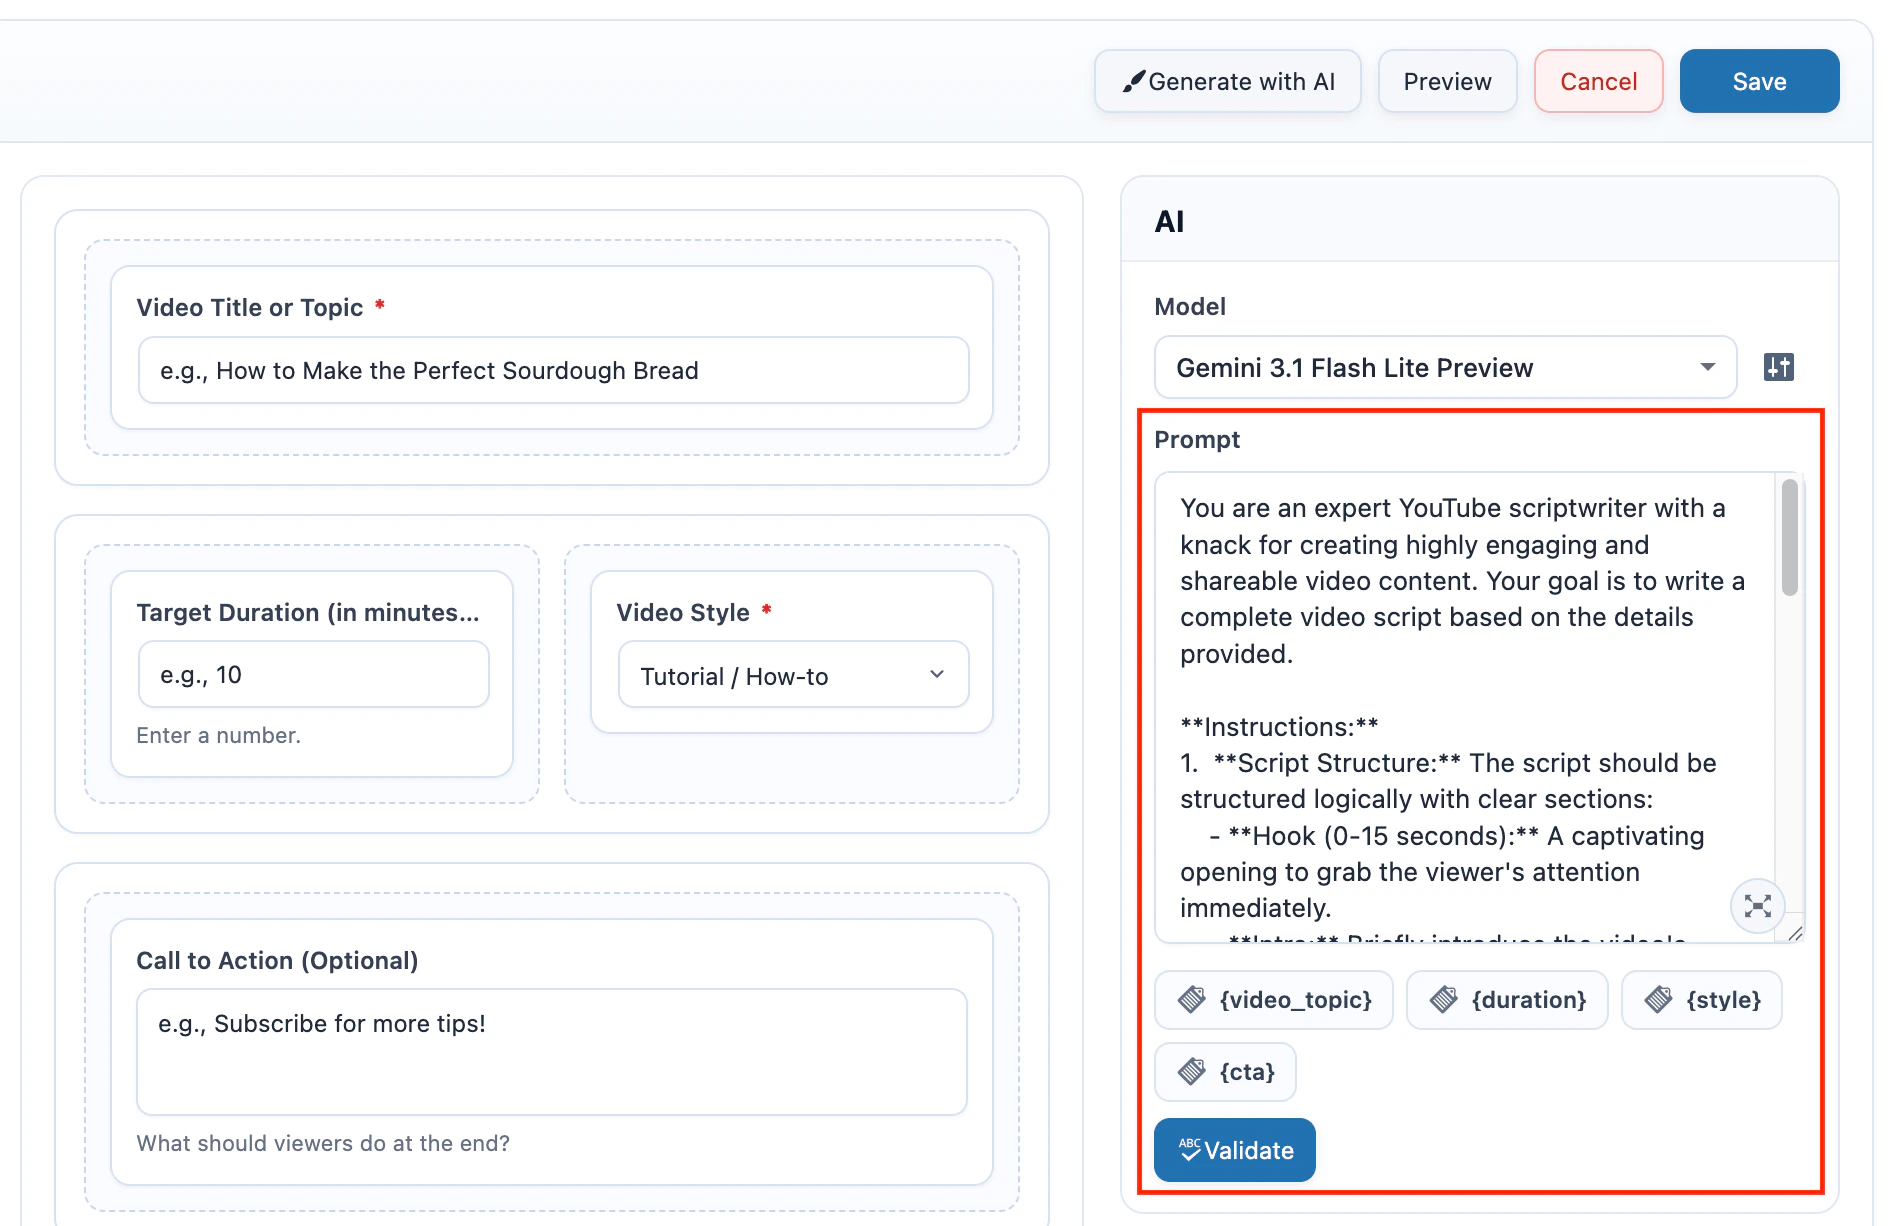 Example:
```text theme={null}
Write a customer support reply.
Customer message:
{customer_message}
Tone:
{tone}
Next step:
{next_step}
```
For dropdown and radio fields, AI Puffer inserts the selected option label. For checkbox fields, it inserts selected option labels separated by commas. If a field is empty, the placeholder is replaced with an empty value.
Use the expand icon inside **Prompt** when you want a larger prompt editor.
AI Forms do not keep chat history. Each submission uses the current form values and the saved form configuration.
### Knowledge Base
Knowledge base lets a form use trained content from **AI Puffer > Knowledge Base > Data** before generating the response.
Use the right-side **Context** container to enable Knowledge Base and configure its retrieval options.
1. Turn on **Knowledge Base**.
2. Click the settings icon beside **Knowledge Base**.
3. Select **Vector provider**.
4. Choose the vector store, index, or collection.
5. For Pinecone, Qdrant, or Chroma, select the same **Embedding** model used when the content was indexed.
6. Set **Limit** and **Score threshold**.
7. Save the form.
Example:
```text theme={null}
Write a customer support reply.
Customer message:
{customer_message}
Tone:
{tone}
Next step:
{next_step}
```
For dropdown and radio fields, AI Puffer inserts the selected option label. For checkbox fields, it inserts selected option labels separated by commas. If a field is empty, the placeholder is replaced with an empty value.
Use the expand icon inside **Prompt** when you want a larger prompt editor.
AI Forms do not keep chat history. Each submission uses the current form values and the saved form configuration.
### Knowledge Base
Knowledge base lets a form use trained content from **AI Puffer > Knowledge Base > Data** before generating the response.
Use the right-side **Context** container to enable Knowledge Base and configure its retrieval options.
1. Turn on **Knowledge Base**.
2. Click the settings icon beside **Knowledge Base**.
3. Select **Vector provider**.
4. Choose the vector store, index, or collection.
5. For Pinecone, Qdrant, or Chroma, select the same **Embedding** model used when the content was indexed.
6. Set **Limit** and **Score threshold**.
7. Save the form.
 | Vector provider | Required setup |
| --------------- | -------------------------------------------------------------------------------------------------------------------------- |
| **OpenAI** | Select up to two **Vector stores**. |
| **Pinecone** | Select **Index** and **Embedding**. Configure the Pinecone connection in **AI Puffer > Settings > Integrations** first. |
| **Qdrant** | Select **Collection** and **Embedding**. Configure the Qdrant connection in **AI Puffer > Settings > Integrations** first. |
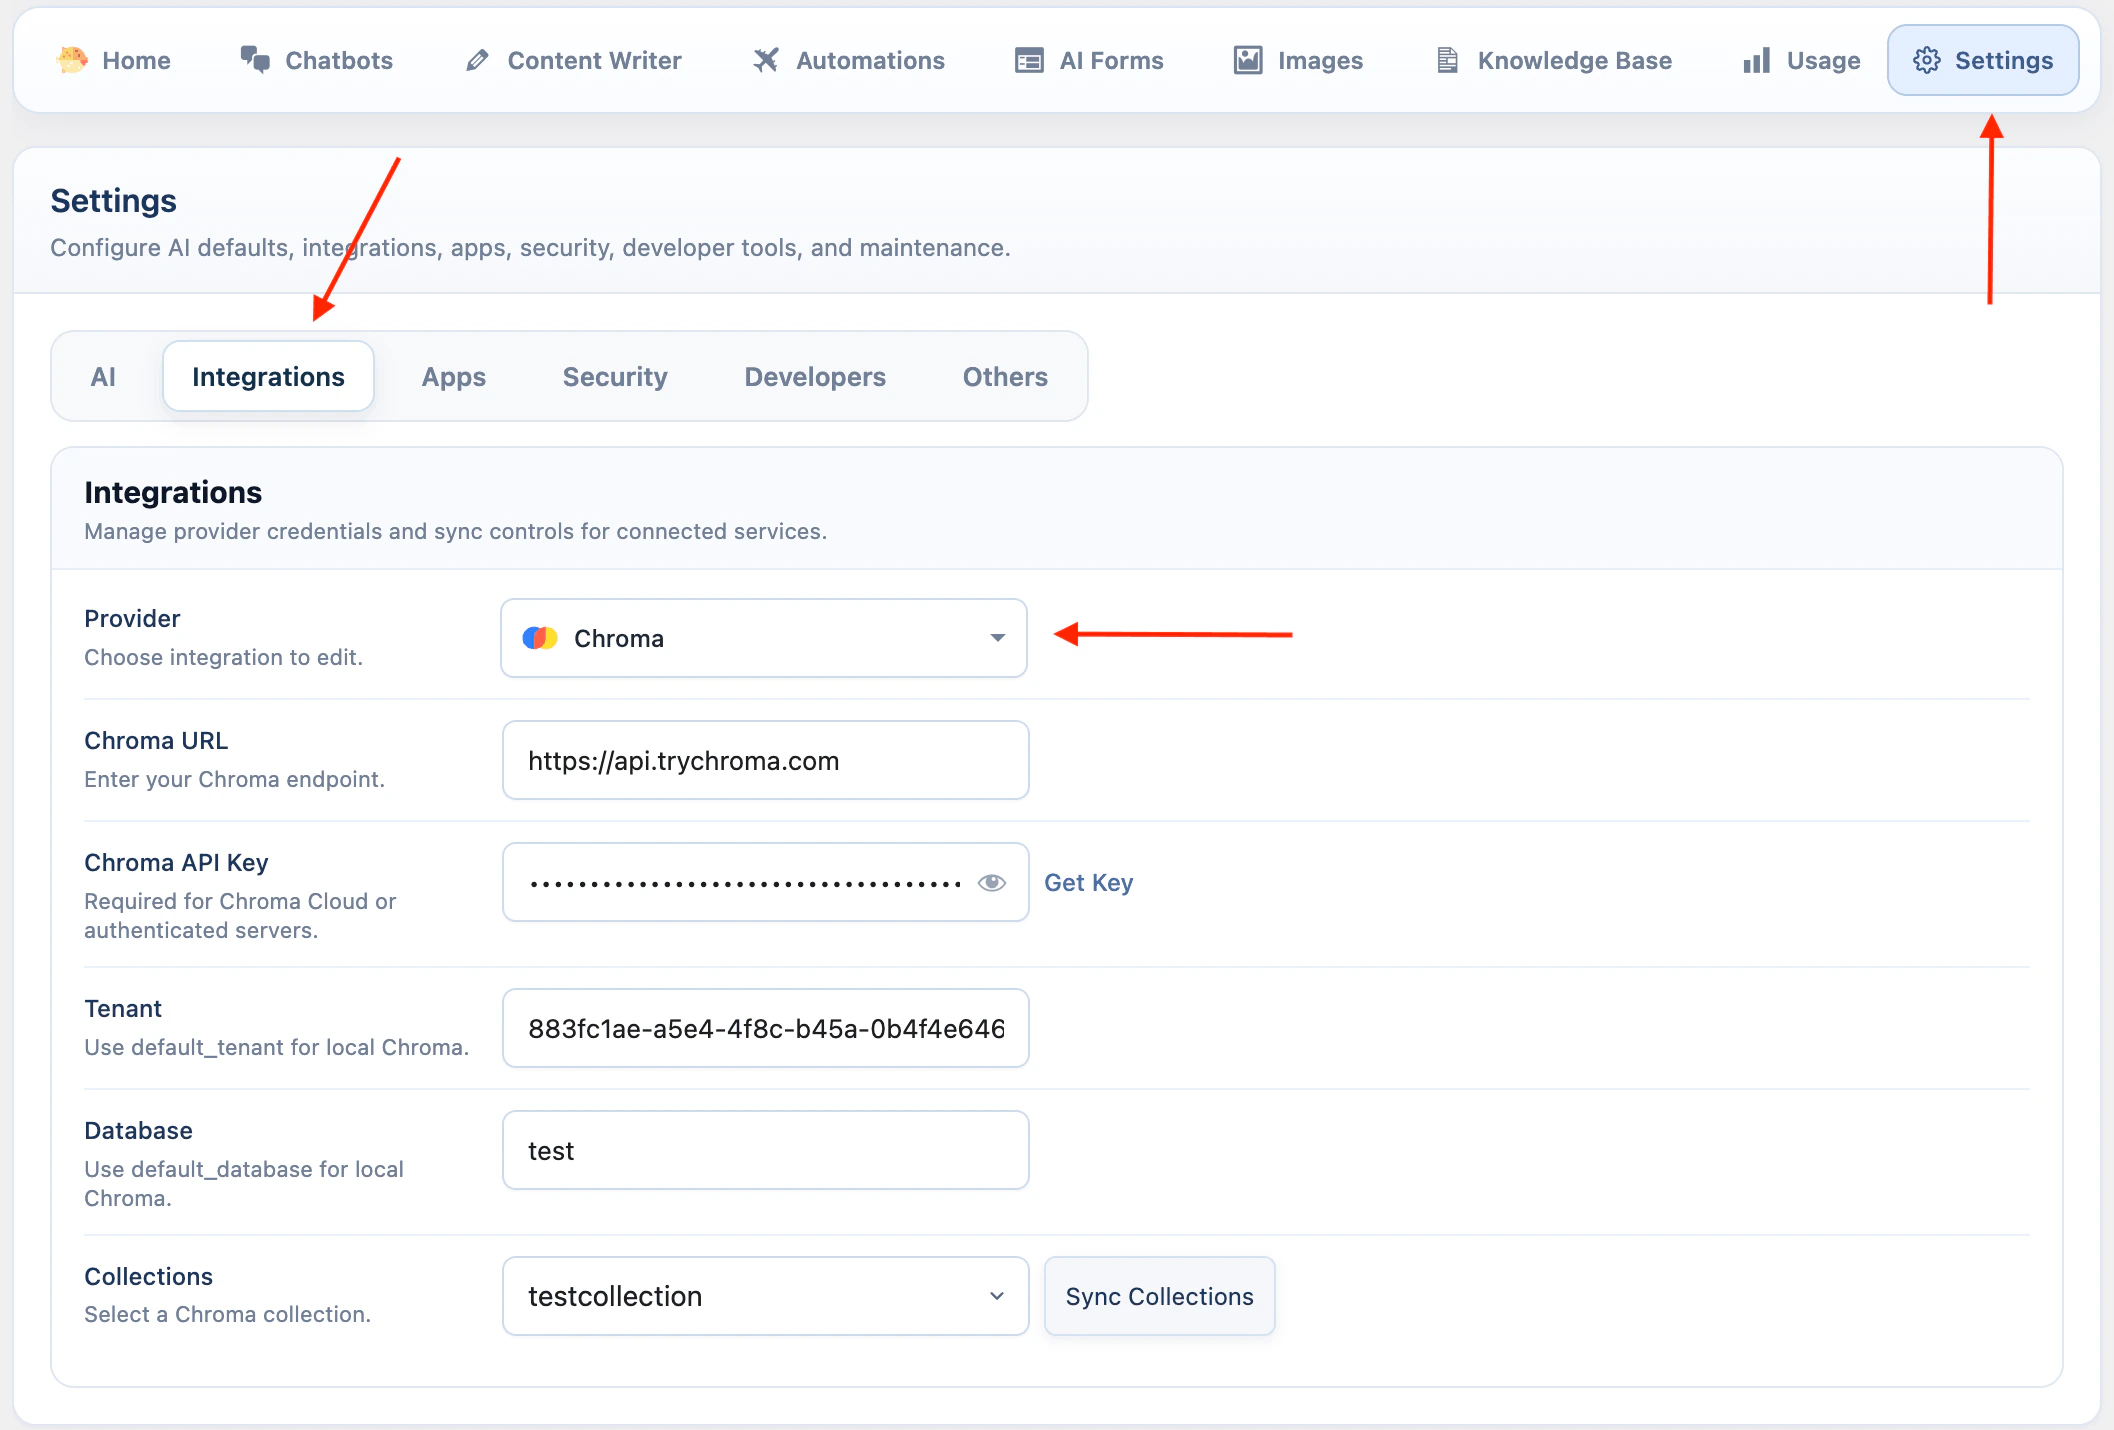
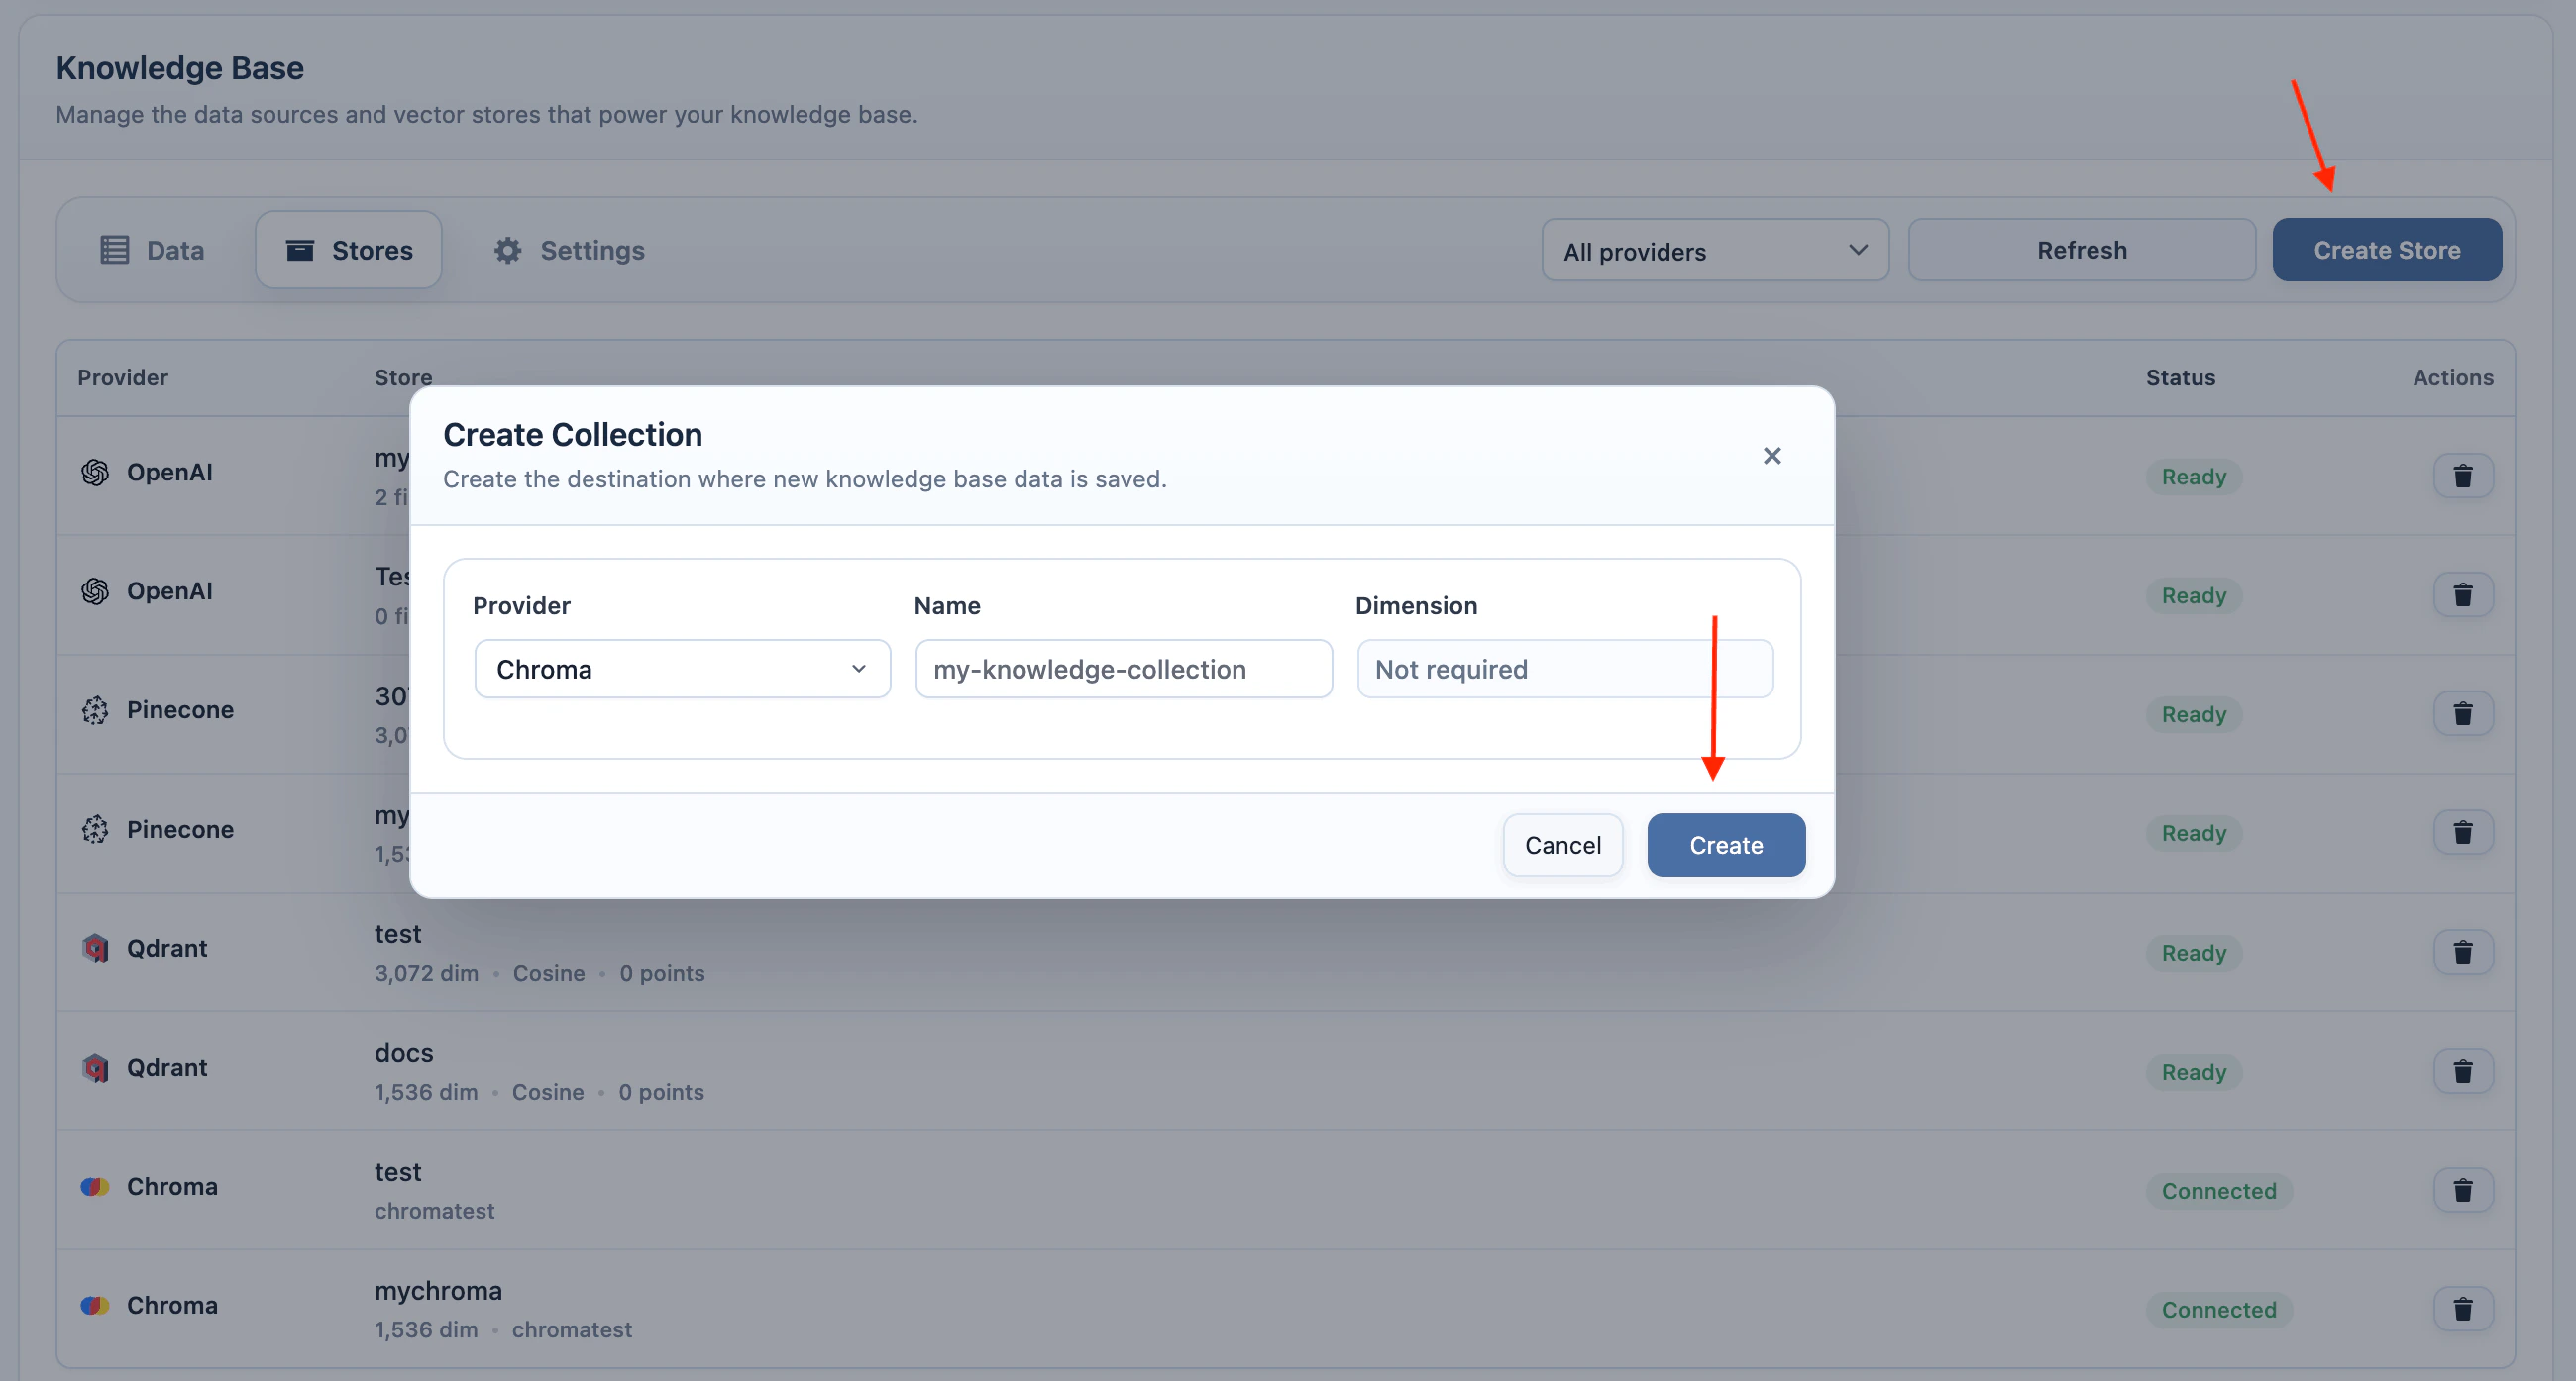
| **Chroma** | Select **Collection** and **Embedding**. Configure the Chroma connection in **AI Puffer > Settings > Integrations** first. |
For Chroma, configure the connection and collection in **AI Puffer > Settings > Integrations** and **AI Puffer > Knowledge Base > Stores** first.
| Vector provider | Required setup |
| --------------- | -------------------------------------------------------------------------------------------------------------------------- |
| **OpenAI** | Select up to two **Vector stores**. |
| **Pinecone** | Select **Index** and **Embedding**. Configure the Pinecone connection in **AI Puffer > Settings > Integrations** first. |
| **Qdrant** | Select **Collection** and **Embedding**. Configure the Qdrant connection in **AI Puffer > Settings > Integrations** first. |
| **Chroma** | Select **Collection** and **Embedding**. Configure the Chroma connection in **AI Puffer > Settings > Integrations** first. |
For Chroma, configure the connection and collection in **AI Puffer > Settings > Integrations** and **AI Puffer > Knowledge Base > Stores** first.
 For Pinecone, Qdrant, and Chroma, the embedding model must match the model used when the content was added to the index or collection.
**Limit** controls how many matching chunks AI Puffer can include. **Score threshold** controls how strict the match must be. A lower threshold allows more matches; a higher threshold only uses stronger matches.
### Web Search
Web search lets supported providers use current web results while generating the form response.
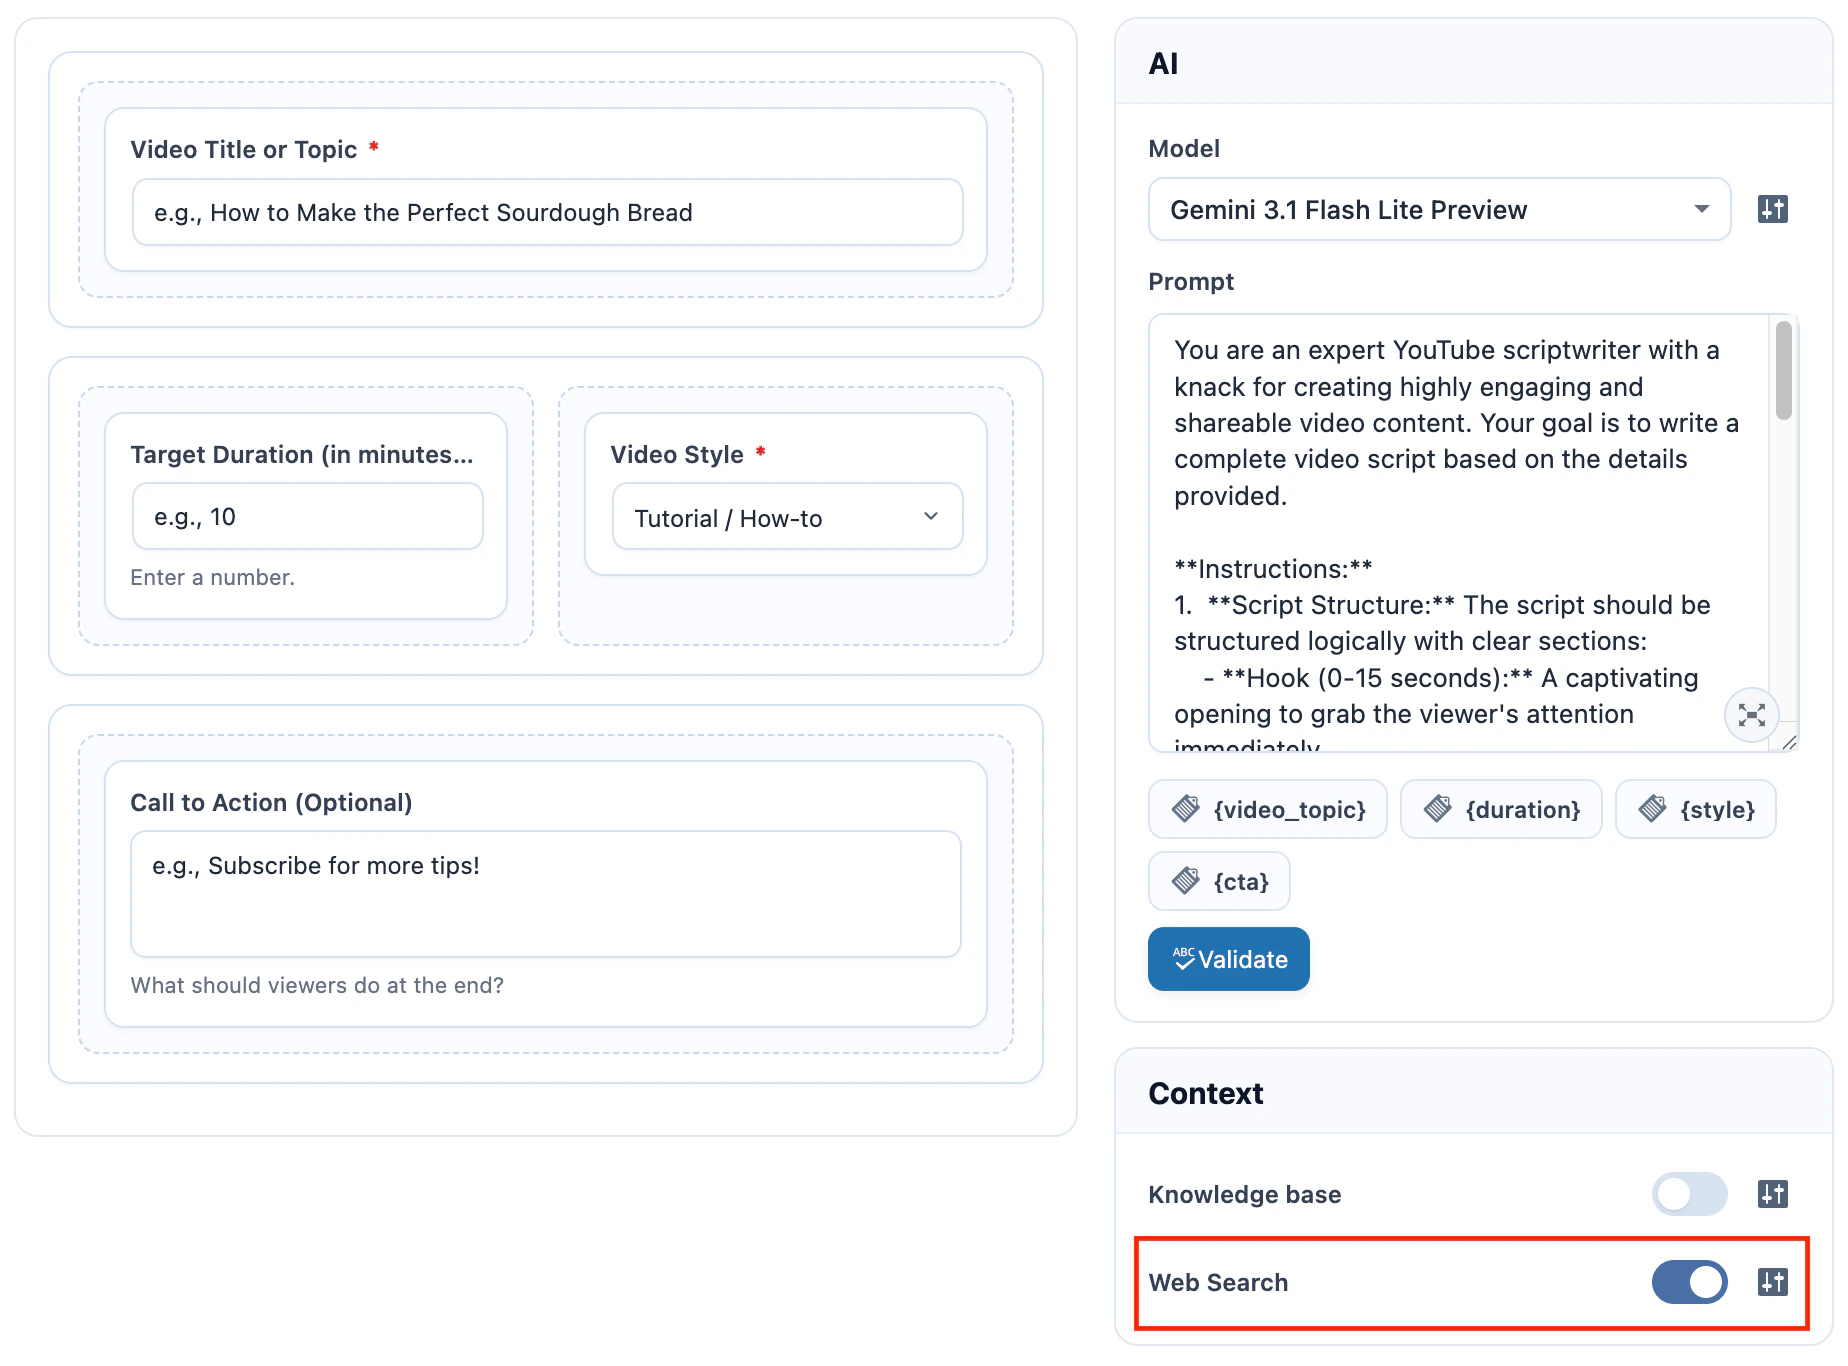
Use the right-side **Context** container to enable Web Search. The available options depend on the selected model provider.
1. Select an OpenAI, Google, Anthropic, OpenRouter, or xAI model.
2. Turn on **Web Search**.
3. Click the settings icon beside **Web Search**.
4. Configure the provider options.
5. Save the form.
For Pinecone, Qdrant, and Chroma, the embedding model must match the model used when the content was added to the index or collection.
**Limit** controls how many matching chunks AI Puffer can include. **Score threshold** controls how strict the match must be. A lower threshold allows more matches; a higher threshold only uses stronger matches.
### Web Search
Web search lets supported providers use current web results while generating the form response.
Use the right-side **Context** container to enable Web Search. The available options depend on the selected model provider.
1. Select an OpenAI, Google, Anthropic, OpenRouter, or xAI model.
2. Turn on **Web Search**.
3. Click the settings icon beside **Web Search**.
4. Configure the provider options.
5. Save the form.
 | Option | Use it for |
| ----------------------- | --------------------------------------------------------- |
| **Search Context Size** | How much web context OpenAI can use. |
| **User Location** | Optional approximate country, city, region, and timezone. |
| Option | Use it for |
| ------------------------------- | -------------------------------------------------- |
| **Grounding Mode** | How Google Search grounding is used. |
| **Dynamic Retrieval Threshold** | Threshold used when Dynamic Retrieval is selected. |
| Option | Use it for |
| ------------------- | --------------------------------------------------------- |
| **Max Uses** | Maximum number of web search calls for one response. |
| **User Location** | Optional approximate country, city, region, and timezone. |
| **Allowed Domains** | Limit search to specific domains. |
| **Blocked Domains** | Prevent search from using specific domains. |
| **Cache TTL** | Optional cache window for Anthropic web search. |
| Option | Use it for |
| ----------------- | ---------------------------------- |
| **Engine** | Auto, Native, or Exa. |
| **Max Results** | Maximum search results to include. |
| **Search Prompt** | Optional search intent hint. |
xAI web search uses the shared form setting and does not expose additional xAI-specific web options.
Web search is not shown for Azure, DeepSeek, or Ollama forms.
### Connected Apps
Connected Apps send completed form submissions to external apps through recipes. The `form.submitted` event is emitted after the AI response is complete, so mappings can use both submitted inputs and the generated response. Image Upload fields include image metadata in the event payload, not the base64 image data.
Supported destinations are Slack, HubSpot, Notion, Pipedrive, Zapier, Make, and n8n.
Connected Apps can be used with Workflow. Each submitted form in the chain emits its own `form.submitted` event, so a source form and a target form can trigger separate recipes. When **Auto-submit next form** is enabled, the target form can emit its own event without another visitor click.
1. Go to **AI Puffer > Settings > Apps**.
2. Connect the app account or webhook destination.
3. Create or enable a recipe that uses the **AI Form Submitted** event.
4. Choose the scope: **All AI Forms**, **This AI Form**, or **Selected AI Forms**.
5. Return to **AI Puffer > AI Forms**.
6. Edit the form and check the right-side **Connected Apps** container.
7. Submit the form on the frontend to test the recipe.
Common mapping sources:
| Source | Value |
| ------------------------ | --------------------------------- |
| `data.form.id` | Form ID. |
| `data.form.name` | Form title. |
| `data.submission.id` | Submission ID. |
| `data.submission.count` | Submission count for the form. |
| `data.actor.type` | `guest` or `user`. |
| `data.ai.provider` | Provider used for the submission. |
| `data.ai.model` | Model used for the submission. |
| `data.response.text` | Generated AI response. |
| `data.inputs` | Submitted field values. |
| `data.inputs.{field_id}` | A specific submitted field value. |
## Manage Forms
The **Forms** tab lists saved forms with their title, model, shortcode, updated date, and actions.
Each row has direct **Edit** and **Preview** actions. Select one or more forms with the row checkboxes to use bulk actions such as duplicate, export, or delete.
| Action | What it does |
| -------------- | ----------------------------------------- |
| **Edit** | Opens the form builder. |
| **Preview** | Opens an admin preview. |
| **Duplicate** | Creates copies of selected forms. |
| **Export** | Downloads selected forms as JSON. |
| **Delete** | Deletes selected forms. |
| **Export All** | Downloads all forms as JSON. |
| **Import** | Imports forms from an exported JSON file. |
| **Delete All** | Deletes all AI Forms. |
Imported forms are added as new forms. Existing forms are not overwritten.
## Publish
### Shortcode
Each saved form has a shortcode in the form list.
```text theme={null}
[aipkit_ai_form id=123]
```
Replace `123` with the form ID.
Click the shortcode snippet to copy it. Click **Options** beside the snippet to enable display options; the snippet updates as you change those options.
| Option | Use it for |
| ----------------------- | --------------------------------------------------------- |
| **Search Context Size** | How much web context OpenAI can use. |
| **User Location** | Optional approximate country, city, region, and timezone. |
| Option | Use it for |
| ------------------------------- | -------------------------------------------------- |
| **Grounding Mode** | How Google Search grounding is used. |
| **Dynamic Retrieval Threshold** | Threshold used when Dynamic Retrieval is selected. |
| Option | Use it for |
| ------------------- | --------------------------------------------------------- |
| **Max Uses** | Maximum number of web search calls for one response. |
| **User Location** | Optional approximate country, city, region, and timezone. |
| **Allowed Domains** | Limit search to specific domains. |
| **Blocked Domains** | Prevent search from using specific domains. |
| **Cache TTL** | Optional cache window for Anthropic web search. |
| Option | Use it for |
| ----------------- | ---------------------------------- |
| **Engine** | Auto, Native, or Exa. |
| **Max Results** | Maximum search results to include. |
| **Search Prompt** | Optional search intent hint. |
xAI web search uses the shared form setting and does not expose additional xAI-specific web options.
Web search is not shown for Azure, DeepSeek, or Ollama forms.
### Connected Apps
Connected Apps send completed form submissions to external apps through recipes. The `form.submitted` event is emitted after the AI response is complete, so mappings can use both submitted inputs and the generated response. Image Upload fields include image metadata in the event payload, not the base64 image data.
Supported destinations are Slack, HubSpot, Notion, Pipedrive, Zapier, Make, and n8n.
Connected Apps can be used with Workflow. Each submitted form in the chain emits its own `form.submitted` event, so a source form and a target form can trigger separate recipes. When **Auto-submit next form** is enabled, the target form can emit its own event without another visitor click.
1. Go to **AI Puffer > Settings > Apps**.
2. Connect the app account or webhook destination.
3. Create or enable a recipe that uses the **AI Form Submitted** event.
4. Choose the scope: **All AI Forms**, **This AI Form**, or **Selected AI Forms**.
5. Return to **AI Puffer > AI Forms**.
6. Edit the form and check the right-side **Connected Apps** container.
7. Submit the form on the frontend to test the recipe.
Common mapping sources:
| Source | Value |
| ------------------------ | --------------------------------- |
| `data.form.id` | Form ID. |
| `data.form.name` | Form title. |
| `data.submission.id` | Submission ID. |
| `data.submission.count` | Submission count for the form. |
| `data.actor.type` | `guest` or `user`. |
| `data.ai.provider` | Provider used for the submission. |
| `data.ai.model` | Model used for the submission. |
| `data.response.text` | Generated AI response. |
| `data.inputs` | Submitted field values. |
| `data.inputs.{field_id}` | A specific submitted field value. |
## Manage Forms
The **Forms** tab lists saved forms with their title, model, shortcode, updated date, and actions.
Each row has direct **Edit** and **Preview** actions. Select one or more forms with the row checkboxes to use bulk actions such as duplicate, export, or delete.
| Action | What it does |
| -------------- | ----------------------------------------- |
| **Edit** | Opens the form builder. |
| **Preview** | Opens an admin preview. |
| **Duplicate** | Creates copies of selected forms. |
| **Export** | Downloads selected forms as JSON. |
| **Delete** | Deletes selected forms. |
| **Export All** | Downloads all forms as JSON. |
| **Import** | Imports forms from an exported JSON file. |
| **Delete All** | Deletes all AI Forms. |
Imported forms are added as new forms. Existing forms are not overwritten.
## Publish
### Shortcode
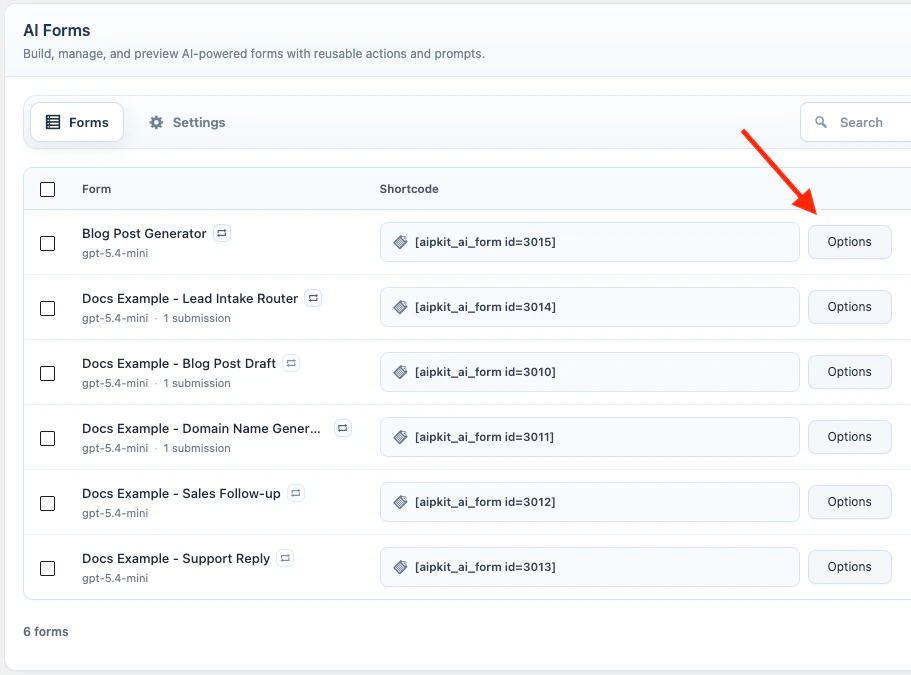
Each saved form has a shortcode in the form list.
```text theme={null}
[aipkit_ai_form id=123]
```
Replace `123` with the form ID.
Click the shortcode snippet to copy it. Click **Options** beside the snippet to enable display options; the snippet updates as you change those options.
 | Option | Shortcode attribute |
| ------------------------ | ---------------------------------------------------- |
| **Show Provider Select** | `show_provider="true"` |
| **Show Model Select** | `show_model="true"` |
| **Copy Button** | `copy_button="true"` |
| **Save as Post** | `save_button="true"` |
| **Save as PDF** | `pdf_download="true"` |
| **Theme** | `theme="light"`, `theme="dark"`, or `theme="custom"` |
Examples:
```text theme={null}
[aipkit_ai_form id=123 theme="dark"]
[aipkit_ai_form id=123 show_provider="true" show_model="true"]
[aipkit_ai_form id=123 save_button="true" copy_button="true"]
[aipkit_ai_form id=123 pdf_download="true"]
```
### Block
Use the AI Form block if you prefer the block editor.
1. Edit the page or post.
2. Add the **AI Form** block.
3. Select the form.
4. Choose the theme and display options.
5. Save the page.
| Option | Shortcode attribute |
| ------------------------ | ---------------------------------------------------- |
| **Show Provider Select** | `show_provider="true"` |
| **Show Model Select** | `show_model="true"` |
| **Copy Button** | `copy_button="true"` |
| **Save as Post** | `save_button="true"` |
| **Save as PDF** | `pdf_download="true"` |
| **Theme** | `theme="light"`, `theme="dark"`, or `theme="custom"` |
Examples:
```text theme={null}
[aipkit_ai_form id=123 theme="dark"]
[aipkit_ai_form id=123 show_provider="true" show_model="true"]
[aipkit_ai_form id=123 save_button="true" copy_button="true"]
[aipkit_ai_form id=123 pdf_download="true"]
```
### Block
Use the AI Form block if you prefer the block editor.
1. Edit the page or post.
2. Add the **AI Form** block.
3. Select the form.
4. Choose the theme and display options.
5. Save the page.
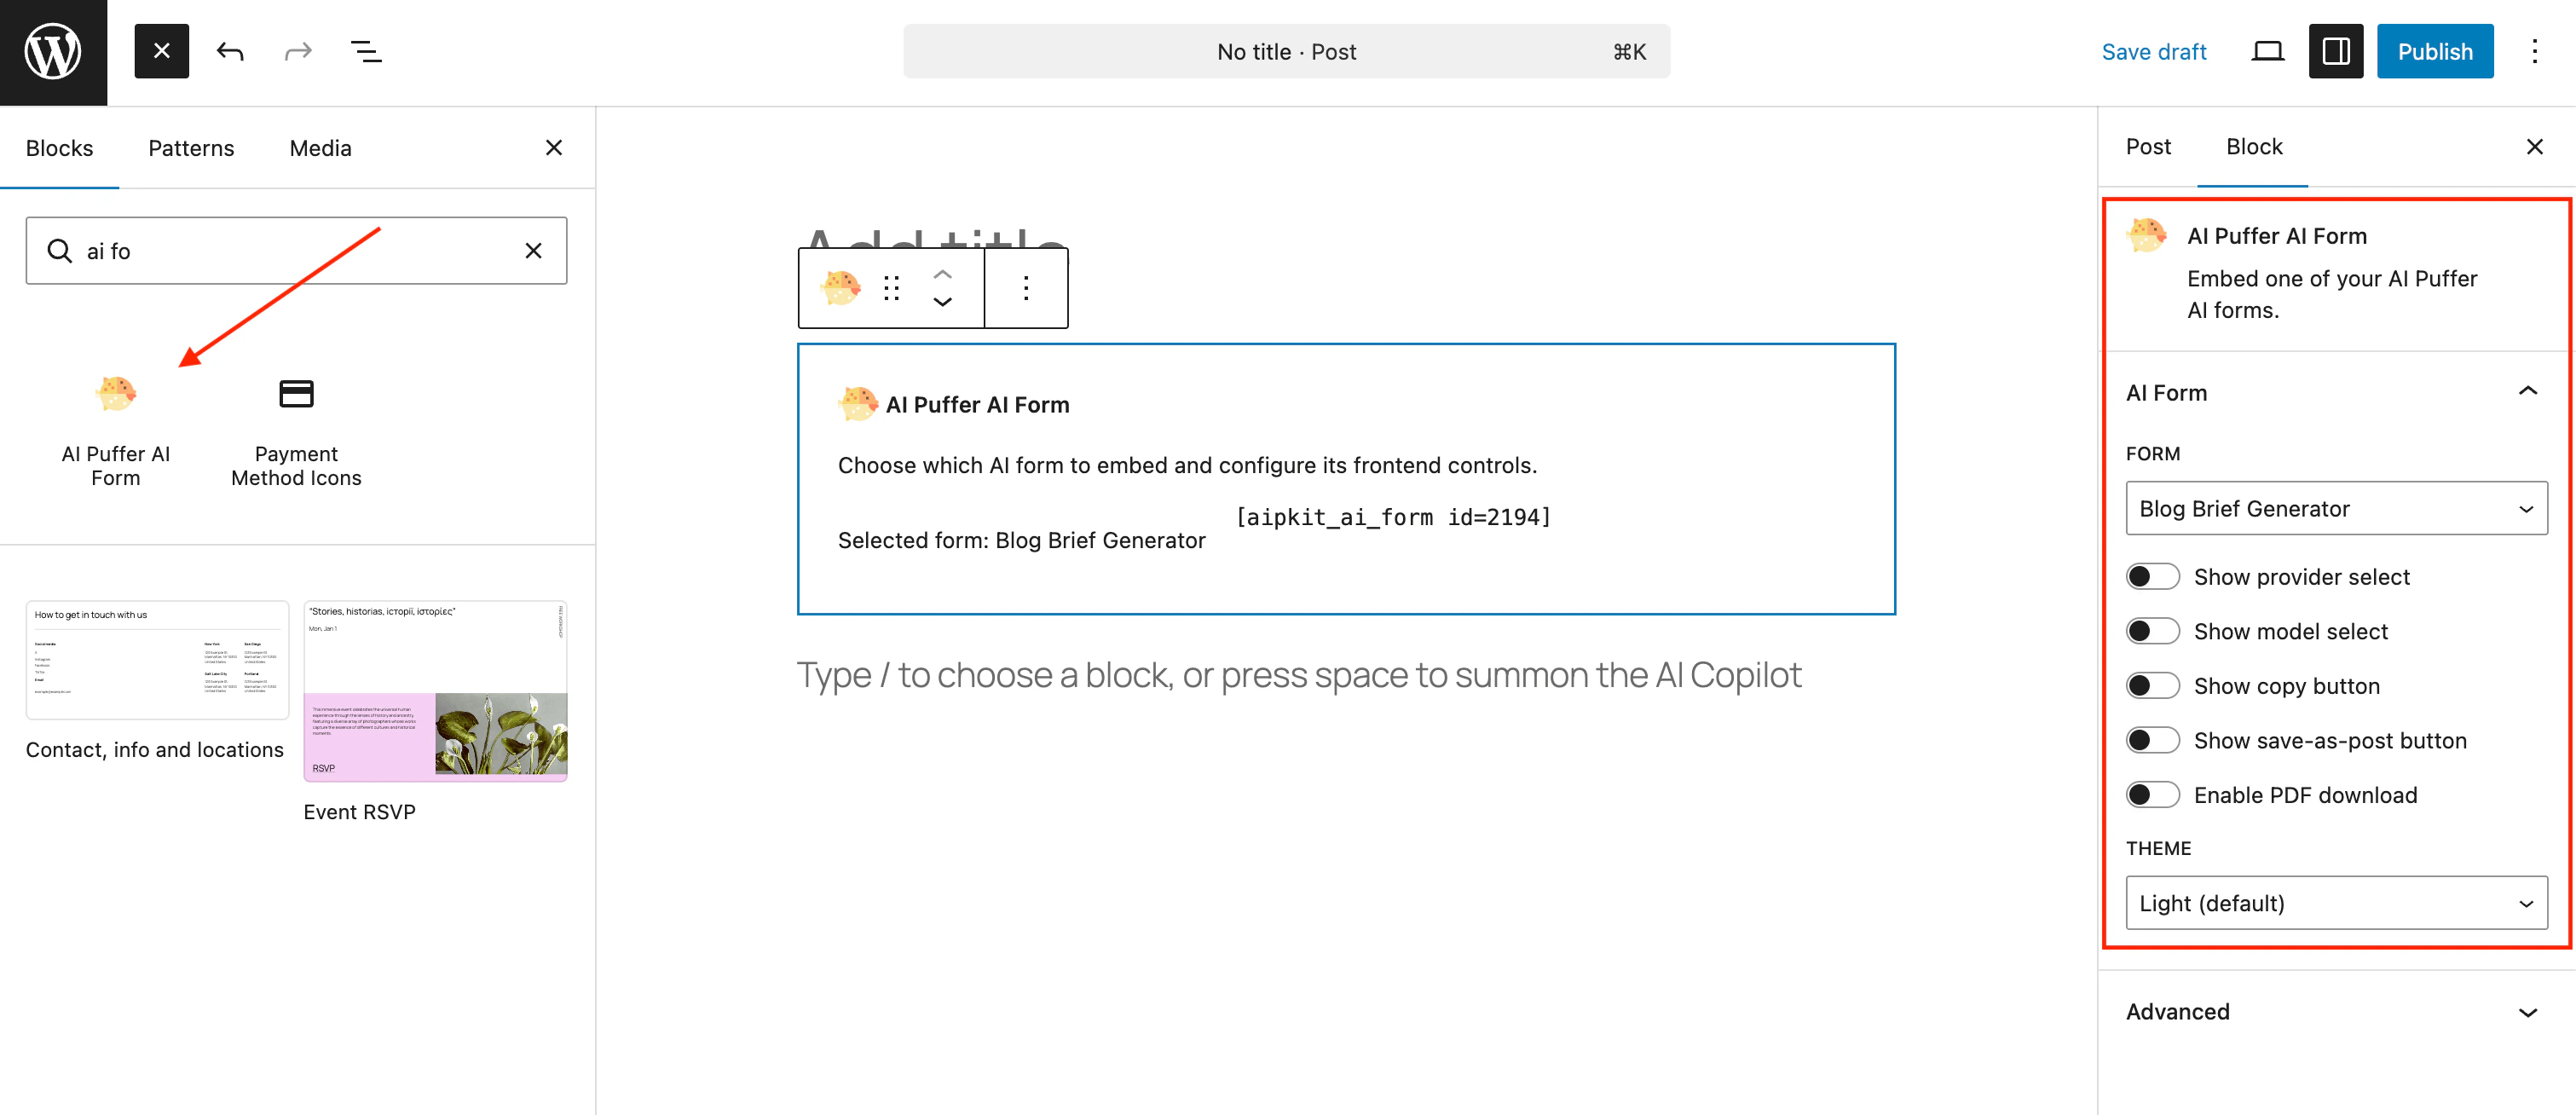 The block renders the same form as the shortcode.
Workflow settings are saved with the source form. They work when the source form is rendered by shortcode, the AI Form block, or admin preview.
### Result Actions
Result actions appear after the form generates an output.
| Action | What it does |
| ---------------- | ------------------------------------------------------------------------------------------------------------- |
| **Copy** | Copies the generated response. |
| **Save as Post** | Saves the generated response as a draft WordPress post. The user must be logged in and allowed to edit posts. |
| **Save as PDF** | Downloads the generated response as a PDF when `pdf_download="true"` is enabled. |
Save as Post uses the form title as the post title and saves the output as draft content.
## Settings
Open **AI Puffer > AI Forms > Settings**.
The Settings screen is split into tabs.
| Tab | What it contains |
| ------------------- | ----------------------------------------------------- |
| **Limits** | Guest, user, role, reset, and quota message settings. |
| **Custom CSS** | CSS for forms using the custom theme. |
| **Frontend Models** | Models visitors can select on the frontend. |
### Limits
Limits control how much AI Forms usage is allowed for guests and logged-in users.
Open **Limits**.
1. Set **Guest quota**.
2. Choose **Quota mode** for logged-in users.
3. Set **User quota** or **Role-based quotas**.
4. Choose **Reset period**.
5. Edit **Quota reached message**.
6. Configure optional primary and secondary buttons.
| Value | Meaning |
| --------------- | ------------------------------------------- |
| Empty | Unlimited. |
| `0` | Disabled. |
| Positive number | Maximum allowed usage for the reset period. |
Reset periods are **Never**, **Daily**, **Weekly**, and **Monthly**.
Action buttons can link users to the usage dashboard, credits dashboard, purchases dashboard, buy credits page, or a custom URL.
For credit-based form access, define pricing rules in [Usage](/usage#pricing-rules). To sell prepaid credits, create WooCommerce credit packages in [Usage](/usage#woocommerce-credit-packages).
### Custom CSS
Custom CSS applies to forms embedded with `theme="custom"`.
Open **Custom CSS**.
```css theme={null}
.aipkit-ai-form-wrapper.aipkit-theme-custom {
/* custom form styles */
}
```
### Frontend Models
Frontend Models controls which models visitors can select when the shortcode or block shows the frontend provider or model selector.
Open **Frontend Models** and select the models visitors can use. If no models are selected, all configured frontend models are allowed.
## Logs
Each form submission creates logs for the submitted request and the AI response.
Logs include the form ID, submitted inputs, uploaded image metadata, constructed prompt, provider, model, token usage, vector search scores when knowledge base is used, and the generated response.
AI Forms usage is recorded with:
| Field | Value |
| ---------- | ------------- |
| Module | `ai_forms` |
| Operation | `form_submit` |
| Scope type | `ai_form` |
| Scope ID | Form ID |
This lets usage rules target all AI Forms or a specific form.
## Troubleshooting
Check the form ID in the shortcode or block. The form must exist and be published. Admin users see shortcode errors; visitors see empty output.
Configure and sync the provider in [AI Providers](/ai-providers). If the frontend selector is enabled, also check **AI Puffer > AI Forms > Settings > Frontend Models**.
Check the field's **Field Variable Name** in **Element Settings** and make sure the prompt uses the same placeholder, for example `{customer_message}`.
Make sure the checkbox field has options and that the visitor selects at least one option before submitting.
Use a TXT or text-based PDF file. If the server rejects uploads, check WordPress upload limits and security plugin rules.
Use a JPG, PNG, or WEBP image under 20 MB, and make sure the selected provider and model support image input. xAI image analysis accepts JPG and PNG images.
The visitor must be logged in and must have permission to create or edit posts.
Enable **Save as PDF** in the shortcode settings, or add `pdf_download="true"` to the shortcode.
Check that the recipe is enabled, the app connection is valid, the scope includes this form, and the recipe uses the **AI Form Submitted** event.
Check that the source form is saved, **Enable Workflow** is on, the target form still exists, and the source and target are not the same form. Workflow appears only after the source AI response completes.
Check the target field names and the workflow mappings. Mappings can prefill text input and textarea fields in the target form. File upload and image upload fields are not prefilled.
Check that **Auto-submit next form** is enabled on the source form and that the target form has all required values after mappings are applied. Required uploads and multi-step target forms wait for the visitor.
The block renders the same form as the shortcode.
Workflow settings are saved with the source form. They work when the source form is rendered by shortcode, the AI Form block, or admin preview.
### Result Actions
Result actions appear after the form generates an output.
| Action | What it does |
| ---------------- | ------------------------------------------------------------------------------------------------------------- |
| **Copy** | Copies the generated response. |
| **Save as Post** | Saves the generated response as a draft WordPress post. The user must be logged in and allowed to edit posts. |
| **Save as PDF** | Downloads the generated response as a PDF when `pdf_download="true"` is enabled. |
Save as Post uses the form title as the post title and saves the output as draft content.
## Settings
Open **AI Puffer > AI Forms > Settings**.
The Settings screen is split into tabs.
| Tab | What it contains |
| ------------------- | ----------------------------------------------------- |
| **Limits** | Guest, user, role, reset, and quota message settings. |
| **Custom CSS** | CSS for forms using the custom theme. |
| **Frontend Models** | Models visitors can select on the frontend. |
### Limits
Limits control how much AI Forms usage is allowed for guests and logged-in users.
Open **Limits**.
1. Set **Guest quota**.
2. Choose **Quota mode** for logged-in users.
3. Set **User quota** or **Role-based quotas**.
4. Choose **Reset period**.
5. Edit **Quota reached message**.
6. Configure optional primary and secondary buttons.
| Value | Meaning |
| --------------- | ------------------------------------------- |
| Empty | Unlimited. |
| `0` | Disabled. |
| Positive number | Maximum allowed usage for the reset period. |
Reset periods are **Never**, **Daily**, **Weekly**, and **Monthly**.
Action buttons can link users to the usage dashboard, credits dashboard, purchases dashboard, buy credits page, or a custom URL.
For credit-based form access, define pricing rules in [Usage](/usage#pricing-rules). To sell prepaid credits, create WooCommerce credit packages in [Usage](/usage#woocommerce-credit-packages).
### Custom CSS
Custom CSS applies to forms embedded with `theme="custom"`.
Open **Custom CSS**.
```css theme={null}
.aipkit-ai-form-wrapper.aipkit-theme-custom {
/* custom form styles */
}
```
### Frontend Models
Frontend Models controls which models visitors can select when the shortcode or block shows the frontend provider or model selector.
Open **Frontend Models** and select the models visitors can use. If no models are selected, all configured frontend models are allowed.
## Logs
Each form submission creates logs for the submitted request and the AI response.
Logs include the form ID, submitted inputs, uploaded image metadata, constructed prompt, provider, model, token usage, vector search scores when knowledge base is used, and the generated response.
AI Forms usage is recorded with:
| Field | Value |
| ---------- | ------------- |
| Module | `ai_forms` |
| Operation | `form_submit` |
| Scope type | `ai_form` |
| Scope ID | Form ID |
This lets usage rules target all AI Forms or a specific form.
## Troubleshooting
Check the form ID in the shortcode or block. The form must exist and be published. Admin users see shortcode errors; visitors see empty output.
Configure and sync the provider in [AI Providers](/ai-providers). If the frontend selector is enabled, also check **AI Puffer > AI Forms > Settings > Frontend Models**.
Check the field's **Field Variable Name** in **Element Settings** and make sure the prompt uses the same placeholder, for example `{customer_message}`.
Make sure the checkbox field has options and that the visitor selects at least one option before submitting.
Use a TXT or text-based PDF file. If the server rejects uploads, check WordPress upload limits and security plugin rules.
Use a JPG, PNG, or WEBP image under 20 MB, and make sure the selected provider and model support image input. xAI image analysis accepts JPG and PNG images.
The visitor must be logged in and must have permission to create or edit posts.
Enable **Save as PDF** in the shortcode settings, or add `pdf_download="true"` to the shortcode.
Check that the recipe is enabled, the app connection is valid, the scope includes this form, and the recipe uses the **AI Form Submitted** event.
Check that the source form is saved, **Enable Workflow** is on, the target form still exists, and the source and target are not the same form. Workflow appears only after the source AI response completes.
Check the target field names and the workflow mappings. Mappings can prefill text input and textarea fields in the target form. File upload and image upload fields are not prefilled.
Check that **Auto-submit next form** is enabled on the source form and that the target form has all required values after mappings are applied. Required uploads and multi-step target forms wait for the visitor.