> ## Documentation Index
> Fetch the complete documentation index at: https://docs.aipower.org/llms.txt
> Use this file to discover all available pages before exploring further.
# Automations
> Create, schedule, and monitor recurring AI Puffer tasks.
## Overview
Use Automations to run recurring AI Puffer tasks from WordPress. A task can create content, index WordPress content into a vector store, rewrite existing content, or reply to comments.
In WordPress admin, go to **AI Puffer > Automations**.
Set up the AI provider, image provider, vector store, or source connection required by the task you want to run. If the Automations menu is not visible, check that the module is enabled and that your WordPress role has access to it.
Create posts from topics, CSV, RSS, URLs, and Sheets.
Rewrite existing content and update products.
Add WordPress content to vector stores on a schedule.
Generate replies for approved WordPress comments.
Configure schedule, model, prompts, SEO, images, and knowledge.
Review pending, completed, and failed task items.
Send automation events to external apps.
Review automation activity and generated output.
## How Automations Run
Automations use WordPress cron.
1. A task-specific cron event runs on the selected frequency.
2. The task finds matching work and adds items to the queue.
3. The main queue processor handles pending queue items in batches.
4. Each queue item becomes **Completed** or **Failed**.
The queue processor handles up to 5 pending items per run. If more items remain, AI Puffer schedules another queue run about 30 seconds later.
WordPress cron depends on site traffic unless you run a real server cron. If site traffic is low, scheduled tasks can run late. If `DISABLE_WP_CRON` is enabled, set up a server cron job for WordPress.
## Create Content
Create content tasks use the Content Writer engine inside Automations. They can create posts, pages, products, or other supported post types.
### Manual Entry
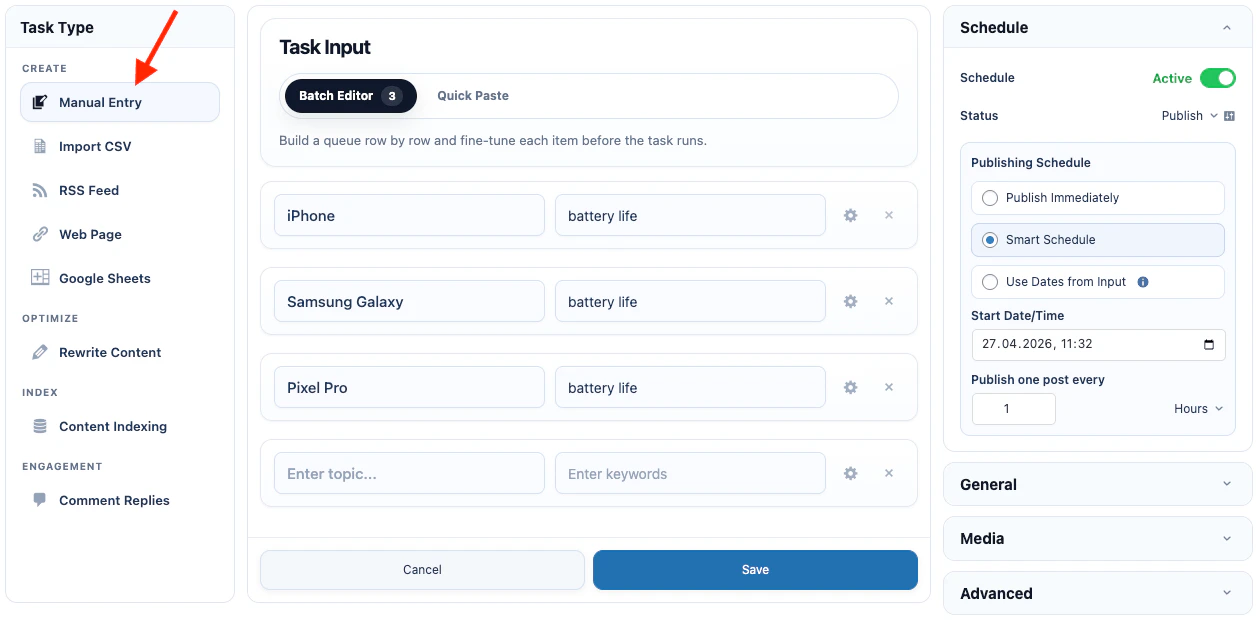
Manual Entry reads each non-empty line as a content item.
To create a Manual Entry automation:
1. Click **New Task**.
2. Select **Manual Entry**.
3. Enter one topic per line.
4. Add optional keywords, category ID, author, post type, or schedule date with the extended format.
5. Set the model, prompts, publishing, image, and SEO options.
6. Save the task.
Basic format:
```text theme={null}
Topic
```
Extended format:
```text theme={null}
Topic | Keywords | Category ID | Author Login | Post Type | YYYY-MM-DD HH:MM
```
Example:
```text theme={null}
How to clean leather boots | leather care, boots | 12 | editor | post | 2026-05-01 09:00
```
 ### CSV
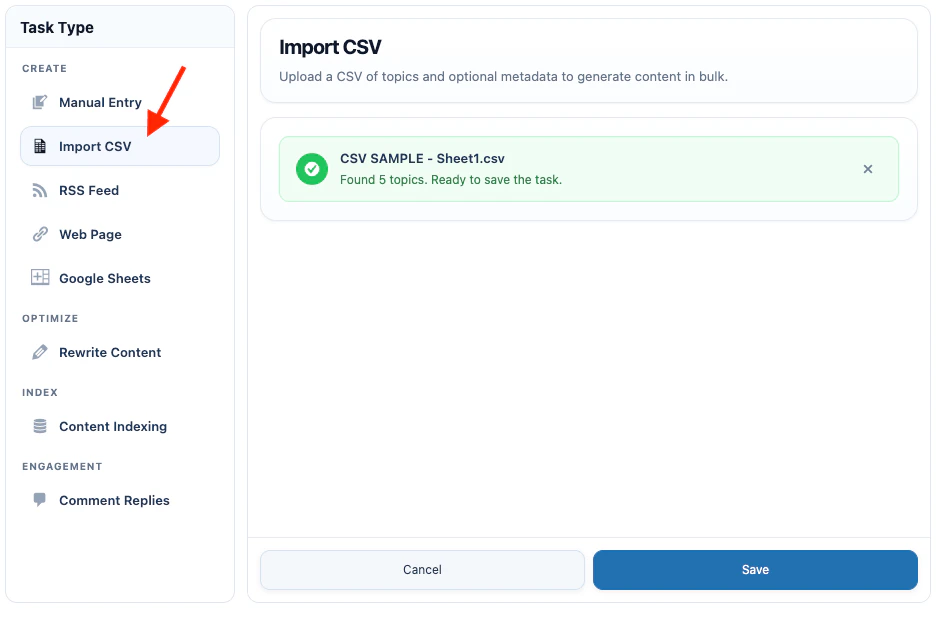
CSV import reads every non-empty row.
[Download sample CSV](https://docs.google.com/spreadsheets/d/1WOnO_UKkbRCoyjRxQnDDTy0i-RsnrY_MDKD3Ks09JJk/export?format=csv\&gid=0)
To create a CSV automation:
1. Click **New Task**.
2. Select **Import CSV**.
3. Upload the `.csv` file.
4. Confirm that the rows were detected.
5. Set the model, prompts, publishing, image, and SEO options.
6. Save the task.
| Column | Field | Required |
| ------ | ------------ | -------- |
| 1 | Topic | Yes |
| 2 | Keywords | No |
| 3 | Category ID | No |
| 4 | Author Login | No |
| 5 | Post Type | No |
| 6 | Schedule | No |
Do not include a header row unless you want the header row to be treated as a topic.
### CSV
CSV import reads every non-empty row.
[Download sample CSV](https://docs.google.com/spreadsheets/d/1WOnO_UKkbRCoyjRxQnDDTy0i-RsnrY_MDKD3Ks09JJk/export?format=csv\&gid=0)
To create a CSV automation:
1. Click **New Task**.
2. Select **Import CSV**.
3. Upload the `.csv` file.
4. Confirm that the rows were detected.
5. Set the model, prompts, publishing, image, and SEO options.
6. Save the task.
| Column | Field | Required |
| ------ | ------------ | -------- |
| 1 | Topic | Yes |
| 2 | Keywords | No |
| 3 | Category ID | No |
| 4 | Author Login | No |
| 5 | Post Type | No |
| 6 | Schedule | No |
Do not include a header row unless you want the header row to be treated as a topic.
 ### RSS Feed
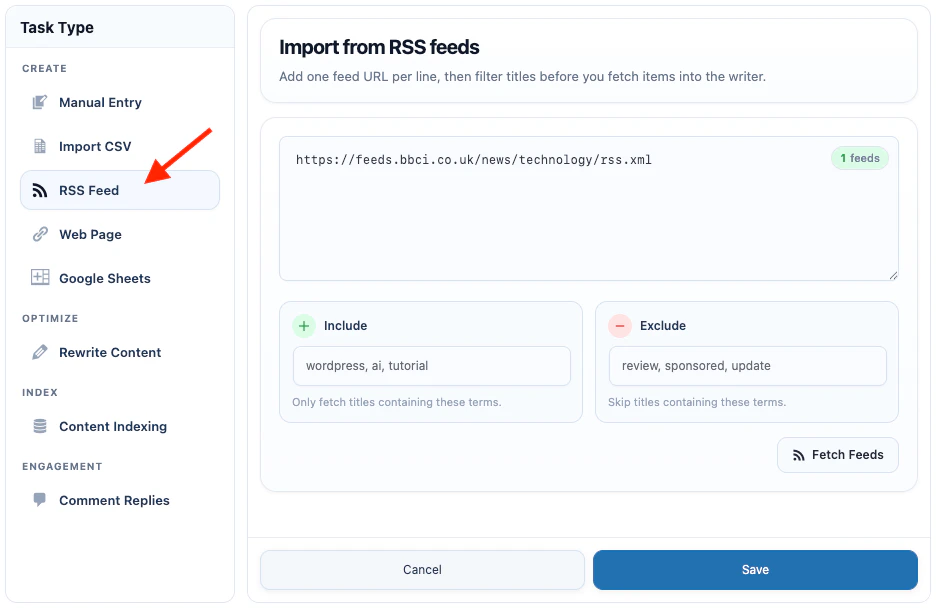
RSS Feed creates posts from feed items.
To create an RSS Feed automation:
1. Click **New Task**.
2. Select **RSS Feed**.
3. Add one RSS feed URL per line.
4. Add include keywords if only matching feed items should be used.
5. Add exclude keywords if matching feed items should be skipped.
6. Set the model, prompts, publishing, image, and SEO options.
7. Set the task frequency.
8. Save the task.
Scheduled RSS tasks use the task's last run time and RSS history to avoid processing the same feed item again. Run Now checks recent feed items and still skips items that are already in the task history.
### RSS Feed
RSS Feed creates posts from feed items.
To create an RSS Feed automation:
1. Click **New Task**.
2. Select **RSS Feed**.
3. Add one RSS feed URL per line.
4. Add include keywords if only matching feed items should be used.
5. Add exclude keywords if matching feed items should be skipped.
6. Set the model, prompts, publishing, image, and SEO options.
7. Set the task frequency.
8. Save the task.
Scheduled RSS tasks use the task's last run time and RSS history to avoid processing the same feed item again. Run Now checks recent feed items and still skips items that are already in the task history.
 ### Web Page
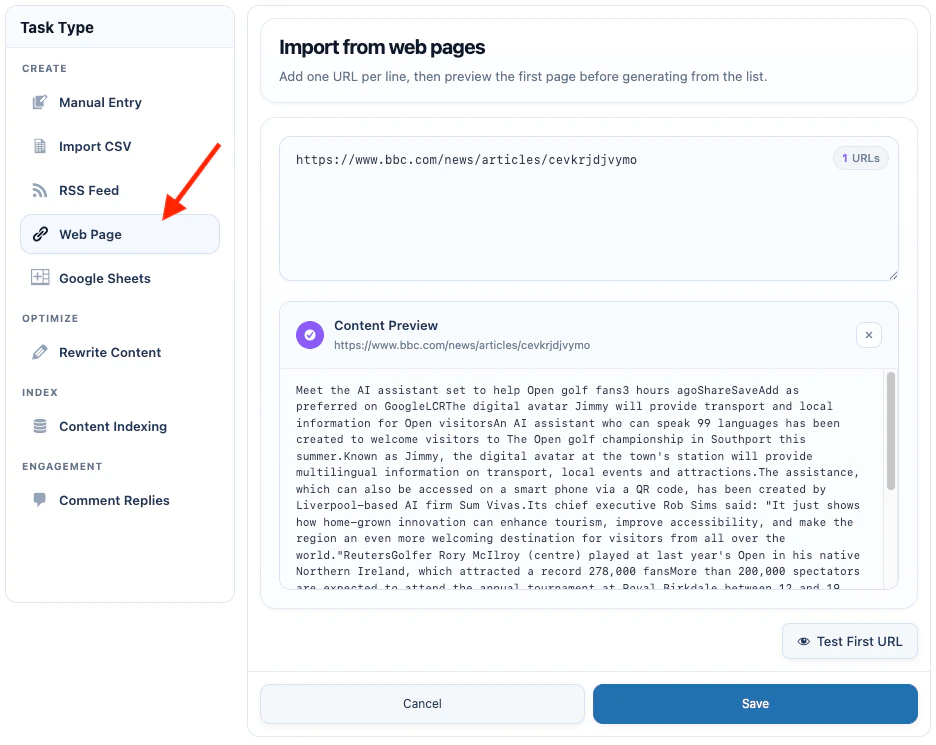
Web Page creates posts from extracted URL content.
To create a Web Page automation:
1. Click **New Task**.
2. Select **Web Page**.
3. Add one URL per line.
4. Set the model, prompts, publishing, image, and SEO options.
5. Set the task frequency.
6. Save the task.
AI Puffer extracts readable text from each URL and passes it to the content prompt.
Useful placeholders:
| Placeholder | Value |
| --------------- | -------------------- |
| `{url_content}` | Extracted page text. |
| `{source_url}` | Source URL. |
### Web Page
Web Page creates posts from extracted URL content.
To create a Web Page automation:
1. Click **New Task**.
2. Select **Web Page**.
3. Add one URL per line.
4. Set the model, prompts, publishing, image, and SEO options.
5. Set the task frequency.
6. Save the task.
AI Puffer extracts readable text from each URL and passes it to the content prompt.
Useful placeholders:
| Placeholder | Value |
| --------------- | -------------------- |
| `{url_content}` | Extracted page text. |
| `{source_url}` | Source URL. |
 ### Google Sheets
Google Sheets tasks create posts from spreadsheet rows.
[Open the sample Google Sheet](https://docs.google.com/spreadsheets/d/18QIWggMmbTVTb-nztTo7SFdGJTUC6kwRxgc841xq4x0/edit?gid=0#gid=0), make a copy, and keep the same column order.
AI Puffer reads columns `A:G`.
| Column | Field | Notes |
| ------ | ------------- | ---------------------------------------------- |
| A | Topic | Required. |
| B | Keywords | Optional. |
| C | Category ID | Optional. |
| D | Author Login | Optional. |
| E | Post Type | Optional. |
| F | Schedule Date | Optional. Use `YYYY-MM-DD HH:MM`. |
| G | Status | Leave empty for rows that should be processed. |
Column G controls whether a row is processed. If column G has any value, AI Puffer skips that row.
Rows are processed only when column A has a topic and column G is empty. After a post is created, AI Puffer writes `Processed on ...` to column G so the row is not used again.
If you use a header row, put a value in column G for that row, such as `Status`, so it is skipped.
### Google Sheets
Google Sheets tasks create posts from spreadsheet rows.
[Open the sample Google Sheet](https://docs.google.com/spreadsheets/d/18QIWggMmbTVTb-nztTo7SFdGJTUC6kwRxgc841xq4x0/edit?gid=0#gid=0), make a copy, and keep the same column order.
AI Puffer reads columns `A:G`.
| Column | Field | Notes |
| ------ | ------------- | ---------------------------------------------- |
| A | Topic | Required. |
| B | Keywords | Optional. |
| C | Category ID | Optional. |
| D | Author Login | Optional. |
| E | Post Type | Optional. |
| F | Schedule Date | Optional. Use `YYYY-MM-DD HH:MM`. |
| G | Status | Leave empty for rows that should be processed. |
Column G controls whether a row is processed. If column G has any value, AI Puffer skips that row.
Rows are processed only when column A has a topic and column G is empty. After a post is created, AI Puffer writes `Processed on ...` to column G so the row is not used again.
If you use a header row, put a value in column G for that row, such as `Status`, so it is skipped.
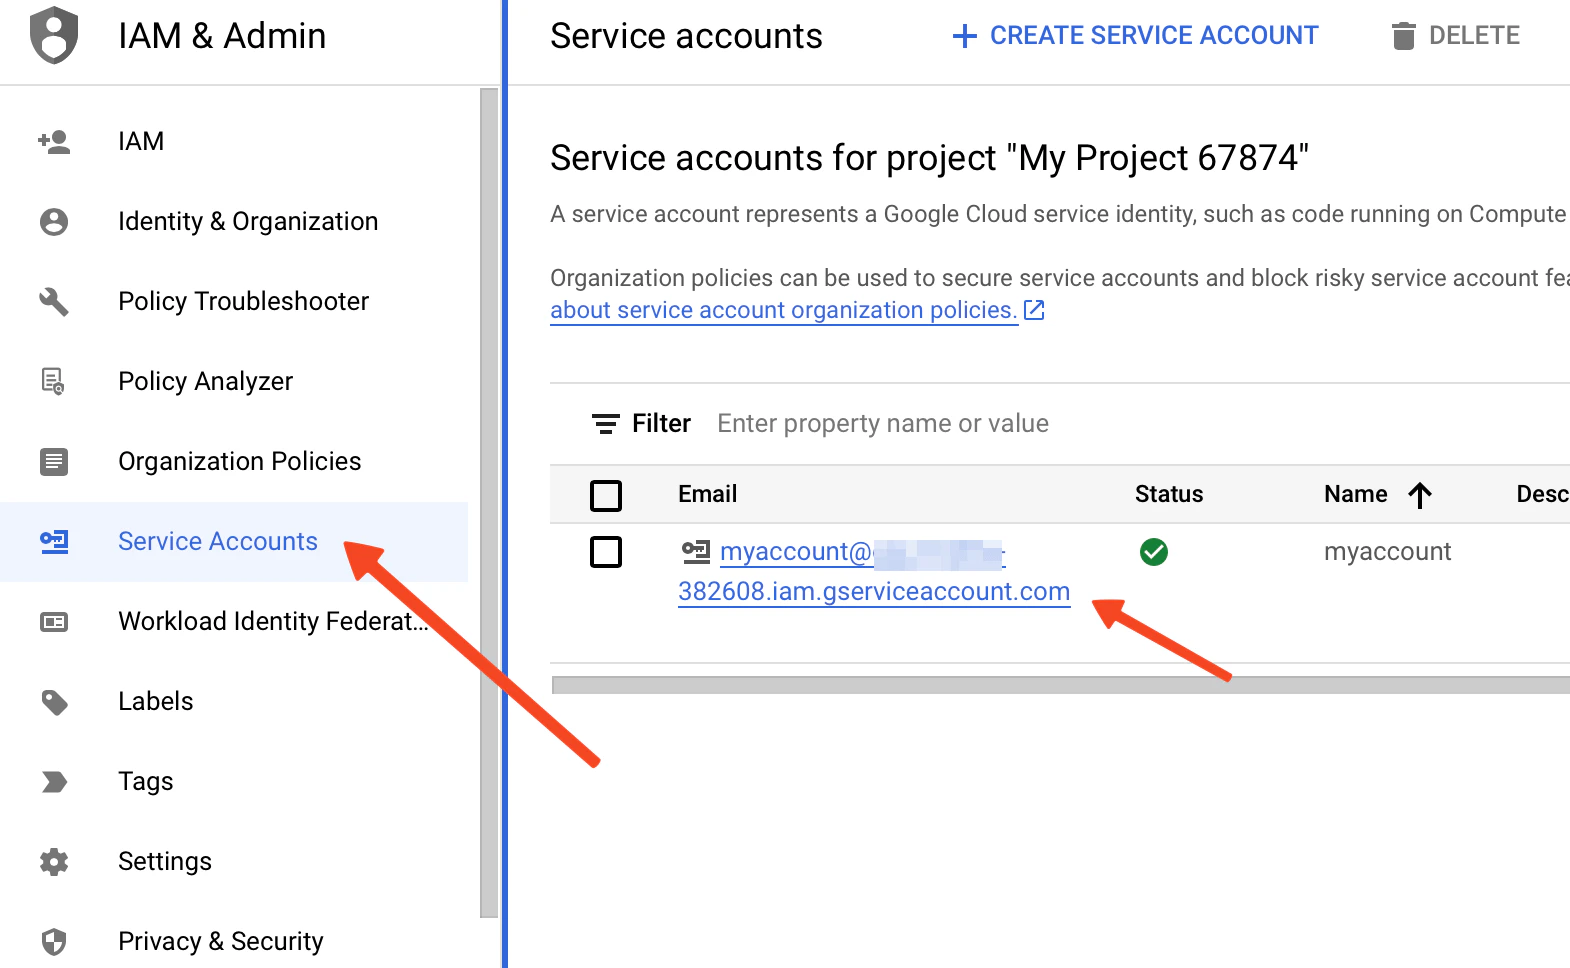
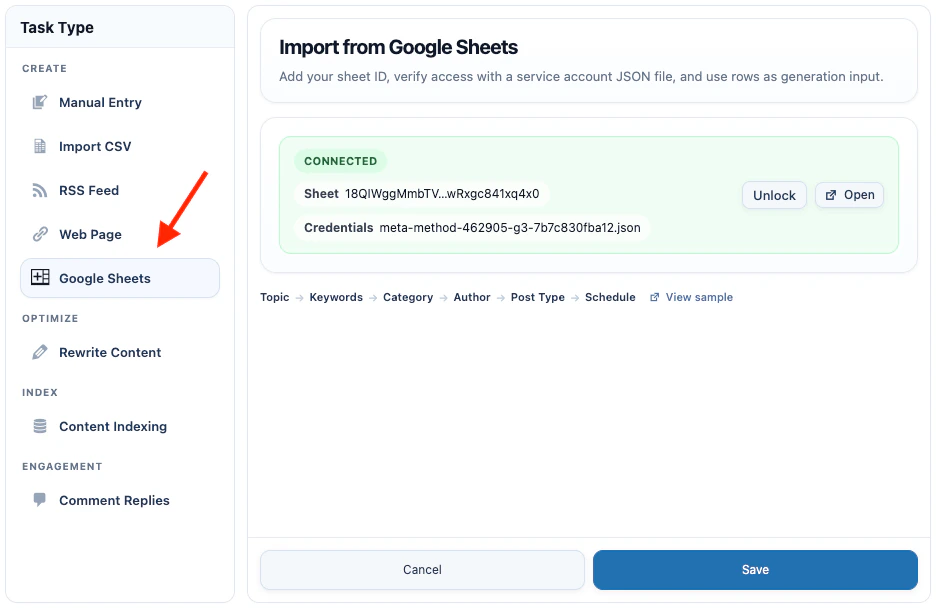 Before creating the task, set up Google access. AI Puffer uses a Google Cloud service account to read rows and write the processed status.
1. Open [Google Cloud Console](https://console.cloud.google.com/).
2. Create a new project, or select an existing project.
3. Go to **APIs & Services**.
4. Click **Enable APIs and Services**.
5. Search for **Google Sheets API**.
6. Select **Google Sheets API** and click **Enable**.
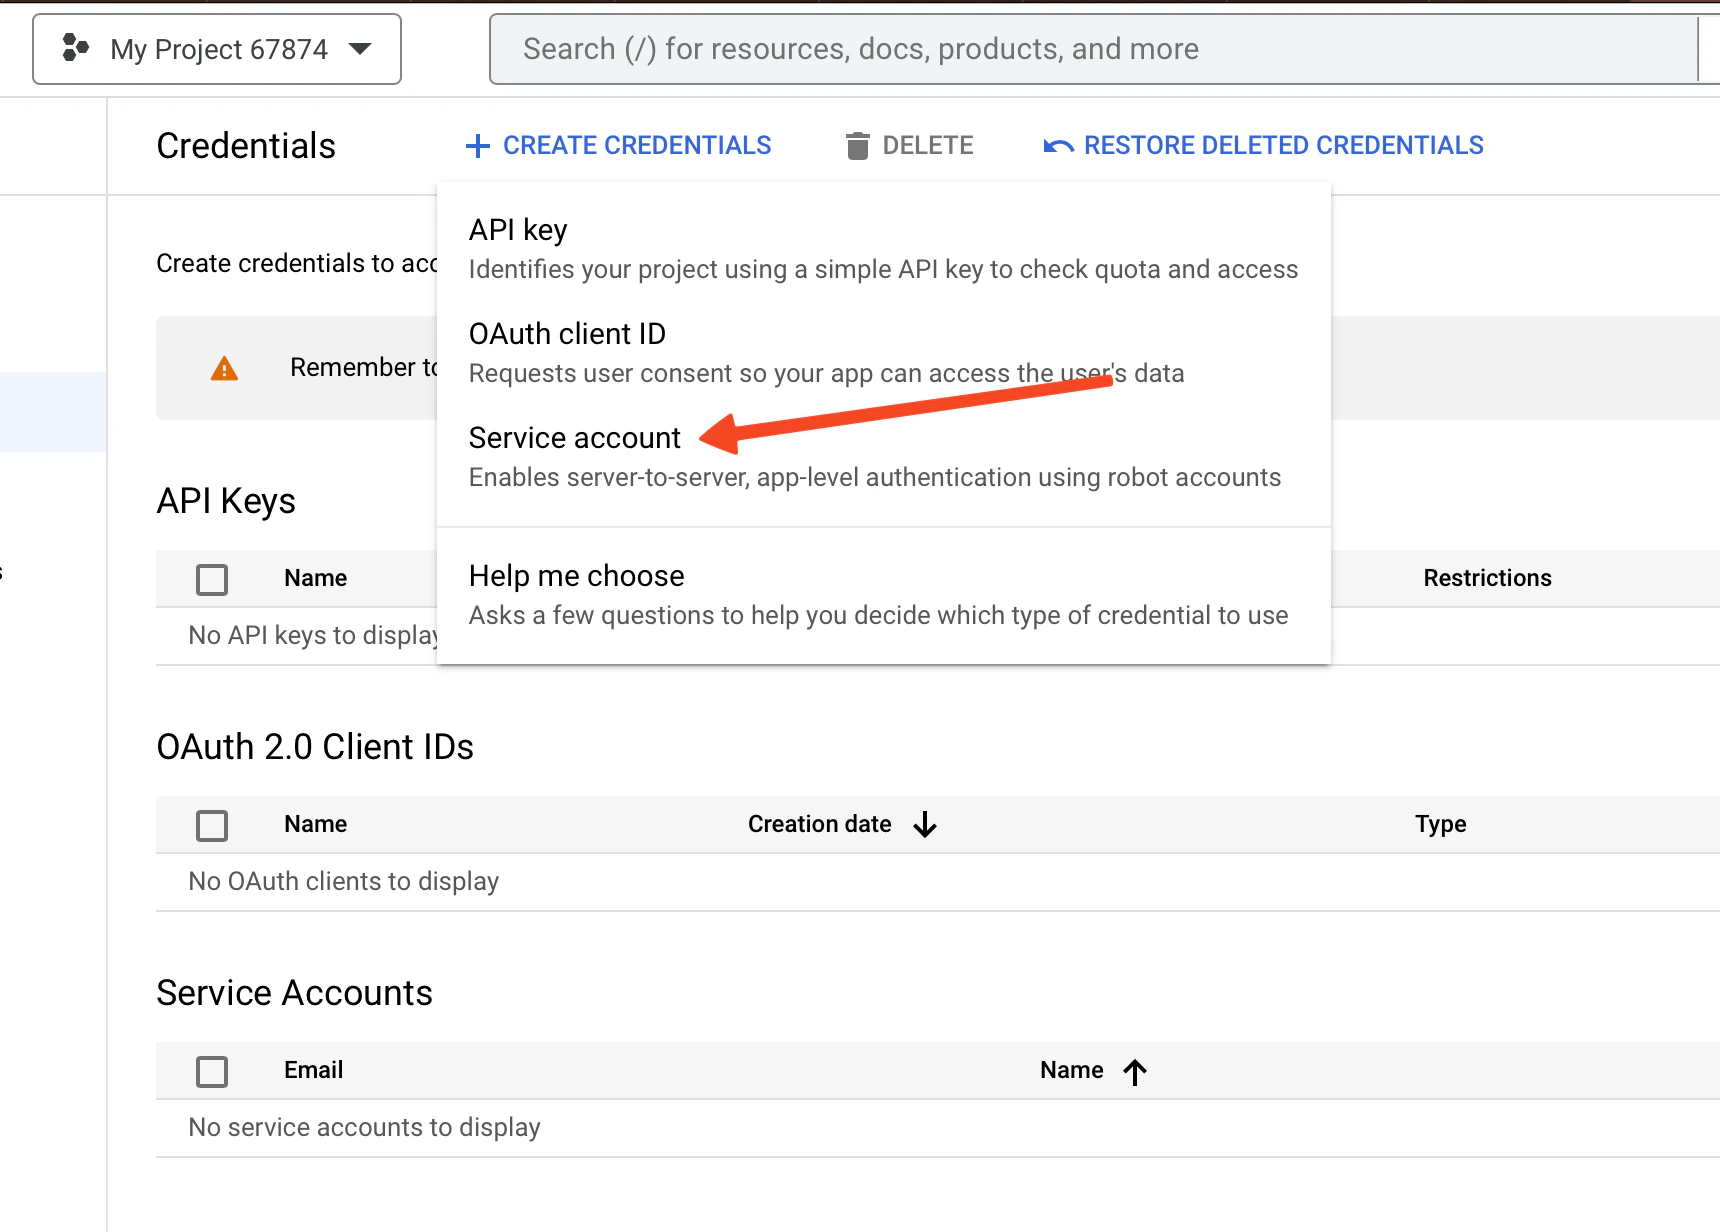
7. Go to **Credentials**.
8. Click **Create credentials**.
9. Select **Service account**.
10. Enter a service account name and click **Done**.
11. Open the service account.
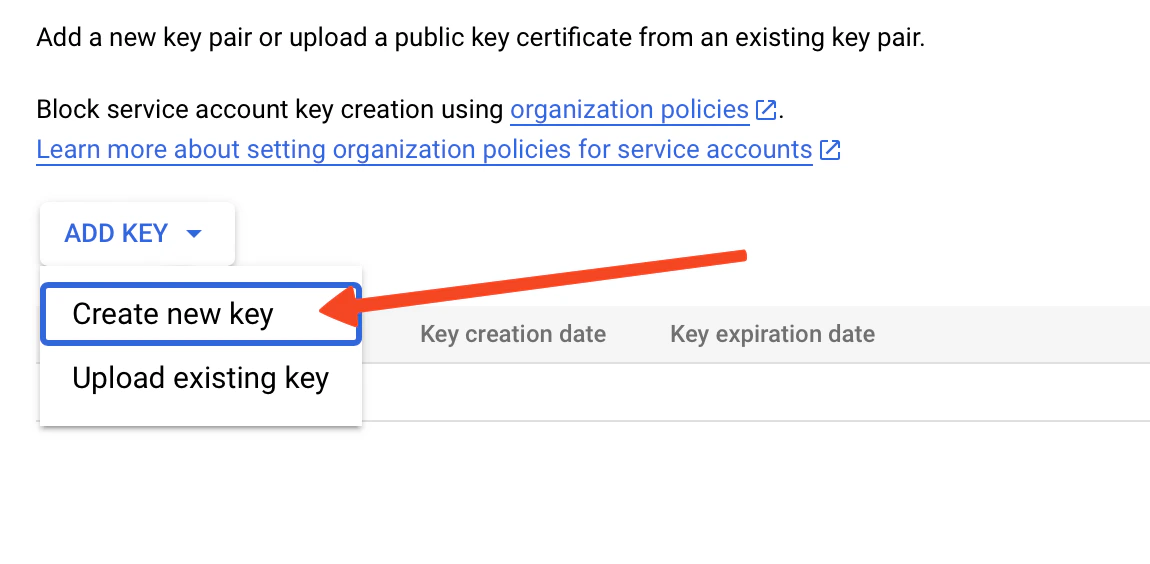
12. Go to **Keys**.
13. Click **Add key**.
14. Select **Create new key**.
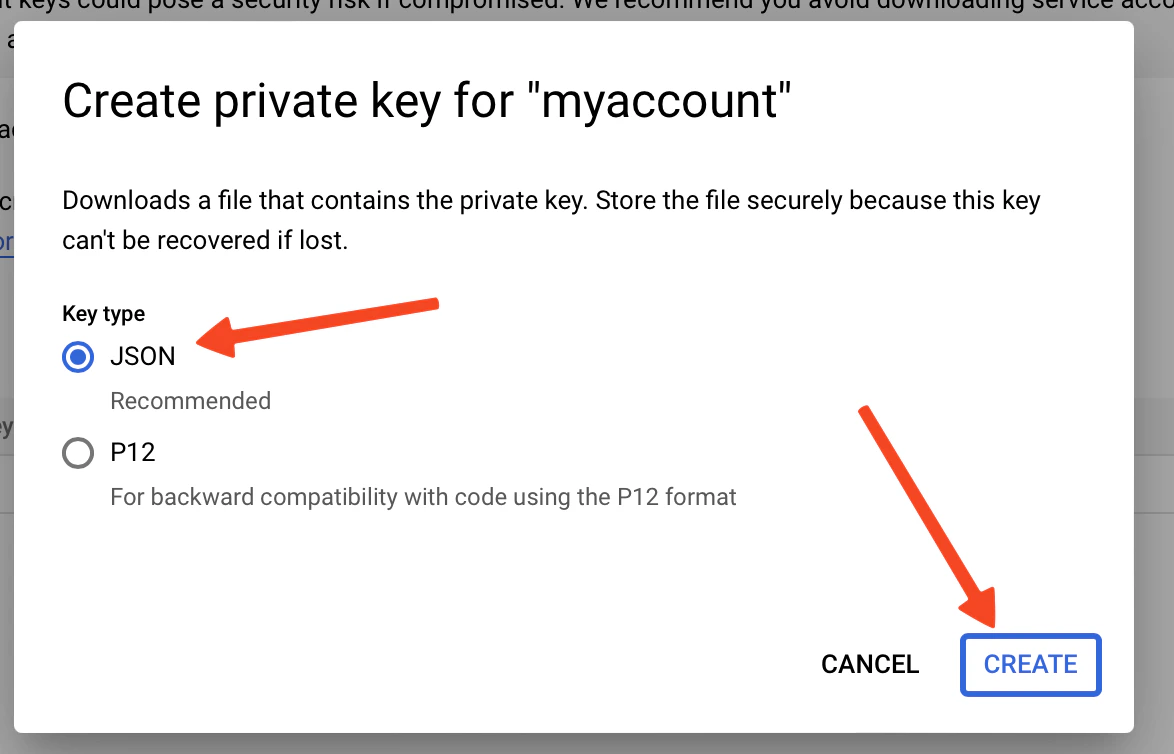
15. Select **JSON** and click **Create**.
Before creating the task, set up Google access. AI Puffer uses a Google Cloud service account to read rows and write the processed status.
1. Open [Google Cloud Console](https://console.cloud.google.com/).
2. Create a new project, or select an existing project.
3. Go to **APIs & Services**.
4. Click **Enable APIs and Services**.
5. Search for **Google Sheets API**.
6. Select **Google Sheets API** and click **Enable**.
7. Go to **Credentials**.
8. Click **Create credentials**.
9. Select **Service account**.
10. Enter a service account name and click **Done**.
11. Open the service account.
12. Go to **Keys**.
13. Click **Add key**.
14. Select **Create new key**.
15. Select **JSON** and click **Create**.
 Keep the service account JSON file private. Anyone with this file can use the permissions granted to that service account.
Google downloads a `.json` file. You will upload it in AI Puffer.
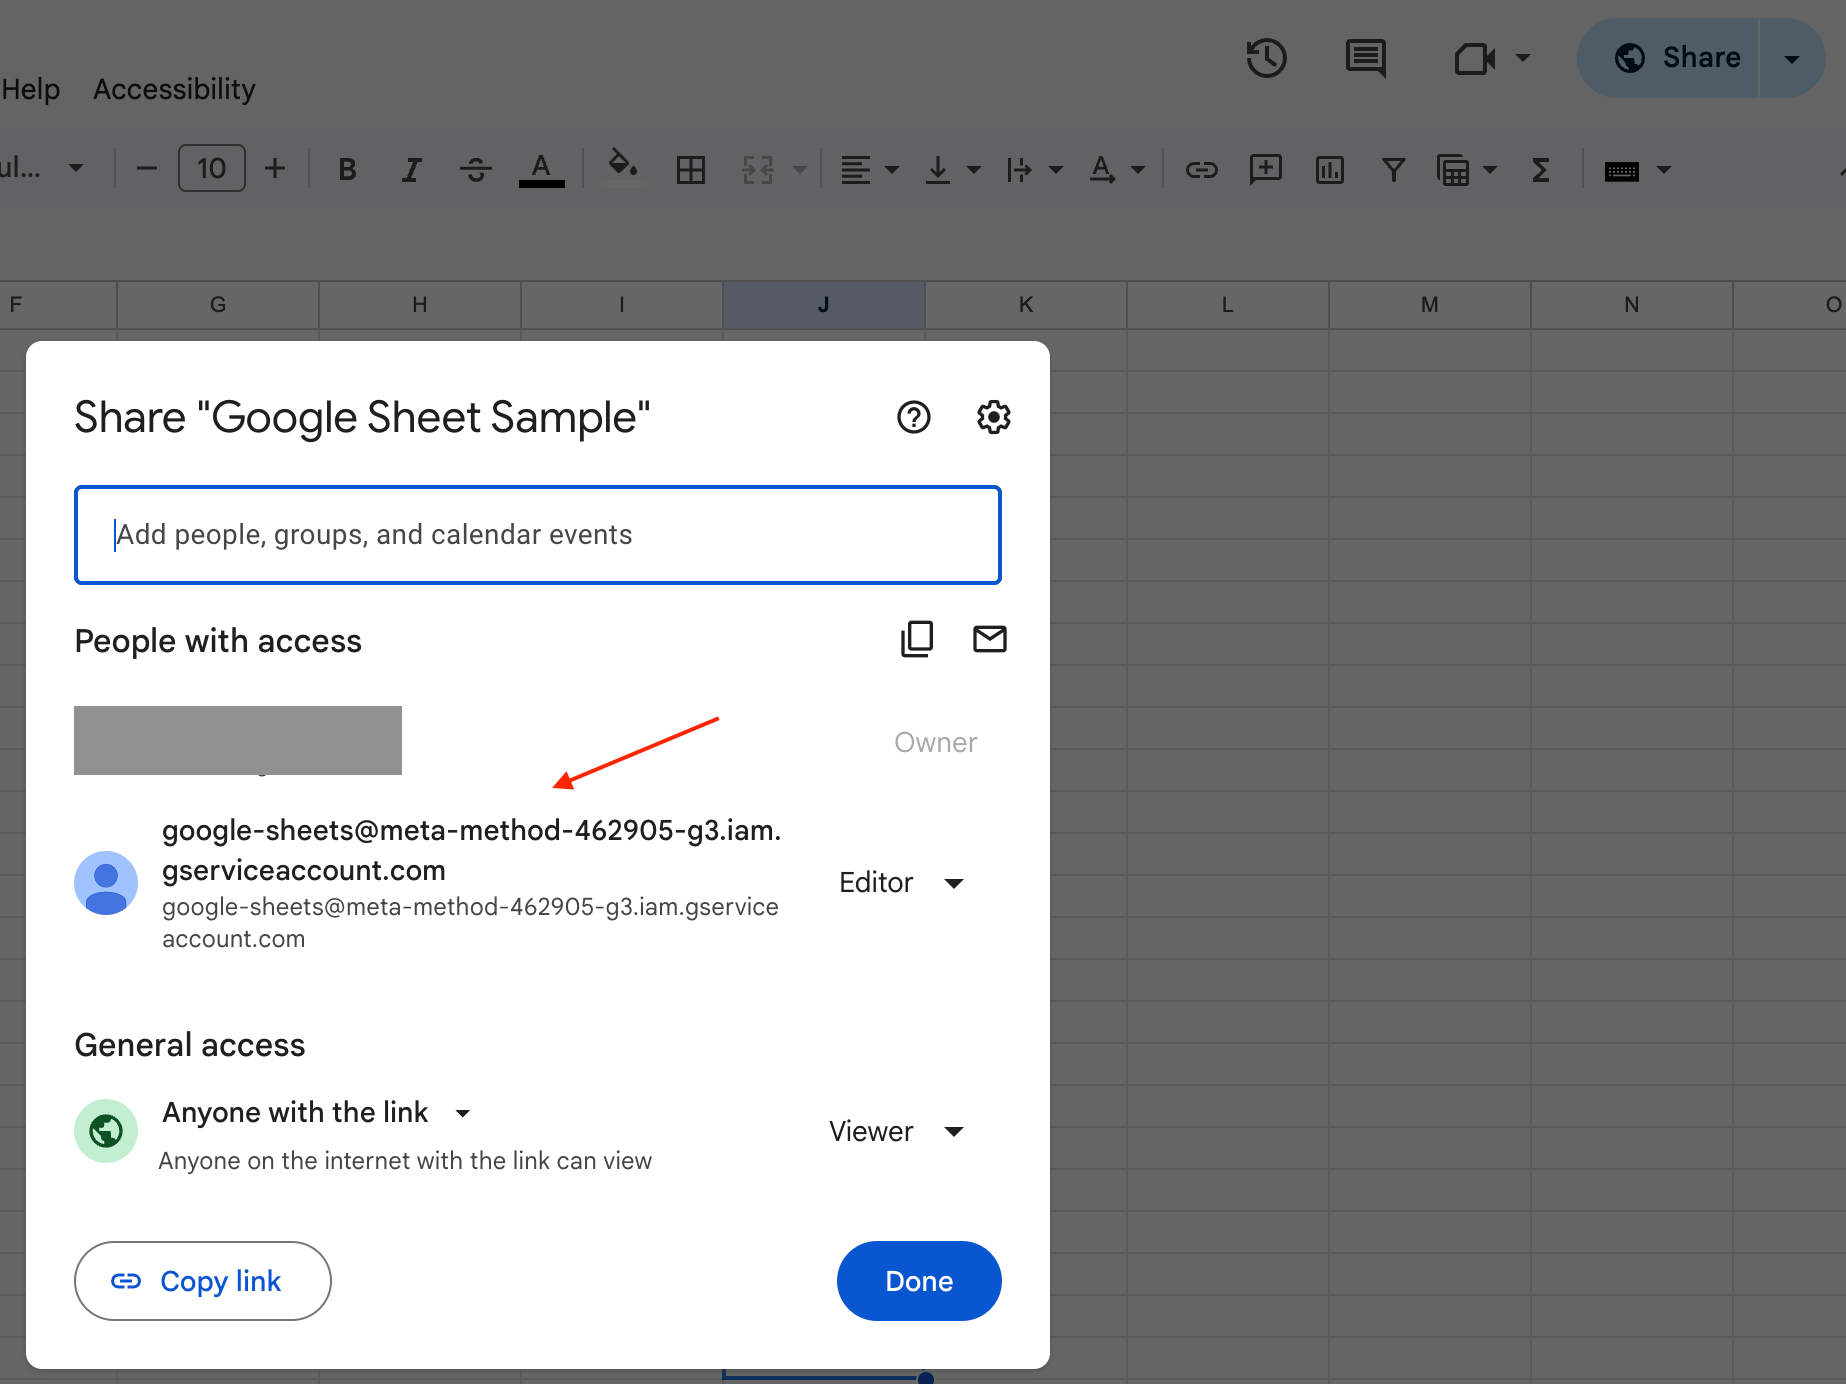
Share the sheet with the service account:
1. Open your Google Sheet.
2. Click **Share**.
3. Copy the service account email from Google Cloud or from the JSON file field named `client_email`.
4. Share the sheet with that email as **Editor**.
Editor access is required because AI Puffer writes the processed status back to column G.
Keep the service account JSON file private. Anyone with this file can use the permissions granted to that service account.
Google downloads a `.json` file. You will upload it in AI Puffer.
Share the sheet with the service account:
1. Open your Google Sheet.
2. Click **Share**.
3. Copy the service account email from Google Cloud or from the JSON file field named `client_email`.
4. Share the sheet with that email as **Editor**.
Editor access is required because AI Puffer writes the processed status back to column G.
 Create the automation:
1. Click **New Task**.
2. Select **Google Sheets** as the task type.
3. Paste the Google Sheet ID.
4. Upload the service account JSON file.
5. Wait for the connection check to pass.
6. Set the model, prompts, publishing, image, and SEO options.
7. Set the task frequency.
8. Save the task.
The Google Sheet ID is the value between `/d/` and `/edit` in the sheet URL.
```text theme={null}
https://docs.google.com/spreadsheets/d/GOOGLE_SHEET_ID/edit
```
## Optimize
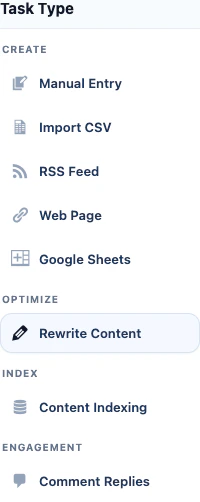
Use Optimize tasks when you want scheduled updates for content that already exists in WordPress.
Create the automation:
1. Click **New Task**.
2. Select **Google Sheets** as the task type.
3. Paste the Google Sheet ID.
4. Upload the service account JSON file.
5. Wait for the connection check to pass.
6. Set the model, prompts, publishing, image, and SEO options.
7. Set the task frequency.
8. Save the task.
The Google Sheet ID is the value between `/d/` and `/edit` in the sheet URL.
```text theme={null}
https://docs.google.com/spreadsheets/d/GOOGLE_SHEET_ID/edit
```
## Optimize
Use Optimize tasks when you want scheduled updates for content that already exists in WordPress.
 ### Rewrite Posts and Pages
Use **Rewrite Content** to update posts, pages, or custom post types on a schedule.
Rewrite Content updates WordPress content directly. Test with one small task before enabling a broad scheduled rewrite.
### Rewrite Posts and Pages
Use **Rewrite Content** to update posts, pages, or custom post types on a schedule.
Rewrite Content updates WordPress content directly. Test with one small task before enabling a broad scheduled rewrite.
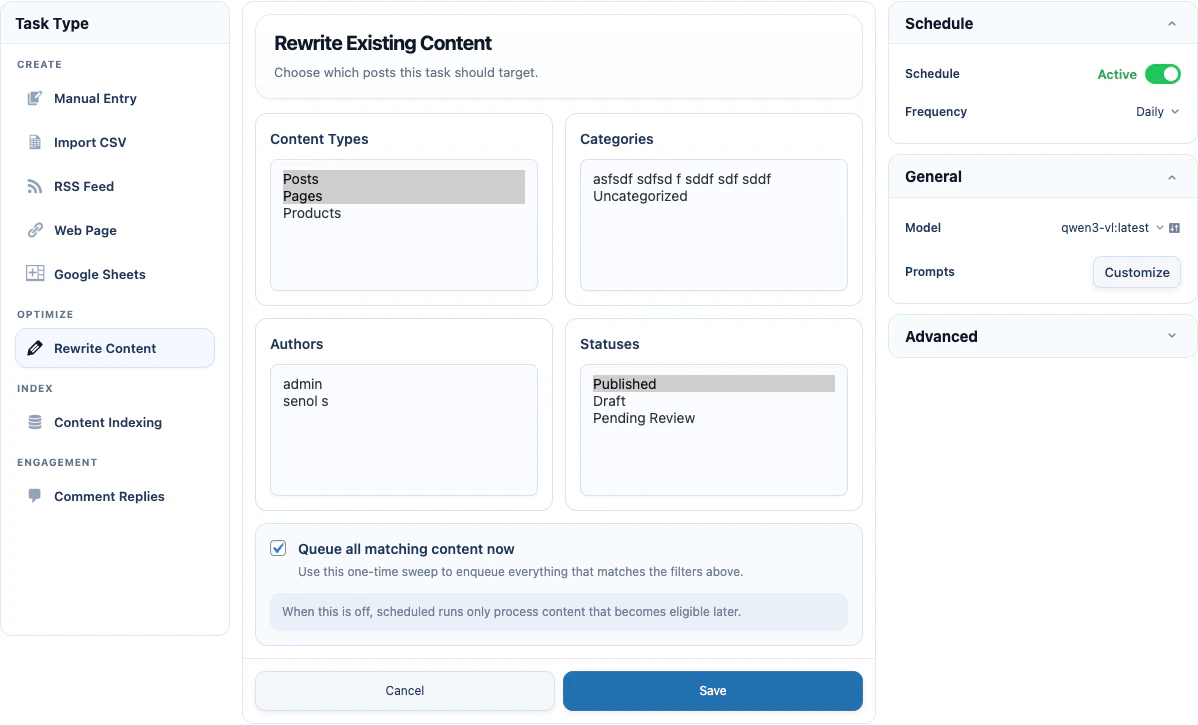 Choose which content the task can update.
| Filter | Notes |
| -------------- | ------------------------------------------------ |
| **Post Types** | Required. Select one or more post types. |
| **Categories** | Optional. Applies to category-supported content. |
| **Authors** | Optional. Limits updates to selected authors. |
| **Statuses** | Published, Draft, or Pending Review. |
Use **Queue all matching content now** to enqueue the matching content one time when the task is saved. If this option is off, scheduled runs process content that becomes eligible later.
Select at least one field to update. Each selected field has its own prompt.
| Field | What AI Puffer updates |
| -------------------- | ---------------------------------------------- |
| **Title** | WordPress post title. |
| **Excerpt** | WordPress post excerpt. |
| **Content** | WordPress post content. |
| **Meta Description** | SEO meta description in supported SEO plugins. |
Use placeholders in rewrite prompts to include existing post data.
| Placeholder | Value |
| ----------------------------- | -------------------------------------------------- |
| `{original_title}` | Existing post title. |
| `{original_content}` | Existing post content without shortcodes and HTML. |
| `{original_excerpt}` | Existing excerpt. |
| `{original_meta_description}` | Existing meta description or excerpt fallback. |
| `{original_focus_keyword}` | Existing focus keyword when available. |
| `{original_tags}` | Existing tags. |
| `{categories}` | Existing categories. |
Rewrite Content can optionally use vector context from the right-side **Advanced** card.
| Provider | Required setup |
| ------------ | ----------------------------------------------- |
| **OpenAI** | Select OpenAI Vector Stores. |
| **Pinecone** | Select a Pinecone index and embedding model. |
| **Qdrant** | Select a Qdrant collection and embedding model. |
| **Chroma** | Select a Chroma collection and embedding model. |
The task searches the selected knowledge source using the post title and adds matching context to the AI request.
For Pinecone, Qdrant, and Chroma, use the same embedding model that was used when the data was added.
To create a Rewrite Content automation:
1. Click **New Task**.
2. Select **Rewrite Content**.
3. Select the post types to update.
4. Add category, author, or status filters if needed.
5. Choose whether to queue all matching content now.
6. Select the fields AI Puffer should update.
7. Review the prompt for each selected field.
8. In **Advanced**, set **Context** if the rewrite should use stored knowledge.
9. Set the task frequency.
10. Save the task.
When the task runs, AI Puffer finds matching content, queues it, and updates only the fields you selected.
Run Now queues matching content that is not already present in that task's queue history.
### WooCommerce Products
Use **Rewrite Content** with the `product` post type to update WooCommerce product copy on a schedule.
Choose which content the task can update.
| Filter | Notes |
| -------------- | ------------------------------------------------ |
| **Post Types** | Required. Select one or more post types. |
| **Categories** | Optional. Applies to category-supported content. |
| **Authors** | Optional. Limits updates to selected authors. |
| **Statuses** | Published, Draft, or Pending Review. |
Use **Queue all matching content now** to enqueue the matching content one time when the task is saved. If this option is off, scheduled runs process content that becomes eligible later.
Select at least one field to update. Each selected field has its own prompt.
| Field | What AI Puffer updates |
| -------------------- | ---------------------------------------------- |
| **Title** | WordPress post title. |
| **Excerpt** | WordPress post excerpt. |
| **Content** | WordPress post content. |
| **Meta Description** | SEO meta description in supported SEO plugins. |
Use placeholders in rewrite prompts to include existing post data.
| Placeholder | Value |
| ----------------------------- | -------------------------------------------------- |
| `{original_title}` | Existing post title. |
| `{original_content}` | Existing post content without shortcodes and HTML. |
| `{original_excerpt}` | Existing excerpt. |
| `{original_meta_description}` | Existing meta description or excerpt fallback. |
| `{original_focus_keyword}` | Existing focus keyword when available. |
| `{original_tags}` | Existing tags. |
| `{categories}` | Existing categories. |
Rewrite Content can optionally use vector context from the right-side **Advanced** card.
| Provider | Required setup |
| ------------ | ----------------------------------------------- |
| **OpenAI** | Select OpenAI Vector Stores. |
| **Pinecone** | Select a Pinecone index and embedding model. |
| **Qdrant** | Select a Qdrant collection and embedding model. |
| **Chroma** | Select a Chroma collection and embedding model. |
The task searches the selected knowledge source using the post title and adds matching context to the AI request.
For Pinecone, Qdrant, and Chroma, use the same embedding model that was used when the data was added.
To create a Rewrite Content automation:
1. Click **New Task**.
2. Select **Rewrite Content**.
3. Select the post types to update.
4. Add category, author, or status filters if needed.
5. Choose whether to queue all matching content now.
6. Select the fields AI Puffer should update.
7. Review the prompt for each selected field.
8. In **Advanced**, set **Context** if the rewrite should use stored knowledge.
9. Set the task frequency.
10. Save the task.
When the task runs, AI Puffer finds matching content, queues it, and updates only the fields you selected.
Run Now queues matching content that is not already present in that task's queue history.
### WooCommerce Products
Use **Rewrite Content** with the `product` post type to update WooCommerce product copy on a schedule.
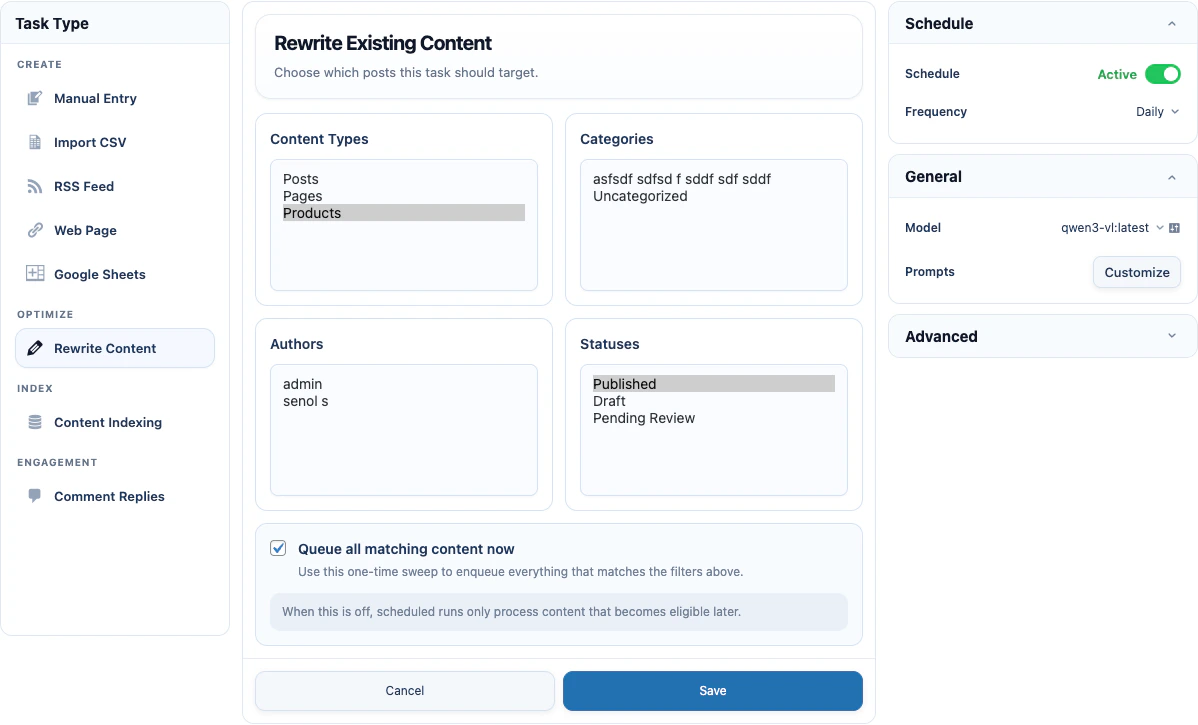 The task can update these product fields:
| Field | What AI Puffer updates |
| -------------------- | ---------------------------------------------- |
| **Title** | Product name. |
| **Excerpt** | Product excerpt or short description. |
| **Content** | Main product description. |
| **Meta Description** | SEO meta description in supported SEO plugins. |
Price, SKU, stock, dimensions, purchase note, categories, and attributes can be used in prompts as source data. AI Puffer does not change those WooCommerce product fields in this task.
Product prompts can use the normal post placeholders and these WooCommerce placeholders:
| Placeholder | Value |
| ---------------------- | ---------------------- |
| `{price}` | Product price. |
| `{regular_price}` | Product regular price. |
| `{sku}` | Product SKU. |
| `{attributes}` | Product attributes. |
| `{stock_quantity}` | Stock quantity. |
| `{stock_status}` | Stock status. |
| `{weight}` | Product weight. |
| `{length}` | Product length. |
| `{width}` | Product width. |
| `{height}` | Product height. |
| `{purchase_note}` | Product purchase note. |
| `{product_categories}` | Product categories. |
To create a WooCommerce product update automation:
1. Click **New Task**.
2. Select **Rewrite Content**.
3. Select **product** under **Post Types**.
4. Add category, author, or status filters if needed.
5. Choose whether to queue matching products now.
6. Select the product fields AI Puffer should update.
7. Review the prompt for each selected field.
8. In **Advanced**, set **Context** if product copy should use stored product or business information.
9. Set the task frequency.
10. Save the task.
## Content Indexing
Use Content Indexing to add WordPress content to a vector store for later retrieval.
The task can update these product fields:
| Field | What AI Puffer updates |
| -------------------- | ---------------------------------------------- |
| **Title** | Product name. |
| **Excerpt** | Product excerpt or short description. |
| **Content** | Main product description. |
| **Meta Description** | SEO meta description in supported SEO plugins. |
Price, SKU, stock, dimensions, purchase note, categories, and attributes can be used in prompts as source data. AI Puffer does not change those WooCommerce product fields in this task.
Product prompts can use the normal post placeholders and these WooCommerce placeholders:
| Placeholder | Value |
| ---------------------- | ---------------------- |
| `{price}` | Product price. |
| `{regular_price}` | Product regular price. |
| `{sku}` | Product SKU. |
| `{attributes}` | Product attributes. |
| `{stock_quantity}` | Stock quantity. |
| `{stock_status}` | Stock status. |
| `{weight}` | Product weight. |
| `{length}` | Product length. |
| `{width}` | Product width. |
| `{height}` | Product height. |
| `{purchase_note}` | Product purchase note. |
| `{product_categories}` | Product categories. |
To create a WooCommerce product update automation:
1. Click **New Task**.
2. Select **Rewrite Content**.
3. Select **product** under **Post Types**.
4. Add category, author, or status filters if needed.
5. Choose whether to queue matching products now.
6. Select the product fields AI Puffer should update.
7. Review the prompt for each selected field.
8. In **Advanced**, set **Context** if product copy should use stored product or business information.
9. Set the task frequency.
10. Save the task.
## Content Indexing
Use Content Indexing to add WordPress content to a vector store for later retrieval.
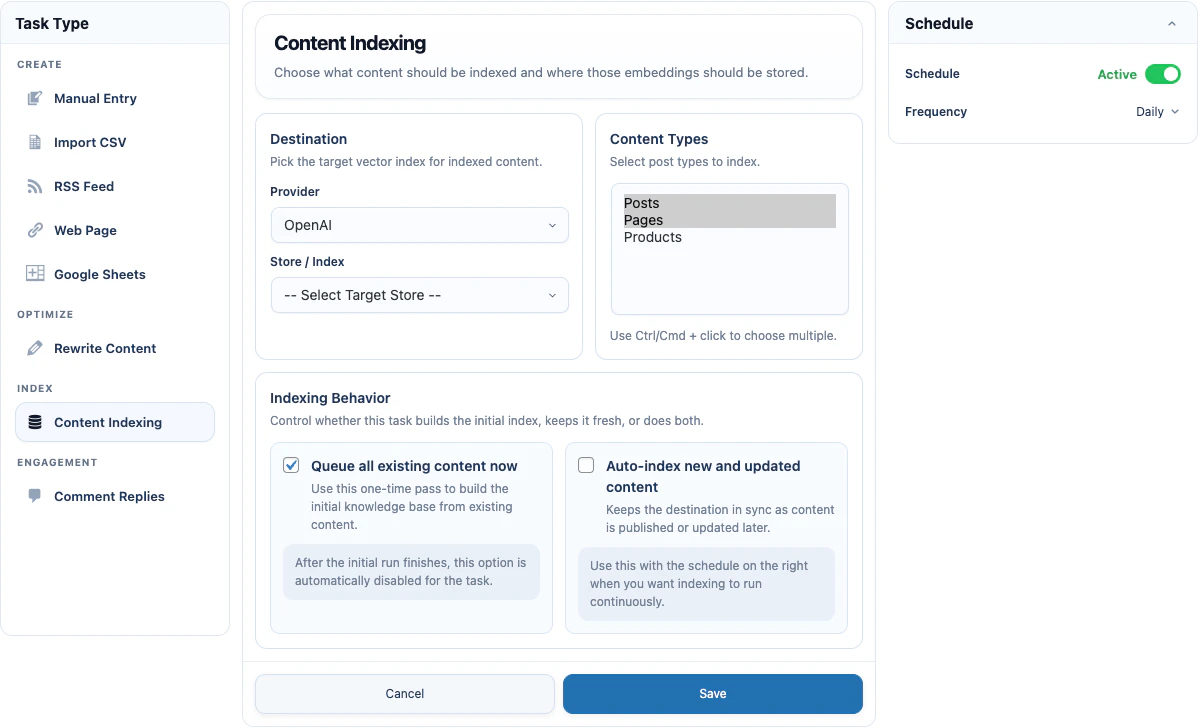 | Destination | Required setup |
| ------------ | -------------------------------------------------------- |
| **OpenAI** | Select an OpenAI Vector Store. |
| **Pinecone** | Select a Pinecone index and embedding provider/model. |
| **Qdrant** | Select a Qdrant collection and embedding provider/model. |
| **Chroma** | Select a Chroma collection and embedding provider/model. |
Pinecone, Qdrant, and Chroma require an embedding model because AI Puffer needs to create embeddings before writing vectors.
For Pinecone, Qdrant, and Chroma, the index or collection dimension must match the embedding model.
Content selection settings:
| Setting | What it does |
| -------------------------------------- | ------------------------------------------------------------- |
| **Post Types** | Selects the public post types to index. |
| **Queue existing content now** | Queues matching published content for initial indexing. |
| **Auto-index new and updated content** | Keeps the vector store updated when selected content changes. |
| **Frequency** | Controls how often the task checks for work. |
Content Indexing only queues published content.
To create a Content Indexing automation:
1. Click **New Task**.
2. Select **Content Indexing**.
3. Choose OpenAI, Pinecone, Qdrant, or Chroma as the destination.
4. Select the vector store, index, or collection.
5. For Pinecone, Qdrant, or Chroma, select the embedding provider and model.
6. Select the public post types to index.
7. Choose whether to queue existing content now.
8. Choose whether new and updated content should be indexed automatically.
9. Set the task frequency.
10. Save the task.
**Queue all existing content now** creates an initial batch for matching published content. AI Puffer queues existing content in batches of 200 posts. After the initial queueing pass finishes, the one-time flag is turned off for the task.
Run Now queues all matching published content again.
**Auto-index new and updated content** checks posts modified after the task's last run time. Use this when the vector store should stay in sync with published WordPress content.
## Comment Replies
Use Comment Replies to draft and publish replies to WordPress comments.
| Destination | Required setup |
| ------------ | -------------------------------------------------------- |
| **OpenAI** | Select an OpenAI Vector Store. |
| **Pinecone** | Select a Pinecone index and embedding provider/model. |
| **Qdrant** | Select a Qdrant collection and embedding provider/model. |
| **Chroma** | Select a Chroma collection and embedding provider/model. |
Pinecone, Qdrant, and Chroma require an embedding model because AI Puffer needs to create embeddings before writing vectors.
For Pinecone, Qdrant, and Chroma, the index or collection dimension must match the embedding model.
Content selection settings:
| Setting | What it does |
| -------------------------------------- | ------------------------------------------------------------- |
| **Post Types** | Selects the public post types to index. |
| **Queue existing content now** | Queues matching published content for initial indexing. |
| **Auto-index new and updated content** | Keeps the vector store updated when selected content changes. |
| **Frequency** | Controls how often the task checks for work. |
Content Indexing only queues published content.
To create a Content Indexing automation:
1. Click **New Task**.
2. Select **Content Indexing**.
3. Choose OpenAI, Pinecone, Qdrant, or Chroma as the destination.
4. Select the vector store, index, or collection.
5. For Pinecone, Qdrant, or Chroma, select the embedding provider and model.
6. Select the public post types to index.
7. Choose whether to queue existing content now.
8. Choose whether new and updated content should be indexed automatically.
9. Set the task frequency.
10. Save the task.
**Queue all existing content now** creates an initial batch for matching published content. AI Puffer queues existing content in batches of 200 posts. After the initial queueing pass finishes, the one-time flag is turned off for the task.
Run Now queues all matching published content again.
**Auto-index new and updated content** checks posts modified after the task's last run time. Use this when the vector store should stay in sync with published WordPress content.
## Comment Replies
Use Comment Replies to draft and publish replies to WordPress comments.
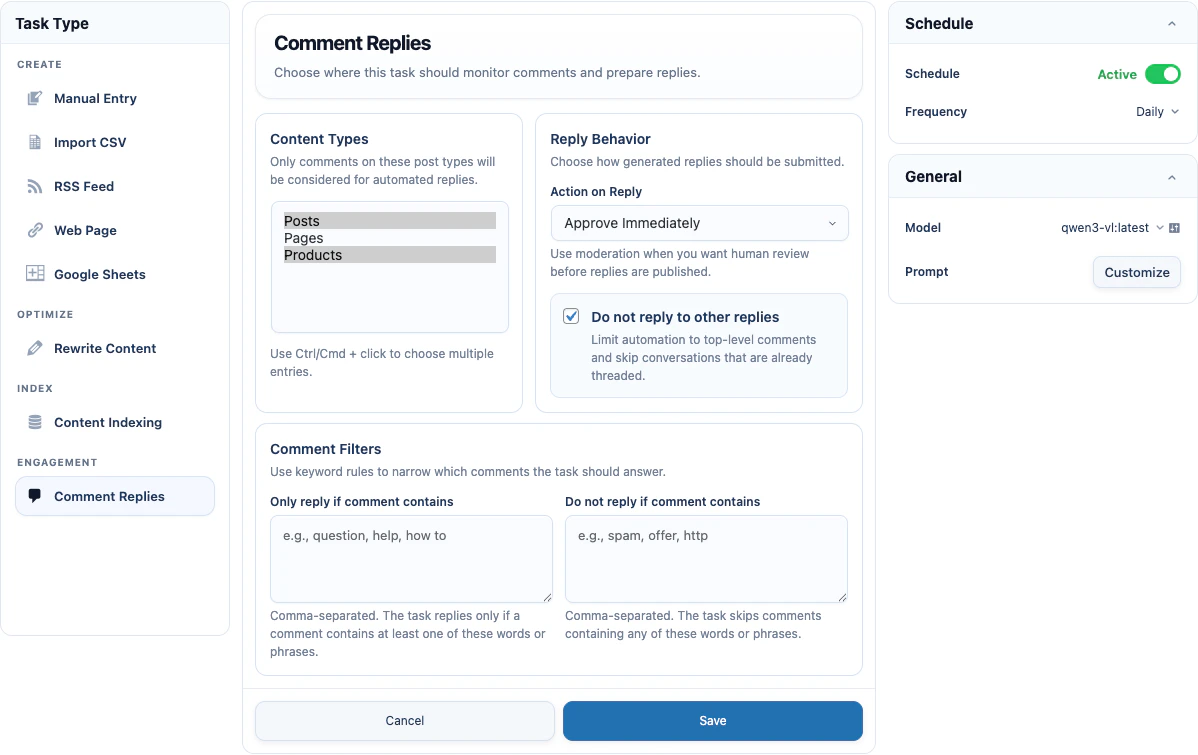 | Setting | What it does |
| --------------------------------- | ------------------------------------------------------------ |
| **Post Types** | Selects which comment areas the task monitors. |
| **Approve Immediately** | Inserts the AI reply as an approved comment. |
| **Hold for Moderation** | Inserts the AI reply as an unapproved comment. |
| **Do not reply to other replies** | Limits the task to top-level comments. |
| **Include keywords** | Replies only when the comment contains at least one keyword. |
| **Exclude keywords** | Skips comments that contain any excluded keyword. |
Use placeholders to include the original comment and post title in the reply prompt.
| Placeholder | Value |
| ------------------- | ---------------------------- |
| `{comment_content}` | Original comment text. |
| `{comment_author}` | Original comment author. |
| `{post_title}` | Title of the commented post. |
To create a Comment Replies automation:
1. Click **New Task**.
2. Select **Comment Replies**.
3. Select the post types to monitor.
4. Choose whether to reply only to top-level comments.
5. Choose whether replies should be approved immediately or held for moderation.
6. Add include or exclude keywords if needed.
7. Review the reply prompt.
8. Select the model.
9. Set the task frequency.
10. Save the task.
Scheduled runs check approved comments. Each run queues up to 50 matching comments.
AI Puffer checks whether a comment is already queued or already has a reply from the same task before adding it again.
Replies are inserted as child comments. The reply author is the post author when possible, with a fallback to the site administrator.
## Settings
Automation settings appear in the right-side cards after you choose a task type.
### Task Schedule
Task schedule controls whether the task is active and when AI Puffer checks for work. These settings are in the right-side **Schedule** card.
| Setting | What it does |
| ------------- | ---------------------------------------------------------------------- |
| **Active** | Schedules the task. |
| **Paused** | Stops future scheduled runs. Existing queue items remain in the queue. |
| **Frequency** | Controls how often AI Puffer checks the task source. |
| Setting | What it does |
| --------------------------------- | ------------------------------------------------------------ |
| **Post Types** | Selects which comment areas the task monitors. |
| **Approve Immediately** | Inserts the AI reply as an approved comment. |
| **Hold for Moderation** | Inserts the AI reply as an unapproved comment. |
| **Do not reply to other replies** | Limits the task to top-level comments. |
| **Include keywords** | Replies only when the comment contains at least one keyword. |
| **Exclude keywords** | Skips comments that contain any excluded keyword. |
Use placeholders to include the original comment and post title in the reply prompt.
| Placeholder | Value |
| ------------------- | ---------------------------- |
| `{comment_content}` | Original comment text. |
| `{comment_author}` | Original comment author. |
| `{post_title}` | Title of the commented post. |
To create a Comment Replies automation:
1. Click **New Task**.
2. Select **Comment Replies**.
3. Select the post types to monitor.
4. Choose whether to reply only to top-level comments.
5. Choose whether replies should be approved immediately or held for moderation.
6. Add include or exclude keywords if needed.
7. Review the reply prompt.
8. Select the model.
9. Set the task frequency.
10. Save the task.
Scheduled runs check approved comments. Each run queues up to 50 matching comments.
AI Puffer checks whether a comment is already queued or already has a reply from the same task before adding it again.
Replies are inserted as child comments. The reply author is the post author when possible, with a fallback to the site administrator.
## Settings
Automation settings appear in the right-side cards after you choose a task type.
### Task Schedule
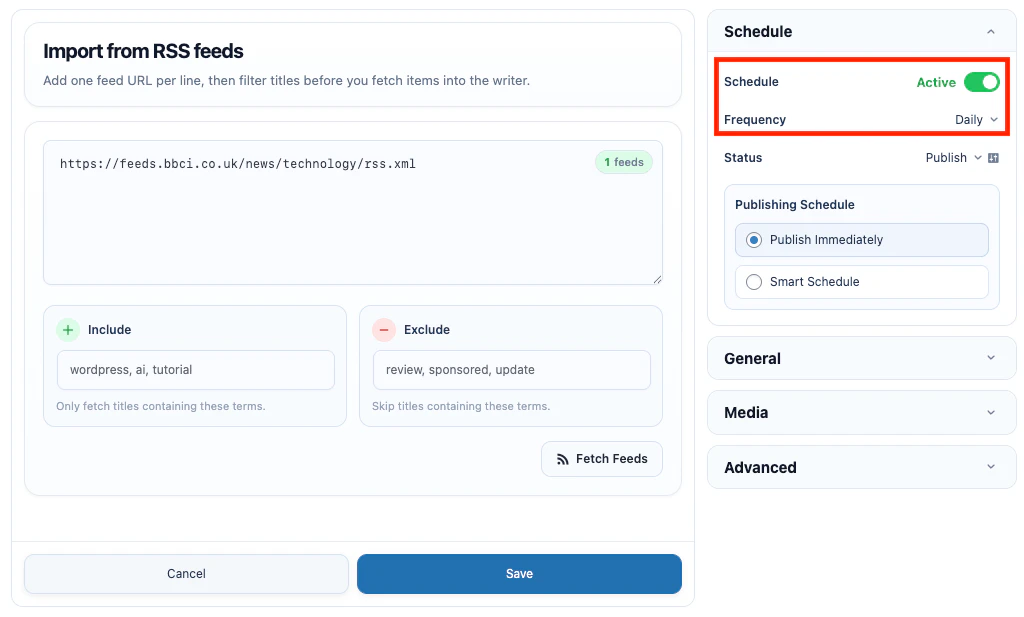
Task schedule controls whether the task is active and when AI Puffer checks for work. These settings are in the right-side **Schedule** card.
| Setting | What it does |
| ------------- | ---------------------------------------------------------------------- |
| **Active** | Schedules the task. |
| **Paused** | Stops future scheduled runs. Existing queue items remain in the queue. |
| **Frequency** | Controls how often AI Puffer checks the task source. |
 Available frequencies:
| Frequency | Notes |
| -------------------- | ---------------------------------------- |
| **One-time** | Runs once. |
| **Every 5 Minutes** | Uses a custom WordPress cron interval. |
| **Every 15 Minutes** | Uses a custom WordPress cron interval. |
| **Every 30 Minutes** | Uses a custom WordPress cron interval. |
| **Hourly** | Uses the WordPress hourly interval. |
| **Twice Daily** | Uses the WordPress twice-daily interval. |
| **Daily** | Uses the WordPress daily interval. |
| **Weekly** | Uses a custom WordPress cron interval. |
Manual Entry and CSV tasks are one-time tasks. RSS Feed, Web Page, Google Sheets, Rewrite Content, Content Indexing, and Comment Replies can use recurring frequencies.
The first run is scheduled shortly after the task is saved or resumed.
### AI
AI settings choose the model that writes the content.
xAI can be used for text automation tasks such as content creation, rewriting, and comment replies. It can also be selected as an image source for content-writing automation tasks. It is not used for Knowledge Base indexing destinations.
To set the model:
1. In the right-side **General** card, use **Model** to choose the provider and model.
2. Select **Length** for content creation tasks.
3. Click the settings icon next to **Model** to open **Model settings**.
4. Adjust **Temperature** if you want more or less variation.
5. Set **Reasoning** only for models that support it. Keep it on **None** for faster runs.
| Setting | What it does |
| --------------- | -------------------------------------------------------- |
| **Model** | Provider and model used by the task. |
| **Length** | Token budget for generated content. |
| **Temperature** | Response variation. |
| **Reasoning** | Reasoning effort for supported OpenAI and Ollama models. |
Available frequencies:
| Frequency | Notes |
| -------------------- | ---------------------------------------- |
| **One-time** | Runs once. |
| **Every 5 Minutes** | Uses a custom WordPress cron interval. |
| **Every 15 Minutes** | Uses a custom WordPress cron interval. |
| **Every 30 Minutes** | Uses a custom WordPress cron interval. |
| **Hourly** | Uses the WordPress hourly interval. |
| **Twice Daily** | Uses the WordPress twice-daily interval. |
| **Daily** | Uses the WordPress daily interval. |
| **Weekly** | Uses a custom WordPress cron interval. |
Manual Entry and CSV tasks are one-time tasks. RSS Feed, Web Page, Google Sheets, Rewrite Content, Content Indexing, and Comment Replies can use recurring frequencies.
The first run is scheduled shortly after the task is saved or resumed.
### AI
AI settings choose the model that writes the content.
xAI can be used for text automation tasks such as content creation, rewriting, and comment replies. It can also be selected as an image source for content-writing automation tasks. It is not used for Knowledge Base indexing destinations.
To set the model:
1. In the right-side **General** card, use **Model** to choose the provider and model.
2. Select **Length** for content creation tasks.
3. Click the settings icon next to **Model** to open **Model settings**.
4. Adjust **Temperature** if you want more or less variation.
5. Set **Reasoning** only for models that support it. Keep it on **None** for faster runs.
| Setting | What it does |
| --------------- | -------------------------------------------------------- |
| **Model** | Provider and model used by the task. |
| **Length** | Token budget for generated content. |
| **Temperature** | Response variation. |
| **Reasoning** | Reasoning effort for supported OpenAI and Ollama models. |
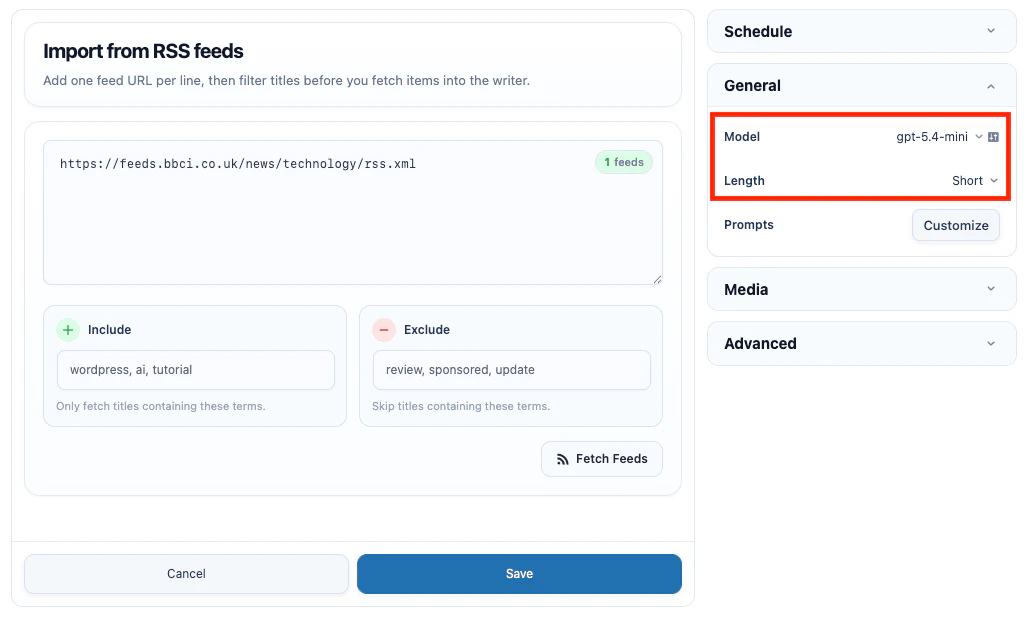 Length values map to these token budgets:
| Length | Token budget |
| ---------- | ------------ |
| **Short** | 2000 |
| **Medium** | 4000 |
| **Long** | 6000 |
Length values map to these token budgets:
| Length | Token budget |
| ---------- | ------------ |
| **Short** | 2000 |
| **Medium** | 4000 |
| **Long** | 6000 |
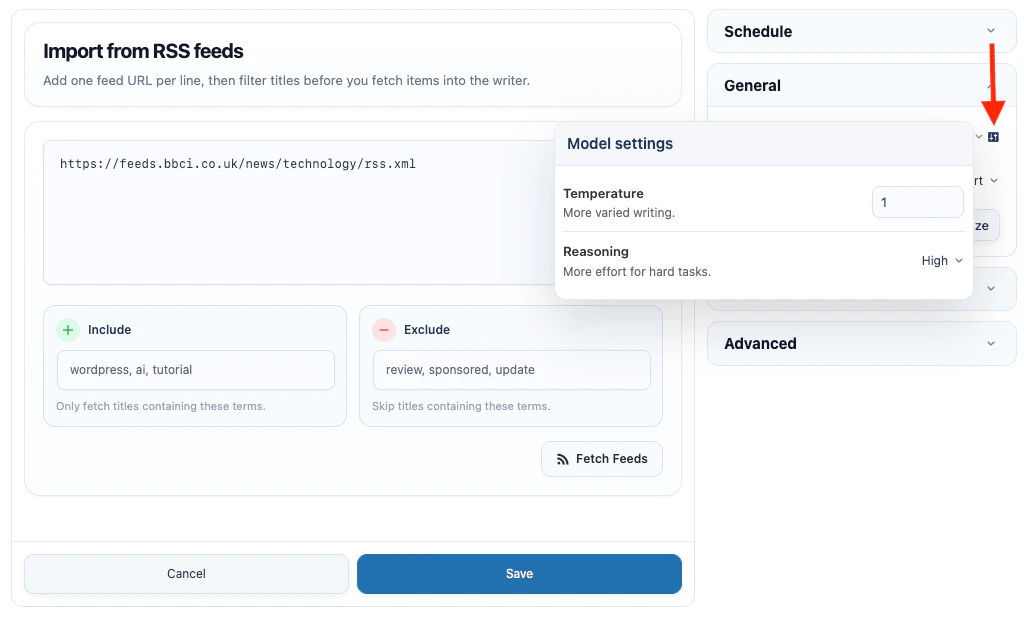 If the provider or model list is empty, configure the provider first in [AI Providers](/ai-providers).
### Prompts
Prompts are the instructions Automations sends to the selected model. Content creation tasks can generate a title, content, SEO fields, excerpt, tags, inline image prompt, and featured image prompt.
To customize prompts:
1. In the right-side **General** card, click **Customize** next to **Prompts**.
2. Enable the outputs you want AI Puffer to generate.
3. Click the edit icon next to an output.
4. Select a saved prompt or edit the prompt text directly.
5. Use the variables shown under the editor.
6. Save the task and run one test item before enabling a larger task.
| Output | What it creates |
| -------------------- | --------------------------------------- |
| **Title** | WordPress post title. |
| **Content** | WordPress post content. |
| **Meta Description** | SEO meta description. |
| **Focus Keyword** | Focus keyword in supported SEO plugins. |
| **Excerpt** | WordPress excerpt. |
| **Tags** | WordPress tags or product tags. |
| **Content Image** | Prompt used for inline images. |
| **Featured Image** | Prompt used for the post thumbnail. |
Available variables change by source.
| Source | Variables to use |
| -------------------------------- | --------------------------------------------------------------------------------- |
| Manual Entry, CSV, Google Sheets | Use `{topic}` and `{keywords}`. |
| RSS Feed | Use `{description}` and `{source_url}`. |
| Web Page | Use `{url_content}` and `{source_url}`. |
| SEO, excerpt, tags | Use `{content_summary}` when the output should be based on the generated article. |
If the provider or model list is empty, configure the provider first in [AI Providers](/ai-providers).
### Prompts
Prompts are the instructions Automations sends to the selected model. Content creation tasks can generate a title, content, SEO fields, excerpt, tags, inline image prompt, and featured image prompt.
To customize prompts:
1. In the right-side **General** card, click **Customize** next to **Prompts**.
2. Enable the outputs you want AI Puffer to generate.
3. Click the edit icon next to an output.
4. Select a saved prompt or edit the prompt text directly.
5. Use the variables shown under the editor.
6. Save the task and run one test item before enabling a larger task.
| Output | What it creates |
| -------------------- | --------------------------------------- |
| **Title** | WordPress post title. |
| **Content** | WordPress post content. |
| **Meta Description** | SEO meta description. |
| **Focus Keyword** | Focus keyword in supported SEO plugins. |
| **Excerpt** | WordPress excerpt. |
| **Tags** | WordPress tags or product tags. |
| **Content Image** | Prompt used for inline images. |
| **Featured Image** | Prompt used for the post thumbnail. |
Available variables change by source.
| Source | Variables to use |
| -------------------------------- | --------------------------------------------------------------------------------- |
| Manual Entry, CSV, Google Sheets | Use `{topic}` and `{keywords}`. |
| RSS Feed | Use `{description}` and `{source_url}`. |
| Web Page | Use `{url_content}` and `{source_url}`. |
| SEO, excerpt, tags | Use `{content_summary}` when the output should be based on the generated article. |
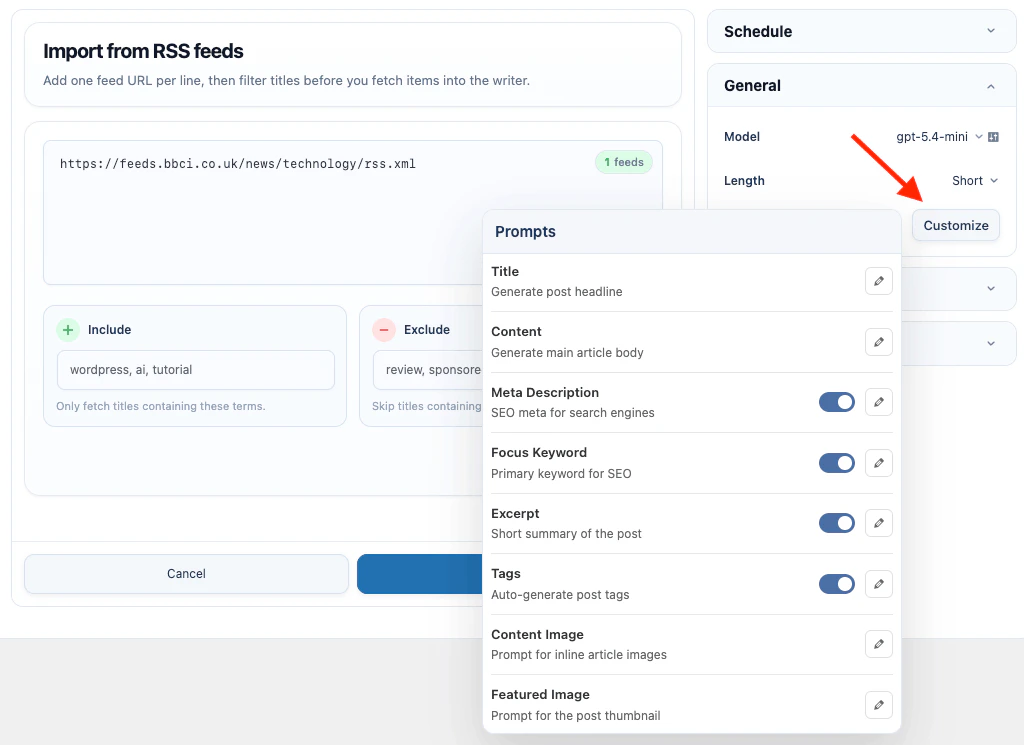 AI Puffer checks required variables before generation. If a required variable is missing, the task will not run until the prompt is fixed.
### SEO
Use SEO settings when generated posts should include search metadata. AI Puffer can create a meta description, focus keyword, tags, and a cleaner WordPress URL slug. Pro users can also use **Smart SEO** to audit and improve generated posts before each automation queue item is completed.
To generate SEO output:
1. In the right-side **General** card, click **Customize** next to **Prompts**.
2. Enable **Meta Description**, **Focus Keyword**, or **Tags**.
3. Edit the enabled prompts if needed.
4. In the right-side **Schedule** card, click the settings icon next to **Status** to open **Post settings**.
5. Enable **Optimize URL** if AI Puffer should update the post slug.
6. Save and test the task.
| Output | How it is saved |
| -------------------- | --------------------------------------------------------------------------------------------------------- |
| **Meta Description** | Saved to the active SEO plugin. If no supported SEO plugin is active, AI Puffer saves fallback post meta. |
| **Focus Keyword** | Saved to Yoast SEO, Rank Math, or All in One SEO. |
| **Tags** | Saved as WordPress tags or product tags. |
| **URL** | Updates the WordPress post slug when **Optimize URL** is enabled. |
AI Puffer checks required variables before generation. If a required variable is missing, the task will not run until the prompt is fixed.
### SEO
Use SEO settings when generated posts should include search metadata. AI Puffer can create a meta description, focus keyword, tags, and a cleaner WordPress URL slug. Pro users can also use **Smart SEO** to audit and improve generated posts before each automation queue item is completed.
To generate SEO output:
1. In the right-side **General** card, click **Customize** next to **Prompts**.
2. Enable **Meta Description**, **Focus Keyword**, or **Tags**.
3. Edit the enabled prompts if needed.
4. In the right-side **Schedule** card, click the settings icon next to **Status** to open **Post settings**.
5. Enable **Optimize URL** if AI Puffer should update the post slug.
6. Save and test the task.
| Output | How it is saved |
| -------------------- | --------------------------------------------------------------------------------------------------------- |
| **Meta Description** | Saved to the active SEO plugin. If no supported SEO plugin is active, AI Puffer saves fallback post meta. |
| **Focus Keyword** | Saved to Yoast SEO, Rank Math, or All in One SEO. |
| **Tags** | Saved as WordPress tags or product tags. |
| **URL** | Updates the WordPress post slug when **Optimize URL** is enabled. |
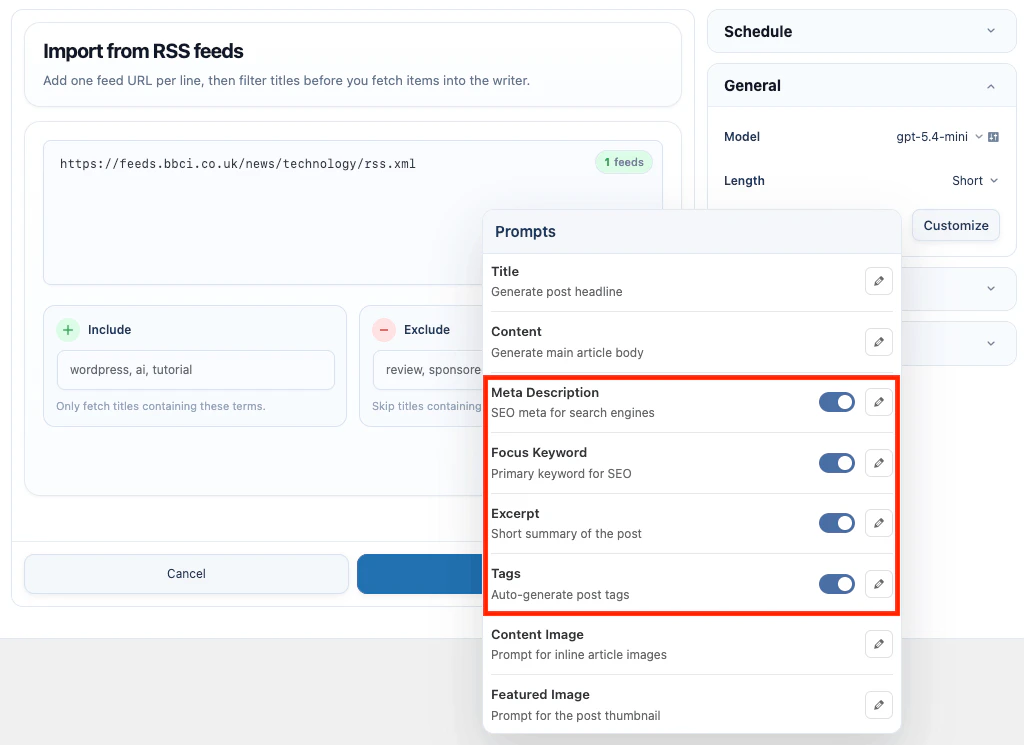 #### Smart SEO
Smart SEO is a Pro feature.
* It works in content-writing automation tasks.
* It supports Manual Entry, CSV, RSS, URL, and Google Sheets tasks.
* It automatically detects the active SEO plugin.
* It checks each generated post against that SEO profile.
* It improves the generated draft before the post is saved.
* For SEO revisions, Smart SEO may use a quality-focused model from the same AI provider selected for generation, never switches providers, and uses the selected deployment or local model for Azure and Ollama.
* It tries to improve the generated draft up to `100/100`.
* It can run up to three SEO revisions.
* If the generated post cannot reach `100/100`, AI Puffer keeps the best-scoring revision.
* In Automations, Smart SEO runs in the background for each queue item.
* There is no live SEO score during task setup because the content does not exist yet.
* After the queue item finishes, AI Puffer saves the final SEO score and Smart SEO details with the generated post.
* Free users can still generate meta descriptions, focus keywords, tags, and optimized slugs.
To use Smart SEO in an automation:
1. Open **AI Puffer > Automations**.
2. Create or edit a content-writing task.
3. Configure the task source, model, prompts, publishing settings, and SEO outputs.
4. Enable **Smart SEO**.
5. Save the task.
#### Smart SEO
Smart SEO is a Pro feature.
* It works in content-writing automation tasks.
* It supports Manual Entry, CSV, RSS, URL, and Google Sheets tasks.
* It automatically detects the active SEO plugin.
* It checks each generated post against that SEO profile.
* It improves the generated draft before the post is saved.
* For SEO revisions, Smart SEO may use a quality-focused model from the same AI provider selected for generation, never switches providers, and uses the selected deployment or local model for Azure and Ollama.
* It tries to improve the generated draft up to `100/100`.
* It can run up to three SEO revisions.
* If the generated post cannot reach `100/100`, AI Puffer keeps the best-scoring revision.
* In Automations, Smart SEO runs in the background for each queue item.
* There is no live SEO score during task setup because the content does not exist yet.
* After the queue item finishes, AI Puffer saves the final SEO score and Smart SEO details with the generated post.
* Free users can still generate meta descriptions, focus keywords, tags, and optimized slugs.
To use Smart SEO in an automation:
1. Open **AI Puffer > Automations**.
2. Create or edit a content-writing task.
3. Configure the task source, model, prompts, publishing settings, and SEO outputs.
4. Enable **Smart SEO**.
5. Save the task.
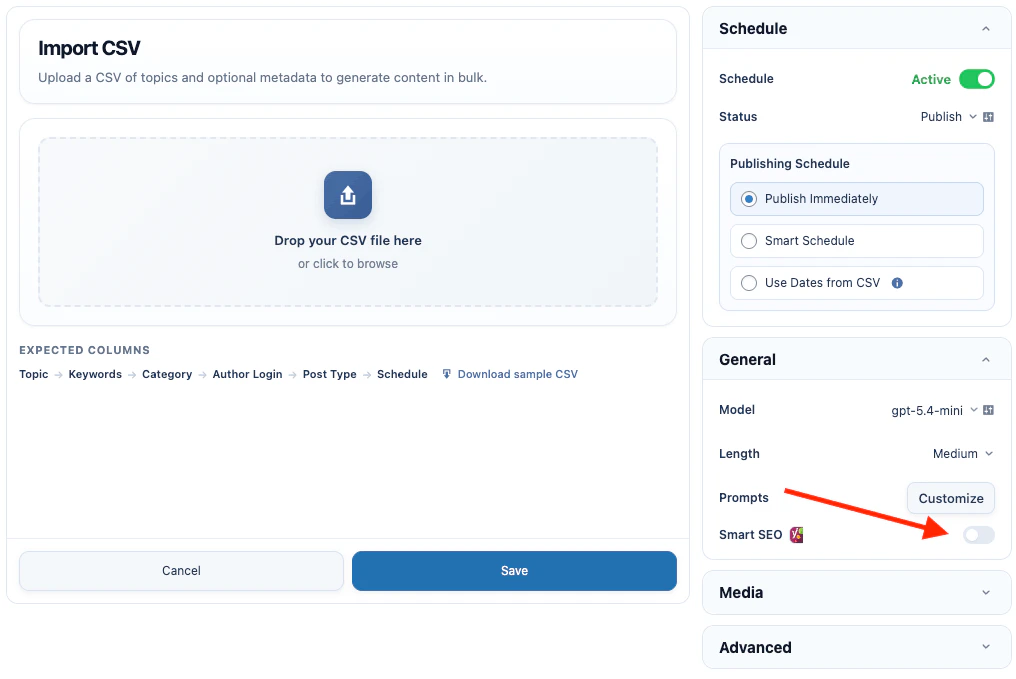 Advanced users can open **Smart SEO rules** from the settings icon next to the Smart SEO toggle. This panel lets you choose a preset or enable and disable individual rules for the active SEO plugin profile before the task is saved.
| Preset | Default | What it does |
| ----------------- | ------- | ---------------------------------------------------------------------------------------------------------------------------------------------------------------------------------------------------------------------------------------------------------------- |
| **Strict score** | No | Enables every listed rule to chase the highest possible SEO plugin score for each queue item. Use it when matching the plugin score is more important than minimizing editorial constraints. |
| **Balanced** | Yes | Keeps the main SEO checks enabled, including Rank Math title-start, table of contents, rich media, and keyword density checks. It still skips optional title gimmicks such as numbers, power words, sentiment wording, and selected image-alt/headline pressure. |
| **Content first** | No | Keeps essential metadata and placement checks while reducing content-length, density, readability, media, and plugin-specific pressure. Use it when natural writing matters more than maximum plugin score. |
After choosing a preset, you can still toggle individual rules. If the selected rules no longer match a preset, the panel shows the selection as custom.
Depending on the active SEO plugin profile, Smart SEO can check:
| Area | Examples |
| --------------------- | --------------------------------------------------------------------------------------------------- |
| **Focus keyword** | Title, introduction, headings, meta description, slug, and duplicate-keyword usage. |
| **Metadata** | Meta description presence and length. |
| **Content structure** | Content length, heading balance, table of contents, paragraph length, and sentence length. |
| **Links** | Internal links, outbound links, and dofollow outbound links when the active SEO plugin scores them. |
| **Media** | Image presence and focus-keyword image alt text. |
| **Readability** | Transition words, repeated sentence openings, passive voice, and reading ease where supported. |
The exact checks depend on the active SEO plugin profile. Some checks are shared across profiles, while others mirror plugin-specific scoring behavior.
| Check | Applies to | What Smart SEO checks |
| --------------------------------- | --------------------------------------- | ------------------------------------------------------------------------------------------------------------------------------------------------------------------- |
| Focus keyword in title | Yoast SEO, Rank Math, All in One SEO | The SEO title should include the focus keyword. Yoast prefers the exact keyphrase at the beginning, while Rank Math and AIOSEO add their own title-position checks. |
| Focus keyword in URL slug | Yoast SEO, Rank Math, All in One SEO | The optimized slug should include the focus keyword when **Optimize URL** is enabled or a slug is available. |
| Paragraph length | Yoast SEO, Rank Math, All in One SEO | Long paragraphs should be split so the article is easier to scan. |
| Meta description exists | Yoast SEO, Rank Math, The SEO Framework | A meta description should be present. AIOSEO uses its own profile-specific meta description check. |
| Content length | Yoast SEO, Rank Math | Yoast uses the selected minimum word count. Rank Math uses its own scoring ladder and gives full content-length credit at `2500+` words. |
| Focus keyword in introduction | Yoast SEO, Rank Math | Yoast checks the first paragraph. Rank Math checks the first 10% of the content. |
| Focus keyword in meta description | Yoast SEO, Rank Math | The meta description should include the focus keyword. |
| Focus keyword in heading | Yoast SEO, Rank Math | Yoast checks H2/H3 balance. Rank Math accepts H2-H6 and needs at least one matching heading. |
| Internal link | Yoast SEO, Rank Math | The article should include a verified internal link. Rank Math requires a link to another published post or page. |
| External link | Yoast SEO, Rank Math | The article should include a safe outbound link when the profile scores outbound links. |
| Image alt keyphrase | Yoast SEO, Rank Math | At least one image alt text should contain the focus keyphrase or enough keyphrase words. |
| Previously used keyphrase | Yoast SEO, Rank Math | The focus keyphrase should not already be used by another post. |
| Keyword density | Yoast SEO, Rank Math | Exact focus-keyphrase usage should stay in the plugin's target range without stuffing. |
| Check | What Smart SEO checks |
| ---------------------------------- | ---------------------------------------------------------------------------------------- |
| SEO title width | Title should be in a strong display range, roughly 35-65 characters. |
| Focus keyphrase length | Focus keyphrase should usually be 1-4 words. |
| Meta description length | Strong range is 120-156 characters. Longer descriptions are reduced. |
| Focus keyphrase in first paragraph | The first introduction paragraph should include the focus keyphrase when natural. |
| Focus keyphrase in subheadings | Enough H2/H3 subheadings should include the keyphrase, but over-optimization is avoided. |
| Heading distribution | Longer articles should use H2/H3 headings to break up sections. |
| Image exists | The draft should include at least one image. |
| Single H1 | The article body should not contain multiple H1 headings. |
| Competing links | Link anchor text should not be the exact focus keyphrase. |
| Consecutive sentence starts | Avoid three or more consecutive sentences starting with the same word. |
| Transition words | At least about 30% of eligible sentences should use transition words. |
| Sentence length | Long sentences over 20 words should stay within Yoast's readability threshold. |
| Passive voice | Passive voice should generally stay at or below 10% of sentences. |
| Check | What Smart SEO checks |
| -------------------------------- | ---------------------------------------------------------------------------------------------------------------------------------- |
| Content length | Full content-length credit is `2500+` words. Rank Math gives partial credit at lower ranges and fails very short content. |
| Focus keyword at title beginning | The SEO title should start with the exact focus keyword. |
| Number in title | The SEO title should include a relevant number. |
| Power word in title | The SEO title should include a natural power word such as "best", "complete", "easy", "powerful", or "ultimate". |
| Sentiment in title | The SEO title should include natural positive or negative sentiment wording. |
| Permalink length | The full permalink should be 75 characters or fewer. |
| Table of contents | A Rank Math-compatible table of contents should be present, or a ToC plugin should be detected. |
| Keyword density | Exact focus-keyphrase usage should stay in Rank Math's target range. Low density is improved and overuse is reduced. |
| Images or videos | Rank Math gives media credit for images or videos. Smart SEO preserves media and alt text but does not invent image or video URLs. |
| Check | What Smart SEO checks |
| ---------------------------------- | ------------------------------------------------------------------------------------ |
| Focus keyword in content | The content should contain the focus keyword. |
| Focus keyword in introduction | The first paragraph should contain the focus keyword when natural. |
| Focus keyword in meta description | The meta description should contain the focus keyword. |
| Focus keyword in image alt | Existing image alt text should contain the exact focus keyword. |
| Focus keyword in subheadings | The exact focus keyword should appear in about 30%-75% of H2/H3 subheadings. |
| Focus keyword length | 1-4 words passes; longer keyphrases may warn or fail. |
| Meta description length | The target range is roughly 121-160 characters. Empty descriptions fail. |
| Content length | More than 300 words passes. Shorter content may warn or fail. |
| Internal links | The content should link to another resource on the same site. |
| External links | The content should link to a relevant external resource. |
| Focus keyword near title beginning | The focus keyword should appear near the beginning of the SEO title. |
| SEO title length | The title should generally be 41-60 characters after AIOSEO-style title scoring. |
| Headline score | If AIOSEO's headline analyzer is available, Smart SEO aims for a 70+ headline score. |
| Images or videos | The content should include rich media when AIOSEO scores it. |
| Sentence length | Too many sentences over 20 words can reduce the readability score. |
| Passive voice | Passive voice should generally stay at or below 10% of sentences. |
| Transition words | At least about 30% of eligible sentences should use transition words. |
| Consecutive sentences | Avoid four or more consecutive sentences starting with the same word. |
| Subheading distribution | Long sections should be separated by subheadings. |
| Flesch reading ease | Copy should be easy to read, with a target score of about 63 or higher. |
| Check | What Smart SEO checks |
| -------------------------- | ---------------------------------------------------------------------------------------------------------------------------------------------------------------- |
| Meta description exists | A meta description should be present. |
| Meta description length | The strongest range is roughly 80-160 characters. |
| SEO title length and width | Smart SEO estimates the title shown by The SEO Framework, including the site title unless that setting removes it, and keeps it within the target display range. |
| Focus keyword behavior | The SEO Framework does not provide a native focus keyword field, so Smart SEO does not apply focus-keyword placement rules for this profile. |
Smart SEO follows the active SEO plugin profile automatically. If more than one supported SEO plugin is active, AI Puffer chooses one profile and shows a warning in Content Writer. For predictable scores, use one SEO plugin at a time.
Some SEO plugin checks are owned by the SEO plugin itself and cannot always be fixed by AI Puffer. For example, plugin-specific premium AI checks or settings-based checks may still appear in the SEO plugin after generation.
#### Yoast SEO
AI Puffer saves the generated meta description to the Yoast meta description field and the generated focus keyword to the Yoast focus keyphrase field.
If **Optimize URL** is enabled, the slug is built from the focus keyphrase when available. If there is no focus keyphrase, the post title is used.
Smart SEO's Yoast profile is tuned for Yoast SEO analysis and readability checks, including keyphrase placement, meta description length, links, image alt text, and readability signals.
#### Rank Math
AI Puffer saves the generated meta description to the Rank Math description field and the generated focus keyword to the Rank Math focus keyword field.
Smart SEO's Rank Math profile is tuned for Rank Math's Basic SEO, Additional SEO, Title Readability, and Content Readability checks.
#### All in One SEO
AI Puffer saves the generated meta description to All in One SEO and updates the focus keyphrase data used by AIOSEO.
Smart SEO's All in One SEO profile is tuned for TruSEO checks, focus keyphrase analysis, readability checks, and headline score improvements.
#### The SEO Framework
AI Puffer saves the generated meta description to The SEO Framework description field.
The SEO Framework does not provide a native focus keyword field, so AI Puffer does not save a focus keyword for it.
Smart SEO's The SEO Framework profile focuses on title and description behavior because The SEO Framework does not provide a native focus keyword field.
If none of the supported SEO plugins are active, AI Puffer still saves the meta description as fallback post meta. WordPress tags and the optimized URL slug still work without an SEO plugin.
### Publishing
Publishing settings control the WordPress post created by a content creation task.
To set the post target:
1. In the right-side **Schedule** card, select the post **Status**.
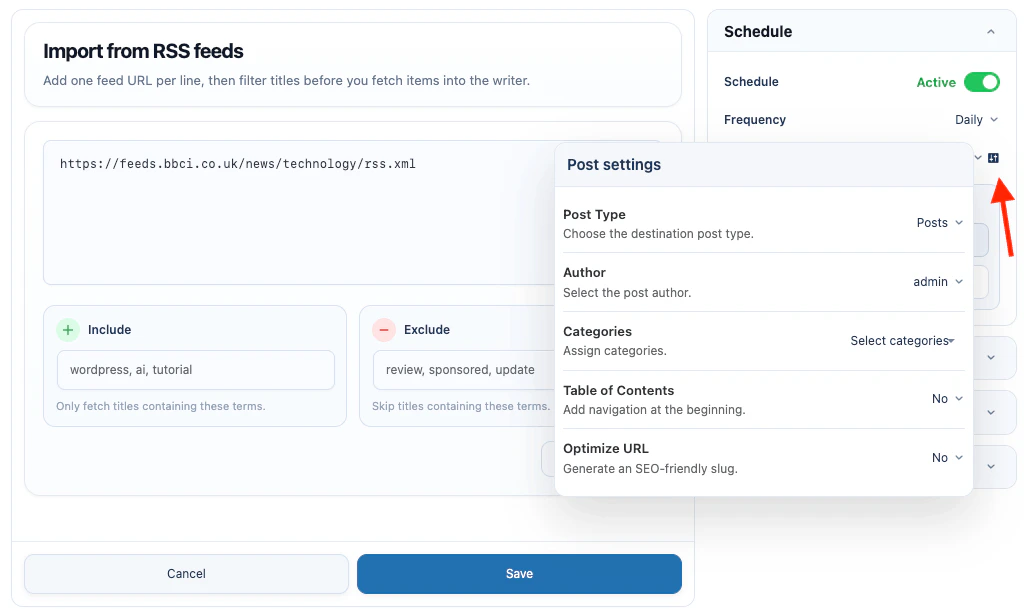
2. Click the settings icon next to **Status** to open **Post settings**.
3. Select the **Post Type**.
4. Select the **Author**.
5. Select categories if the post type supports categories.
6. Enable **Table of Contents** if needed.
7. Enable **Optimize URL** if AI Puffer should generate a cleaner slug.
| Setting | What it does |
| --------------------- | ---------------------------------------------------------------- |
| **Status** | Draft, Publish, Pending Review, or Private. |
| **Post Type** | Public WordPress post type. |
| **Author** | WordPress author. |
| **Categories** | Categories assigned to the post when supported by the post type. |
| **Table of Contents** | Adds a generated table of contents to the top of the post. |
| **Optimize URL** | Updates the WordPress slug after the post is saved. |
Advanced users can open **Smart SEO rules** from the settings icon next to the Smart SEO toggle. This panel lets you choose a preset or enable and disable individual rules for the active SEO plugin profile before the task is saved.
| Preset | Default | What it does |
| ----------------- | ------- | ---------------------------------------------------------------------------------------------------------------------------------------------------------------------------------------------------------------------------------------------------------------- |
| **Strict score** | No | Enables every listed rule to chase the highest possible SEO plugin score for each queue item. Use it when matching the plugin score is more important than minimizing editorial constraints. |
| **Balanced** | Yes | Keeps the main SEO checks enabled, including Rank Math title-start, table of contents, rich media, and keyword density checks. It still skips optional title gimmicks such as numbers, power words, sentiment wording, and selected image-alt/headline pressure. |
| **Content first** | No | Keeps essential metadata and placement checks while reducing content-length, density, readability, media, and plugin-specific pressure. Use it when natural writing matters more than maximum plugin score. |
After choosing a preset, you can still toggle individual rules. If the selected rules no longer match a preset, the panel shows the selection as custom.
Depending on the active SEO plugin profile, Smart SEO can check:
| Area | Examples |
| --------------------- | --------------------------------------------------------------------------------------------------- |
| **Focus keyword** | Title, introduction, headings, meta description, slug, and duplicate-keyword usage. |
| **Metadata** | Meta description presence and length. |
| **Content structure** | Content length, heading balance, table of contents, paragraph length, and sentence length. |
| **Links** | Internal links, outbound links, and dofollow outbound links when the active SEO plugin scores them. |
| **Media** | Image presence and focus-keyword image alt text. |
| **Readability** | Transition words, repeated sentence openings, passive voice, and reading ease where supported. |
The exact checks depend on the active SEO plugin profile. Some checks are shared across profiles, while others mirror plugin-specific scoring behavior.
| Check | Applies to | What Smart SEO checks |
| --------------------------------- | --------------------------------------- | ------------------------------------------------------------------------------------------------------------------------------------------------------------------- |
| Focus keyword in title | Yoast SEO, Rank Math, All in One SEO | The SEO title should include the focus keyword. Yoast prefers the exact keyphrase at the beginning, while Rank Math and AIOSEO add their own title-position checks. |
| Focus keyword in URL slug | Yoast SEO, Rank Math, All in One SEO | The optimized slug should include the focus keyword when **Optimize URL** is enabled or a slug is available. |
| Paragraph length | Yoast SEO, Rank Math, All in One SEO | Long paragraphs should be split so the article is easier to scan. |
| Meta description exists | Yoast SEO, Rank Math, The SEO Framework | A meta description should be present. AIOSEO uses its own profile-specific meta description check. |
| Content length | Yoast SEO, Rank Math | Yoast uses the selected minimum word count. Rank Math uses its own scoring ladder and gives full content-length credit at `2500+` words. |
| Focus keyword in introduction | Yoast SEO, Rank Math | Yoast checks the first paragraph. Rank Math checks the first 10% of the content. |
| Focus keyword in meta description | Yoast SEO, Rank Math | The meta description should include the focus keyword. |
| Focus keyword in heading | Yoast SEO, Rank Math | Yoast checks H2/H3 balance. Rank Math accepts H2-H6 and needs at least one matching heading. |
| Internal link | Yoast SEO, Rank Math | The article should include a verified internal link. Rank Math requires a link to another published post or page. |
| External link | Yoast SEO, Rank Math | The article should include a safe outbound link when the profile scores outbound links. |
| Image alt keyphrase | Yoast SEO, Rank Math | At least one image alt text should contain the focus keyphrase or enough keyphrase words. |
| Previously used keyphrase | Yoast SEO, Rank Math | The focus keyphrase should not already be used by another post. |
| Keyword density | Yoast SEO, Rank Math | Exact focus-keyphrase usage should stay in the plugin's target range without stuffing. |
| Check | What Smart SEO checks |
| ---------------------------------- | ---------------------------------------------------------------------------------------- |
| SEO title width | Title should be in a strong display range, roughly 35-65 characters. |
| Focus keyphrase length | Focus keyphrase should usually be 1-4 words. |
| Meta description length | Strong range is 120-156 characters. Longer descriptions are reduced. |
| Focus keyphrase in first paragraph | The first introduction paragraph should include the focus keyphrase when natural. |
| Focus keyphrase in subheadings | Enough H2/H3 subheadings should include the keyphrase, but over-optimization is avoided. |
| Heading distribution | Longer articles should use H2/H3 headings to break up sections. |
| Image exists | The draft should include at least one image. |
| Single H1 | The article body should not contain multiple H1 headings. |
| Competing links | Link anchor text should not be the exact focus keyphrase. |
| Consecutive sentence starts | Avoid three or more consecutive sentences starting with the same word. |
| Transition words | At least about 30% of eligible sentences should use transition words. |
| Sentence length | Long sentences over 20 words should stay within Yoast's readability threshold. |
| Passive voice | Passive voice should generally stay at or below 10% of sentences. |
| Check | What Smart SEO checks |
| -------------------------------- | ---------------------------------------------------------------------------------------------------------------------------------- |
| Content length | Full content-length credit is `2500+` words. Rank Math gives partial credit at lower ranges and fails very short content. |
| Focus keyword at title beginning | The SEO title should start with the exact focus keyword. |
| Number in title | The SEO title should include a relevant number. |
| Power word in title | The SEO title should include a natural power word such as "best", "complete", "easy", "powerful", or "ultimate". |
| Sentiment in title | The SEO title should include natural positive or negative sentiment wording. |
| Permalink length | The full permalink should be 75 characters or fewer. |
| Table of contents | A Rank Math-compatible table of contents should be present, or a ToC plugin should be detected. |
| Keyword density | Exact focus-keyphrase usage should stay in Rank Math's target range. Low density is improved and overuse is reduced. |
| Images or videos | Rank Math gives media credit for images or videos. Smart SEO preserves media and alt text but does not invent image or video URLs. |
| Check | What Smart SEO checks |
| ---------------------------------- | ------------------------------------------------------------------------------------ |
| Focus keyword in content | The content should contain the focus keyword. |
| Focus keyword in introduction | The first paragraph should contain the focus keyword when natural. |
| Focus keyword in meta description | The meta description should contain the focus keyword. |
| Focus keyword in image alt | Existing image alt text should contain the exact focus keyword. |
| Focus keyword in subheadings | The exact focus keyword should appear in about 30%-75% of H2/H3 subheadings. |
| Focus keyword length | 1-4 words passes; longer keyphrases may warn or fail. |
| Meta description length | The target range is roughly 121-160 characters. Empty descriptions fail. |
| Content length | More than 300 words passes. Shorter content may warn or fail. |
| Internal links | The content should link to another resource on the same site. |
| External links | The content should link to a relevant external resource. |
| Focus keyword near title beginning | The focus keyword should appear near the beginning of the SEO title. |
| SEO title length | The title should generally be 41-60 characters after AIOSEO-style title scoring. |
| Headline score | If AIOSEO's headline analyzer is available, Smart SEO aims for a 70+ headline score. |
| Images or videos | The content should include rich media when AIOSEO scores it. |
| Sentence length | Too many sentences over 20 words can reduce the readability score. |
| Passive voice | Passive voice should generally stay at or below 10% of sentences. |
| Transition words | At least about 30% of eligible sentences should use transition words. |
| Consecutive sentences | Avoid four or more consecutive sentences starting with the same word. |
| Subheading distribution | Long sections should be separated by subheadings. |
| Flesch reading ease | Copy should be easy to read, with a target score of about 63 or higher. |
| Check | What Smart SEO checks |
| -------------------------- | ---------------------------------------------------------------------------------------------------------------------------------------------------------------- |
| Meta description exists | A meta description should be present. |
| Meta description length | The strongest range is roughly 80-160 characters. |
| SEO title length and width | Smart SEO estimates the title shown by The SEO Framework, including the site title unless that setting removes it, and keeps it within the target display range. |
| Focus keyword behavior | The SEO Framework does not provide a native focus keyword field, so Smart SEO does not apply focus-keyword placement rules for this profile. |
Smart SEO follows the active SEO plugin profile automatically. If more than one supported SEO plugin is active, AI Puffer chooses one profile and shows a warning in Content Writer. For predictable scores, use one SEO plugin at a time.
Some SEO plugin checks are owned by the SEO plugin itself and cannot always be fixed by AI Puffer. For example, plugin-specific premium AI checks or settings-based checks may still appear in the SEO plugin after generation.
#### Yoast SEO
AI Puffer saves the generated meta description to the Yoast meta description field and the generated focus keyword to the Yoast focus keyphrase field.
If **Optimize URL** is enabled, the slug is built from the focus keyphrase when available. If there is no focus keyphrase, the post title is used.
Smart SEO's Yoast profile is tuned for Yoast SEO analysis and readability checks, including keyphrase placement, meta description length, links, image alt text, and readability signals.
#### Rank Math
AI Puffer saves the generated meta description to the Rank Math description field and the generated focus keyword to the Rank Math focus keyword field.
Smart SEO's Rank Math profile is tuned for Rank Math's Basic SEO, Additional SEO, Title Readability, and Content Readability checks.
#### All in One SEO
AI Puffer saves the generated meta description to All in One SEO and updates the focus keyphrase data used by AIOSEO.
Smart SEO's All in One SEO profile is tuned for TruSEO checks, focus keyphrase analysis, readability checks, and headline score improvements.
#### The SEO Framework
AI Puffer saves the generated meta description to The SEO Framework description field.
The SEO Framework does not provide a native focus keyword field, so AI Puffer does not save a focus keyword for it.
Smart SEO's The SEO Framework profile focuses on title and description behavior because The SEO Framework does not provide a native focus keyword field.
If none of the supported SEO plugins are active, AI Puffer still saves the meta description as fallback post meta. WordPress tags and the optimized URL slug still work without an SEO plugin.
### Publishing
Publishing settings control the WordPress post created by a content creation task.
To set the post target:
1. In the right-side **Schedule** card, select the post **Status**.
2. Click the settings icon next to **Status** to open **Post settings**.
3. Select the **Post Type**.
4. Select the **Author**.
5. Select categories if the post type supports categories.
6. Enable **Table of Contents** if needed.
7. Enable **Optimize URL** if AI Puffer should generate a cleaner slug.
| Setting | What it does |
| --------------------- | ---------------------------------------------------------------- |
| **Status** | Draft, Publish, Pending Review, or Private. |
| **Post Type** | Public WordPress post type. |
| **Author** | WordPress author. |
| **Categories** | Categories assigned to the post when supported by the post type. |
| **Table of Contents** | Adds a generated table of contents to the top of the post. |
| **Optimize URL** | Updates the WordPress slug after the post is saved. |
 #### Schedule
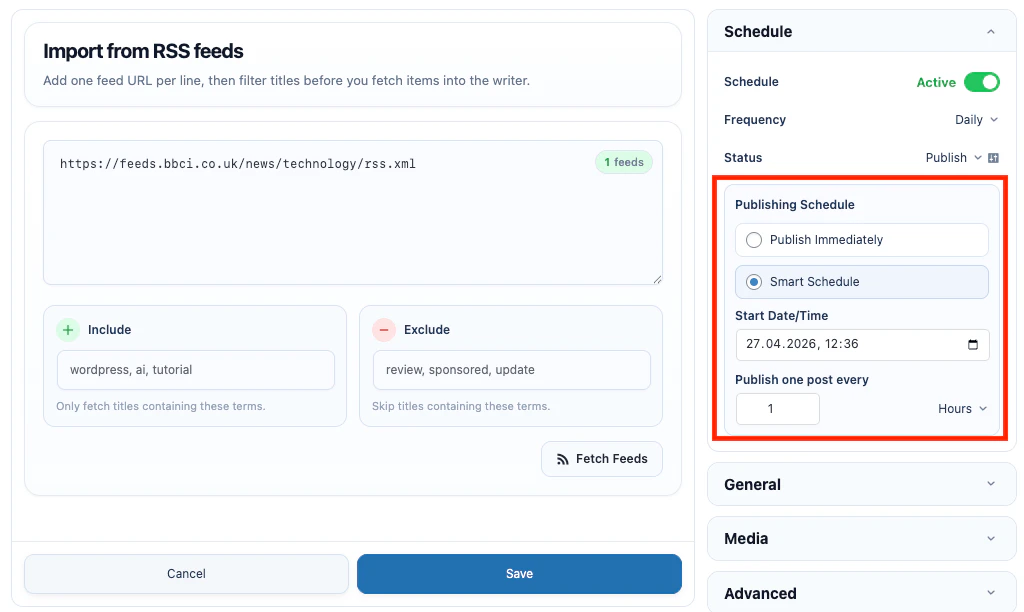
Content creation tasks have a task schedule and a post publishing schedule. The task schedule controls when AI Puffer checks the source and queues work. The post publishing schedule controls the date used for the generated WordPress post.
| Publishing mode | What it does |
| ------------------------ | ------------------------------------------------------------------------------------ |
| **Publish Immediately** | Creates the post with the selected post status. |
| **Smart Schedule** | Schedules generated posts starting from a selected date and spaced by hours or days. |
| **Use Dates from Input** | Reads the date from Batch Editor, Quick Paste, CSV, or Google Sheets. |
#### Schedule
Content creation tasks have a task schedule and a post publishing schedule. The task schedule controls when AI Puffer checks the source and queues work. The post publishing schedule controls the date used for the generated WordPress post.
| Publishing mode | What it does |
| ------------------------ | ------------------------------------------------------------------------------------ |
| **Publish Immediately** | Creates the post with the selected post status. |
| **Smart Schedule** | Schedules generated posts starting from a selected date and spaced by hours or days. |
| **Use Dates from Input** | Reads the date from Batch Editor, Quick Paste, CSV, or Google Sheets. |
 Supported input date examples:
```text theme={null}
2026-05-01 09:00
2026-05-01 09:00:30
2026/05/01 09:00
05/01/2026 09:00
01/05/2026 09:00
2026-05-01T09:00:00Z
2026-05-01T09:00:00+02:00
```
Dates without a timezone are interpreted using the WordPress site timezone.
### Images
Image settings can add images inside generated content, set a featured image, or both.
To enable images:
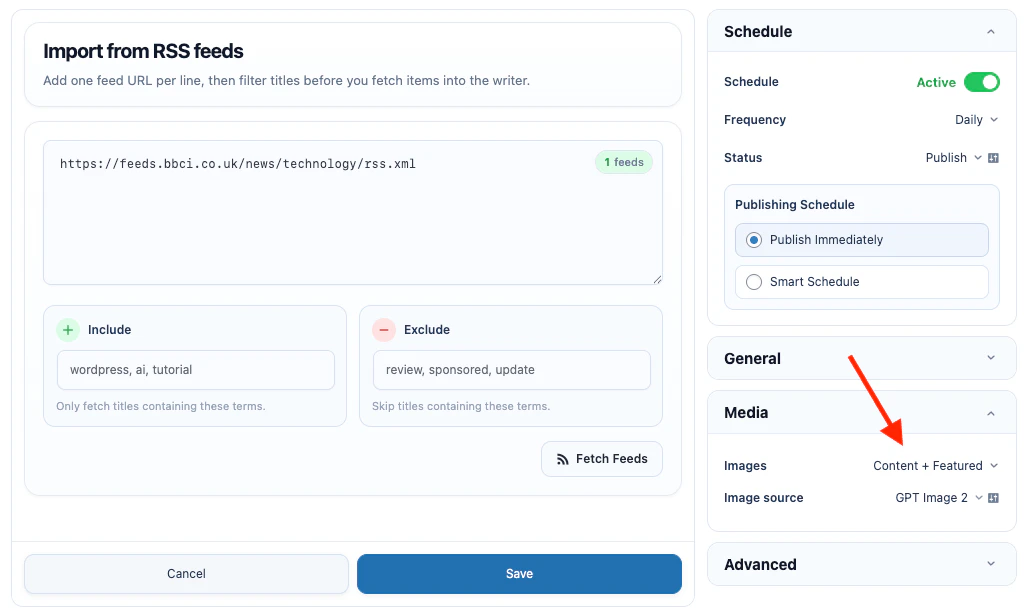
1. In the right-side **Media** card, set **Images** to **Content**, **Featured**, or **Content + Featured**.
2. Select the image provider or model from **Image source**.
3. Click the settings icon beside **Image source** to open **Image settings**.
4. Set count, placement, WordPress display size, alignment, and provider options.
5. To change image prompts, in the right-side **General** card, click **Customize** next to **Prompts** and edit **Content Image** or **Featured Image**.
| Mode | Result |
| ---------------------- | ---------------------------------------------- |
| **Off** | No images are generated or fetched. |
| **Content** | Adds images inside the post content. |
| **Featured** | Sets a featured image. |
| **Content + Featured** | Adds content images and sets a featured image. |
Supported input date examples:
```text theme={null}
2026-05-01 09:00
2026-05-01 09:00:30
2026/05/01 09:00
05/01/2026 09:00
01/05/2026 09:00
2026-05-01T09:00:00Z
2026-05-01T09:00:00+02:00
```
Dates without a timezone are interpreted using the WordPress site timezone.
### Images
Image settings can add images inside generated content, set a featured image, or both.
To enable images:
1. In the right-side **Media** card, set **Images** to **Content**, **Featured**, or **Content + Featured**.
2. Select the image provider or model from **Image source**.
3. Click the settings icon beside **Image source** to open **Image settings**.
4. Set count, placement, WordPress display size, alignment, and provider options.
5. To change image prompts, in the right-side **General** card, click **Customize** next to **Prompts** and edit **Content Image** or **Featured Image**.
| Mode | Result |
| ---------------------- | ---------------------------------------------- |
| **Off** | No images are generated or fetched. |
| **Content** | Adds images inside the post content. |
| **Featured** | Sets a featured image. |
| **Content + Featured** | Adds content images and sets a featured image. |
 Supported image sources:
| Source | Setup |
| -------------- | ---------------------------------------------------------------------------------------------------- |
| **OpenAI** | Add the OpenAI API key in **AI Puffer > Settings > AI** and sync image models. |
| **Google** | Add the Google API key in **AI Puffer > Settings > AI** and sync image models. |
| **OpenRouter** | Add the OpenRouter API key in **AI Puffer > Settings > AI** and sync image-capable models. |
| **Azure** | Add the Azure endpoint, API key, API version, and image deployment in **AI Puffer > Settings > AI**. |
| **xAI** | Add the xAI API key in **AI Puffer > Settings > AI** and sync image models. |
| **Replicate** | Add the Replicate API key in **AI Puffer > Settings > Integrations** and sync models. |
| **Pexels** | Add the Pexels API key in **AI Puffer > Settings > Integrations**. |
| **Pixabay** | Add the Pixabay API key in **AI Puffer > Settings > Integrations**. |
xAI image generation uses xAI image models such as `grok-imagine-image`.
For content images, placement controls where images appear after the post is saved.
| Placement | Result |
| ---------------------- | ---------------------------------------------------------- |
| **After 1st H2** | Inserts the first image after the first H2 heading. |
| **After 1st H3** | Inserts the first image after the first H3 heading. |
| **Every X H2s** | Inserts images after every selected number of H2 headings. |
| **Every X H3s** | Inserts images after every selected number of H3 headings. |
| **Every X paragraphs** | Inserts images after every selected number of paragraphs. |
| **End of content** | Adds images at the end of the article. |
Supported image sources:
| Source | Setup |
| -------------- | ---------------------------------------------------------------------------------------------------- |
| **OpenAI** | Add the OpenAI API key in **AI Puffer > Settings > AI** and sync image models. |
| **Google** | Add the Google API key in **AI Puffer > Settings > AI** and sync image models. |
| **OpenRouter** | Add the OpenRouter API key in **AI Puffer > Settings > AI** and sync image-capable models. |
| **Azure** | Add the Azure endpoint, API key, API version, and image deployment in **AI Puffer > Settings > AI**. |
| **xAI** | Add the xAI API key in **AI Puffer > Settings > AI** and sync image models. |
| **Replicate** | Add the Replicate API key in **AI Puffer > Settings > Integrations** and sync models. |
| **Pexels** | Add the Pexels API key in **AI Puffer > Settings > Integrations**. |
| **Pixabay** | Add the Pixabay API key in **AI Puffer > Settings > Integrations**. |
xAI image generation uses xAI image models such as `grok-imagine-image`.
For content images, placement controls where images appear after the post is saved.
| Placement | Result |
| ---------------------- | ---------------------------------------------------------- |
| **After 1st H2** | Inserts the first image after the first H2 heading. |
| **After 1st H3** | Inserts the first image after the first H3 heading. |
| **Every X H2s** | Inserts images after every selected number of H2 headings. |
| **Every X H3s** | Inserts images after every selected number of H3 headings. |
| **Every X paragraphs** | Inserts images after every selected number of paragraphs. |
| **End of content** | Adds images at the end of the article. |
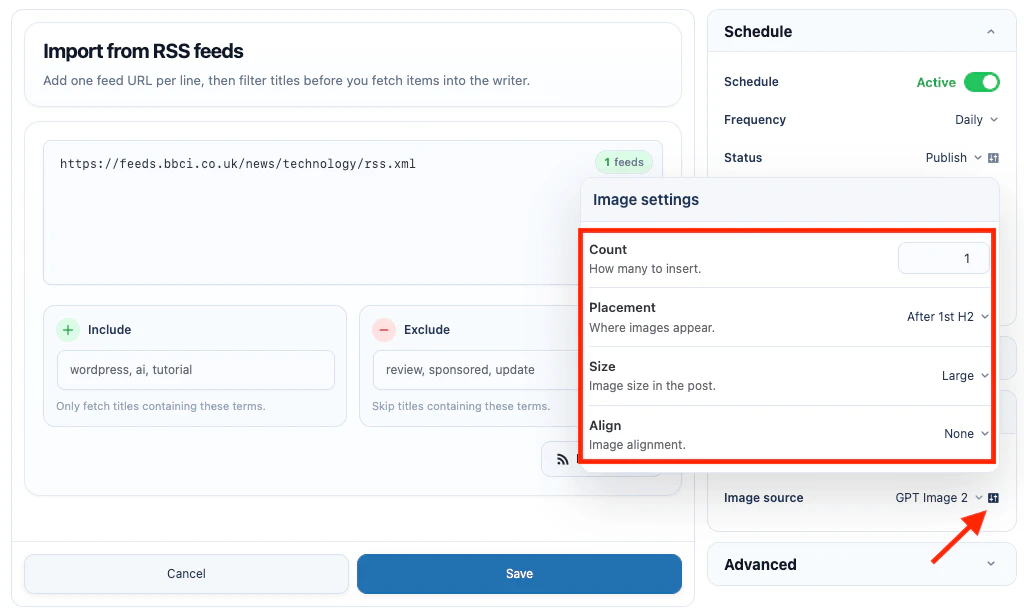 Pexels can filter by orientation, size, and color. Pixabay can filter by orientation, type, and category.
#### OpenAI
OpenAI uses your OpenAI API key and one of the image models available in your synced model list.
To set it up:
1. Go to **AI Puffer > Settings > AI**.
2. Select **OpenAI**.
3. Add your OpenAI API key.
4. Sync models.
5. In the right-side **Media** card, set **Images** to **Content**, **Featured**, or **Content + Featured**.
6. Select an OpenAI image model from **Image source**.
#### Google
Google uses your Google API key and the Google image models available in your synced model list.
To set it up:
1. Go to **AI Puffer > Settings > AI**.
2. Select **Google**.
3. Add your Google API key.
4. Sync models.
5. In the right-side **Media** card, set **Images** to **Content**, **Featured**, or **Content + Featured**.
6. Select a Google image model from **Image source**.
#### OpenRouter
OpenRouter uses image-capable models from your OpenRouter account.
To set it up:
1. Go to **AI Puffer > Settings > AI**.
2. Select **OpenRouter**.
3. Add your OpenRouter API key.
4. Sync models.
5. In the right-side **Media** card, set **Images** to **Content**, **Featured**, or **Content + Featured**.
6. Select an OpenRouter image model from **Image source**.
If a selected OpenRouter model does not return images, choose another image-capable model from the synced list.
#### Azure
Azure uses your Azure OpenAI endpoint, API key, API version, and image deployment.
To set it up:
1. Go to **AI Puffer > Settings > AI**.
2. Select **Azure**.
3. Add the Azure endpoint and API key.
4. Add or sync the image deployment you want to use.
5. In the right-side **Media** card, set **Images** to **Content**, **Featured**, or **Content + Featured**.
6. Select the Azure image deployment from **Image source**.
#### xAI
xAI uses your xAI API key and synced xAI image models.
To set it up:
1. Go to **AI Puffer > Settings > AI**.
2. Select **xAI**.
3. Add your xAI API key.
4. Sync models.
5. In the right-side **Media** card, set **Images** to **Content**, **Featured**, or **Content + Featured**.
6. Select an xAI image model from **Image source**.
#### Replicate
Replicate uses your Replicate API key and synced text-to-image models.
To set it up:
1. Go to **AI Puffer > Settings > Integrations**.
2. Select **Replicate**.
3. Add your Replicate API key.
4. Sync Replicate models.
5. In the right-side **Media** card, set **Images** to **Content**, **Featured**, or **Content + Featured**.
6. Select a Replicate model from **Image source**.
#### Pexels
Pexels searches stock photos instead of generating a new image.
To set it up:
1. Go to **AI Puffer > Settings > Integrations**.
2. Select **Pexels**.
3. Add your Pexels API key, or use the **Get Key** link to create one.
4. In the right-side **Media** card, set **Images** to **Content**, **Featured**, or **Content + Featured**.
5. Select **Pexels** from **Image source**.
6. Click the settings icon beside **Image source** to open **Image settings**.
7. Set **Orientation**, **Size**, and **Color** if you want to filter results.
#### Pixabay
Pixabay searches stock photos, illustrations, or vectors.
To set it up:
1. Go to **AI Puffer > Settings > Integrations**.
2. Select **Pixabay**.
3. Add your Pixabay API key, or use the **Get Key** link to create one.
4. In the right-side **Media** card, set **Images** to **Content**, **Featured**, or **Content + Featured**.
5. Select **Pixabay** from **Image source**.
6. Click the settings icon beside **Image source** to open **Image settings**.
7. Set **Orientation**, **Type**, and **Category** if you want to narrow results.
#### Provider Options
Provider options control the generation request sent to the selected AI provider. They are separate from WordPress display settings such as image size and alignment.
Only options supported by the selected provider and model are shown.
| Provider | Available options |
| -------------- | -------------------------------------------------------------------------------------------------------------------------------------------------- |
| **OpenAI** | Canvas size, quality, output format, compression, background, moderation. |
| **Azure** | Canvas size, quality, output format, compression, background. |
| **Google** | Aspect ratio, image resolution, and person generation for supported Imagen models. Nano Banana models are included in the Google image model list. |
| **OpenRouter** | Aspect ratio and image resolution for models that support image configuration. |
| **xAI** | Aspect ratio and image resolution. |
| **Replicate** | Model-specific options from synced model schemas. |
Pexels and Pixabay are stock image sources. Their filters narrow search results instead of changing an AI generation request.
#### Image Prompts
For AI image providers, the image prompt controls content images and the featured image prompt controls the featured image. To edit them, in the right-side **General** card, click **Customize** next to **Prompts** and open **Content Image** or **Featured Image**.
You can use these placeholders:
| Placeholder | Replaced with |
| -------------- | --------------------- |
| `{topic}` | Generated title. |
| `{keywords}` | Generated keywords. |
| `{post_title}` | WordPress post title. |
| `{excerpt}` | Generated excerpt. |
Pexels can filter by orientation, size, and color. Pixabay can filter by orientation, type, and category.
#### OpenAI
OpenAI uses your OpenAI API key and one of the image models available in your synced model list.
To set it up:
1. Go to **AI Puffer > Settings > AI**.
2. Select **OpenAI**.
3. Add your OpenAI API key.
4. Sync models.
5. In the right-side **Media** card, set **Images** to **Content**, **Featured**, or **Content + Featured**.
6. Select an OpenAI image model from **Image source**.
#### Google
Google uses your Google API key and the Google image models available in your synced model list.
To set it up:
1. Go to **AI Puffer > Settings > AI**.
2. Select **Google**.
3. Add your Google API key.
4. Sync models.
5. In the right-side **Media** card, set **Images** to **Content**, **Featured**, or **Content + Featured**.
6. Select a Google image model from **Image source**.
#### OpenRouter
OpenRouter uses image-capable models from your OpenRouter account.
To set it up:
1. Go to **AI Puffer > Settings > AI**.
2. Select **OpenRouter**.
3. Add your OpenRouter API key.
4. Sync models.
5. In the right-side **Media** card, set **Images** to **Content**, **Featured**, or **Content + Featured**.
6. Select an OpenRouter image model from **Image source**.
If a selected OpenRouter model does not return images, choose another image-capable model from the synced list.
#### Azure
Azure uses your Azure OpenAI endpoint, API key, API version, and image deployment.
To set it up:
1. Go to **AI Puffer > Settings > AI**.
2. Select **Azure**.
3. Add the Azure endpoint and API key.
4. Add or sync the image deployment you want to use.
5. In the right-side **Media** card, set **Images** to **Content**, **Featured**, or **Content + Featured**.
6. Select the Azure image deployment from **Image source**.
#### xAI
xAI uses your xAI API key and synced xAI image models.
To set it up:
1. Go to **AI Puffer > Settings > AI**.
2. Select **xAI**.
3. Add your xAI API key.
4. Sync models.
5. In the right-side **Media** card, set **Images** to **Content**, **Featured**, or **Content + Featured**.
6. Select an xAI image model from **Image source**.
#### Replicate
Replicate uses your Replicate API key and synced text-to-image models.
To set it up:
1. Go to **AI Puffer > Settings > Integrations**.
2. Select **Replicate**.
3. Add your Replicate API key.
4. Sync Replicate models.
5. In the right-side **Media** card, set **Images** to **Content**, **Featured**, or **Content + Featured**.
6. Select a Replicate model from **Image source**.
#### Pexels
Pexels searches stock photos instead of generating a new image.
To set it up:
1. Go to **AI Puffer > Settings > Integrations**.
2. Select **Pexels**.
3. Add your Pexels API key, or use the **Get Key** link to create one.
4. In the right-side **Media** card, set **Images** to **Content**, **Featured**, or **Content + Featured**.
5. Select **Pexels** from **Image source**.
6. Click the settings icon beside **Image source** to open **Image settings**.
7. Set **Orientation**, **Size**, and **Color** if you want to filter results.
#### Pixabay
Pixabay searches stock photos, illustrations, or vectors.
To set it up:
1. Go to **AI Puffer > Settings > Integrations**.
2. Select **Pixabay**.
3. Add your Pixabay API key, or use the **Get Key** link to create one.
4. In the right-side **Media** card, set **Images** to **Content**, **Featured**, or **Content + Featured**.
5. Select **Pixabay** from **Image source**.
6. Click the settings icon beside **Image source** to open **Image settings**.
7. Set **Orientation**, **Type**, and **Category** if you want to narrow results.
#### Provider Options
Provider options control the generation request sent to the selected AI provider. They are separate from WordPress display settings such as image size and alignment.
Only options supported by the selected provider and model are shown.
| Provider | Available options |
| -------------- | -------------------------------------------------------------------------------------------------------------------------------------------------- |
| **OpenAI** | Canvas size, quality, output format, compression, background, moderation. |
| **Azure** | Canvas size, quality, output format, compression, background. |
| **Google** | Aspect ratio, image resolution, and person generation for supported Imagen models. Nano Banana models are included in the Google image model list. |
| **OpenRouter** | Aspect ratio and image resolution for models that support image configuration. |
| **xAI** | Aspect ratio and image resolution. |
| **Replicate** | Model-specific options from synced model schemas. |
Pexels and Pixabay are stock image sources. Their filters narrow search results instead of changing an AI generation request.
#### Image Prompts
For AI image providers, the image prompt controls content images and the featured image prompt controls the featured image. To edit them, in the right-side **General** card, click **Customize** next to **Prompts** and open **Content Image** or **Featured Image**.
You can use these placeholders:
| Placeholder | Replaced with |
| -------------- | --------------------- |
| `{topic}` | Generated title. |
| `{keywords}` | Generated keywords. |
| `{post_title}` | WordPress post title. |
| `{excerpt}` | Generated excerpt. |
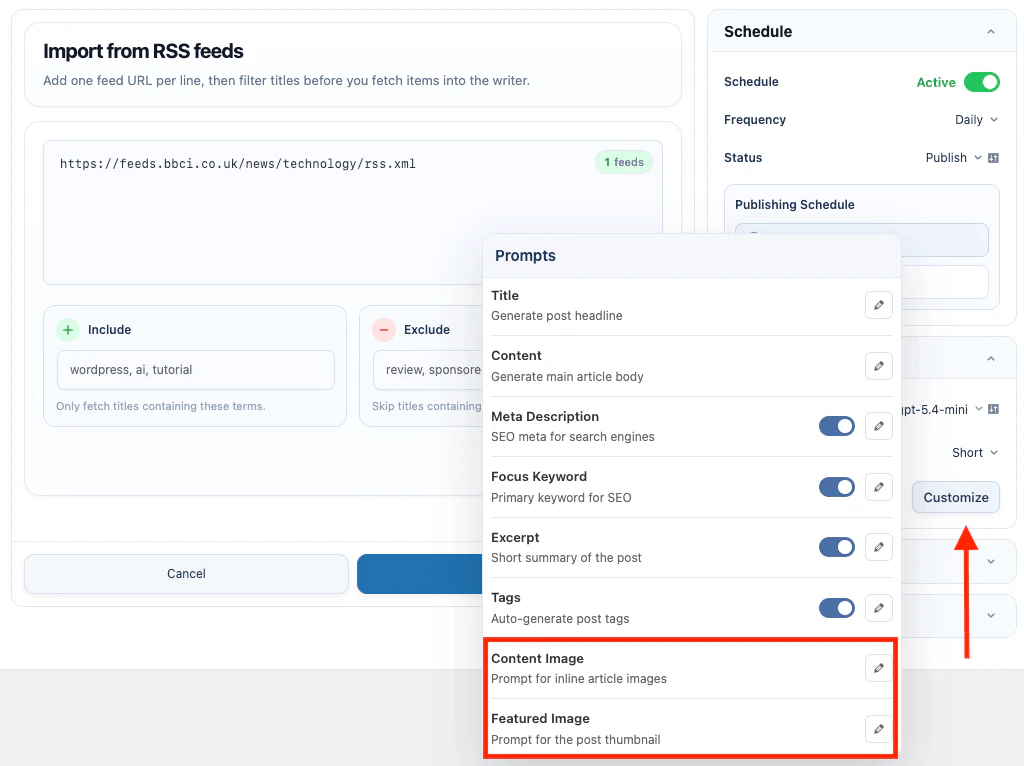 ### Knowledge Base
Knowledge Base lets content creation and Rewrite Content tasks use vector data from **AI Puffer > Knowledge Base > Data**.
When enabled, AI Puffer searches the selected source and adds matching context to the generation request.
To enable it:
1. Add data in **AI Puffer > Knowledge Base > Data**.
2. In the right-side **Advanced** card, set **Context** to **OpenAI**, **Pinecone**, **Qdrant**, or **Chroma**.
3. Select the vector store, index, or collection in **Source**.
4. Click the settings icon beside **Source** to open **Context settings**.
5. Set **Results Limit**. For content creation tasks, you can also set **Confidence Threshold**.
6. For Pinecone, Qdrant, or Chroma, select the embedding provider and model in **Context settings**.
7. Save and test the task.
### Knowledge Base
Knowledge Base lets content creation and Rewrite Content tasks use vector data from **AI Puffer > Knowledge Base > Data**.
When enabled, AI Puffer searches the selected source and adds matching context to the generation request.
To enable it:
1. Add data in **AI Puffer > Knowledge Base > Data**.
2. In the right-side **Advanced** card, set **Context** to **OpenAI**, **Pinecone**, **Qdrant**, or **Chroma**.
3. Select the vector store, index, or collection in **Source**.
4. Click the settings icon beside **Source** to open **Context settings**.
5. Set **Results Limit**. For content creation tasks, you can also set **Confidence Threshold**.
6. For Pinecone, Qdrant, or Chroma, select the embedding provider and model in **Context settings**.
7. Save and test the task.
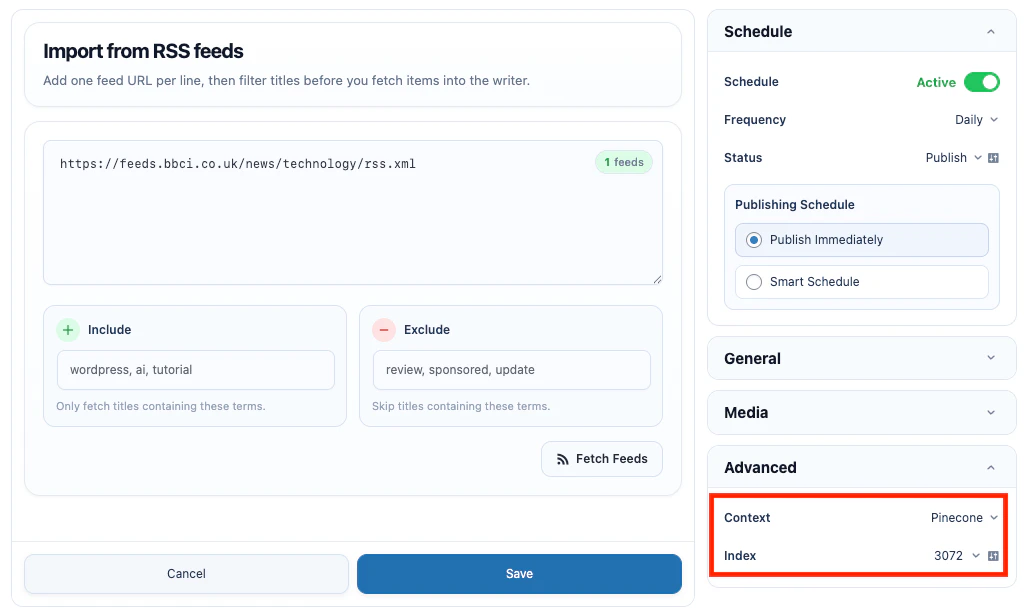 | Provider | Required setup |
| ------------ | -------------------------------------------------------------------------------- |
| **OpenAI** | Select one or more OpenAI Vector Stores. |
| **Pinecone** | Select a Pinecone index and the embedding model used when the data was added. |
| **Qdrant** | Select a Qdrant collection and the embedding model used when the data was added. |
| **Chroma** | Select a Chroma collection and the embedding model used when the data was added. |
For Pinecone, Qdrant, and Chroma, use the same embedding model when adding data and when selecting **Context** in an automation task.
#### OpenAI
OpenAI uses OpenAI Vector Stores.
To prepare a vector store:
1. Go to **AI Puffer > Knowledge Base > Stores**.
2. Select **OpenAI** as the provider.
3. Click **Create Store**.
| Provider | Required setup |
| ------------ | -------------------------------------------------------------------------------- |
| **OpenAI** | Select one or more OpenAI Vector Stores. |
| **Pinecone** | Select a Pinecone index and the embedding model used when the data was added. |
| **Qdrant** | Select a Qdrant collection and the embedding model used when the data was added. |
| **Chroma** | Select a Chroma collection and the embedding model used when the data was added. |
For Pinecone, Qdrant, and Chroma, use the same embedding model when adding data and when selecting **Context** in an automation task.
#### OpenAI
OpenAI uses OpenAI Vector Stores.
To prepare a vector store:
1. Go to **AI Puffer > Knowledge Base > Stores**.
2. Select **OpenAI** as the provider.
3. Click **Create Store**.
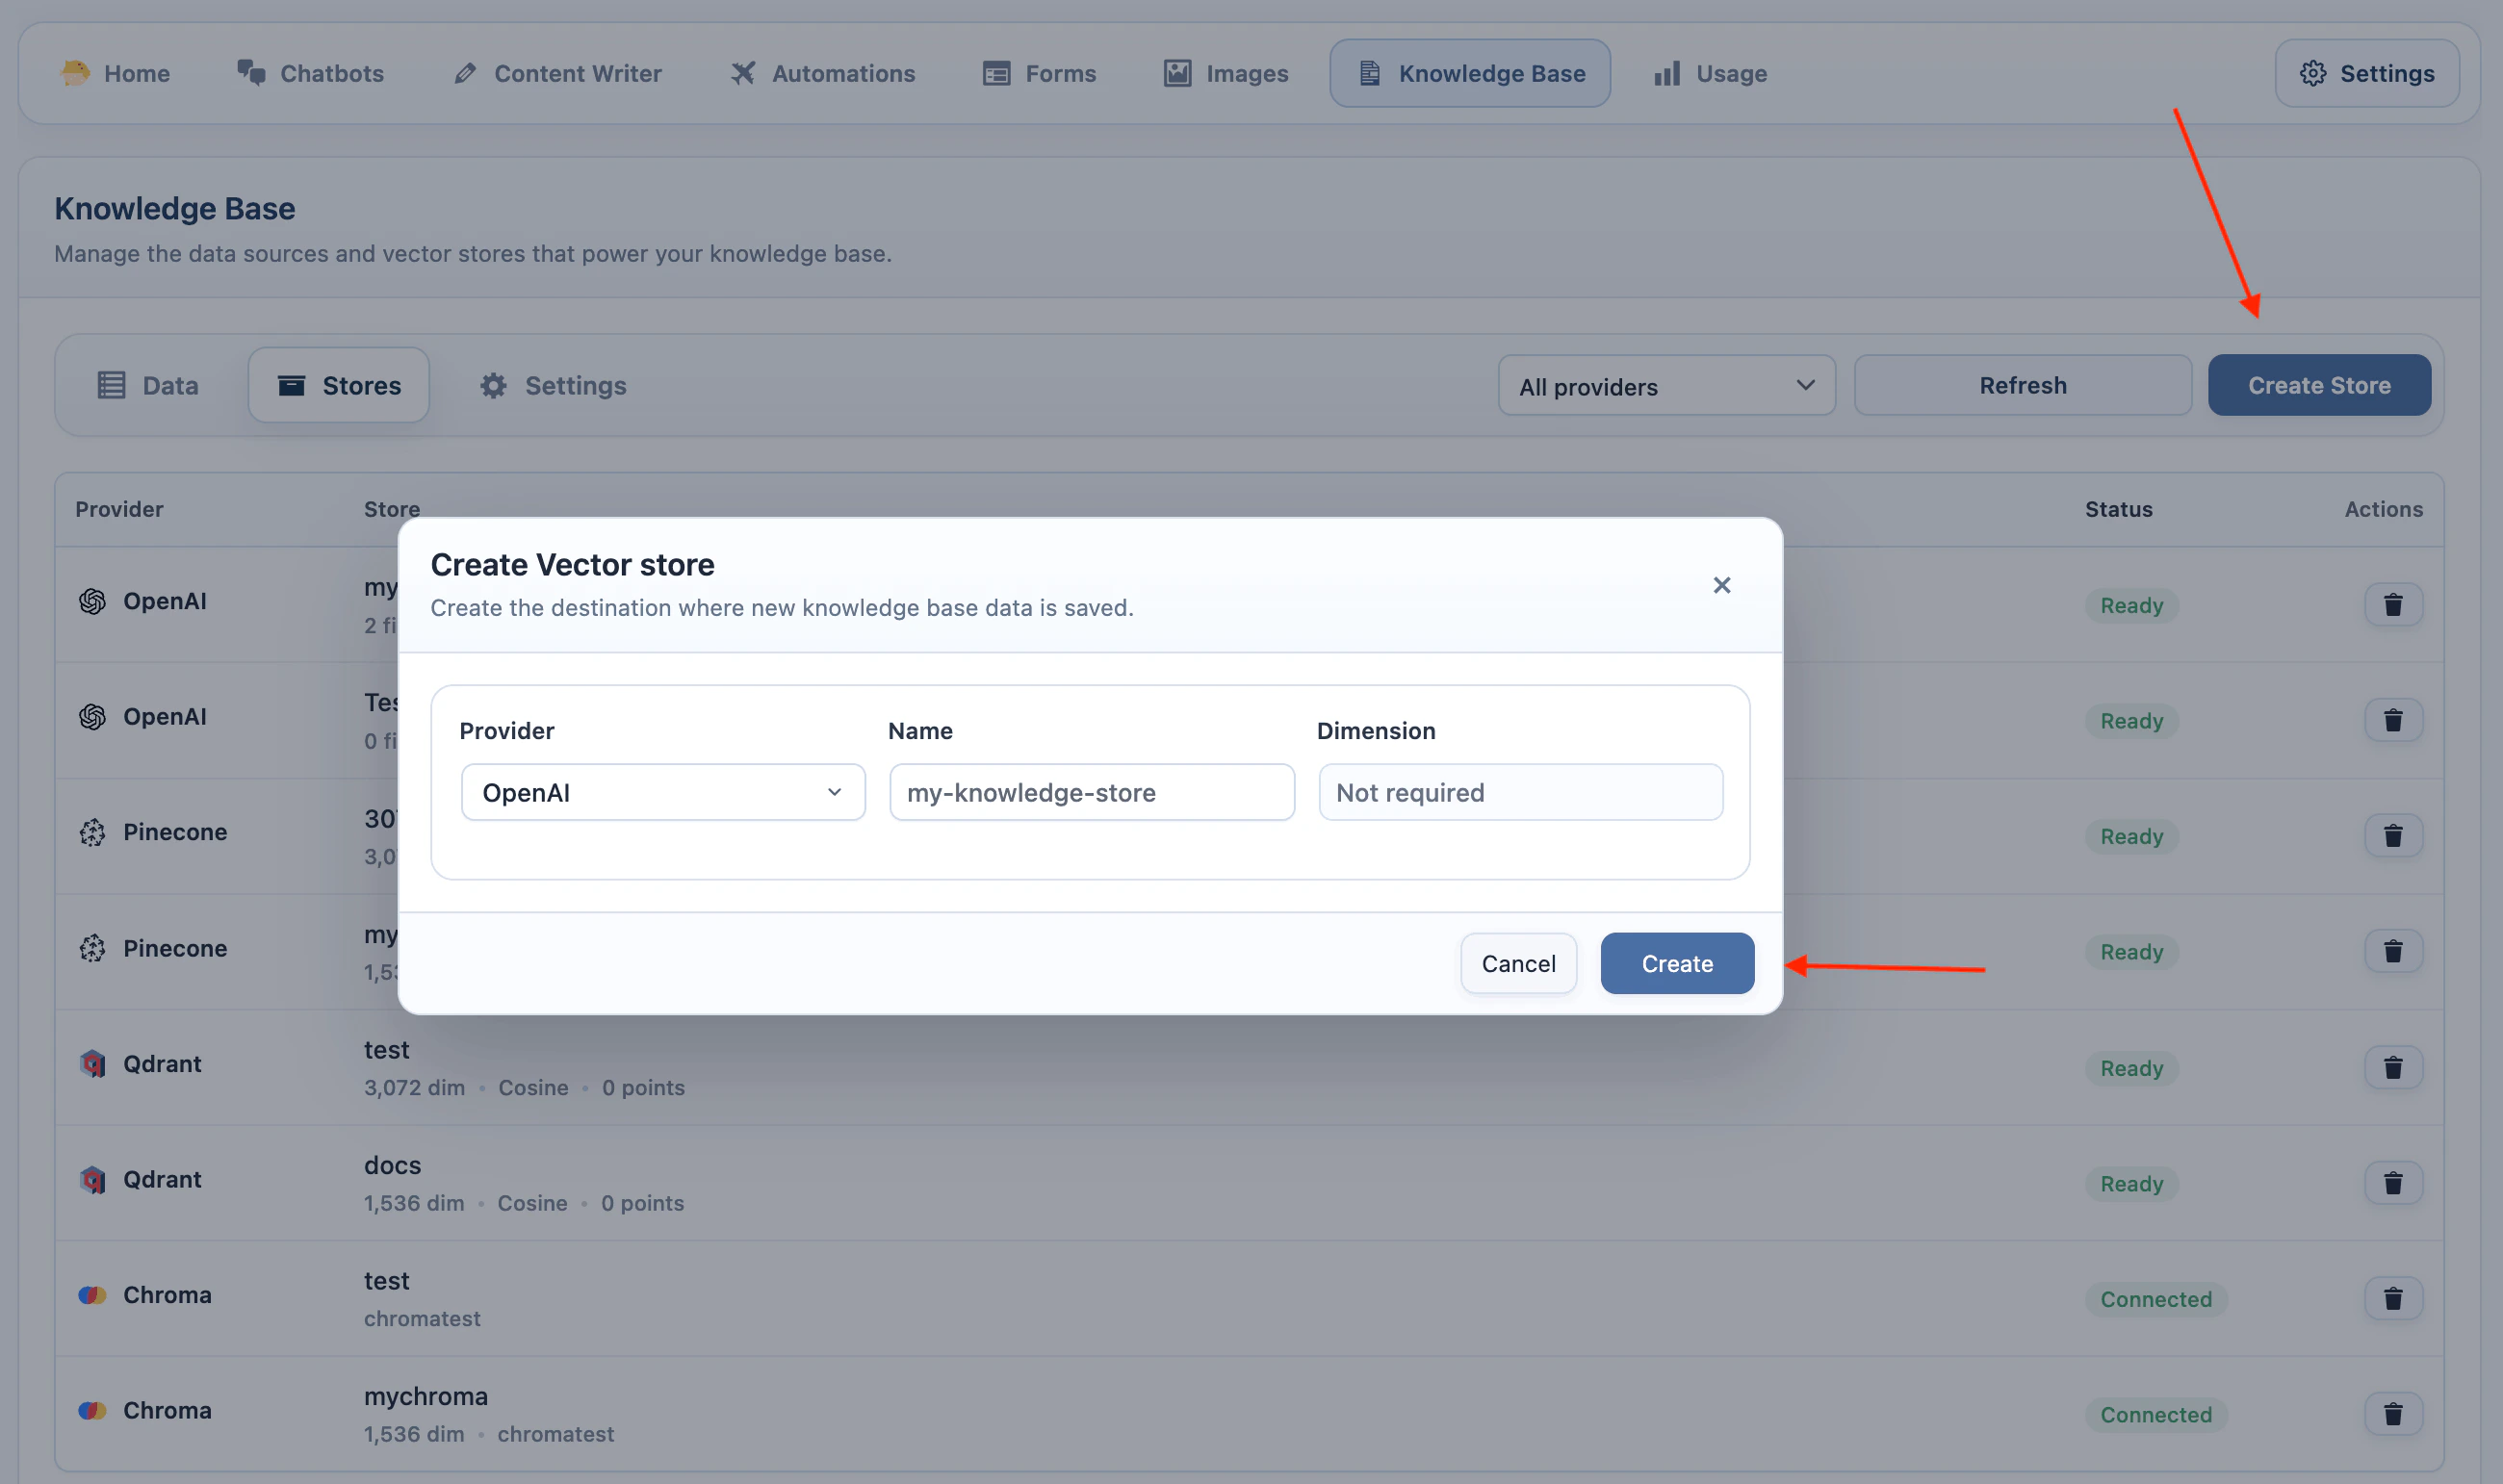 4. Enter a store name and create it.
5. Go to **AI Puffer > Knowledge Base > Data** and add data to the store.
4. Enter a store name and create it.
5. Go to **AI Puffer > Knowledge Base > Data** and add data to the store.
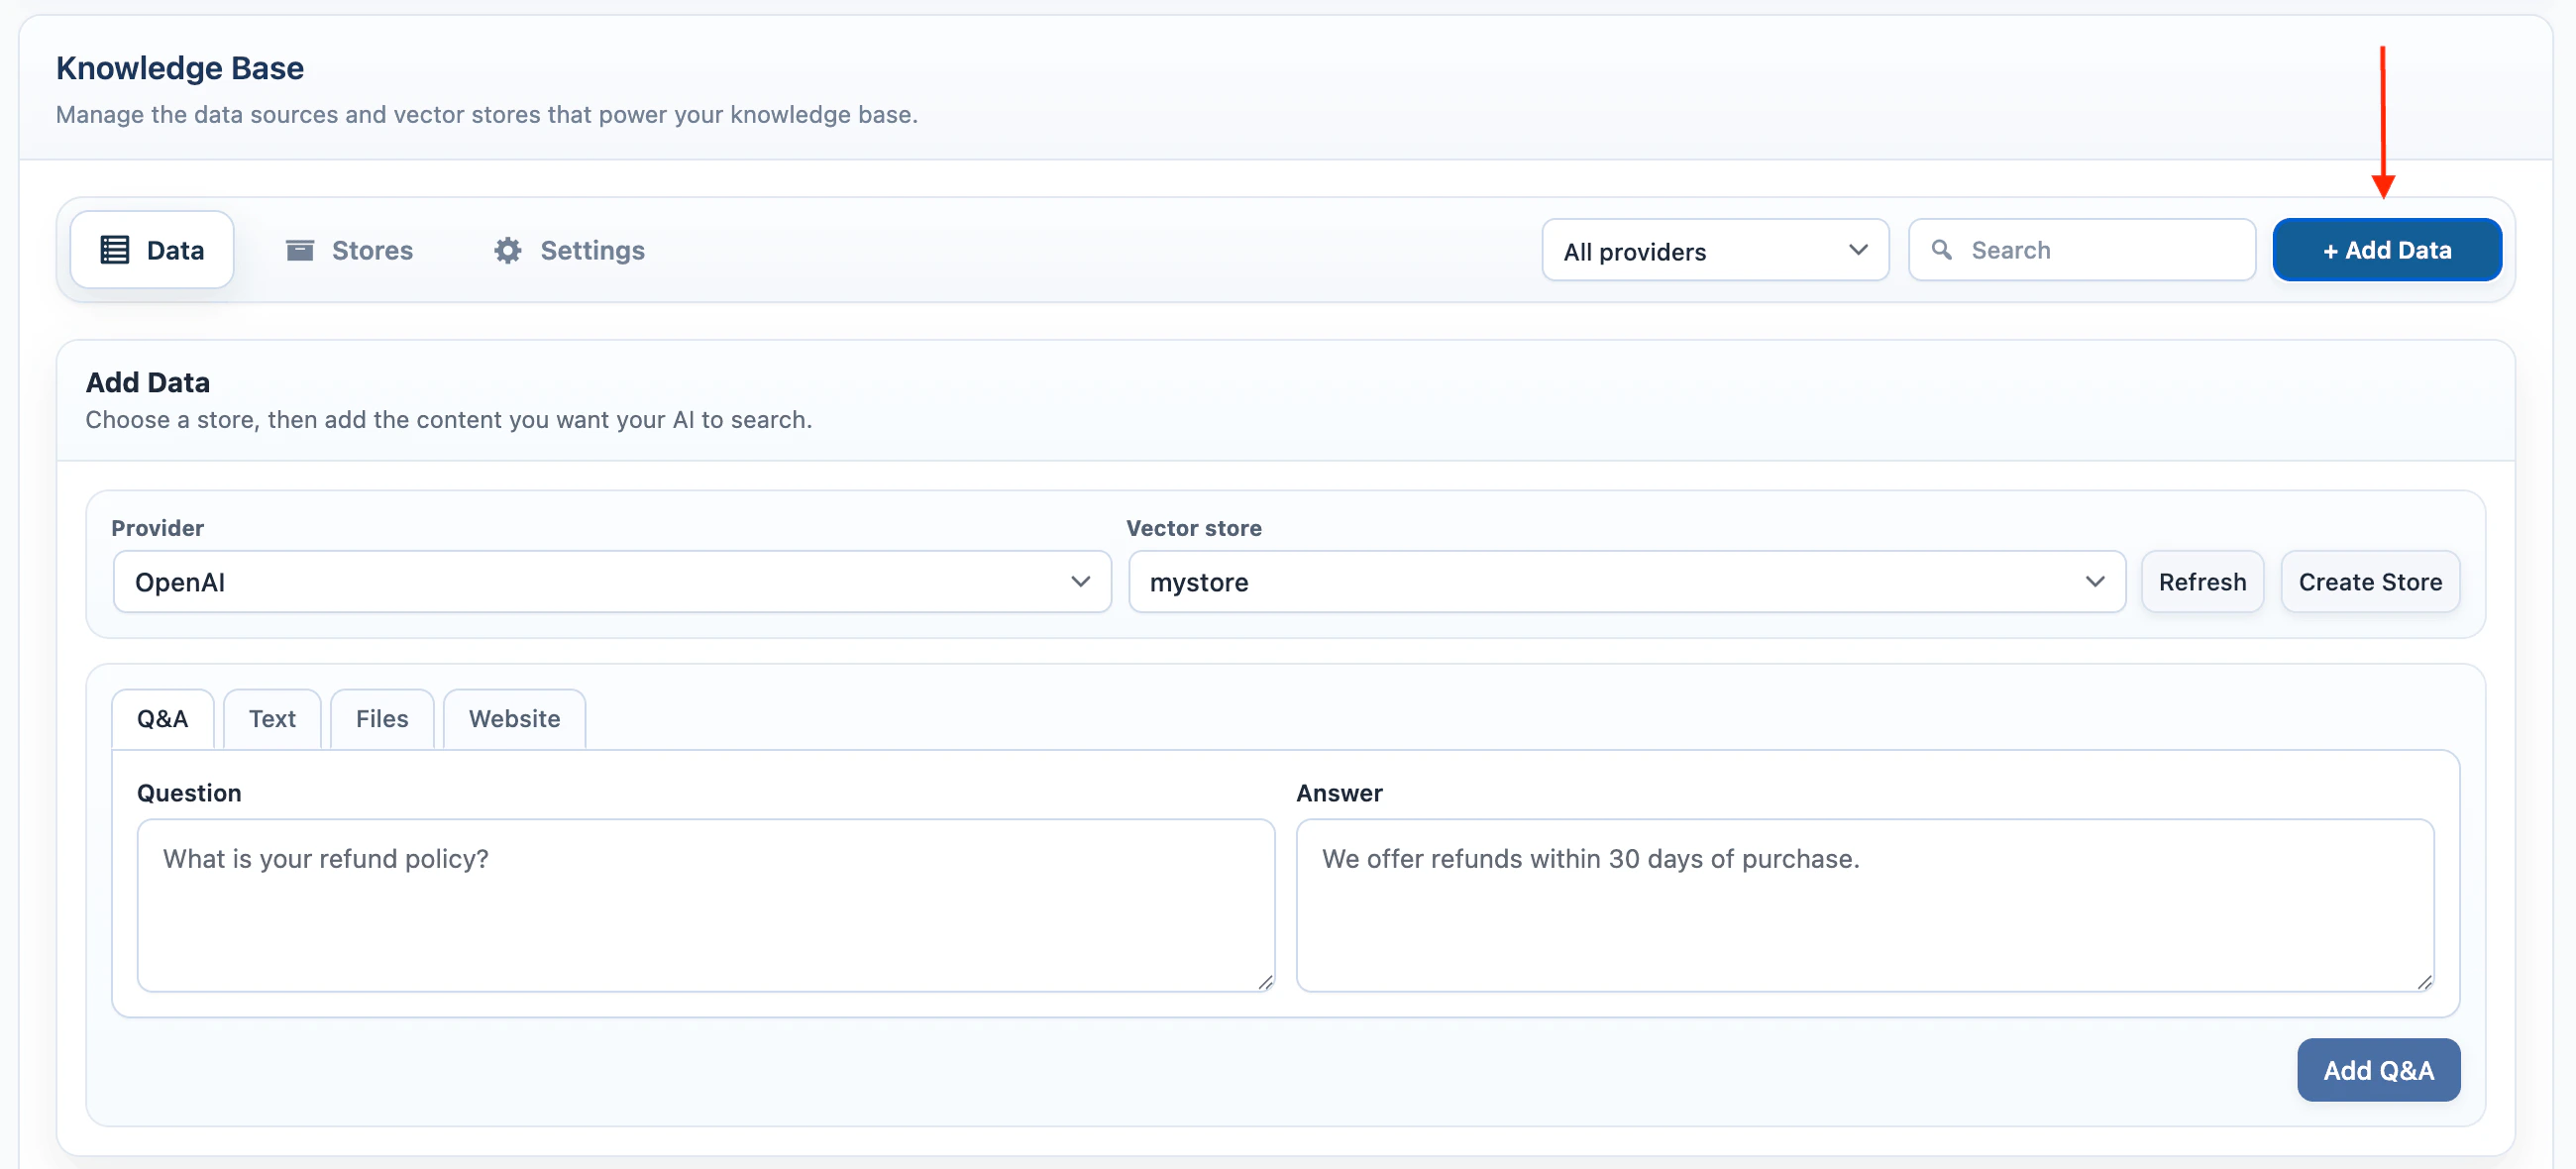 To use it in Automations:
1. Add data to an OpenAI Vector Store in **AI Puffer > Knowledge Base > Data**.
2. Create or edit the automation task.
3. In the right-side **Advanced** card, set **Context** to **OpenAI**.
4. Select one or more vector stores in **Source**.
5. Click the settings icon beside **Source** to adjust **Results Limit**. Content creation tasks also show **Confidence Threshold**.
#### Pinecone
Pinecone stores vectors in an index. AI Puffer creates and searches those vectors with the embedding model you choose.
The Pinecone index dimension must match the embedding model. For example, if your index is **3072 dimensions**, use a **3072-dimension** embedding model.
To prepare an index:
1. Add your Pinecone credentials in **AI Puffer > Settings > Integrations**.
To use it in Automations:
1. Add data to an OpenAI Vector Store in **AI Puffer > Knowledge Base > Data**.
2. Create or edit the automation task.
3. In the right-side **Advanced** card, set **Context** to **OpenAI**.
4. Select one or more vector stores in **Source**.
5. Click the settings icon beside **Source** to adjust **Results Limit**. Content creation tasks also show **Confidence Threshold**.
#### Pinecone
Pinecone stores vectors in an index. AI Puffer creates and searches those vectors with the embedding model you choose.
The Pinecone index dimension must match the embedding model. For example, if your index is **3072 dimensions**, use a **3072-dimension** embedding model.
To prepare an index:
1. Add your Pinecone credentials in **AI Puffer > Settings > Integrations**.
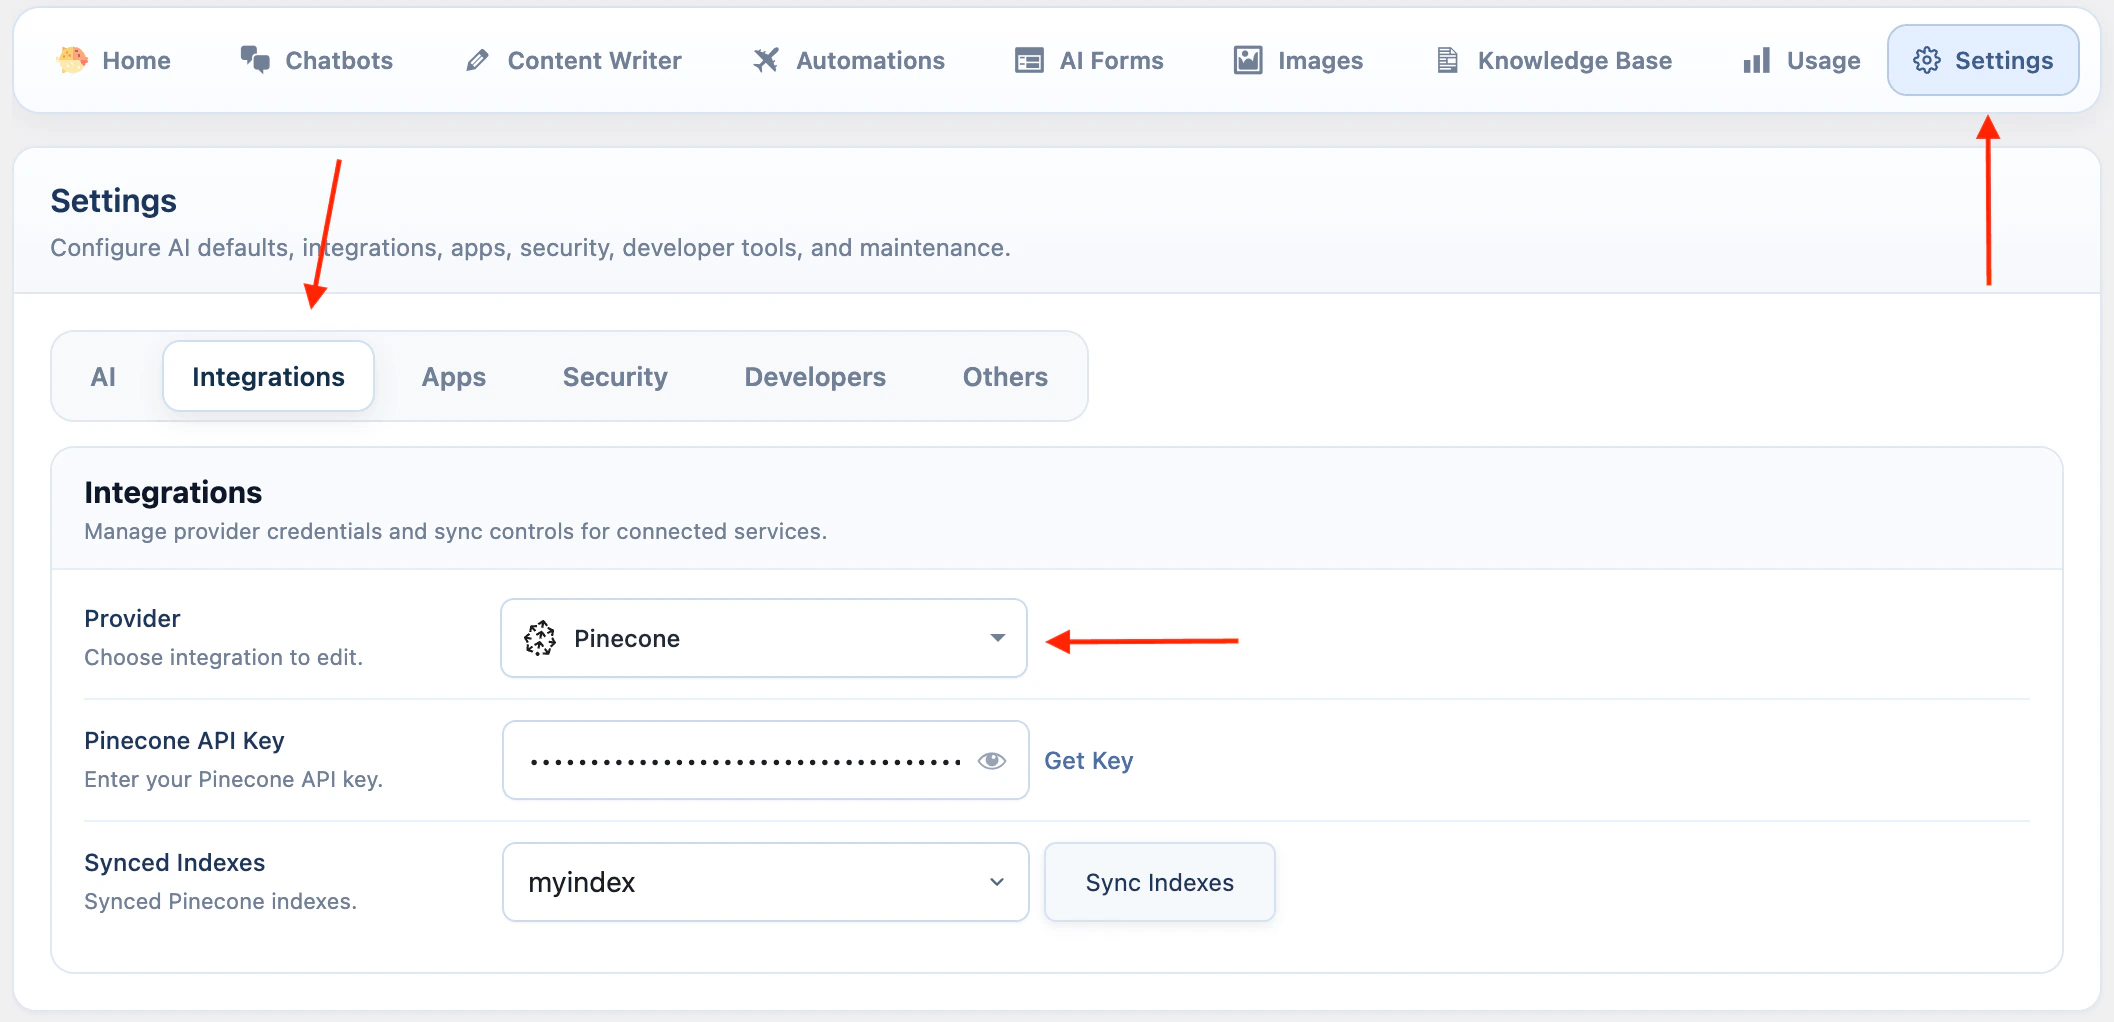 2. Go to **AI Puffer > Knowledge Base > Stores**.
3. Select **Pinecone** as the provider.
4. Select the embedding model you want to use.
5. Click **Create Store**.
2. Go to **AI Puffer > Knowledge Base > Stores**.
3. Select **Pinecone** as the provider.
4. Select the embedding model you want to use.
5. Click **Create Store**.
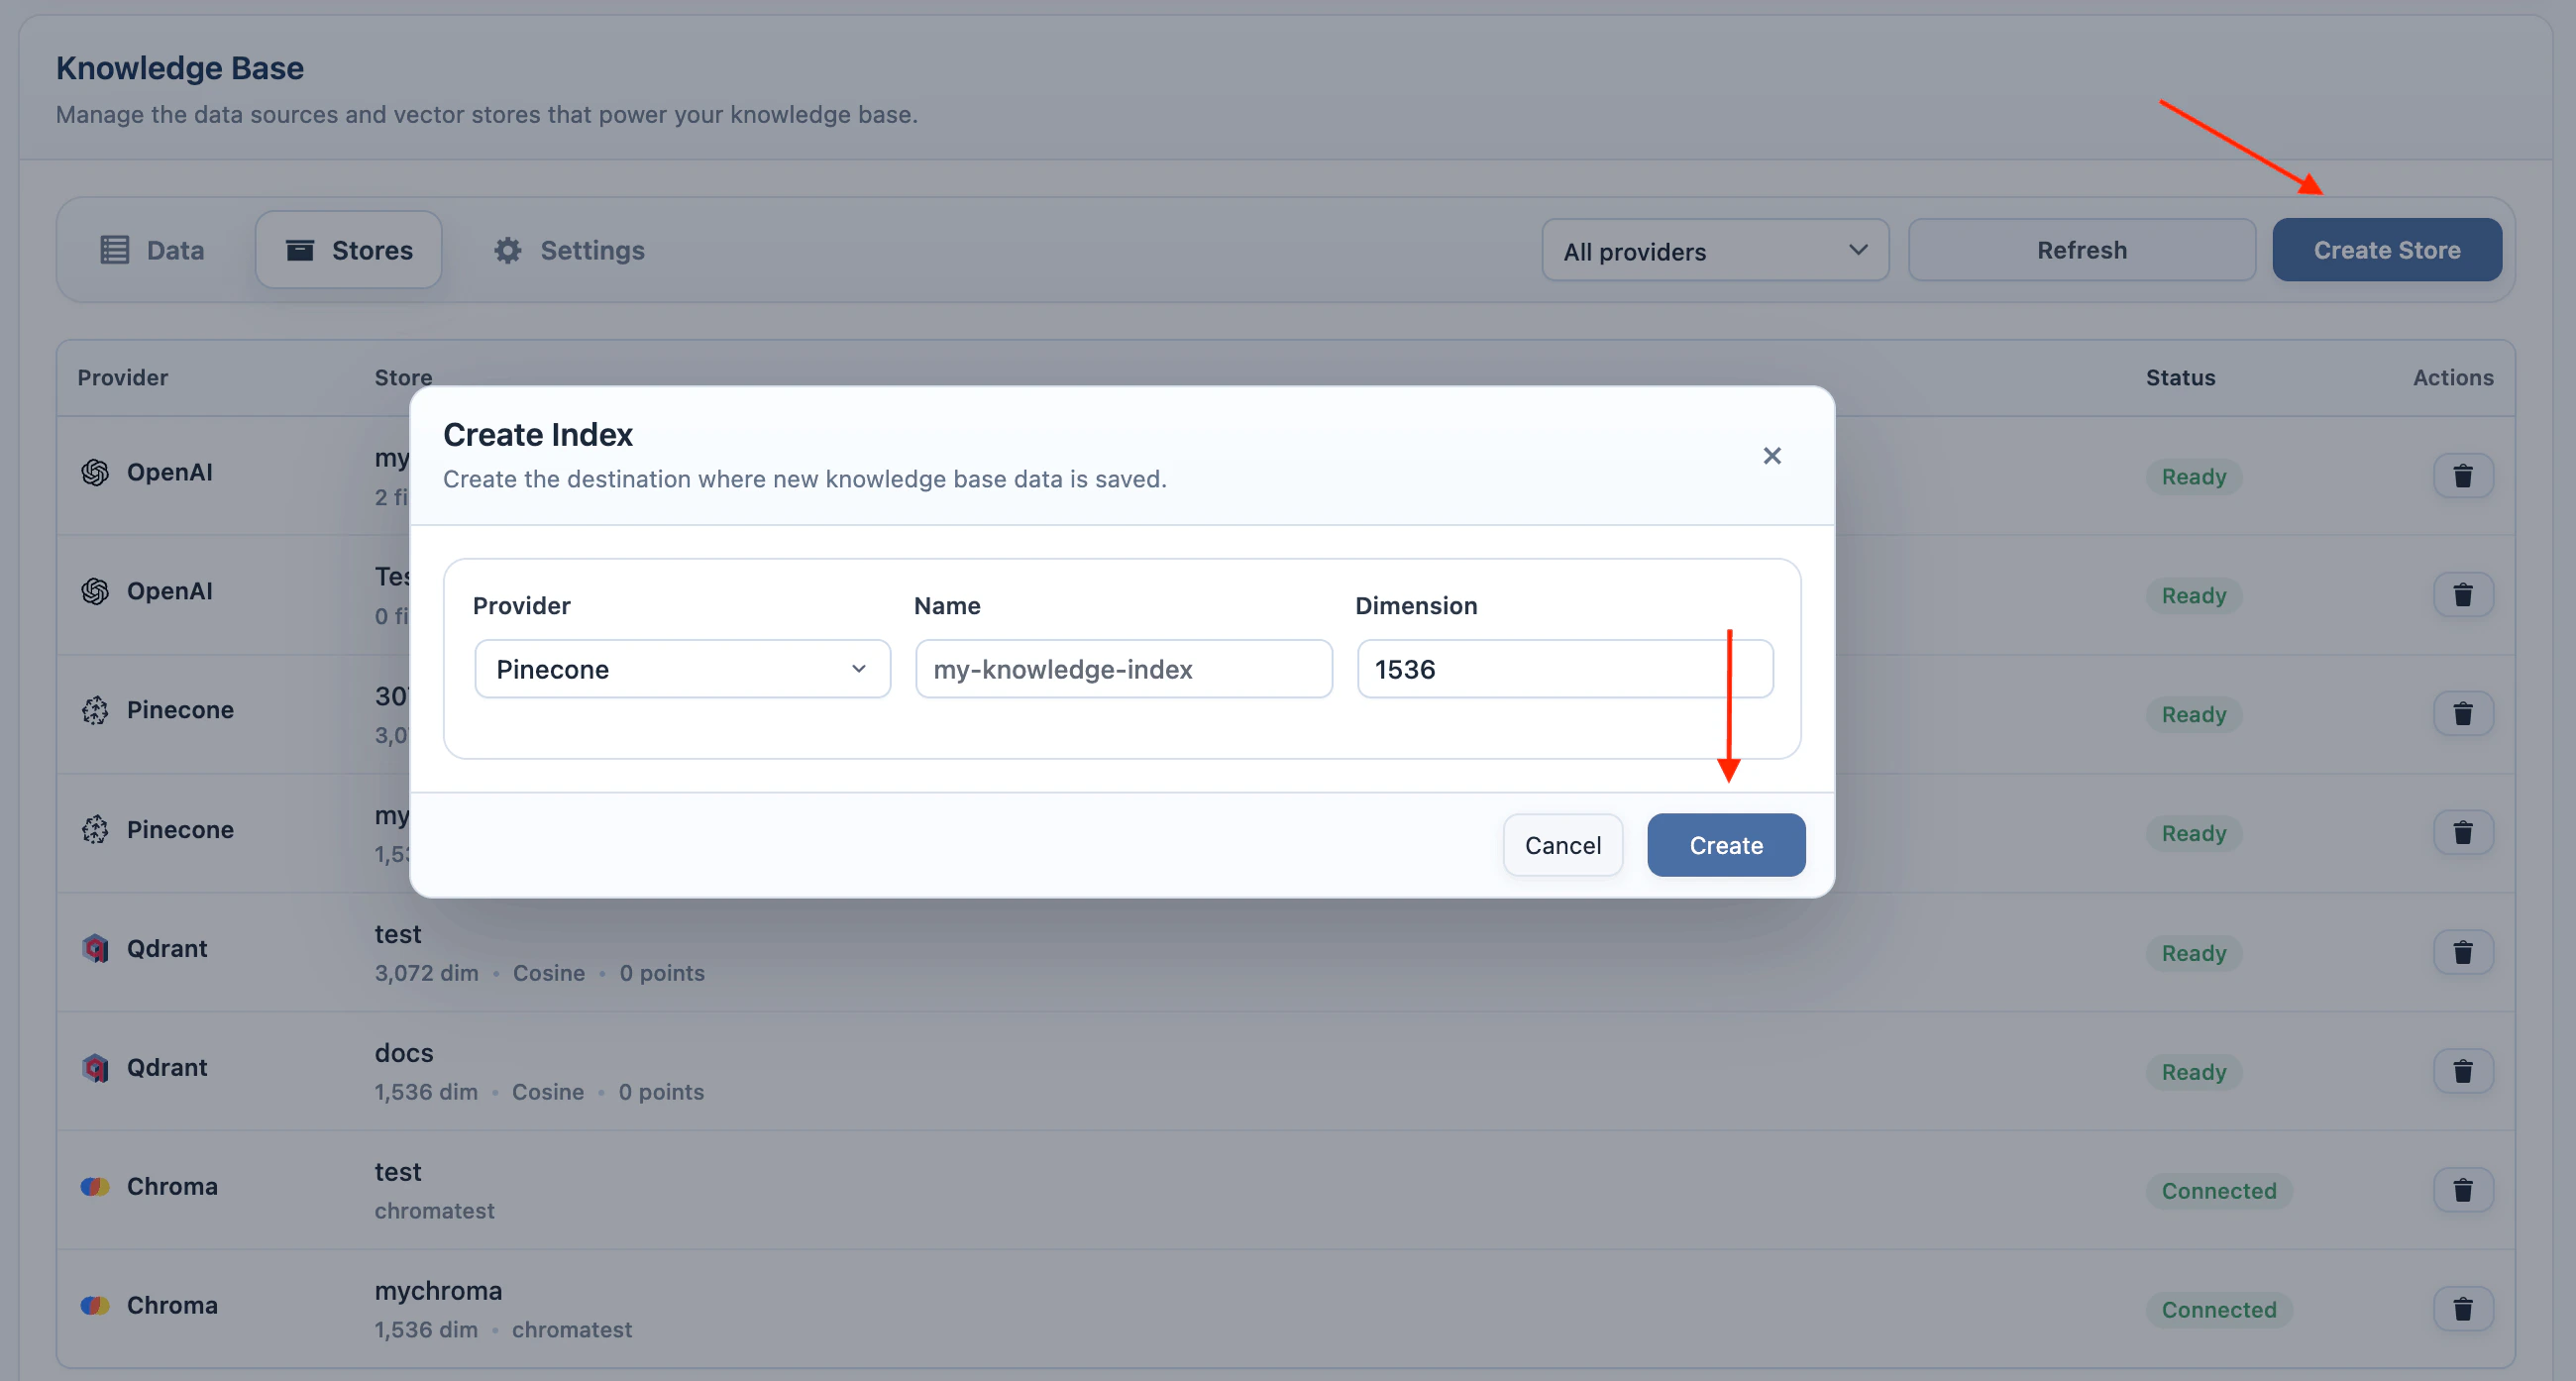 6. Enter an index name and use the dimension for the selected embedding model.
7. Create the index, then add data with the same embedding model.
To use it in Automations:
1. Create or edit the automation task.
2. In the right-side **Advanced** card, set **Context** to **Pinecone**.
3. Select the Pinecone index in **Source**.
4. Click the settings icon beside **Source** to open **Context settings**.
5. Select the same embedding provider and model used when you added the data.
6. Adjust **Results Limit**. Content creation tasks also show **Confidence Threshold**.
#### Qdrant
Qdrant stores vectors in a collection. AI Puffer creates and searches those vectors with the embedding model you choose.
The Qdrant collection size must match the embedding model. For example, if your collection is **3072 dimensions**, use a **3072-dimension** embedding model.
To prepare a collection:
1. Add your Qdrant URL and API key in **AI Puffer > Settings > Integrations**.
6. Enter an index name and use the dimension for the selected embedding model.
7. Create the index, then add data with the same embedding model.
To use it in Automations:
1. Create or edit the automation task.
2. In the right-side **Advanced** card, set **Context** to **Pinecone**.
3. Select the Pinecone index in **Source**.
4. Click the settings icon beside **Source** to open **Context settings**.
5. Select the same embedding provider and model used when you added the data.
6. Adjust **Results Limit**. Content creation tasks also show **Confidence Threshold**.
#### Qdrant
Qdrant stores vectors in a collection. AI Puffer creates and searches those vectors with the embedding model you choose.
The Qdrant collection size must match the embedding model. For example, if your collection is **3072 dimensions**, use a **3072-dimension** embedding model.
To prepare a collection:
1. Add your Qdrant URL and API key in **AI Puffer > Settings > Integrations**.
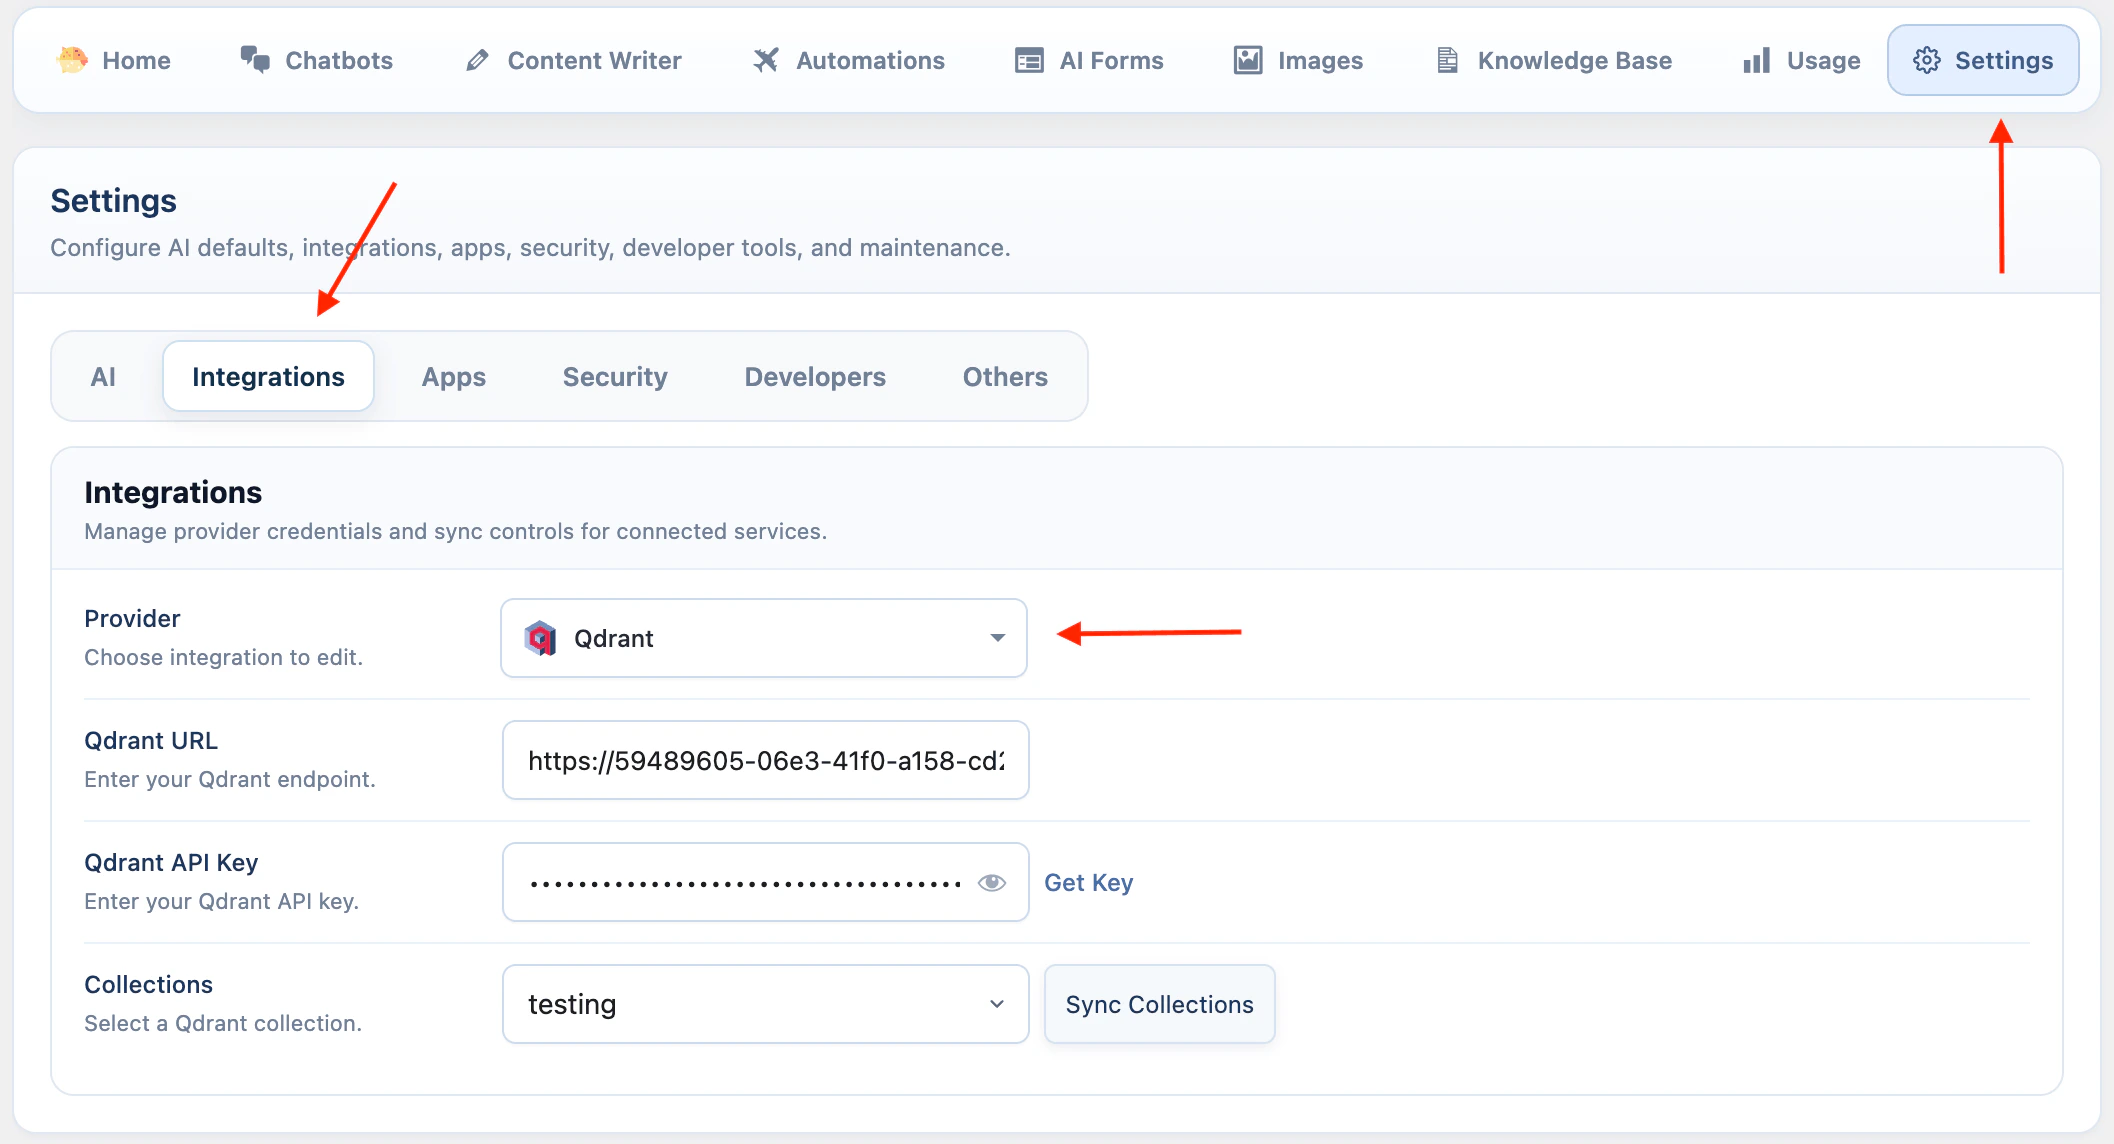 2. Go to **AI Puffer > Knowledge Base > Stores**.
3. Select **Qdrant** as the provider.
4. Select the embedding model you want to use.
5. Click **Create Store**.
2. Go to **AI Puffer > Knowledge Base > Stores**.
3. Select **Qdrant** as the provider.
4. Select the embedding model you want to use.
5. Click **Create Store**.
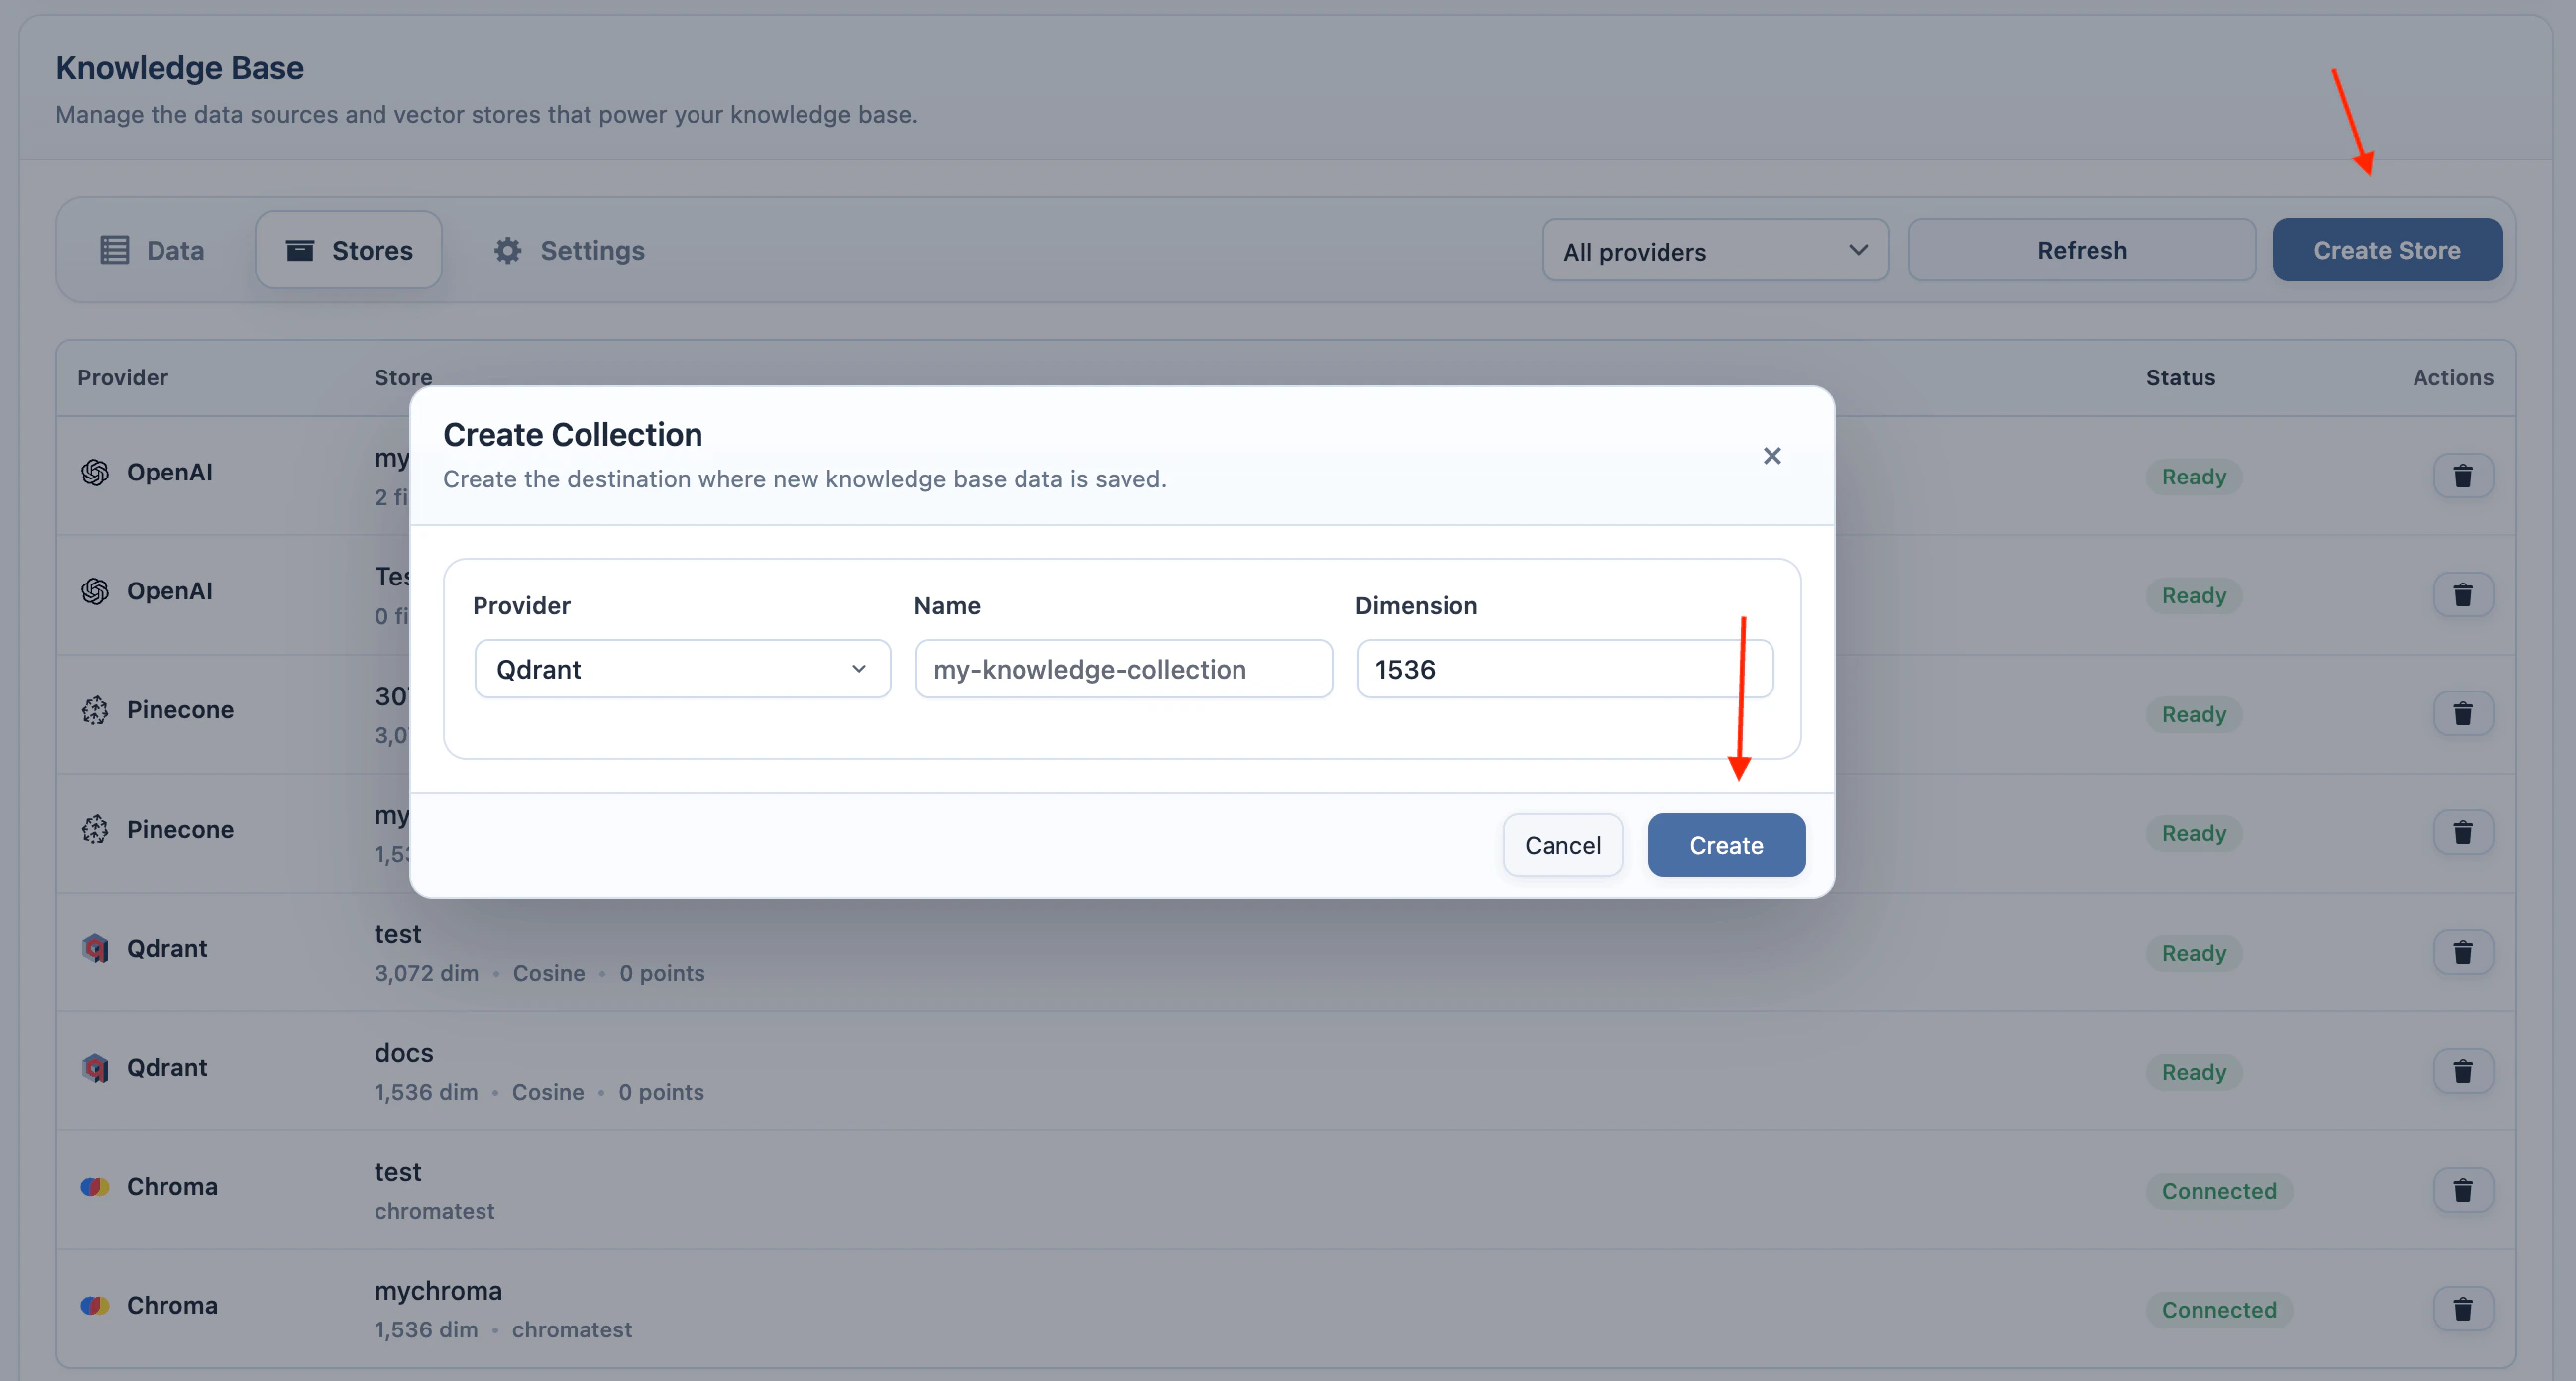 6. Enter a collection name and use the dimension for the selected embedding model.
7. Create the collection, then add data with the same embedding model.
To use it in Automations:
1. Create or edit the automation task.
2. In the right-side **Advanced** card, set **Context** to **Qdrant**.
3. Select the Qdrant collection in **Source**.
4. Click the settings icon beside **Source** to open **Context settings**.
5. Select the same embedding provider and model used when you added the data.
6. Adjust **Results Limit**. Content creation tasks also show **Confidence Threshold**.
#### Chroma
Chroma stores vectors in a collection. AI Puffer creates and searches those vectors with the embedding model you choose.
Chroma collections do not require a dimension when they are created in AI Puffer, but stored vectors still need a consistent dimension.
To prepare a collection:
1. Add your Chroma endpoint, tenant, database, and API key in **AI Puffer > Settings > Integrations**.
6. Enter a collection name and use the dimension for the selected embedding model.
7. Create the collection, then add data with the same embedding model.
To use it in Automations:
1. Create or edit the automation task.
2. In the right-side **Advanced** card, set **Context** to **Qdrant**.
3. Select the Qdrant collection in **Source**.
4. Click the settings icon beside **Source** to open **Context settings**.
5. Select the same embedding provider and model used when you added the data.
6. Adjust **Results Limit**. Content creation tasks also show **Confidence Threshold**.
#### Chroma
Chroma stores vectors in a collection. AI Puffer creates and searches those vectors with the embedding model you choose.
Chroma collections do not require a dimension when they are created in AI Puffer, but stored vectors still need a consistent dimension.
To prepare a collection:
1. Add your Chroma endpoint, tenant, database, and API key in **AI Puffer > Settings > Integrations**.
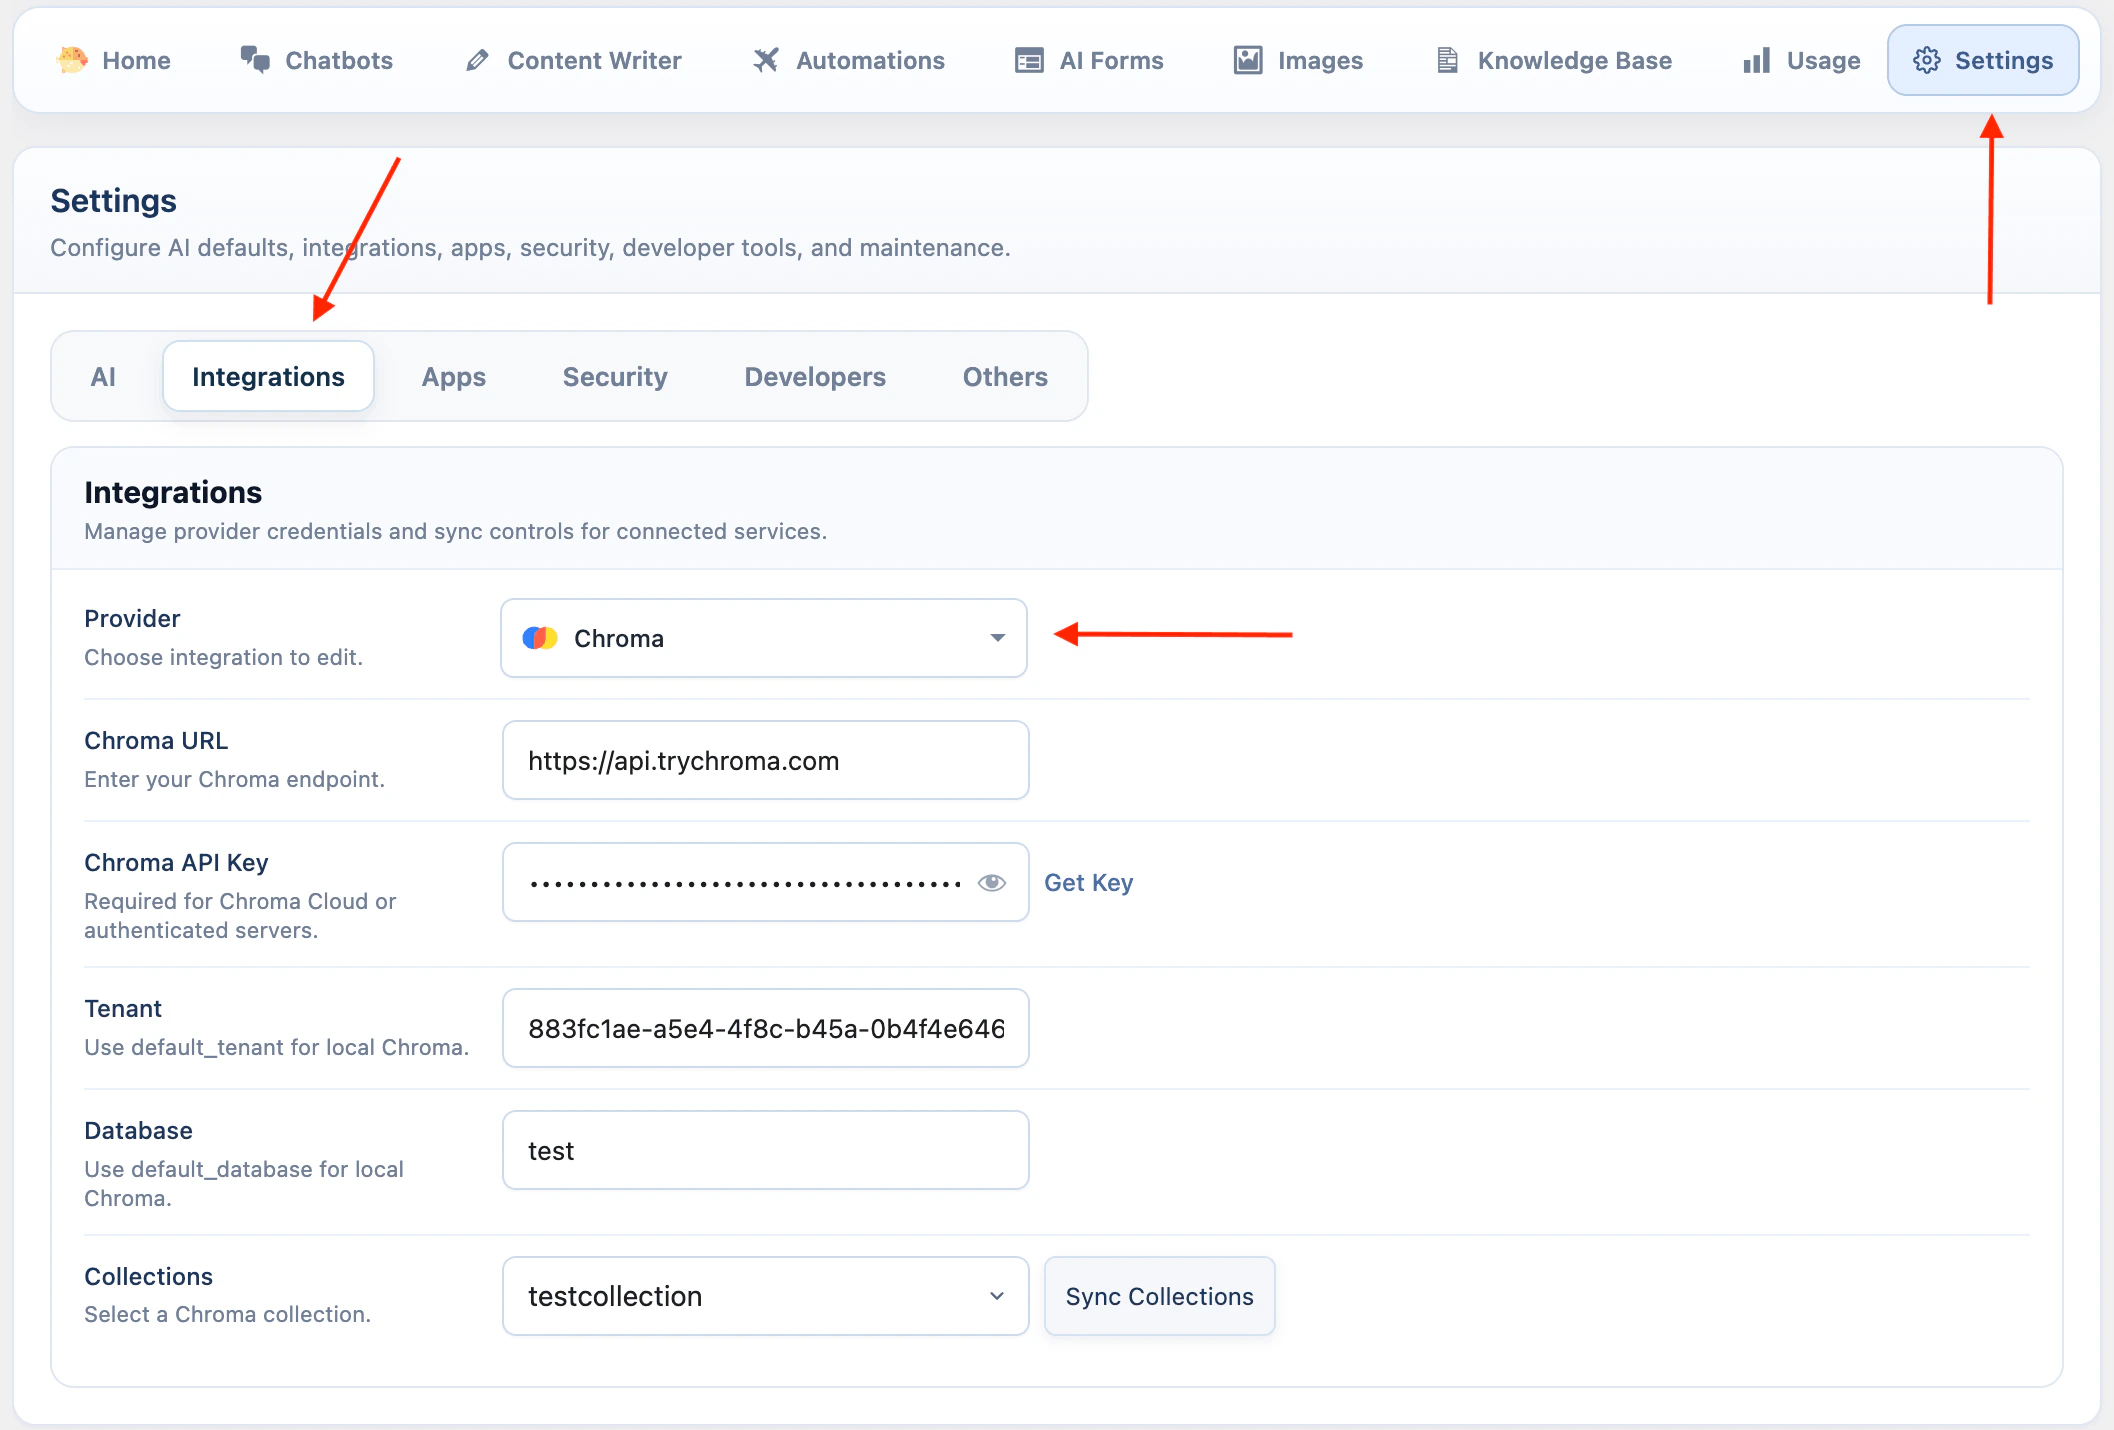 2. Go to **AI Puffer > Knowledge Base > Stores**.
3. Select **Chroma** as the provider.
4. Click **Create Store**.
2. Go to **AI Puffer > Knowledge Base > Stores**.
3. Select **Chroma** as the provider.
4. Click **Create Store**.
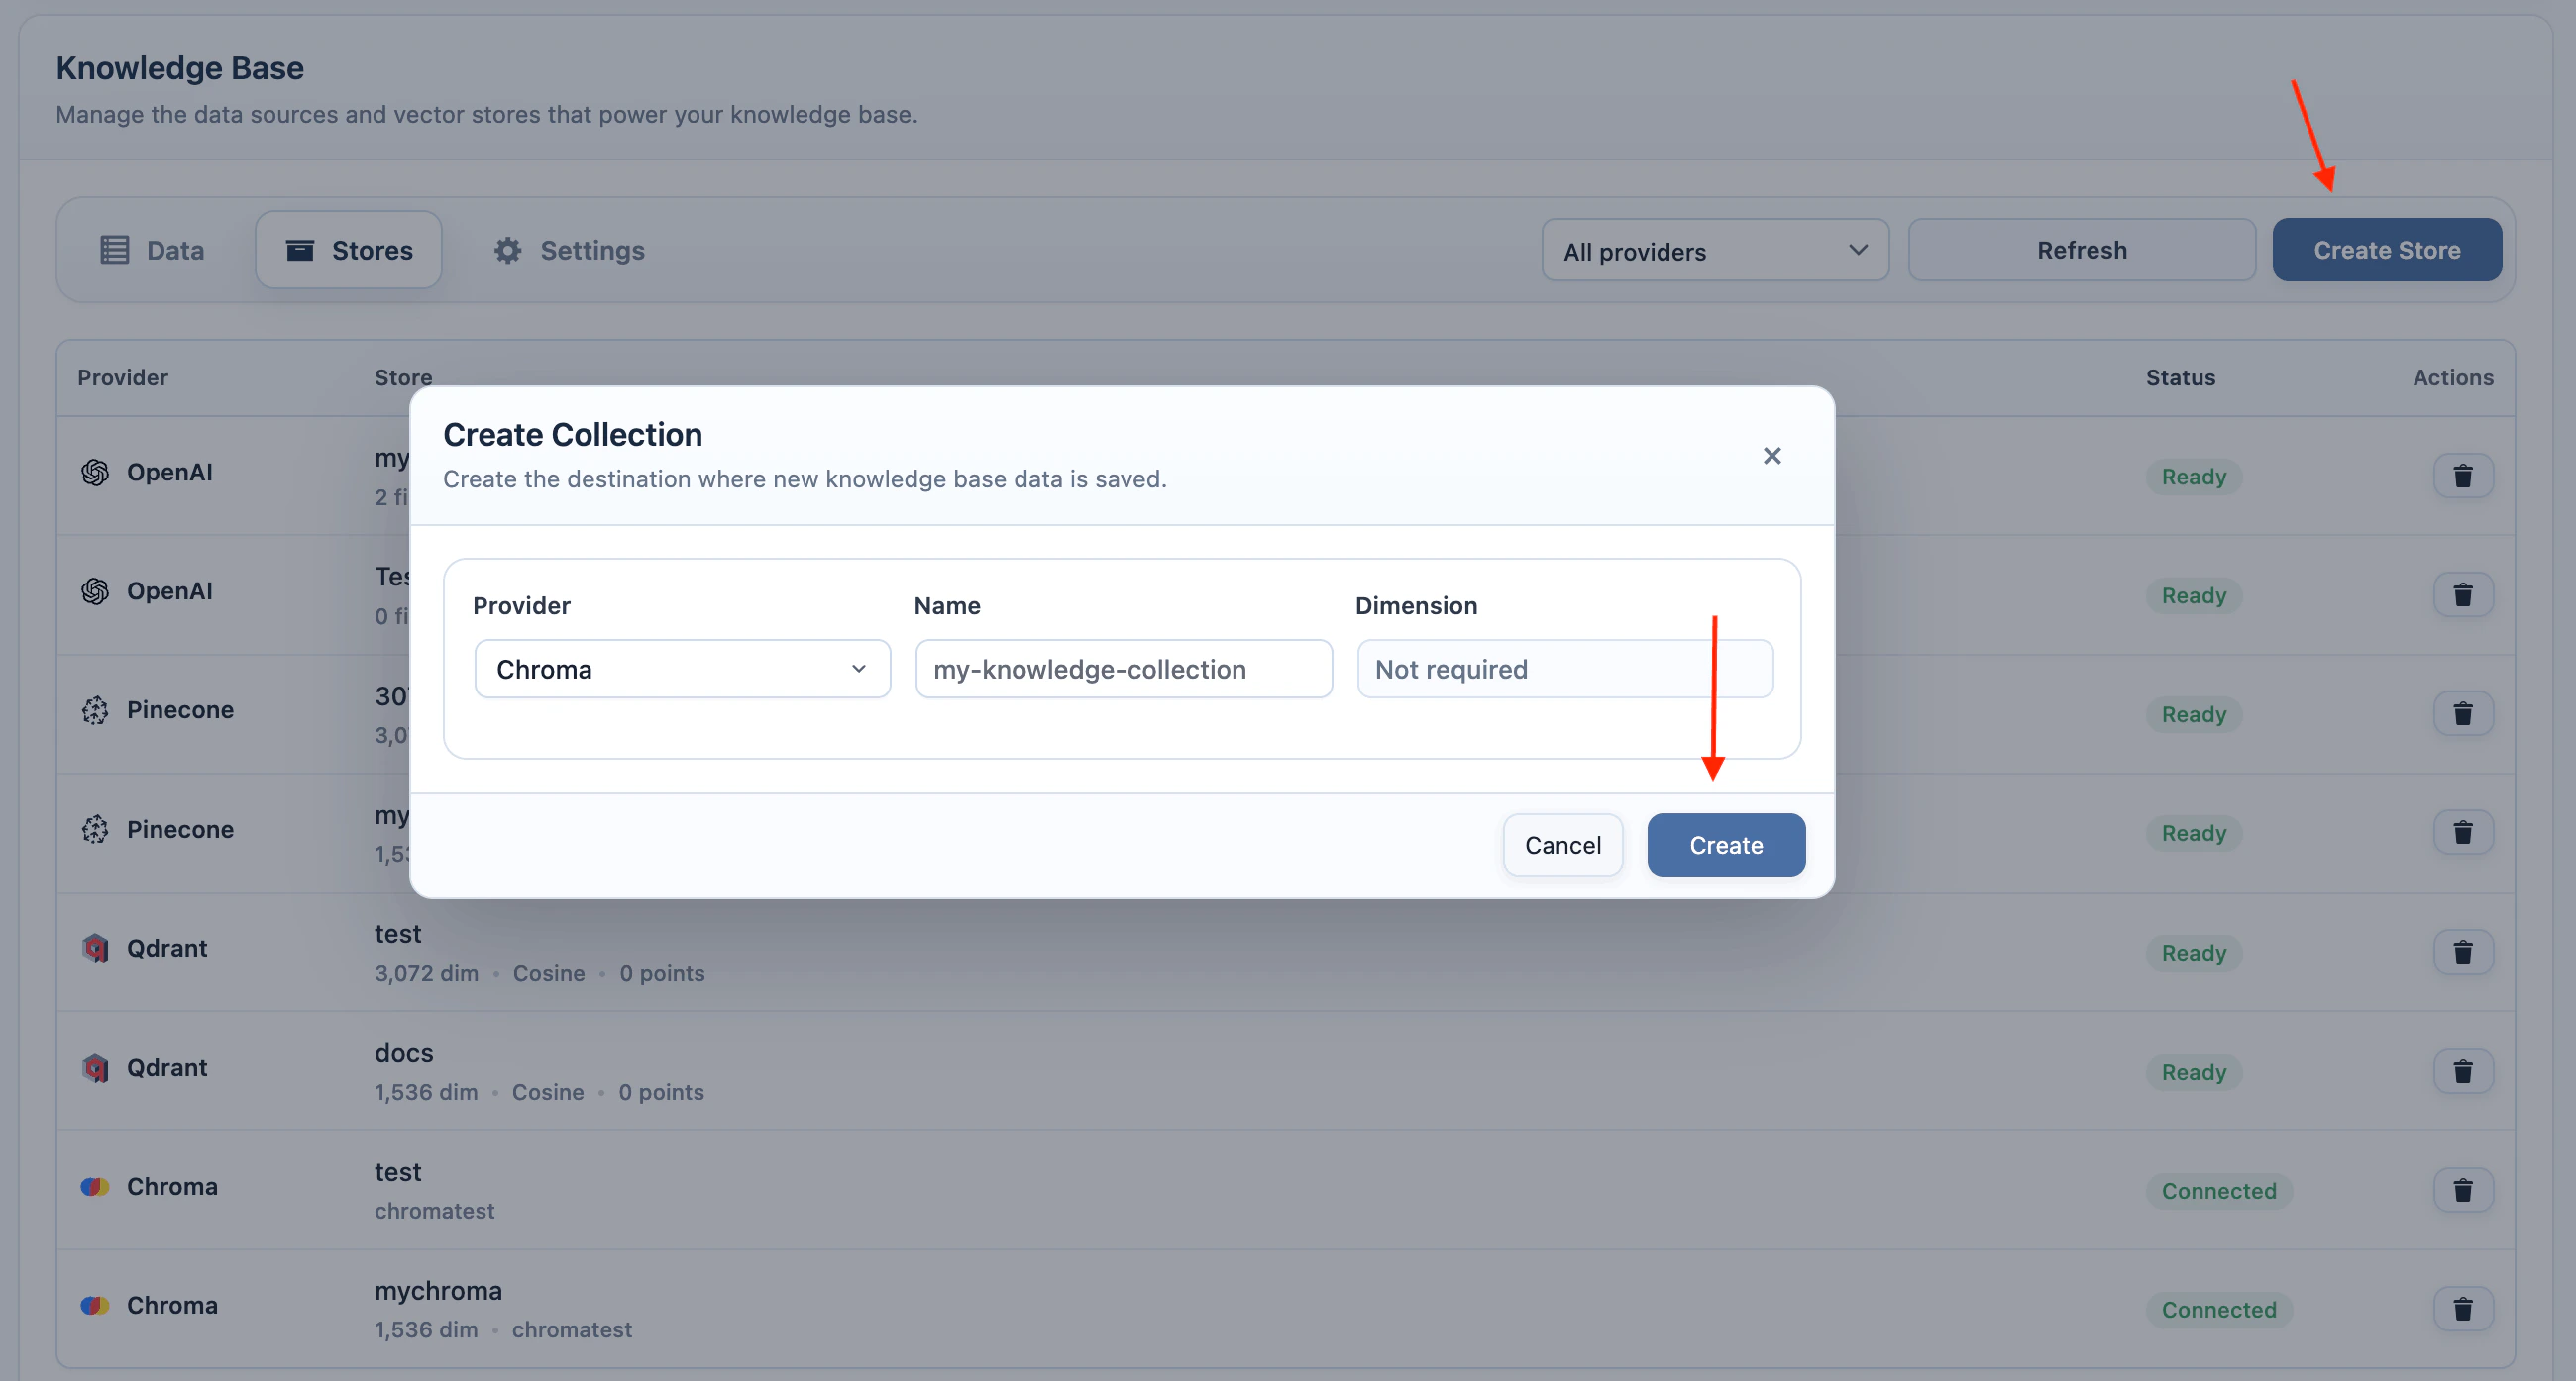 5. Enter a collection name.
6. Create the collection, then add data with the same embedding model.
To use it in Automations:
1. Create or edit the automation task.
2. In the right-side **Advanced** card, set **Context** to **Chroma**.
3. Select the Chroma collection in **Source**.
4. Click the settings icon beside **Source** to open **Context settings**.
5. Select the same embedding provider and model used when you added the data.
6. Adjust **Results Limit**. Content creation tasks also show **Confidence Threshold**.
#### Limit and Threshold
Use these settings to control how much vector context is added to the task.
| Setting | How it works |
| ------------------------ | -------------------------------------------------------------- |
| **Results Limit** | Maximum number of matching knowledge pieces AI Puffer can use. |
| **Confidence Threshold** | How closely a result must match before AI Puffer includes it. |
5. Enter a collection name.
6. Create the collection, then add data with the same embedding model.
To use it in Automations:
1. Create or edit the automation task.
2. In the right-side **Advanced** card, set **Context** to **Chroma**.
3. Select the Chroma collection in **Source**.
4. Click the settings icon beside **Source** to open **Context settings**.
5. Select the same embedding provider and model used when you added the data.
6. Adjust **Results Limit**. Content creation tasks also show **Confidence Threshold**.
#### Limit and Threshold
Use these settings to control how much vector context is added to the task.
| Setting | How it works |
| ------------------------ | -------------------------------------------------------------- |
| **Results Limit** | Maximum number of matching knowledge pieces AI Puffer can use. |
| **Confidence Threshold** | How closely a result must match before AI Puffer includes it. |
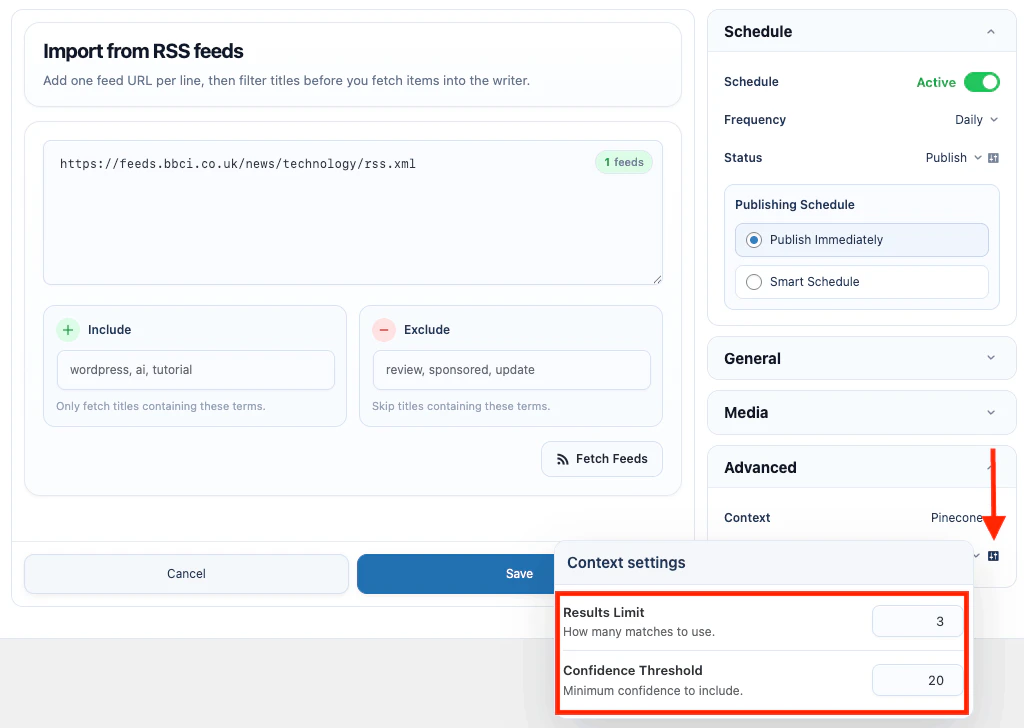 ## Queue
The queue shows work created by saved tasks and Run Now actions.
## Queue
The queue shows work created by saved tasks and Run Now actions.
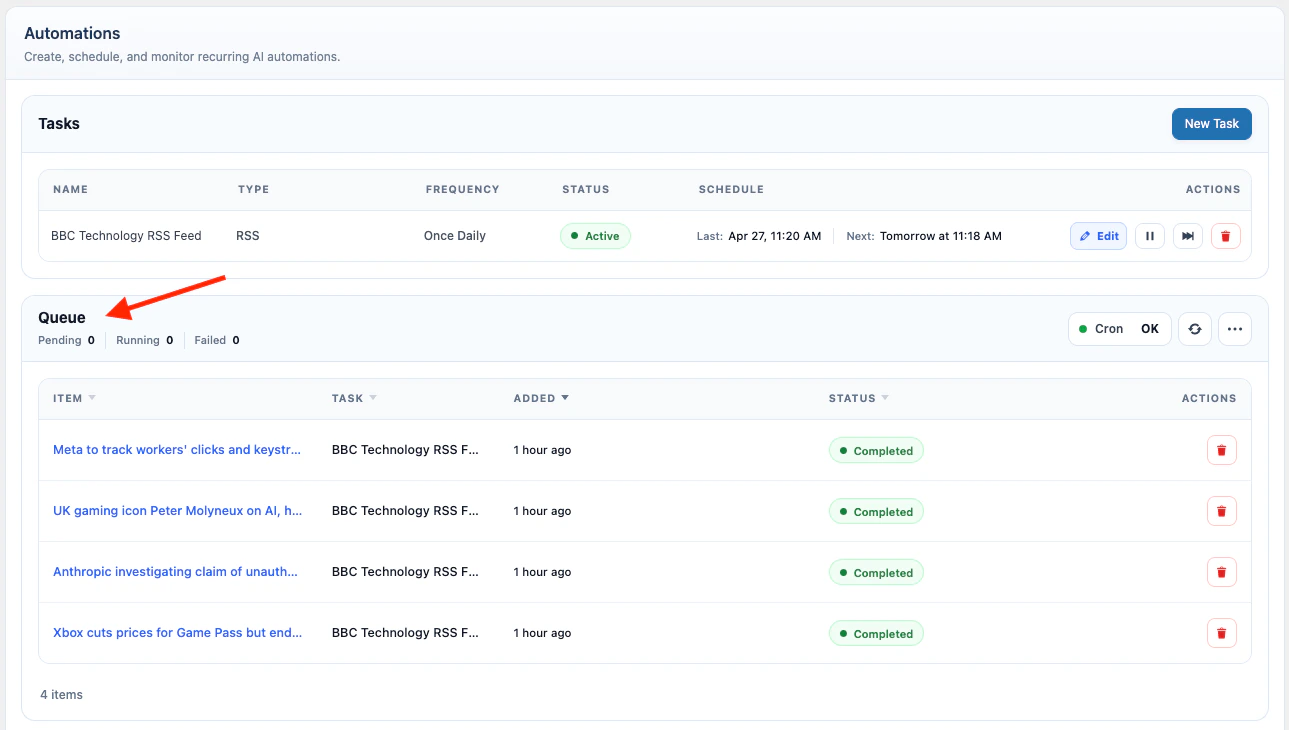 | Status | Meaning |
| -------------- | ----------------------------------------------- |
| **Pending** | Waiting to be processed. |
| **Processing** | Currently being handled by the queue processor. |
| **Completed** | Finished successfully. |
| **Failed** | The queue item returned an error. |
Queue controls:
| Control | What it does |
| ------------------- | ---------------------------------------------------------------- |
| **Search** | Searches target identifiers and task names. |
| **Status filter** | Shows all items or one status. |
| **Retry** | Moves a failed item back to pending and starts queue processing. |
| **Delete** | Deletes one queue item. |
| **Delete filtered** | Deletes queue items matching the current filter. |
Completed content creation items can show the generated post when a post ID is available.
## Connected Apps
Automations can send task results to Connected Apps and webhooks.
| Event | When it fires |
| --------------------- | --------------------------------------------- |
| `content.generated` | After a content creation task creates a post. |
| `task.item_completed` | After a queue item finishes successfully. |
Use these events when another system needs the generated post, task result, or queue item details. Recipe templates include generated content or completed task notifications for apps such as Slack, Notion, Zapier, and Make.
## Logs
Automation activity can appear in AI Puffer logs.
| Task area | Log module |
| ---------------- | --------------------------- |
| Content creation | `content_writer_automation` |
| Comment replies | `community_reply_comments` |
Queue status and error messages remain visible in the Automations queue.
## Troubleshooting
Check these items:
1. Confirm the task status is **Active**.
2. Check the next run time in the task list.
3. Confirm WordPress cron is working.
4. If `DISABLE_WP_CRON` is enabled, configure a server cron job.
5. Check whether the task already has pending or processing queue items.
Content creation tasks do not queue another scheduled batch while that same task already has pending or processing items.
Possible causes:
| Task type | Check |
| ---------------- | -------------------------------------------------------------------------------- |
| Manual Entry | The input must contain at least one non-empty topic line. |
| CSV | The CSV must contain topic rows. |
| RSS Feed | The feed must contain new unprocessed items that pass the filters. |
| Web Page | The URLs must be reachable and extractable. |
| Google Sheets | Column A must contain a topic and column G must be empty. |
| Rewrite Content | The selected post type, status, author, and category filters must match content. |
| Content Indexing | Matching content must be published. |
| Comment Replies | Matching comments must be approved. |
1. Open the queue.
2. Read the error message.
3. Fix the provider, model, source, prompt, or destination setting.
4. Click **Retry**.
Check these items:
1. The Sheet ID is correct.
2. The service account JSON credentials are valid.
3. The spreadsheet is shared with the service account email.
4. Column A has a topic.
5. Column G is empty.
Check these items:
1. The selected vector store, index, or collection exists.
2. Pinecone, Qdrant, and Chroma have an embedding provider and model selected.
3. The selected post types contain published content.
4. The provider API key is configured in [AI Providers](/ai-providers).
Check these items:
1. The comment is approved.
2. The comment belongs to a selected post type.
3. The include and exclude keyword filters allow the comment.
4. The reply prompt is not empty.
5. The selected model is configured.
| Status | Meaning |
| -------------- | ----------------------------------------------- |
| **Pending** | Waiting to be processed. |
| **Processing** | Currently being handled by the queue processor. |
| **Completed** | Finished successfully. |
| **Failed** | The queue item returned an error. |
Queue controls:
| Control | What it does |
| ------------------- | ---------------------------------------------------------------- |
| **Search** | Searches target identifiers and task names. |
| **Status filter** | Shows all items or one status. |
| **Retry** | Moves a failed item back to pending and starts queue processing. |
| **Delete** | Deletes one queue item. |
| **Delete filtered** | Deletes queue items matching the current filter. |
Completed content creation items can show the generated post when a post ID is available.
## Connected Apps
Automations can send task results to Connected Apps and webhooks.
| Event | When it fires |
| --------------------- | --------------------------------------------- |
| `content.generated` | After a content creation task creates a post. |
| `task.item_completed` | After a queue item finishes successfully. |
Use these events when another system needs the generated post, task result, or queue item details. Recipe templates include generated content or completed task notifications for apps such as Slack, Notion, Zapier, and Make.
## Logs
Automation activity can appear in AI Puffer logs.
| Task area | Log module |
| ---------------- | --------------------------- |
| Content creation | `content_writer_automation` |
| Comment replies | `community_reply_comments` |
Queue status and error messages remain visible in the Automations queue.
## Troubleshooting
Check these items:
1. Confirm the task status is **Active**.
2. Check the next run time in the task list.
3. Confirm WordPress cron is working.
4. If `DISABLE_WP_CRON` is enabled, configure a server cron job.
5. Check whether the task already has pending or processing queue items.
Content creation tasks do not queue another scheduled batch while that same task already has pending or processing items.
Possible causes:
| Task type | Check |
| ---------------- | -------------------------------------------------------------------------------- |
| Manual Entry | The input must contain at least one non-empty topic line. |
| CSV | The CSV must contain topic rows. |
| RSS Feed | The feed must contain new unprocessed items that pass the filters. |
| Web Page | The URLs must be reachable and extractable. |
| Google Sheets | Column A must contain a topic and column G must be empty. |
| Rewrite Content | The selected post type, status, author, and category filters must match content. |
| Content Indexing | Matching content must be published. |
| Comment Replies | Matching comments must be approved. |
1. Open the queue.
2. Read the error message.
3. Fix the provider, model, source, prompt, or destination setting.
4. Click **Retry**.
Check these items:
1. The Sheet ID is correct.
2. The service account JSON credentials are valid.
3. The spreadsheet is shared with the service account email.
4. Column A has a topic.
5. Column G is empty.
Check these items:
1. The selected vector store, index, or collection exists.
2. Pinecone, Qdrant, and Chroma have an embedding provider and model selected.
3. The selected post types contain published content.
4. The provider API key is configured in [AI Providers](/ai-providers).
Check these items:
1. The comment is approved.
2. The comment belongs to a selected post type.
3. The include and exclude keyword filters allow the comment.
4. The reply prompt is not empty.
5. The selected model is configured.