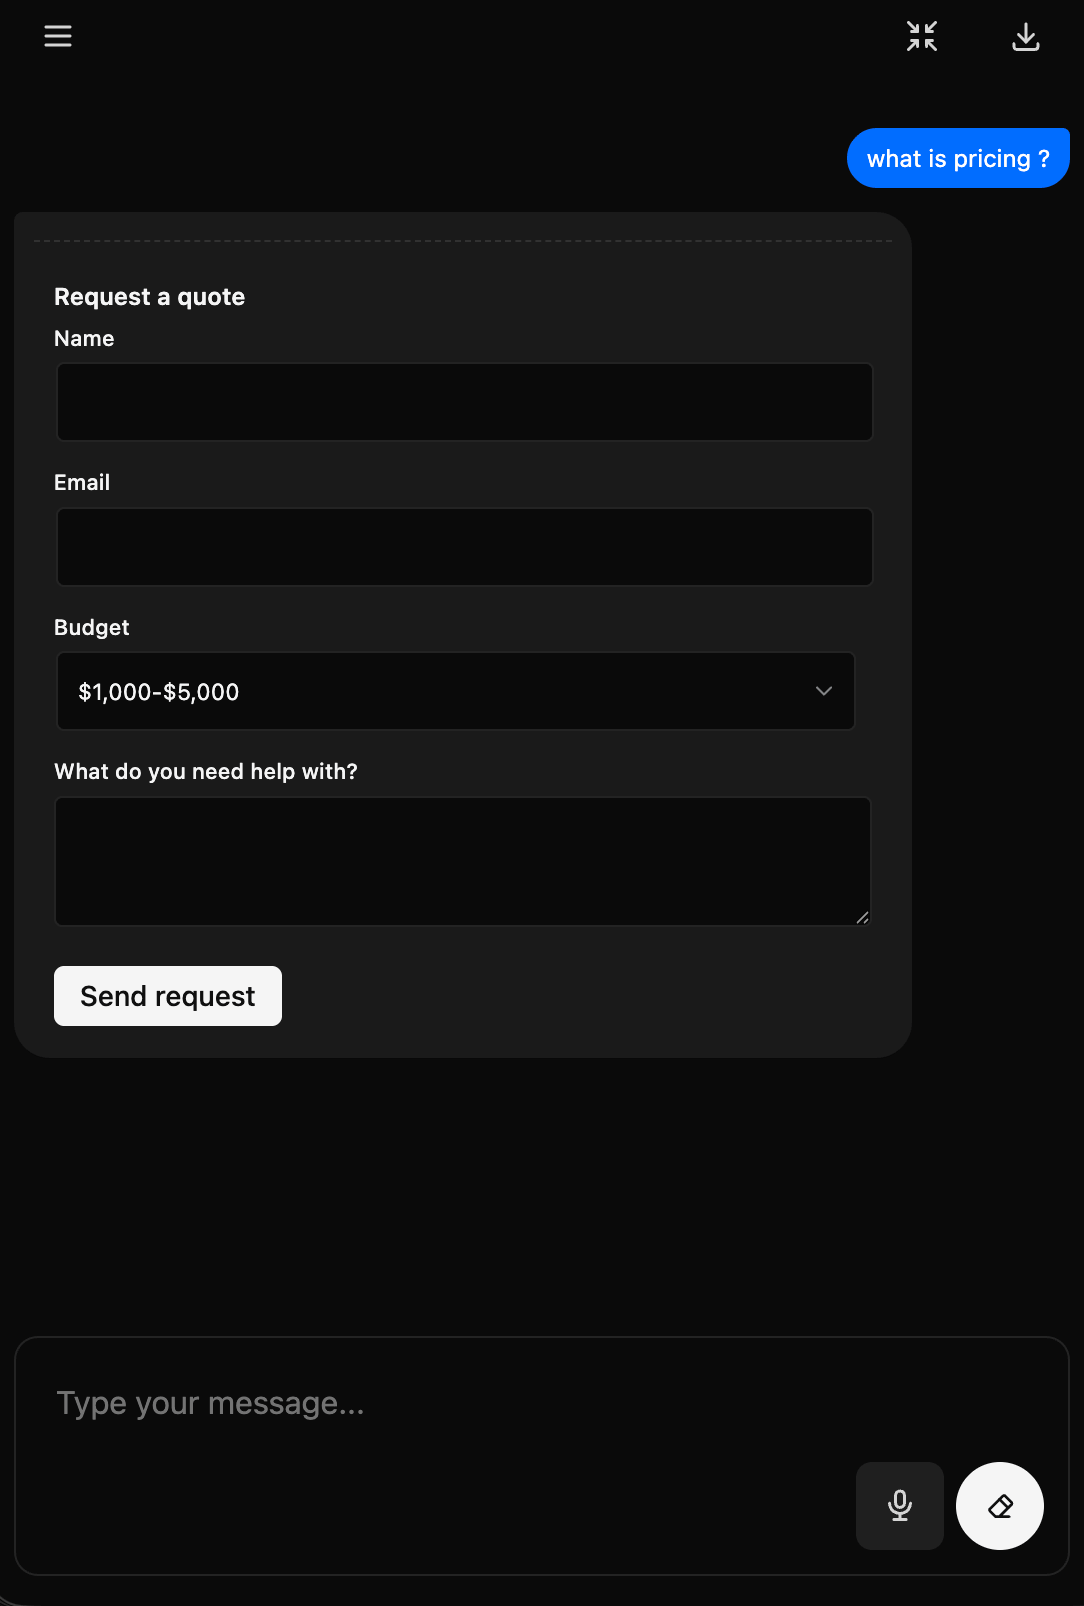
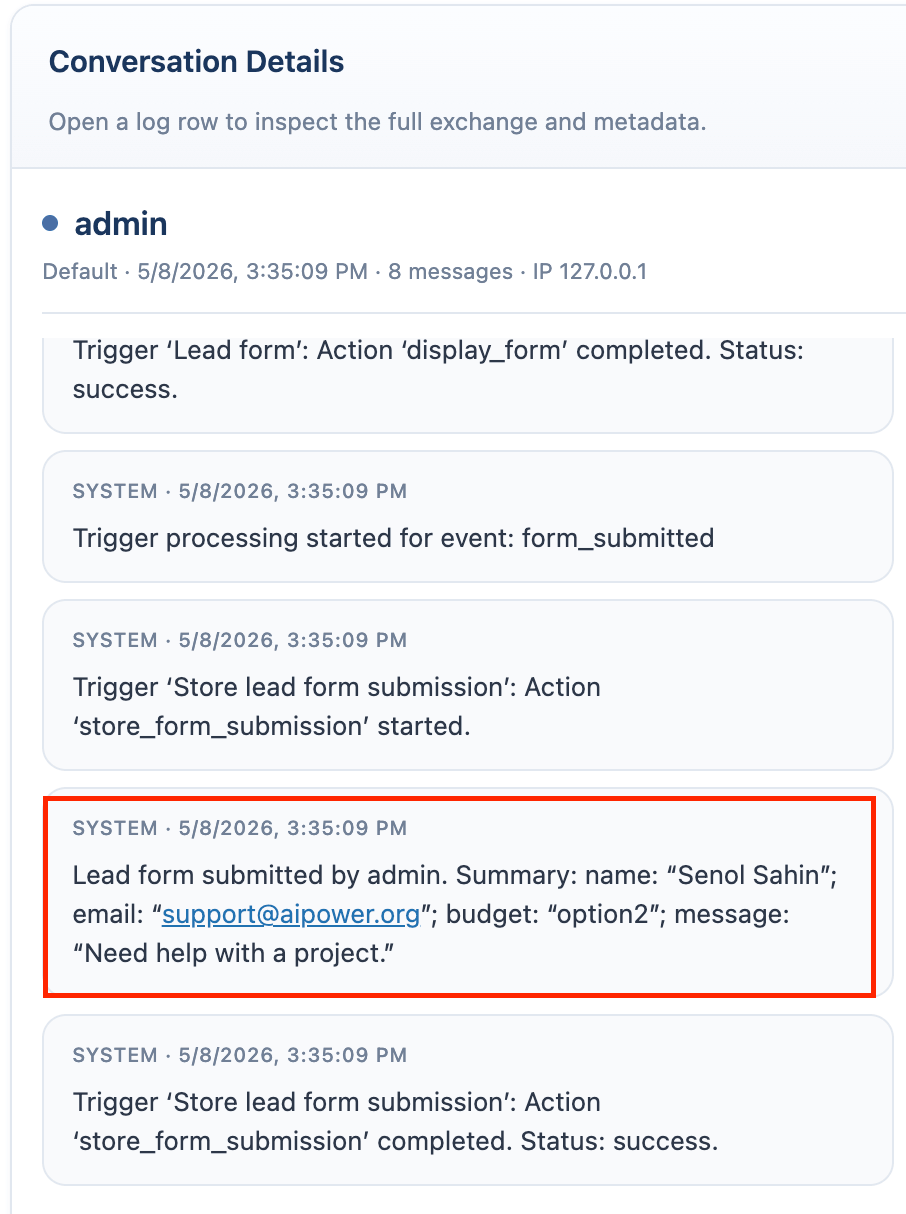
> ## Documentation Index
> Fetch the complete documentation index at: https://docs.aipower.org/llms.txt
> Use this file to discover all available pages before exploring further.
# Chatbots
> Create, configure, and deploy AI Puffer chatbots.
## Overview
Use Chatbots to add AI chatbots to WordPress. Each chatbot has its own model, instructions, knowledge sources, tools, interface, popup settings, limits, connected apps, and rules.
Open the frontend chatbot example.
Use popup, on-page, or external embed.
Choose the provider, model, instructions, and memory.
Use vectors, page context, and training data.
Add file upload, web search, images, and voice.
Customize theme, popup, starters, consent, and labels.
Set usage limits and credit behavior.
Send chatbot events to Slack, HubSpot, Notion, and more.
Trigger actions from chatbot events and conditions.
## Create a Chatbot
1. Click the **+** button in the chatbot tab row.
 2. A new bot will be created immediately with the default name New Chatbot.
3. Use the Name field in the Chatbot accordion to rename it.
2. A new bot will be created immediately with the default name New Chatbot.
3. Use the Name field in the Chatbot accordion to rename it.
 4. Use **Preview** to test the chatbot before publishing it.
Use **Actions** for saved chatbots:
| Action | What it does |
| ------------- | ----------------------------------------------------------- |
| **Duplicate** | Creates a copy of the current chatbot. |
| **Reset** | Resets the current chatbot settings. |
| **Delete** | Deletes the chatbot. The default chatbot cannot be deleted. |
4. Use **Preview** to test the chatbot before publishing it.
Use **Actions** for saved chatbots:
| Action | What it does |
| ------------- | ----------------------------------------------------------- |
| **Duplicate** | Creates a copy of the current chatbot. |
| **Reset** | Resets the current chatbot settings. |
| **Delete** | Deletes the chatbot. The default chatbot cannot be deleted. |
 ## Deploy a Chatbot
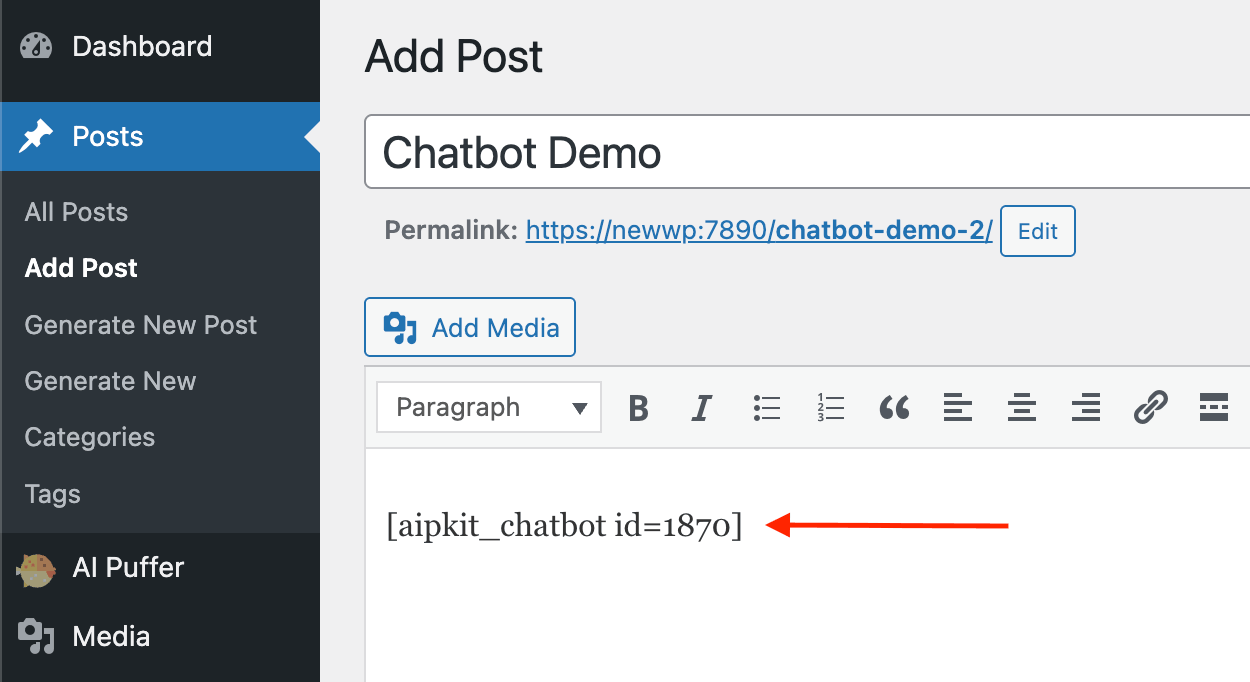
Each chatbot has a shortcode. For example:
```text theme={null}
[aipkit_chatbot id=123]
```
### On-page Chatbot
1. Select **Mode: On-page**.
2. Copy the shortcode.
## Deploy a Chatbot
Each chatbot has a shortcode. For example:
```text theme={null}
[aipkit_chatbot id=123]
```
### On-page Chatbot
1. Select **Mode: On-page**.
2. Copy the shortcode.
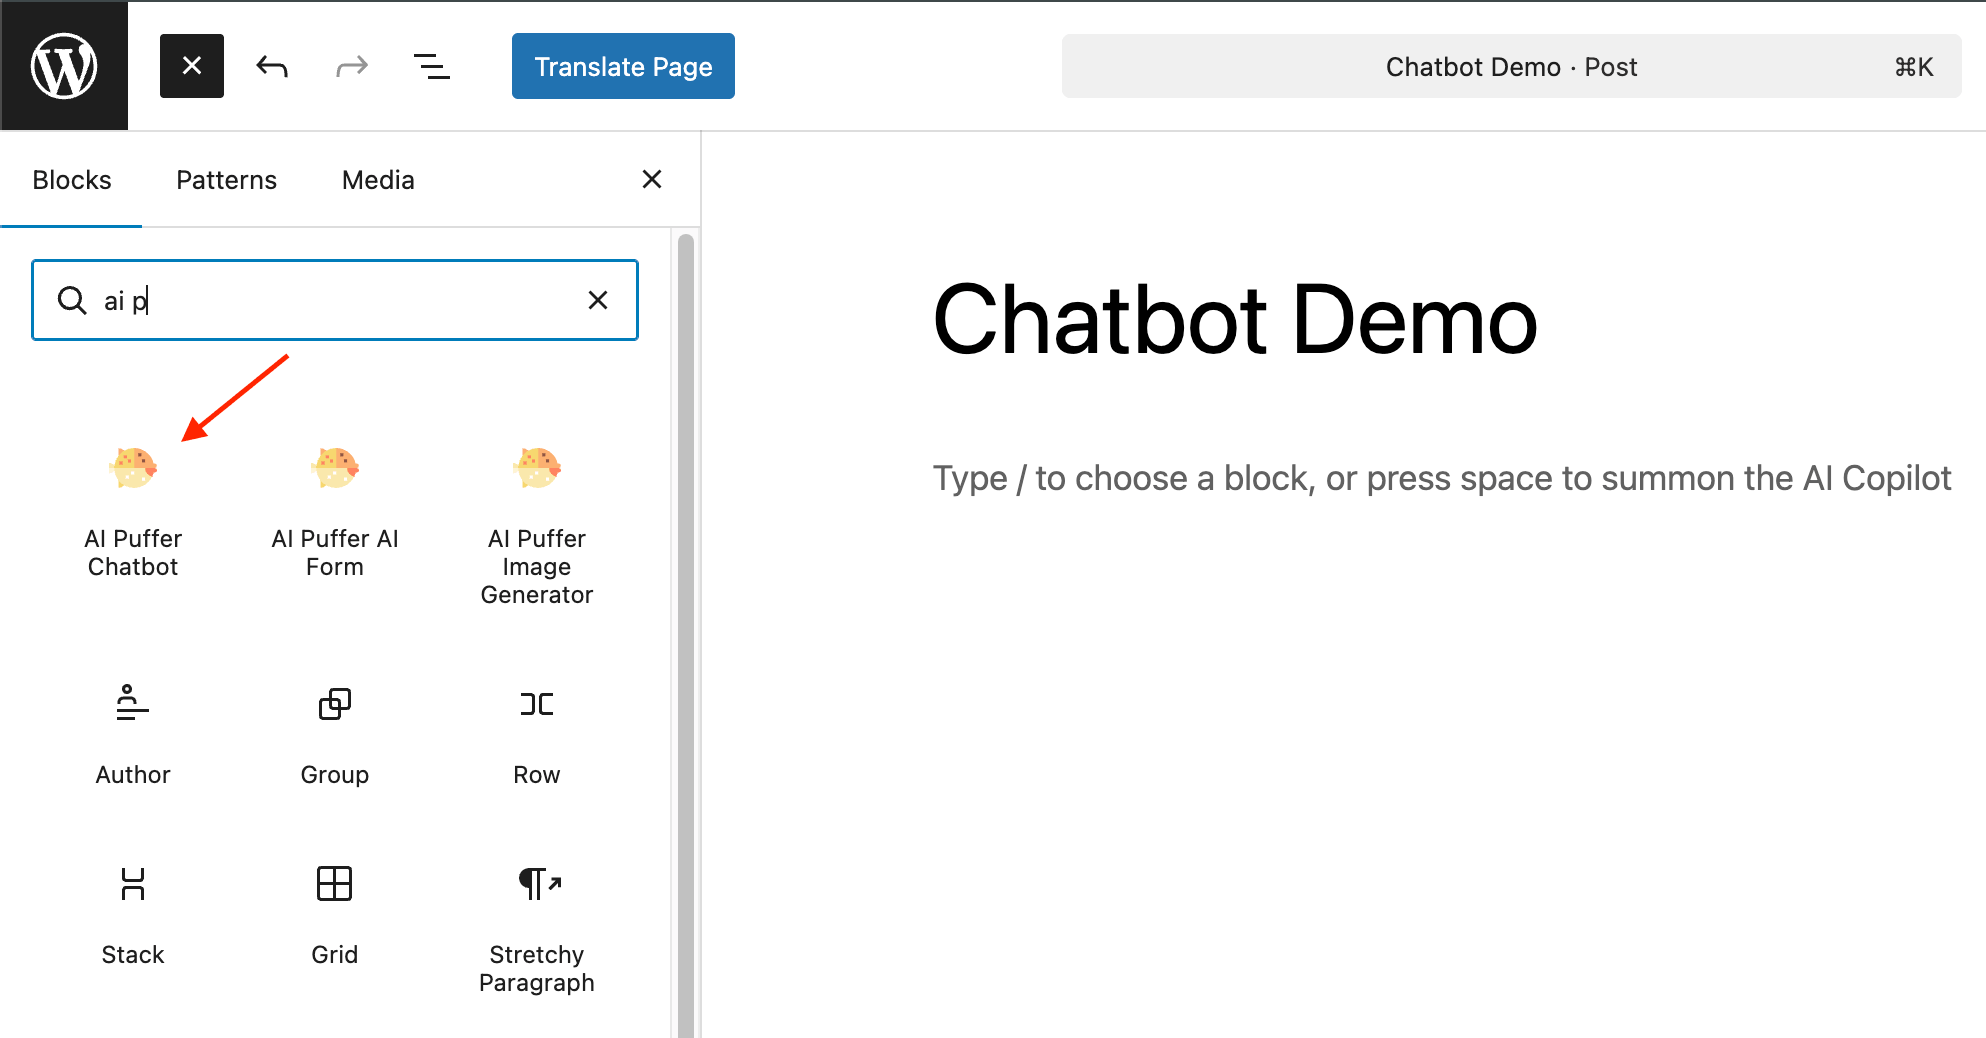
 3. Paste it into a page, post, block, or shortcode area.
4. Publish or update the page.
3. Paste it into a page, post, block, or shortcode area.
4. Publish or update the page.
 ### Popup Chatbot
1. Select **Mode: Popup**.
2. Choose whether the popup should be **Site-Wide**.
3. Save and test the site frontend.
Site-wide popup mode is global. Enabling it for one chatbot turns it off for the previous site-wide popup chatbot.
### External Embed
External Embed lets you place a chatbot on a non-WordPress site while managing it from WordPress.
1. Select **Mode: External**.
2. Click **External Setup**.
### Popup Chatbot
1. Select **Mode: Popup**.
2. Choose whether the popup should be **Site-Wide**.
3. Save and test the site frontend.
Site-wide popup mode is global. Enabling it for one chatbot turns it off for the previous site-wide popup chatbot.
### External Embed
External Embed lets you place a chatbot on a non-WordPress site while managing it from WordPress.
1. Select **Mode: External**.
2. Click **External Setup**.
 3. Copy the embed code.
4. Add allowed domains, one URL per line.
5. Paste the embed code into the external site.
Set allowed domains before using external embed on a production site. Do not leave external embeds open to domains you do not control.
3. Copy the embed code.
4. Add allowed domains, one URL per line.
5. Paste the embed code into the external site.
Set allowed domains before using external embed on a production site. Do not leave external embeds open to domains you do not control.
 ## Model and Instructions
Open the **General** section to set the chatbot identity and model behavior.
| Setting | Use it for |
| ------------------ | ------------------------------------------------------------------------------------------------------------------------------------------------------------------------- |
| **Name** | Internal chatbot name shown in the Chatbots screen. |
| **Engine** | AI provider for this chatbot. |
| **Model** | Model used by this chatbot. |
| **Instructions** | System instructions for the chatbot. Use `[date]` when the bot needs today's date in its instructions. |
| **Temperature** | Response variation. Lower values are more predictable. |
| **Context** | Maximum completion tokens for the model response. |
| **Messages** | Number of previous conversation messages included as history. |
| **Session memory** | Only applies when the chatbot uses OpenAI. AI Puffer stores the OpenAI response ID and sends it with the next message so OpenAI can continue the same conversation state. |
| **Reasoning** | Reasoning effort for supported models. Keep it set to None for faster responses; higher values can make replies slower. |
Session memory applies only to OpenAI chatbots. When enabled, conversation continuity depends on OpenAI response IDs, so review this setting before using it for privacy-sensitive chatbots.
## Model and Instructions
Open the **General** section to set the chatbot identity and model behavior.
| Setting | Use it for |
| ------------------ | ------------------------------------------------------------------------------------------------------------------------------------------------------------------------- |
| **Name** | Internal chatbot name shown in the Chatbots screen. |
| **Engine** | AI provider for this chatbot. |
| **Model** | Model used by this chatbot. |
| **Instructions** | System instructions for the chatbot. Use `[date]` when the bot needs today's date in its instructions. |
| **Temperature** | Response variation. Lower values are more predictable. |
| **Context** | Maximum completion tokens for the model response. |
| **Messages** | Number of previous conversation messages included as history. |
| **Session memory** | Only applies when the chatbot uses OpenAI. AI Puffer stores the OpenAI response ID and sends it with the next message so OpenAI can continue the same conversation state. |
| **Reasoning** | Reasoning effort for supported models. Keep it set to None for faster responses; higher values can make replies slower. |
Session memory applies only to OpenAI chatbots. When enabled, conversation continuity depends on OpenAI response IDs, so review this setting before using it for privacy-sensitive chatbots.
 ## Knowledge
Knowledge controls the information a chatbot can use before it answers.
It can read the current page content, search trained vector data, or use both depending on the chatbot setup.
## Knowledge
Knowledge controls the information a chatbot can use before it answers.
It can read the current page content, search trained vector data, or use both depending on the chatbot setup.
 ### Vector
Vector is the better option when you want to train the chatbot with your own content.
AI Puffer converts your content into searchable chunks.
When a visitor asks a question, the chatbot retrieves the closest matching chunks and uses them as context for the answer.
#### OpenAI
OpenAI Vector Stores are the simplest option when the chatbot uses OpenAI.
To create a store:
1. Go to **AI Puffer > Knowledge Base > Stores**.
2. Select **OpenAI** as the provider.
3. Click **Create Store**.
### Vector
Vector is the better option when you want to train the chatbot with your own content.
AI Puffer converts your content into searchable chunks.
When a visitor asks a question, the chatbot retrieves the closest matching chunks and uses them as context for the answer.
#### OpenAI
OpenAI Vector Stores are the simplest option when the chatbot uses OpenAI.
To create a store:
1. Go to **AI Puffer > Knowledge Base > Stores**.
2. Select **OpenAI** as the provider.
3. Click **Create Store**.
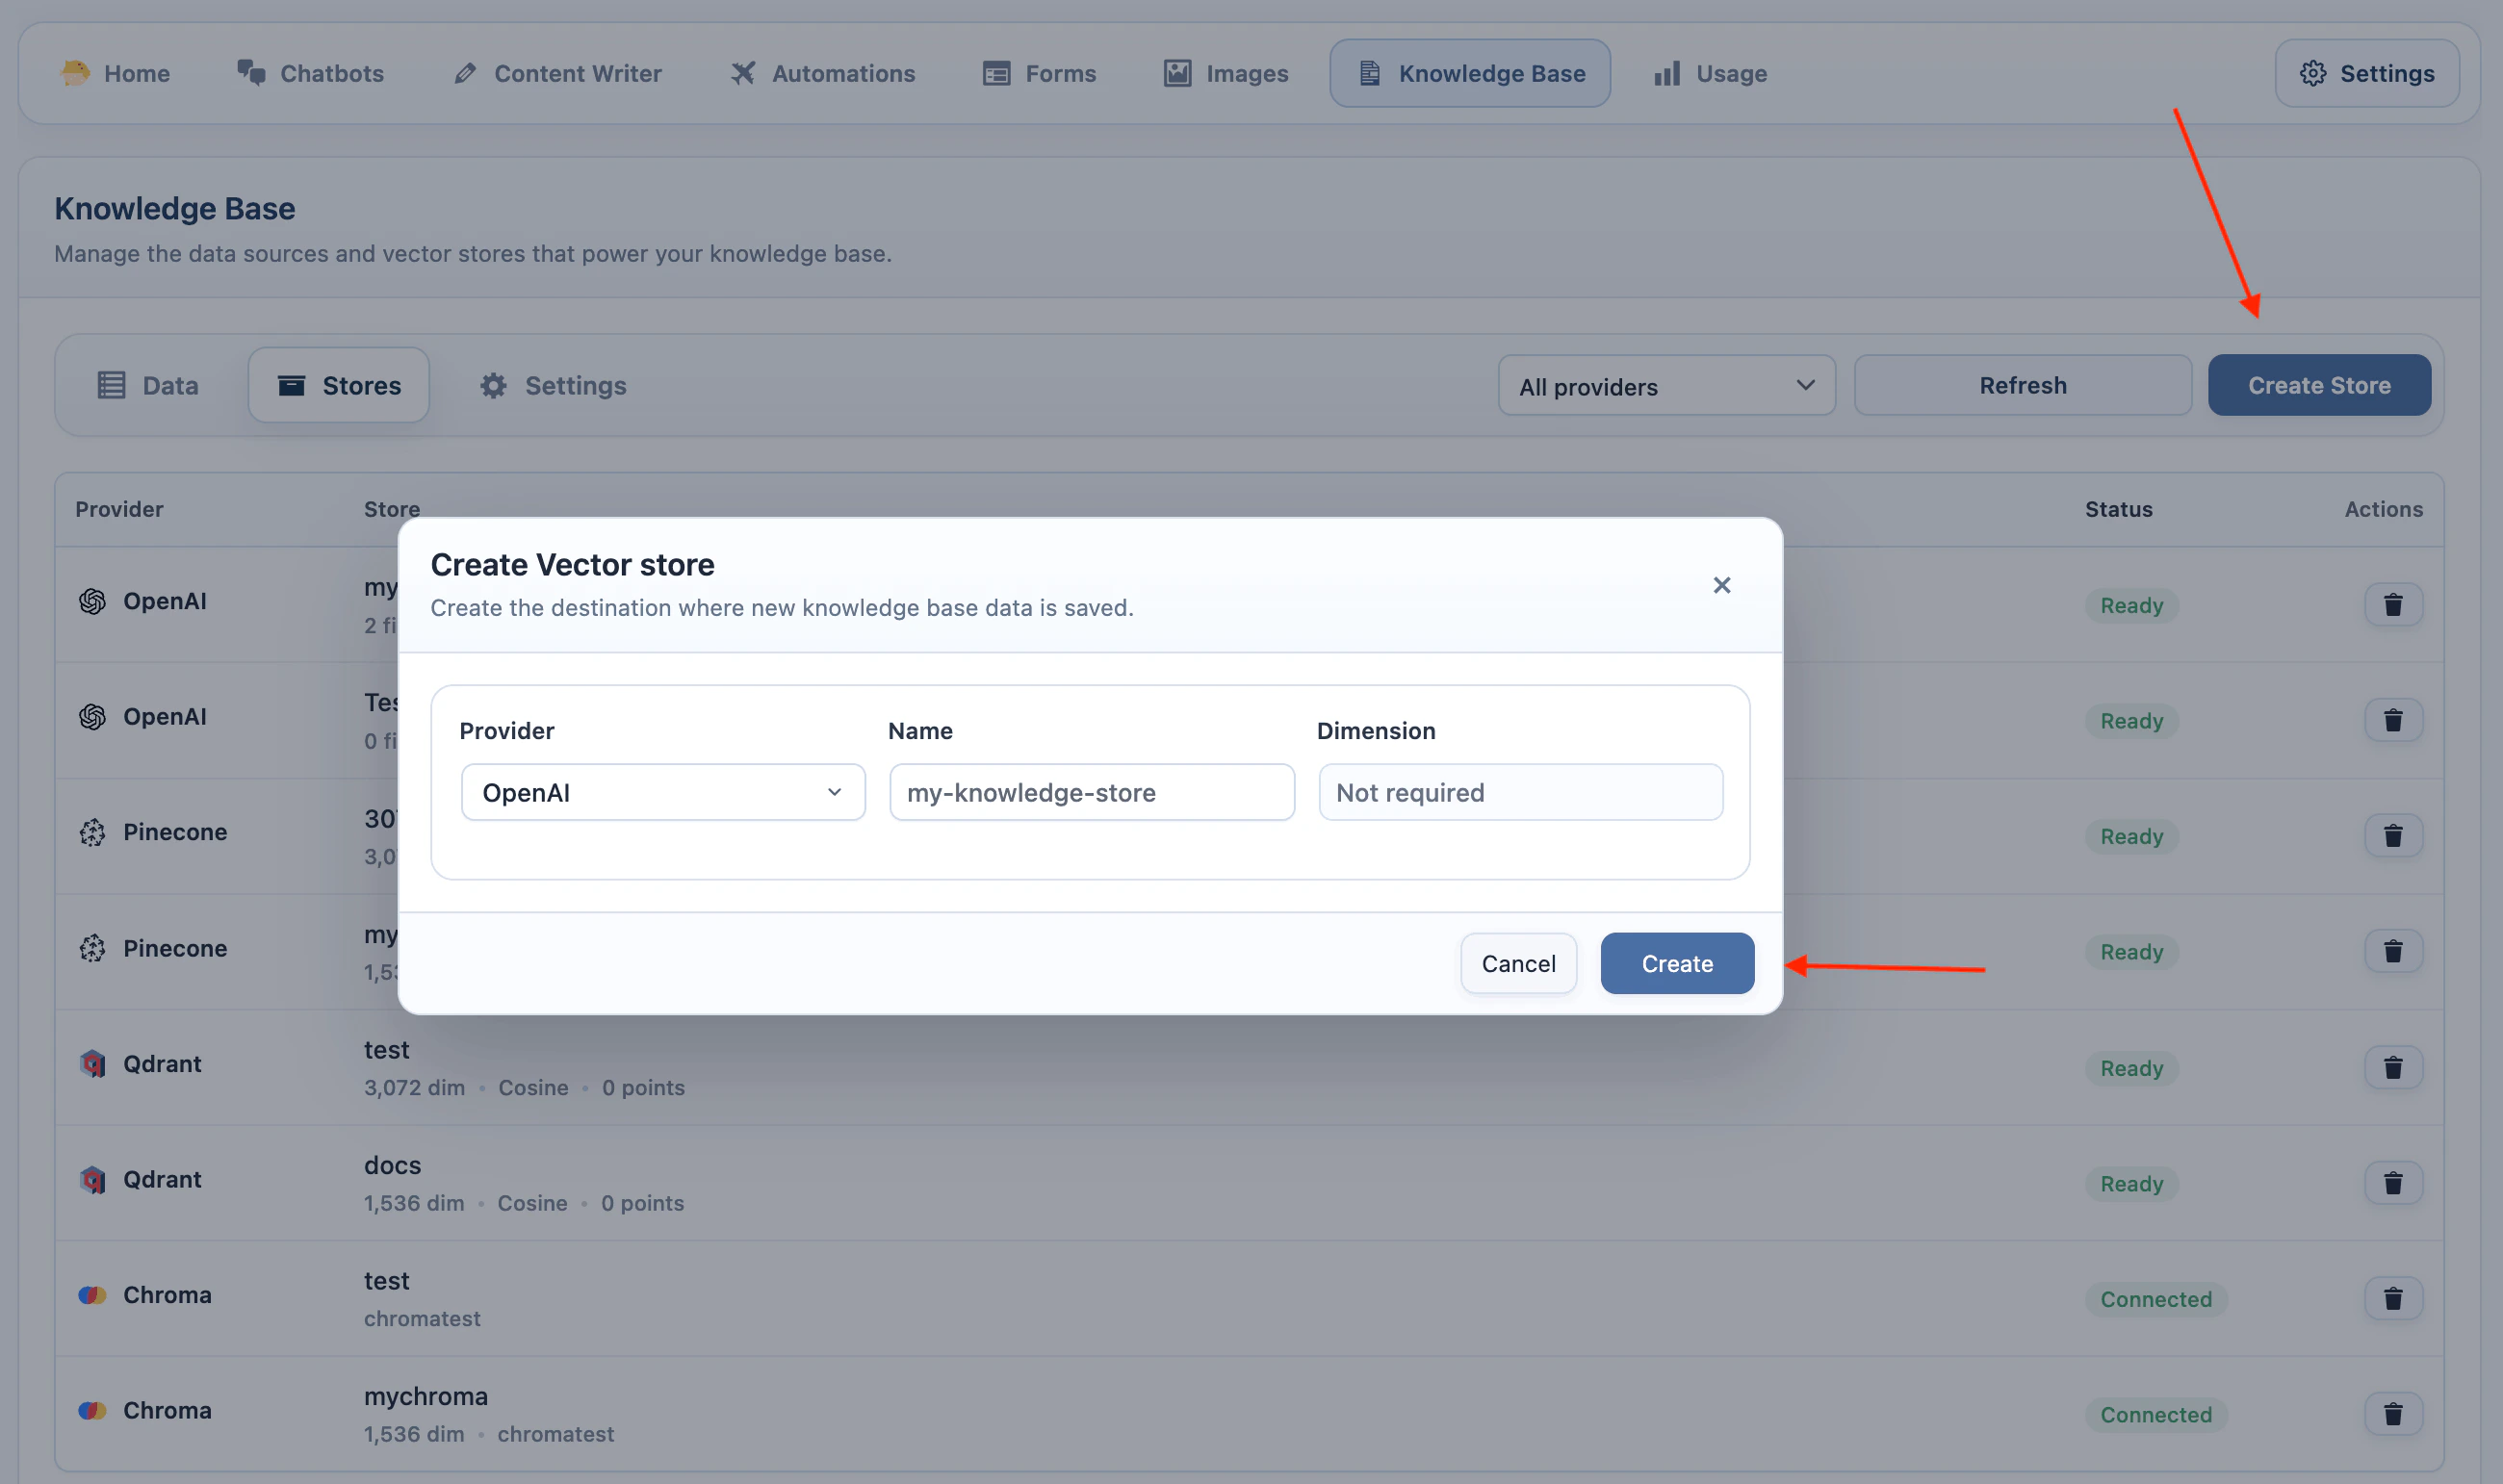 4. Enter a store name and create it.
5. Go to **AI Puffer > Knowledge Base > Data** and add training data to the store.
4. Enter a store name and create it.
5. Go to **AI Puffer > Knowledge Base > Data** and add training data to the store.
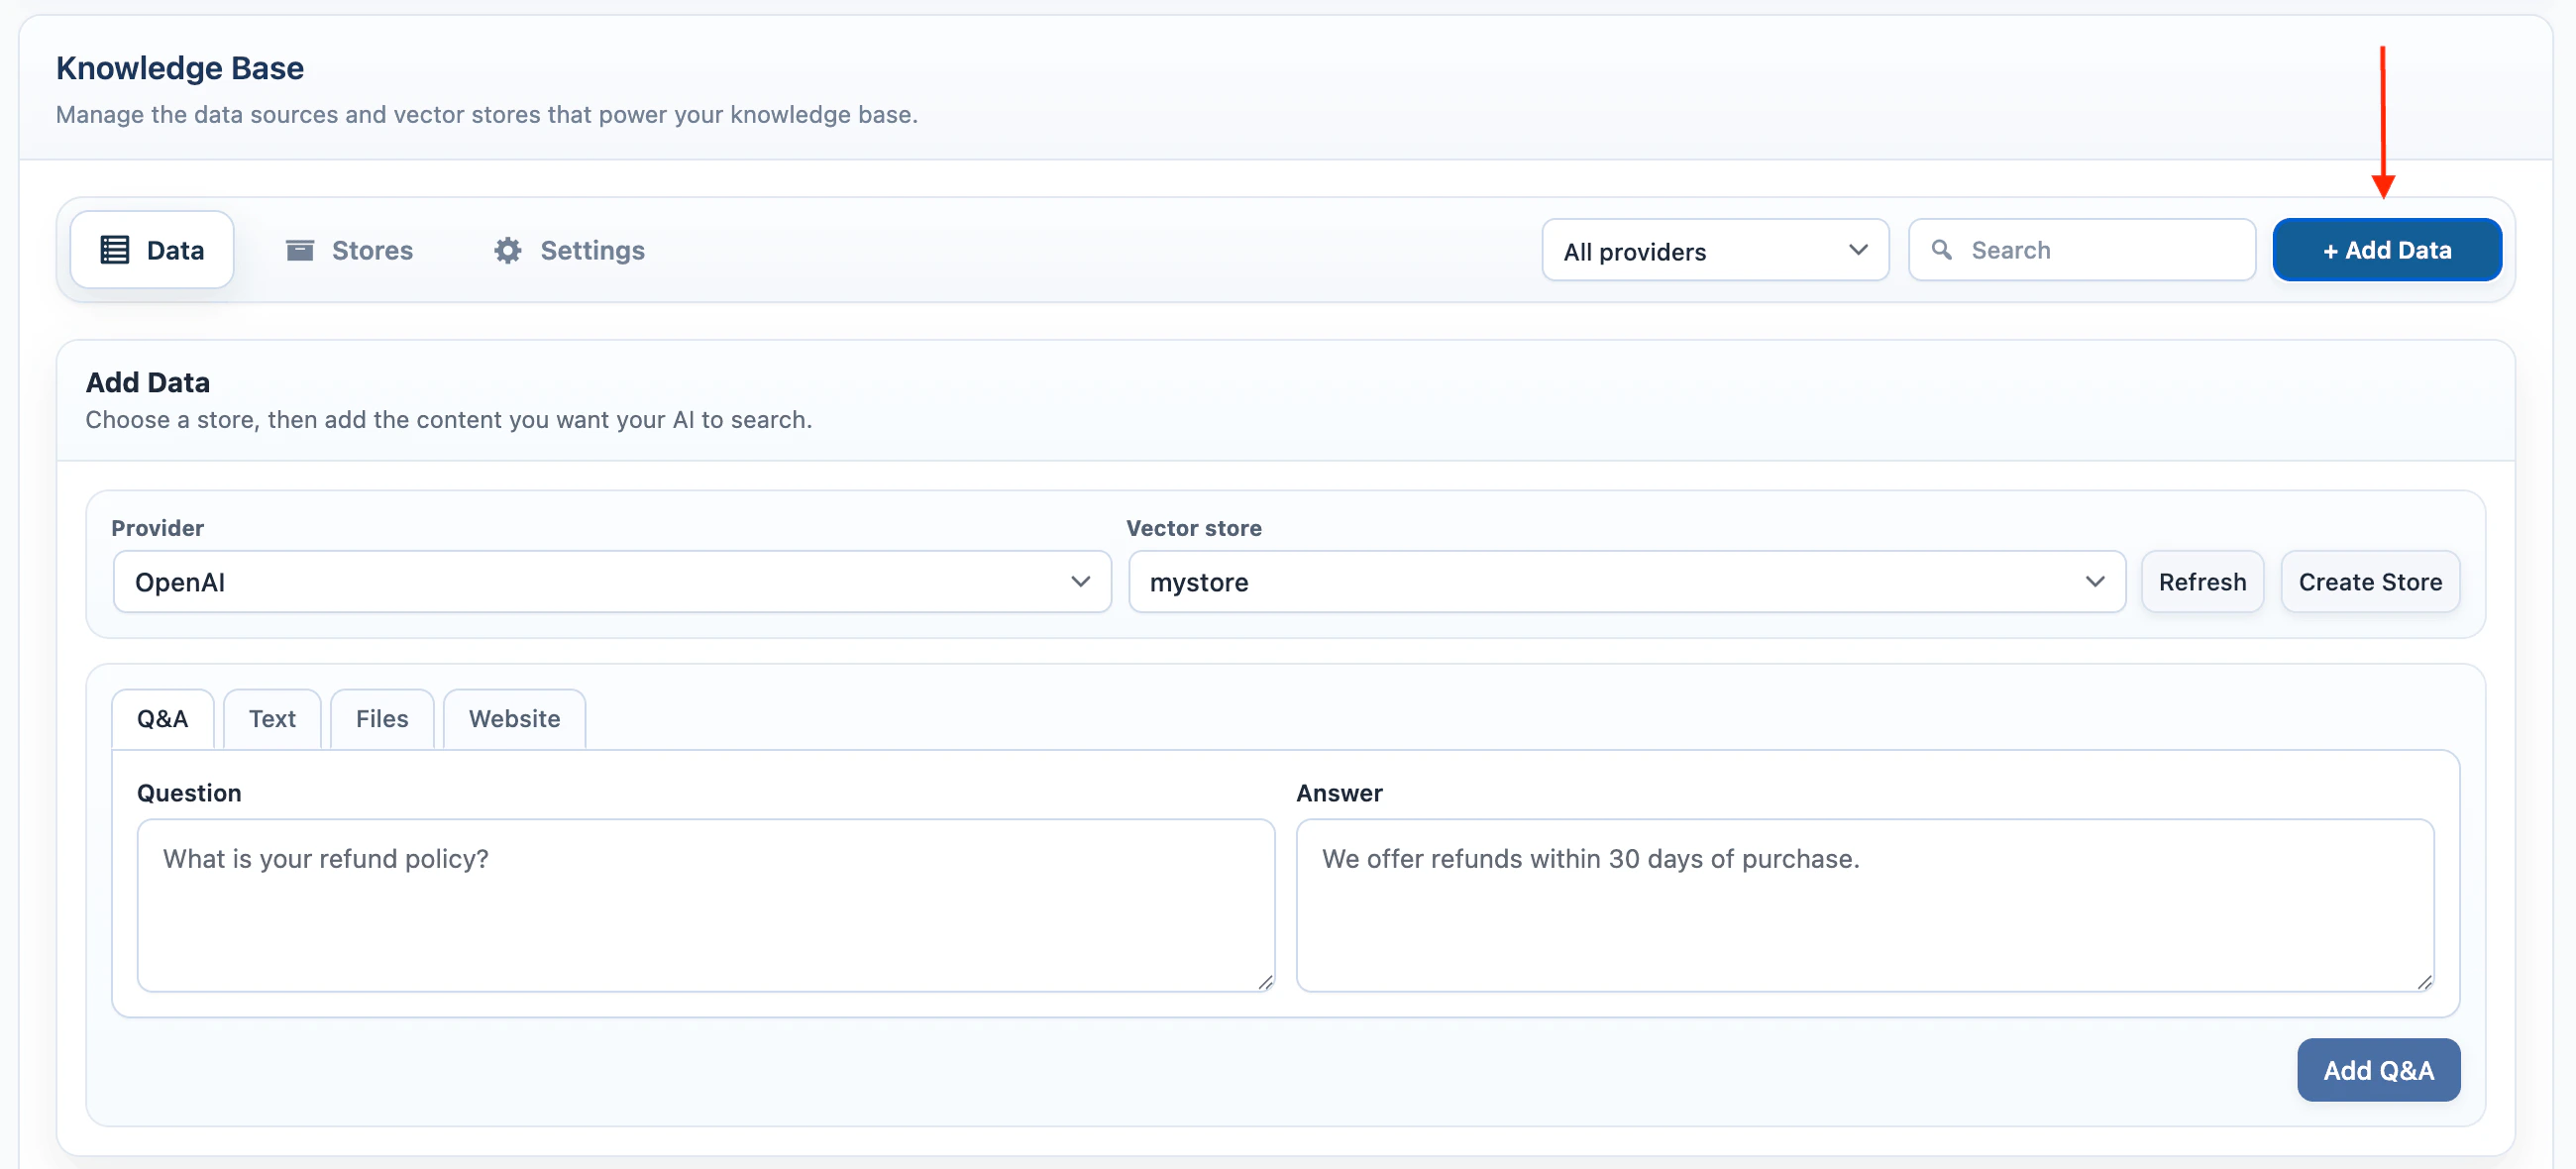 To use it in a chatbot:
1. Go to **AI Puffer > Chatbots** and select the chatbot.
2. In **Knowledge**, select **Vector** as a data source.
3. Set **Vector provider** to **OpenAI**.
To use it in a chatbot:
1. Go to **AI Puffer > Chatbots** and select the chatbot.
2. In **Knowledge**, select **Vector** as a data source.
3. Set **Vector provider** to **OpenAI**.
 4. Select one or two vector stores.
5. Save the chatbot.
#### Pinecone
Pinecone stores vectors in an index. AI Puffer creates those vectors with the embedding model you choose.
The Pinecone index dimension must match the embedding model.
For example, if your index is **3072 dimensions**, use a **3072-dimension** embedding model.
Use the same embedding model when adding data and when enabling Pinecone in the chatbot.
If the Pinecone index dimension does not match the embedding model, search can fail or return poor context.
To create an index:
1. Add your Pinecone credentials in **AI Puffer > Settings > Integrations**.
4. Select one or two vector stores.
5. Save the chatbot.
#### Pinecone
Pinecone stores vectors in an index. AI Puffer creates those vectors with the embedding model you choose.
The Pinecone index dimension must match the embedding model.
For example, if your index is **3072 dimensions**, use a **3072-dimension** embedding model.
Use the same embedding model when adding data and when enabling Pinecone in the chatbot.
If the Pinecone index dimension does not match the embedding model, search can fail or return poor context.
To create an index:
1. Add your Pinecone credentials in **AI Puffer > Settings > Integrations**.
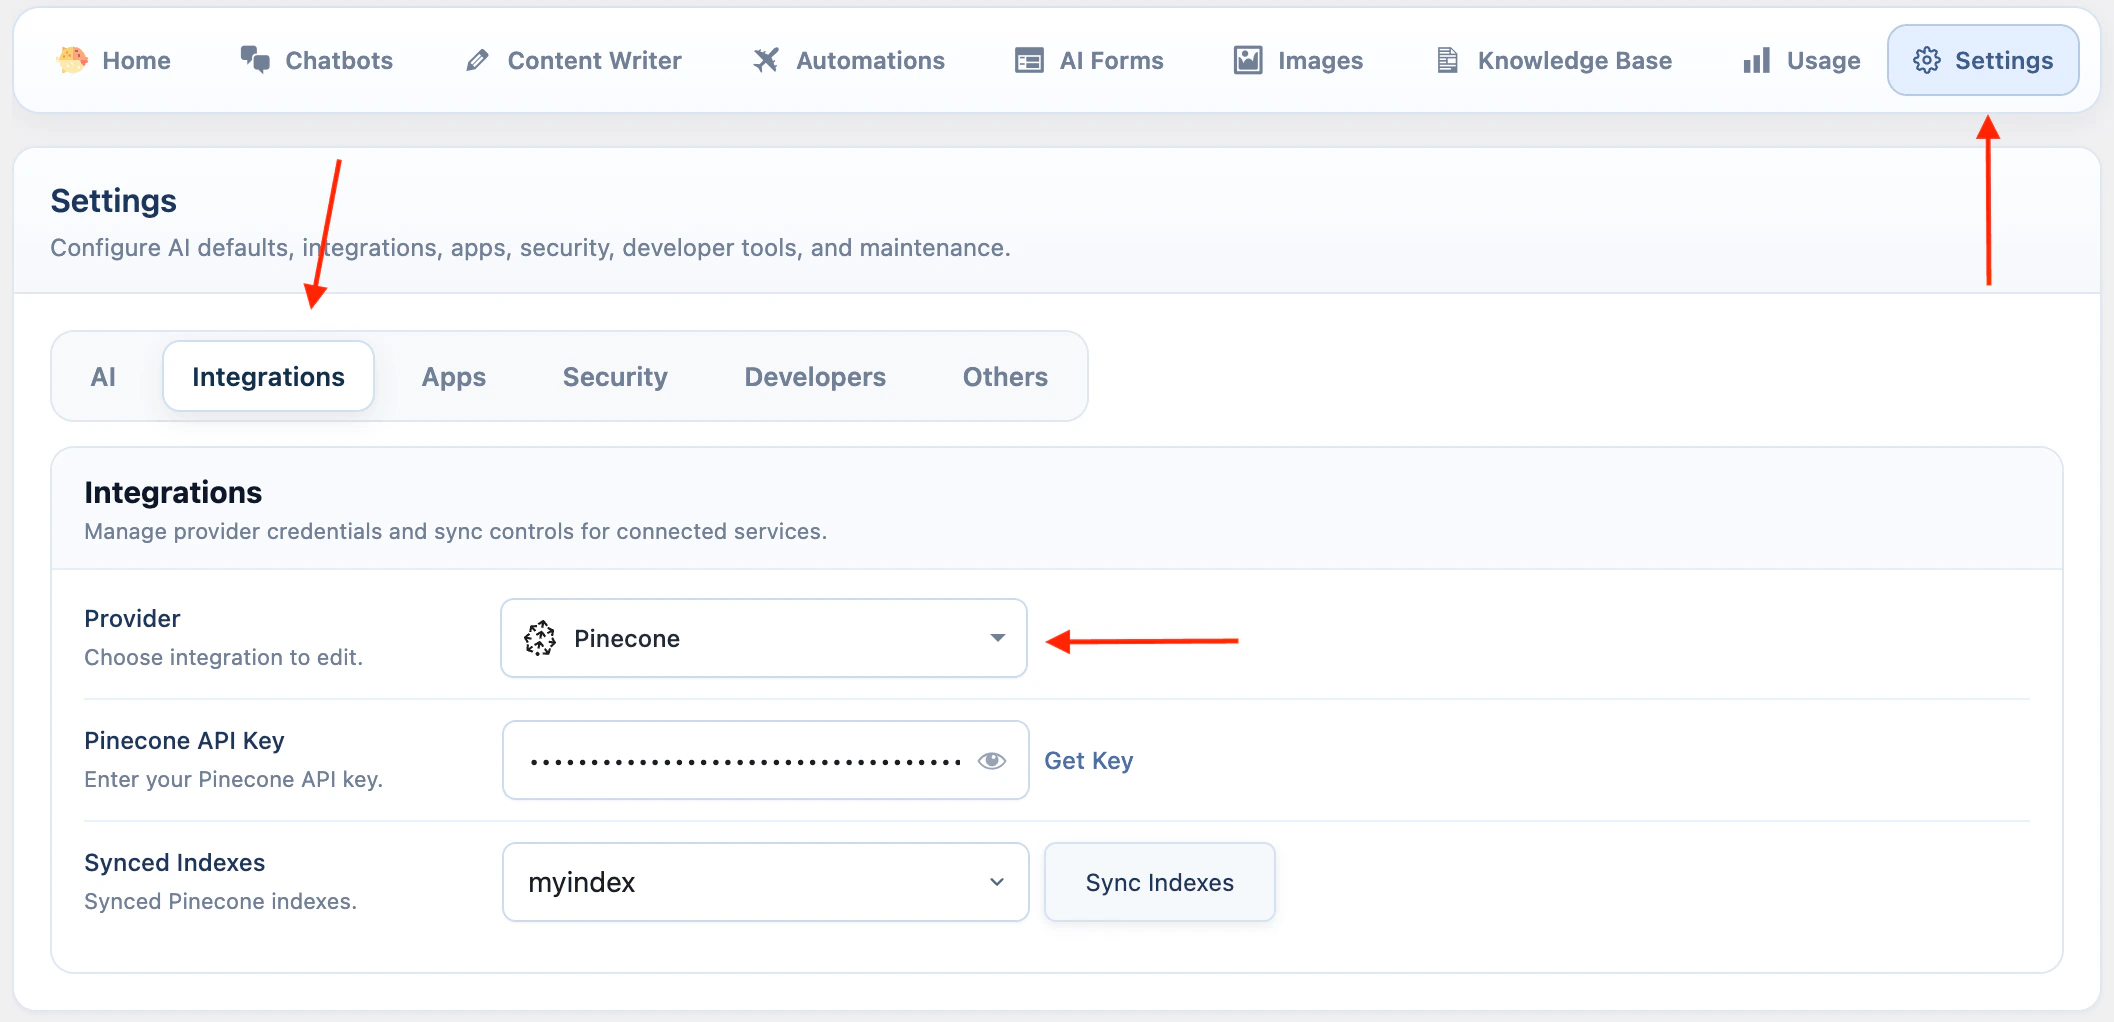 2. Go to **AI Puffer > Knowledge Base > Stores**.
3. Select **Pinecone** as the provider.
4. Select the embedding model you want to use.
5. Click **Create Store**.
2. Go to **AI Puffer > Knowledge Base > Stores**.
3. Select **Pinecone** as the provider.
4. Select the embedding model you want to use.
5. Click **Create Store**.
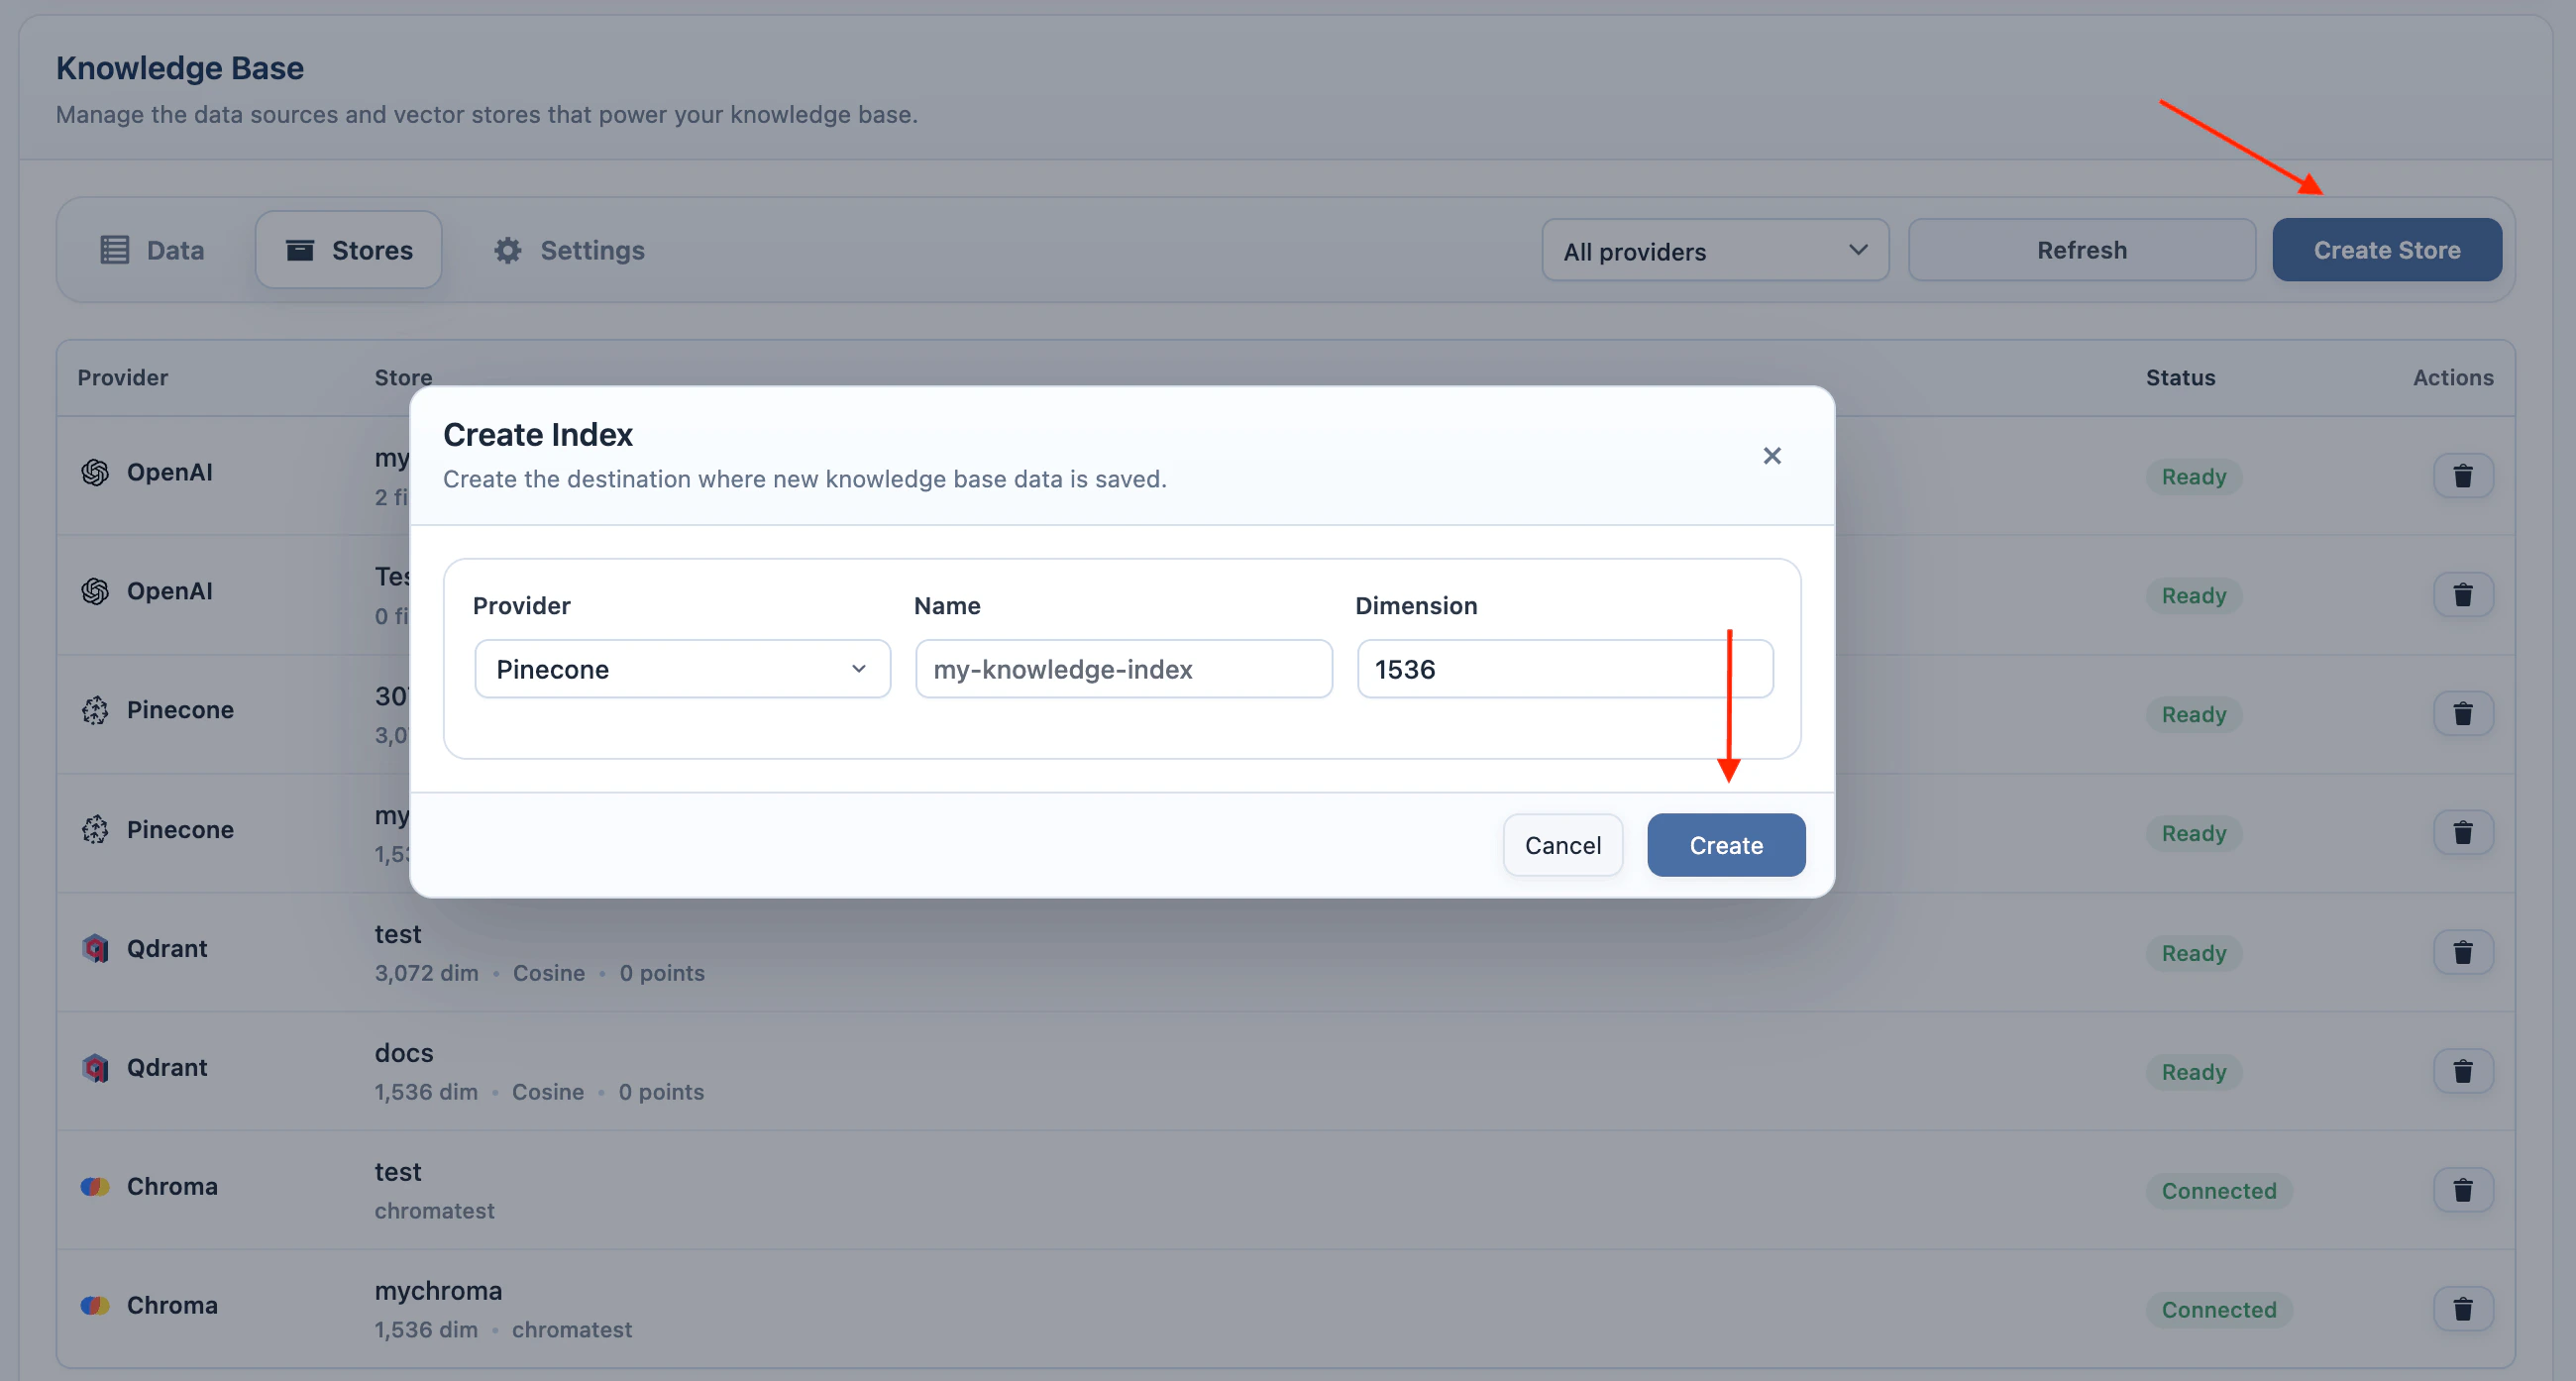 6. Enter an index name and use the dimension for the selected embedding model.
7. Create the index, then add training data with the same embedding model.
To use it in a chatbot:
1. Go to **AI Puffer > Chatbots** and select the chatbot.
2. In **Knowledge**, select **Vector** as a data source.
3. Set **Vector provider** to **Pinecone**.
4. Select the Pinecone index.
5. Select the same embedding provider and model used when you added the data.
6. Save the chatbot.
6. Enter an index name and use the dimension for the selected embedding model.
7. Create the index, then add training data with the same embedding model.
To use it in a chatbot:
1. Go to **AI Puffer > Chatbots** and select the chatbot.
2. In **Knowledge**, select **Vector** as a data source.
3. Set **Vector provider** to **Pinecone**.
4. Select the Pinecone index.
5. Select the same embedding provider and model used when you added the data.
6. Save the chatbot.
 #### Qdrant
Qdrant stores vectors in collections. AI Puffer creates those vectors with the embedding model you choose.
The Qdrant collection size must match the embedding model. For example, if your collection is **3072 dimensions**, use a **3072-dimension** embedding model.
Use the same embedding model when adding data and when enabling Qdrant in the chatbot.
If the Qdrant collection size does not match the embedding model, search can fail or return poor context.
To create a collection:
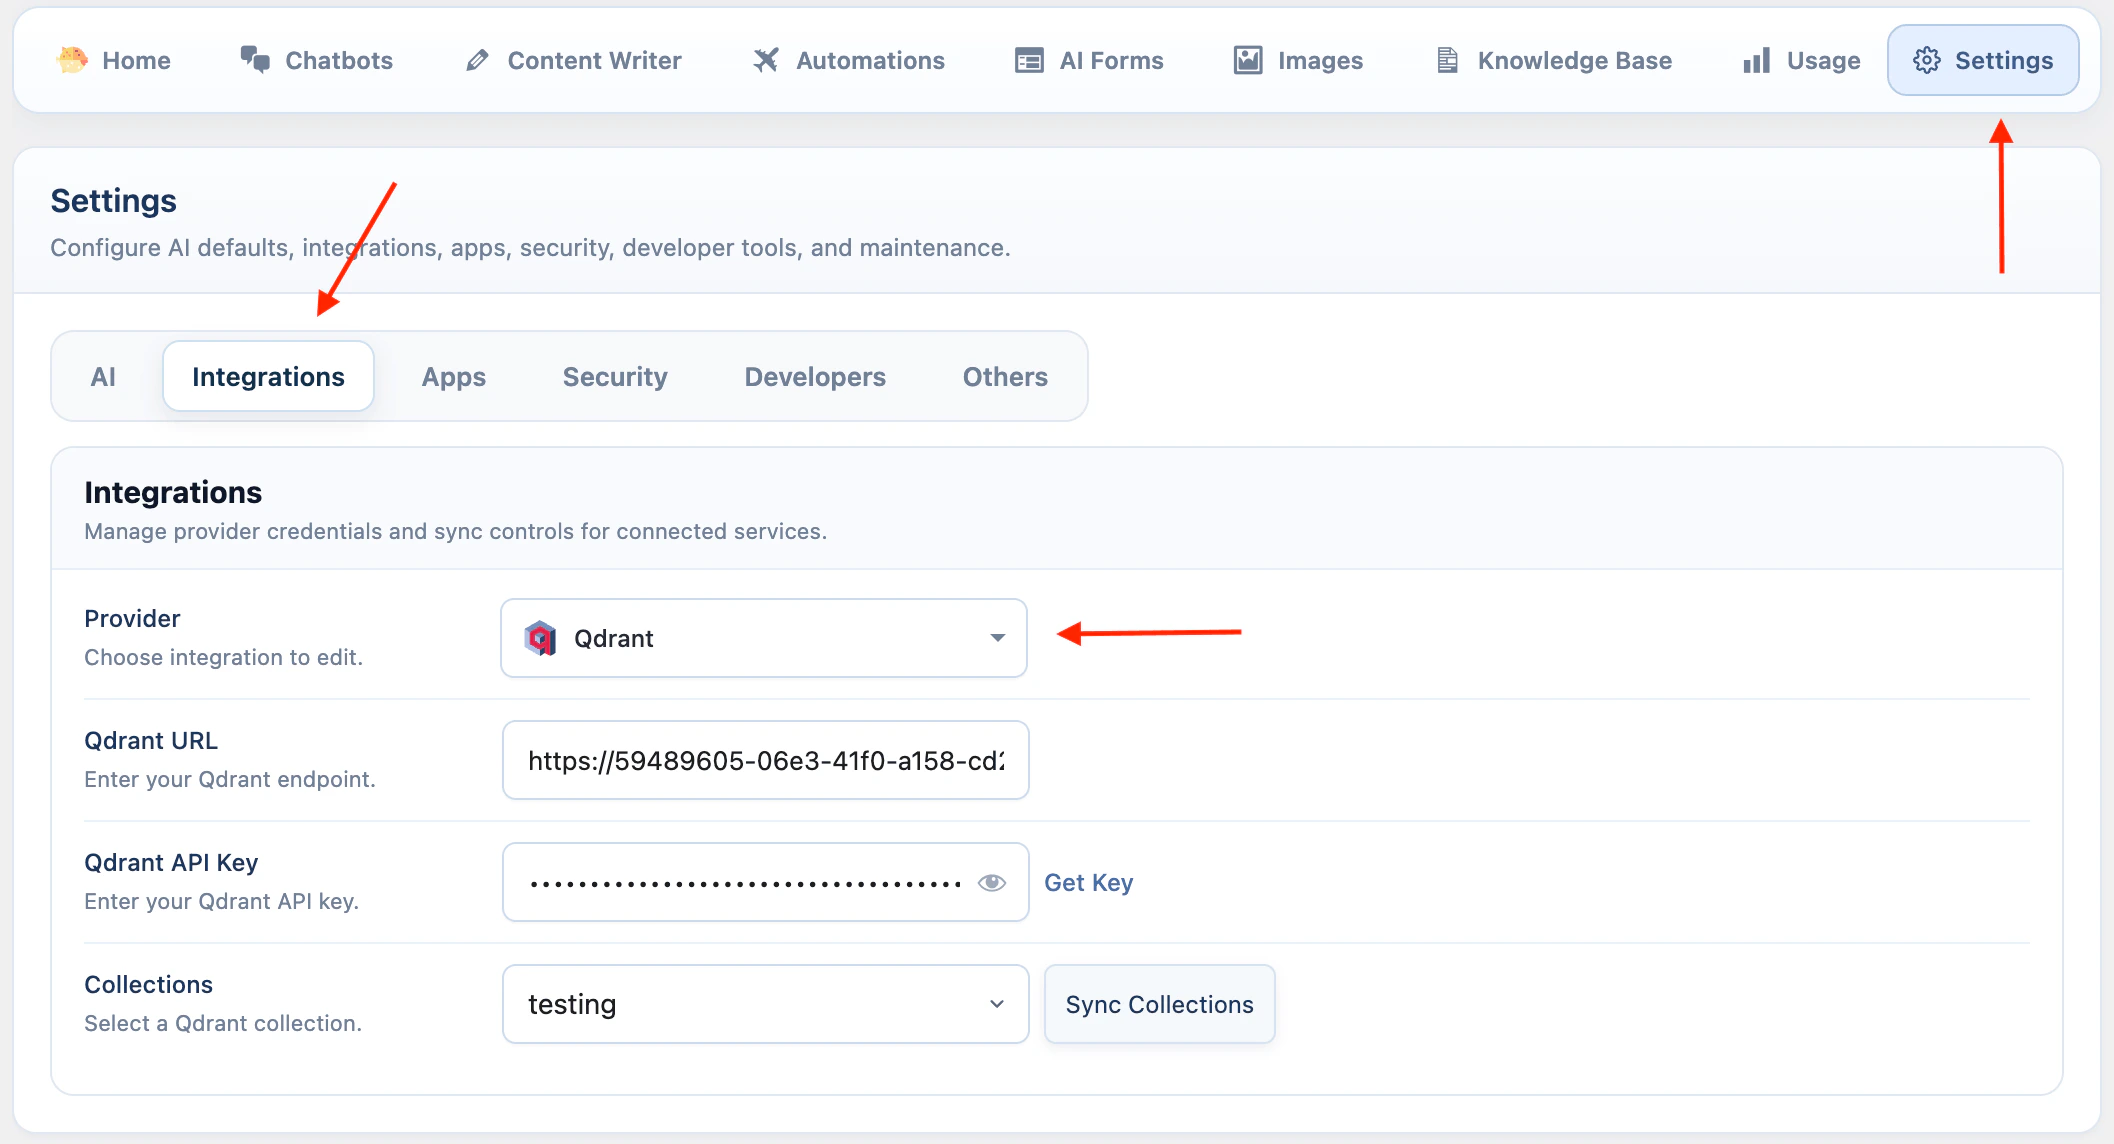
1. Add your Qdrant URL and API key in **AI Puffer > Settings > Integrations**.
#### Qdrant
Qdrant stores vectors in collections. AI Puffer creates those vectors with the embedding model you choose.
The Qdrant collection size must match the embedding model. For example, if your collection is **3072 dimensions**, use a **3072-dimension** embedding model.
Use the same embedding model when adding data and when enabling Qdrant in the chatbot.
If the Qdrant collection size does not match the embedding model, search can fail or return poor context.
To create a collection:
1. Add your Qdrant URL and API key in **AI Puffer > Settings > Integrations**.
 2. Go to **AI Puffer > Knowledge Base > Stores**.
3. Select **Qdrant** as the provider.
4. Select the embedding model you want to use.
5. Click **Create Store**.
2. Go to **AI Puffer > Knowledge Base > Stores**.
3. Select **Qdrant** as the provider.
4. Select the embedding model you want to use.
5. Click **Create Store**.
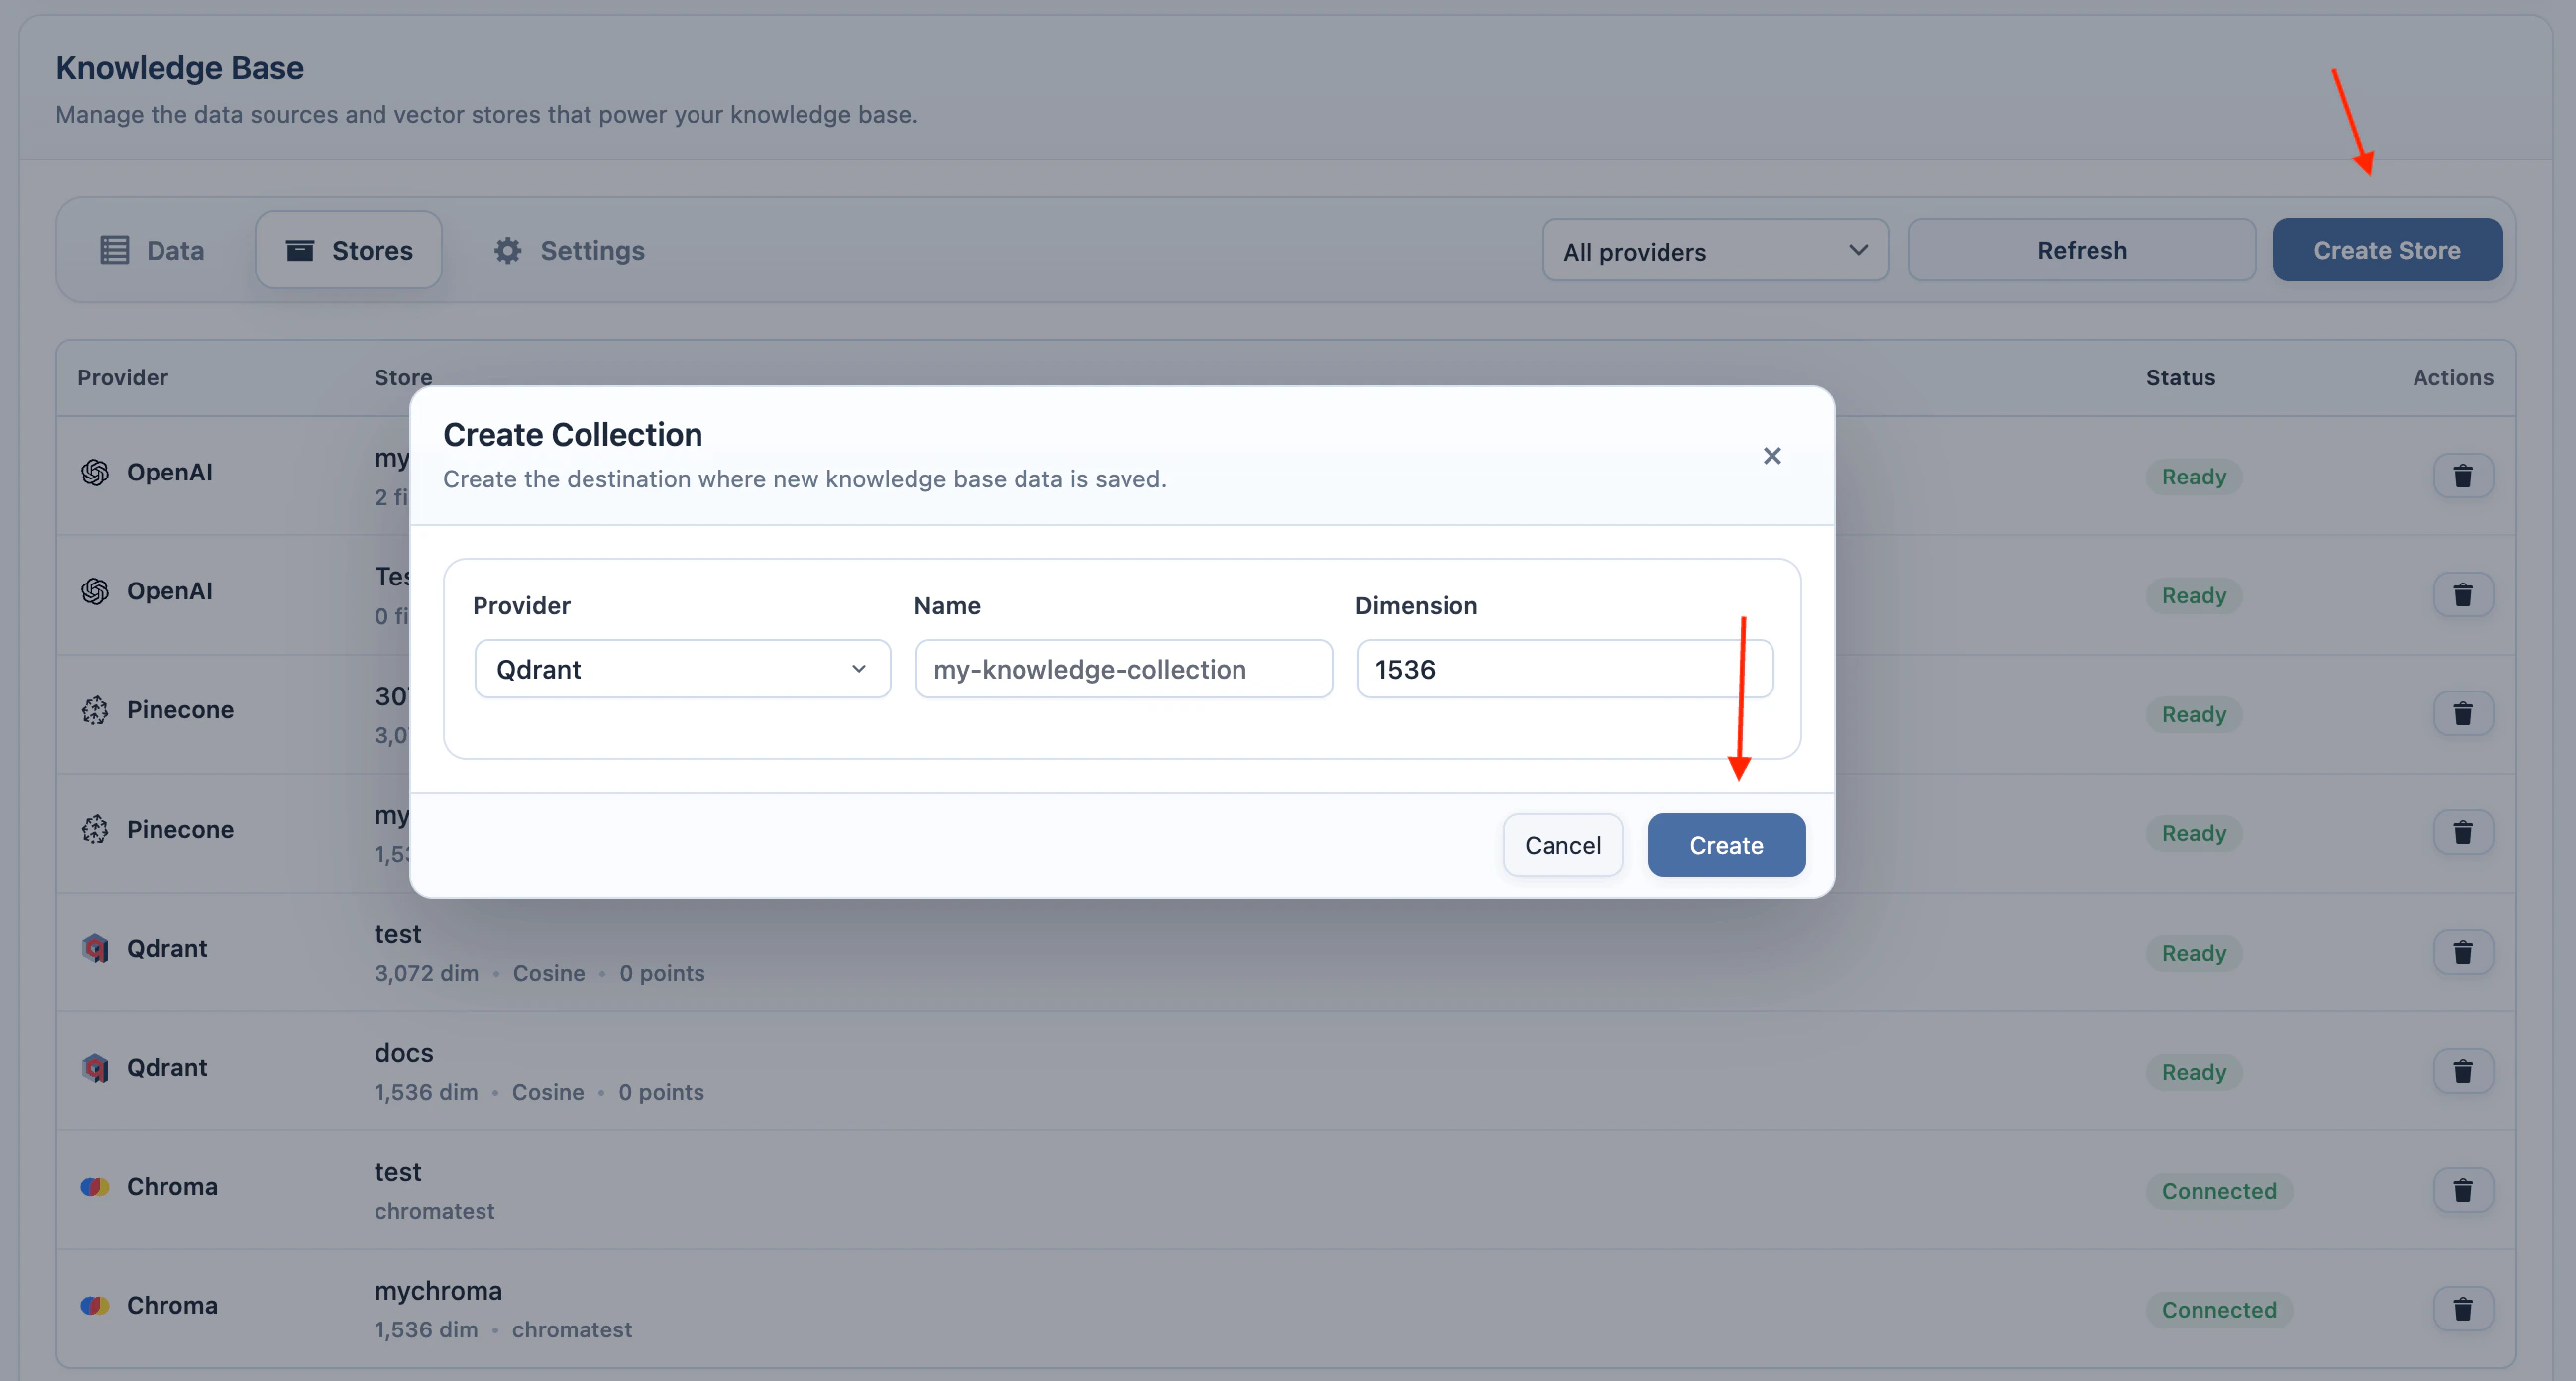 6. Enter a collection name and use the dimension for the selected embedding model.
7. Create the collection, then add training data with the same embedding model.
To use it in a chatbot:
1. Go to **AI Puffer > Chatbots** and select the chatbot.
2. In **Knowledge**, select **Vector** as a data source.
3. Set **Vector provider** to **Qdrant**.
4. Select one or more collections.
5. Select the same embedding provider and model used when you added the data.
6. Save the chatbot.
6. Enter a collection name and use the dimension for the selected embedding model.
7. Create the collection, then add training data with the same embedding model.
To use it in a chatbot:
1. Go to **AI Puffer > Chatbots** and select the chatbot.
2. In **Knowledge**, select **Vector** as a data source.
3. Set **Vector provider** to **Qdrant**.
4. Select one or more collections.
5. Select the same embedding provider and model used when you added the data.
6. Save the chatbot.
 #### Chroma
Chroma stores vectors in collections. AI Puffer creates those vectors with the embedding model you choose.
Chroma collections do not require a dimension when they are created in AI Puffer, but stored vectors still need a consistent dimension.
Use the same embedding model when adding data and when enabling Chroma in the chatbot.
If the Chroma collection contains vectors from a different embedding model, search can fail or return poor context.
To create a collection:
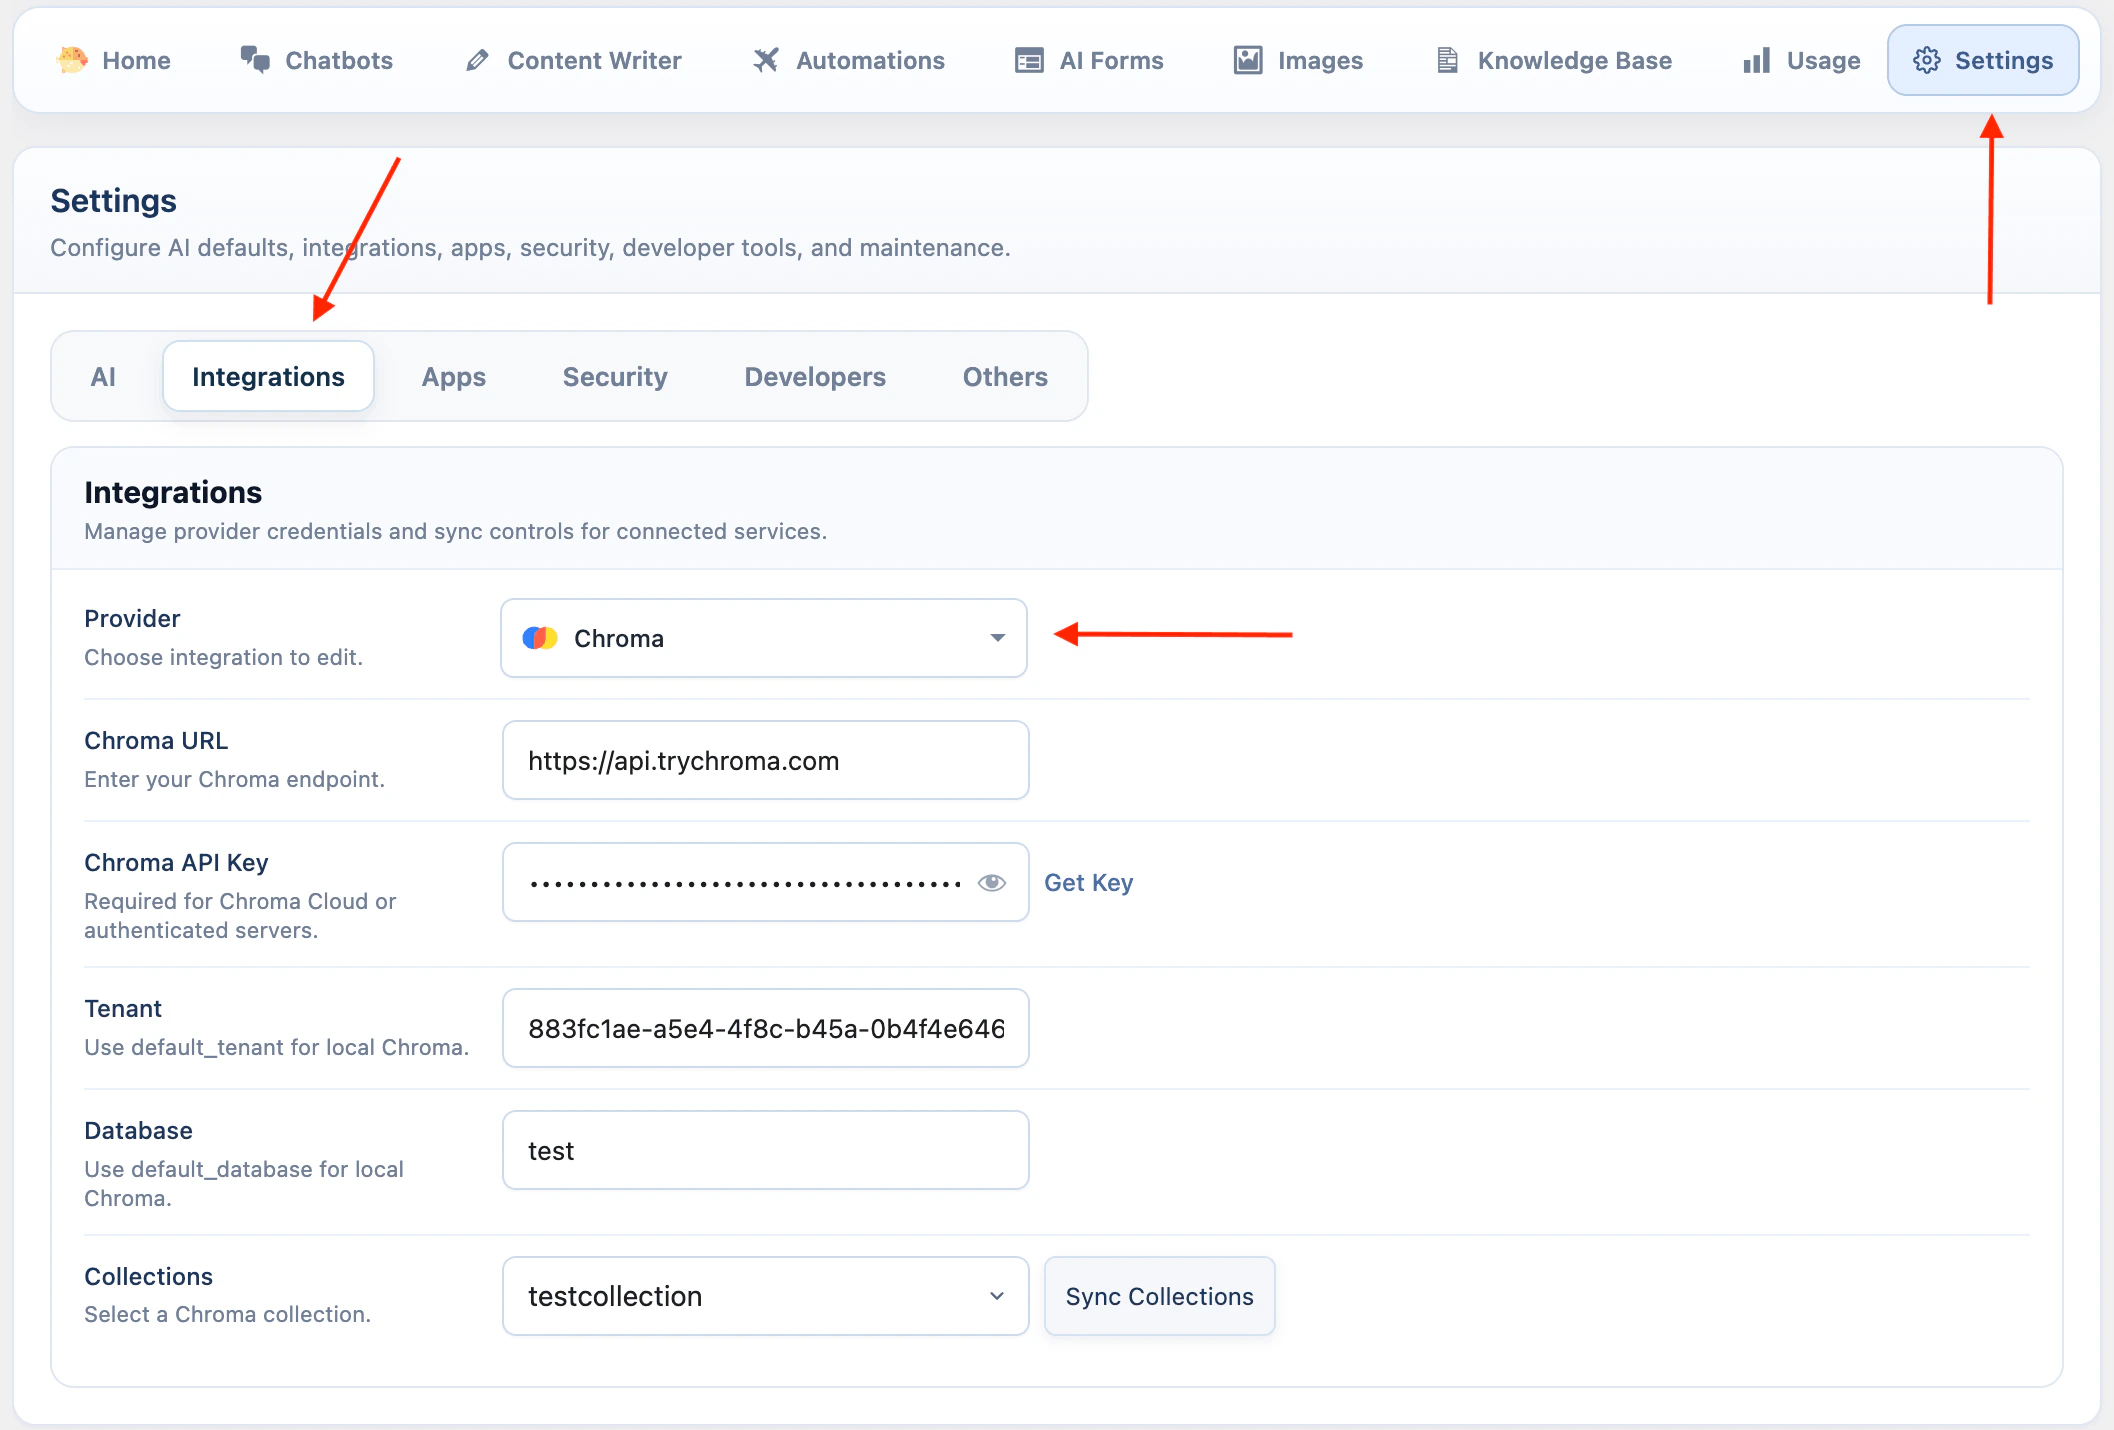
1. Add your Chroma endpoint, tenant, database, and API key in **AI Puffer > Settings > Integrations**.
#### Chroma
Chroma stores vectors in collections. AI Puffer creates those vectors with the embedding model you choose.
Chroma collections do not require a dimension when they are created in AI Puffer, but stored vectors still need a consistent dimension.
Use the same embedding model when adding data and when enabling Chroma in the chatbot.
If the Chroma collection contains vectors from a different embedding model, search can fail or return poor context.
To create a collection:
1. Add your Chroma endpoint, tenant, database, and API key in **AI Puffer > Settings > Integrations**.
 2. Go to **AI Puffer > Knowledge Base > Stores**.
3. Select **Chroma** as the provider.
4. Click **Create Store**.
2. Go to **AI Puffer > Knowledge Base > Stores**.
3. Select **Chroma** as the provider.
4. Click **Create Store**.
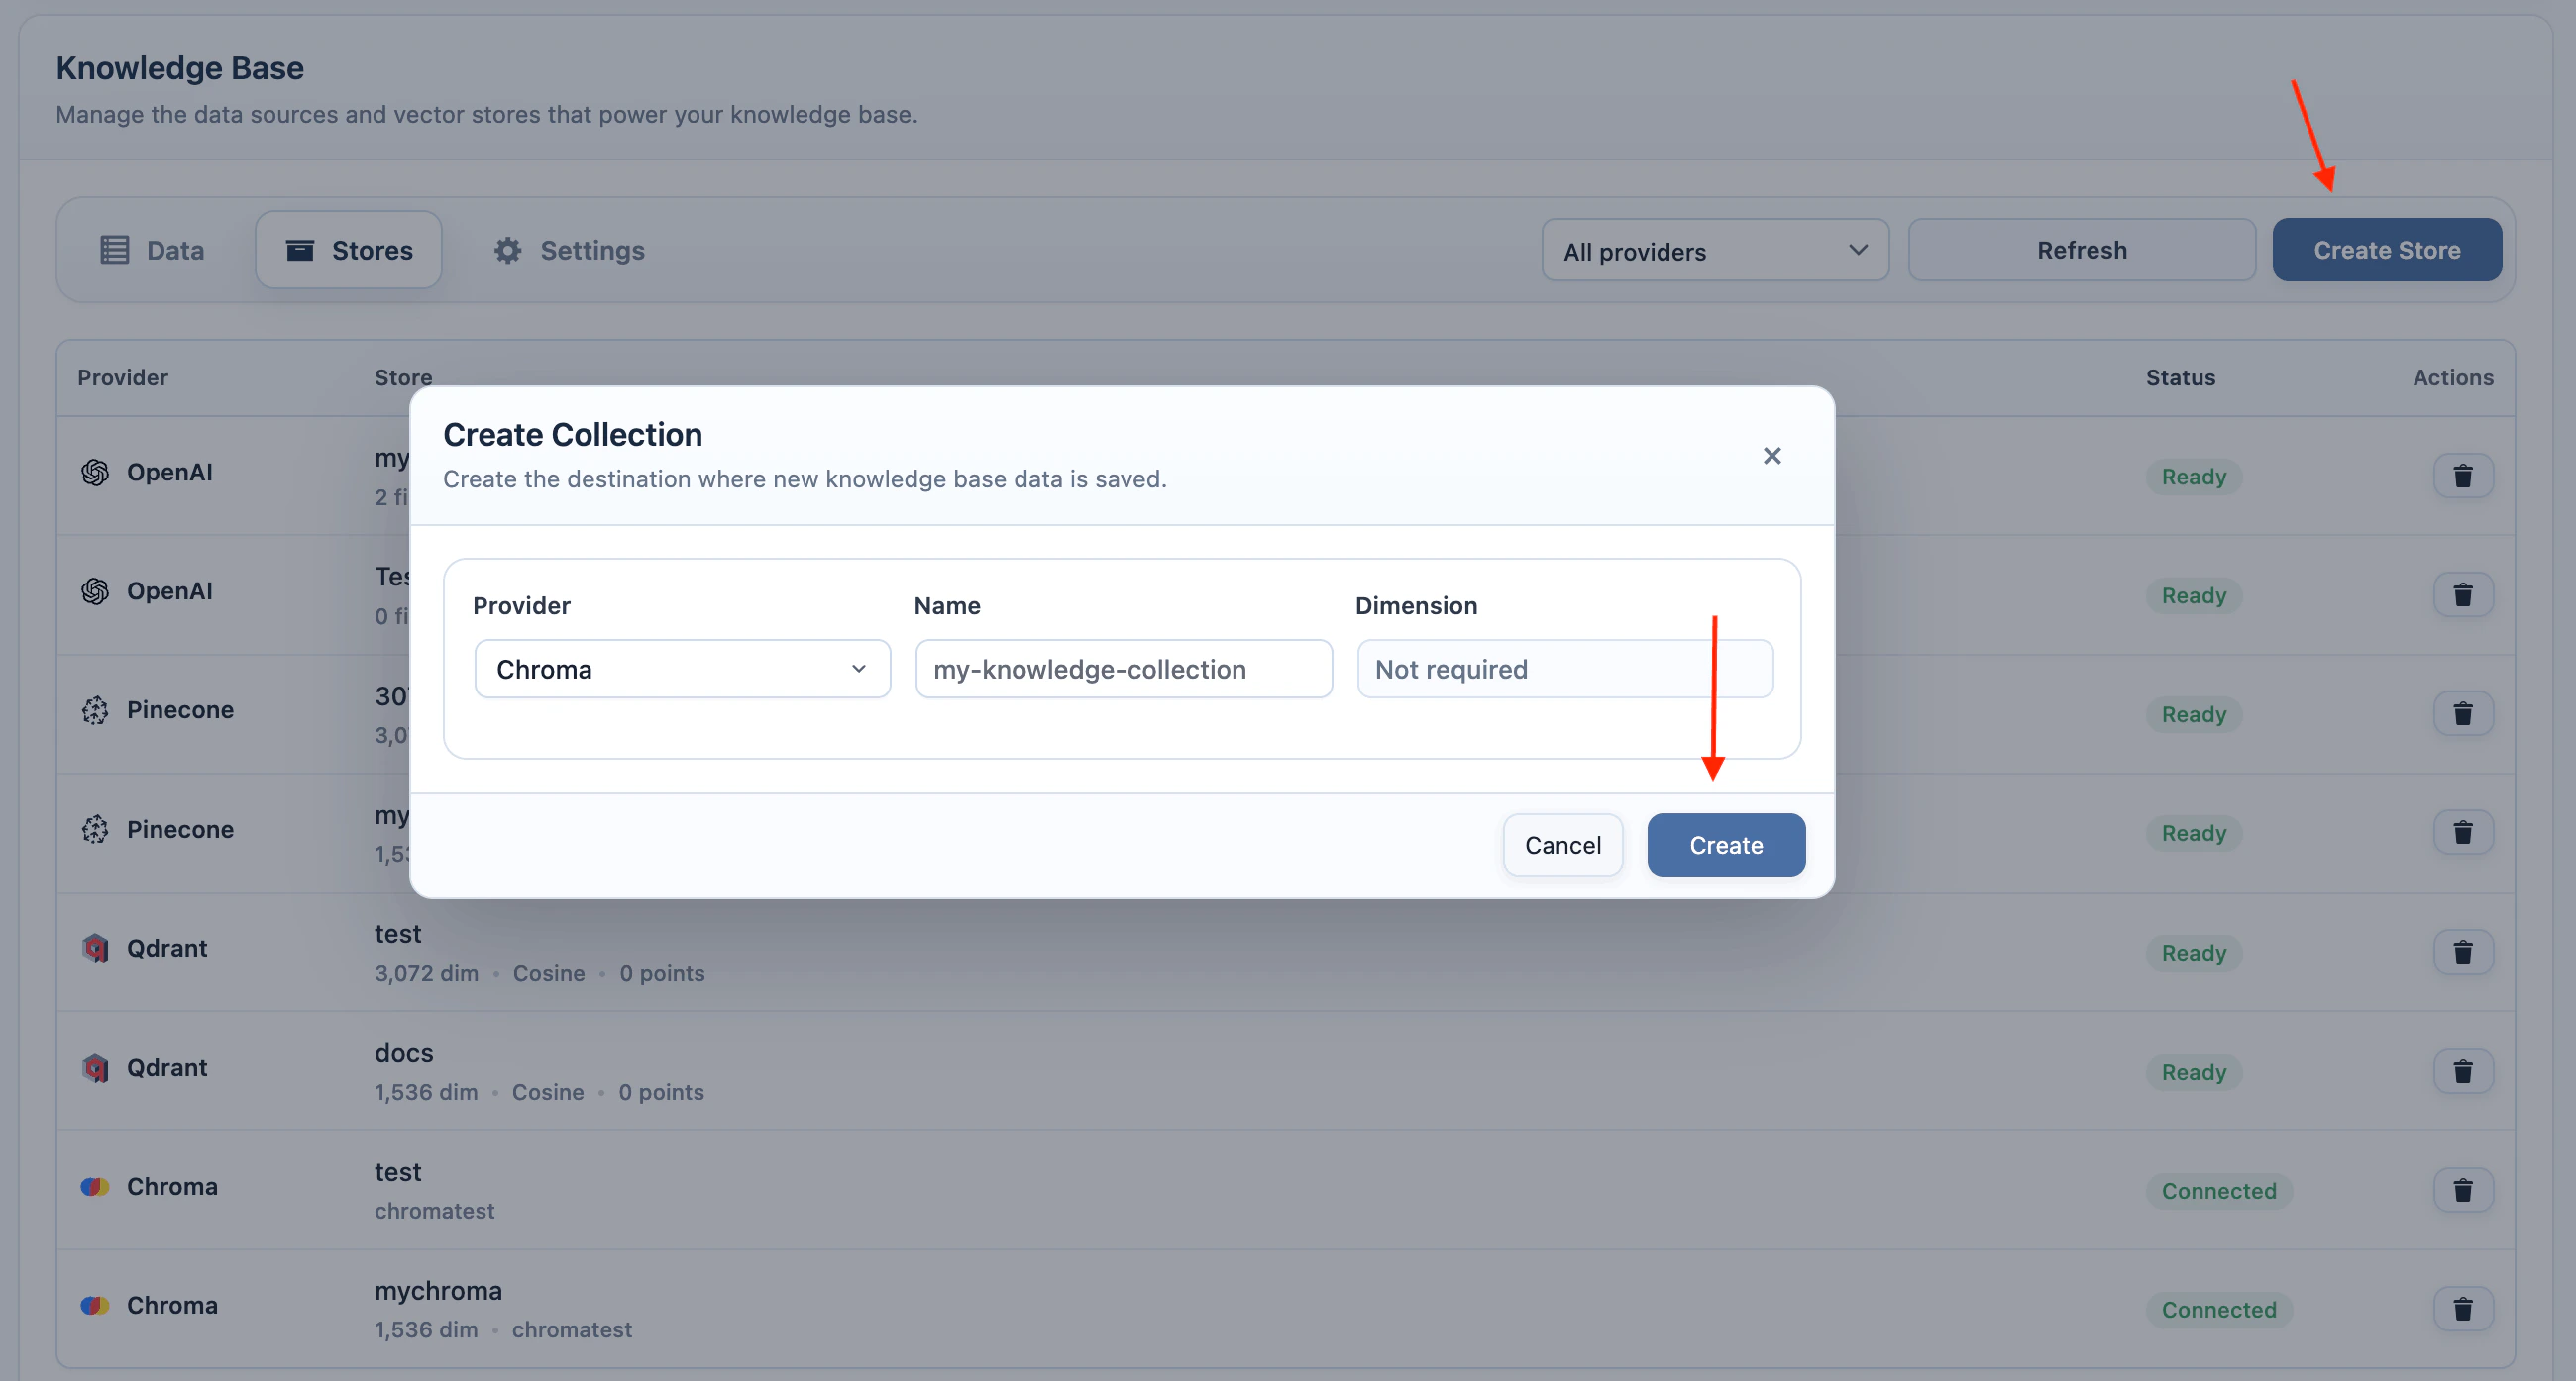 5. Enter a collection name.
6. Create the collection, then add training data with the same embedding model.
To use it in a chatbot:
1. Go to **AI Puffer > Chatbots** and select the chatbot.
2. In **Knowledge**, select **Vector** as a data source.
3. Set **Vector provider** to **Chroma**.
4. Select one or more collections.
5. Select the same embedding provider and model used when you added the data.
6. Save the chatbot.
#### Limit and Threshold
For OpenAI, Pinecone, Qdrant, and Chroma, use these settings to control how much vector context is added to the answer.
| Setting | How it works | Example |
| ------------- | ----------------------------------------------------------------------------------------------- | ----------------------------------------------------------------------------- |
| **Limit** | How many pieces of your content the chatbot is allowed to use for one answer. | `3` means the chatbot can use up to 3 matching pieces from your content. |
| **Threshold** | How closely a piece of content must match the visitor’s question before the chatbot can use it. | Lower values allow looser matches. Higher values allow only stronger matches. |
5. Enter a collection name.
6. Create the collection, then add training data with the same embedding model.
To use it in a chatbot:
1. Go to **AI Puffer > Chatbots** and select the chatbot.
2. In **Knowledge**, select **Vector** as a data source.
3. Set **Vector provider** to **Chroma**.
4. Select one or more collections.
5. Select the same embedding provider and model used when you added the data.
6. Save the chatbot.
#### Limit and Threshold
For OpenAI, Pinecone, Qdrant, and Chroma, use these settings to control how much vector context is added to the answer.
| Setting | How it works | Example |
| ------------- | ----------------------------------------------------------------------------------------------- | ----------------------------------------------------------------------------- |
| **Limit** | How many pieces of your content the chatbot is allowed to use for one answer. | `3` means the chatbot can use up to 3 matching pieces from your content. |
| **Threshold** | How closely a piece of content must match the visitor’s question before the chatbot can use it. | Lower values allow looser matches. Higher values allow only stronger matches. |
 If answers miss useful context, increase **Limit** or lower **Threshold**. If answers include unrelated context, lower **Limit** or raise **Threshold**.
After testing, open **Usage > Logs** and check the Score badge in the conversation details.
Start with a small limit and a moderate threshold. Then use the Score badge in logs to tune the chatbot with real questions.
If answers miss useful context, increase **Limit** or lower **Threshold**. If answers include unrelated context, lower **Limit** or raise **Threshold**.
After testing, open **Usage > Logs** and check the Score badge in the conversation details.
Start with a small limit and a moderate threshold. Then use the Score badge in logs to tune the chatbot with real questions.
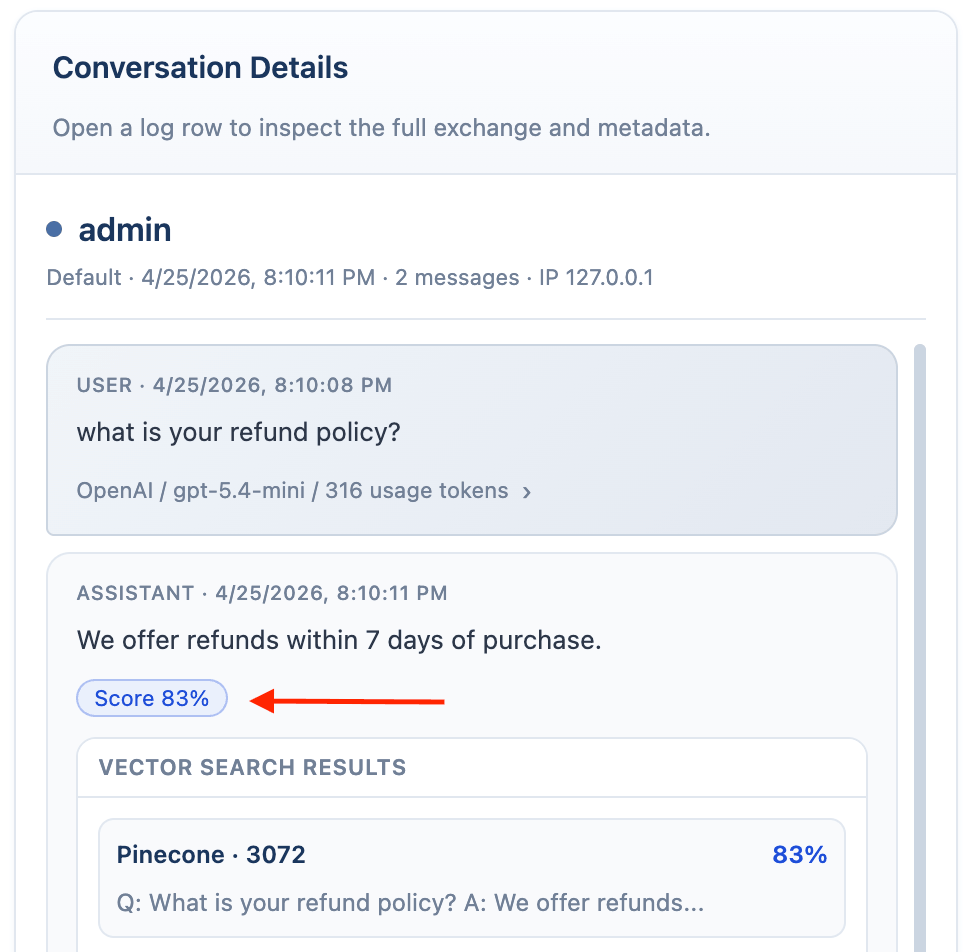 Scores show which vector results matched the visitor question and help you tune the threshold.
#### Embedding Models
Pinecone, Qdrant, and Chroma need an embedding model because AI Puffer must turn your content and the visitor question into vectors before it can search.
OpenAI Vector Stores do not need this setting in AI Puffer. OpenAI handles the vector store search on its side.
For Pinecone, Qdrant, and Chroma, use the same embedding model when adding training data and when enabling the chatbot vector provider.
| Model | Dimension |
| ------------------------ | --------- |
| `text-embedding-3-small` | 1536 |
| `text-embedding-3-large` | 3072 |
| `text-embedding-ada-002` | 1536 |
| Model | Dimension |
| ---------------------------- | --------- |
| `gemini-embedding-2-preview` | 3072 |
| `gemini-embedding-001` | 3072 |
| `models/text-embedding-004` | 768 |
| Model | Dimension |
| -------------------------------------------------- | ----------------------------------- |
| `baai/bge-base-en-v1.5` | 768 |
| `baai/bge-large-en-v1.5` | 1024 |
| `baai/bge-m3` | 1024 |
| `google/gemini-embedding-001` | 3072 |
| `google/gemini-embedding-2-preview` | 3072 by default. Supports 128-3072. |
| `intfloat/e5-base-v2` | 768 |
| `intfloat/e5-large-v2` | 1024 |
| `intfloat/multilingual-e5-large` | 1024 |
| `mistralai/mistral-embed-2312` | 1024 |
| `nvidia/llama-nemotron-embed-vl-1b-v2:free` | 2048 |
| `openai/text-embedding-3-large` | 3072 |
| `openai/text-embedding-3-small` | 1536 |
| `openai/text-embedding-ada-002` | 1536 |
| `perplexity/pplx-embed-v1-0.6b` | 1024 |
| `perplexity/pplx-embed-v1-4b` | 2560 |
| `qwen/qwen3-embedding-4b` | 2560 |
| `qwen/qwen3-embedding-8b` | 4096 |
| `sentence-transformers/all-minilm-l12-v2` | 384 |
| `sentence-transformers/all-minilm-l6-v2` | 384 |
| `sentence-transformers/all-mpnet-base-v2` | 768 |
| `sentence-transformers/multi-qa-mpnet-base-dot-v1` | 768 |
| `sentence-transformers/paraphrase-minilm-l6-v2` | 384 |
| `thenlper/gte-base` | 768 |
| `thenlper/gte-large` | 1024 |
| Model | Dimension |
| ----------------------------------------------------- | --------- |
| `nomic-embed-text-v2-moe` | 768 |
| `qwen3-embedding` / `qwen3-embedding:8b` | 4096 |
| `qwen3-embedding:4b` | 2560 |
| `qwen3-embedding:0.6b` | 1024 |
| `embeddinggemma` | 768 |
| `nomic-embed-text` | 768 |
| `mxbai-embed-large` | 1024 |
| `bge-m3` | 1024 |
| `snowflake-arctic-embed` / `snowflake-arctic-embed:l` | 1024 |
| `snowflake-arctic-embed:m` | 768 |
| `snowflake-arctic-embed:m-long` | 768 |
| `snowflake-arctic-embed:s` | 384 |
| `snowflake-arctic-embed:xs` | 384 |
| `all-minilm` / `all-minilm:l6` | 384 |
| `all-minilm:l12` | 384 |
| `paraphrase-multilingual` | 768 |
| `snowflake-arctic-embed2` | 1024 |
| `granite-embedding:30m` | 384 |
| `granite-embedding` / `granite-embedding:278m` | 768 |
| `bge-large` | 1024 |
Azure OpenAI embedding deployments are synced from your Azure resource. Use the dimension of the model behind the deployment.
#### Training Data
When Vector is enabled, use **Training Data** to add sources.
| Source | Use it for |
| ----------- | ------------------------------------------------------------------------ |
| **Q\&A** | Add question and answer pairs. |
| **Text** | Paste custom text. |
| **Files** | Upload `.pdf`, `.docx`, `.txt`, `.md`, `.csv`, or `.json` files. |
| **Website** | Add WordPress content by post type and status, or select specific posts. |
Use **AI Puffer > Knowledge Base > Data** to review and manage existing sources.
Scores show which vector results matched the visitor question and help you tune the threshold.
#### Embedding Models
Pinecone, Qdrant, and Chroma need an embedding model because AI Puffer must turn your content and the visitor question into vectors before it can search.
OpenAI Vector Stores do not need this setting in AI Puffer. OpenAI handles the vector store search on its side.
For Pinecone, Qdrant, and Chroma, use the same embedding model when adding training data and when enabling the chatbot vector provider.
| Model | Dimension |
| ------------------------ | --------- |
| `text-embedding-3-small` | 1536 |
| `text-embedding-3-large` | 3072 |
| `text-embedding-ada-002` | 1536 |
| Model | Dimension |
| ---------------------------- | --------- |
| `gemini-embedding-2-preview` | 3072 |
| `gemini-embedding-001` | 3072 |
| `models/text-embedding-004` | 768 |
| Model | Dimension |
| -------------------------------------------------- | ----------------------------------- |
| `baai/bge-base-en-v1.5` | 768 |
| `baai/bge-large-en-v1.5` | 1024 |
| `baai/bge-m3` | 1024 |
| `google/gemini-embedding-001` | 3072 |
| `google/gemini-embedding-2-preview` | 3072 by default. Supports 128-3072. |
| `intfloat/e5-base-v2` | 768 |
| `intfloat/e5-large-v2` | 1024 |
| `intfloat/multilingual-e5-large` | 1024 |
| `mistralai/mistral-embed-2312` | 1024 |
| `nvidia/llama-nemotron-embed-vl-1b-v2:free` | 2048 |
| `openai/text-embedding-3-large` | 3072 |
| `openai/text-embedding-3-small` | 1536 |
| `openai/text-embedding-ada-002` | 1536 |
| `perplexity/pplx-embed-v1-0.6b` | 1024 |
| `perplexity/pplx-embed-v1-4b` | 2560 |
| `qwen/qwen3-embedding-4b` | 2560 |
| `qwen/qwen3-embedding-8b` | 4096 |
| `sentence-transformers/all-minilm-l12-v2` | 384 |
| `sentence-transformers/all-minilm-l6-v2` | 384 |
| `sentence-transformers/all-mpnet-base-v2` | 768 |
| `sentence-transformers/multi-qa-mpnet-base-dot-v1` | 768 |
| `sentence-transformers/paraphrase-minilm-l6-v2` | 384 |
| `thenlper/gte-base` | 768 |
| `thenlper/gte-large` | 1024 |
| Model | Dimension |
| ----------------------------------------------------- | --------- |
| `nomic-embed-text-v2-moe` | 768 |
| `qwen3-embedding` / `qwen3-embedding:8b` | 4096 |
| `qwen3-embedding:4b` | 2560 |
| `qwen3-embedding:0.6b` | 1024 |
| `embeddinggemma` | 768 |
| `nomic-embed-text` | 768 |
| `mxbai-embed-large` | 1024 |
| `bge-m3` | 1024 |
| `snowflake-arctic-embed` / `snowflake-arctic-embed:l` | 1024 |
| `snowflake-arctic-embed:m` | 768 |
| `snowflake-arctic-embed:m-long` | 768 |
| `snowflake-arctic-embed:s` | 384 |
| `snowflake-arctic-embed:xs` | 384 |
| `all-minilm` / `all-minilm:l6` | 384 |
| `all-minilm:l12` | 384 |
| `paraphrase-multilingual` | 768 |
| `snowflake-arctic-embed2` | 1024 |
| `granite-embedding:30m` | 384 |
| `granite-embedding` / `granite-embedding:278m` | 768 |
| `bge-large` | 1024 |
Azure OpenAI embedding deployments are synced from your Azure resource. Use the dimension of the model behind the deployment.
#### Training Data
When Vector is enabled, use **Training Data** to add sources.
| Source | Use it for |
| ----------- | ------------------------------------------------------------------------ |
| **Q\&A** | Add question and answer pairs. |
| **Text** | Paste custom text. |
| **Files** | Upload `.pdf`, `.docx`, `.txt`, `.md`, `.csv`, or `.json` files. |
| **Website** | Add WordPress content by post type and status, or select specific posts. |
Use **AI Puffer > Knowledge Base > Data** to review and manage existing sources.
 ### Page Context
Adds the current page or post content to the chatbot context.
When this feature is enabled, the chatbot will use the current page's content as part of its contextual understanding.
If the page has an excerpt, that excerpt will be used directly as the bot’s context.
### Page Context
Adds the current page or post content to the chatbot context.
When this feature is enabled, the chatbot will use the current page's content as part of its contextual understanding.
If the page has an excerpt, that excerpt will be used directly as the bot’s context.
 If no excerpt is available, the plugin will automatically generate a short summary of the page content and feed that to the bot instead.
This is ideal for creating page-specific chatbots.
## Tools
Tools are optional capabilities the chatbot can use during a conversation. They let visitors upload files, search the web, attach images, generate images, or use voice features when those options are enabled.
Enable only the tools you want your chatbot to offer.
### File Upload
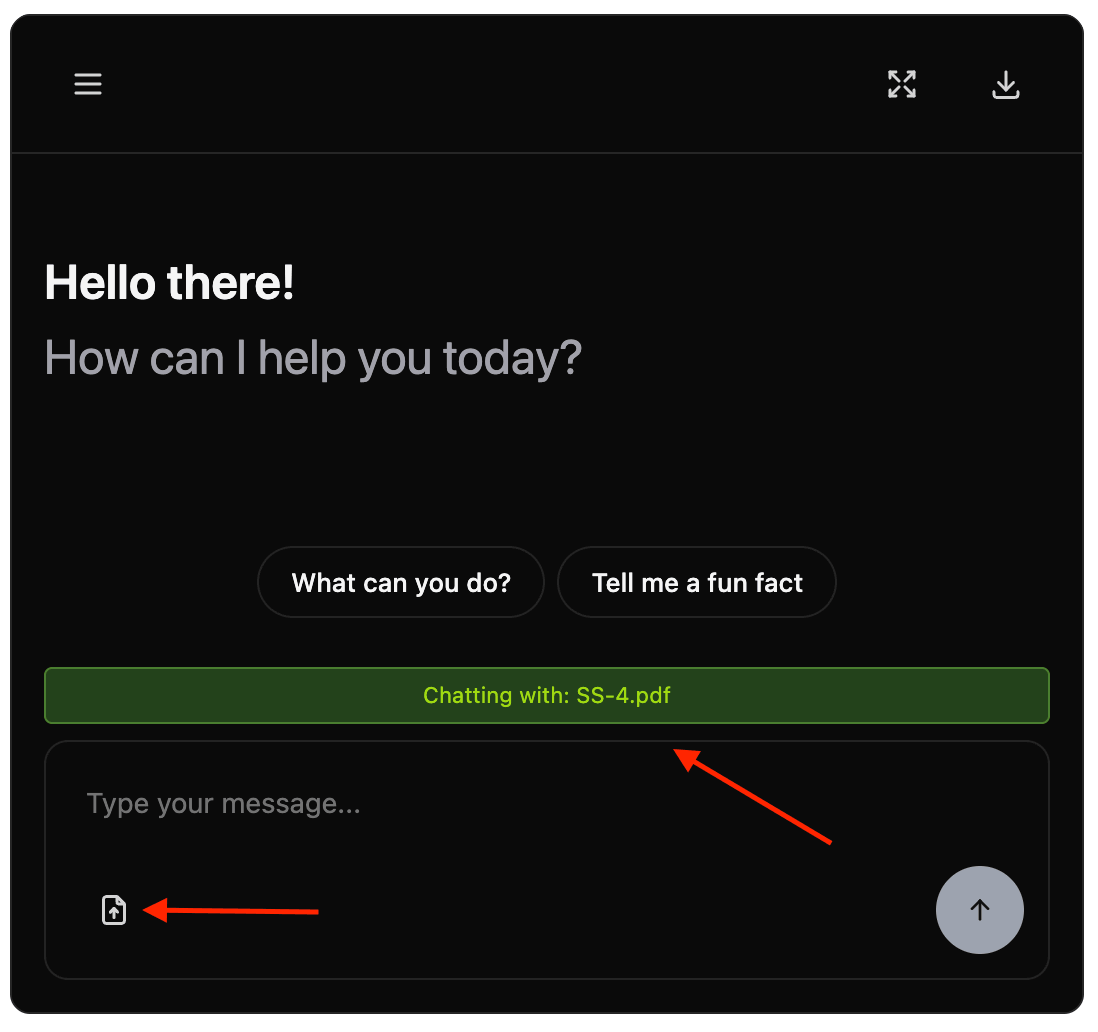
File upload lets visitors attach a document to the current chat. AI Puffer reads the file, prepares it for the selected vector provider, and uses the matching file content as context for the visitor's next messages.
File upload uses the chatbot's **Vector provider** setting: OpenAI, Pinecone, Qdrant, Chroma, or Anthropic Files when the chatbot provider is Anthropic.
Visitors can upload `.txt` and `.pdf` files. The frontend limit is **20 MB**, but your WordPress or server upload limit can be lower.
Text-based PDFs work best. Scanned PDFs may not provide usable text unless they contain OCR text.
To enable file upload:
1. Go to **AI Puffer > Chatbots** and select the chatbot.
2. In **Knowledge**, select **Vector** as a data source.
3. Select the **Vector provider**.
4. Configure vector provider.
5. Open **Tools**.
6. Add **File upload** to **Enabled tools**.
7. Save the chatbot.
If no excerpt is available, the plugin will automatically generate a short summary of the page content and feed that to the bot instead.
This is ideal for creating page-specific chatbots.
## Tools
Tools are optional capabilities the chatbot can use during a conversation. They let visitors upload files, search the web, attach images, generate images, or use voice features when those options are enabled.
Enable only the tools you want your chatbot to offer.
### File Upload
File upload lets visitors attach a document to the current chat. AI Puffer reads the file, prepares it for the selected vector provider, and uses the matching file content as context for the visitor's next messages.
File upload uses the chatbot's **Vector provider** setting: OpenAI, Pinecone, Qdrant, Chroma, or Anthropic Files when the chatbot provider is Anthropic.
Visitors can upload `.txt` and `.pdf` files. The frontend limit is **20 MB**, but your WordPress or server upload limit can be lower.
Text-based PDFs work best. Scanned PDFs may not provide usable text unless they contain OCR text.
To enable file upload:
1. Go to **AI Puffer > Chatbots** and select the chatbot.
2. In **Knowledge**, select **Vector** as a data source.
3. Select the **Vector provider**.
4. Configure vector provider.
5. Open **Tools**.
6. Add **File upload** to **Enabled tools**.
7. Save the chatbot.
 8. Test the chatbot on the frontend and upload a `.txt` or `.pdf` file.
 ### Web Search
Web Search lets a chatbot use online sources while answering. When enabled, the chatbot input shows a web/search toggle on the frontend.
If the frontend toggle is off, the chatbot answers without web search even when the tool is enabled in the admin.
Web Search is available for OpenAI, Google, Anthropic, OpenRouter, and xAI models that support web search.
Web search has two controls: the admin tool setting enables the feature, and the frontend toggle decides whether a specific visitor message uses it.
To enable web search:
1. Go to **AI Puffer > Chatbots** and select the chatbot.
2. In **General**, select **OpenAI**, **Google**, **Anthropic**, **OpenRouter**, or **xAI** as the engine.
3. In **Tools**, add **Web search** to **Enabled tools**.
4. Set **Web search** to **Yes**.
5. Click **Options**.
### Web Search
Web Search lets a chatbot use online sources while answering. When enabled, the chatbot input shows a web/search toggle on the frontend.
If the frontend toggle is off, the chatbot answers without web search even when the tool is enabled in the admin.
Web Search is available for OpenAI, Google, Anthropic, OpenRouter, and xAI models that support web search.
Web search has two controls: the admin tool setting enables the feature, and the frontend toggle decides whether a specific visitor message uses it.
To enable web search:
1. Go to **AI Puffer > Chatbots** and select the chatbot.
2. In **General**, select **OpenAI**, **Google**, **Anthropic**, **OpenRouter**, or **xAI** as the engine.
3. In **Tools**, add **Web search** to **Enabled tools**.
4. Set **Web search** to **Yes**.
5. Click **Options**.
 6. Configure the provider settings.
7. Save the chatbot.
8. Test the chatbot on the frontend.
6. Configure the provider settings.
7. Save the chatbot.
8. Test the chatbot on the frontend.
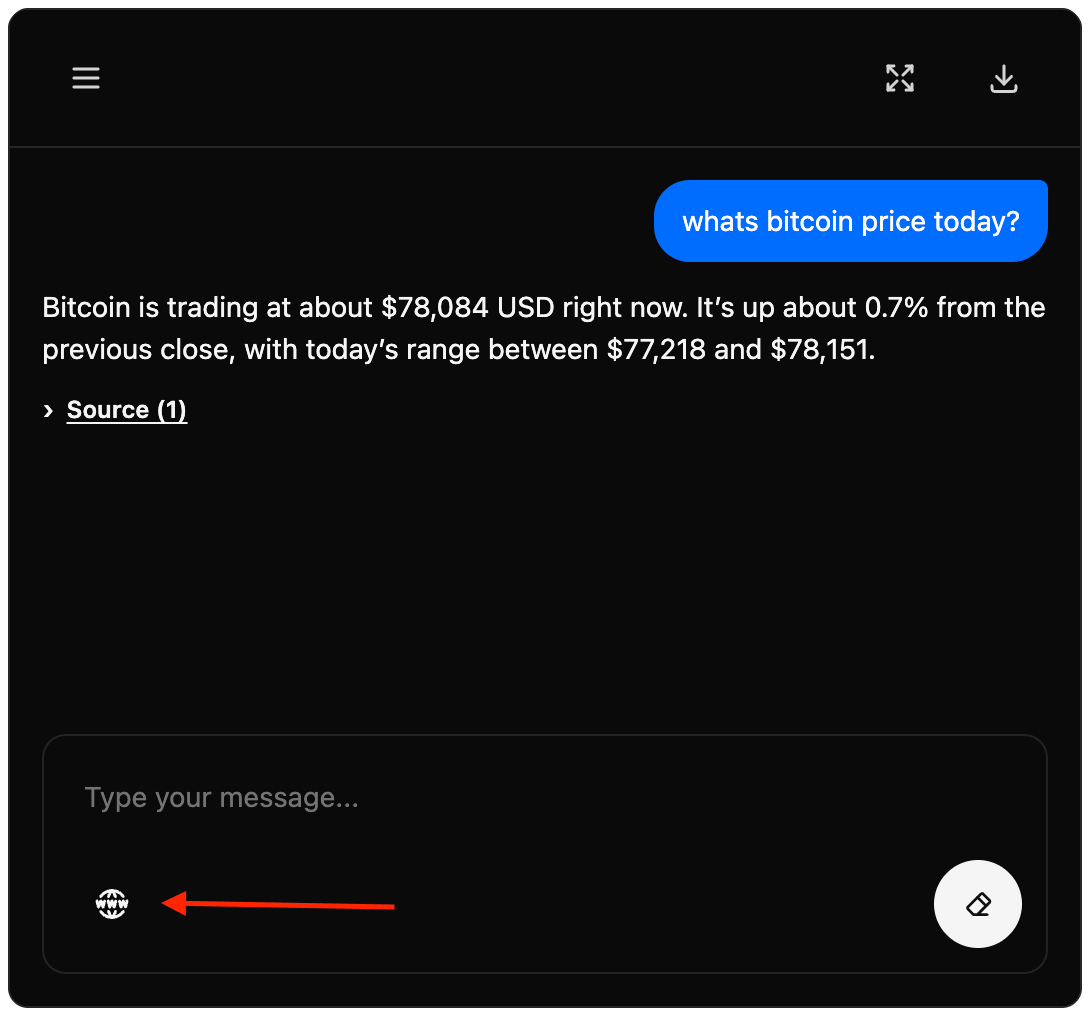 These options appear for every web search provider:
| Option | What it does |
| ------------------------- | ---------------------------------------------------------------------- |
| **Web toggle default on** | Starts the frontend web/search toggle enabled. |
| **Show sources** | Shows source links under replies when the provider returns them. |
| **Sources label** | Changes the label shown above source links. |
| **Searching web text** | Changes the temporary status text shown while a web search is running. |
Provider-specific options are shown based on the chatbot engine.
xAI uses the shared web search options above and does not add provider-specific web settings.
| Option | What it does |
| ----------------------- | ---------------------------------------------------------- |
| **Search context size** | Controls how much web-search context OpenAI can use. |
| **User location** | Sends approximate location only when local results matter. |
| Option | What it does |
| ----------------------- | ------------------------------------------------------------- |
| **Mode** | Controls Gemini grounding mode. |
| **Retrieval threshold** | Applies only to Dynamic mode. Lower values search more often. |
| Option | What it does |
| ------------------- | --------------------------------------------------------------- |
| **Max uses** | Limits web searches per answer. |
| **User location** | Sends approximate country, city, region, or timezone. |
| **Allowed domains** | Restricts web search to specific domains. |
| **Blocked domains** | Excludes specific domains. |
| **Cache TTL** | Sets optional Anthropic cache time: None, 5 minutes, or 1 hour. |
| Option | What it does |
| ----------------- | --------------------------------------------------- |
| **Engine** | Chooses Auto, Native, or Exa search when supported. |
| **Max results** | Limits search results from 1 to 10. |
| **Search prompt** | Adds search-specific instructions. |
### Images and Vision
Image tools cover two separate features:
* **Image analysis** sends an uploaded image to the chatbot model so it can answer questions about the image.
* **Image generation** creates a new image when the visitor types a configured image command.
#### Image Analysis
Image analysis lets visitors attach an image to a chat message. The image is sent with the next message to the chatbot's selected model.
Image analysis uses the chatbot's selected provider and model.
Image analysis is model-dependent. If the option is missing or replies fail, choose a vision-capable model and sync models again.
| Provider | Support | Notes |
| -------------- | --------------- | --------------------------------------------------------------------------------------- |
| **OpenAI** | Yes | Uses the selected OpenAI chat model. |
| **Anthropic** | Yes | Uses the selected Claude chat model. |
| **xAI** | Yes | Uses a selected Grok model that supports image input. |
| **OpenRouter** | Model-dependent | The selected model must support image input. Sync models if the option does not appear. |
| **Ollama** | Model-dependent | The selected local model must be vision-capable. Sync Ollama models first. |
| **Google** | No | Chatbot image analysis is not exposed for Google. |
| **Azure** | No | Chatbot image analysis is not exposed for Azure. |
| **DeepSeek** | No | Chatbot image analysis is not exposed for DeepSeek. |
Visitors can upload one image per message, with a **20 MB** frontend limit. xAI image analysis accepts JPG/JPEG and PNG files. Other supported providers can also accept WEBP when their model supports it.
To enable image analysis:
1. Go to **AI Puffer > Chatbots** and select the chatbot.
2. In **General**, select a supported provider and model.
3. Open **Tools**.
4. Add **Image analysis** to **Enabled tools**.
5. Set **Image analysis** to **Yes**.
These options appear for every web search provider:
| Option | What it does |
| ------------------------- | ---------------------------------------------------------------------- |
| **Web toggle default on** | Starts the frontend web/search toggle enabled. |
| **Show sources** | Shows source links under replies when the provider returns them. |
| **Sources label** | Changes the label shown above source links. |
| **Searching web text** | Changes the temporary status text shown while a web search is running. |
Provider-specific options are shown based on the chatbot engine.
xAI uses the shared web search options above and does not add provider-specific web settings.
| Option | What it does |
| ----------------------- | ---------------------------------------------------------- |
| **Search context size** | Controls how much web-search context OpenAI can use. |
| **User location** | Sends approximate location only when local results matter. |
| Option | What it does |
| ----------------------- | ------------------------------------------------------------- |
| **Mode** | Controls Gemini grounding mode. |
| **Retrieval threshold** | Applies only to Dynamic mode. Lower values search more often. |
| Option | What it does |
| ------------------- | --------------------------------------------------------------- |
| **Max uses** | Limits web searches per answer. |
| **User location** | Sends approximate country, city, region, or timezone. |
| **Allowed domains** | Restricts web search to specific domains. |
| **Blocked domains** | Excludes specific domains. |
| **Cache TTL** | Sets optional Anthropic cache time: None, 5 minutes, or 1 hour. |
| Option | What it does |
| ----------------- | --------------------------------------------------- |
| **Engine** | Chooses Auto, Native, or Exa search when supported. |
| **Max results** | Limits search results from 1 to 10. |
| **Search prompt** | Adds search-specific instructions. |
### Images and Vision
Image tools cover two separate features:
* **Image analysis** sends an uploaded image to the chatbot model so it can answer questions about the image.
* **Image generation** creates a new image when the visitor types a configured image command.
#### Image Analysis
Image analysis lets visitors attach an image to a chat message. The image is sent with the next message to the chatbot's selected model.
Image analysis uses the chatbot's selected provider and model.
Image analysis is model-dependent. If the option is missing or replies fail, choose a vision-capable model and sync models again.
| Provider | Support | Notes |
| -------------- | --------------- | --------------------------------------------------------------------------------------- |
| **OpenAI** | Yes | Uses the selected OpenAI chat model. |
| **Anthropic** | Yes | Uses the selected Claude chat model. |
| **xAI** | Yes | Uses a selected Grok model that supports image input. |
| **OpenRouter** | Model-dependent | The selected model must support image input. Sync models if the option does not appear. |
| **Ollama** | Model-dependent | The selected local model must be vision-capable. Sync Ollama models first. |
| **Google** | No | Chatbot image analysis is not exposed for Google. |
| **Azure** | No | Chatbot image analysis is not exposed for Azure. |
| **DeepSeek** | No | Chatbot image analysis is not exposed for DeepSeek. |
Visitors can upload one image per message, with a **20 MB** frontend limit. xAI image analysis accepts JPG/JPEG and PNG files. Other supported providers can also accept WEBP when their model supports it.
To enable image analysis:
1. Go to **AI Puffer > Chatbots** and select the chatbot.
2. In **General**, select a supported provider and model.
3. Open **Tools**.
4. Add **Image analysis** to **Enabled tools**.
5. Set **Image analysis** to **Yes**.
 6. Save the chatbot.
7. Test the chatbot on the frontend.
6. Save the chatbot.
7. Test the chatbot on the frontend.
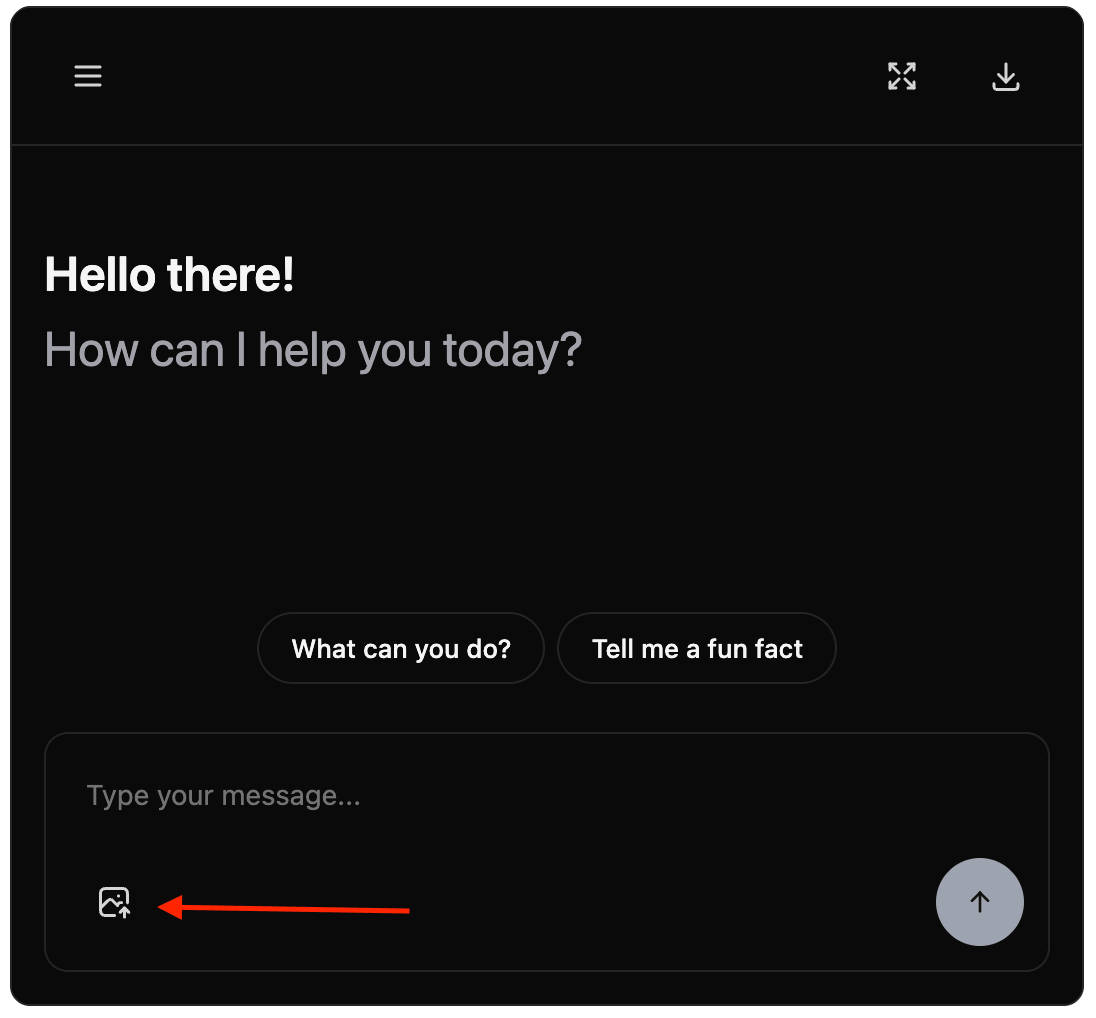 On the frontend, visitors use the image upload button, select an image, type a question, and send the message.
If File Upload and Image Analysis are both enabled, the attachment button opens a small menu.
#### Image Generation
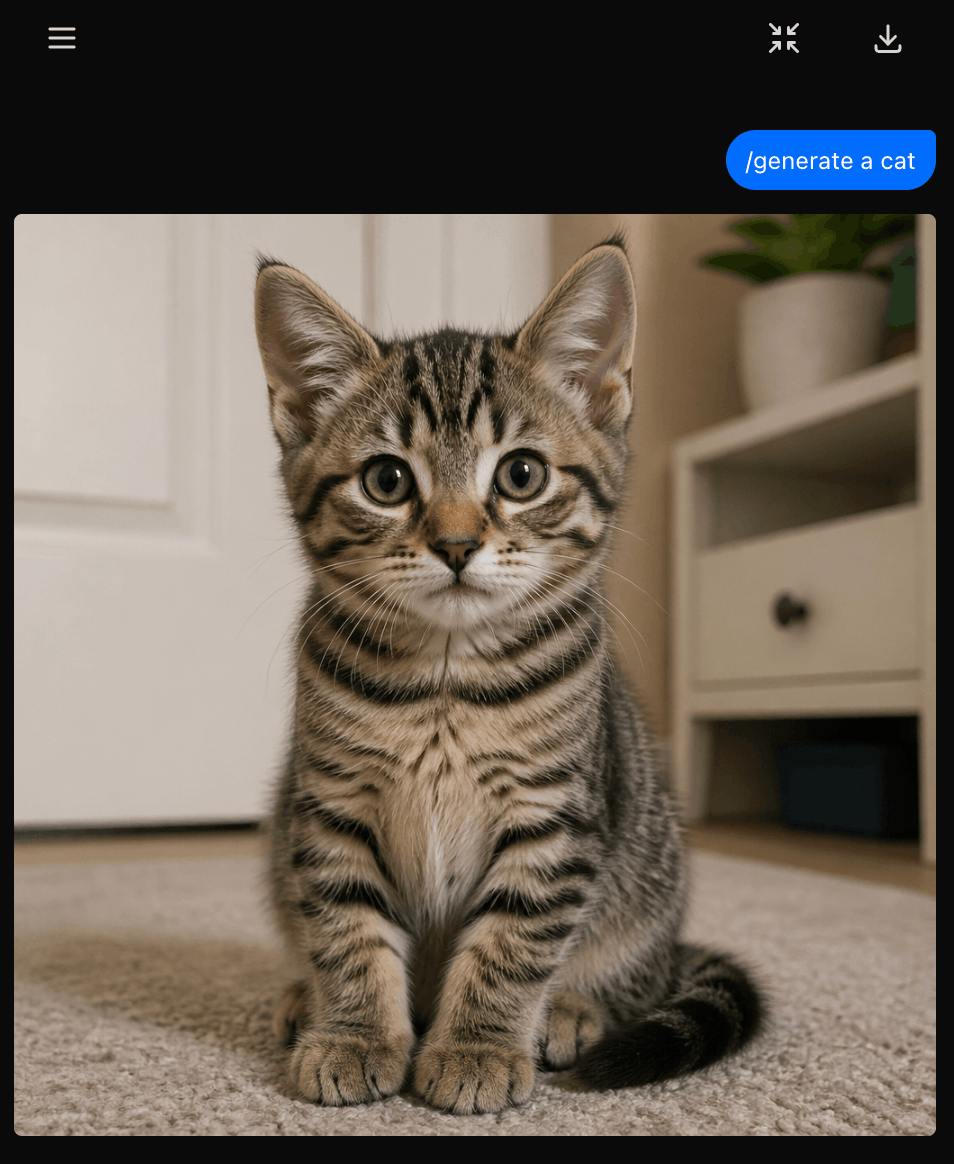
Image generation lets visitors create a new image from a chat command. The visitor types a trigger followed by a prompt, for example:
```text theme={null}
/image a clean product photo on a white background
```
Each command returns one image.
Image generation uses a separate image model. It does not use the chatbot's answer model.
Image generation uses the image model selected in Tools, not the chatbot model selected in General.
| Provider | Support | Model source |
| -------------- | --------------- | -------------------------------------------------------------------------------- |
| **OpenAI** | Yes | Built-in GPT Image models. |
| **Google** | Yes | Synced Google image models. |
| **Azure** | Yes | Synced Azure image deployments. |
| **OpenRouter** | Model-dependent | Synced OpenRouter models with image output. |
| **xAI** | Yes | Synced xAI image models such as `grok-imagine-image`. |
| **Replicate** | Yes | Add the API key under **Settings > Integrations > Replicate**, then sync models. |
The chatbot image generation model list includes those image providers only.
If a model is missing, configure the provider and sync models in [AI Providers](/ai-providers).
To enable image generation:
1. Go to **AI Puffer > Chatbots** and select the chatbot.
2. Open **Tools**.
3. Add **Image generation** to **Enabled tools**.
4. Select the image model.
5. Set the image triggers.
6. Save the chatbot.
7. Test the command on the frontend.
Triggers are comma-separated and must start with `/`. Examples:
```text theme={null}
/image, /generate, /draw
```
On the frontend, visitors use the image upload button, select an image, type a question, and send the message.
If File Upload and Image Analysis are both enabled, the attachment button opens a small menu.
#### Image Generation
Image generation lets visitors create a new image from a chat command. The visitor types a trigger followed by a prompt, for example:
```text theme={null}
/image a clean product photo on a white background
```
Each command returns one image.
Image generation uses a separate image model. It does not use the chatbot's answer model.
Image generation uses the image model selected in Tools, not the chatbot model selected in General.
| Provider | Support | Model source |
| -------------- | --------------- | -------------------------------------------------------------------------------- |
| **OpenAI** | Yes | Built-in GPT Image models. |
| **Google** | Yes | Synced Google image models. |
| **Azure** | Yes | Synced Azure image deployments. |
| **OpenRouter** | Model-dependent | Synced OpenRouter models with image output. |
| **xAI** | Yes | Synced xAI image models such as `grok-imagine-image`. |
| **Replicate** | Yes | Add the API key under **Settings > Integrations > Replicate**, then sync models. |
The chatbot image generation model list includes those image providers only.
If a model is missing, configure the provider and sync models in [AI Providers](/ai-providers).
To enable image generation:
1. Go to **AI Puffer > Chatbots** and select the chatbot.
2. Open **Tools**.
3. Add **Image generation** to **Enabled tools**.
4. Select the image model.
5. Set the image triggers.
6. Save the chatbot.
7. Test the command on the frontend.
Triggers are comma-separated and must start with `/`. Examples:
```text theme={null}
/image, /generate, /draw
```
 When a visitor uses an image trigger, AI Puffer extracts the prompt after the trigger and sends it to the selected image model. The original command is saved in the conversation log, and the generated image reply is shown in the chat.
 ### Audio and Speech
Audio tools are configured per chatbot under **Tools**.
| Tool | What it does |
| ------------------ | ---------------------------------------------------------------------------------- |
| **Speech to Text** | Records visitor speech, transcribes it, and sends the text as the chat message. |
| **Text to Speech** | Adds a play button to assistant replies. Auto play can read replies automatically. |
| **Realtime Voice** | Starts a live voice session with OpenAI Realtime. |
#### Speech to Text
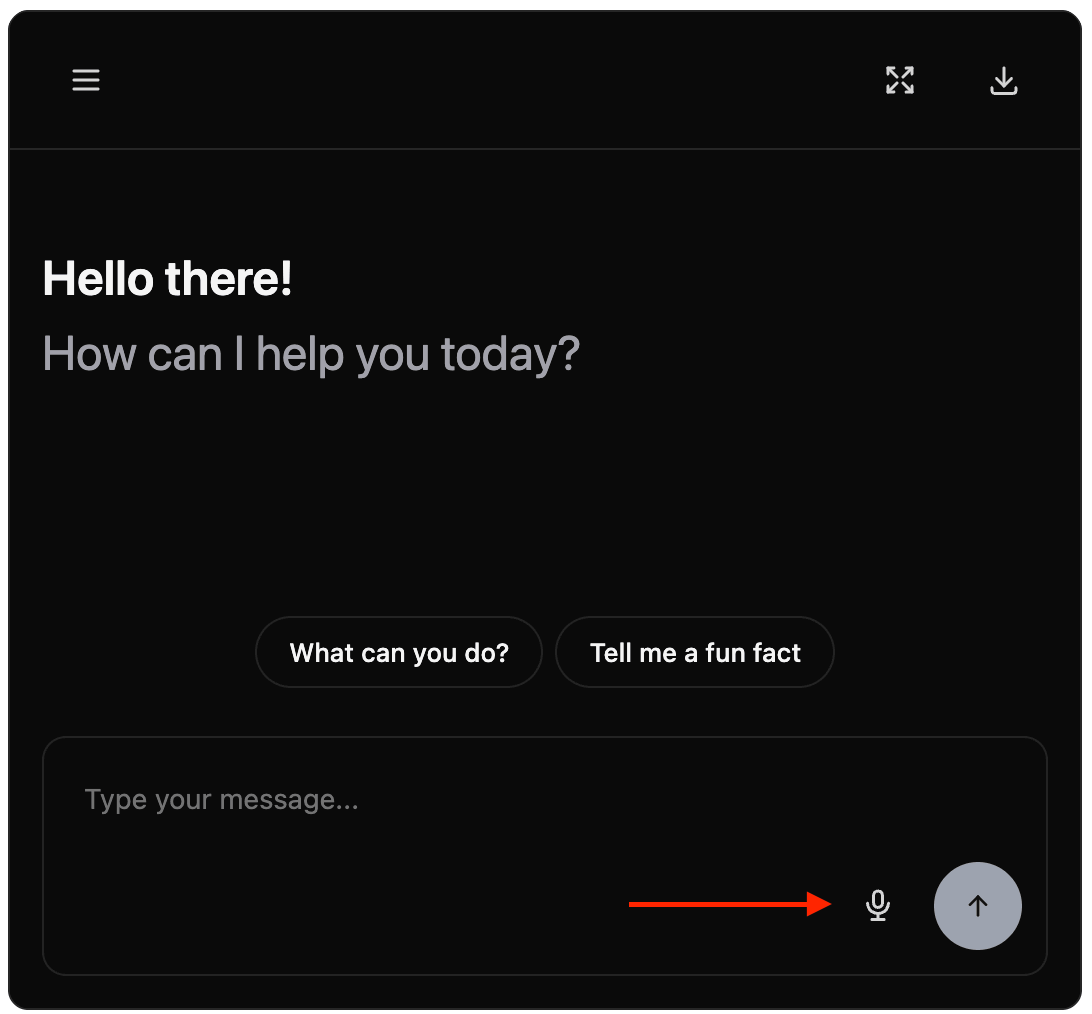
Speech to Text adds a microphone button to the chatbot input.
When a visitor clicks the microphone, AI Puffer records the audio in the browser, uploads it to WordPress, sends it to the speech-to-text provider, then submits the transcript as the user message.
Speech to Text is currently available for OpenAI.
| Provider | Speech to Text model |
| ---------- | -------------------- |
| **OpenAI** | `whisper-1` |
To enable speech to text:
1. Configure OpenAI in [AI Providers](/ai-providers).
2. Go to **AI Puffer > Chatbots** and select the chatbot.
3. Open **Tools**.
4. Add **Speech to Text** to **Enabled tools**.
5. Set **Speech to Text** to **Yes**.
### Audio and Speech
Audio tools are configured per chatbot under **Tools**.
| Tool | What it does |
| ------------------ | ---------------------------------------------------------------------------------- |
| **Speech to Text** | Records visitor speech, transcribes it, and sends the text as the chat message. |
| **Text to Speech** | Adds a play button to assistant replies. Auto play can read replies automatically. |
| **Realtime Voice** | Starts a live voice session with OpenAI Realtime. |
#### Speech to Text
Speech to Text adds a microphone button to the chatbot input.
When a visitor clicks the microphone, AI Puffer records the audio in the browser, uploads it to WordPress, sends it to the speech-to-text provider, then submits the transcript as the user message.
Speech to Text is currently available for OpenAI.
| Provider | Speech to Text model |
| ---------- | -------------------- |
| **OpenAI** | `whisper-1` |
To enable speech to text:
1. Configure OpenAI in [AI Providers](/ai-providers).
2. Go to **AI Puffer > Chatbots** and select the chatbot.
3. Open **Tools**.
4. Add **Speech to Text** to **Enabled tools**.
5. Set **Speech to Text** to **Yes**.
 6. Select the model if the model selector is shown.
7. Save the chatbot and test the microphone on the frontend.
Speech to Text needs browser microphone permission and HTTPS. Localhost can be used for testing without HTTPS. Recorded audio uploads are limited to **4 MB** by default.
6. Select the model if the model selector is shown.
7. Save the chatbot and test the microphone on the frontend.
Speech to Text needs browser microphone permission and HTTPS. Localhost can be used for testing without HTTPS. Recorded audio uploads are limited to **4 MB** by default.
 #### Text to Speech
Text to Speech adds playback controls for assistant replies.
When a visitor clicks the play button, AI Puffer sends the assistant reply text to the selected text-to-speech provider and plays the returned audio in the browser.
Text to Speech is available for Google, OpenAI, and ElevenLabs.
| Provider | Text to Speech models |
| -------------- | ----------------------------------------------------------------------------- |
| **OpenAI** | `tts-1`, `tts-1-hd` |
| **ElevenLabs** | `eleven_v3`, `eleven_multilingual_v2`, `eleven_flash_v2_5`, `eleven_flash_v2` |
| **Google** | Uses synced Google voices. |
To enable text to speech:
1. Go to **AI Puffer > Chatbots** and select the chatbot.
2. Open **Tools**.
3. Add **Text to Speech** to **Enabled tools**.
4. Set **Text to Speech** to **Yes**.
5. Select the provider.
6. Select the voice and model fields shown for that provider.
7. Enable **Auto play** only if replies should play automatically.
8. Save the chatbot and test the play button on an assistant reply.
#### Text to Speech
Text to Speech adds playback controls for assistant replies.
When a visitor clicks the play button, AI Puffer sends the assistant reply text to the selected text-to-speech provider and plays the returned audio in the browser.
Text to Speech is available for Google, OpenAI, and ElevenLabs.
| Provider | Text to Speech models |
| -------------- | ----------------------------------------------------------------------------- |
| **OpenAI** | `tts-1`, `tts-1-hd` |
| **ElevenLabs** | `eleven_v3`, `eleven_multilingual_v2`, `eleven_flash_v2_5`, `eleven_flash_v2` |
| **Google** | Uses synced Google voices. |
To enable text to speech:
1. Go to **AI Puffer > Chatbots** and select the chatbot.
2. Open **Tools**.
3. Add **Text to Speech** to **Enabled tools**.
4. Set **Text to Speech** to **Yes**.
5. Select the provider.
6. Select the voice and model fields shown for that provider.
7. Enable **Auto play** only if replies should play automatically.
8. Save the chatbot and test the play button on an assistant reply.
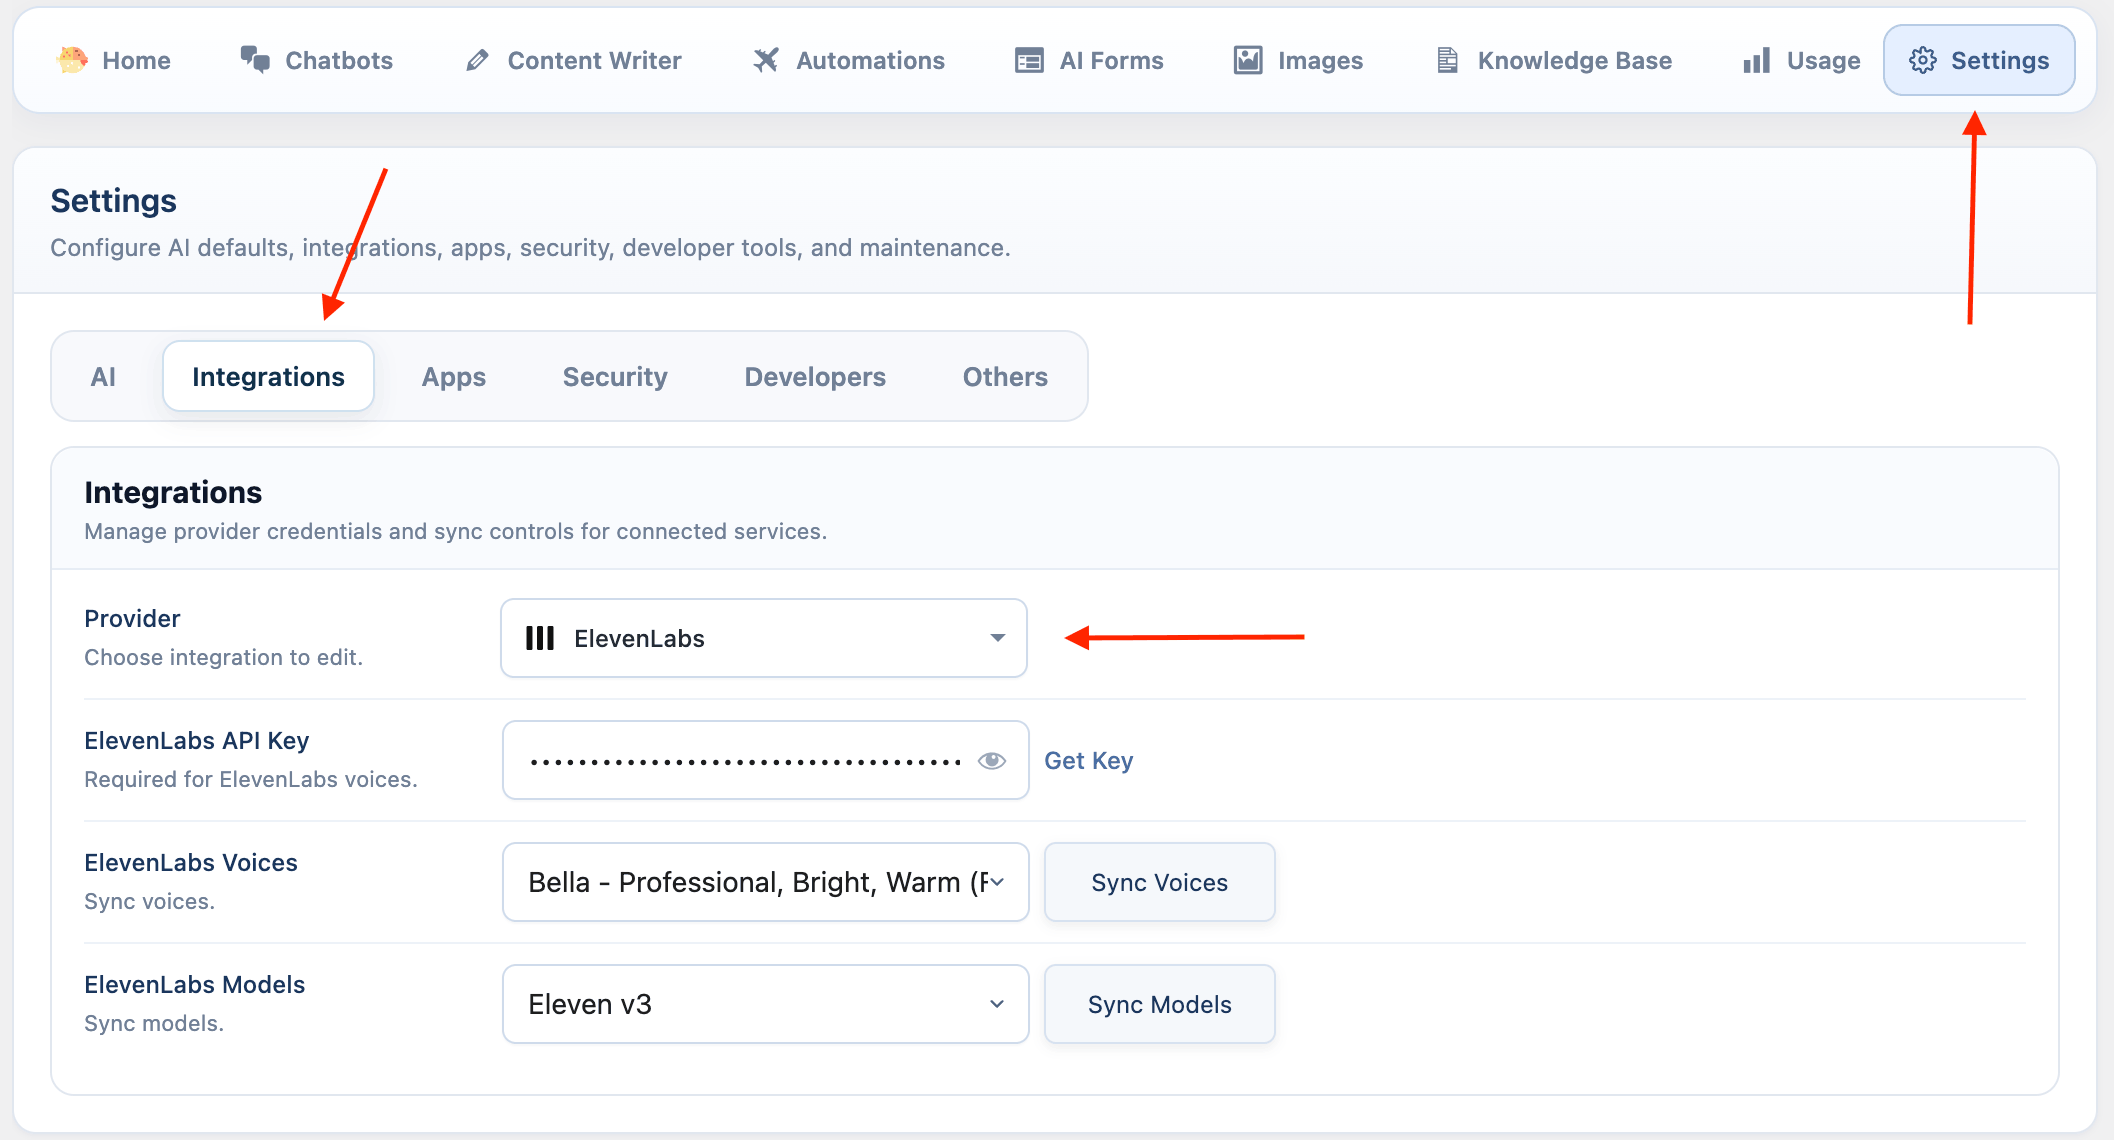
 ElevenLabs voices and models appear only after the ElevenLabs API key is saved under **Settings > Integrations**.
 #### Realtime Voice Agents
Realtime Voice is separate from Speech to Text and Text to Speech. It creates a live WebRTC session with OpenAI Realtime, streams microphone audio, receives spoken replies, and logs completed turns.
Realtime Voice is currently available for OpenAI.
| Provider | Realtime models |
| ---------- | ------------------------------------------------- |
| **OpenAI** | `gpt-4o-realtime-preview`, `gpt-4o-mini-realtime` |
To enable realtime voice:
1. Configure OpenAI in [AI Providers](/ai-providers).
2. Go to **AI Puffer > Chatbots** and select the chatbot.
3. Open **Tools**.
4. Add **Realtime Voice** to **Enabled tools**.
5. Set **Realtime voice agent** to **Yes**.
6. Select the realtime model.
7. Select the voice.
8. Choose turn detection.
9. Save the chatbot and test voice mode on the frontend.
#### Realtime Voice Agents
Realtime Voice is separate from Speech to Text and Text to Speech. It creates a live WebRTC session with OpenAI Realtime, streams microphone audio, receives spoken replies, and logs completed turns.
Realtime Voice is currently available for OpenAI.
| Provider | Realtime models |
| ---------- | ------------------------------------------------- |
| **OpenAI** | `gpt-4o-realtime-preview`, `gpt-4o-mini-realtime` |
To enable realtime voice:
1. Configure OpenAI in [AI Providers](/ai-providers).
2. Go to **AI Puffer > Chatbots** and select the chatbot.
3. Open **Tools**.
4. Add **Realtime Voice** to **Enabled tools**.
5. Set **Realtime voice agent** to **Yes**.
6. Select the realtime model.
7. Select the voice.
8. Choose turn detection.
9. Save the chatbot and test voice mode on the frontend.
 Realtime options:
| Setting | What it does |
| --------------------- | ---------------------------------------------------------------------------------------------------------------------- |
| **Model** | OpenAI Realtime model used for the voice session. |
| **Voice** | Voice used for spoken replies. |
| **Direct voice mode** | Popup-only. The popup launcher starts and stops the voice session directly, and the in-chat realtime button is hidden. |
| **Noise reduction** | Applies input audio noise reduction before the model receives the microphone stream. |
| **Audio format** | Sets the input and output audio format. Available values are `pcm16`, `g711_ulaw`, and `g711_alaw`. |
| **Response speed** | Controls spoken reply speed from `0.25` to `1.5`. |
Turn detection options:
| Mode | Behavior |
| ------------- | ---------------------------------------------------------------------------------------------------------- |
| **None** | No server voice activity detection. Use this for push-to-talk style sessions. |
| **Automatic** | Uses server voice activity detection. This is the default. |
| **Smart** | Uses semantic voice activity detection, so the model can wait for a more complete thought before replying. |
Realtime sessions create chat log entries for the user transcript and assistant transcript when a turn completes. If OpenAI returns usage data, AI Puffer records the token usage against the chatbot.
Realtime Voice uses microphone access and an OpenAI Realtime model. Test it on HTTPS and review costs in your OpenAI account.
## Interface
Open **Interface** to control the visible chatbot UI.
Realtime options:
| Setting | What it does |
| --------------------- | ---------------------------------------------------------------------------------------------------------------------- |
| **Model** | OpenAI Realtime model used for the voice session. |
| **Voice** | Voice used for spoken replies. |
| **Direct voice mode** | Popup-only. The popup launcher starts and stops the voice session directly, and the in-chat realtime button is hidden. |
| **Noise reduction** | Applies input audio noise reduction before the model receives the microphone stream. |
| **Audio format** | Sets the input and output audio format. Available values are `pcm16`, `g711_ulaw`, and `g711_alaw`. |
| **Response speed** | Controls spoken reply speed from `0.25` to `1.5`. |
Turn detection options:
| Mode | Behavior |
| ------------- | ---------------------------------------------------------------------------------------------------------- |
| **None** | No server voice activity detection. Use this for push-to-talk style sessions. |
| **Automatic** | Uses server voice activity detection. This is the default. |
| **Smart** | Uses semantic voice activity detection, so the model can wait for a more complete thought before replying. |
Realtime sessions create chat log entries for the user transcript and assistant transcript when a turn completes. If OpenAI returns usage data, AI Puffer records the token usage against the chatbot.
Realtime Voice uses microphone access and an OpenAI Realtime model. Test it on HTTPS and review costs in your OpenAI account.
## Interface
Open **Interface** to control the visible chatbot UI.
 ### Theme
Choose **Light**, **Dark**, **ChatGPT**, or one of the custom color presets from the **Theme** menu.
To build your own theme, select **Custom** and click **Edit**. The custom editor lets you change the main colors, bubble radius, font, inline width, popup width, chat height, and advanced colors for messages, header, footer, input area, buttons, and sidebar. Use **Reset** to return the custom theme fields to their defaults.
### Theme
Choose **Light**, **Dark**, **ChatGPT**, or one of the custom color presets from the **Theme** menu.
To build your own theme, select **Custom** and click **Edit**. The custom editor lets you change the main colors, bubble radius, font, inline width, popup width, chat height, and advanced colors for messages, header, footer, input area, buttons, and sidebar. Use **Reset** to return the custom theme fields to their defaults.
 ### Popup
Popup mode adds a launcher button to the page. When the visitor clicks it, the chatbot opens in a floating chat window.
To configure a popup:
1. Go to **AI Puffer > Chatbots** and select the chatbot.
2. Set **Mode** to **Popup**.
3. Set **Site-Wide** to **Yes** if the launcher should appear across the site.
4. Open **Popup**.
5. Configure the launcher position, shape, size, hint, icon, avatar, and online text.
6. Save the chatbot and test it on the frontend.
### Popup
Popup mode adds a launcher button to the page. When the visitor clicks it, the chatbot opens in a floating chat window.
To configure a popup:
1. Go to **AI Puffer > Chatbots** and select the chatbot.
2. Set **Mode** to **Popup**.
3. Set **Site-Wide** to **Yes** if the launcher should appear across the site.
4. Open **Popup**.
5. Configure the launcher position, shape, size, hint, icon, avatar, and online text.
6. Save the chatbot and test it on the frontend.
 | Setting | Use it for |
| --------------- | ----------------------------------------------------------------------------------------------------------------------------------------------- |
| **Position** | Place the launcher in a page corner. Options are bottom right, bottom left, top right, and top left. |
| **Shape** | Set the launcher shape to circle, square, or none. |
| **Size** | Set the launcher size to small, medium, large, or x-large. |
| **Auto-open** | Open the popup automatically after a delay, or keep it off. |
| **Hint** | Show a short message near the launcher. Click **Edit** to set the text, timing, size, frequency, desktop/mobile visibility, and dismiss button. |
| **Online text** | Set the status text shown in the chatbot header. |
| **Icon** | Choose a built-in launcher icon or enter a custom icon URL. |
| **Avatar** | Choose a built-in header avatar or enter a custom avatar URL. |
### UI Features
Use UI features to choose which controls appear in the chatbot.
| Setting | Use it for |
| -------------- | ---------------------------------------------------------------------------------- |
| **Download** | Let visitors download chatbot transcripts as TXT or PDF. |
| **Copy** | Show copy buttons on assistant messages. |
| **Feedback** | Show like and dislike buttons on assistant messages. |
| **Fullscreen** | Show the fullscreen button. |
| **Sidebar** | Show conversation history for on-page chatbots. Sidebar is disabled in popup mode. |
| Setting | Use it for |
| --------------- | ----------------------------------------------------------------------------------------------------------------------------------------------- |
| **Position** | Place the launcher in a page corner. Options are bottom right, bottom left, top right, and top left. |
| **Shape** | Set the launcher shape to circle, square, or none. |
| **Size** | Set the launcher size to small, medium, large, or x-large. |
| **Auto-open** | Open the popup automatically after a delay, or keep it off. |
| **Hint** | Show a short message near the launcher. Click **Edit** to set the text, timing, size, frequency, desktop/mobile visibility, and dismiss button. |
| **Online text** | Set the status text shown in the chatbot header. |
| **Icon** | Choose a built-in launcher icon or enter a custom icon URL. |
| **Avatar** | Choose a built-in header avatar or enter a custom avatar URL. |
### UI Features
Use UI features to choose which controls appear in the chatbot.
| Setting | Use it for |
| -------------- | ---------------------------------------------------------------------------------- |
| **Download** | Let visitors download chatbot transcripts as TXT or PDF. |
| **Copy** | Show copy buttons on assistant messages. |
| **Feedback** | Show like and dislike buttons on assistant messages. |
| **Fullscreen** | Show the fullscreen button. |
| **Sidebar** | Show conversation history for on-page chatbots. Sidebar is disabled in popup mode. |
 #### Conversation Starters
Conversation starters are quick prompts shown inside the chatbot before the first message. Use them to help visitors begin with common questions.
To enable and customize starters:
1. Go to **AI Puffer > Chatbots** and select the chatbot.
2. Open **Interface**.
3. In **UI features**, enable **Starters**.
4. Click **Edit**.
5. Add one starter prompt per line.
6. Keep the list to 6 prompts or fewer.
7. Save the chatbot.
#### Conversation Starters
Conversation starters are quick prompts shown inside the chatbot before the first message. Use them to help visitors begin with common questions.
To enable and customize starters:
1. Go to **AI Puffer > Chatbots** and select the chatbot.
2. Open **Interface**.
3. In **UI features**, enable **Starters**.
4. Click **Edit**.
5. Add one starter prompt per line.
6. Keep the list to 6 prompts or fewer.
7. Save the chatbot.
 #### Consent Notice
Consent shows a notice before the conversation starts. The chatbot input stays disabled until the visitor clicks the consent button.
To enable and customize the consent notice:
1. Go to **AI Puffer > Chatbots** and select the chatbot.
2. Open **Interface**.
3. In **UI features**, enable **Consent**.
4. Click **Edit**.
5. Set the **Title**.
6. Set the **Button label**.
7. Write the **Message**.
8. Save the chatbot.
#### Consent Notice
Consent shows a notice before the conversation starts. The chatbot input stays disabled until the visitor clicks the consent button.
To enable and customize the consent notice:
1. Go to **AI Puffer > Chatbots** and select the chatbot.
2. Open **Interface**.
3. In **UI features**, enable **Consent**.
4. Click **Edit**.
5. Set the **Title**.
6. Set the **Button label**.
7. Write the **Message**.
8. Save the chatbot.
 ### Text Labels
Use text labels to change the words visitors see in the chatbot.
| Setting | Use it for |
| --------------- | ------------------------------------------------------ |
| **Greeting** | Main greeting text. |
| **Subgreeting** | Secondary greeting text. |
| **Placeholder** | Input field placeholder. |
| **Footer** | Footer text below the chatbot input. |
| **Typing text** | Text shown while the chatbot is generating. |
| **Status text** | Text shown while knowledge context is being retrieved. |
## Security and Privacy
Chatbots use both global security settings and chatbot-level controls.
Open **AI Puffer > Settings > Security**.
| Setting | What it does |
| -------------------- | --------------------------------------------------------- |
| **IP Anonymization** | Stores anonymized IP addresses in logs. |
| **Banned Words** | Blocks messages that contain configured words or phrases. |
| **Banned IPs** | Blocks messages from configured IP addresses. |
Set custom block messages for banned words and banned IPs if you want visitors to see specific text.
Chatbot logs include conversation messages, usage data, feedback, and metadata needed for history and reporting. Enable IP anonymization if you do not want full IP addresses stored in logs.
Use IP anonymization when you need usage logs without storing full visitor IP addresses.
OpenAI moderation is configured from the OpenAI provider settings.
1. Open **AI Puffer > Settings > AI**.
2. Select **OpenAI**.
3. Open **Advanced**.
4. Set **Moderation** to **Yes**.
5. Set **Moderation Message** if you want a custom message when input is blocked.
Moderation applies to chatbot requests that use OpenAI. If the chatbot uses another provider, this setting is skipped.
## Limits
Limits control how much a visitor can use this chatbot before AI Puffer stops new messages.
AI Puffer checks the visitor's quota before a chat request starts and records usage after the response. Guests are tracked by session. Logged-in users are tracked on their WordPress account. Leave a quota empty for unlimited usage, or set it to `0` to block that group.
| Setting | Use it for |
| ------------------------- | ----------------------------------------------------------------------------------------------------------------- |
| **Quota mode** | Use the same quota for all logged-in users or define role-based quotas. |
| **Guest quota** | Usage quota for visitors who are not logged in. Empty means unlimited. `0` blocks guests. |
| **User quota** | Usage quota for logged-in users when using general quota mode. Empty means unlimited. `0` blocks logged-in users. |
| **Role-based quotas** | Usage quota per WordPress role. Empty means unlimited for that role. |
| **Reset period** | Never, daily, weekly, or monthly. |
| **Quota reached message** | Message shown when the visitor reaches the quota. |
| **Primary button** | Optional button shown after the quota message. |
| **Secondary button** | Optional second button shown after the quota message. |
Quota buttons can link to customer dashboard usage, credits, purchases, the buy credits page, a custom URL, or no button.
For credit-based chatbot access, define pricing rules in [Usage](/usage#pricing-rules). To sell prepaid credits, create WooCommerce credit packages in [Usage](/usage#woocommerce-credit-packages).
### Text Labels
Use text labels to change the words visitors see in the chatbot.
| Setting | Use it for |
| --------------- | ------------------------------------------------------ |
| **Greeting** | Main greeting text. |
| **Subgreeting** | Secondary greeting text. |
| **Placeholder** | Input field placeholder. |
| **Footer** | Footer text below the chatbot input. |
| **Typing text** | Text shown while the chatbot is generating. |
| **Status text** | Text shown while knowledge context is being retrieved. |
## Security and Privacy
Chatbots use both global security settings and chatbot-level controls.
Open **AI Puffer > Settings > Security**.
| Setting | What it does |
| -------------------- | --------------------------------------------------------- |
| **IP Anonymization** | Stores anonymized IP addresses in logs. |
| **Banned Words** | Blocks messages that contain configured words or phrases. |
| **Banned IPs** | Blocks messages from configured IP addresses. |
Set custom block messages for banned words and banned IPs if you want visitors to see specific text.
Chatbot logs include conversation messages, usage data, feedback, and metadata needed for history and reporting. Enable IP anonymization if you do not want full IP addresses stored in logs.
Use IP anonymization when you need usage logs without storing full visitor IP addresses.
OpenAI moderation is configured from the OpenAI provider settings.
1. Open **AI Puffer > Settings > AI**.
2. Select **OpenAI**.
3. Open **Advanced**.
4. Set **Moderation** to **Yes**.
5. Set **Moderation Message** if you want a custom message when input is blocked.
Moderation applies to chatbot requests that use OpenAI. If the chatbot uses another provider, this setting is skipped.
## Limits
Limits control how much a visitor can use this chatbot before AI Puffer stops new messages.
AI Puffer checks the visitor's quota before a chat request starts and records usage after the response. Guests are tracked by session. Logged-in users are tracked on their WordPress account. Leave a quota empty for unlimited usage, or set it to `0` to block that group.
| Setting | Use it for |
| ------------------------- | ----------------------------------------------------------------------------------------------------------------- |
| **Quota mode** | Use the same quota for all logged-in users or define role-based quotas. |
| **Guest quota** | Usage quota for visitors who are not logged in. Empty means unlimited. `0` blocks guests. |
| **User quota** | Usage quota for logged-in users when using general quota mode. Empty means unlimited. `0` blocks logged-in users. |
| **Role-based quotas** | Usage quota per WordPress role. Empty means unlimited for that role. |
| **Reset period** | Never, daily, weekly, or monthly. |
| **Quota reached message** | Message shown when the visitor reaches the quota. |
| **Primary button** | Optional button shown after the quota message. |
| **Secondary button** | Optional second button shown after the quota message. |
Quota buttons can link to customer dashboard usage, credits, purchases, the buy credits page, a custom URL, or no button.
For credit-based chatbot access, define pricing rules in [Usage](/usage#pricing-rules). To sell prepaid credits, create WooCommerce credit packages in [Usage](/usage#woocommerce-credit-packages).
 ## Connected Apps
Use Connected Apps to send chatbot events to external apps.
Connected Apps has two parts: a **connection** stores the app credentials, and a **recipe** decides which chatbot event is sent to that app.
Connected app recipes can send chatbot data to external services. Map only the fields that the destination app needs.
Chatbot recipes can run on these events:
| Event | When it runs |
| ------------------------------- | ----------------------------------------------------- |
| **Chat Session Started** | The first user message starts a new chat session. |
| **Chat User Message Submitted** | A visitor sends a message. |
| **Chat Response Generated** | The chatbot finishes an answer. |
| **Chat Feedback Submitted** | A visitor submits feedback. |
| **Chatbot Form Submitted** | A visitor submits a form displayed by a chatbot rule. |
Use **Chatbot Form Submitted** for forms created with a chatbot rule's **Display form** action. Use **AI Form Submitted** only for standalone AI Forms from the AI Forms module.
Open **AI Puffer > Settings > Apps** to create connections and recipes.
## Connected Apps
Use Connected Apps to send chatbot events to external apps.
Connected Apps has two parts: a **connection** stores the app credentials, and a **recipe** decides which chatbot event is sent to that app.
Connected app recipes can send chatbot data to external services. Map only the fields that the destination app needs.
Chatbot recipes can run on these events:
| Event | When it runs |
| ------------------------------- | ----------------------------------------------------- |
| **Chat Session Started** | The first user message starts a new chat session. |
| **Chat User Message Submitted** | A visitor sends a message. |
| **Chat Response Generated** | The chatbot finishes an answer. |
| **Chat Feedback Submitted** | A visitor submits feedback. |
| **Chatbot Form Submitted** | A visitor submits a form displayed by a chatbot rule. |
Use **Chatbot Form Submitted** for forms created with a chatbot rule's **Display form** action. Use **AI Form Submitted** only for standalone AI Forms from the AI Forms module.
Open **AI Puffer > Settings > Apps** to create connections and recipes.
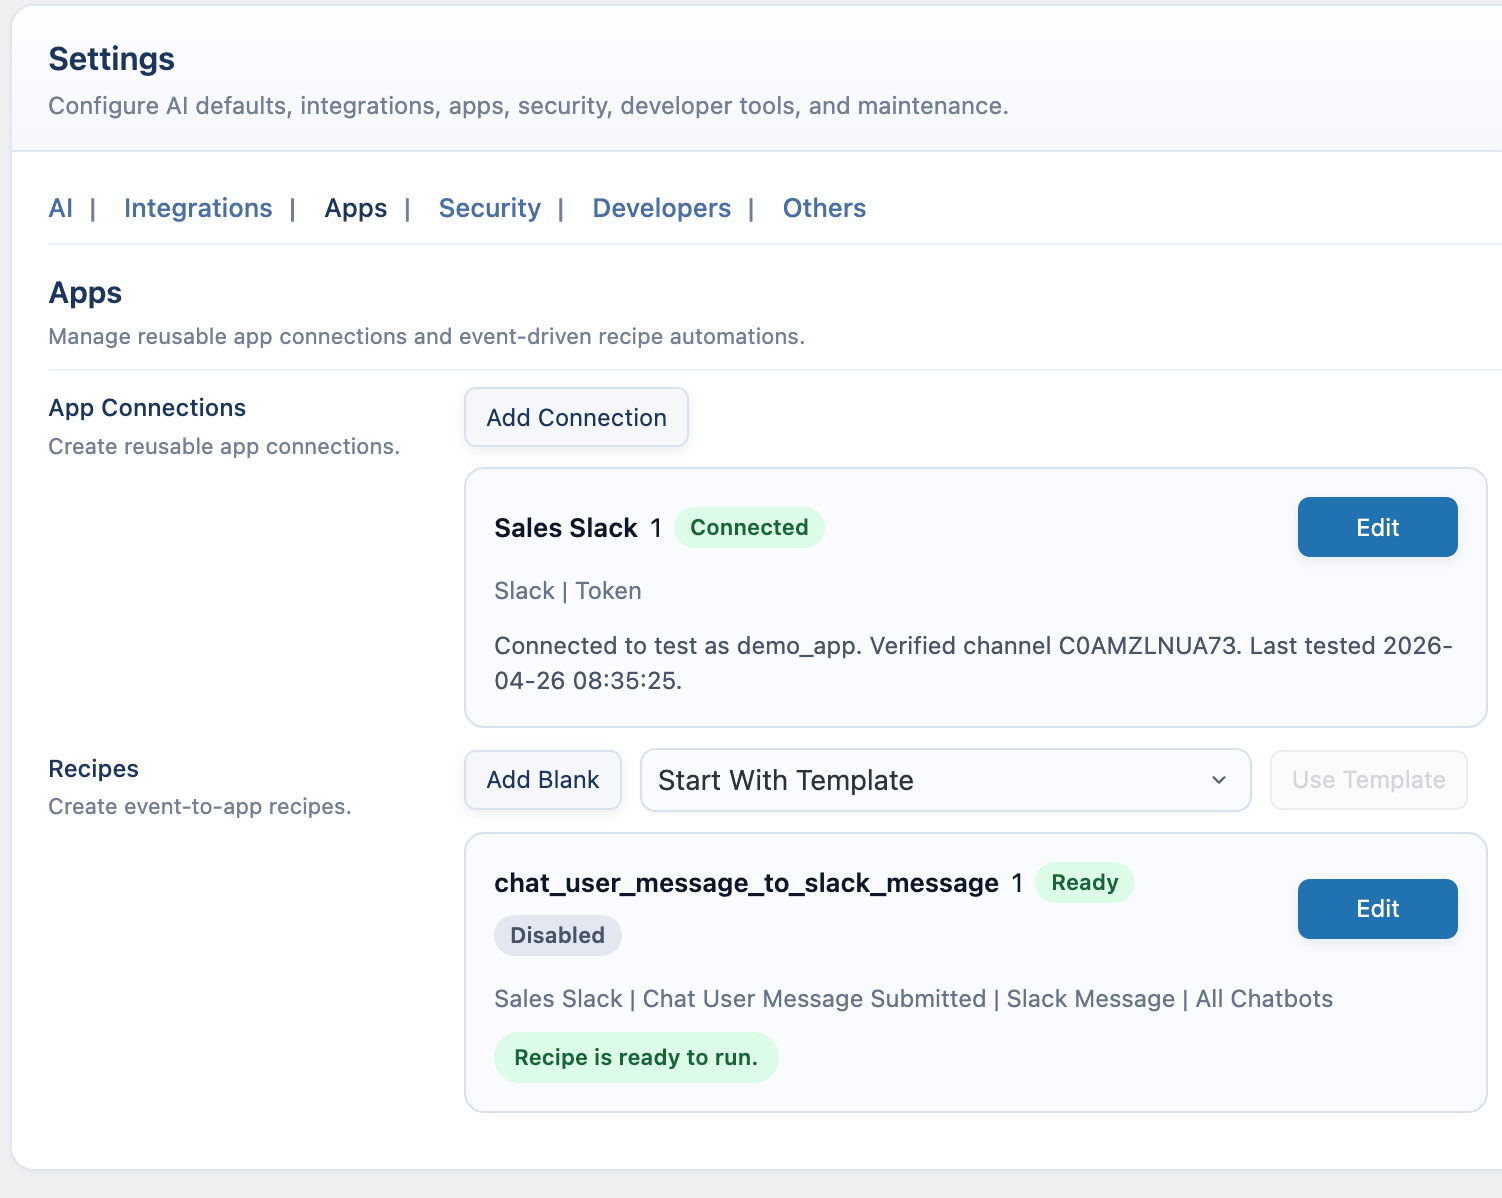 Use **Chatbots > Connected Apps** to review the recipes attached to the current chatbot.
 Failed deliveries appear under **Settings > Apps > Delivery Issues**, where you can retry or clear them.
### Slack
Use Slack to send chatbot messages, responses, feedback, or session alerts to a channel.
1. Go to [https://api.slack.com/apps](https://api.slack.com/apps).
2. Click **Create New App**.
3. Choose **From scratch**.
4. Enter an app name and select the workspace.
5. Click **Create App**.
6. Choose one connection method:
* **Bot token**: open **OAuth & Permissions**, scroll to **Bot Token Scopes**, click **Add an OAuth Scope**, add `chat:write`, click **Install to Workspace**, then copy the **Bot User OAuth Token** that starts with `xoxb-`.
* **Incoming webhook**: open **Incoming Webhooks**, turn on **Activate Incoming Webhooks**, click **Add New Webhook to Workspace**, select a channel, then copy the webhook URL.
7. If you use a bot token, invite the Slack app to the target channel.
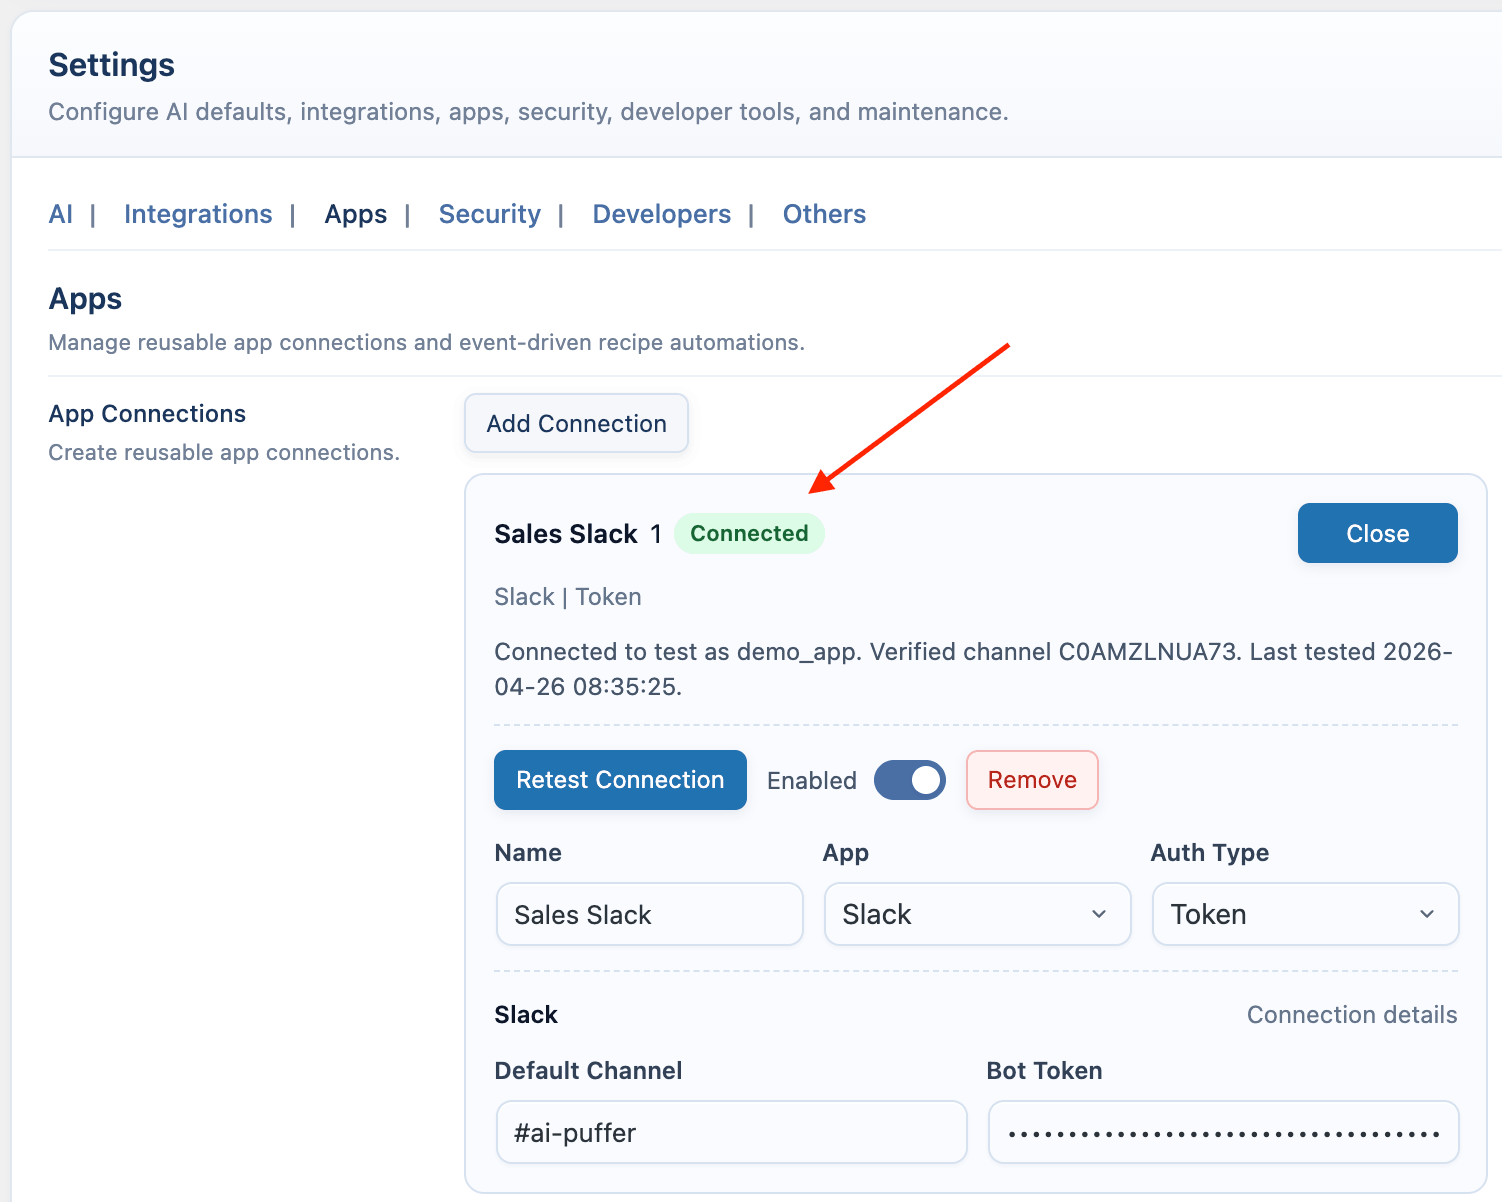
8. In WordPress, open **AI Puffer > Settings > Apps**.
9. Create a **Slack** connection.
10. Select **Token** or **Webhook**.
11. For **Token**, enter the **Bot Token** and **Default Channel**.
12. For **Webhook**, enter the **Webhook URL**.
13. Save the connection.
14. For token connections, click **Test Connection**. AI Puffer posts a temporary Slack message and removes it after the channel is verified.
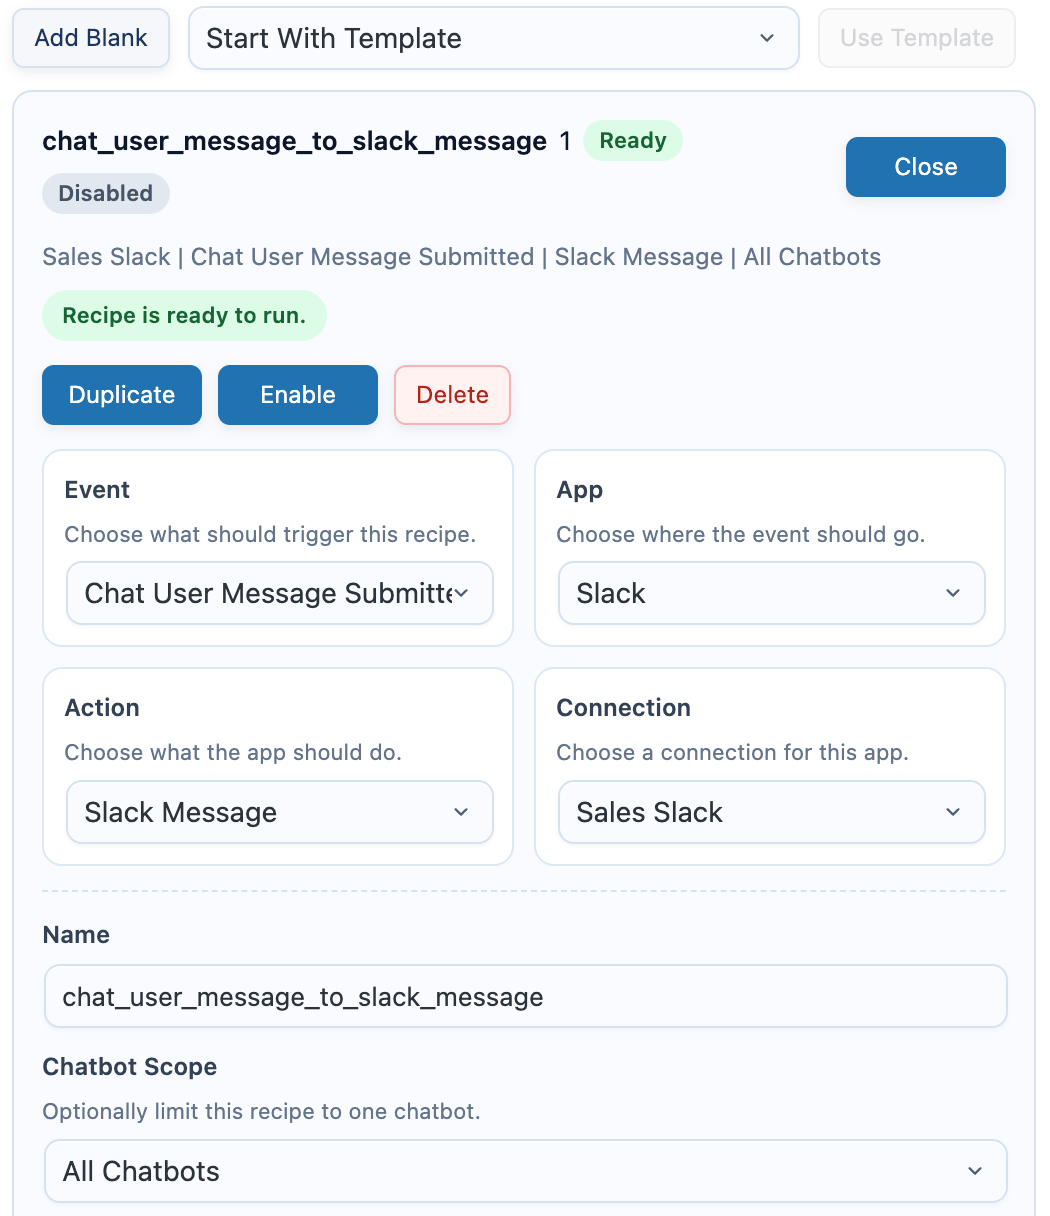
15. Create a recipe, choose a chatbot event, choose **Slack Message**, map the fields, and enable it.
16. Scope the recipe to all chatbots or one chatbot.
17. Test from the frontend chatbot.
Webhook connections are tested at delivery time. If a token test fails, check that the bot is in the default channel.
Failed deliveries appear under **Settings > Apps > Delivery Issues**, where you can retry or clear them.
### Slack
Use Slack to send chatbot messages, responses, feedback, or session alerts to a channel.
1. Go to [https://api.slack.com/apps](https://api.slack.com/apps).
2. Click **Create New App**.
3. Choose **From scratch**.
4. Enter an app name and select the workspace.
5. Click **Create App**.
6. Choose one connection method:
* **Bot token**: open **OAuth & Permissions**, scroll to **Bot Token Scopes**, click **Add an OAuth Scope**, add `chat:write`, click **Install to Workspace**, then copy the **Bot User OAuth Token** that starts with `xoxb-`.
* **Incoming webhook**: open **Incoming Webhooks**, turn on **Activate Incoming Webhooks**, click **Add New Webhook to Workspace**, select a channel, then copy the webhook URL.
7. If you use a bot token, invite the Slack app to the target channel.
8. In WordPress, open **AI Puffer > Settings > Apps**.
9. Create a **Slack** connection.
10. Select **Token** or **Webhook**.
11. For **Token**, enter the **Bot Token** and **Default Channel**.
12. For **Webhook**, enter the **Webhook URL**.
13. Save the connection.
14. For token connections, click **Test Connection**. AI Puffer posts a temporary Slack message and removes it after the channel is verified.
15. Create a recipe, choose a chatbot event, choose **Slack Message**, map the fields, and enable it.
16. Scope the recipe to all chatbots or one chatbot.
17. Test from the frontend chatbot.
Webhook connections are tested at delivery time. If a token test fails, check that the bot is in the default channel.
 ### HubSpot
Use HubSpot to create or update contacts from chatbot events when your recipe maps an email address.
1. Go to [https://app.hubspot.com](https://app.hubspot.com) and select your HubSpot account.
2. Open **Development > Legacy apps**.
3. Click **Create private app**.
4. Enter an app name.
5. Open **Scopes**.
6. Add `crm.objects.contacts.read` and `crm.objects.contacts.write`.
7. Create the app.
8. Open the app's **Auth** tab and copy the private app access token.
9. In WordPress, open **AI Puffer > Settings > Apps**.
10. Create a **HubSpot** connection.
11. Enter the **Private App Token**.
12. Add the **Portal ID** if you want it stored with the connection.
13. Save the connection.
14. Click **Test Connection**.
15. Create a recipe, choose a chatbot event, choose **HubSpot Contact**, map **Email**, and map any other contact fields you need.
16. Enable the recipe and test from the frontend chatbot.
HubSpot contact recipes require an email mapping.
For lead forms shown inside the chatbot by a rule, choose the **Chatbot Form Submitted** event. Common mappings are:
| HubSpot field | Source path |
| ------------- | ------------------------ |
| Email | `data.inputs.email` |
| First name | `data.inputs.first_name` |
| Last name | `data.inputs.last_name` |
| Phone | `data.inputs.phone` |
| Company | `data.inputs.company` |
| Note | `data.summary` |
### HubSpot
Use HubSpot to create or update contacts from chatbot events when your recipe maps an email address.
1. Go to [https://app.hubspot.com](https://app.hubspot.com) and select your HubSpot account.
2. Open **Development > Legacy apps**.
3. Click **Create private app**.
4. Enter an app name.
5. Open **Scopes**.
6. Add `crm.objects.contacts.read` and `crm.objects.contacts.write`.
7. Create the app.
8. Open the app's **Auth** tab and copy the private app access token.
9. In WordPress, open **AI Puffer > Settings > Apps**.
10. Create a **HubSpot** connection.
11. Enter the **Private App Token**.
12. Add the **Portal ID** if you want it stored with the connection.
13. Save the connection.
14. Click **Test Connection**.
15. Create a recipe, choose a chatbot event, choose **HubSpot Contact**, map **Email**, and map any other contact fields you need.
16. Enable the recipe and test from the frontend chatbot.
HubSpot contact recipes require an email mapping.
For lead forms shown inside the chatbot by a rule, choose the **Chatbot Form Submitted** event. Common mappings are:
| HubSpot field | Source path |
| ------------- | ------------------------ |
| Email | `data.inputs.email` |
| First name | `data.inputs.first_name` |
| Last name | `data.inputs.last_name` |
| Phone | `data.inputs.phone` |
| Company | `data.inputs.company` |
| Note | `data.summary` |
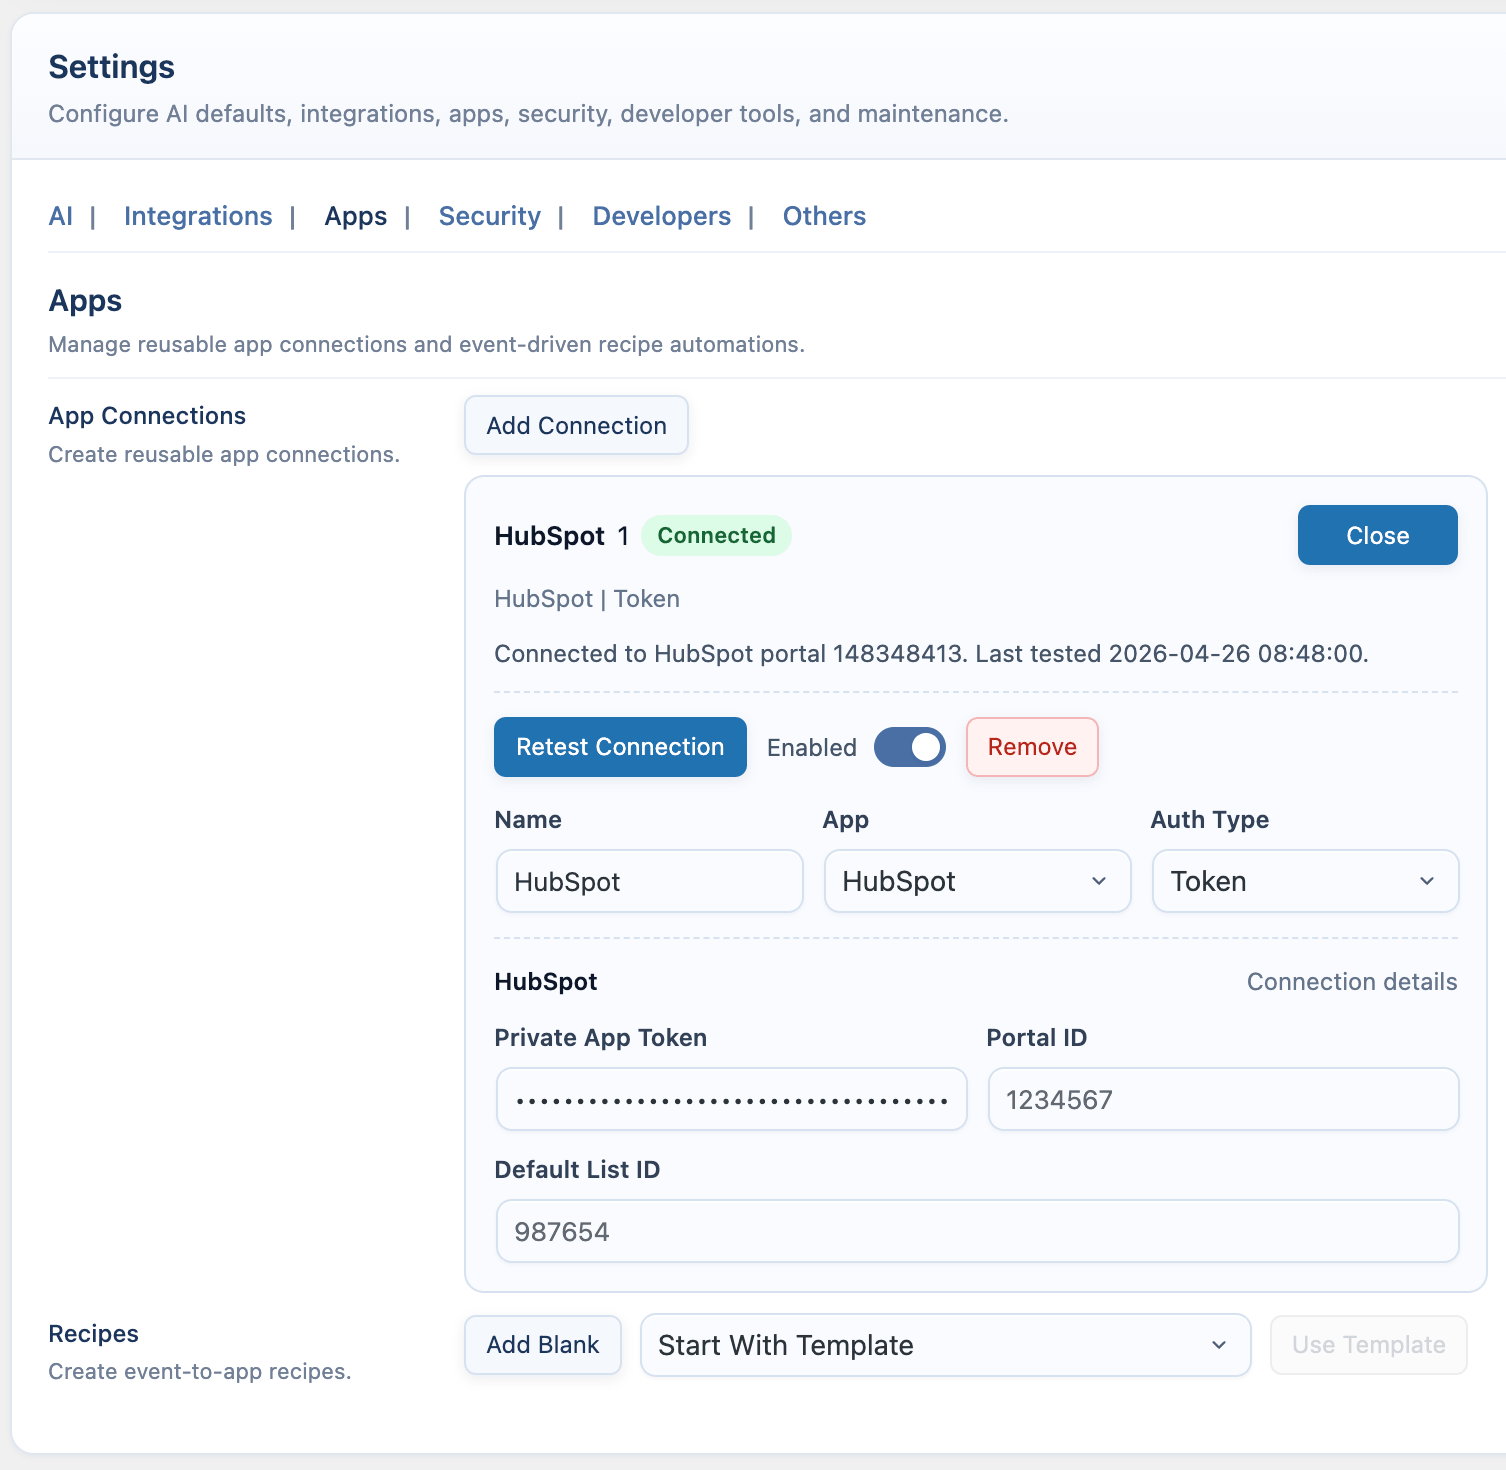 ### Notion
Use Notion to create pages or database items from chatbot events.
1. Go to [https://www.notion.com/my-integrations](https://www.notion.com/my-integrations).
2. Click **New integration** or **Create a new integration**.
3. Select the workspace and enter an integration name.
4. Open the integration's **Configuration** tab.
5. Copy the **Internal Integration Secret**.
6. In Notion, open the page or database AI Puffer should write to.
7. Click the **...** menu in the top-right corner.
8. Select **Connections**.
9. Click **+ Add connection**.
10. Search for your integration and select it.
11. Confirm access.
12. Copy the parent page ID or database ID from the Notion URL.
13. In WordPress, open **AI Puffer > Settings > Apps**.
14. Create a **Notion** connection.
15. Enter the **Integration Token**.
16. Enter **Parent Page ID** for page recipes, or **Database ID** for database item recipes.
17. Save the connection.
18. Click **Test Connection**.
19. Create a recipe, choose a chatbot event, choose **Notion Page** or **Notion Database Item**, map the fields, and enable it.
20. Test from the frontend chatbot.
The connection test checks the token. If delivery fails, confirm the target page or database is shared with the Notion integration.
### Notion
Use Notion to create pages or database items from chatbot events.
1. Go to [https://www.notion.com/my-integrations](https://www.notion.com/my-integrations).
2. Click **New integration** or **Create a new integration**.
3. Select the workspace and enter an integration name.
4. Open the integration's **Configuration** tab.
5. Copy the **Internal Integration Secret**.
6. In Notion, open the page or database AI Puffer should write to.
7. Click the **...** menu in the top-right corner.
8. Select **Connections**.
9. Click **+ Add connection**.
10. Search for your integration and select it.
11. Confirm access.
12. Copy the parent page ID or database ID from the Notion URL.
13. In WordPress, open **AI Puffer > Settings > Apps**.
14. Create a **Notion** connection.
15. Enter the **Integration Token**.
16. Enter **Parent Page ID** for page recipes, or **Database ID** for database item recipes.
17. Save the connection.
18. Click **Test Connection**.
19. Create a recipe, choose a chatbot event, choose **Notion Page** or **Notion Database Item**, map the fields, and enable it.
20. Test from the frontend chatbot.
The connection test checks the token. If delivery fails, confirm the target page or database is shared with the Notion integration.
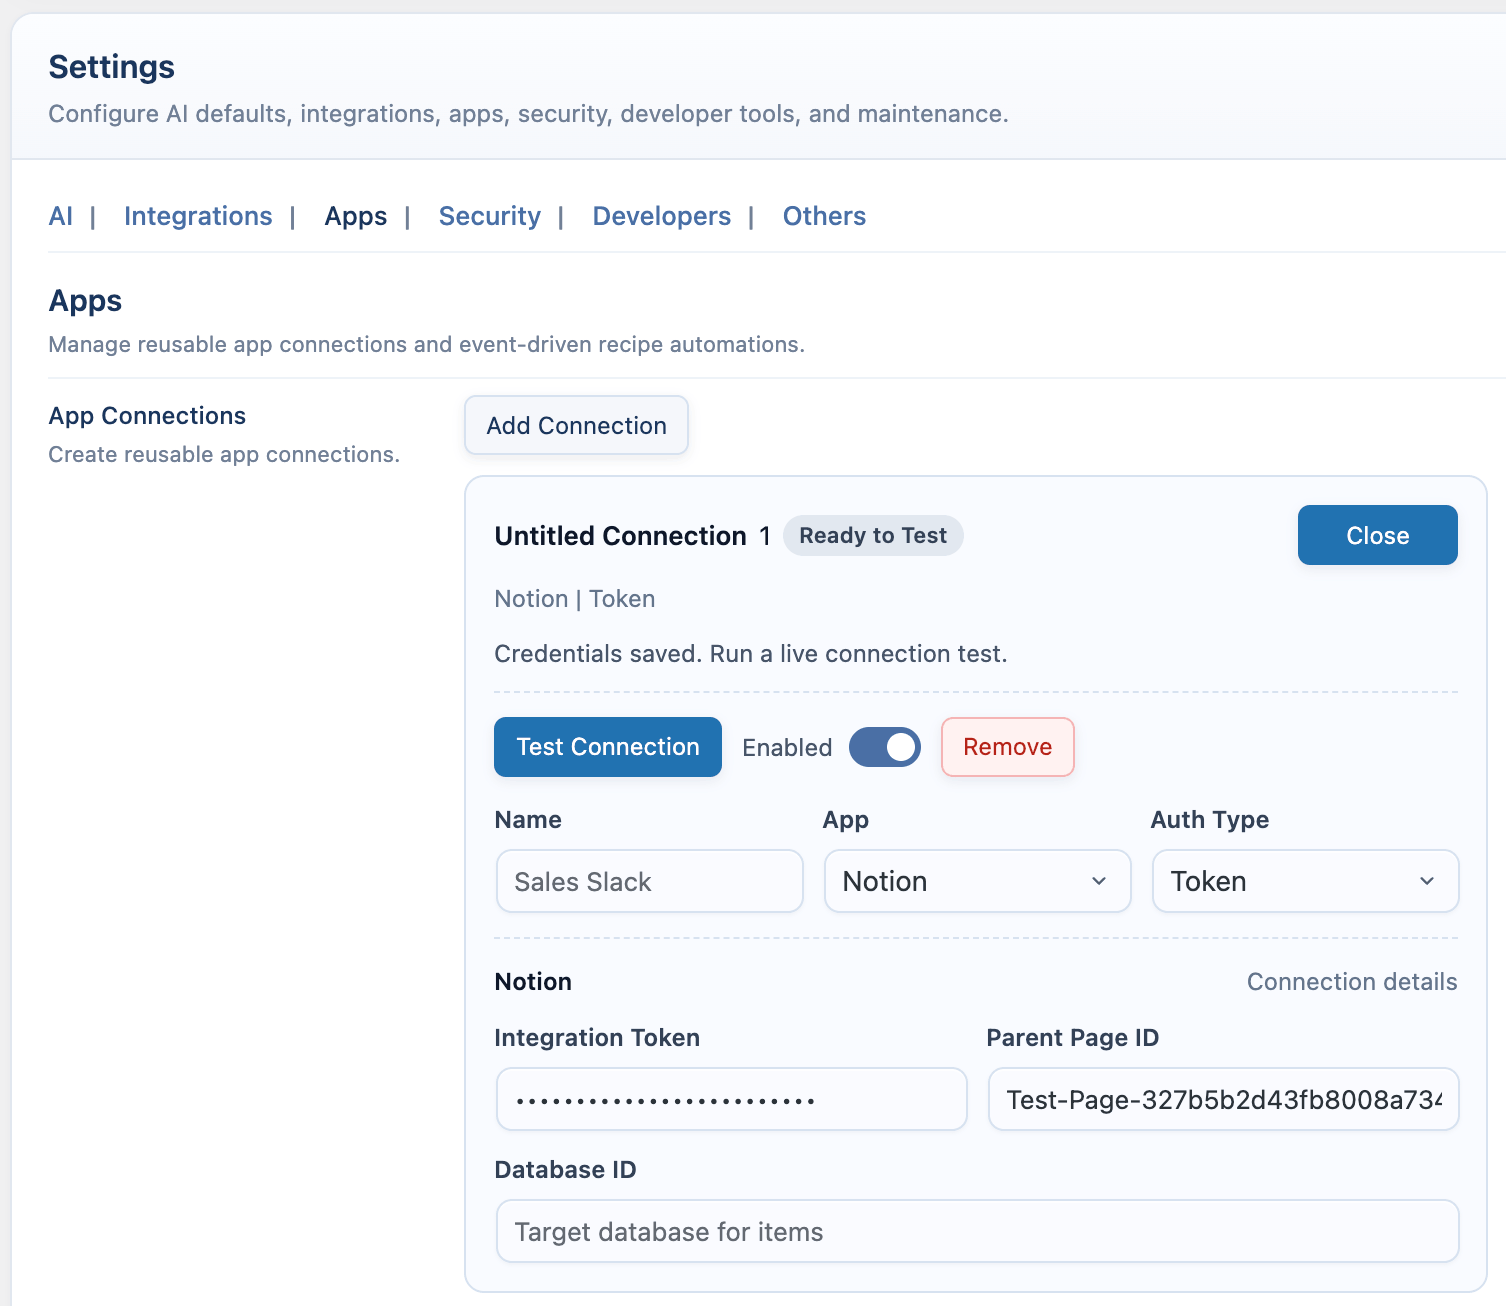 ### Pipedrive
Use Pipedrive to create or update people from chatbot events when your recipe maps a name.
1. Go to [https://app.pipedrive.com](https://app.pipedrive.com).
2. Open your account menu in the top-right corner.
3. Open **Personal preferences**.
4. Open the **API** tab.
5. Copy your personal API token.
6. Copy your company domain from the browser address. For `https://example.pipedrive.com`, the company domain is `example`.
7. In WordPress, open **AI Puffer > Settings > Apps**.
8. Create a **Pipedrive** connection.
9. Enter the **API Token** and **Company Domain**.
10. Add **Default Owner ID** or **Pipeline ID** if your workflow needs them.
11. Save the connection.
12. Click **Test Connection**.
13. Create a recipe, choose a chatbot event, choose **Pipedrive Person**, map **Name**, and map any other fields you need.
14. Enable the recipe and test from the frontend chatbot.
Pipedrive person recipes require a name mapping. If an email is mapped, AI Puffer looks for an existing person before creating a new one.
### Pipedrive
Use Pipedrive to create or update people from chatbot events when your recipe maps a name.
1. Go to [https://app.pipedrive.com](https://app.pipedrive.com).
2. Open your account menu in the top-right corner.
3. Open **Personal preferences**.
4. Open the **API** tab.
5. Copy your personal API token.
6. Copy your company domain from the browser address. For `https://example.pipedrive.com`, the company domain is `example`.
7. In WordPress, open **AI Puffer > Settings > Apps**.
8. Create a **Pipedrive** connection.
9. Enter the **API Token** and **Company Domain**.
10. Add **Default Owner ID** or **Pipeline ID** if your workflow needs them.
11. Save the connection.
12. Click **Test Connection**.
13. Create a recipe, choose a chatbot event, choose **Pipedrive Person**, map **Name**, and map any other fields you need.
14. Enable the recipe and test from the frontend chatbot.
Pipedrive person recipes require a name mapping. If an email is mapped, AI Puffer looks for an existing person before creating a new one.
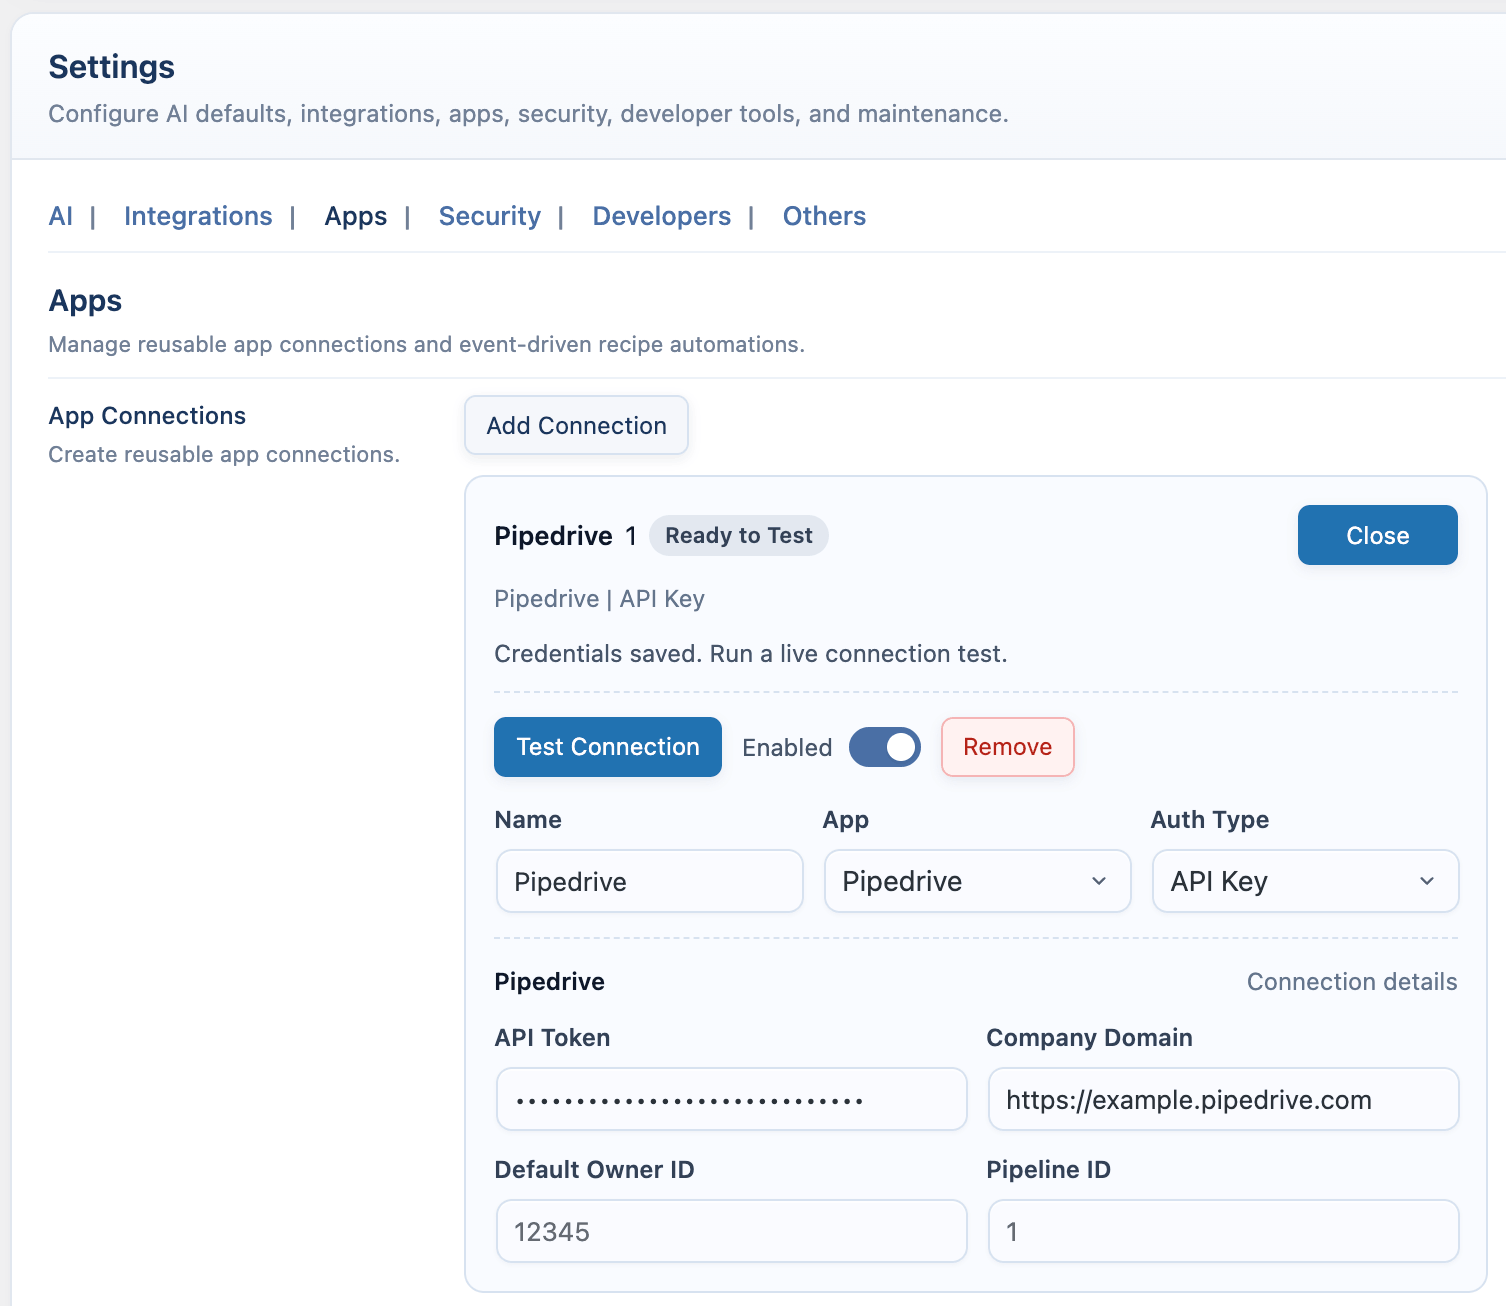 ### Zapier
Use Zapier when you want to send chatbot event data into a Zap.
1. Go to [https://zapier.com/app/editor](https://zapier.com/app/editor).
2. Click the **Trigger** step.
3. Search for **Webhooks by Zapier**.
4. Select **Webhooks by Zapier**.
5. Set **Event** to **Catch Hook**.
6. Click **Continue**.
7. In the **Test** tab, click **Copy** to copy the webhook URL.
8. In WordPress, open **AI Puffer > Settings > Apps**.
9. Create a **Zapier** connection.
10. Enter the **Webhook URL**.
11. Add a **Zap Name** if you want a label for the connection.
12. Save the connection.
13. Create a recipe, choose a chatbot event, choose **Zapier Webhook**, map the fields, and enable it.
14. In Zapier, keep the Zap ready to receive a test request.
15. Test from the frontend chatbot and confirm the request appears in Zapier.
Zapier connections are verified when AI Puffer sends the first event.
### Zapier
Use Zapier when you want to send chatbot event data into a Zap.
1. Go to [https://zapier.com/app/editor](https://zapier.com/app/editor).
2. Click the **Trigger** step.
3. Search for **Webhooks by Zapier**.
4. Select **Webhooks by Zapier**.
5. Set **Event** to **Catch Hook**.
6. Click **Continue**.
7. In the **Test** tab, click **Copy** to copy the webhook URL.
8. In WordPress, open **AI Puffer > Settings > Apps**.
9. Create a **Zapier** connection.
10. Enter the **Webhook URL**.
11. Add a **Zap Name** if you want a label for the connection.
12. Save the connection.
13. Create a recipe, choose a chatbot event, choose **Zapier Webhook**, map the fields, and enable it.
14. In Zapier, keep the Zap ready to receive a test request.
15. Test from the frontend chatbot and confirm the request appears in Zapier.
Zapier connections are verified when AI Puffer sends the first event.
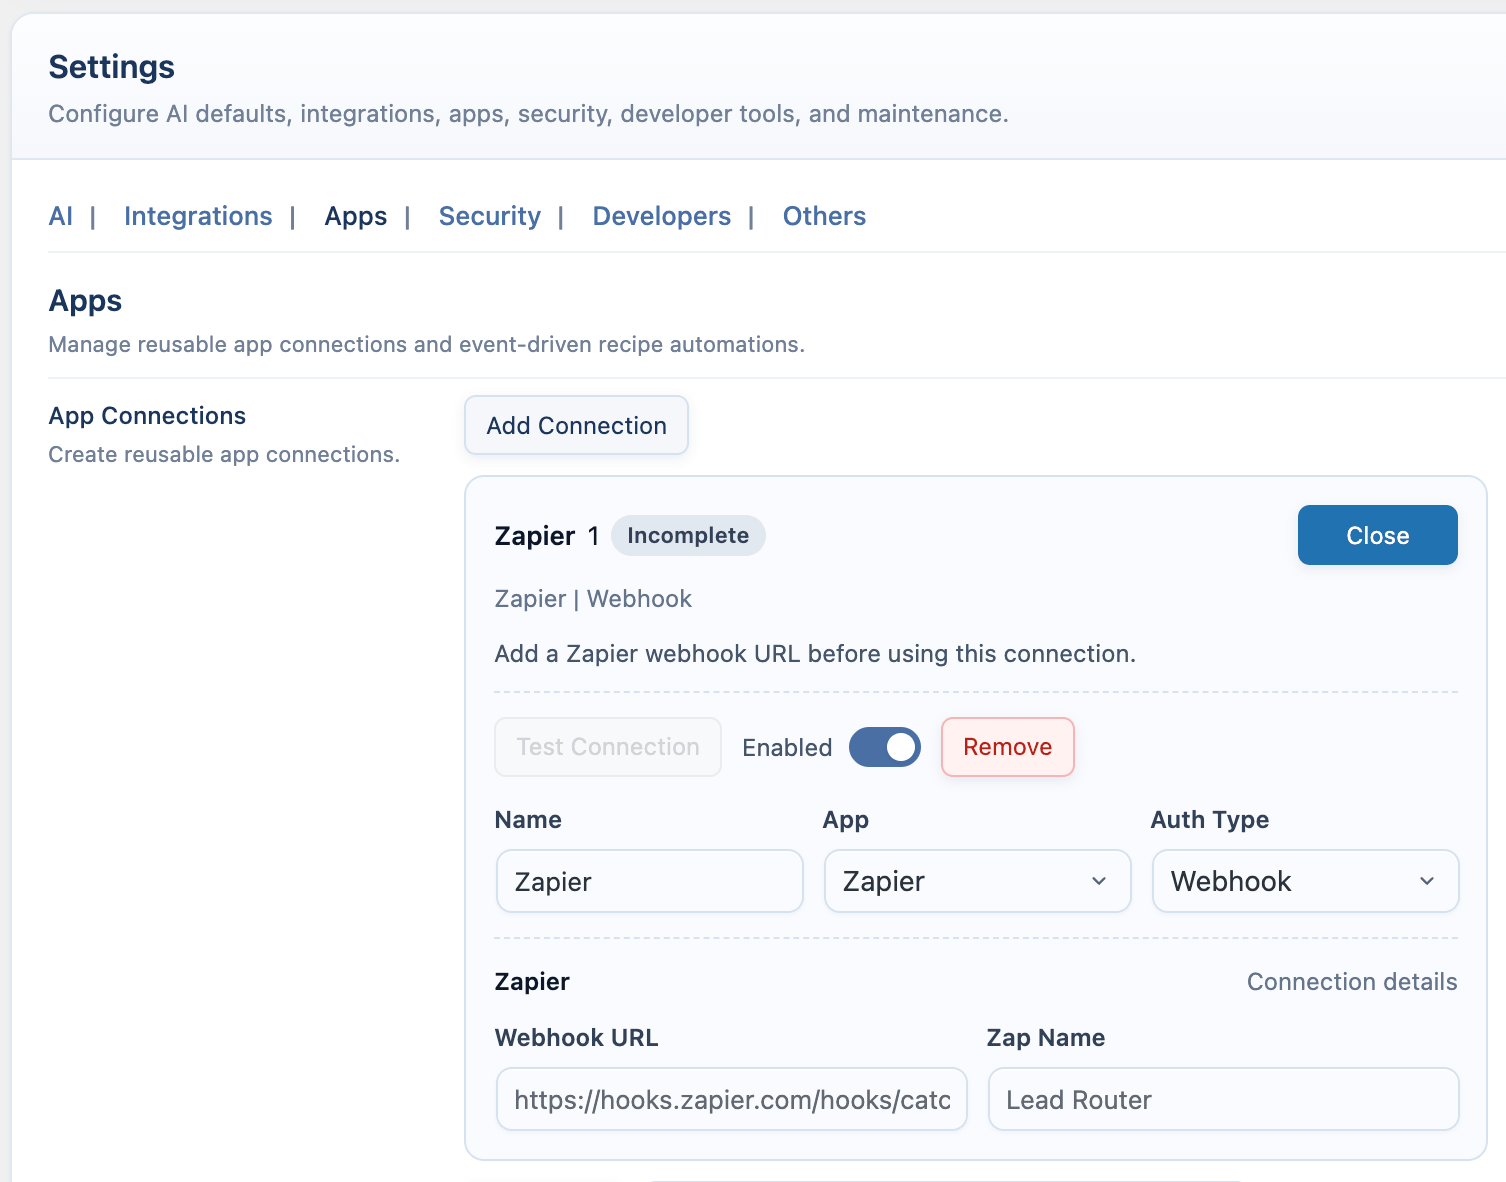 ### Make
Use Make when you want chatbot events to start a Make scenario.
1. Go to [https://www.make.com/en/login](https://www.make.com/en/login) and open Make.
2. Create a new scenario.
3. Click the large **+** button.
4. Search for **Webhooks**.
5. Select **Webhooks > Custom webhook**.
6. Click **Create a webhook**.
7. Name the webhook and save it.
8. Copy the generated webhook URL.
9. In WordPress, open **AI Puffer > Settings > Apps**.
10. Create a **Make** connection.
11. Enter the **Webhook URL**.
12. Add a **Scenario Name** if you want a label for the connection.
13. Save the connection.
14. Create a recipe, choose a chatbot event, choose **Make Webhook**, map the fields, and enable it.
15. In Make, click **Run once** so the scenario can receive a test request.
16. Test from the frontend chatbot and check the Make scenario history.
Make connections are verified when AI Puffer sends the first event.
### Make
Use Make when you want chatbot events to start a Make scenario.
1. Go to [https://www.make.com/en/login](https://www.make.com/en/login) and open Make.
2. Create a new scenario.
3. Click the large **+** button.
4. Search for **Webhooks**.
5. Select **Webhooks > Custom webhook**.
6. Click **Create a webhook**.
7. Name the webhook and save it.
8. Copy the generated webhook URL.
9. In WordPress, open **AI Puffer > Settings > Apps**.
10. Create a **Make** connection.
11. Enter the **Webhook URL**.
12. Add a **Scenario Name** if you want a label for the connection.
13. Save the connection.
14. Create a recipe, choose a chatbot event, choose **Make Webhook**, map the fields, and enable it.
15. In Make, click **Run once** so the scenario can receive a test request.
16. Test from the frontend chatbot and check the Make scenario history.
Make connections are verified when AI Puffer sends the first event.
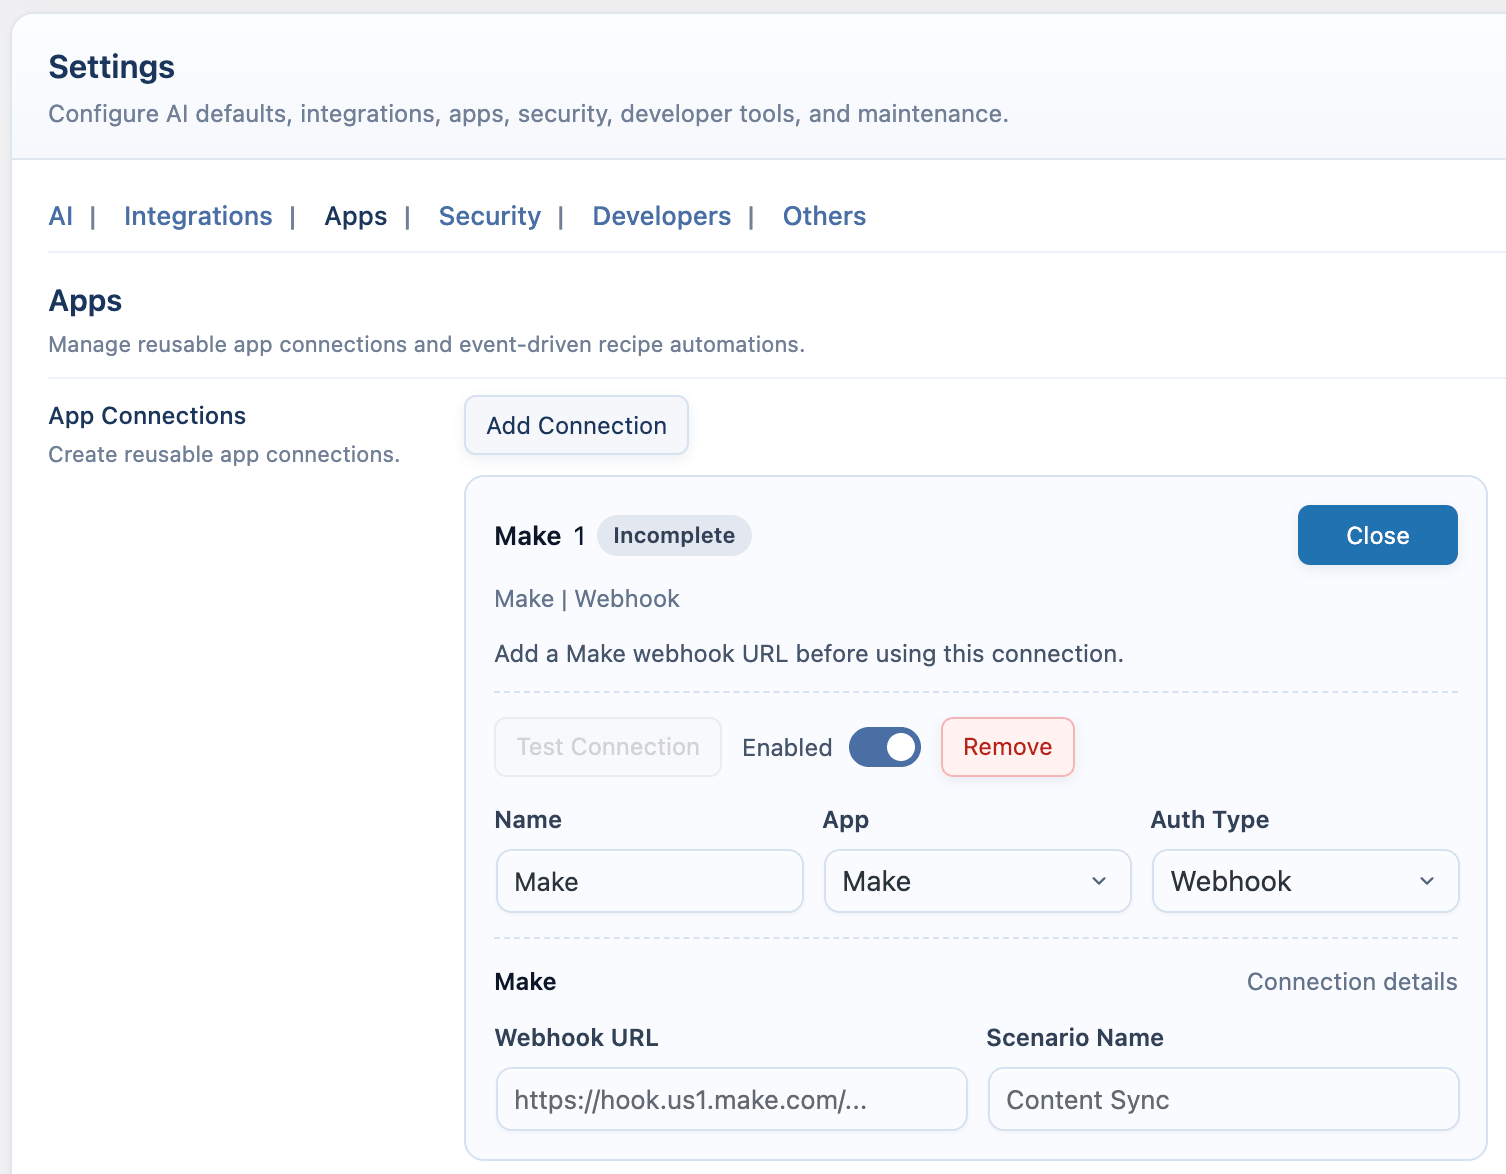 ### n8n
Use n8n when you want chatbot events to start an n8n workflow.
1. Go to [https://app.n8n.cloud](https://app.n8n.cloud) or open your self-hosted n8n URL.
2. Create a new workflow.
3. Add a **Webhook** node.
4. Set **HTTP Method** to **POST**.
5. Copy the **Test URL** if you are testing, or the **Production URL** if the workflow is active.
6. In WordPress, open **AI Puffer > Settings > Apps**.
7. Create an **n8n** connection.
8. Enter the **Webhook URL**.
9. Add a **Workflow Name** if you want a label for the connection.
10. Save the connection.
11. Create a recipe, choose a chatbot event, choose **n8n Webhook**, map the fields, and enable it.
12. In n8n, click **Listen for test event** if you used the Test URL, or activate the workflow if you used the Production URL.
13. Test from the frontend chatbot and check the n8n execution log.
n8n connections are verified when AI Puffer sends the first event.
### n8n
Use n8n when you want chatbot events to start an n8n workflow.
1. Go to [https://app.n8n.cloud](https://app.n8n.cloud) or open your self-hosted n8n URL.
2. Create a new workflow.
3. Add a **Webhook** node.
4. Set **HTTP Method** to **POST**.
5. Copy the **Test URL** if you are testing, or the **Production URL** if the workflow is active.
6. In WordPress, open **AI Puffer > Settings > Apps**.
7. Create an **n8n** connection.
8. Enter the **Webhook URL**.
9. Add a **Workflow Name** if you want a label for the connection.
10. Save the connection.
11. Create a recipe, choose a chatbot event, choose **n8n Webhook**, map the fields, and enable it.
12. In n8n, click **Listen for test event** if you used the Test URL, or activate the workflow if you used the Production URL.
13. Test from the frontend chatbot and check the n8n execution log.
n8n connections are verified when AI Puffer sends the first event.
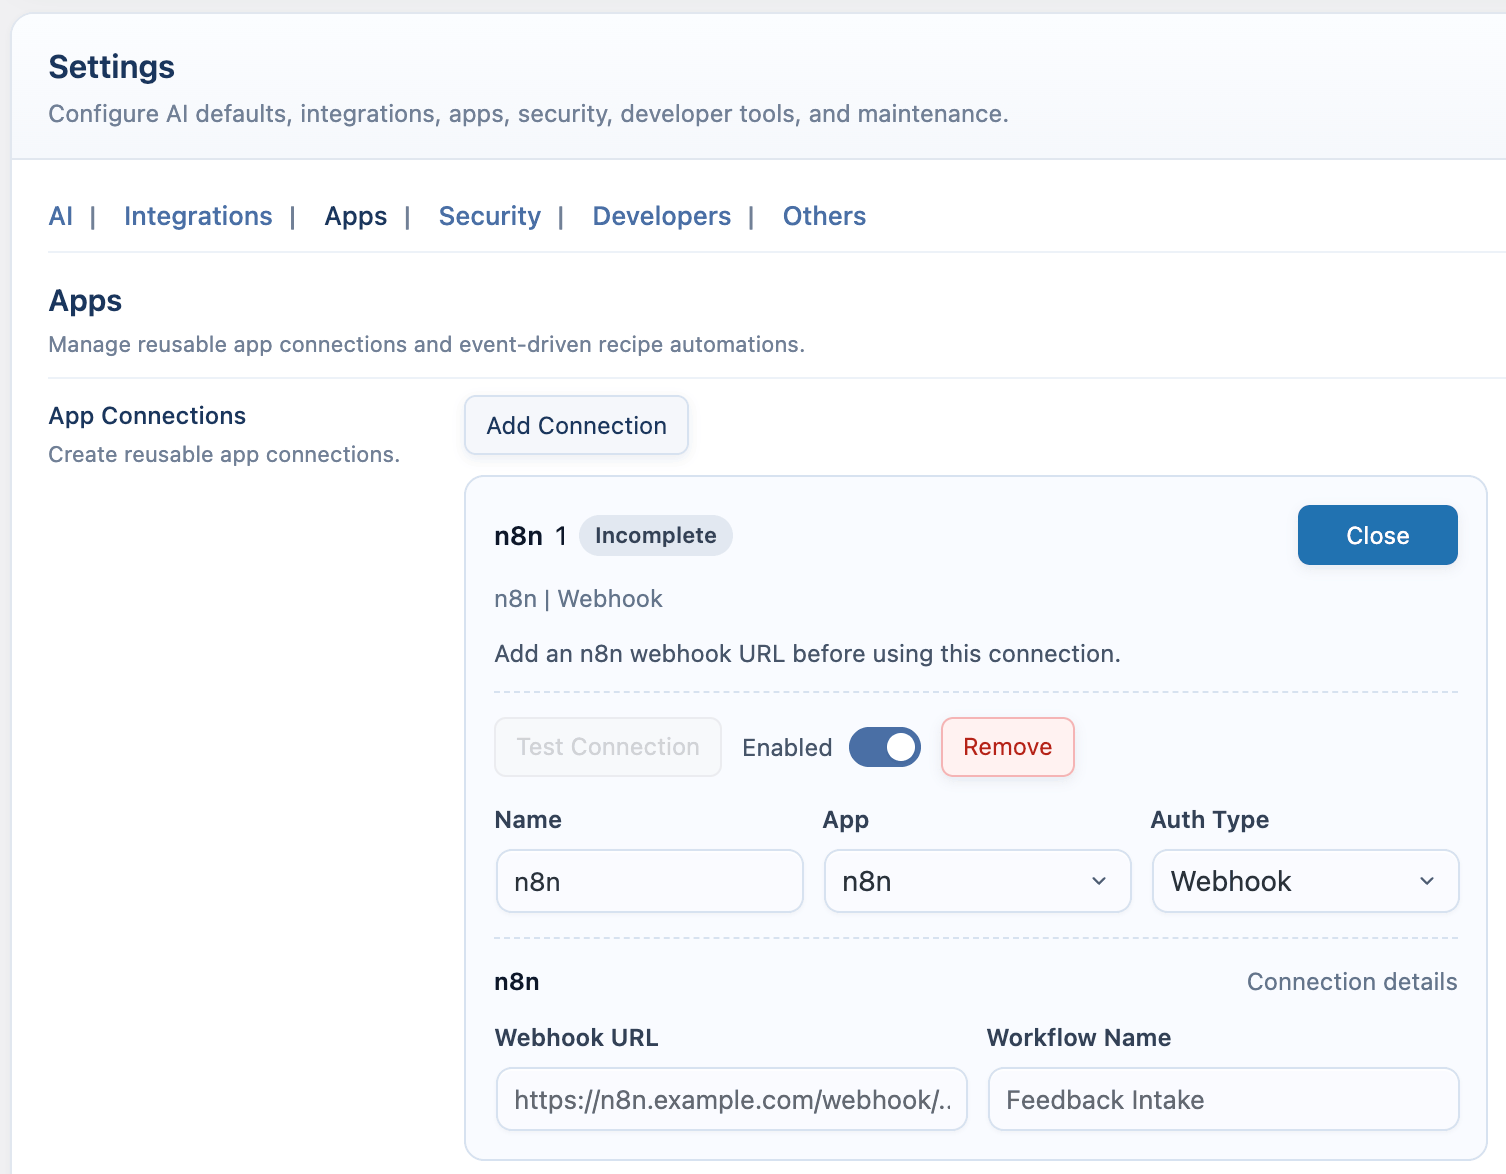 ## Rules
Rules run inside a chatbot and can react to chatbot events. A rule runs when its event fires, all of its conditions pass, and its action executes. Lower priority numbers run first.
### Rule Events
| Event | When it runs |
| ------------------------- | --------------------------------------------------------- |
| **Session started** | A new chatbot session starts with the first user message. |
| **User message received** | A visitor sends a message before AI processing. |
| **System error occurred** | An internal processing error occurs. |
| **Form submitted** | A form displayed by a rule is submitted. |
### Conditions
Rules can check fields from:
| Condition group | Example fields |
| ---------------------- | --------------------------------------------------------------------------------------------- |
| **User context** | Logged-in status, user role, user message text. |
| **Text content** | User message text. |
| **Conversation state** | Message count. |
| **AI model context** | Current provider and model. |
| **HTTP context** | Referrer and user agent. |
| **Post context** | Post ID, title, and tags. |
| **Error context** | Error code, error message, failed provider, failed model, status code, operation, and module. |
Available operators include equals, contains, starts with, ends with, regex match, empty checks, one-of checks, and numeric comparisons.
Conditions inside one rule use **AND** logic. To run the same action when either of two different conditions is true, create two rules with the same action.
### Actions
| Action | What it does |
| ------------------------- | --------------------------------------------------------------- |
| **Bot reply** | Sends a predefined bot message. |
| **Inject context** | Adds content to the system instruction or conversation history. |
| **Block message** | Stops the user message from reaching the AI. |
| **Call webhook** | Sends an HTTP request to an external URL. |
| **Set variable** | Stores a variable in user meta or bot context. |
| **Display form** | Shows a form inside the chatbot. |
| **Store form submission** | Saves submitted form data to the chatbot log. |
Webhook and message fields support placeholders. Form placeholders include submitted data, display values, labels, and individual submitted fields.
Webhook actions send data outside WordPress. Use trusted webhook URLs and avoid sending sensitive conversation data unless the destination is meant to receive it.
## Rules
Rules run inside a chatbot and can react to chatbot events. A rule runs when its event fires, all of its conditions pass, and its action executes. Lower priority numbers run first.
### Rule Events
| Event | When it runs |
| ------------------------- | --------------------------------------------------------- |
| **Session started** | A new chatbot session starts with the first user message. |
| **User message received** | A visitor sends a message before AI processing. |
| **System error occurred** | An internal processing error occurs. |
| **Form submitted** | A form displayed by a rule is submitted. |
### Conditions
Rules can check fields from:
| Condition group | Example fields |
| ---------------------- | --------------------------------------------------------------------------------------------- |
| **User context** | Logged-in status, user role, user message text. |
| **Text content** | User message text. |
| **Conversation state** | Message count. |
| **AI model context** | Current provider and model. |
| **HTTP context** | Referrer and user agent. |
| **Post context** | Post ID, title, and tags. |
| **Error context** | Error code, error message, failed provider, failed model, status code, operation, and module. |
Available operators include equals, contains, starts with, ends with, regex match, empty checks, one-of checks, and numeric comparisons.
Conditions inside one rule use **AND** logic. To run the same action when either of two different conditions is true, create two rules with the same action.
### Actions
| Action | What it does |
| ------------------------- | --------------------------------------------------------------- |
| **Bot reply** | Sends a predefined bot message. |
| **Inject context** | Adds content to the system instruction or conversation history. |
| **Block message** | Stops the user message from reaching the AI. |
| **Call webhook** | Sends an HTTP request to an external URL. |
| **Set variable** | Stores a variable in user meta or bot context. |
| **Display form** | Shows a form inside the chatbot. |
| **Store form submission** | Saves submitted form data to the chatbot log. |
Webhook and message fields support placeholders. Form placeholders include submitted data, display values, labels, and individual submitted fields.
Webhook actions send data outside WordPress. Use trusted webhook URLs and avoid sending sensitive conversation data unless the destination is meant to receive it.
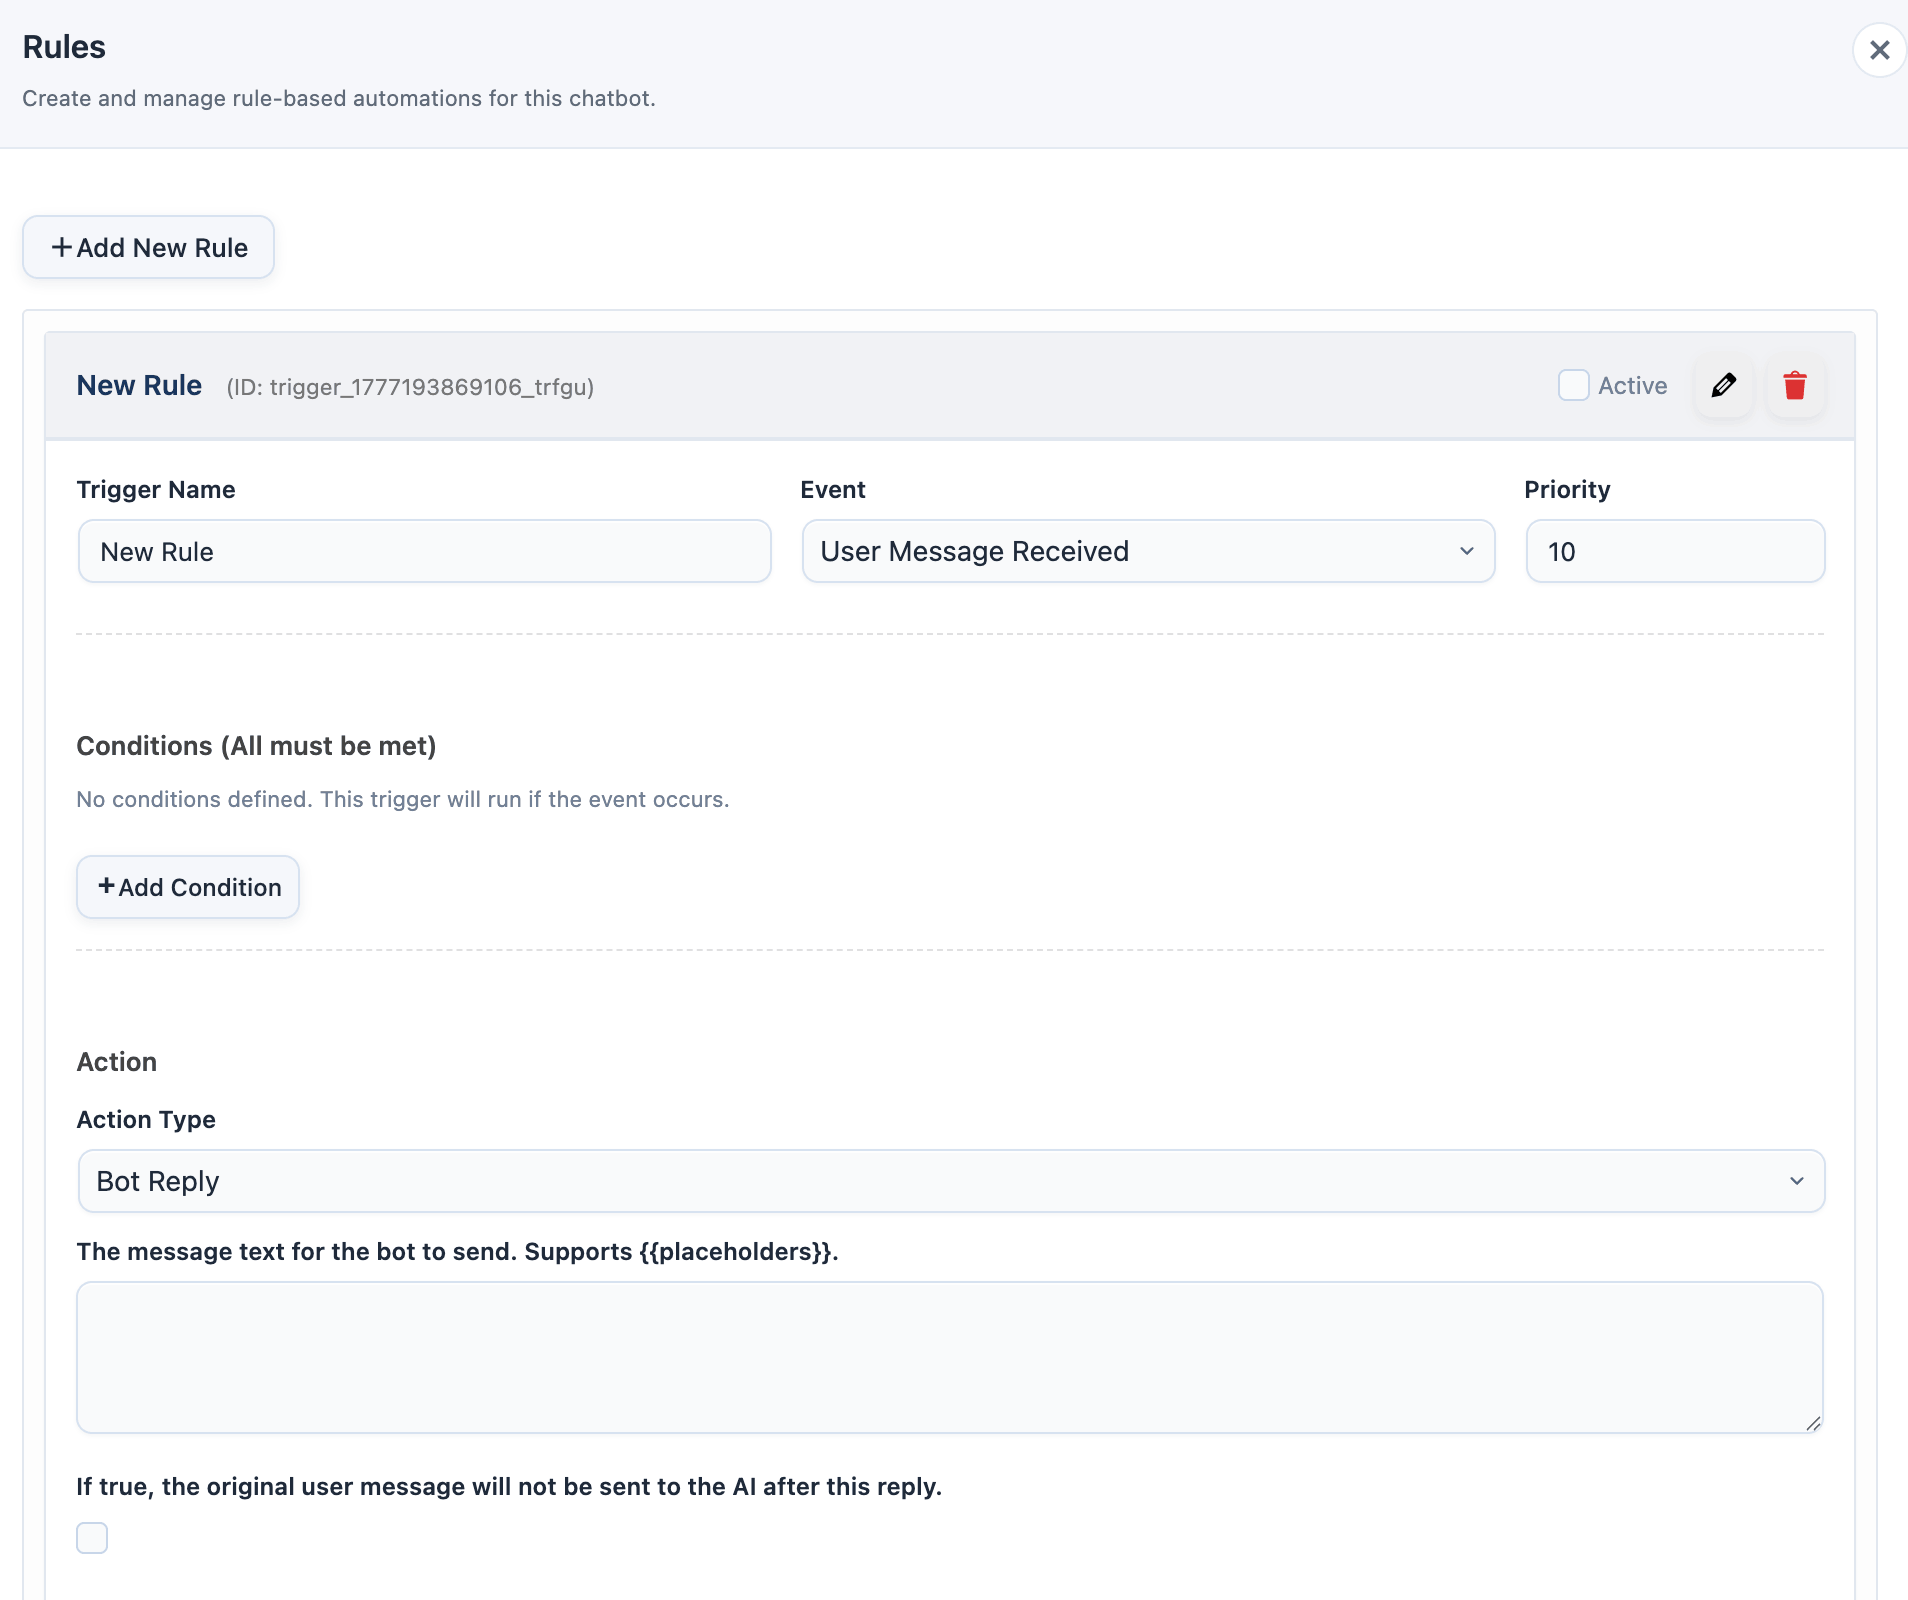 ### Example
#### Lead Collection
Use **Display form** when the chatbot should ask for contact details inside the conversation. The form is rendered in the chat, and AI processing pauses for that message while the visitor completes it.
If the form was displayed from a **User Message Received** rule, AI Puffer automatically continues the AI response after a successful form submission. It uses the captured user message, adds the submitted form data as context, and avoids resuming when a form-submission rule already returned a direct bot reply.
Show the form when the visitor uses a lead keyword:
1. Add a rule named **Lead form**.
### Example
#### Lead Collection
Use **Display form** when the chatbot should ask for contact details inside the conversation. The form is rendered in the chat, and AI processing pauses for that message while the visitor completes it.
If the form was displayed from a **User Message Received** rule, AI Puffer automatically continues the AI response after a successful form submission. It uses the captured user message, adds the submitted form data as context, and avoids resuming when a form-submission rule already returned a direct bot reply.
Show the form when the visitor uses a lead keyword:
1. Add a rule named **Lead form**.
 2. Set **Event** to **User Message Received**.
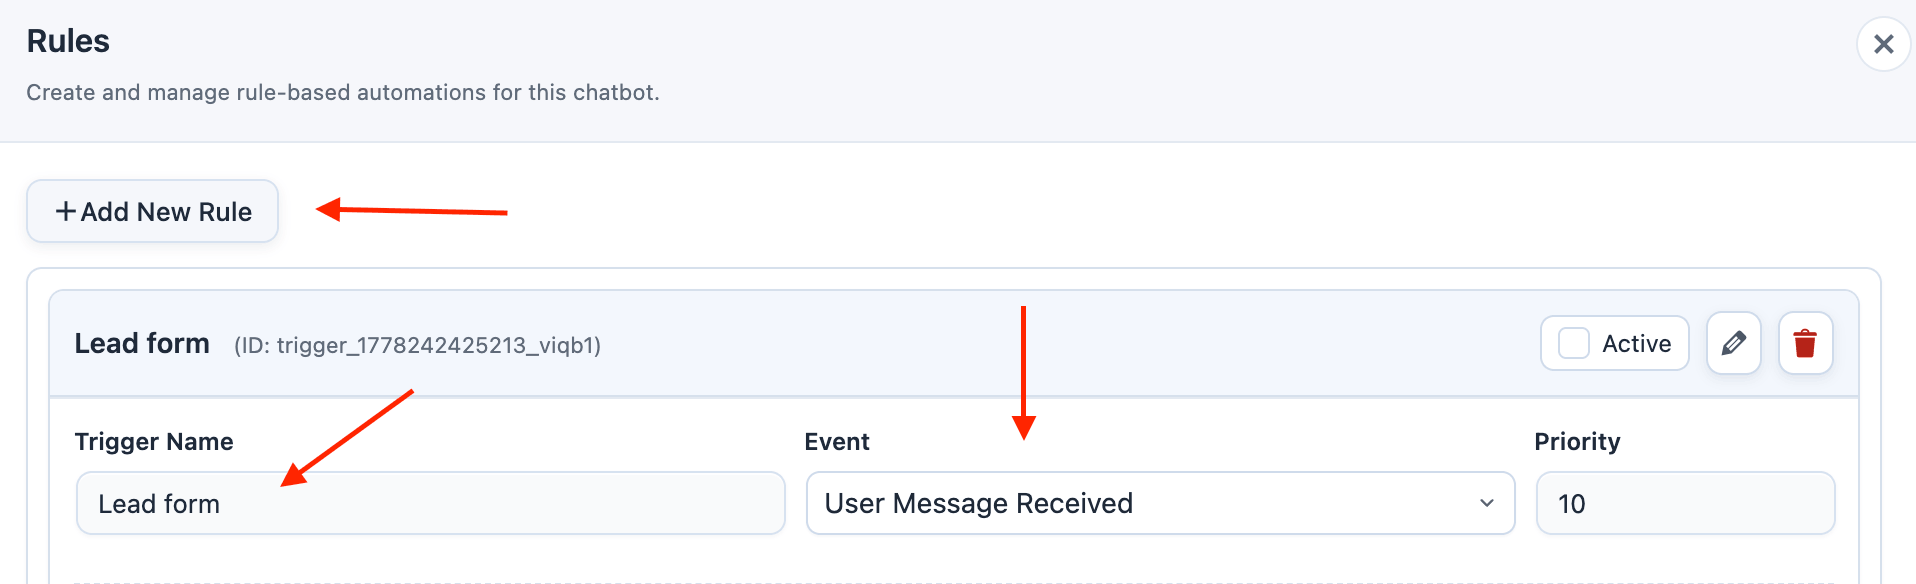 3. Add this condition:
| Type | Field | Operator | Value |
| ---------------- | --------------------- | ------------ | --------- |
| **Text Content** | **User Message Text** | **Contains** | `pricing` |
3. Add this condition:
| Type | Field | Operator | Value |
| ---------------- | --------------------- | ------------ | --------- |
| **Text Content** | **User Message Text** | **Contains** | `pricing` |
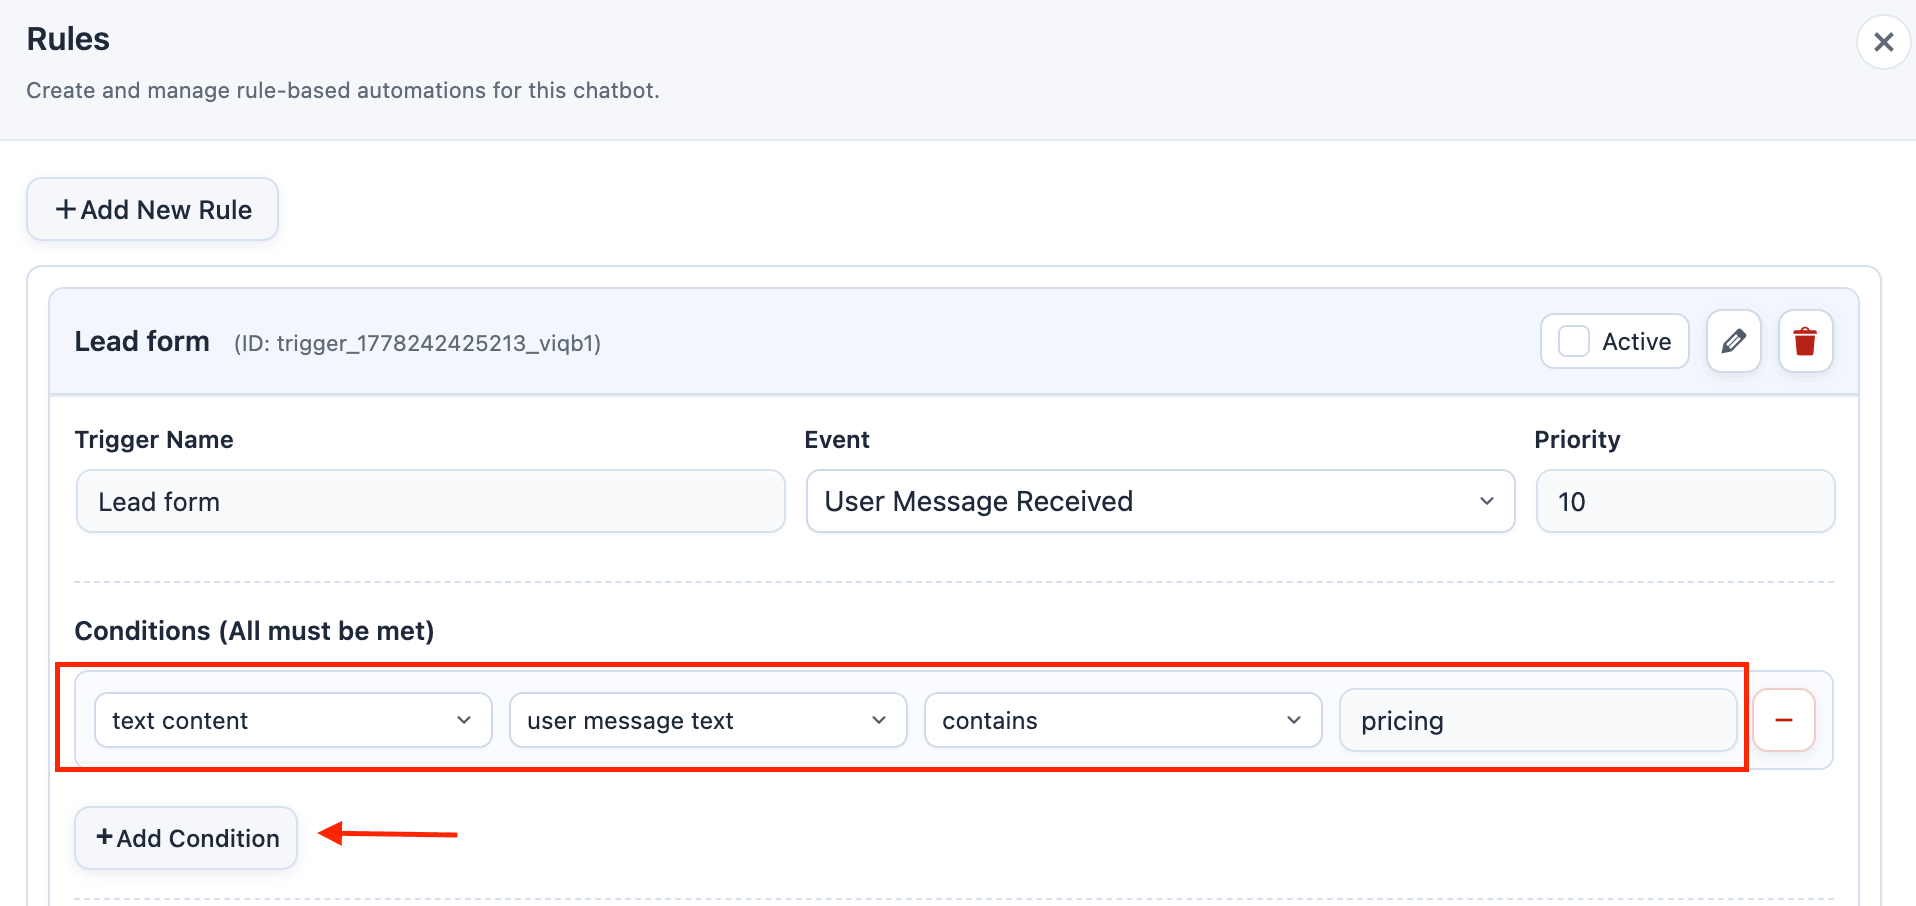 4. Set **Action Type** to **Display Form**.
5. Add the form title, such as `Request a quote`.
4. Set **Action Type** to **Display Form**.
5. Add the form title, such as `Request a quote`.
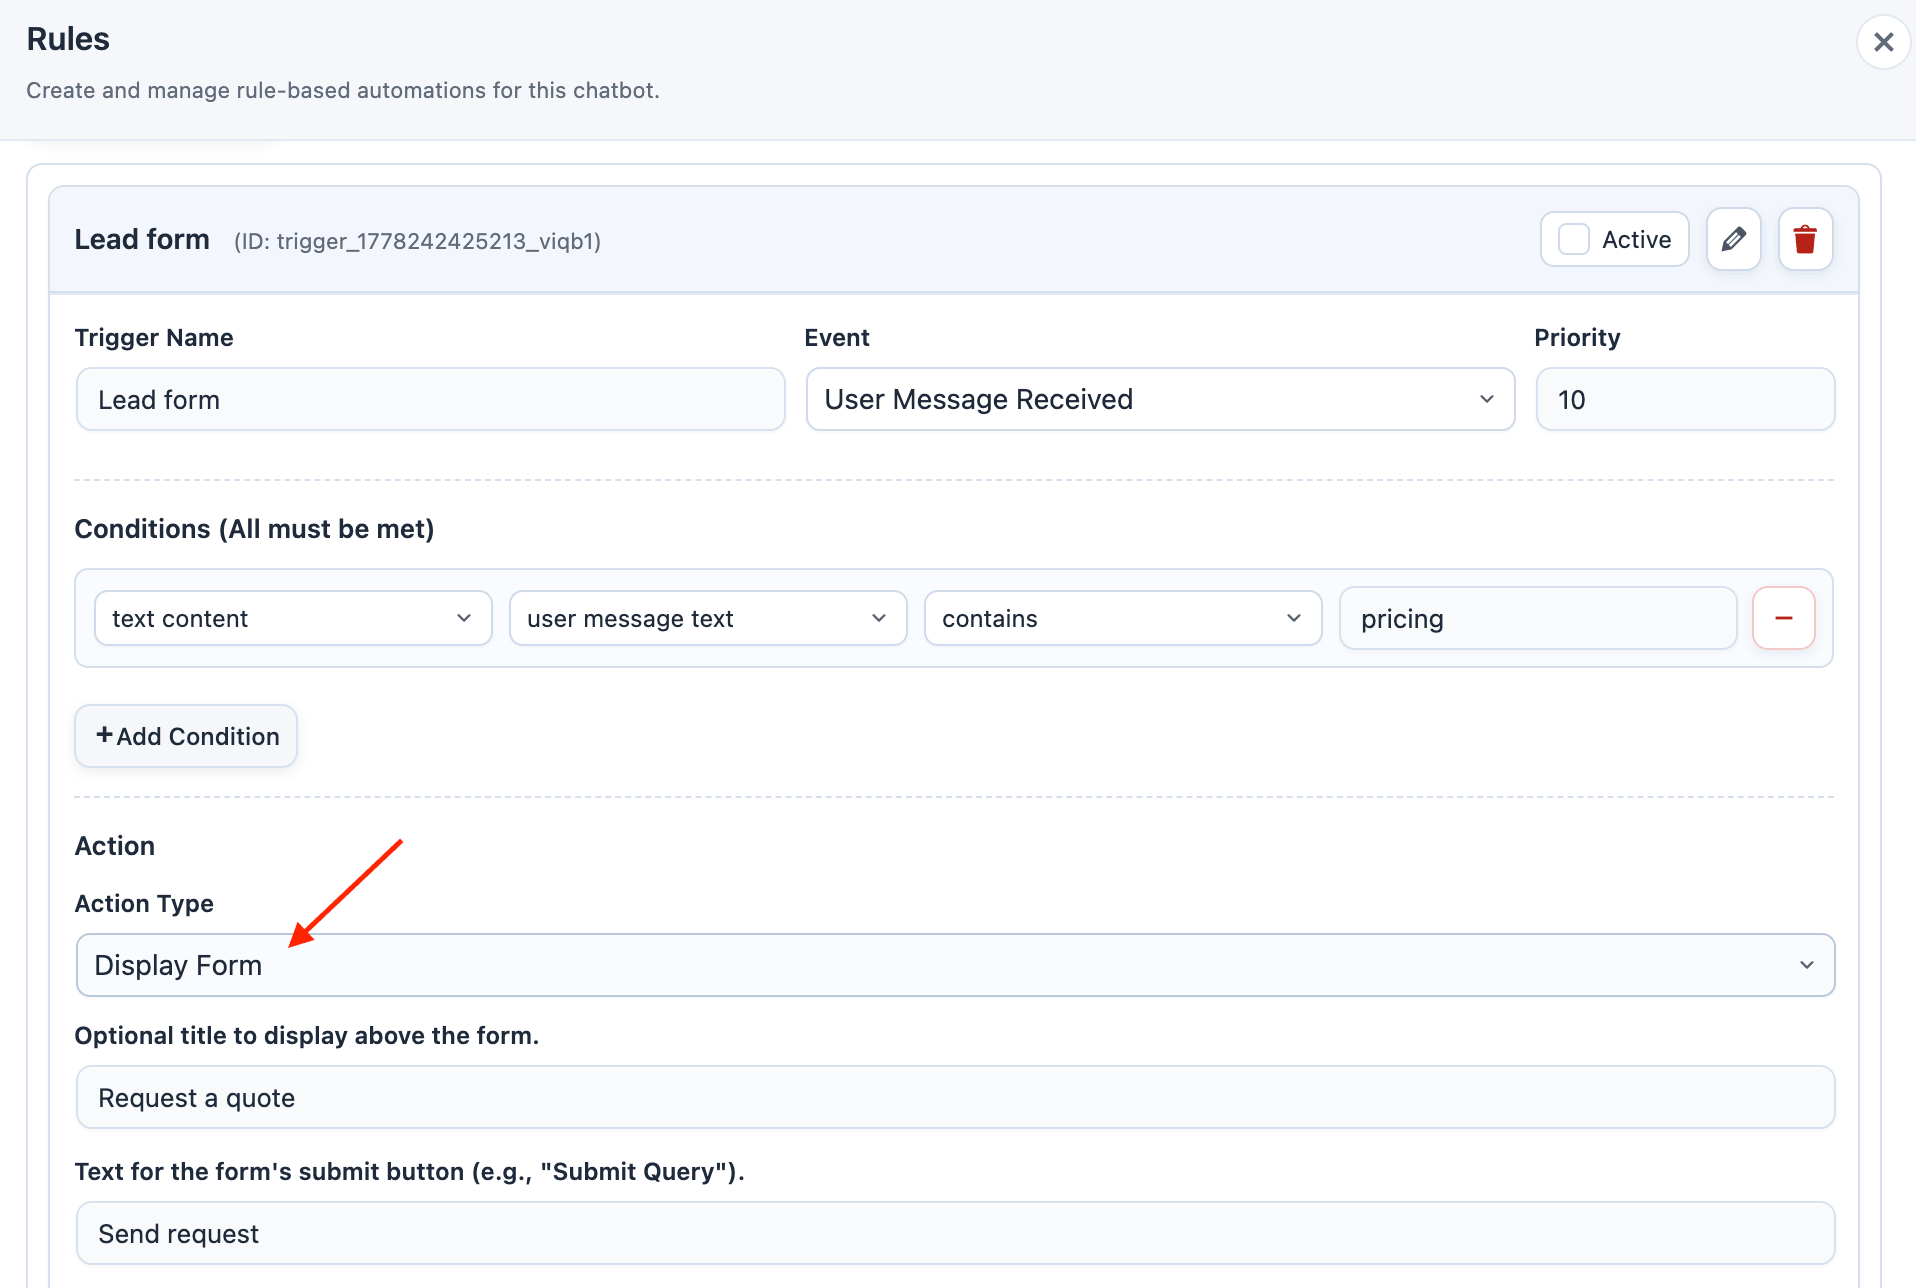 6. Add these form elements:
| Element | Field ID | Setup |
| -------------- | --------- | --------------------------------------------------------------- |
| **Text Input** | `name` | Label: `Name`; required. |
| **Text Input** | `email` | Label: `Email`; required. |
| **Dropdown** | `budget` | Options such as `Under $1,000`, `$1,000-$5,000`, and `$5,000+`. |
| **Textarea** | `message` | Label: `What do you need help with?` |
6. Add these form elements:
| Element | Field ID | Setup |
| -------------- | --------- | --------------------------------------------------------------- |
| **Text Input** | `name` | Label: `Name`; required. |
| **Text Input** | `email` | Label: `Email`; required. |
| **Dropdown** | `budget` | Options such as `Under $1,000`, `$1,000-$5,000`, and `$5,000+`. |
| **Textarea** | `message` | Label: `What do you need help with?` |
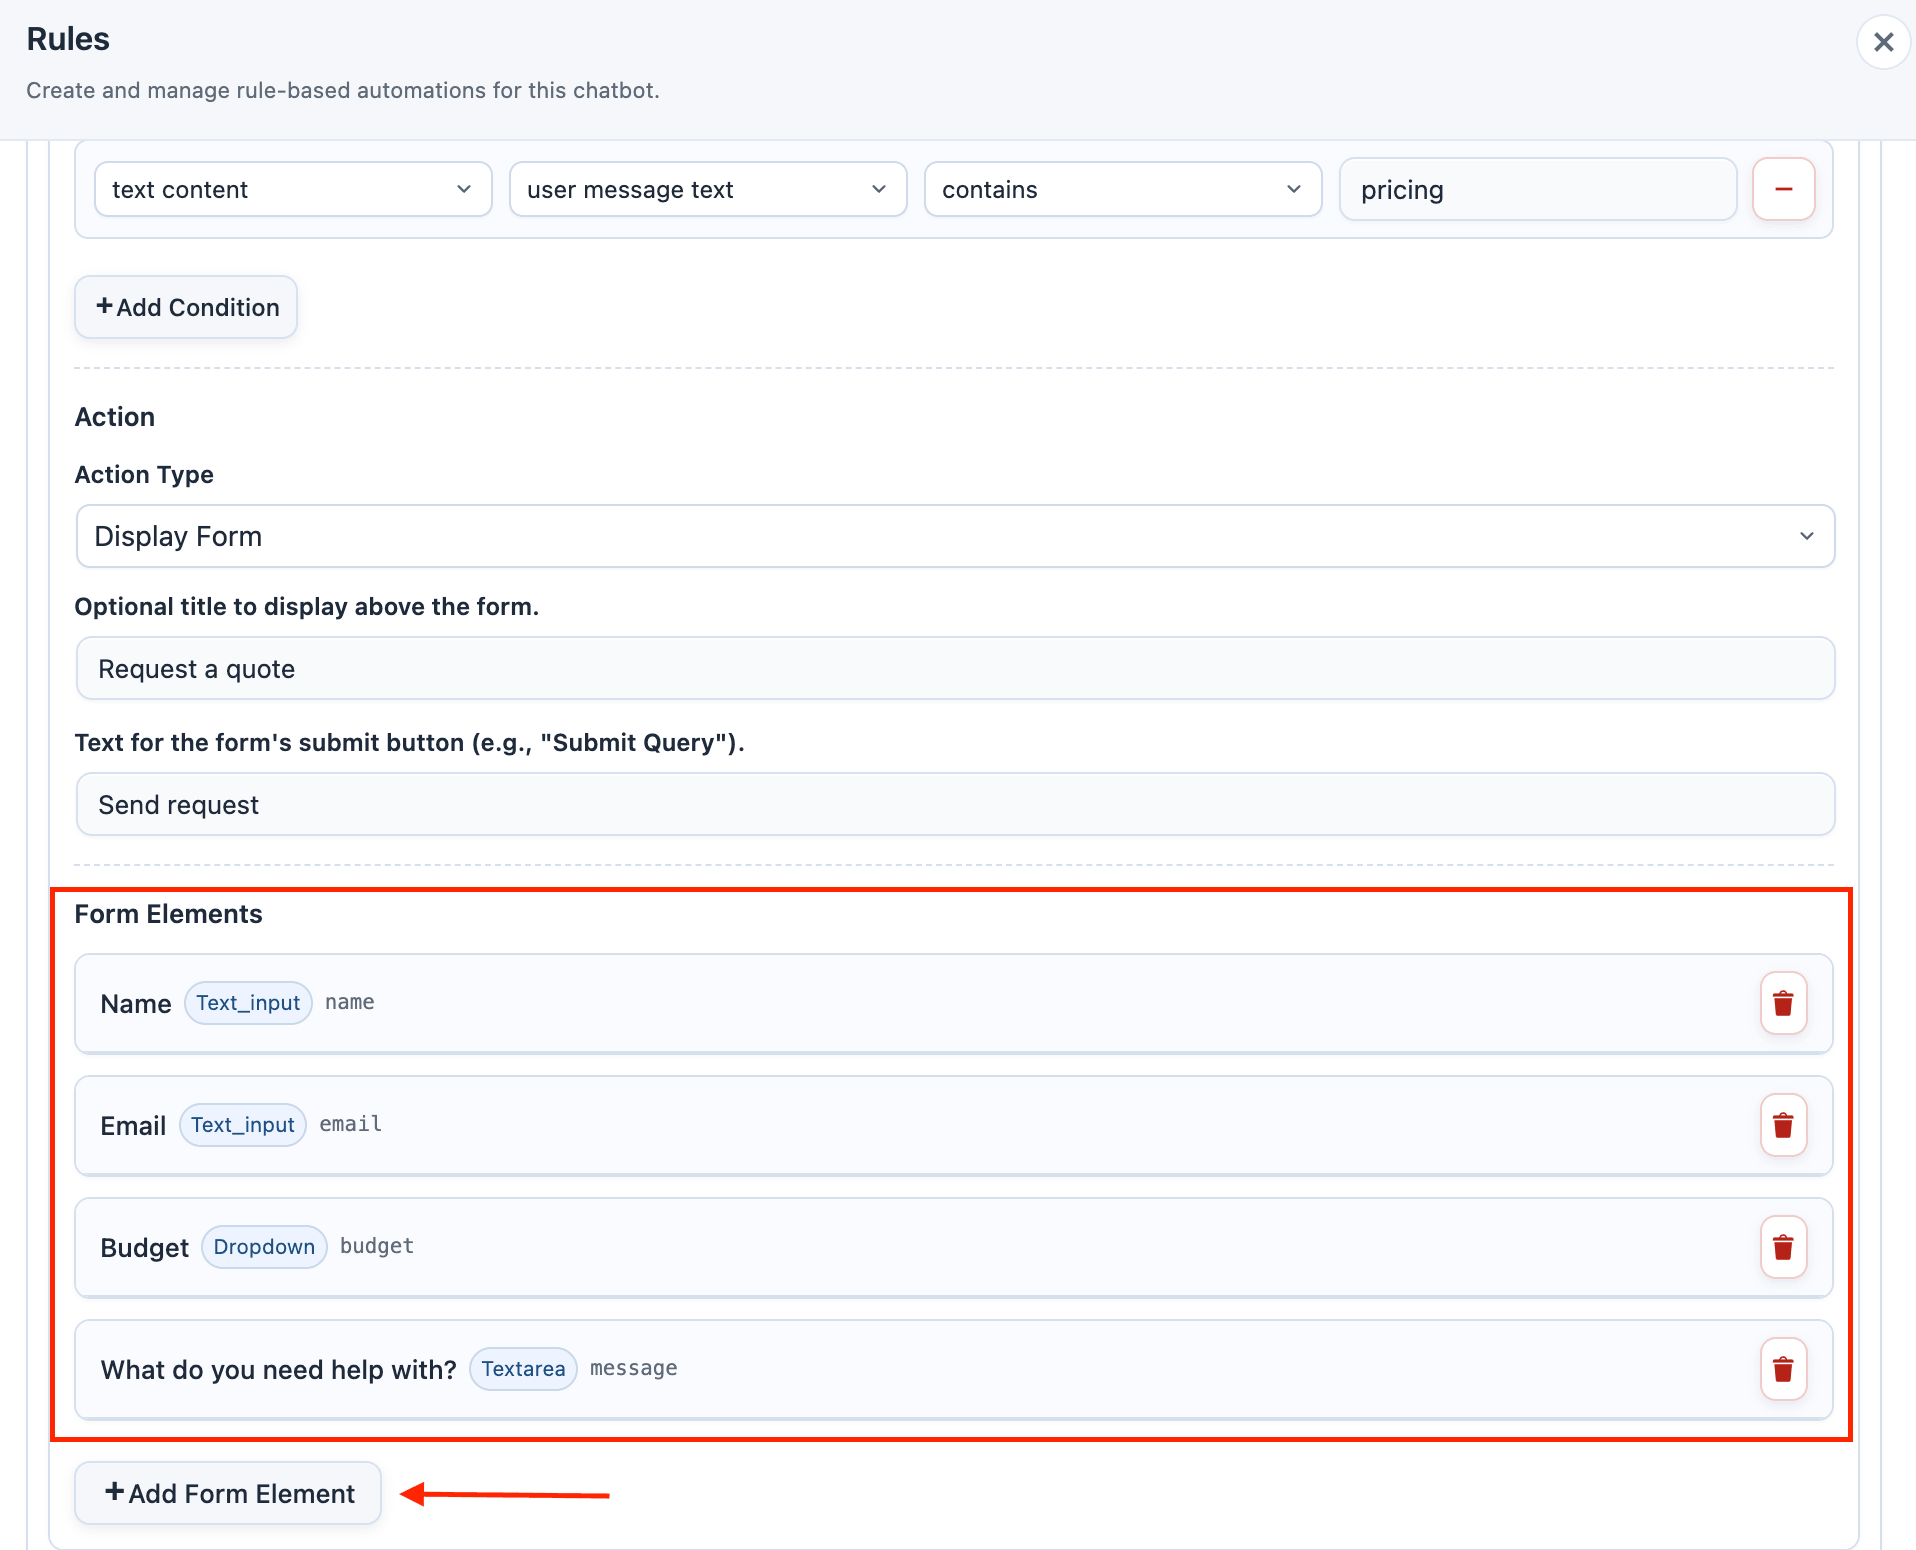 7. Set **Submit Button Text** to `Send request`.
To save the submitted lead in the chatbot log, add a second rule:
1. Add a rule named **Store lead form submission**.
2. Set **Event** to **Form Submitted**.
3. Leave conditions empty if this chatbot only displays one rule form.
4. Set **Action Type** to **Store Form Submission**.
5. Use this **Log Message Format**:
```text theme={null}
Lead form submitted by {{user_name}}. Summary: {{form_submission_summary}}
```
7. Set **Submit Button Text** to `Send request`.
To save the submitted lead in the chatbot log, add a second rule:
1. Add a rule named **Store lead form submission**.
2. Set **Event** to **Form Submitted**.
3. Leave conditions empty if this chatbot only displays one rule form.
4. Set **Action Type** to **Store Form Submission**.
5. Use this **Log Message Format**:
```text theme={null}
Lead form submitted by {{user_name}}. Summary: {{form_submission_summary}}
```
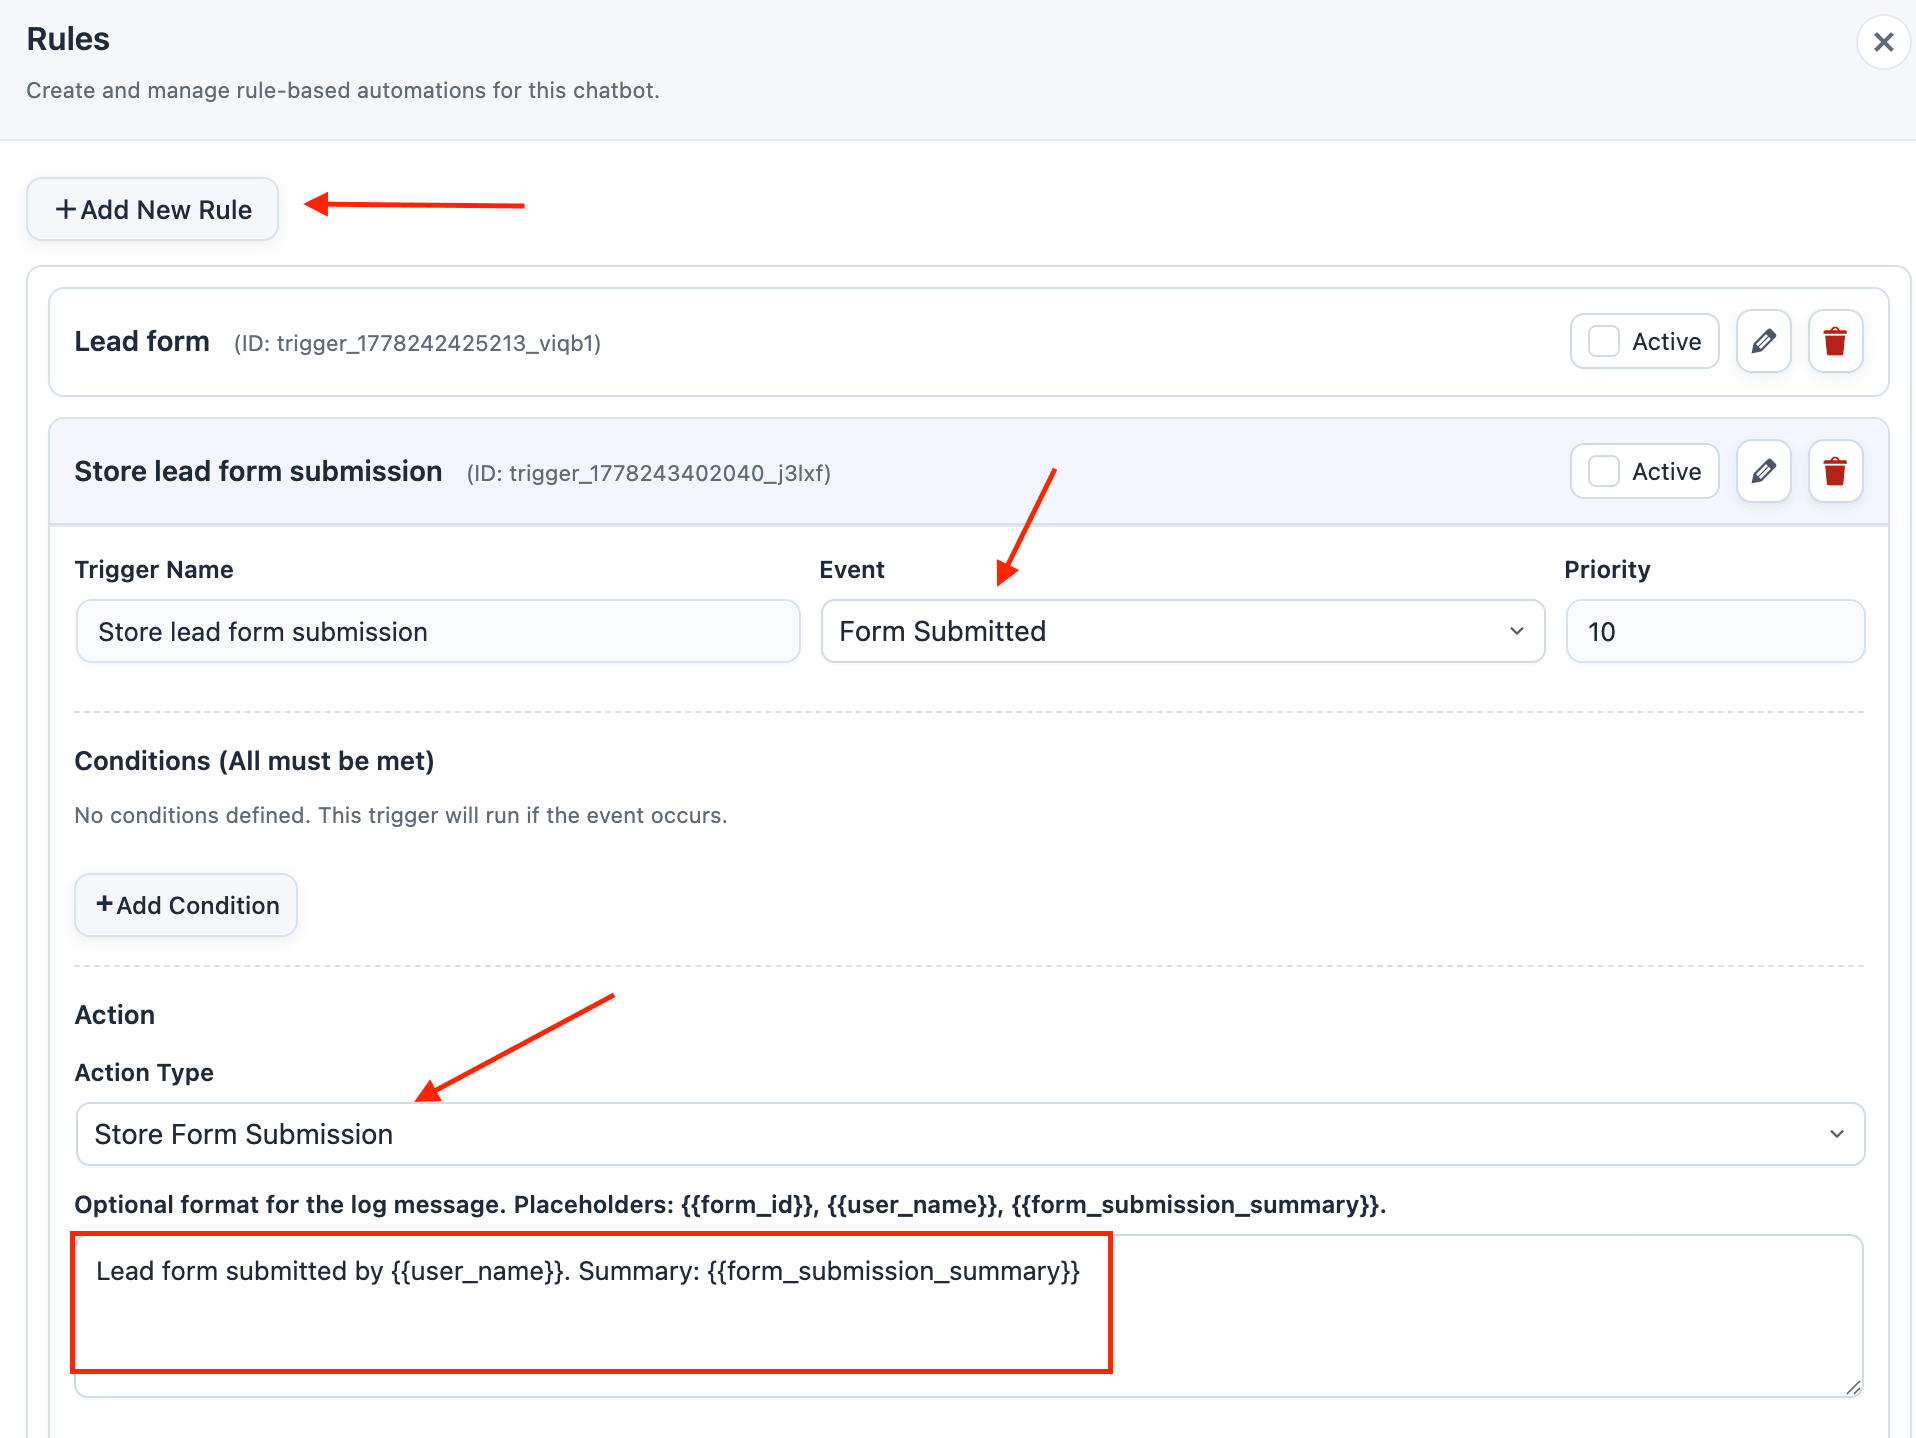 Make sure the **Active** checkbox is checked on both rules.
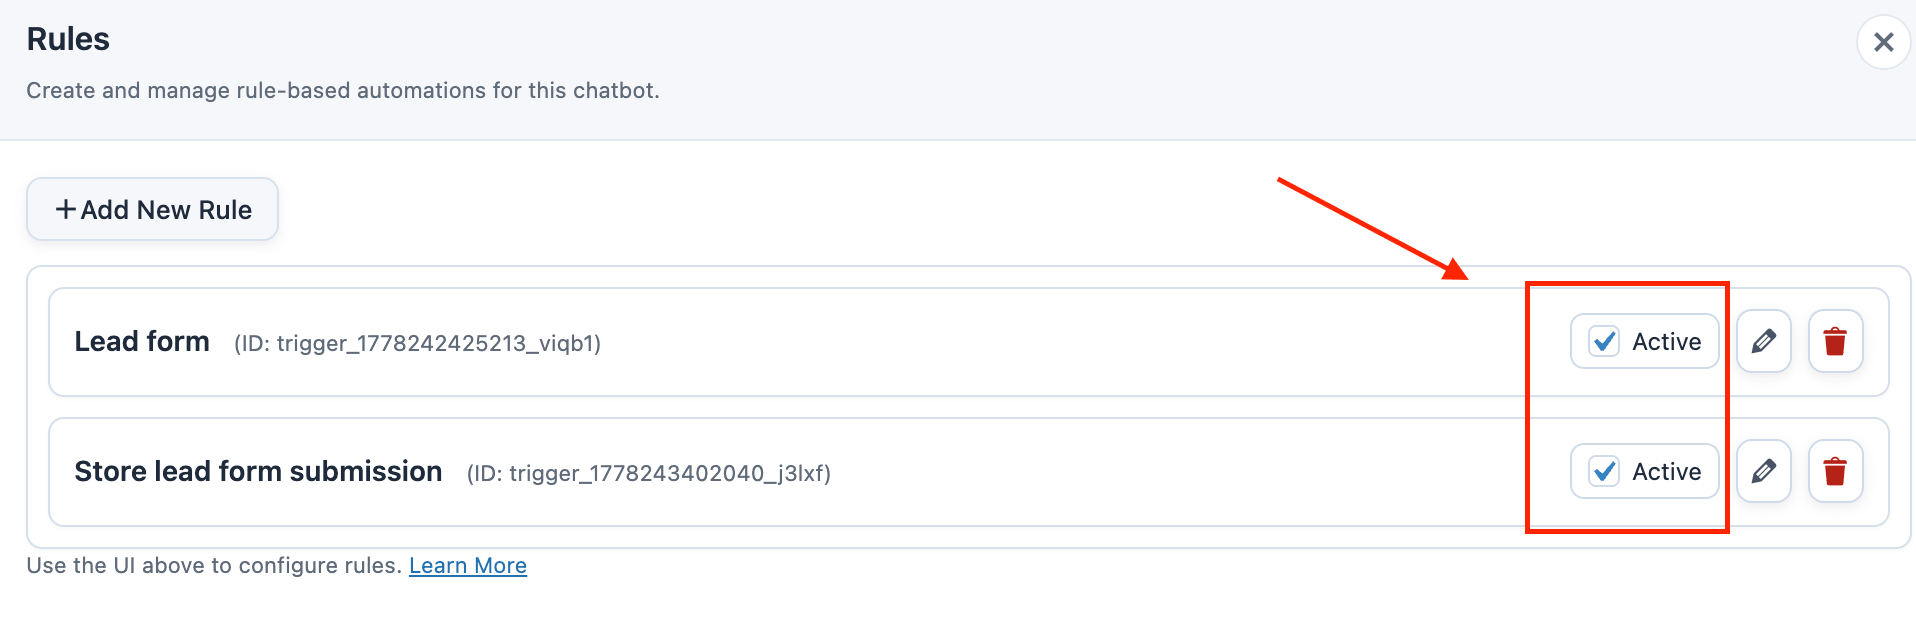 Now ask your bot something about pricing and you will see the form. After the form is submitted, the chatbot continues answering the original pricing question and you can view the submitted details under **Usage > Logs**.
To send the same rule form submission to HubSpot, create a Connected Apps recipe that uses **Chatbot Form Submitted** and maps fields such as `data.inputs.email`, `data.inputs.first_name`, `data.inputs.last_name`, `data.inputs.phone`, and `data.inputs.company`.
Now ask your bot something about pricing and you will see the form. After the form is submitted, the chatbot continues answering the original pricing question and you can view the submitted details under **Usage > Logs**.
To send the same rule form submission to HubSpot, create a Connected Apps recipe that uses **Chatbot Form Submitted** and maps fields such as `data.inputs.email`, `data.inputs.first_name`, `data.inputs.last_name`, `data.inputs.phone`, and `data.inputs.company`.