> ## Documentation Index
> Fetch the complete documentation index at: https://docs.aipower.org/llms.txt
> Use this file to discover all available pages before exploring further.
# Knowledge Base
> Add and manage source data for AI Puffer retrieval.
## Overview
Knowledge Base stores the content AI Puffer can search before it generates an answer or a piece of content.
Use it for support answers, product details, documentation, policies, posts, pages, WooCommerce products, uploaded documents, and other source text you want AI Puffer to use as context.
Use OpenAI Vector Stores, Pinecone, Qdrant, or Chroma.
Create, select, or delete vector targets.
Add data and manage source records.
Configure chunking, batches, content rules, semantic search, and other settings.
Publish and configure a frontend vector search form.
Fix missing targets, dimension errors, and empty results.
## Providers
| Provider | Target name | How it works |
| ------------ | ------------ | ------------------------------------------------------------------------------------------------------------------------------ |
| **OpenAI** | Vector store | AI Puffer sends the source data to OpenAI Vector Stores. No separate embedding model is selected in AI Puffer for this target. |
| **Pinecone** | Index | AI Puffer creates embeddings with the model you choose, then stores the vectors in a Pinecone index. |
| **Qdrant** | Collection | AI Puffer creates embeddings with the model you choose, then stores the vectors in a Qdrant collection. |
| **Chroma** | Collection | AI Puffer creates embeddings with the model you choose, then stores the vectors in a Chroma collection. |
For Pinecone, Qdrant, and Chroma, the index or collection dimension must match the embedding model.
For example, if your Pinecone index, Qdrant collection, or Chroma collection is **3072 dimensions**, use a **3072-dimension** embedding model when adding data and when searching that data later.
If the dimension does not match, the vector provider can reject the data or return unusable search results.
### OpenAI
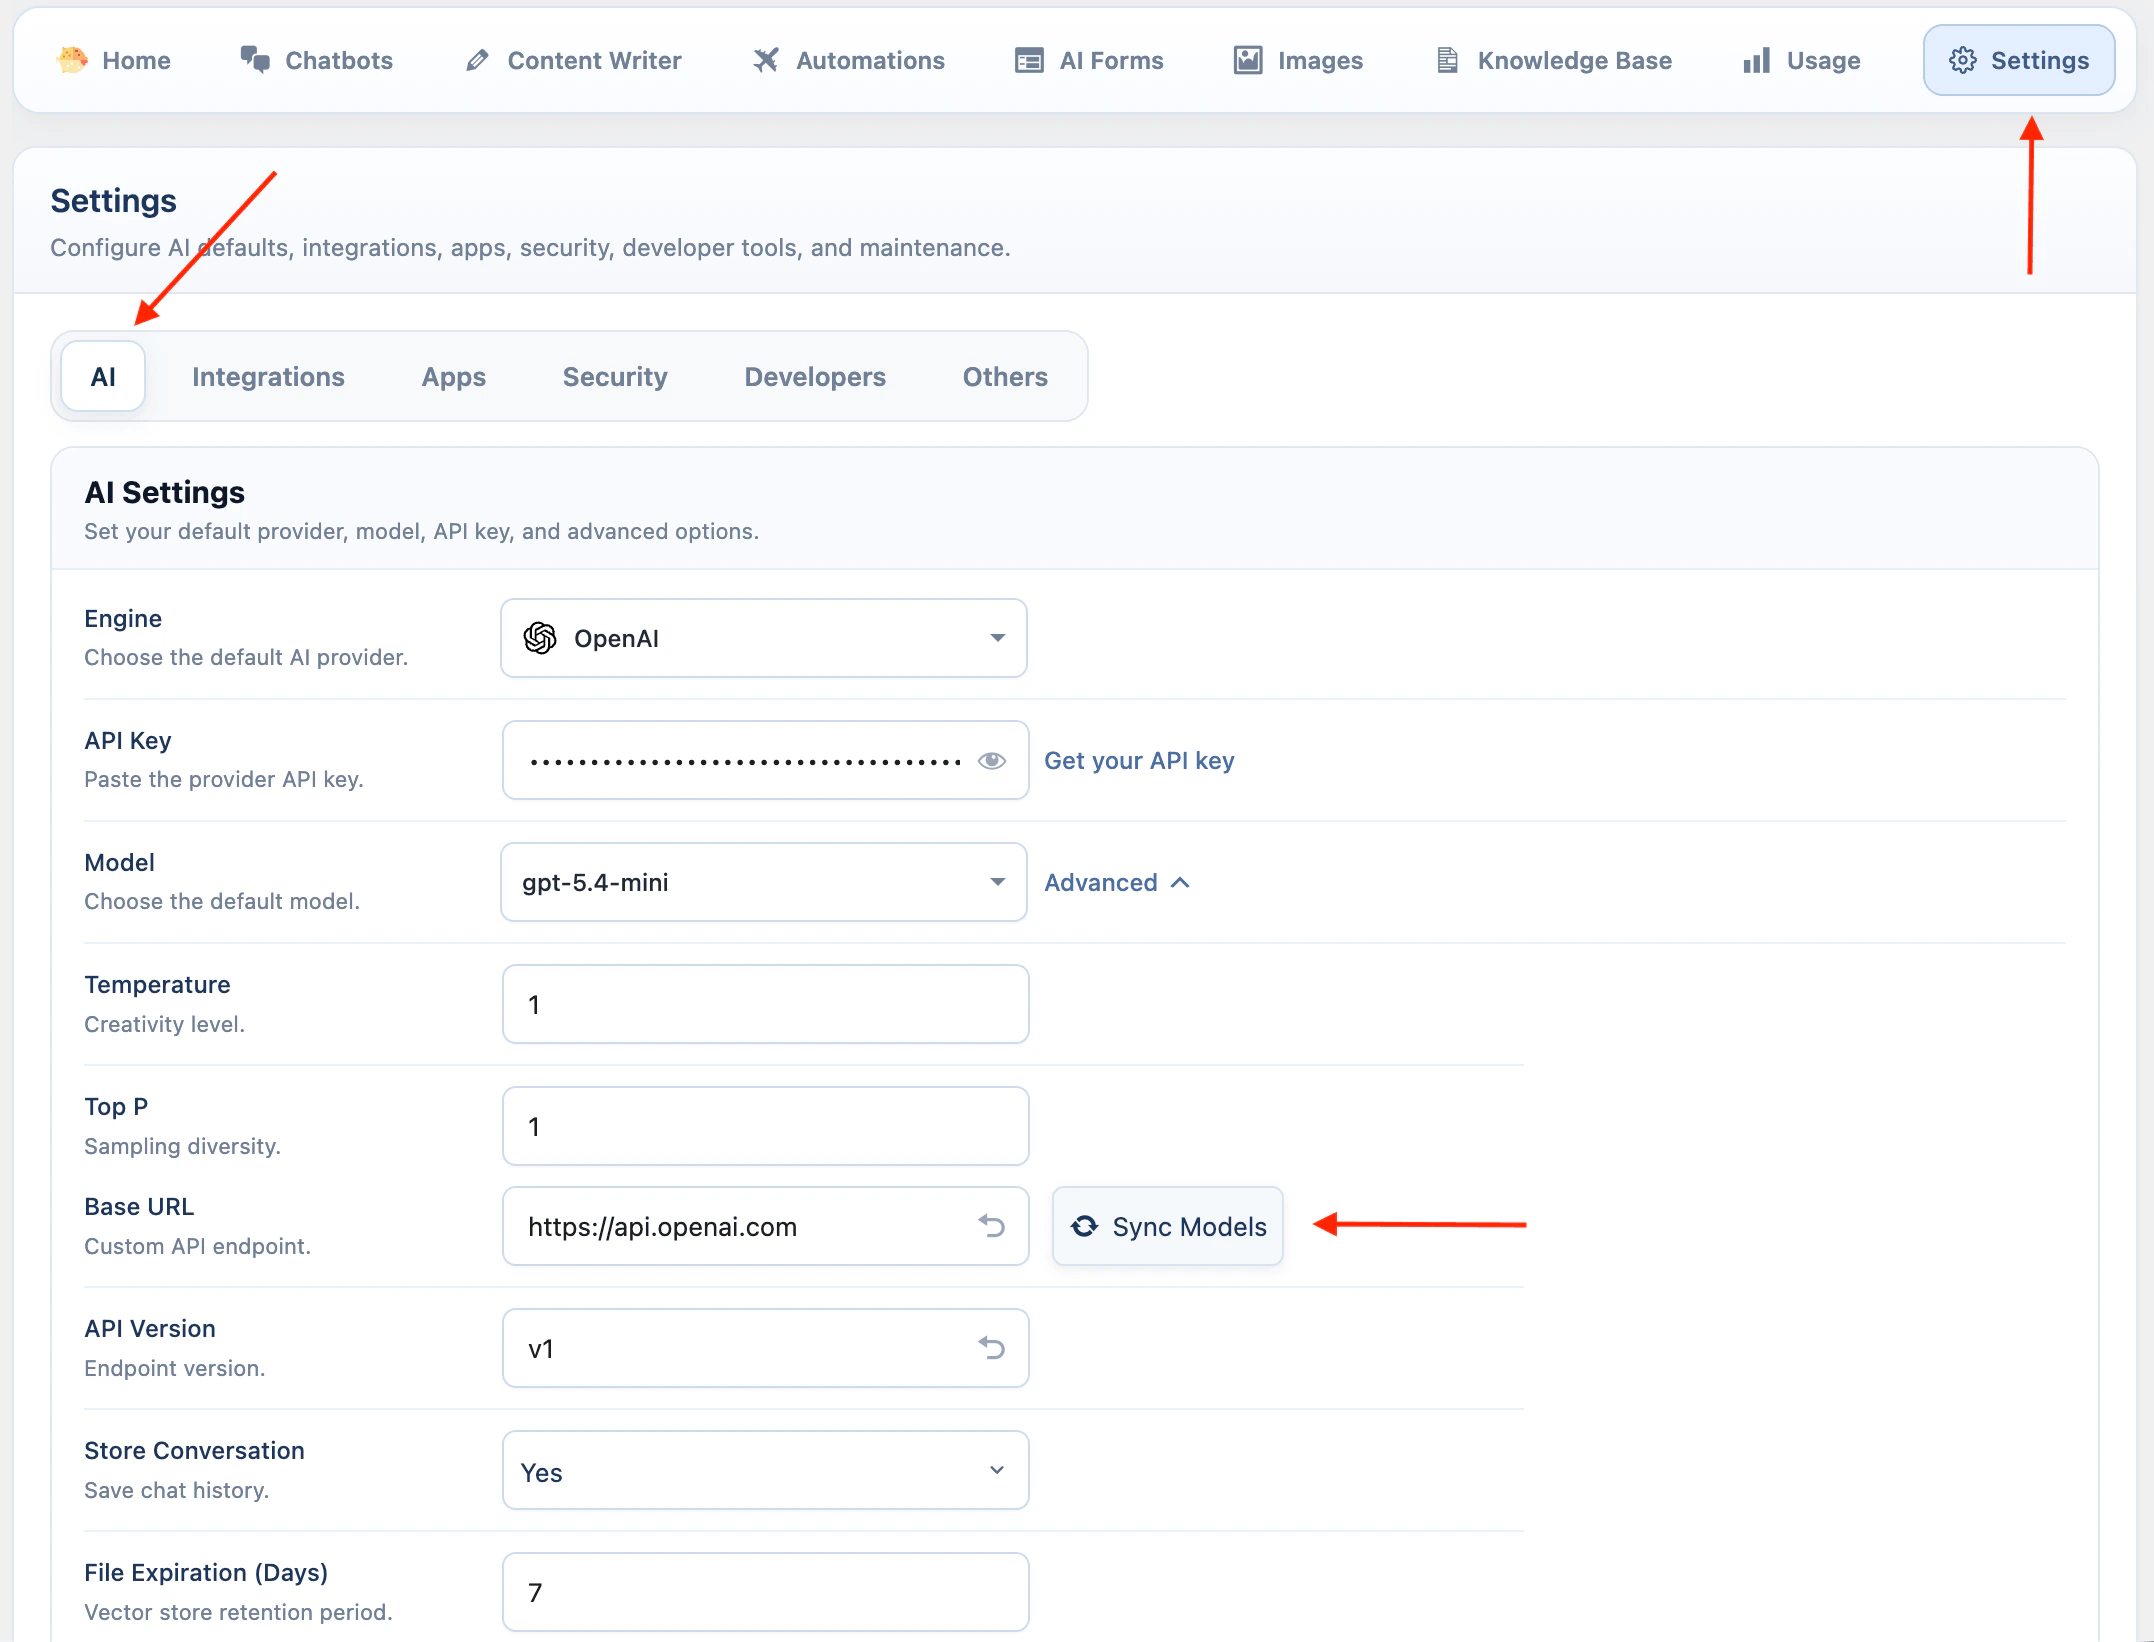
OpenAI Vector Stores use your OpenAI account directly.
1. Go to **AI Puffer > Settings > AI**.
2. Select **OpenAI** as the AI provider.
3. Enter your OpenAI API key.
4. Sync models if needed.
5. Go to **AI Puffer > Knowledge Base > Stores** to create or refresh OpenAI vector stores.
OpenAI Vector Stores do not require a separate embedding model selection in Knowledge Base. OpenAI handles file storage, chunking, embedding, and vector search on its side.
 ### Pinecone
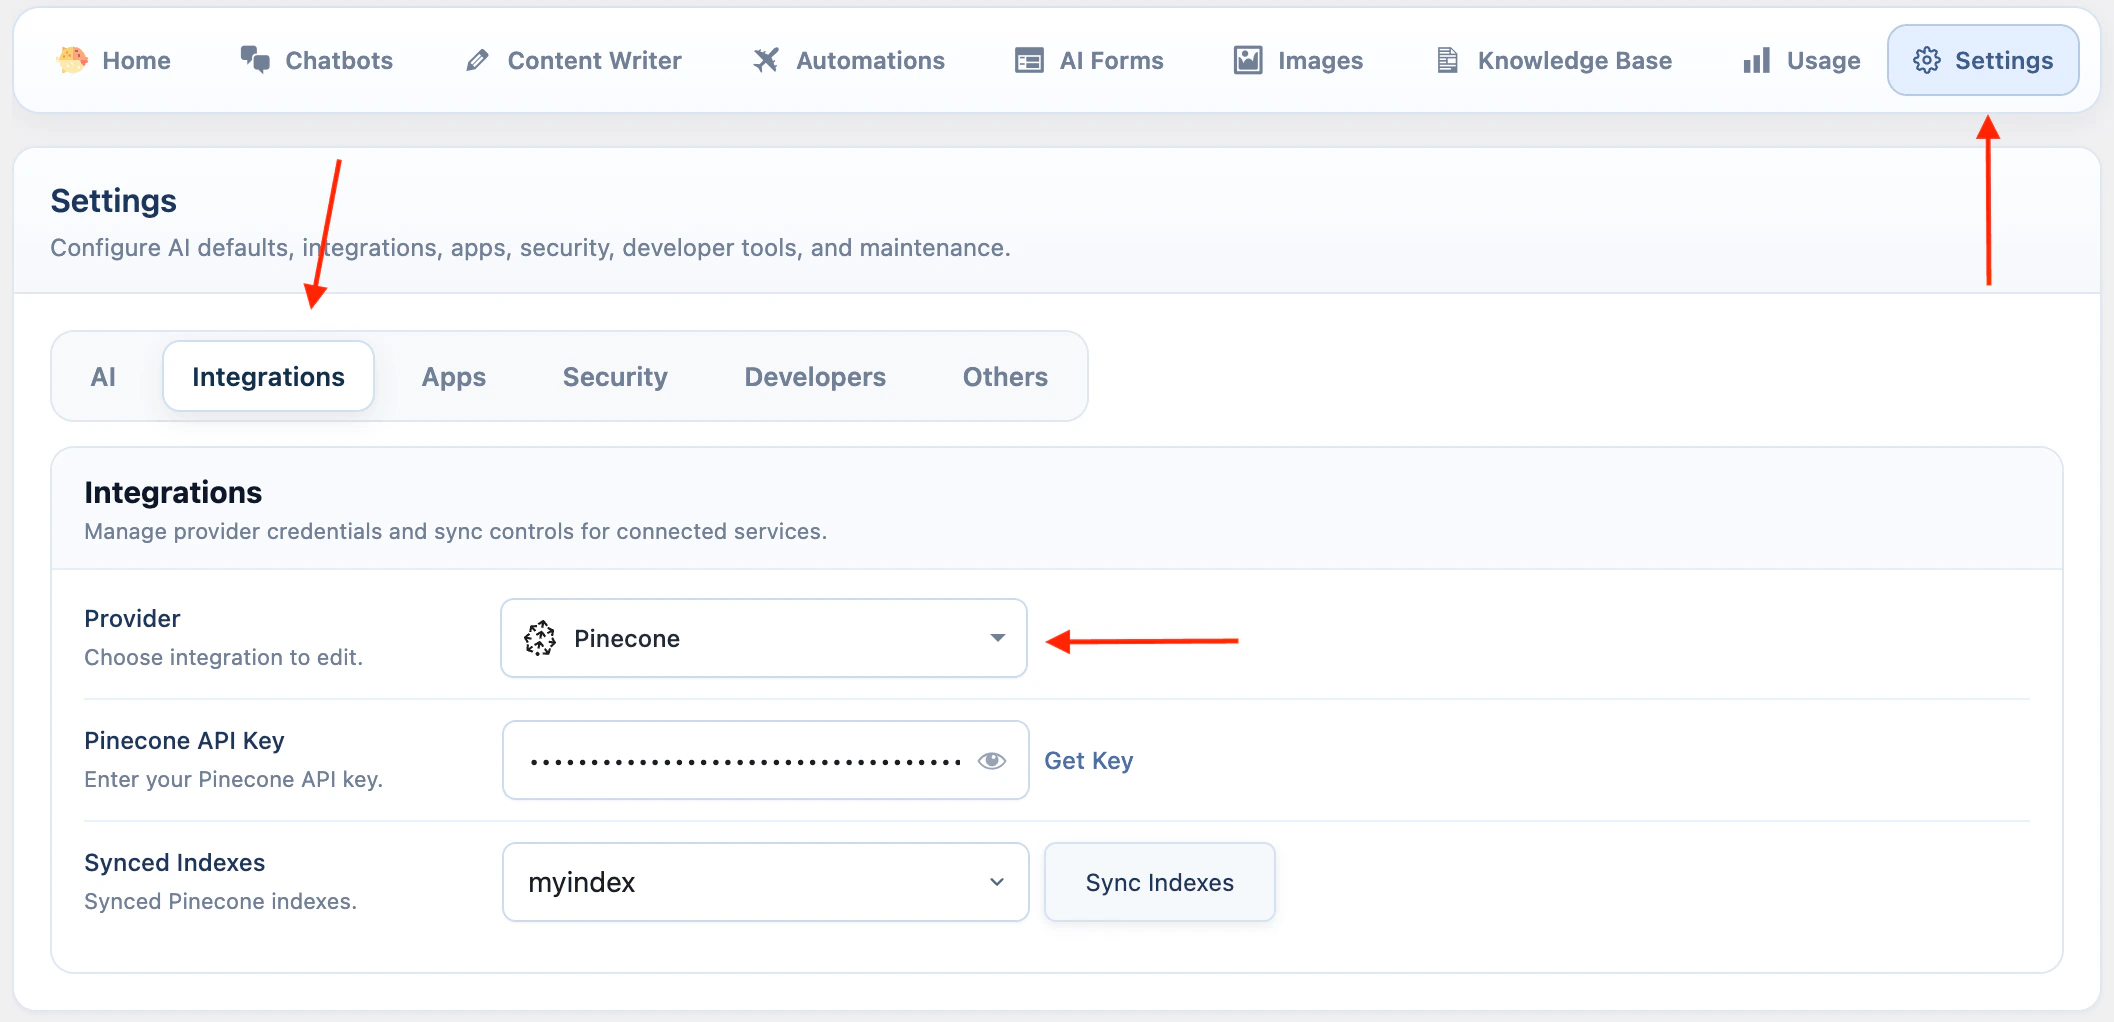
Pinecone is configured from the Integrations settings.
1. Go to **AI Puffer > Settings > Integrations**.
2. Select **Pinecone**.
3. Enter your **Pinecone API Key**.
4. Click **Sync Indexes** to load indexes from Pinecone.
5. Go to **AI Puffer > Knowledge Base > Stores** to create, refresh, or delete indexes.
When you create a Pinecone index in AI Puffer, enter the dimension that matches the embedding model you plan to use.
### Pinecone
Pinecone is configured from the Integrations settings.
1. Go to **AI Puffer > Settings > Integrations**.
2. Select **Pinecone**.
3. Enter your **Pinecone API Key**.
4. Click **Sync Indexes** to load indexes from Pinecone.
5. Go to **AI Puffer > Knowledge Base > Stores** to create, refresh, or delete indexes.
When you create a Pinecone index in AI Puffer, enter the dimension that matches the embedding model you plan to use.
 ### Qdrant
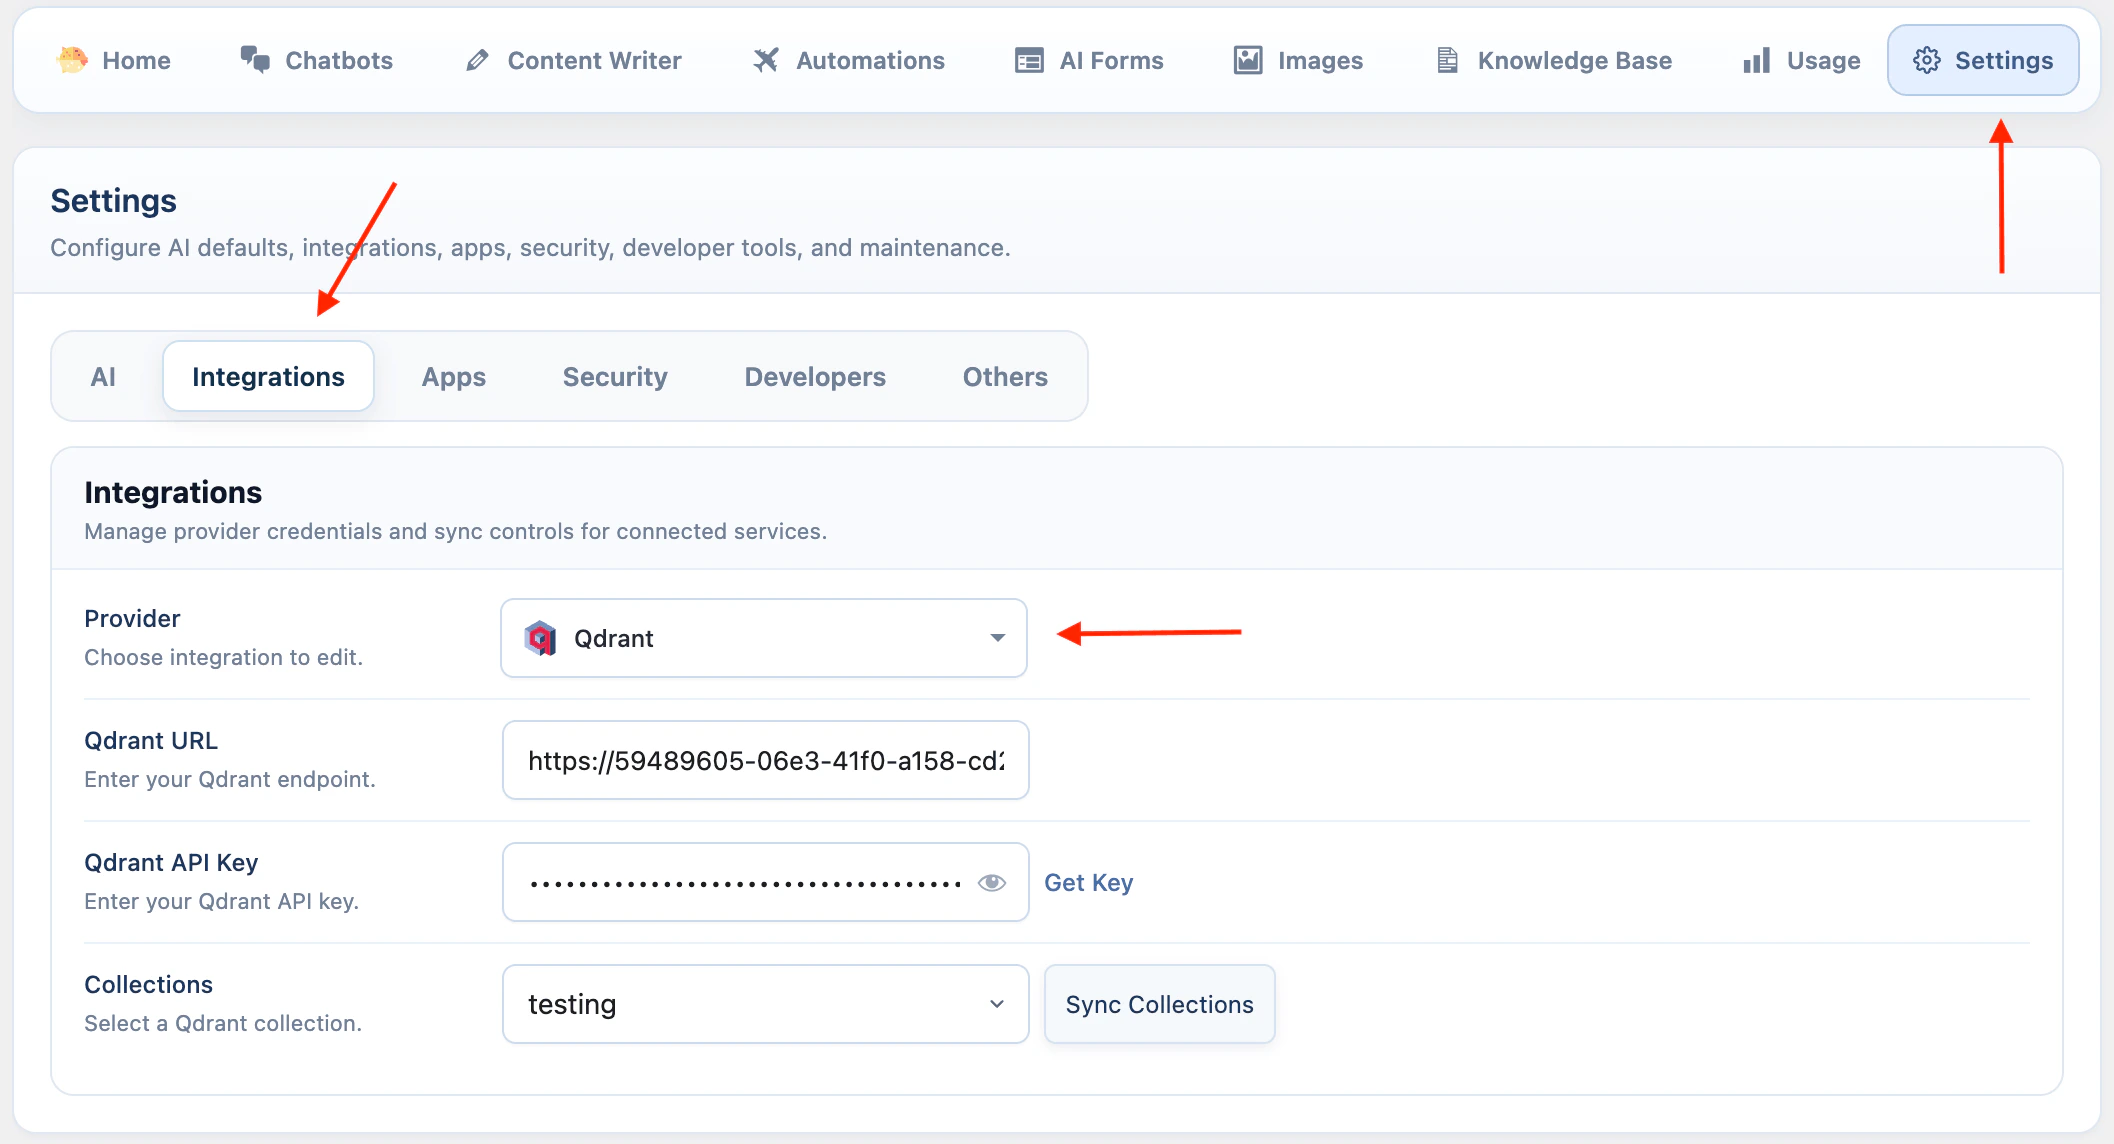
Qdrant requires both an endpoint URL and an API key.
1. Go to **AI Puffer > Settings > Integrations**.
2. Select **Qdrant**.
3. Enter your **Qdrant URL**.
4. Enter your **Qdrant API Key**.
5. Click **Sync Collections** to load collections from Qdrant.
6. Go to **AI Puffer > Knowledge Base > Stores** to create, refresh, or delete collections.
When you create a Qdrant collection in AI Puffer, enter the dimension that matches the embedding model you plan to use.
### Qdrant
Qdrant requires both an endpoint URL and an API key.
1. Go to **AI Puffer > Settings > Integrations**.
2. Select **Qdrant**.
3. Enter your **Qdrant URL**.
4. Enter your **Qdrant API Key**.
5. Click **Sync Collections** to load collections from Qdrant.
6. Go to **AI Puffer > Knowledge Base > Stores** to create, refresh, or delete collections.
When you create a Qdrant collection in AI Puffer, enter the dimension that matches the embedding model you plan to use.
 ### Chroma
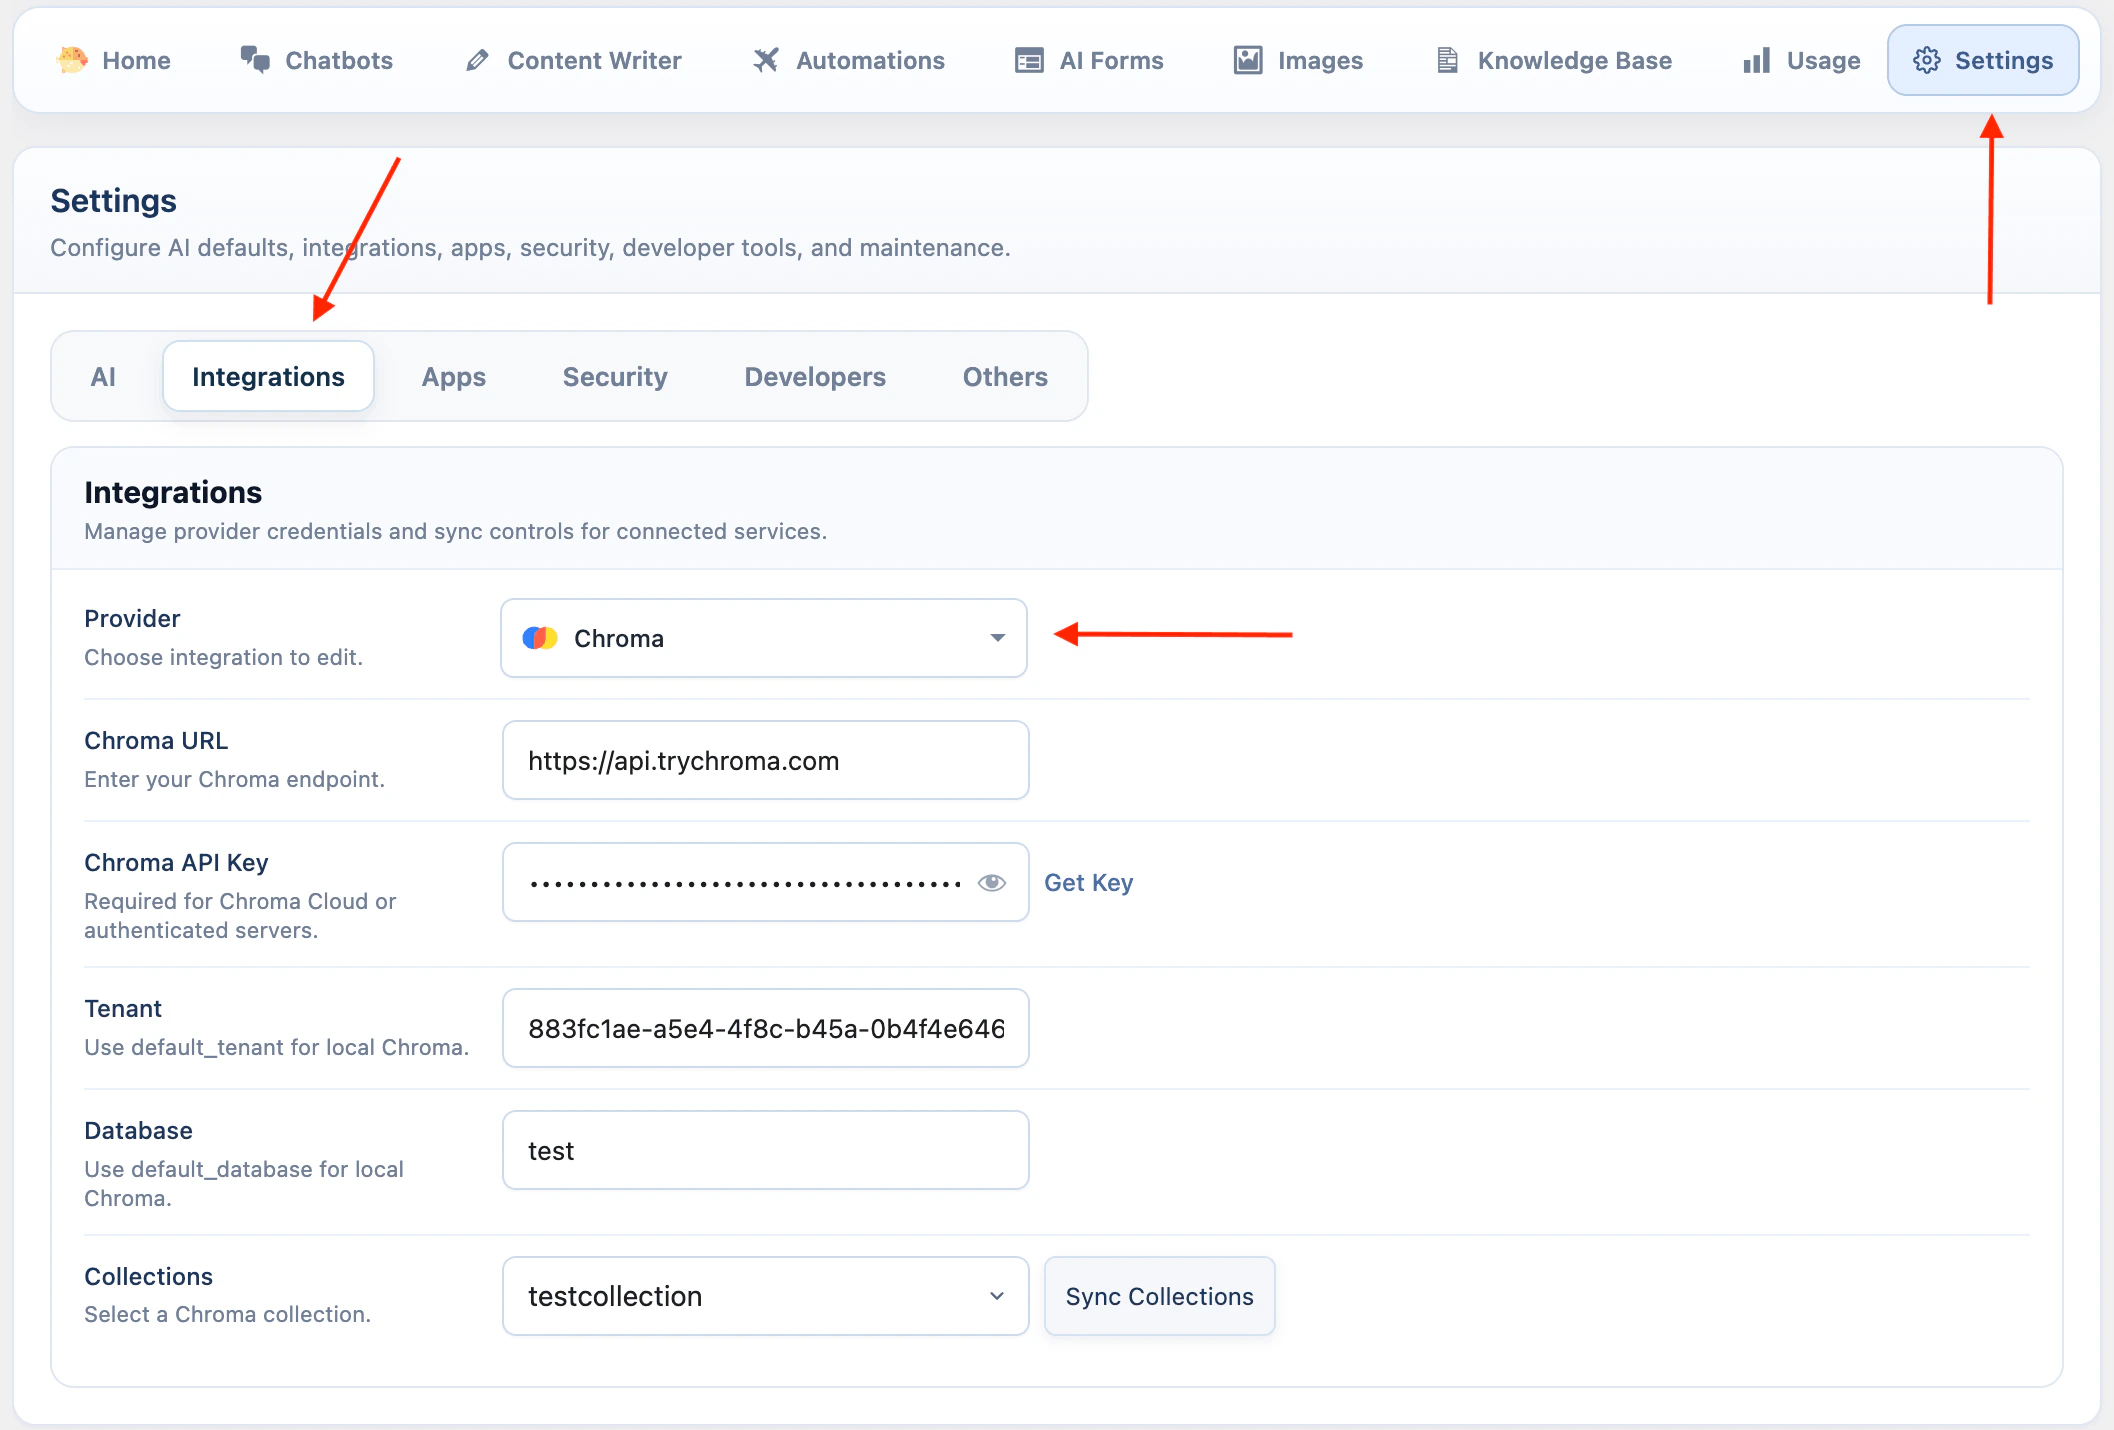
Chroma uses endpoint, tenant, and database settings.
1. Go to **AI Puffer > Settings > Integrations**.
2. Select **Chroma**.
3. Enter your **Chroma URL**. For Cloud, you can use [https://api.trychroma.com](https://api.trychroma.com)
4. Enter your **Chroma API Key** if you use Chroma Cloud or an authenticated server.
5. Enter the **Tenant**.
6. Enter the **Database**.
7. Click **Sync Collections** to load collections from Chroma.
8. Go to **AI Puffer > Knowledge Base > Stores** to create, refresh, or delete collections.
For local Chroma, the default tenant is `default_tenant` and the default database is `default_database`.
### Chroma
Chroma uses endpoint, tenant, and database settings.
1. Go to **AI Puffer > Settings > Integrations**.
2. Select **Chroma**.
3. Enter your **Chroma URL**. For Cloud, you can use [https://api.trychroma.com](https://api.trychroma.com)
4. Enter your **Chroma API Key** if you use Chroma Cloud or an authenticated server.
5. Enter the **Tenant**.
6. Enter the **Database**.
7. Click **Sync Collections** to load collections from Chroma.
8. Go to **AI Puffer > Knowledge Base > Stores** to create, refresh, or delete collections.
For local Chroma, the default tenant is `default_tenant` and the default database is `default_database`.
 ### Embedding Providers
Pinecone, Qdrant, and Chroma store vectors that AI Puffer creates with a selected embedding model. Before adding data to these providers, configure the embedding provider you want to use in **AI Puffer > Settings > AI**.
Supported embedding providers include OpenAI, Google, Azure, and OpenRouter. The selected embedding model must match the dimension of the Pinecone index, Qdrant collection, or Chroma collection.
xAI is not an embedding provider or vector store provider in the current integration. xAI chatbots, forms, and text workflows can still use retrieved Knowledge Base context from OpenAI, Pinecone, Qdrant, or Chroma because AI Puffer sends that context as text.
## Manage Vector Stores
Use **AI Puffer > Knowledge Base > Stores** to create, refresh, inspect, or delete vector targets.
The Stores tab is where you manage OpenAI vector stores, Pinecone indexes, Qdrant collections, and Chroma collections. The Data tab uses these targets when you add content.
### Embedding Providers
Pinecone, Qdrant, and Chroma store vectors that AI Puffer creates with a selected embedding model. Before adding data to these providers, configure the embedding provider you want to use in **AI Puffer > Settings > AI**.
Supported embedding providers include OpenAI, Google, Azure, and OpenRouter. The selected embedding model must match the dimension of the Pinecone index, Qdrant collection, or Chroma collection.
xAI is not an embedding provider or vector store provider in the current integration. xAI chatbots, forms, and text workflows can still use retrieved Knowledge Base context from OpenAI, Pinecone, Qdrant, or Chroma because AI Puffer sends that context as text.
## Manage Vector Stores
Use **AI Puffer > Knowledge Base > Stores** to create, refresh, inspect, or delete vector targets.
The Stores tab is where you manage OpenAI vector stores, Pinecone indexes, Qdrant collections, and Chroma collections. The Data tab uses these targets when you add content.
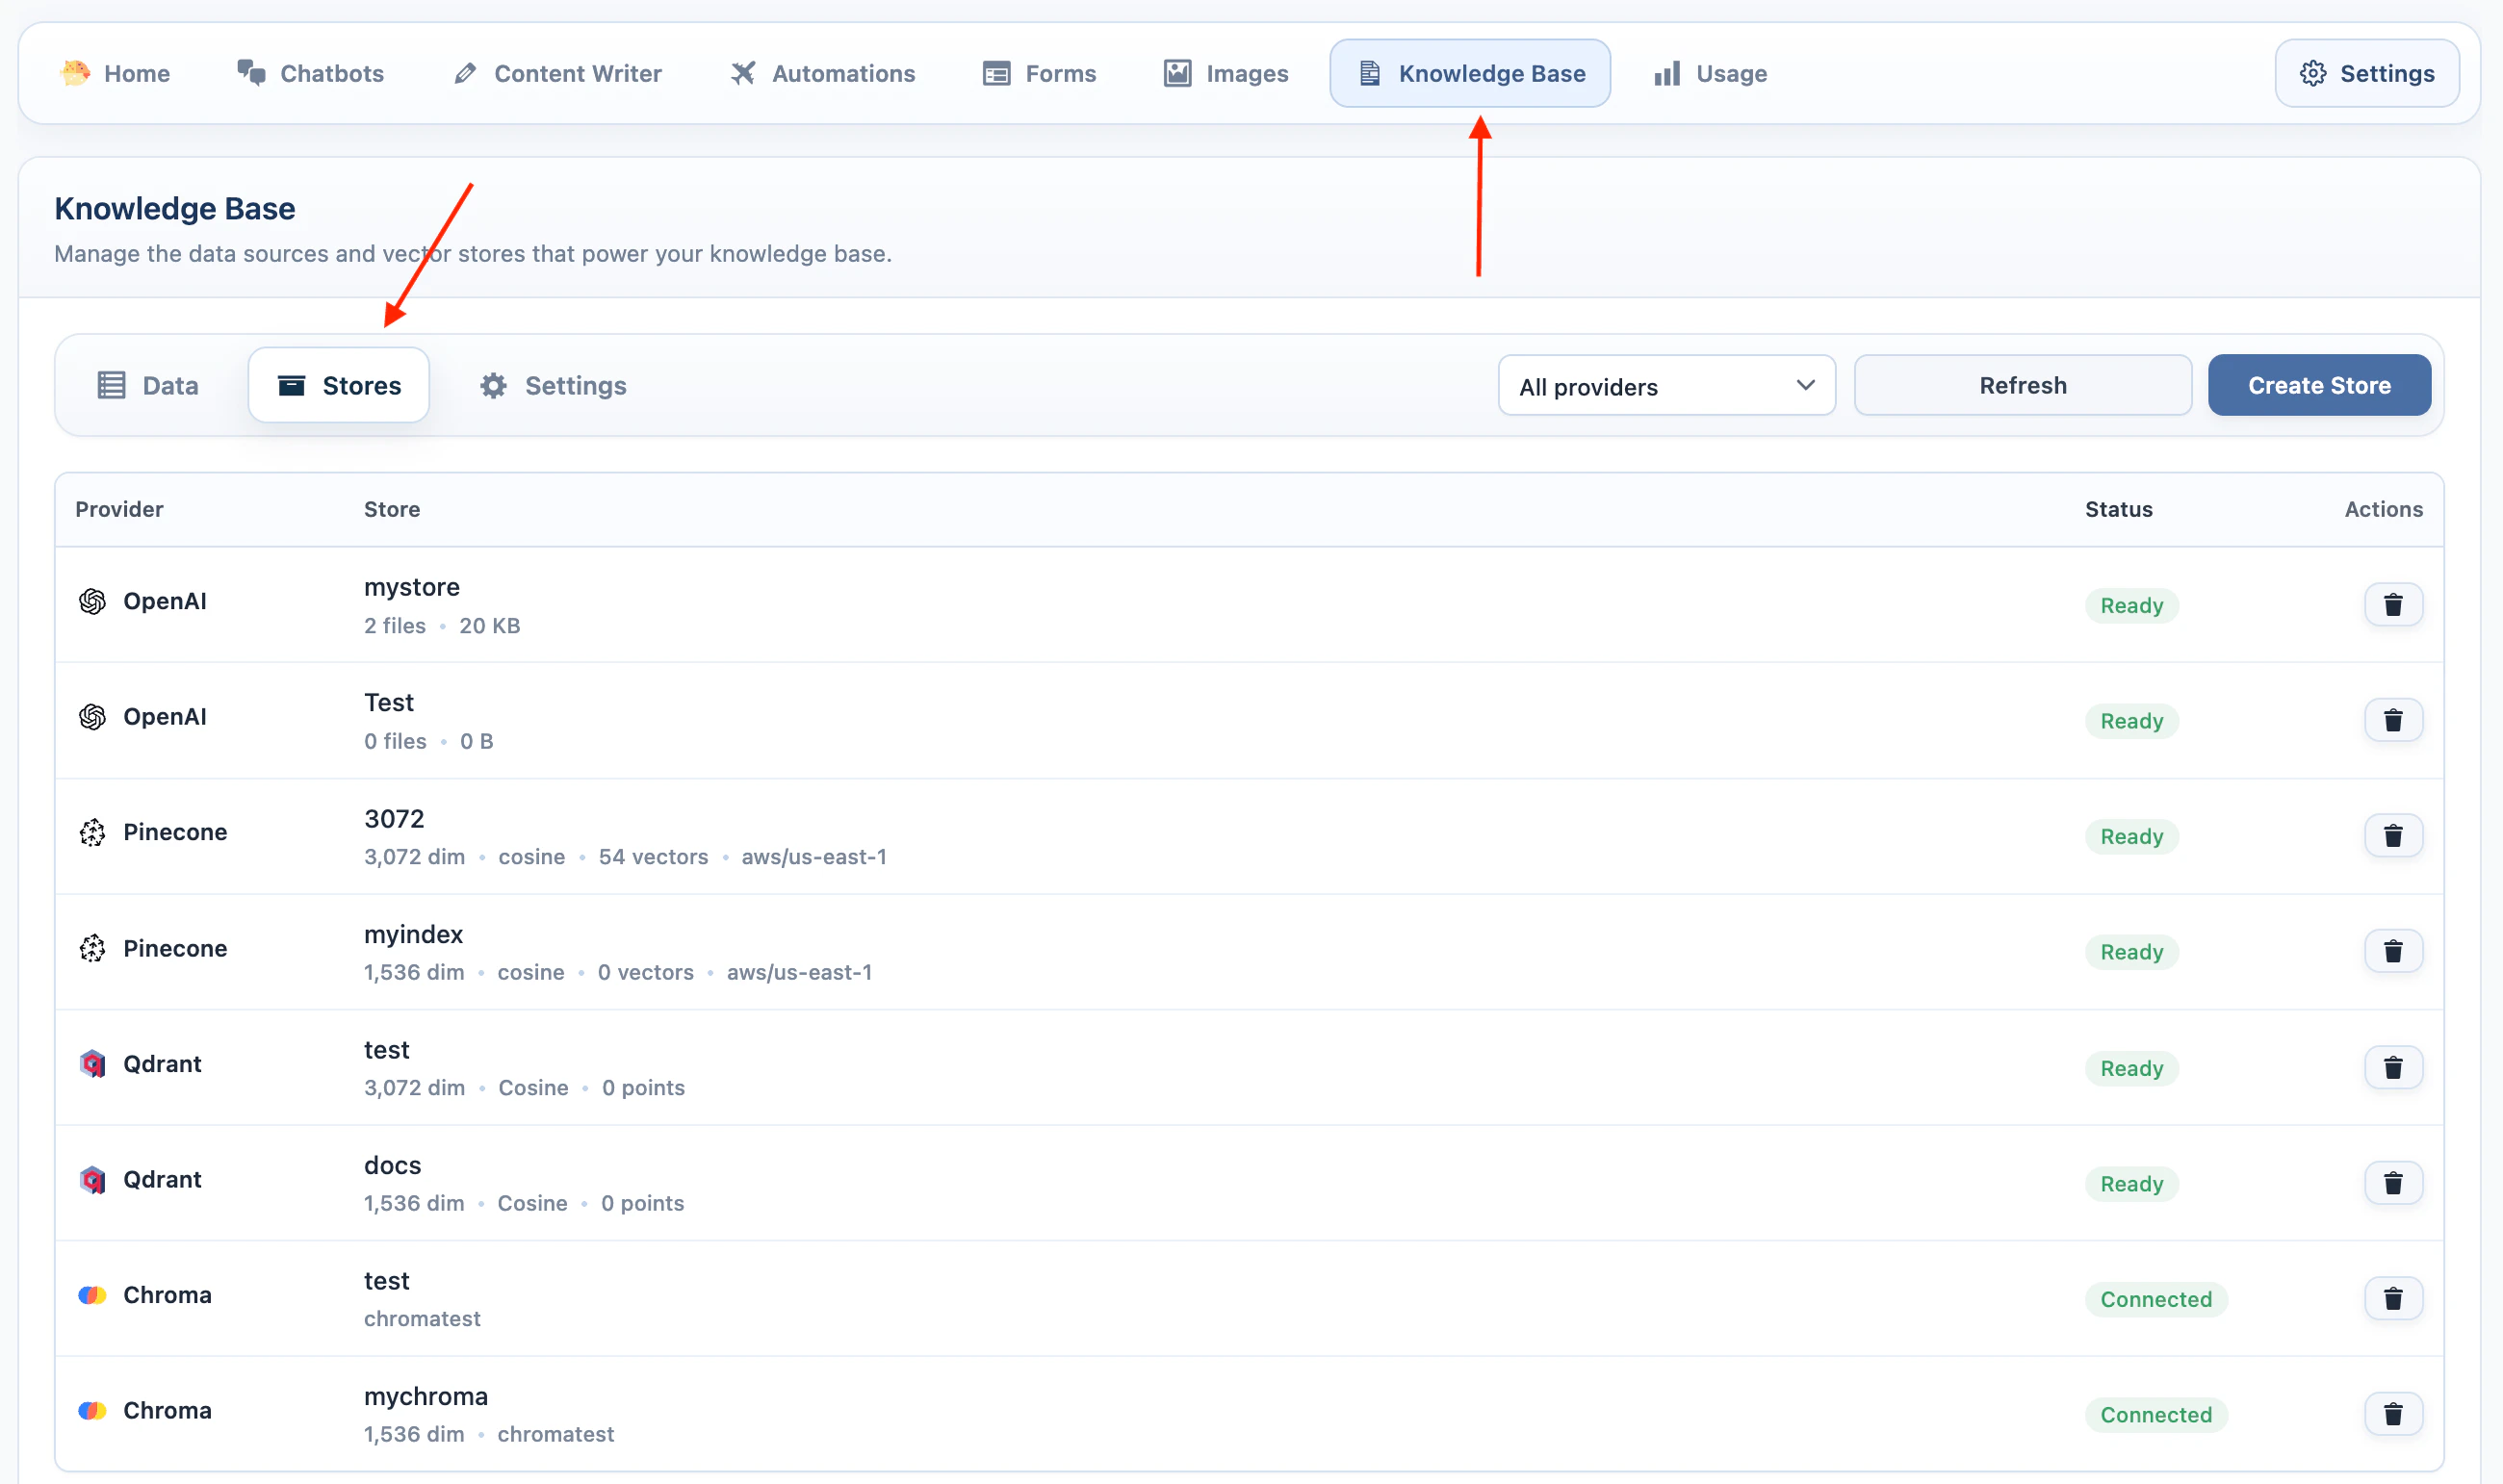 ### OpenAI Vector Stores
1. Add your OpenAI API key in **AI Puffer > Settings > AI**.
2. Go to **AI Puffer > Knowledge Base > Stores**.
3. Select **OpenAI** as the provider.
4. Click **Create Store**.
5. Enter a store name.
6. Click **Create**.
OpenAI handles the vector store search on its side. AI Puffer stores a local source record so you can see what was added.
### OpenAI Vector Stores
1. Add your OpenAI API key in **AI Puffer > Settings > AI**.
2. Go to **AI Puffer > Knowledge Base > Stores**.
3. Select **OpenAI** as the provider.
4. Click **Create Store**.
5. Enter a store name.
6. Click **Create**.
OpenAI handles the vector store search on its side. AI Puffer stores a local source record so you can see what was added.
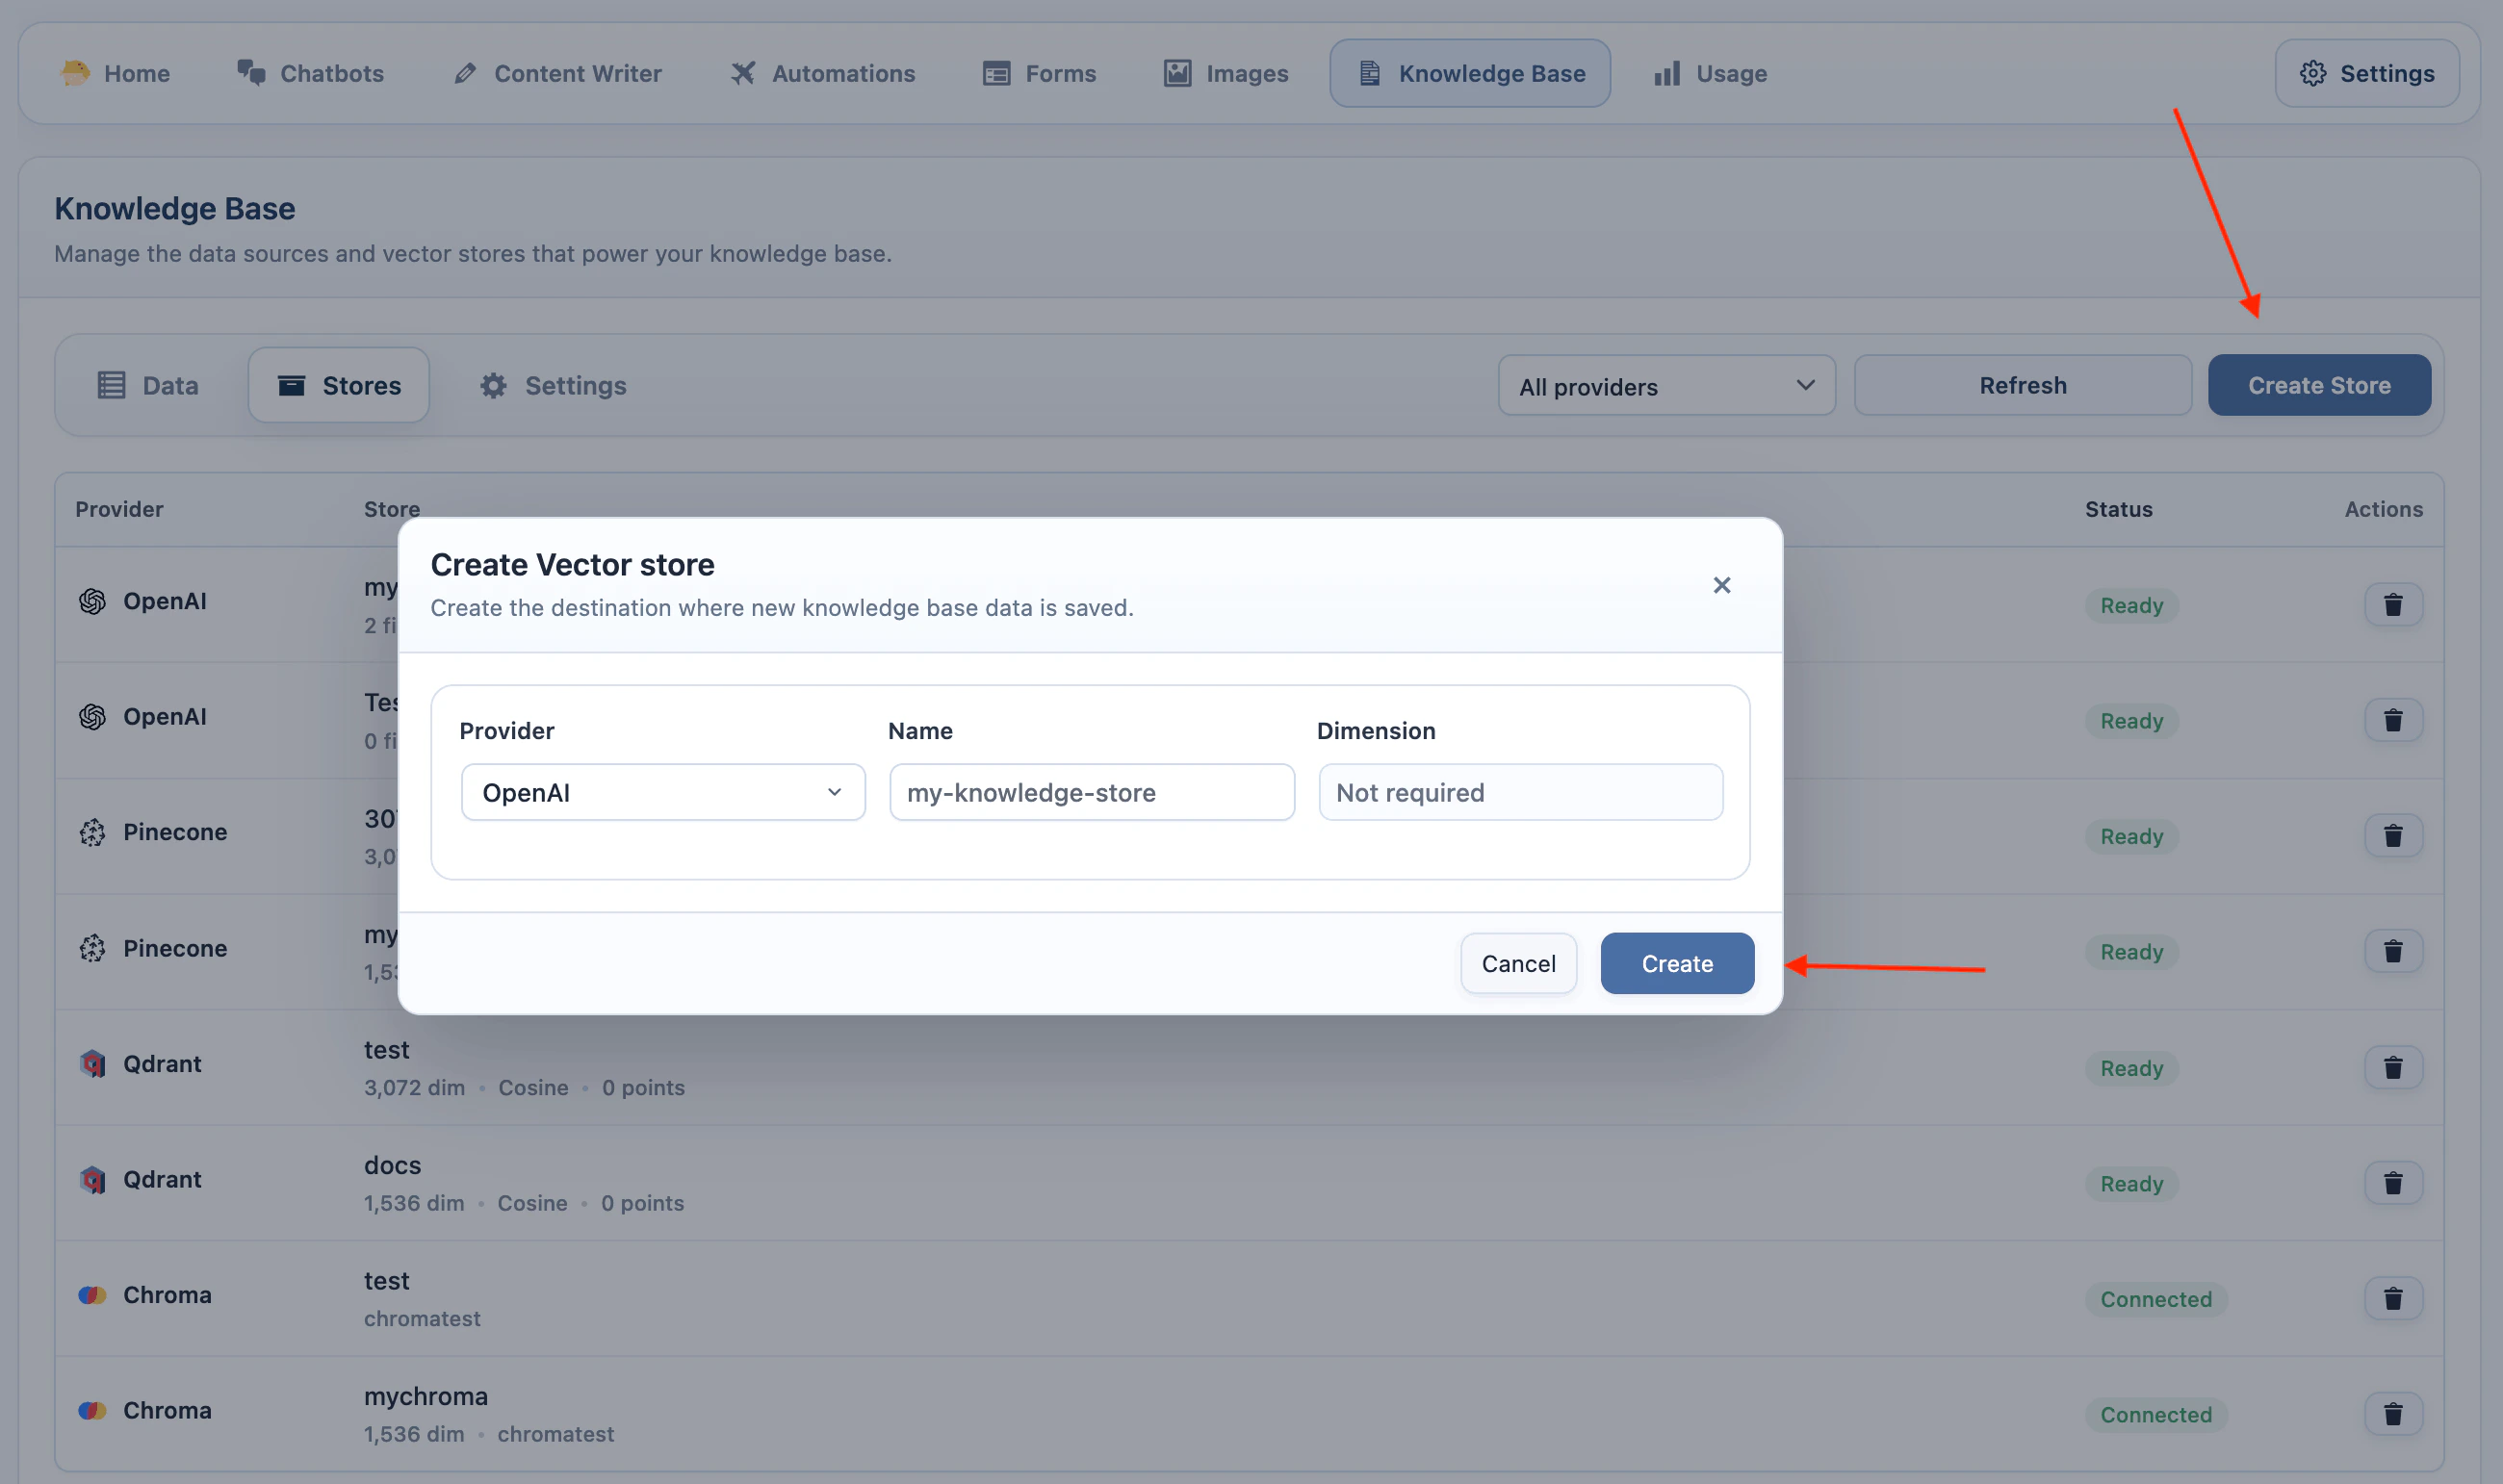 ### Pinecone Indexes
1. Add your Pinecone API key in **AI Puffer > Settings > Integrations**.
2. Go to **AI Puffer > Knowledge Base > Stores**.
3. Select **Pinecone** as the provider.
4. Select the embedding model you plan to use.
5. Click **Create Store**.
6. Enter an index name.
7. Enter the dimension for the selected embedding model.
8. Click **Create**.
Use the same embedding model when you add data to the index and when a module searches that index.
### Pinecone Indexes
1. Add your Pinecone API key in **AI Puffer > Settings > Integrations**.
2. Go to **AI Puffer > Knowledge Base > Stores**.
3. Select **Pinecone** as the provider.
4. Select the embedding model you plan to use.
5. Click **Create Store**.
6. Enter an index name.
7. Enter the dimension for the selected embedding model.
8. Click **Create**.
Use the same embedding model when you add data to the index and when a module searches that index.
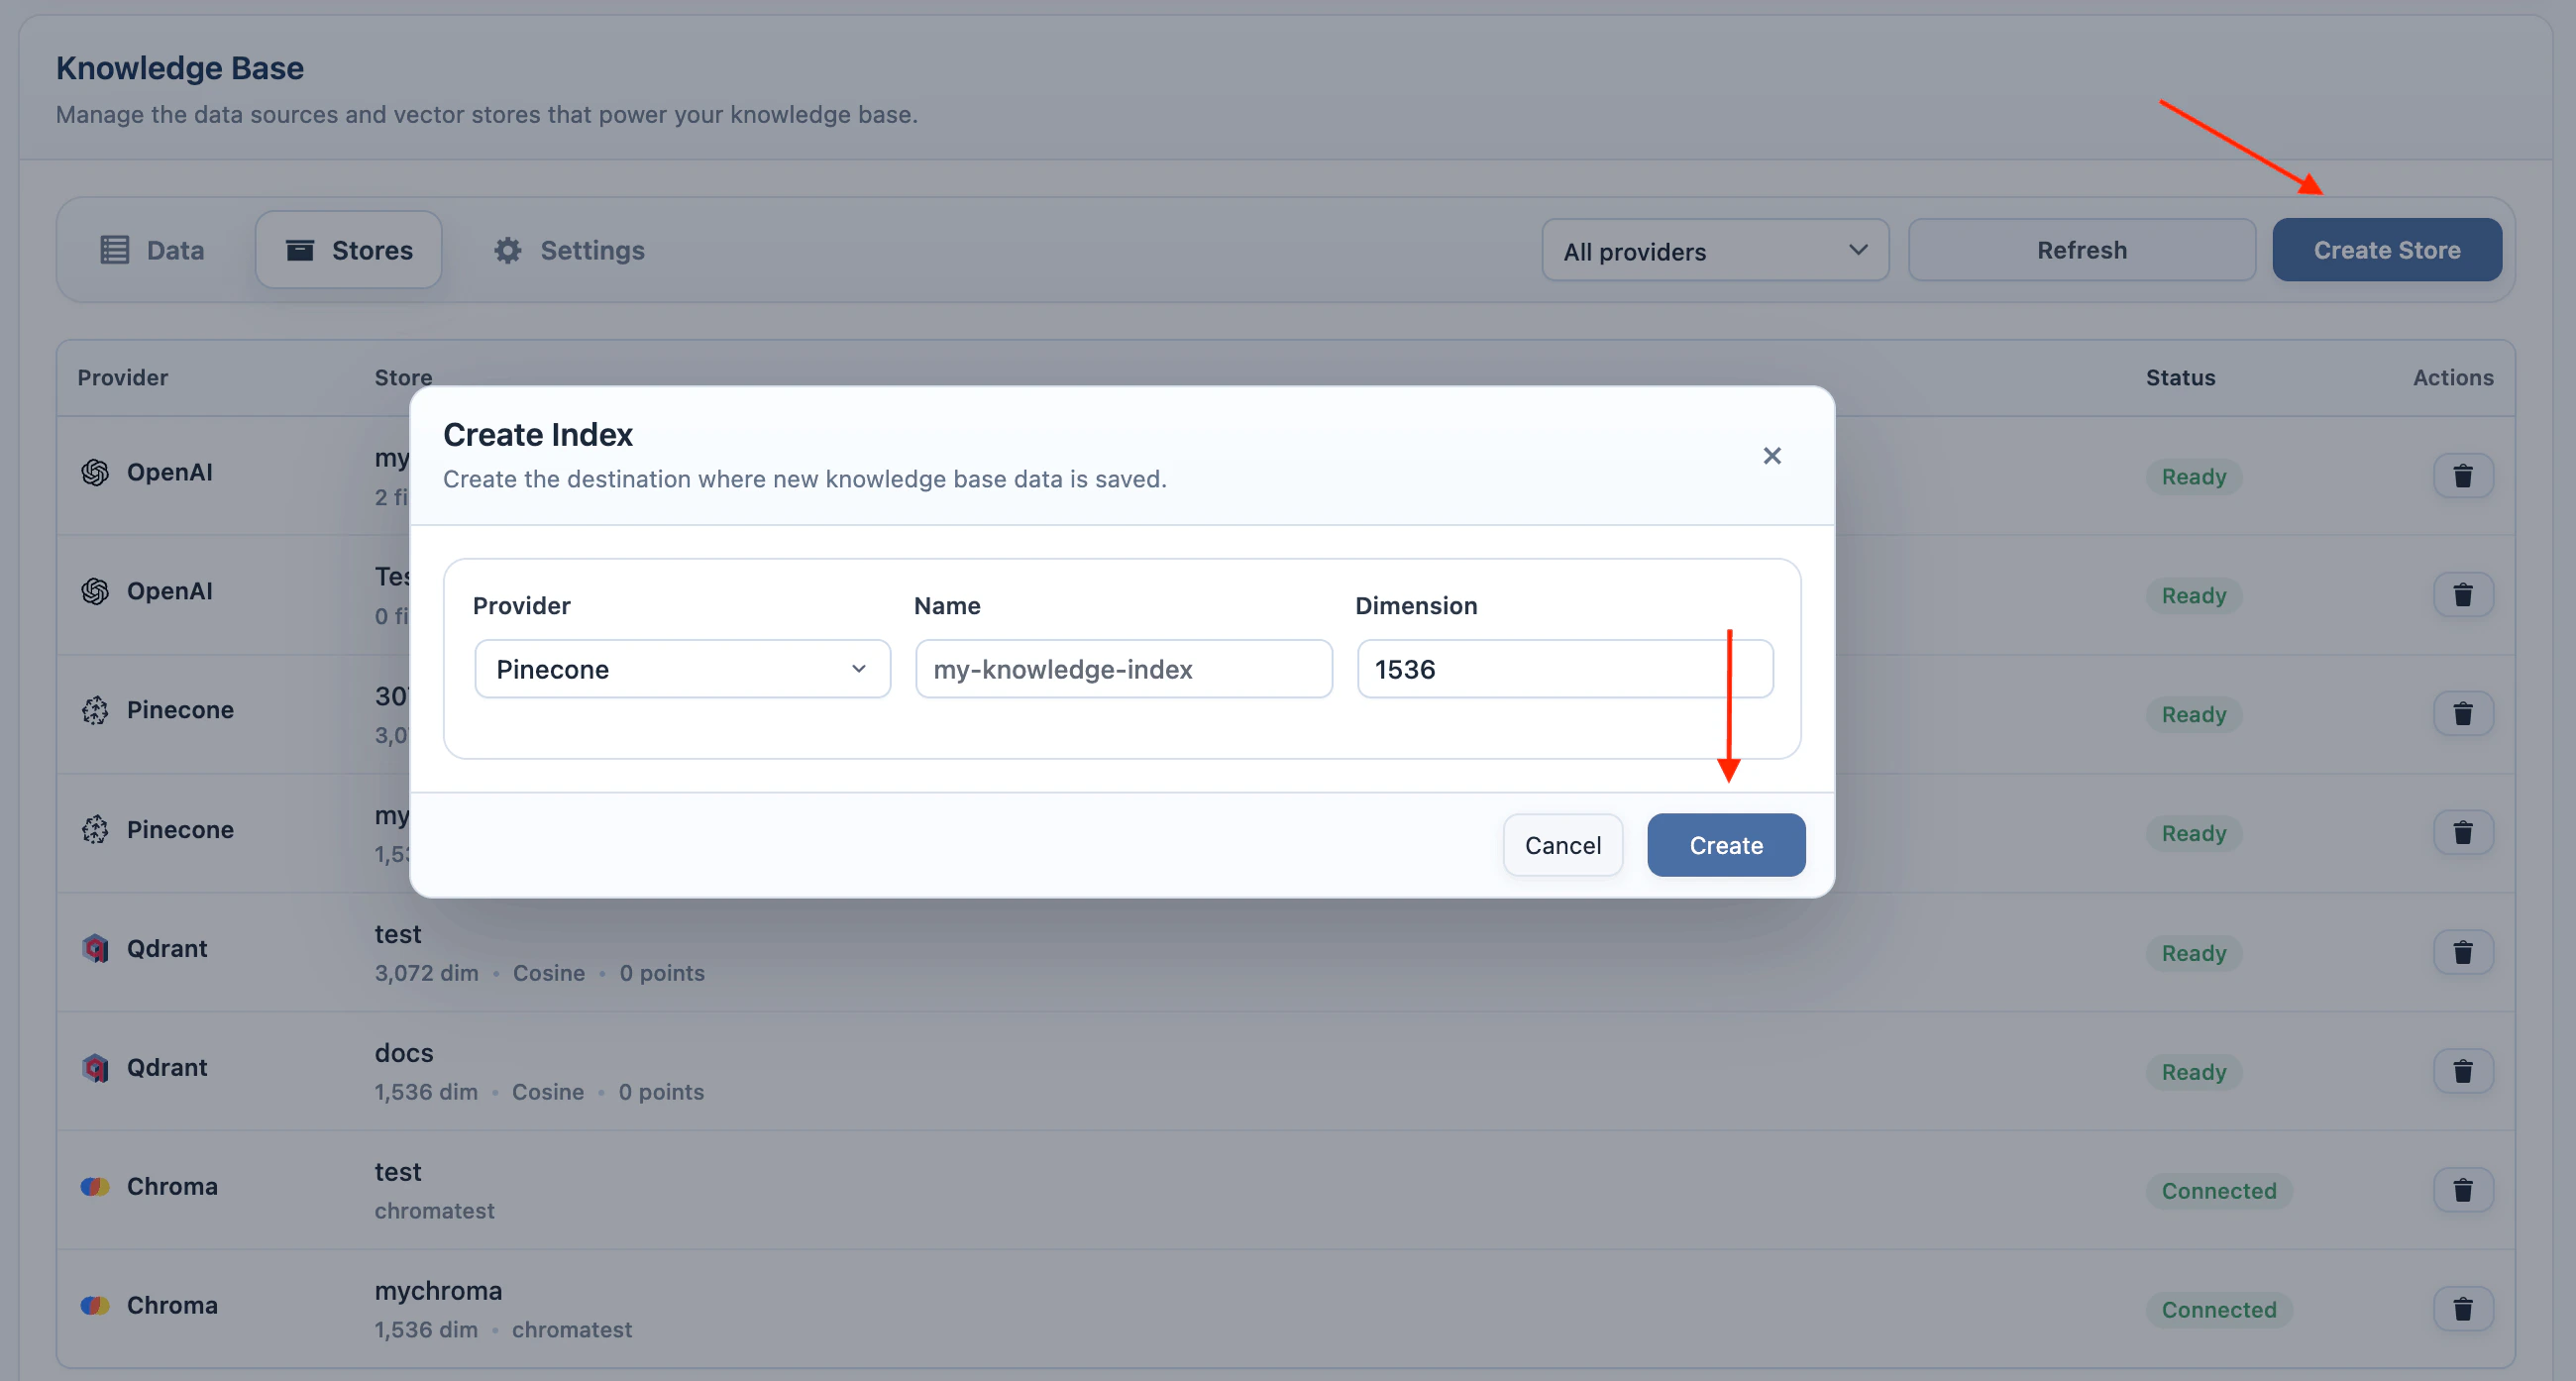 ### Qdrant Collections
1. Add your Qdrant URL and API key in **AI Puffer > Settings > Integrations**.
2. Go to **AI Puffer > Knowledge Base > Stores**.
3. Select **Qdrant** as the provider.
4. Select the embedding model you plan to use.
5. Click **Create Store**.
6. Enter a collection name.
7. Enter the dimension for the selected embedding model.
8. Click **Create**.
Use the same embedding model when you add data to the collection and when a module searches that collection.
### Qdrant Collections
1. Add your Qdrant URL and API key in **AI Puffer > Settings > Integrations**.
2. Go to **AI Puffer > Knowledge Base > Stores**.
3. Select **Qdrant** as the provider.
4. Select the embedding model you plan to use.
5. Click **Create Store**.
6. Enter a collection name.
7. Enter the dimension for the selected embedding model.
8. Click **Create**.
Use the same embedding model when you add data to the collection and when a module searches that collection.
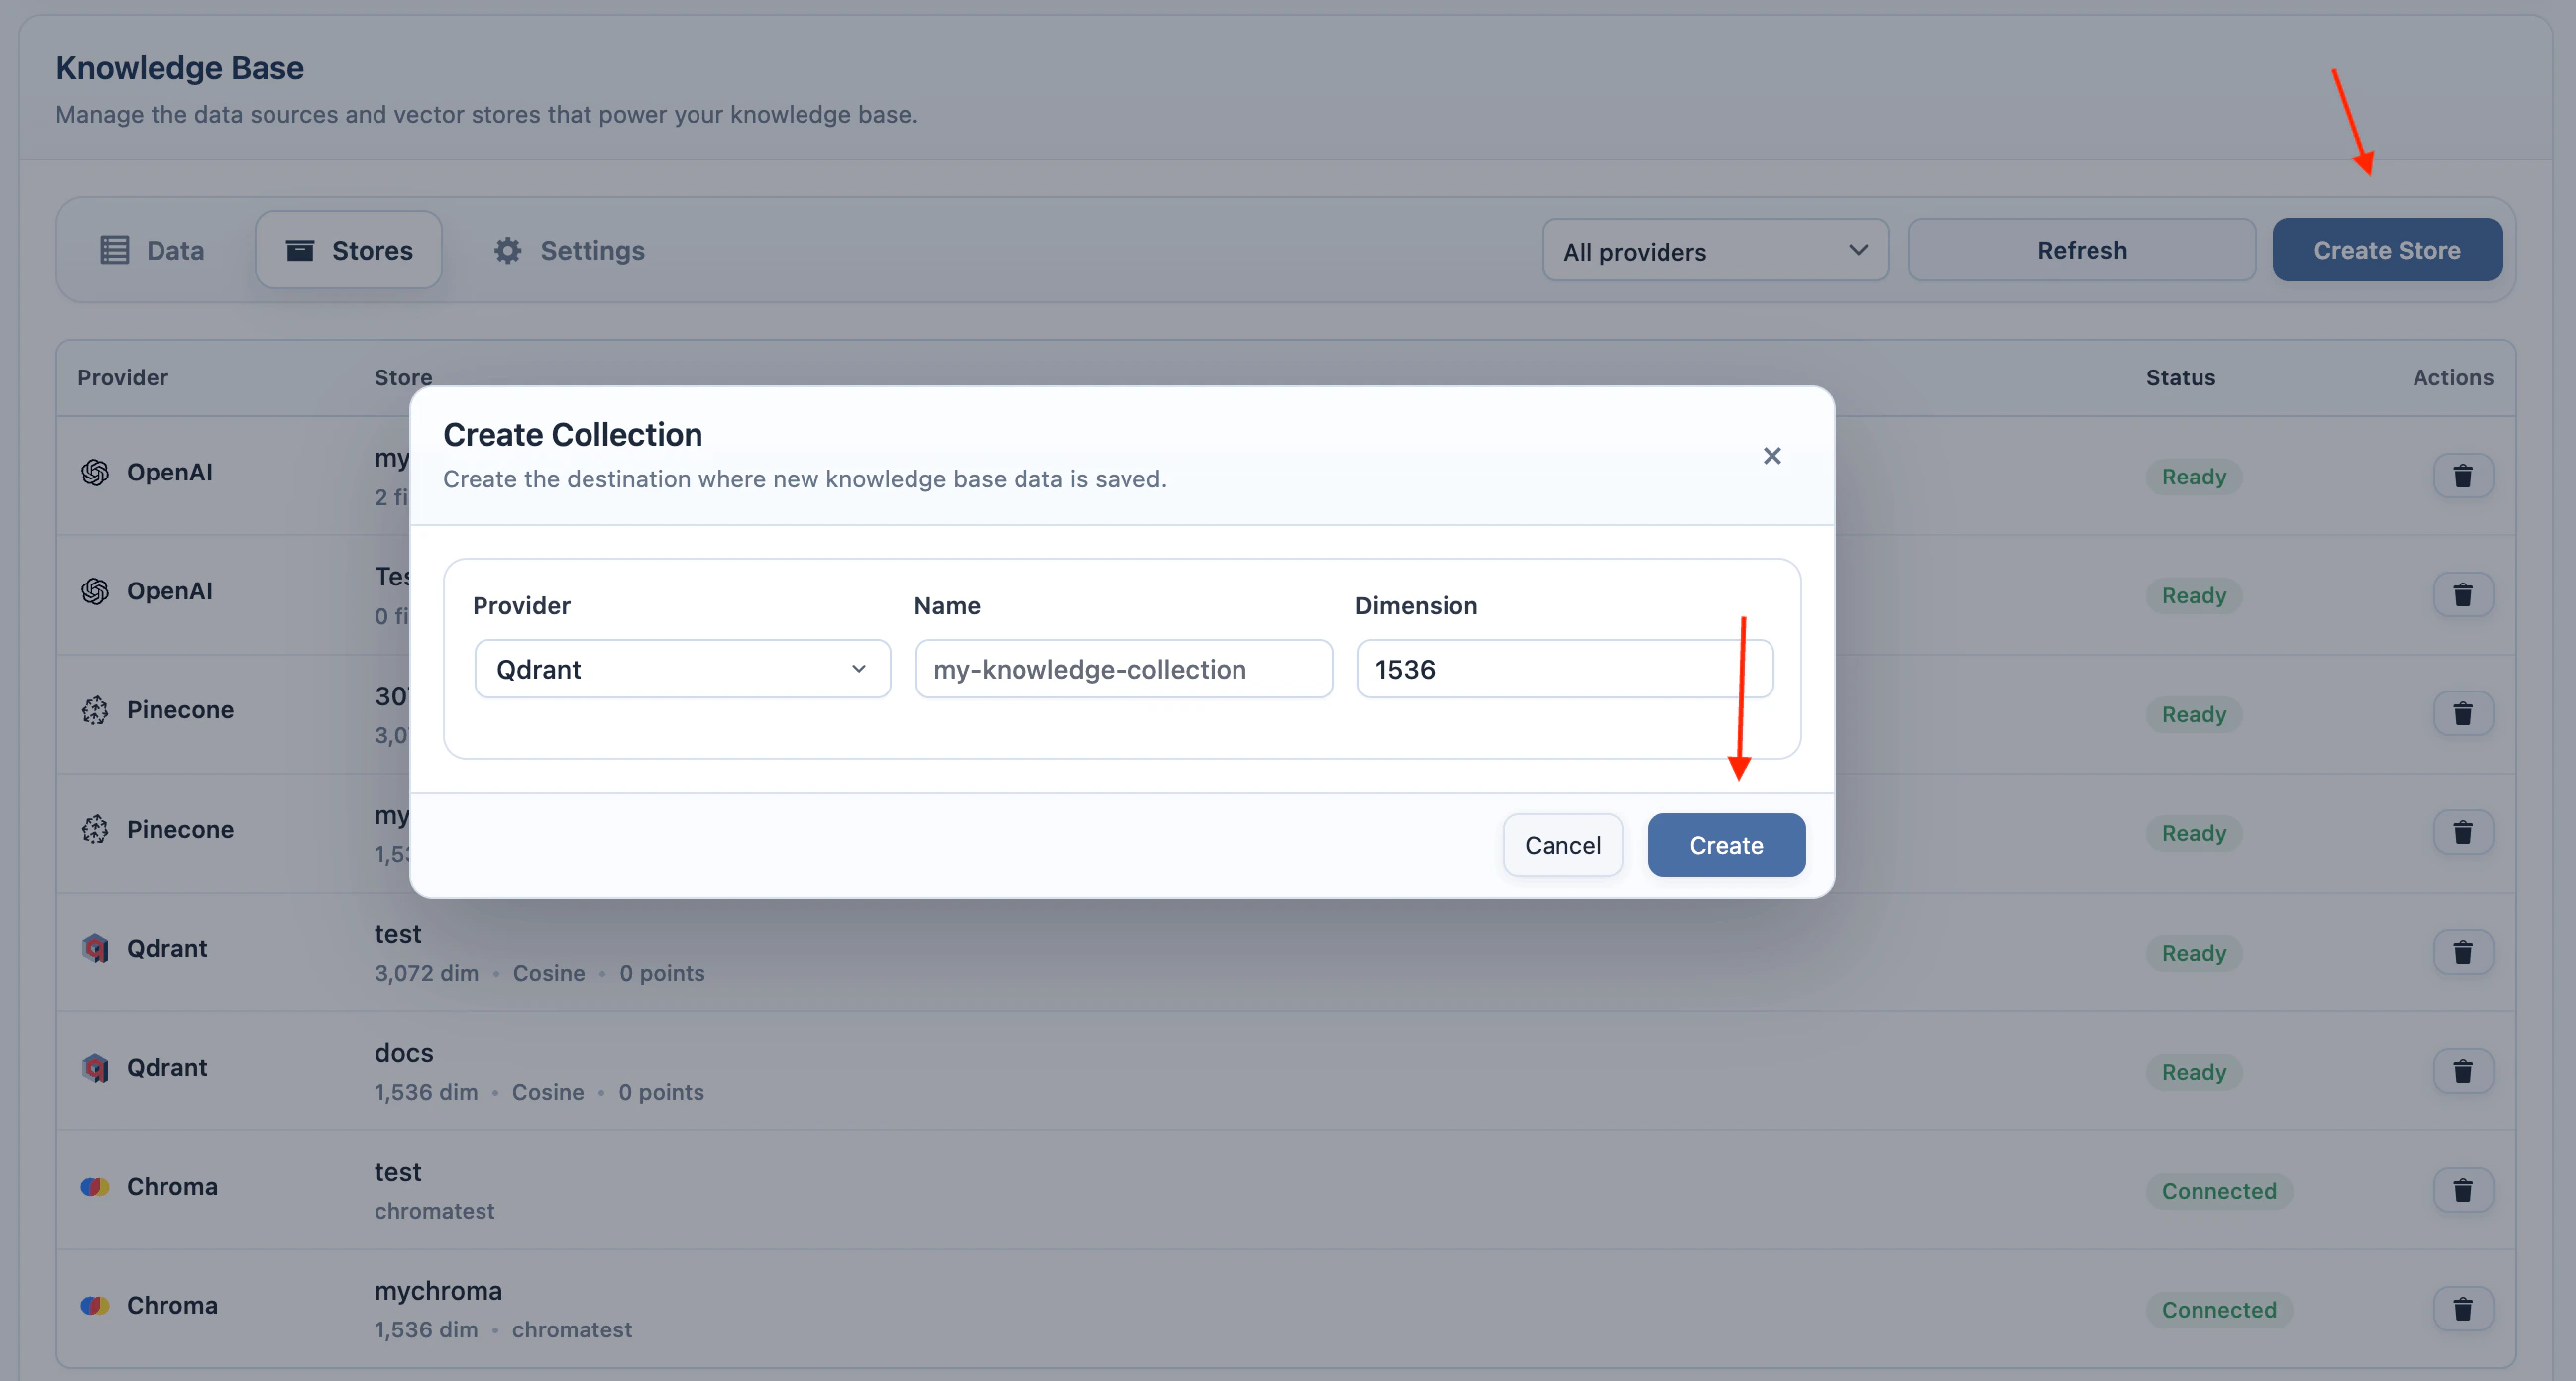 ### Chroma Collections
1. Add your Chroma endpoint, tenant, database, and API key in **AI Puffer > Settings > Integrations**.
2. Go to **AI Puffer > Knowledge Base > Stores**.
3. Select **Chroma** as the provider.
4. Click **Create Store**.
5. Enter a collection name.
6. Click **Create**.
Chroma collections do not require a dimension when they are created in AI Puffer. Use the same embedding model when you add data to the collection and when a module searches that collection.
### Chroma Collections
1. Add your Chroma endpoint, tenant, database, and API key in **AI Puffer > Settings > Integrations**.
2. Go to **AI Puffer > Knowledge Base > Stores**.
3. Select **Chroma** as the provider.
4. Click **Create Store**.
5. Enter a collection name.
6. Click **Create**.
Chroma collections do not require a dimension when they are created in AI Puffer. Use the same embedding model when you add data to the collection and when a module searches that collection.
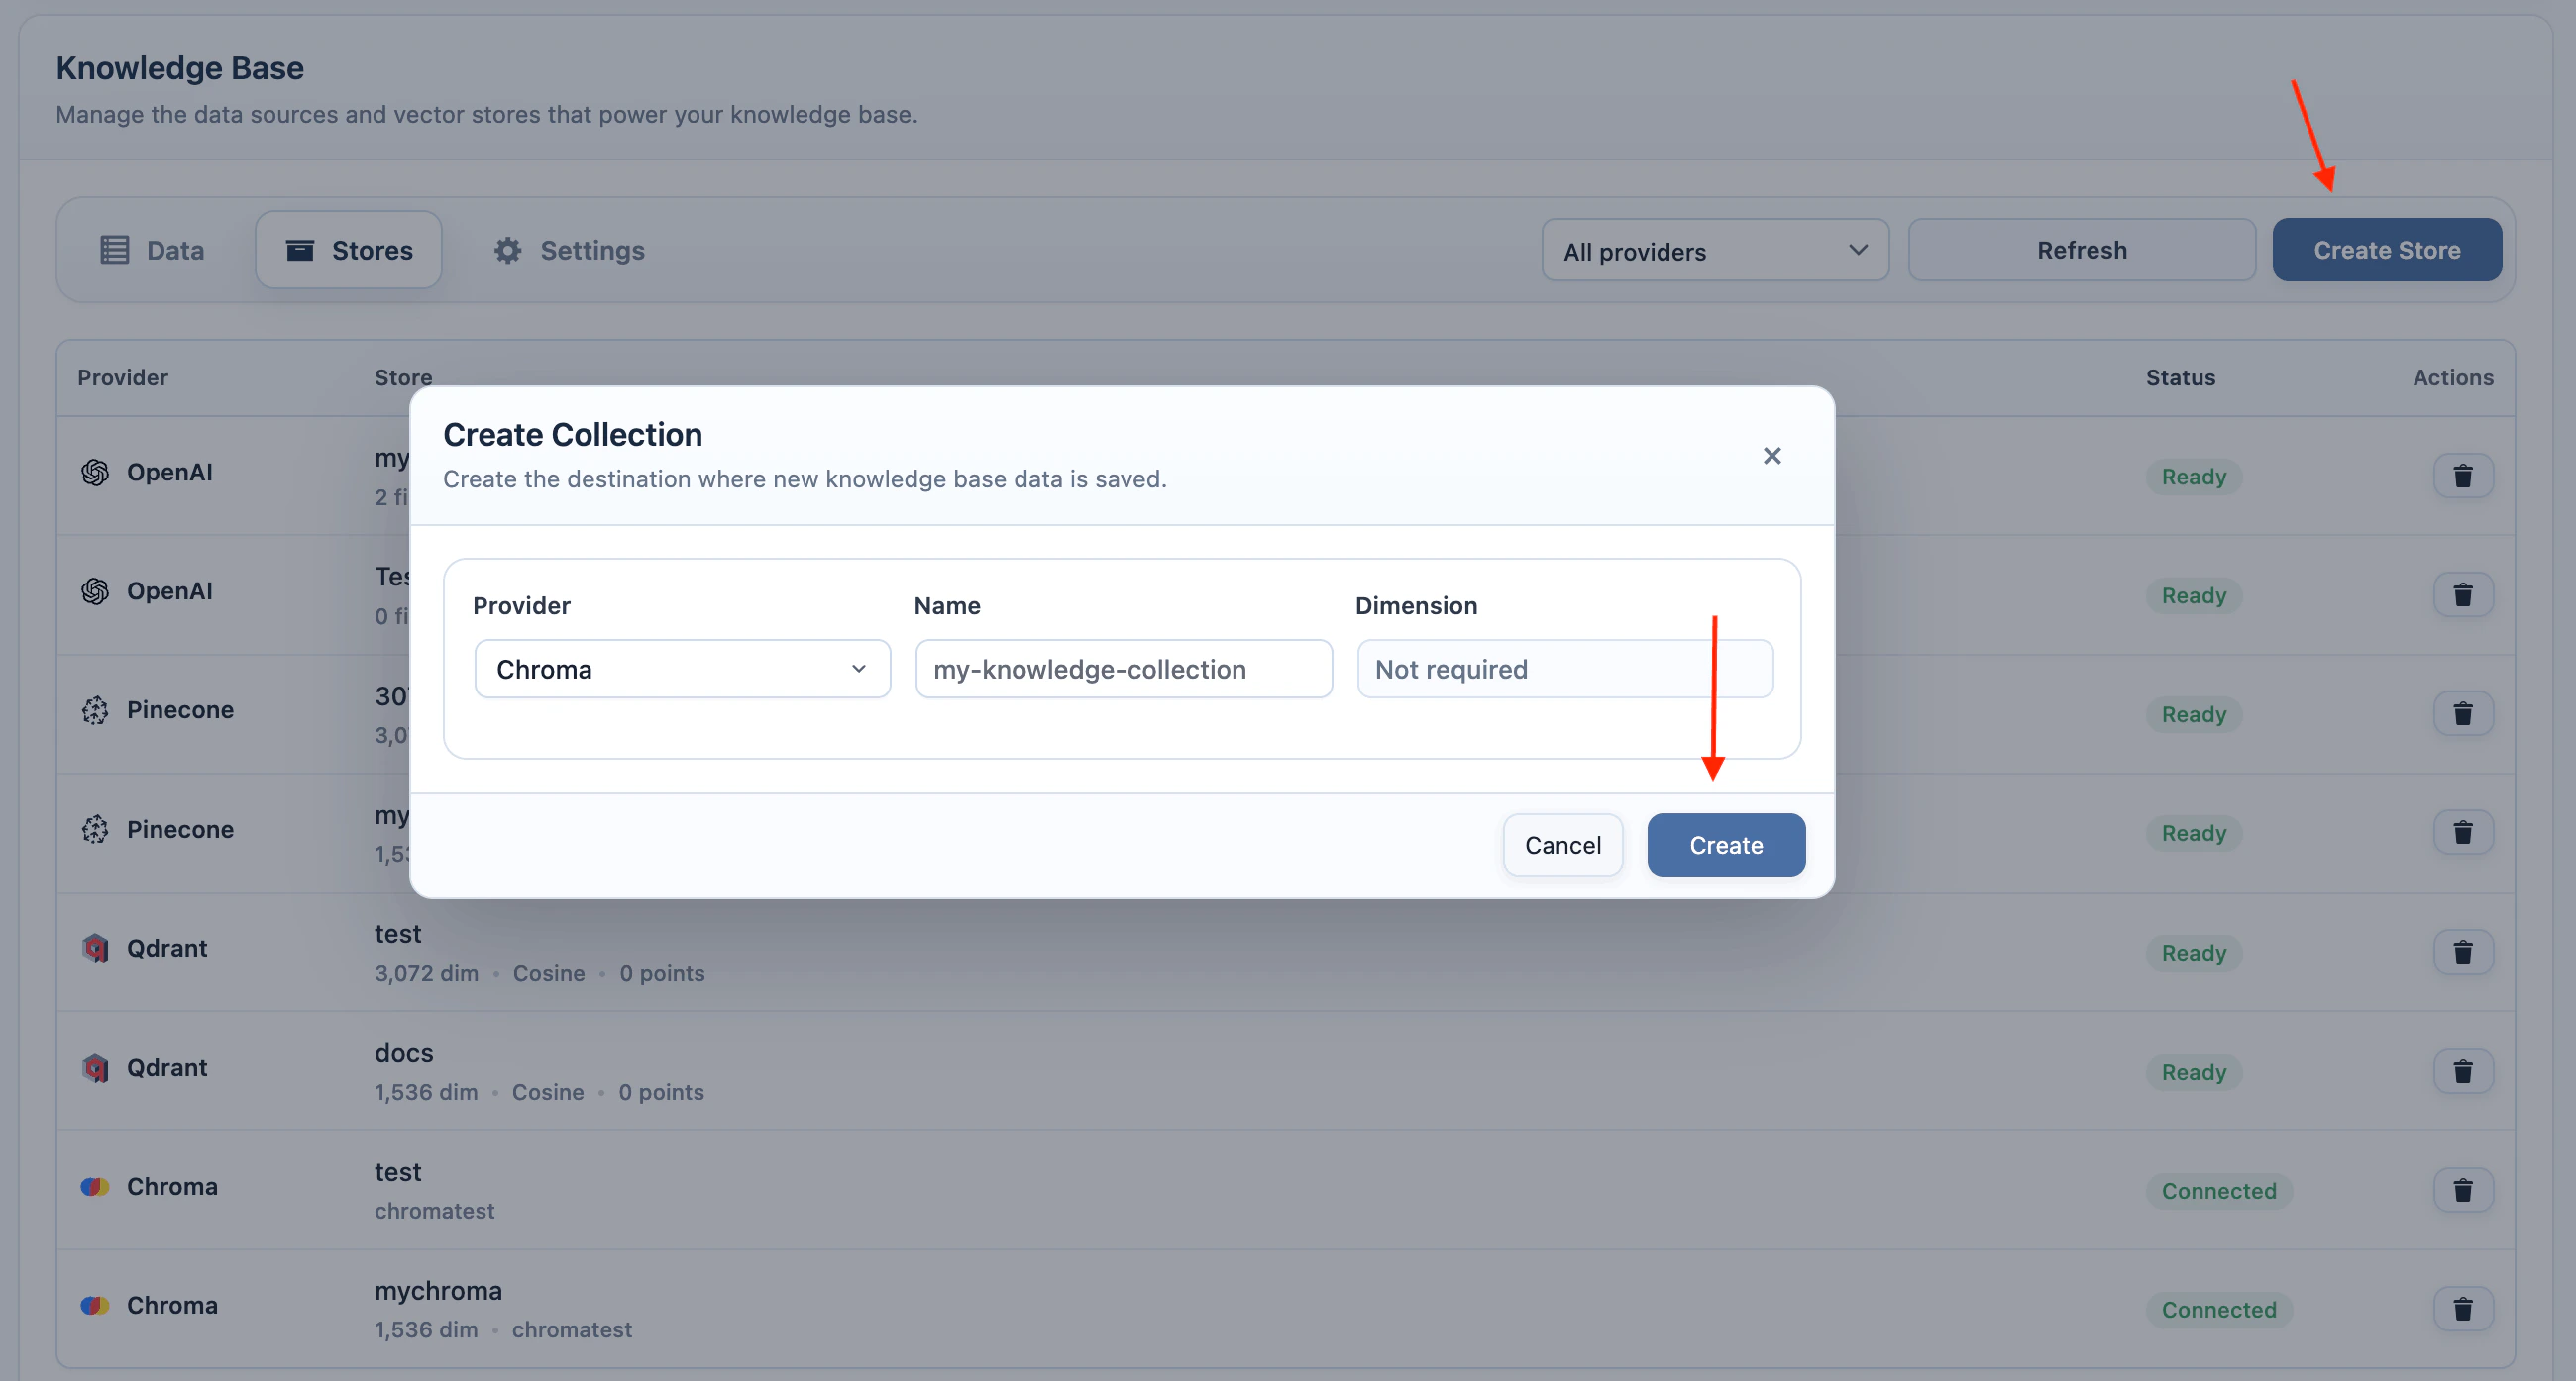 Use **Refresh** when you need AI Puffer to fetch the latest stores, indexes, or collections from the selected provider.
To delete a target, use the available action in the Stores table.
## Add Data
Use **AI Puffer > Knowledge Base > Data** to add new source data and manage existing source records.
Before adding data:
1. Go to **AI Puffer > Knowledge Base > Data**.
2. Select a provider.
3. Select the target vector store, index, or collection.
4. For Pinecone, Qdrant, or Chroma, select the embedding model.
5. Click **+ Add Data**.
Use **Refresh** when you need AI Puffer to fetch the latest stores, indexes, or collections from the selected provider.
To delete a target, use the available action in the Stores table.
## Add Data
Use **AI Puffer > Knowledge Base > Data** to add new source data and manage existing source records.
Before adding data:
1. Go to **AI Puffer > Knowledge Base > Data**.
2. Select a provider.
3. Select the target vector store, index, or collection.
4. For Pinecone, Qdrant, or Chroma, select the embedding model.
5. Click **+ Add Data**.
 ### Q\&A
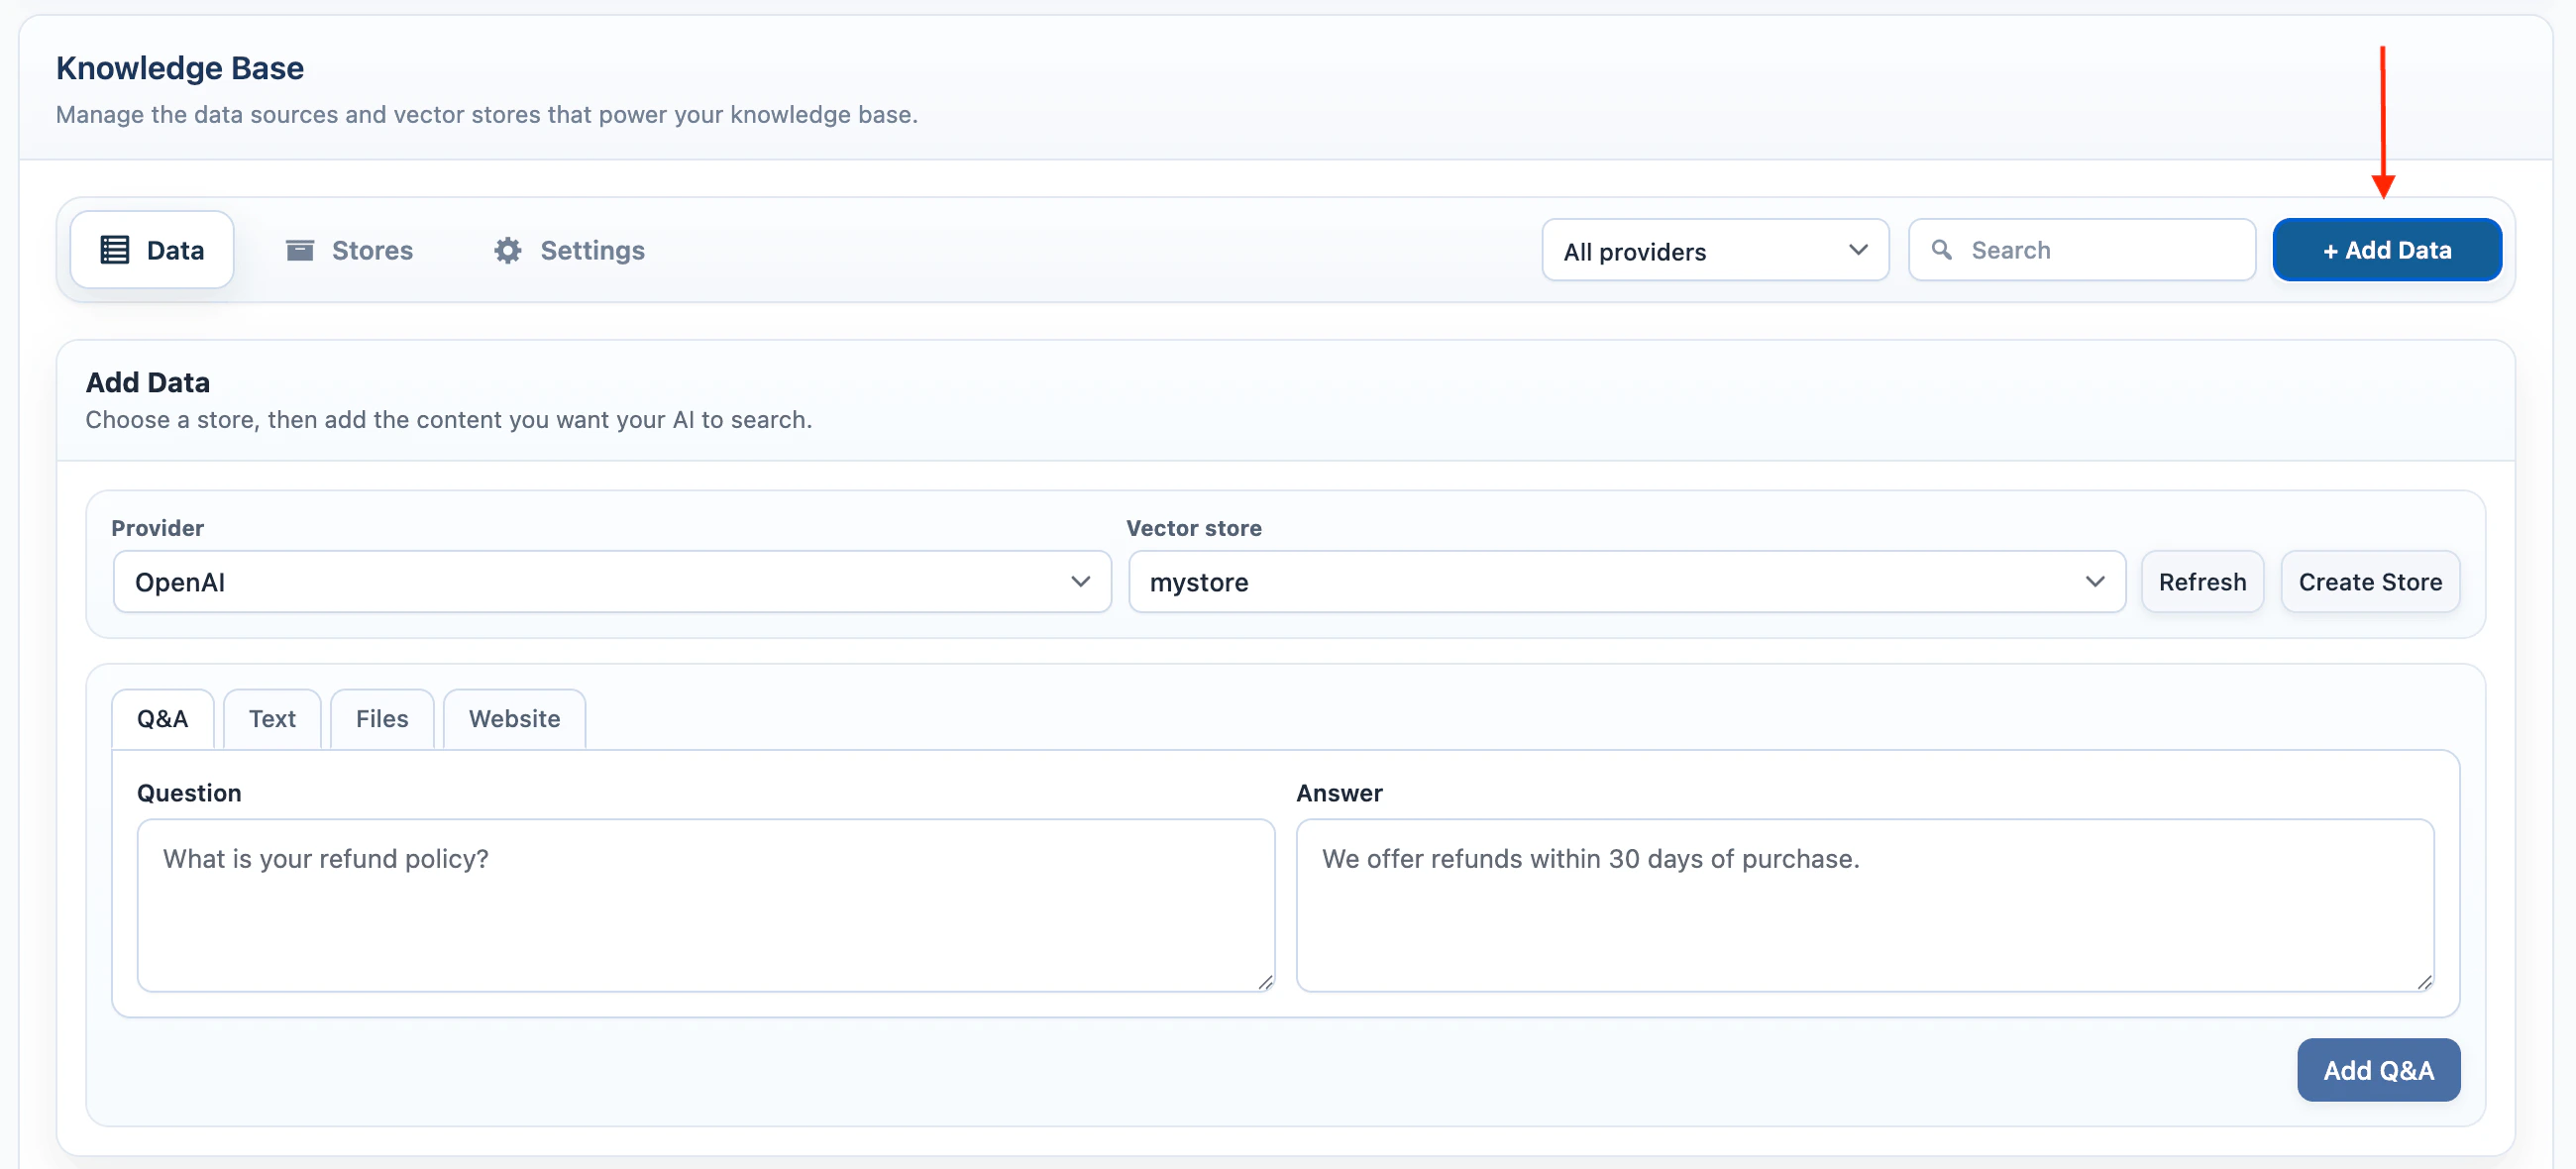
Use Q\&A for short answers that should be easy to retrieve later.
1. Select **Q\&A**.
2. Enter the question.
3. Enter the answer.
4. Click **Add Q\&A**.
AI Puffer stores the pair as text:
```text theme={null}
Q: question text
A: answer text
```
### Q\&A
Use Q\&A for short answers that should be easy to retrieve later.
1. Select **Q\&A**.
2. Enter the question.
3. Enter the answer.
4. Click **Add Q\&A**.
AI Puffer stores the pair as text:
```text theme={null}
Q: question text
A: answer text
```
 ### Text
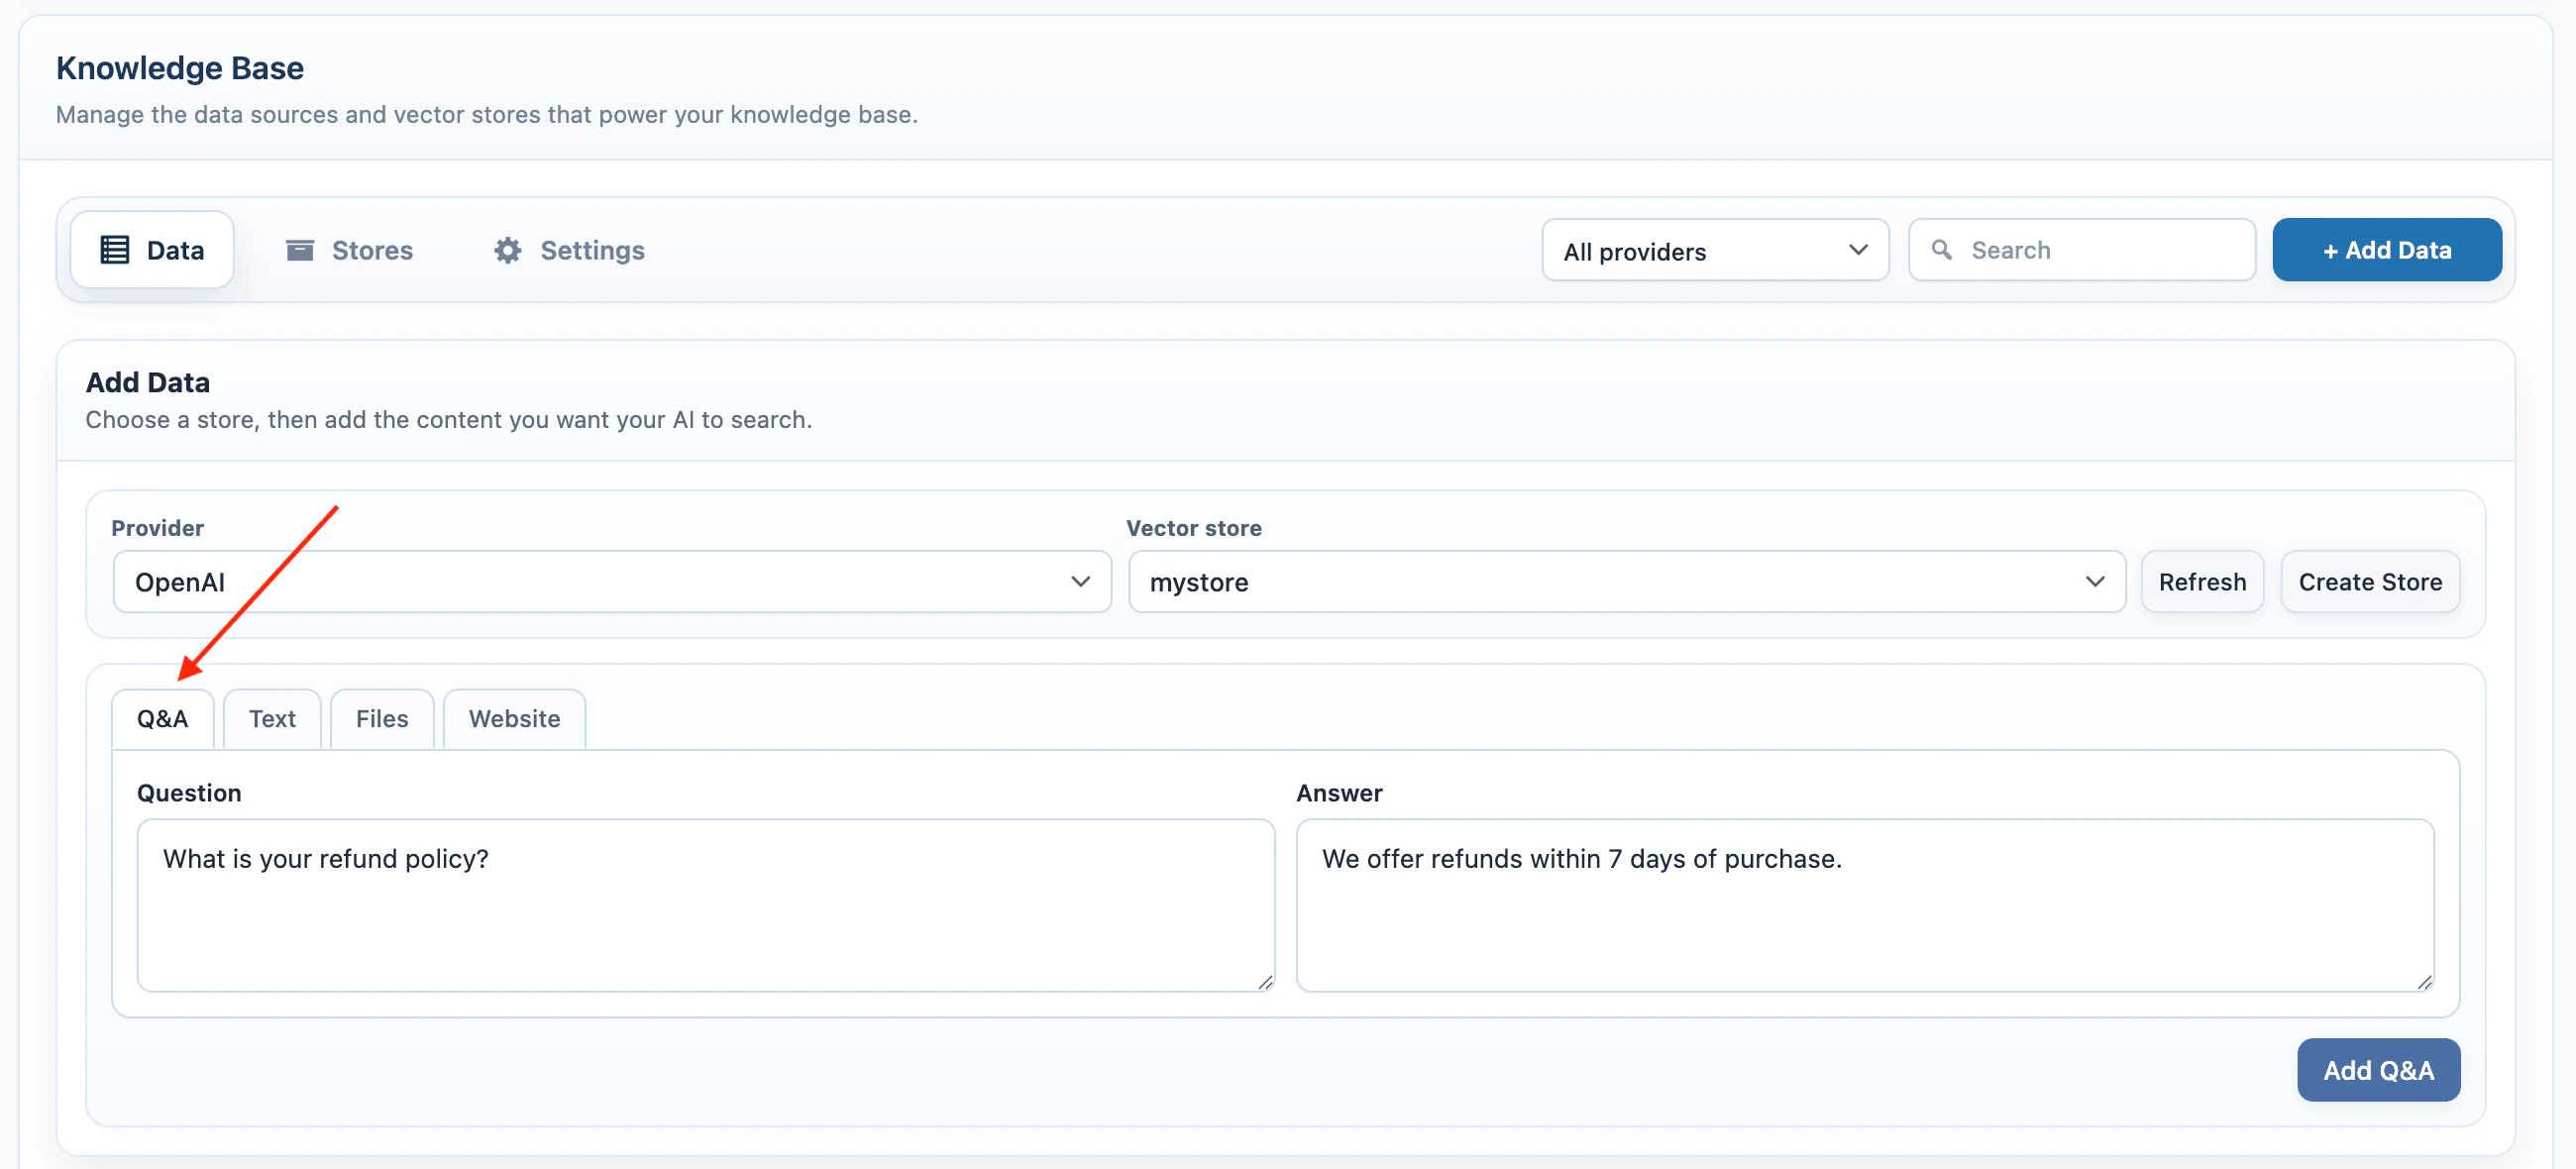
Use Text for policies, instructions, product notes, support snippets, or any source text that does not already exist as WordPress content.
1. Select **Text**.
2. Paste the source text.
3. Click **Add Text**.
### Text
Use Text for policies, instructions, product notes, support snippets, or any source text that does not already exist as WordPress content.
1. Select **Text**.
2. Paste the source text.
3. Click **Add Text**.
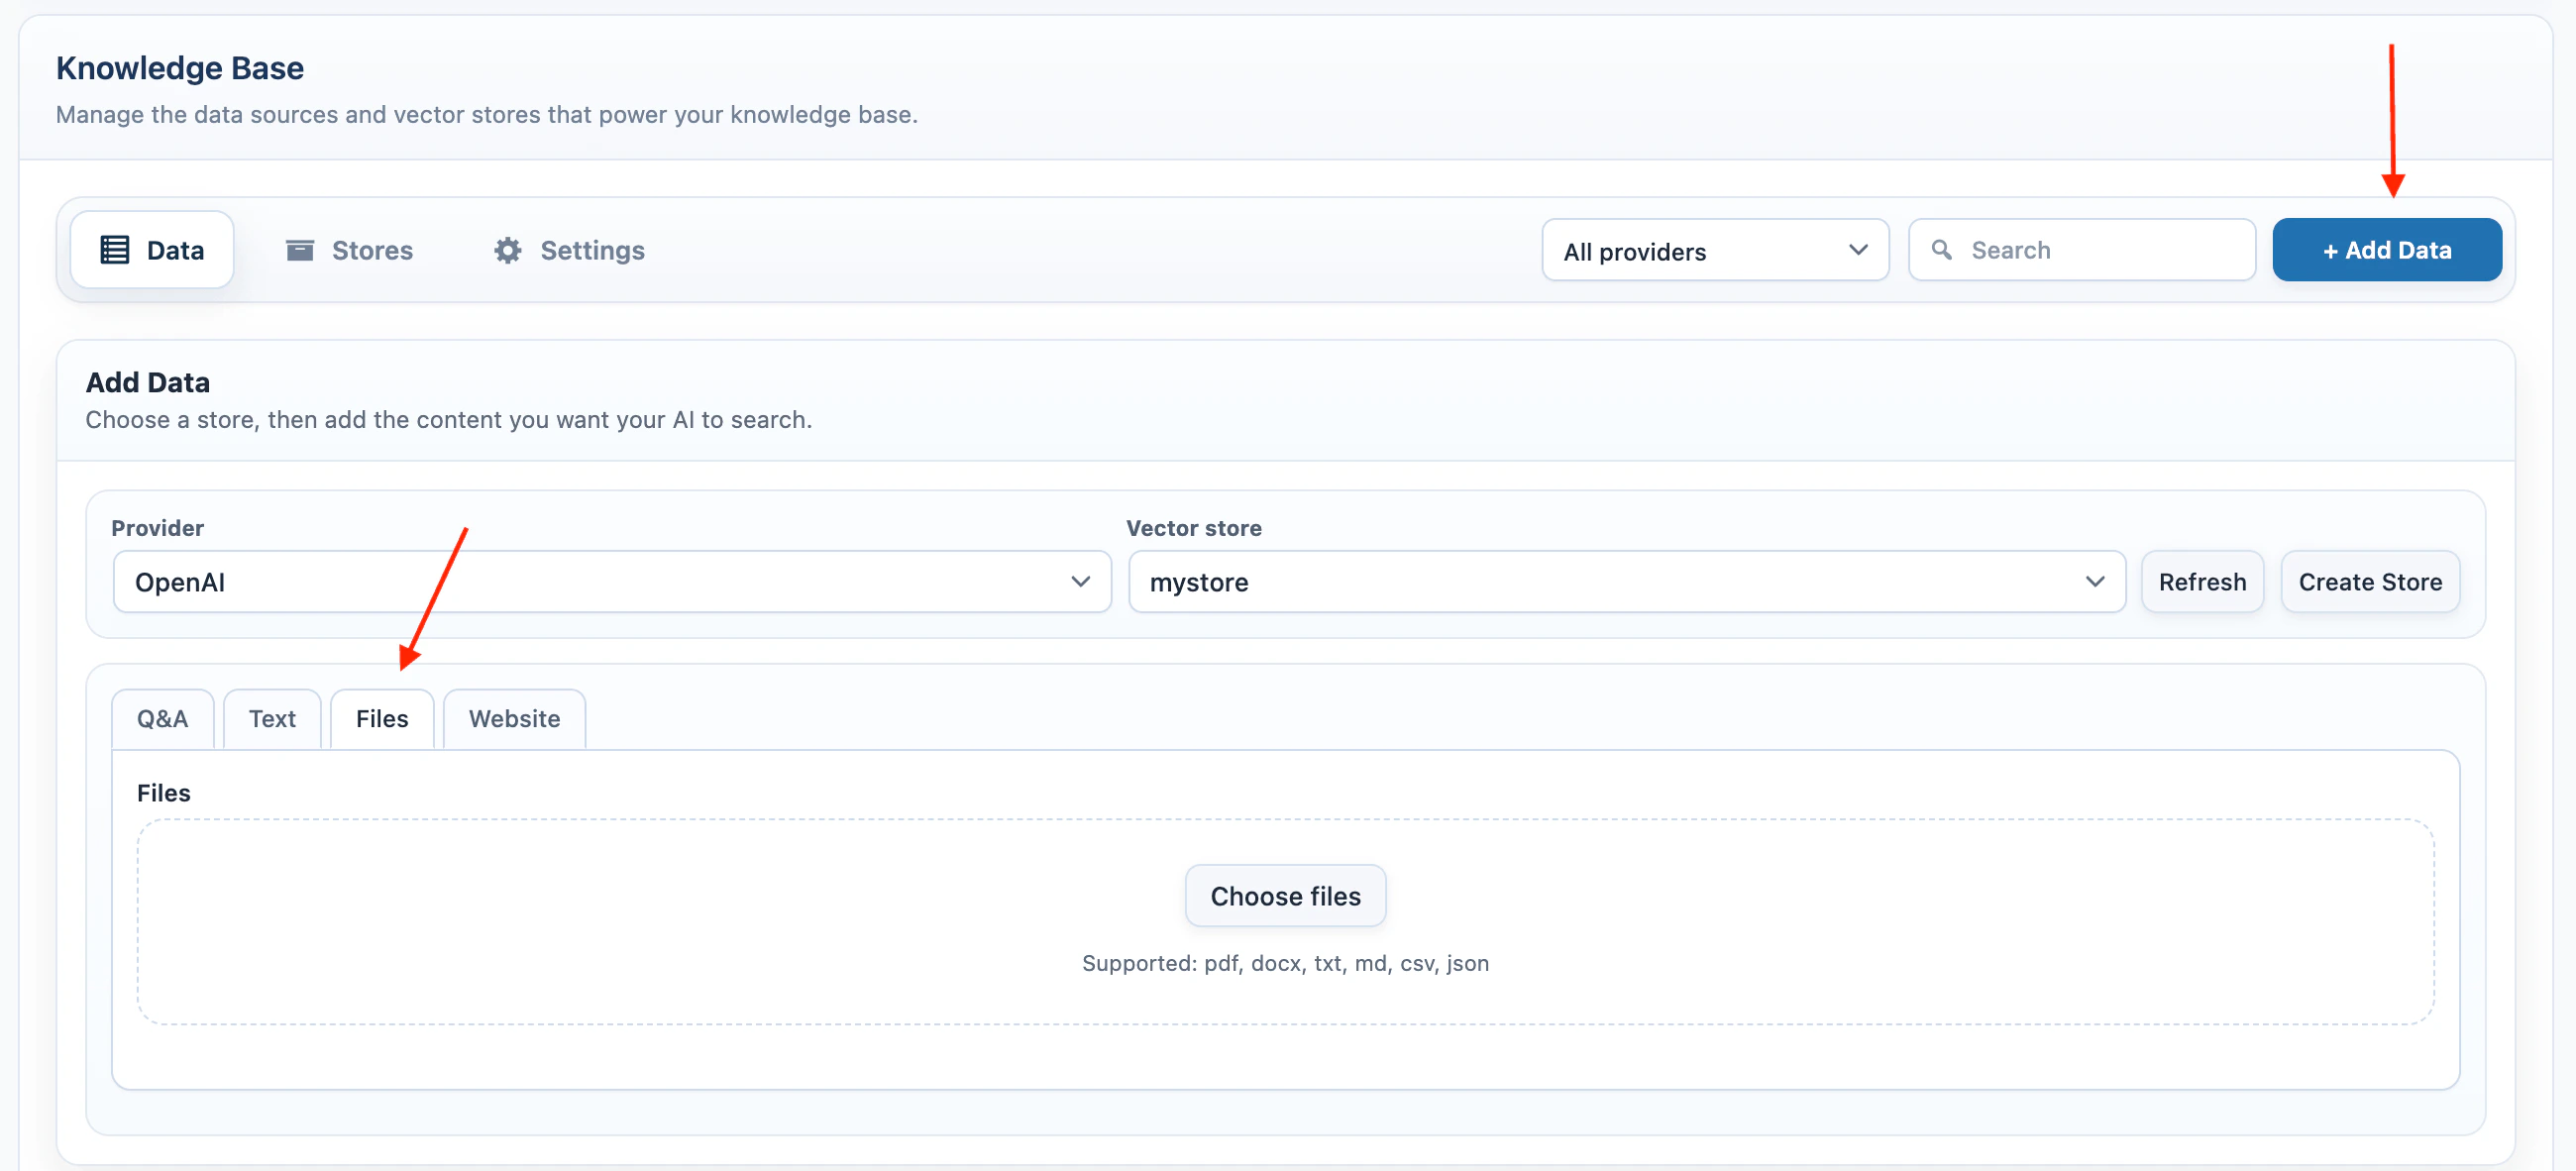
 ### Files
Use Files when the source is already in a document.
1. Select **Files**.
2. Click **Choose files**.
3. Select one or more files.
Files start uploading and training after selection.
Supported file extensions:
```text theme={null}
.pdf, .docx, .txt, .md, .csv, .json
```
For Pinecone, Qdrant, and Chroma, AI Puffer extracts text, splits large files into chunks, creates embeddings, and stores each chunk in the selected index or collection. File chunks can be embedded in batches to reduce the number of embedding API requests.
File size is limited by your WordPress/PHP upload settings. OpenAI Vector Store uploads also use OpenAI's file limits.
### Files
Use Files when the source is already in a document.
1. Select **Files**.
2. Click **Choose files**.
3. Select one or more files.
Files start uploading and training after selection.
Supported file extensions:
```text theme={null}
.pdf, .docx, .txt, .md, .csv, .json
```
For Pinecone, Qdrant, and Chroma, AI Puffer extracts text, splits large files into chunks, creates embeddings, and stores each chunk in the selected index or collection. File chunks can be embedded in batches to reduce the number of embedding API requests.
File size is limited by your WordPress/PHP upload settings. OpenAI Vector Store uploads also use OpenAI's file limits.
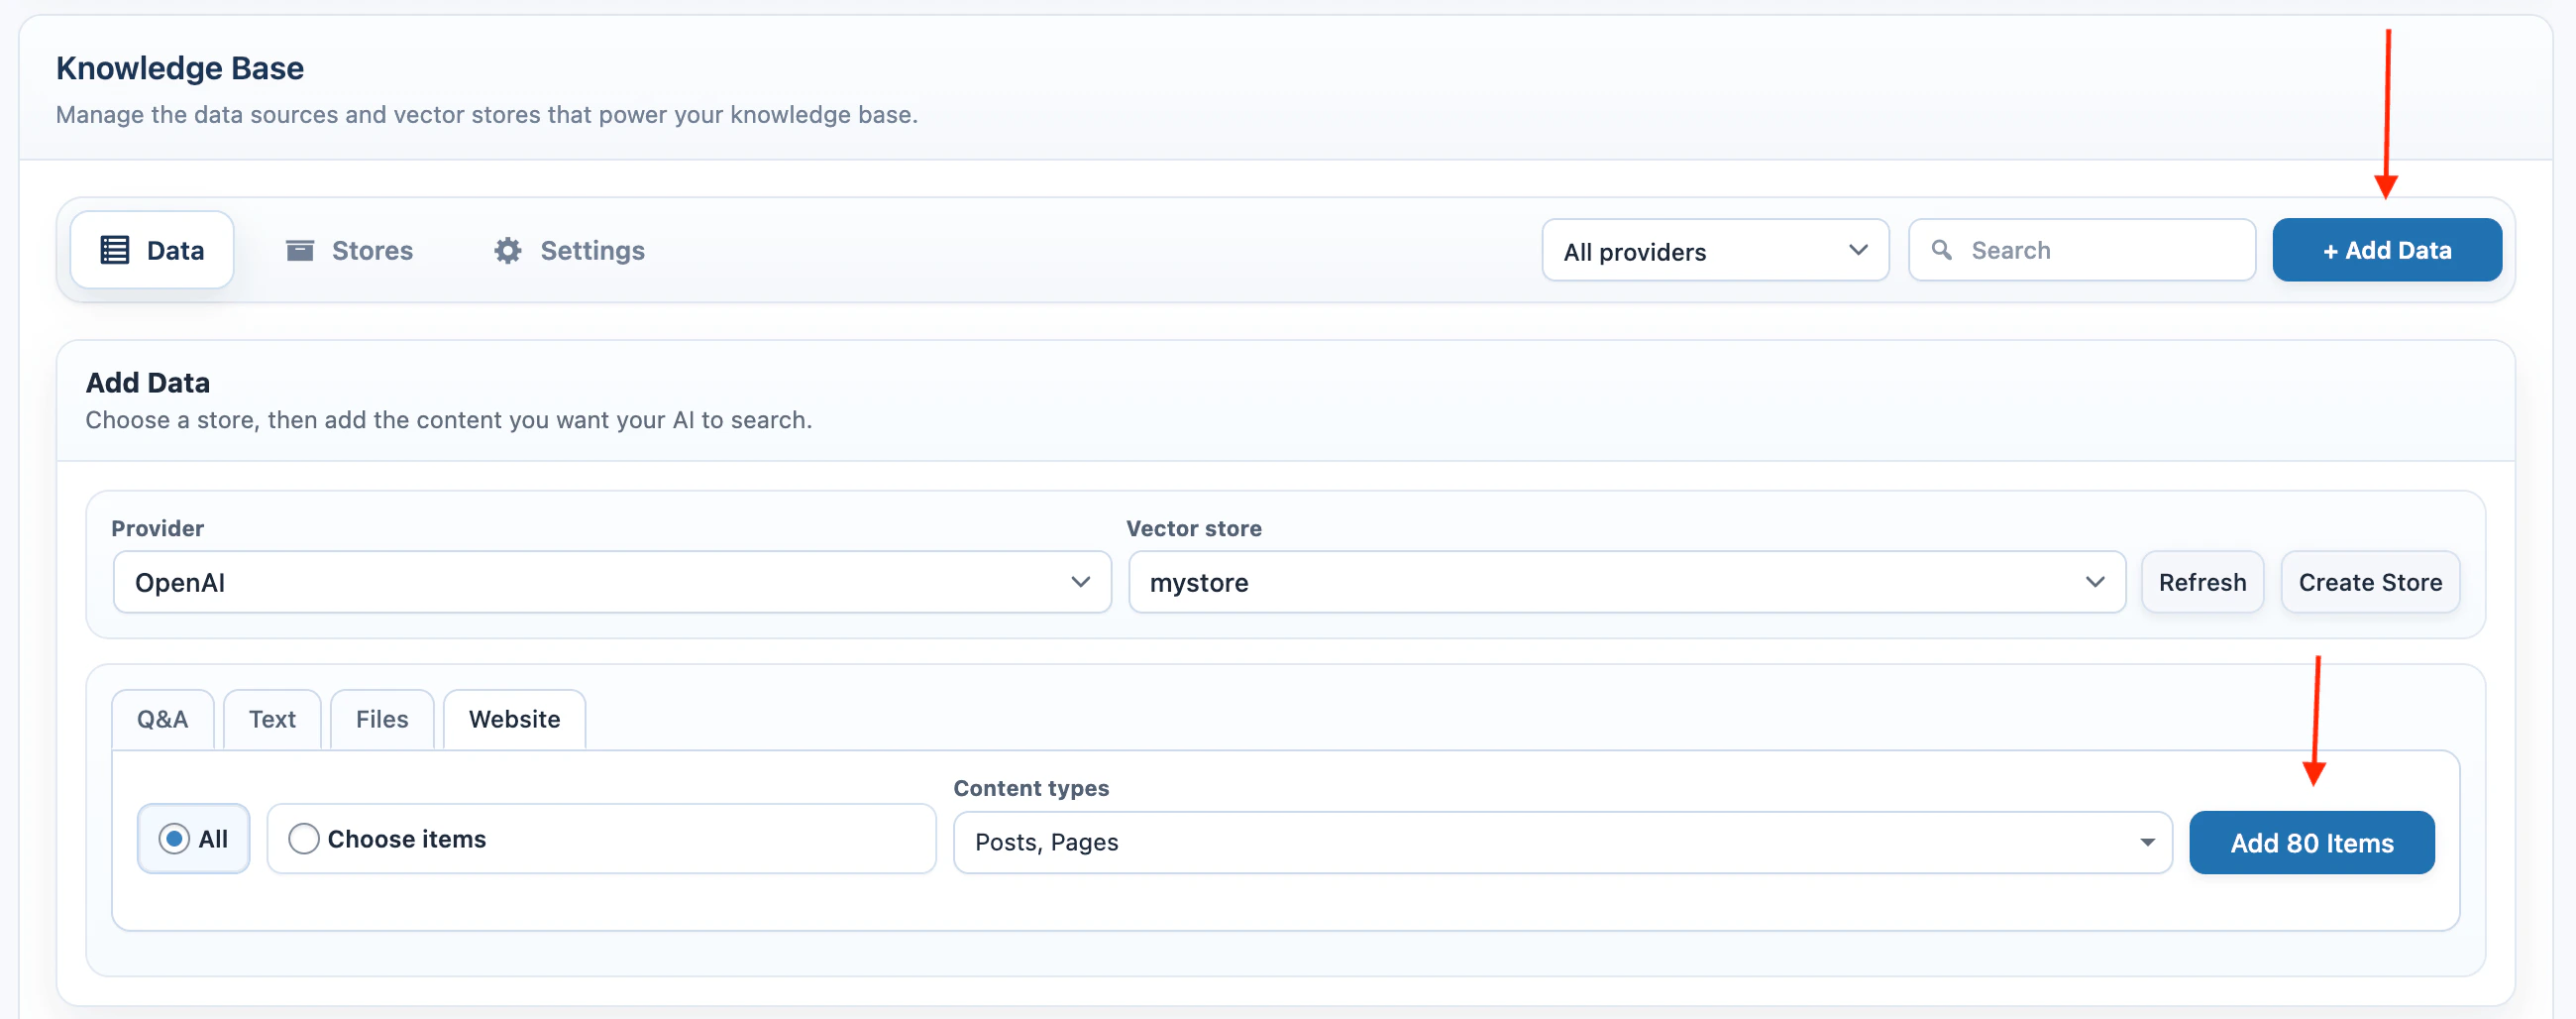
 ### Website
Use Website when the source is WordPress content.
1. Select **Website**.
2. Choose **All** or **Choose items**.
3. Select the content types.
4. If using **Choose items**, select the individual published items.
5. Click **Add Items**.
Website training uses published content. Posts and pages are selected by default. WooCommerce products appear when WooCommerce is active. Public custom post types can also appear.
When WordPress content is indexed, AI Puffer builds the source text from the URL, title, excerpt, content, public custom fields, public taxonomies, and available WooCommerce product data.
### Website
Use Website when the source is WordPress content.
1. Select **Website**.
2. Choose **All** or **Choose items**.
3. Select the content types.
4. If using **Choose items**, select the individual published items.
5. Click **Add Items**.
Website training uses published content. Posts and pages are selected by default. WooCommerce products appear when WooCommerce is active. Public custom post types can also appear.
When WordPress content is indexed, AI Puffer builds the source text from the URL, title, excerpt, content, public custom fields, public taxonomies, and available WooCommerce product data.
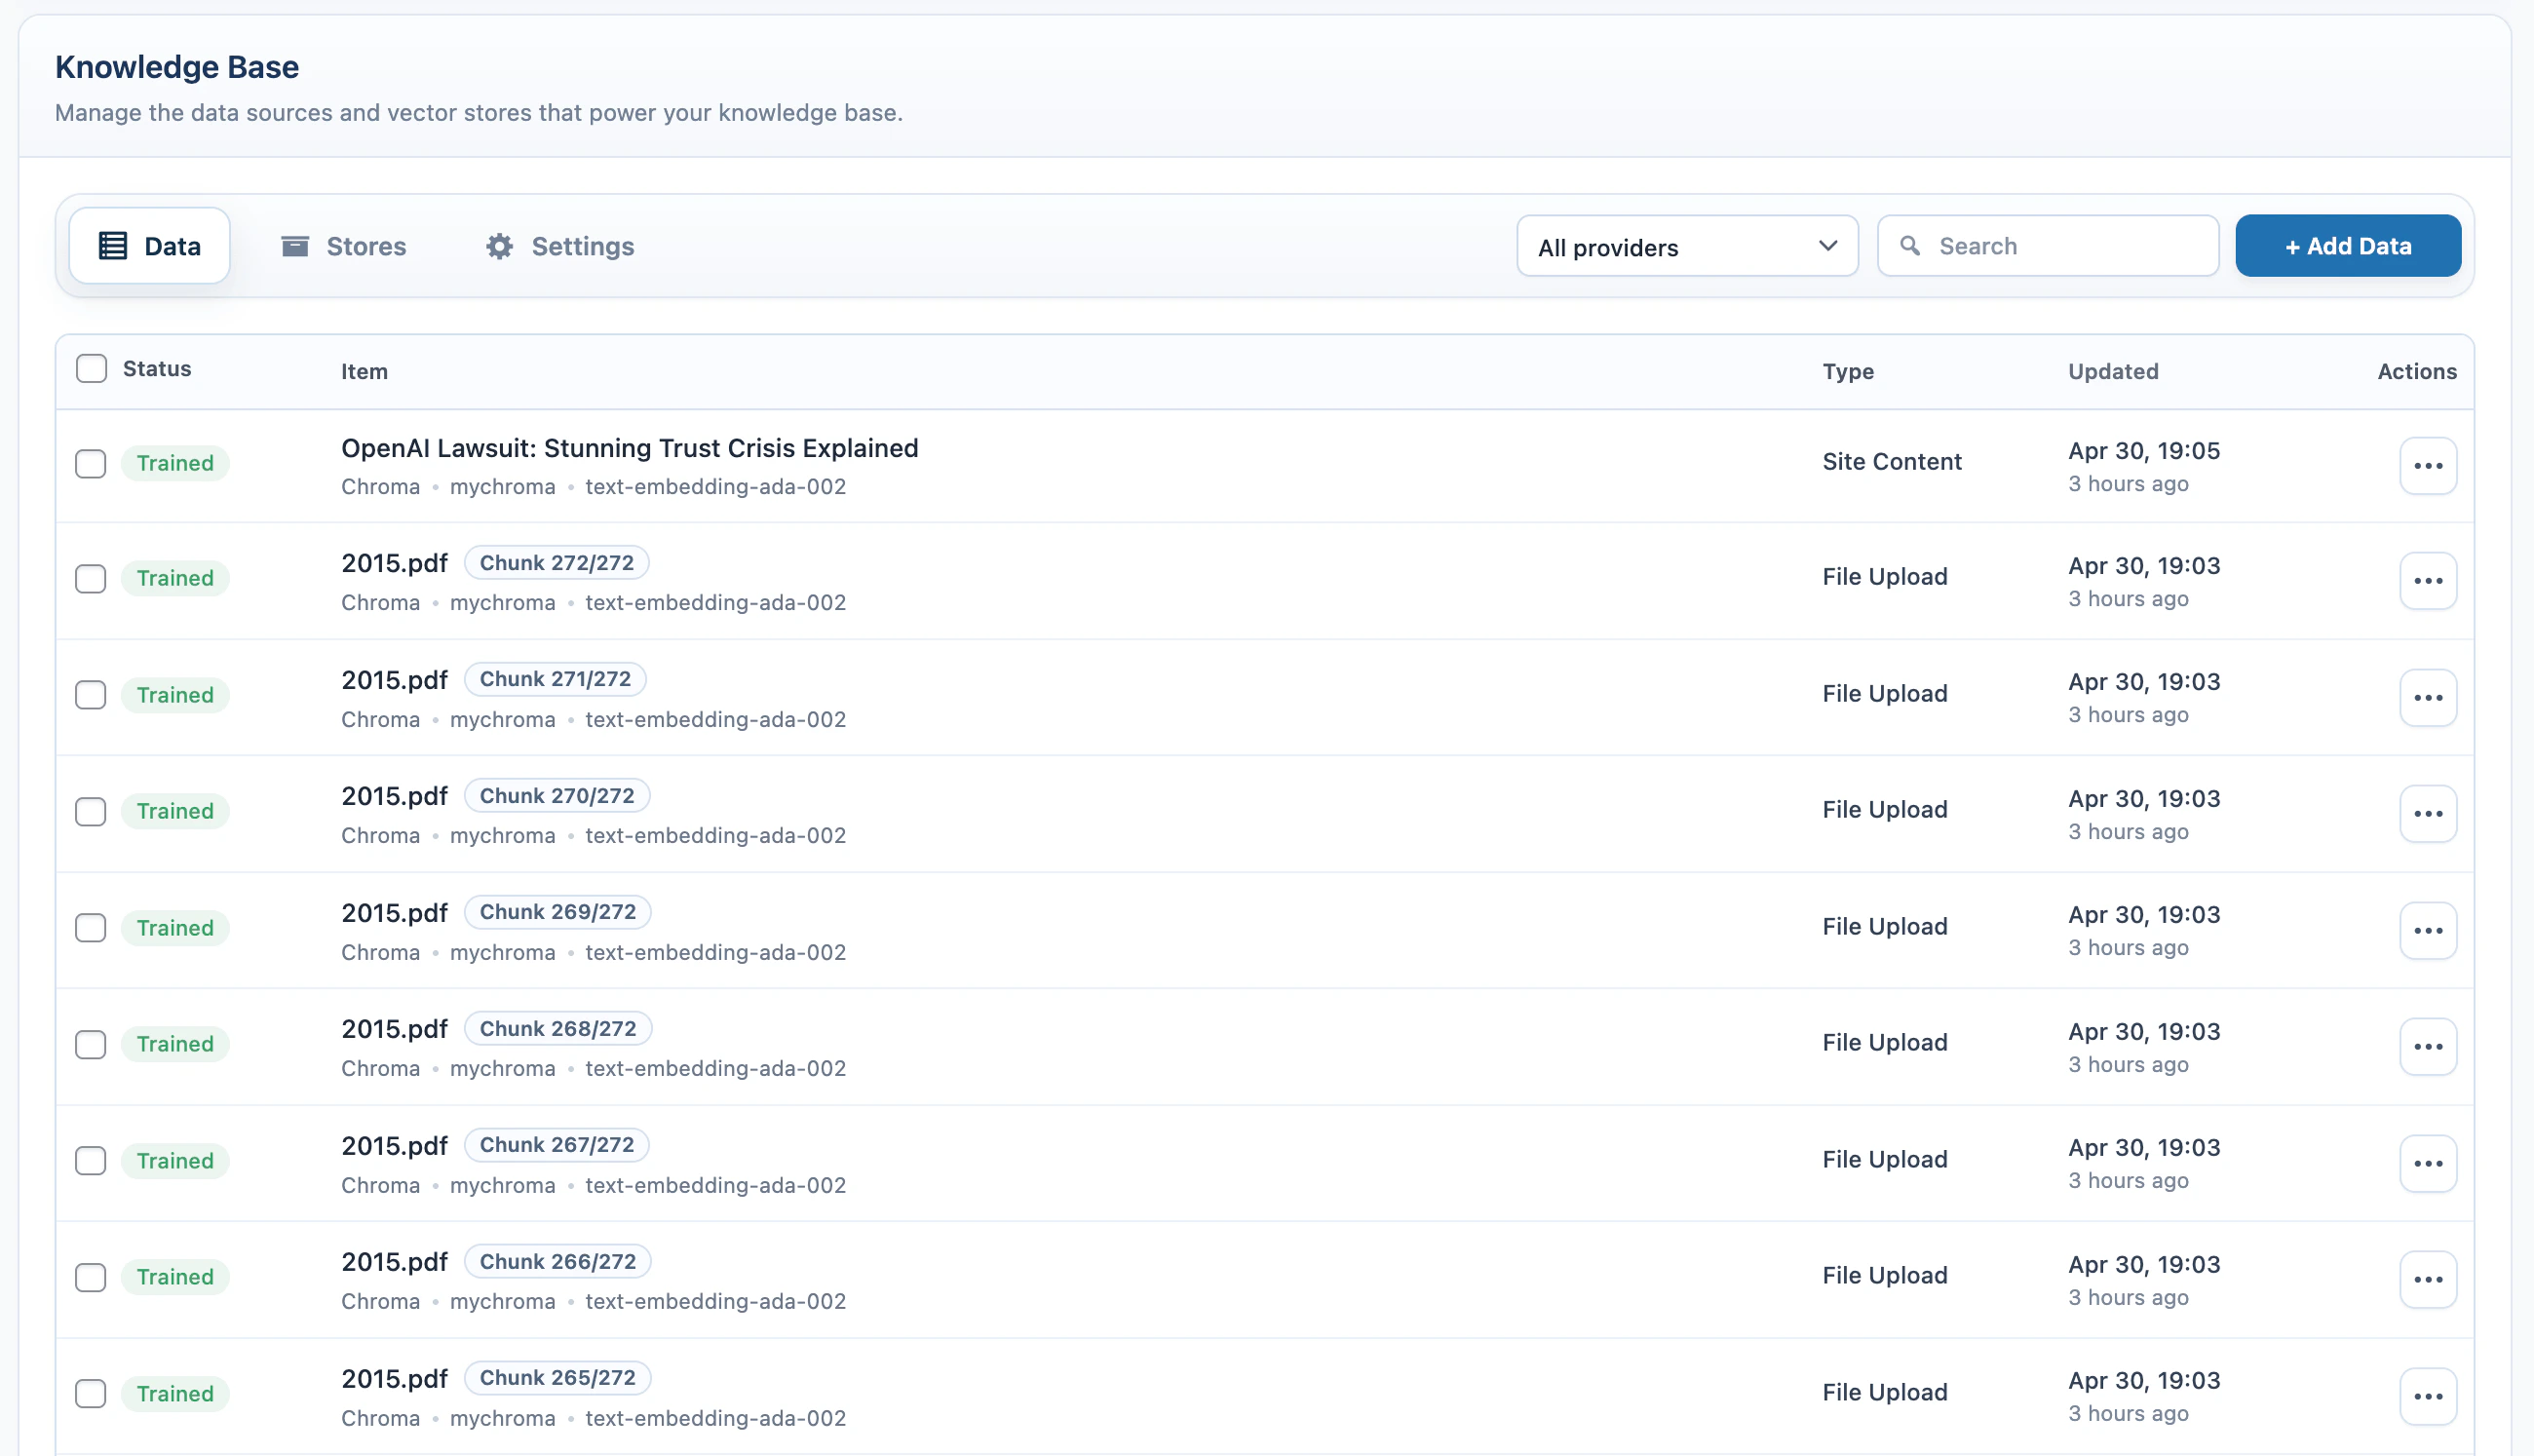
 ### Manage Data
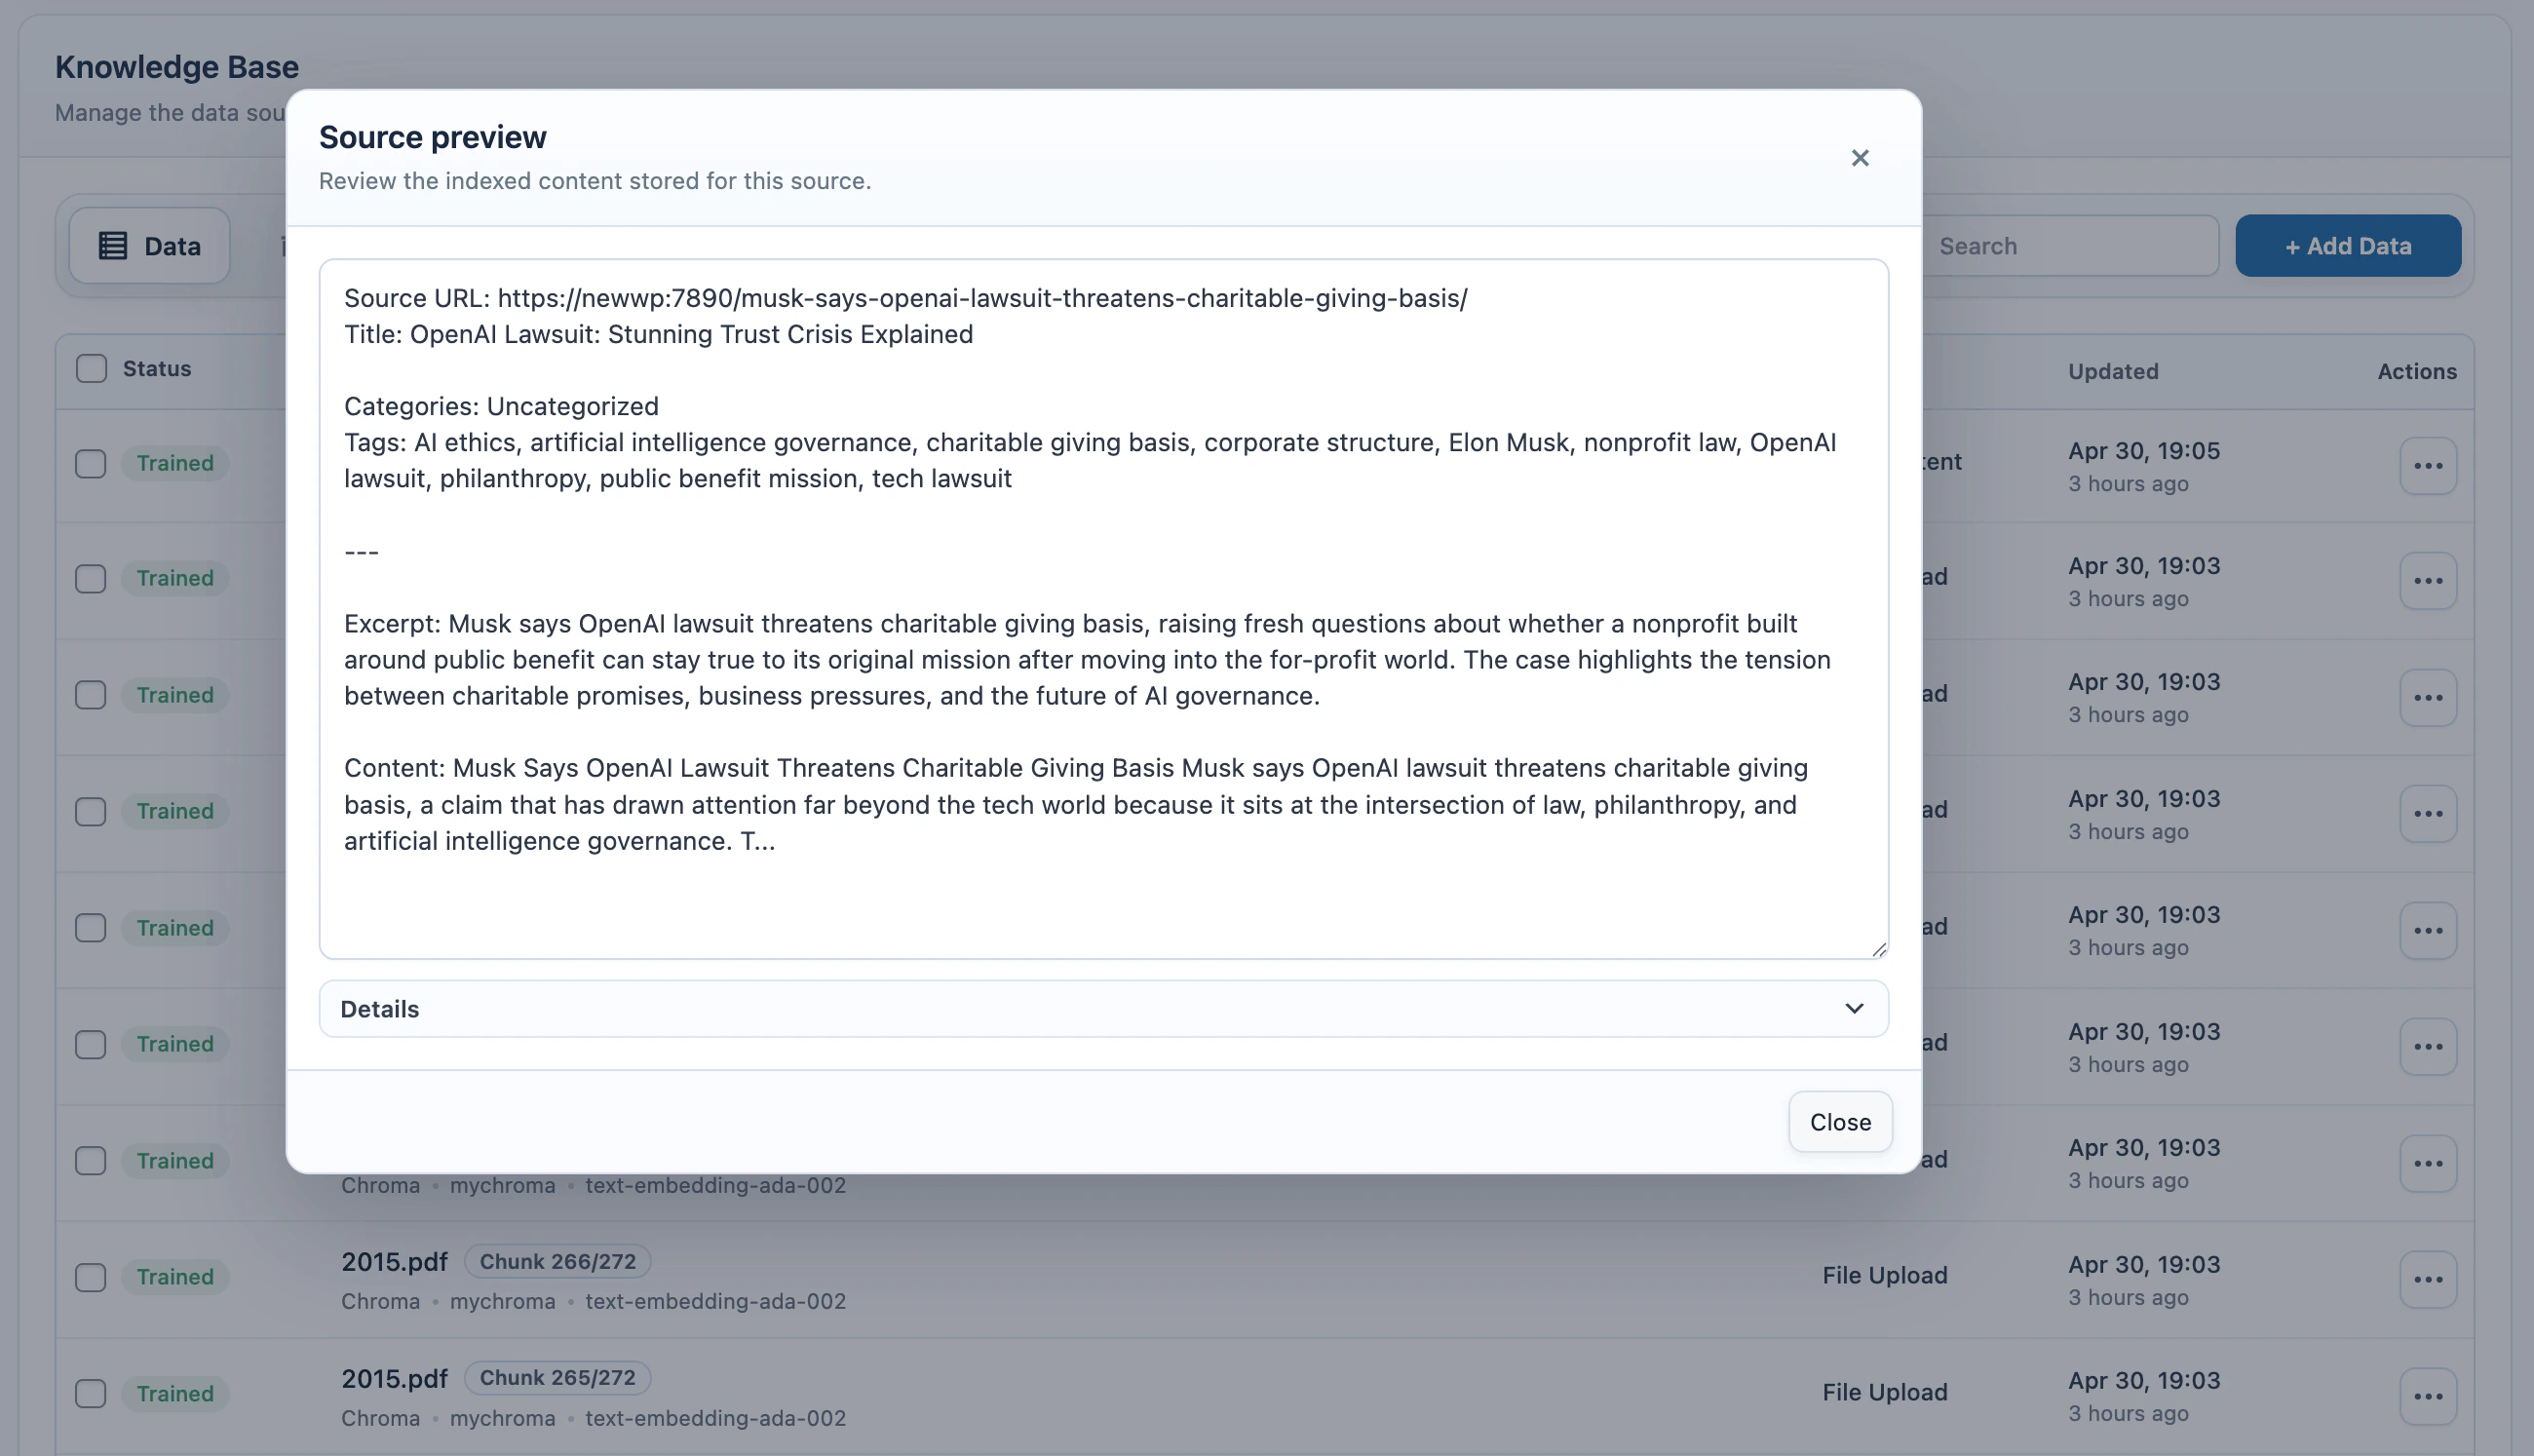
The source table in the Data tab shows the local records created while adding data.
| Column | What it shows |
| ----------- | ------------------------------------------------------------------------------------------------------------------------------ |
| **Status** | Trained, Processing, Failed, or another provider status. |
| **Item** | Post title, text preview, file name, or source identifier. Provider, target, and embedding details appear below the item name. |
| **Type** | Site Content, Text, Q\&A, File Upload, or User Upload. |
| **Updated** | Last update time and relative age. |
| **Actions** | Available actions for the source. |
### Manage Data
The source table in the Data tab shows the local records created while adding data.
| Column | What it shows |
| ----------- | ------------------------------------------------------------------------------------------------------------------------------ |
| **Status** | Trained, Processing, Failed, or another provider status. |
| **Item** | Post title, text preview, file name, or source identifier. Provider, target, and embedding details appear below the item name. |
| **Type** | Site Content, Text, Q\&A, File Upload, or User Upload. |
| **Updated** | Last update time and relative age. |
| **Actions** | Available actions for the source. |
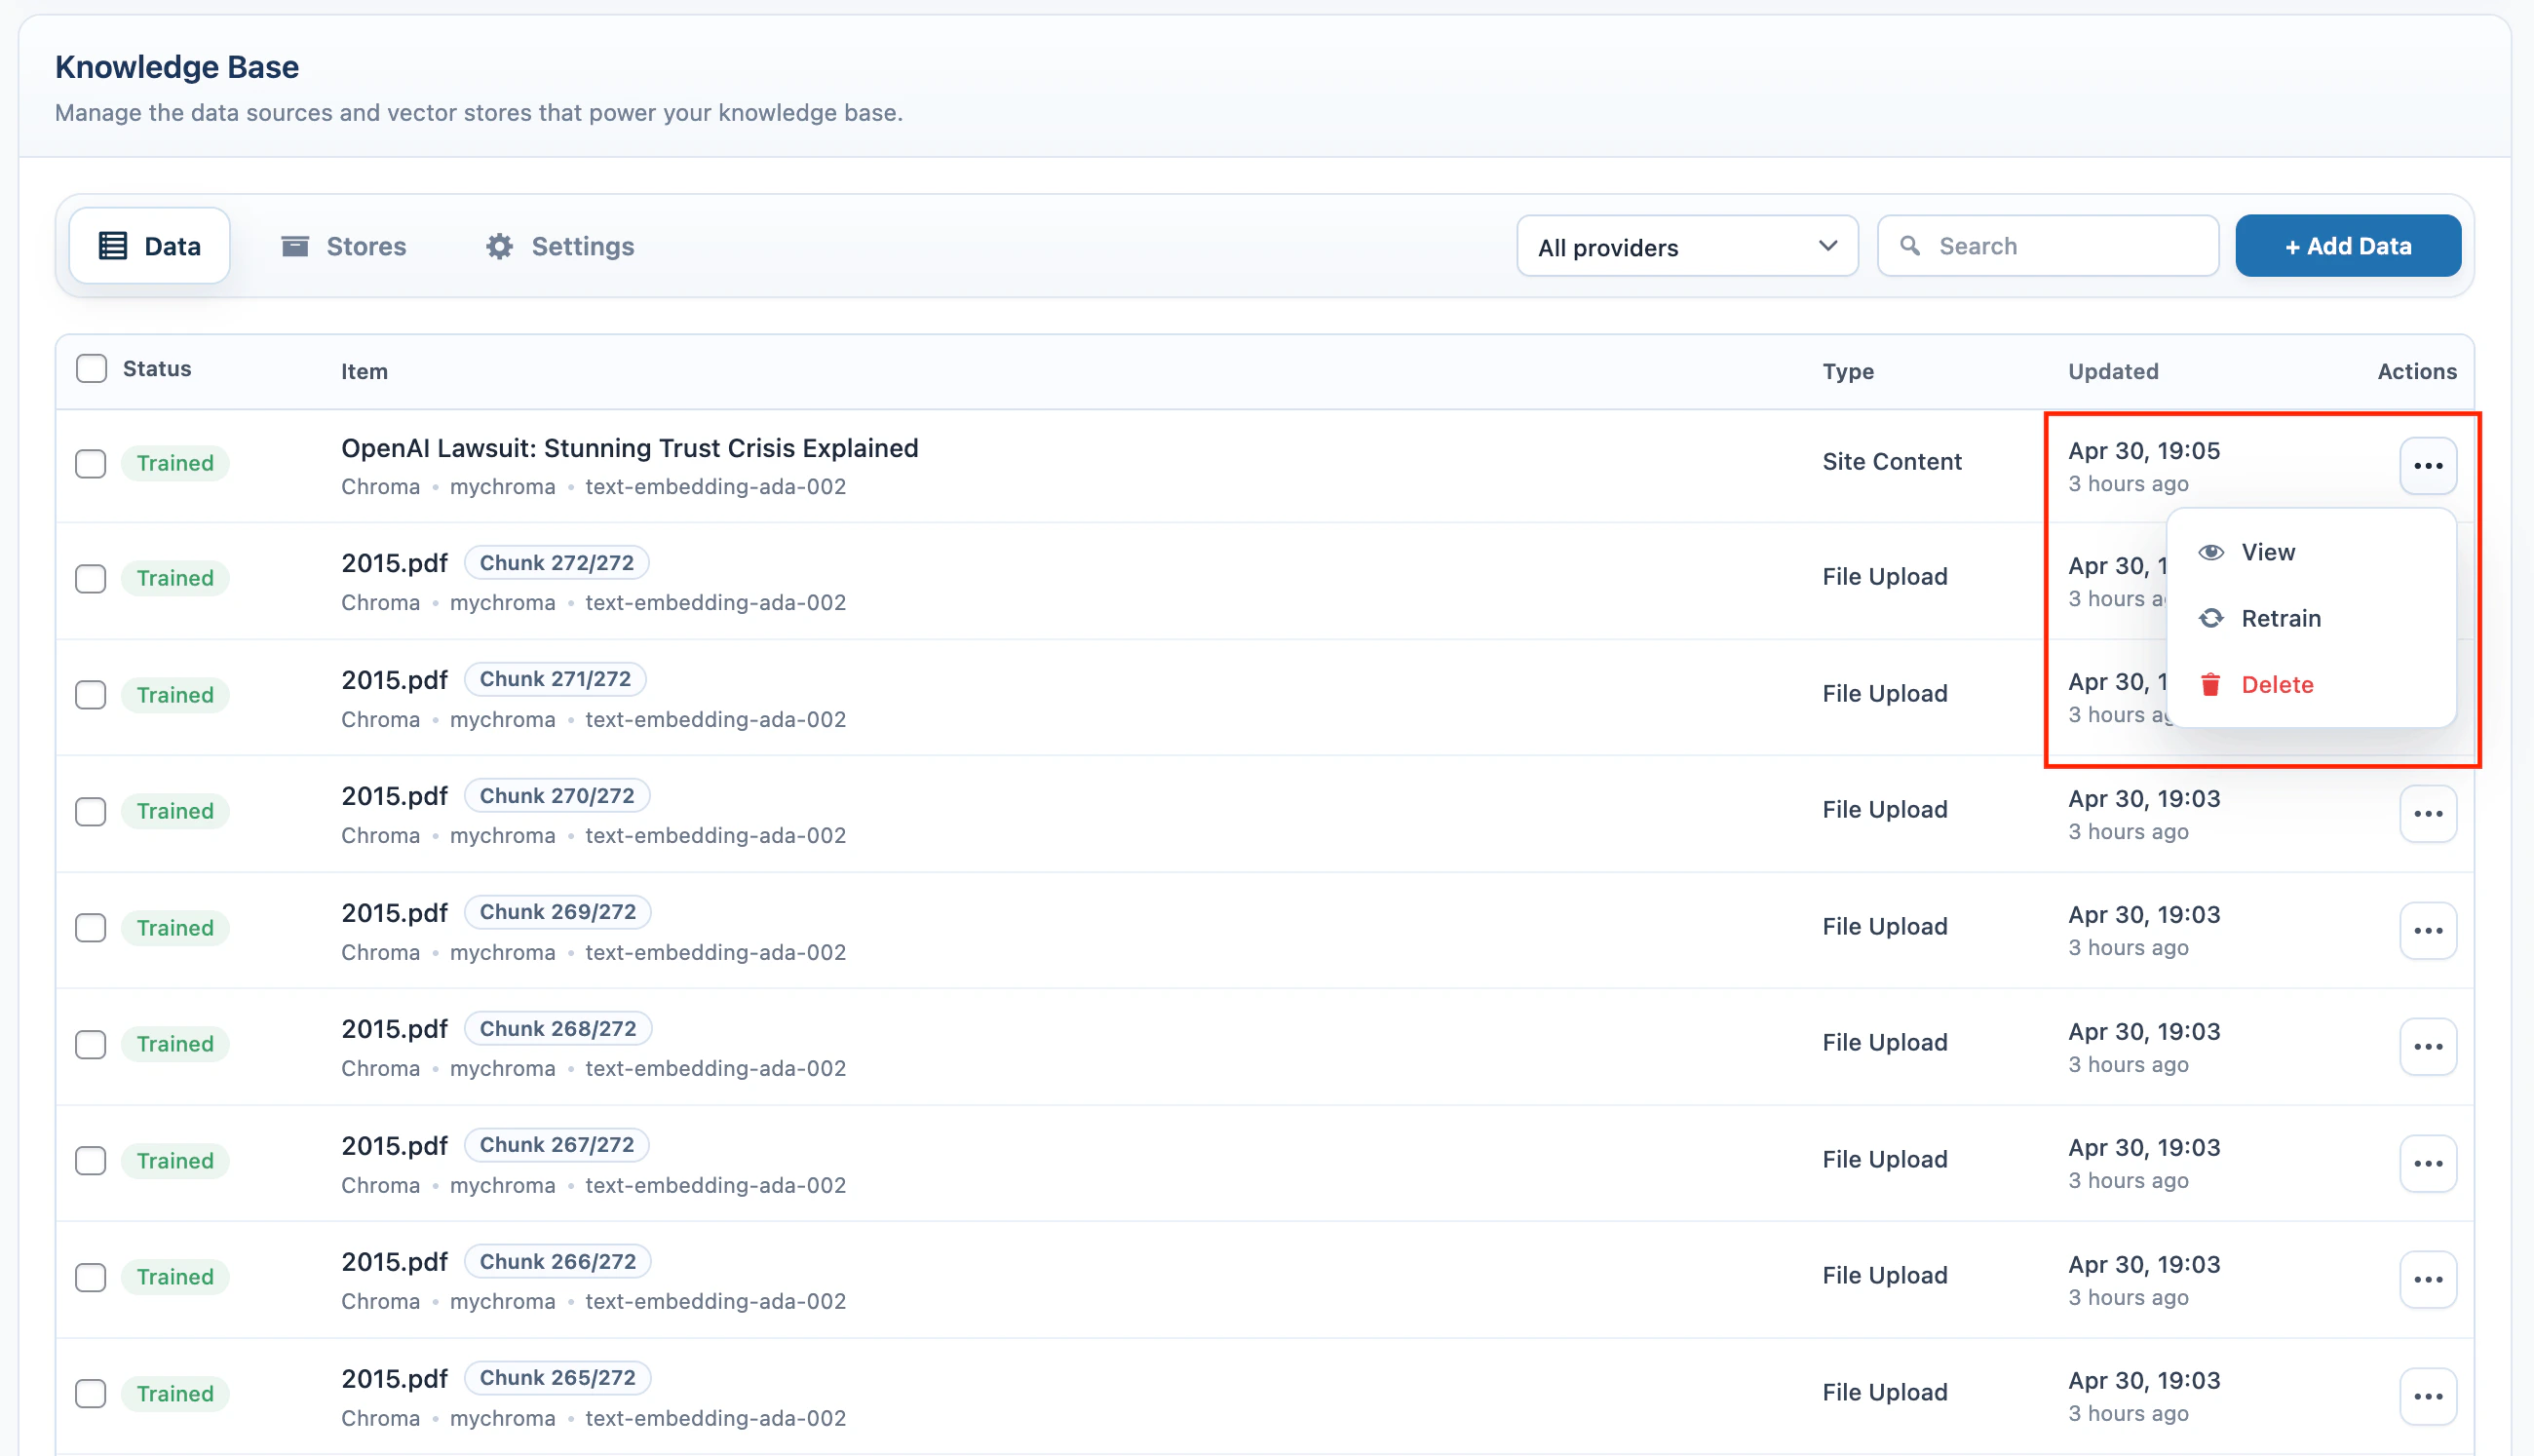
 Available actions:
| Action | Use it for |
| ----------- | ----------------------------------------------------------------------------- |
| **View** | Review the stored source preview. |
| **Edit** | Edit a text source and save it again. |
| **Retrain** | Re-index a WordPress content source after the content changes. |
| **Delete** | Remove the source from the external provider and from the local source table. |
Available actions:
| Action | Use it for |
| ----------- | ----------------------------------------------------------------------------- |
| **View** | Review the stored source preview. |
| **Edit** | Edit a text source and save it again. |
| **Retrain** | Re-index a WordPress content source after the content changes. |
| **Delete** | Remove the source from the external provider and from the local source table. |
 ## Settings
Open **AI Puffer > Knowledge Base > Settings** to configure Knowledge Base behavior.
The Settings screen is split into tabs.
| Tab | What it contains |
| ----------------- | ------------------------------------------------------ |
| **Chunking** | Document chunking controls. |
| **Batches** | Embedding batch controls. |
| **Content Rules** | Rules for which WordPress content fields are embedded. |
| **Others** | Semantic Search and user upload visibility. |
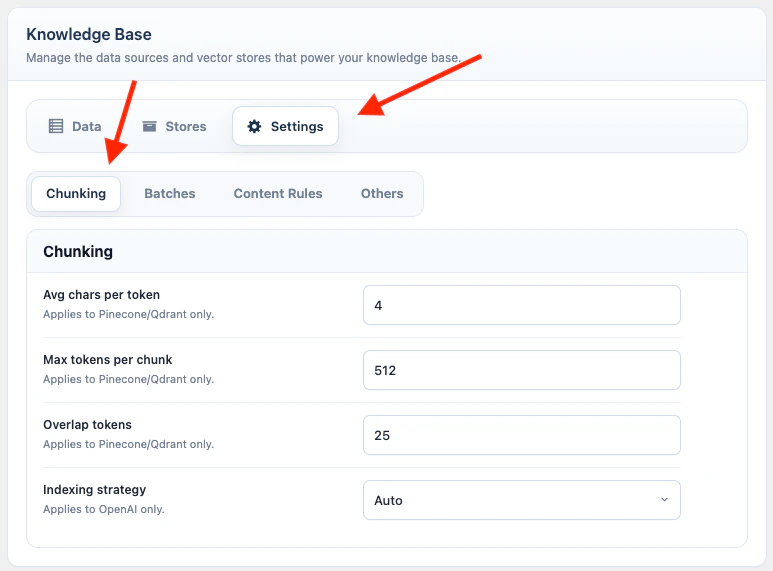
### Chunking
Document chunking controls how AI Puffer splits large uploaded files and WordPress Website content before embedding them for Pinecone, Qdrant, or Chroma.
| Setting | Default | Range | Use it for |
| ------------------------ | ------- | --------------- | ----------------------------------------------------------------------------- |
| **Avg chars per token** | `4` | `2` to `4` | Estimates how many characters equal one token. |
| **Max tokens per chunk** | `3000` | `256` to `6000` | Sets the maximum chunk size before embedding. |
| **Overlap tokens** | `150` | `0` to `1000` | Repeats a small part of the previous chunk so context does not break sharply. |
Use smaller chunks when an embedding provider rejects long input. Keep some overlap for long documents where meaning continues across sections. Some embedding models have lower hard limits than the visible maximum, so AI Puffer may apply a safer model-specific cap during indexing.
OpenAI Vector Store file uploads use OpenAI File Search chunking instead of the Pinecone, Qdrant, and Chroma chunking settings above.
| OpenAI File Search setting | Default | Range | Use it for |
| -------------------------- | ------- | ----------------------------- | ----------------------------------------------------------------------------------------- |
| **Indexing strategy** | `Auto` | `Auto` or `Custom` | Lets OpenAI choose chunking automatically, or lets AI Puffer send custom chunking values. |
| **Max chunk size tokens** | `800` | `100` to `4096` | Sets the maximum OpenAI File Search chunk size when **Custom** is selected. |
| **Chunk overlap tokens** | `400` | `0` to half of max chunk size | Repeats part of the previous OpenAI File Search chunk when **Custom** is selected. |
## Settings
Open **AI Puffer > Knowledge Base > Settings** to configure Knowledge Base behavior.
The Settings screen is split into tabs.
| Tab | What it contains |
| ----------------- | ------------------------------------------------------ |
| **Chunking** | Document chunking controls. |
| **Batches** | Embedding batch controls. |
| **Content Rules** | Rules for which WordPress content fields are embedded. |
| **Others** | Semantic Search and user upload visibility. |
### Chunking
Document chunking controls how AI Puffer splits large uploaded files and WordPress Website content before embedding them for Pinecone, Qdrant, or Chroma.
| Setting | Default | Range | Use it for |
| ------------------------ | ------- | --------------- | ----------------------------------------------------------------------------- |
| **Avg chars per token** | `4` | `2` to `4` | Estimates how many characters equal one token. |
| **Max tokens per chunk** | `3000` | `256` to `6000` | Sets the maximum chunk size before embedding. |
| **Overlap tokens** | `150` | `0` to `1000` | Repeats a small part of the previous chunk so context does not break sharply. |
Use smaller chunks when an embedding provider rejects long input. Keep some overlap for long documents where meaning continues across sections. Some embedding models have lower hard limits than the visible maximum, so AI Puffer may apply a safer model-specific cap during indexing.
OpenAI Vector Store file uploads use OpenAI File Search chunking instead of the Pinecone, Qdrant, and Chroma chunking settings above.
| OpenAI File Search setting | Default | Range | Use it for |
| -------------------------- | ------- | ----------------------------- | ----------------------------------------------------------------------------------------- |
| **Indexing strategy** | `Auto` | `Auto` or `Custom` | Lets OpenAI choose chunking automatically, or lets AI Puffer send custom chunking values. |
| **Max chunk size tokens** | `800` | `100` to `4096` | Sets the maximum OpenAI File Search chunk size when **Custom** is selected. |
| **Chunk overlap tokens** | `400` | `0` to half of max chunk size | Repeats part of the previous OpenAI File Search chunk when **Custom** is selected. |
 ### Batches
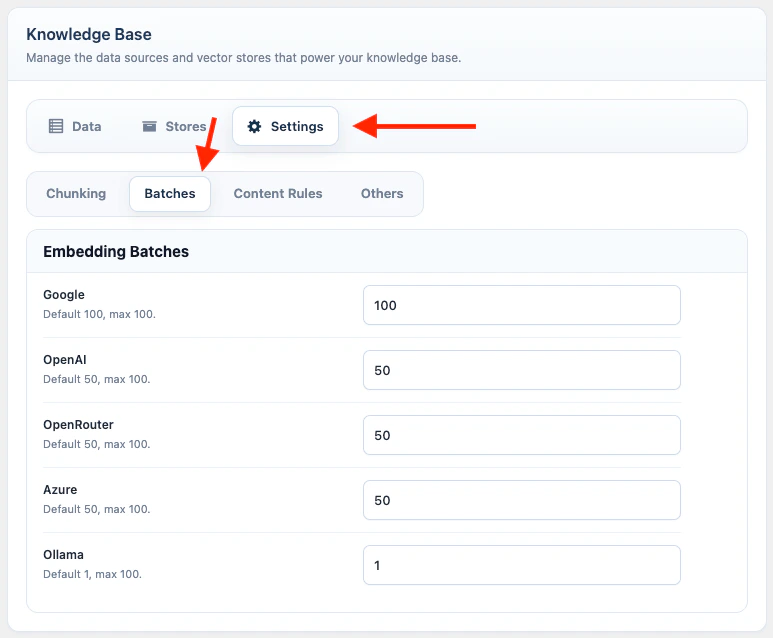
The **Batches** tab contains **Embedding Batches**, which controls how many file chunks AI Puffer sends to the embedding provider in one request.
1. Go to **AI Puffer > Knowledge Base > Settings**.
2. Open **Batches**.
3. Adjust the batch size for the embedding provider you use.
4. Wait for the settings autosave to finish.
If the Batches tab shows **Upgrade**, activate Pro before saving batch settings.
| Provider | Default | Maximum |
| -------------- | ------- | ------- |
| **Google** | `100` | `100` |
| **OpenAI** | `50` | `100` |
| **OpenRouter** | `50` | `100` |
| **Azure** | `50` | `100` |
| **Ollama** | `10` | `100` |
### Batches
The **Batches** tab contains **Embedding Batches**, which controls how many file chunks AI Puffer sends to the embedding provider in one request.
1. Go to **AI Puffer > Knowledge Base > Settings**.
2. Open **Batches**.
3. Adjust the batch size for the embedding provider you use.
4. Wait for the settings autosave to finish.
If the Batches tab shows **Upgrade**, activate Pro before saving batch settings.
| Provider | Default | Maximum |
| -------------- | ------- | ------- |
| **Google** | `100` | `100` |
| **OpenAI** | `50` | `100` |
| **OpenRouter** | `50` | `100` |
| **Azure** | `50` | `100` |
| **Ollama** | `10` | `100` |
 For example, a batch size of `50` means AI Puffer sends up to 50 prepared file chunks to the embedding API at once. Larger batches can make file upload training much faster because they reduce repeated API calls.
Embedding batch settings apply only to chunked file uploads for Pinecone, Qdrant, and Chroma. Website training uses document chunking, but these batch-size settings do not change Q\&A, Text, Website training, semantic search queries, or OpenAI Vector Store file uploads.
If a provider returns rate limit errors such as HTTP `429`, lower that provider's batch size and try again. AI Puffer can pause and retry file upload processing when the provider sends a retry delay, but lowering the batch size is usually better for accounts with stricter quotas.
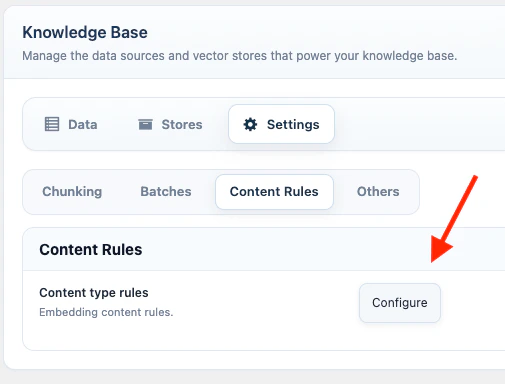
### Content Rules
Content Rules define which WordPress fields are included when Website training or list-screen indexing sends WordPress content to a vector target.
1. Go to **AI Puffer > Knowledge Base > Settings**.
2. Open **Content Rules**.
3. Click **Configure**.
4. Select a post type.
5. Adjust **Basic Labels** if you want different labels for source URL, title, excerpt, or content.
6. Enable or disable custom fields.
7. Enable or disable taxonomies.
8. For WooCommerce products, enable or disable product data such as SKU, price, stock, dimensions, and attributes.
9. Save.
If the Save button shows **Upgrade**, activate Pro before saving indexing rules.
For example, a batch size of `50` means AI Puffer sends up to 50 prepared file chunks to the embedding API at once. Larger batches can make file upload training much faster because they reduce repeated API calls.
Embedding batch settings apply only to chunked file uploads for Pinecone, Qdrant, and Chroma. Website training uses document chunking, but these batch-size settings do not change Q\&A, Text, Website training, semantic search queries, or OpenAI Vector Store file uploads.
If a provider returns rate limit errors such as HTTP `429`, lower that provider's batch size and try again. AI Puffer can pause and retry file upload processing when the provider sends a retry delay, but lowering the batch size is usually better for accounts with stricter quotas.
### Content Rules
Content Rules define which WordPress fields are included when Website training or list-screen indexing sends WordPress content to a vector target.
1. Go to **AI Puffer > Knowledge Base > Settings**.
2. Open **Content Rules**.
3. Click **Configure**.
4. Select a post type.
5. Adjust **Basic Labels** if you want different labels for source URL, title, excerpt, or content.
6. Enable or disable custom fields.
7. Enable or disable taxonomies.
8. For WooCommerce products, enable or disable product data such as SKU, price, stock, dimensions, and attributes.
9. Save.
If the Save button shows **Upgrade**, activate Pro before saving indexing rules.
 ### Others
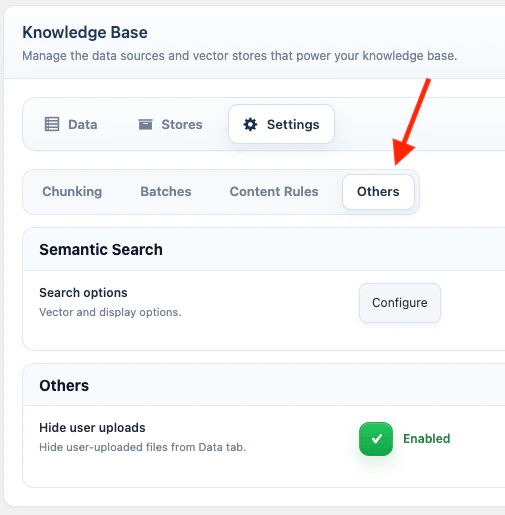
Open **AI Puffer > Knowledge Base > Settings**, then open **Others**.
The Others tab contains Semantic Search and admin visibility settings.
#### Semantic Search
Semantic Search publishes a search form that queries a Pinecone index, Qdrant collection, or Chroma collection from the frontend.
In **Others**, click **Configure** in the **Semantic Search** row.
1. Select **Vector DB**: Pinecone, Qdrant, or Chroma.
2. Select the index or collection.
3. Select the embedding model.
4. Set **Number of Results**.
5. Set **No Results Text**.
6. Test a query in **Try semantic search**.
7. Copy the shortcode.
```text theme={null}
[aipkit_semantic_search]
```
Semantic Search uses the global settings from this panel. It does not use OpenAI Vector Stores in the current UI.
Use the same embedding model that was used when the Pinecone, Qdrant, or Chroma data was added.
### Others
Open **AI Puffer > Knowledge Base > Settings**, then open **Others**.
The Others tab contains Semantic Search and admin visibility settings.
#### Semantic Search
Semantic Search publishes a search form that queries a Pinecone index, Qdrant collection, or Chroma collection from the frontend.
In **Others**, click **Configure** in the **Semantic Search** row.
1. Select **Vector DB**: Pinecone, Qdrant, or Chroma.
2. Select the index or collection.
3. Select the embedding model.
4. Set **Number of Results**.
5. Set **No Results Text**.
6. Test a query in **Try semantic search**.
7. Copy the shortcode.
```text theme={null}
[aipkit_semantic_search]
```
Semantic Search uses the global settings from this panel. It does not use OpenAI Vector Stores in the current UI.
Use the same embedding model that was used when the Pinecone, Qdrant, or Chroma data was added.
 #### Admin Visibility
| Setting | What it does |
| --------------------- | ----------------------------------------------------------------------- |
| **Hide user uploads** | Hides chatbot upload records from the main Knowledge Base source table. |
The post-list **Index** button is managed from **AI Puffer > Settings > Utilities**. See [WordPress Utilities](/wordpress-utilities#content-indexing).
| Control | What it does |
| ------------------------------ | ---------------------------------------------- |
| **Index Status** column | Shows whether a post has already been indexed. |
| **Index Status** filter | Filters content by indexed or not indexed. |
| **Add to Vector Store** action | Sends selected posts to a vector target. |
## Troubleshooting
Configure the provider credentials, then sync or create the vector target again.
Confirm the embedding model dimension matches the index or collection dimension.
Check **Knowledge Base > Settings > Content Rules** for that post type.
Enable **AI Puffer > Settings > Utilities > Index button** and confirm the user role can access the vector content indexer module.
Confirm the selected target contains trained data and the same embedding model is selected.
#### Admin Visibility
| Setting | What it does |
| --------------------- | ----------------------------------------------------------------------- |
| **Hide user uploads** | Hides chatbot upload records from the main Knowledge Base source table. |
The post-list **Index** button is managed from **AI Puffer > Settings > Utilities**. See [WordPress Utilities](/wordpress-utilities#content-indexing).
| Control | What it does |
| ------------------------------ | ---------------------------------------------- |
| **Index Status** column | Shows whether a post has already been indexed. |
| **Index Status** filter | Filters content by indexed or not indexed. |
| **Add to Vector Store** action | Sends selected posts to a vector target. |
## Troubleshooting
Configure the provider credentials, then sync or create the vector target again.
Confirm the embedding model dimension matches the index or collection dimension.
Check **Knowledge Base > Settings > Content Rules** for that post type.
Enable **AI Puffer > Settings > Utilities > Index button** and confirm the user role can access the vector content indexer module.
Confirm the selected target contains trained data and the same embedding model is selected.