WooCommerce
The WooCommerce Product Writer assists users in creating optimized and engaging product listings on their WooCommerce website, including product titles, descriptions, short descriptions, meta descriptions, and tags.
Pre-requisites
Before you can use the WooCommerce Product Writer feature, you must have the WooCommerce plugin installed and enabled on your WordPress website.
Product Writer
To use the WooCommerce Product Writer, follow these steps:
- Log in to your WordPress admin dashboard.
- Navigate to WooCommerce on the left-hand side menu.
- Click Products, and from the drop-down menu, select Add New Product.
- Scroll down to the AI Power Product Writer section. Here, you'll find checkboxes for features including Title, Description, Short Description, Meta Description, and Tags.
- Select the checkboxes for the features you wish to use. For instance, if you want AI Power to generate a product title and description, check the Title and Description boxes.
- Click on the Generate button to produce optimized content for your product listing.
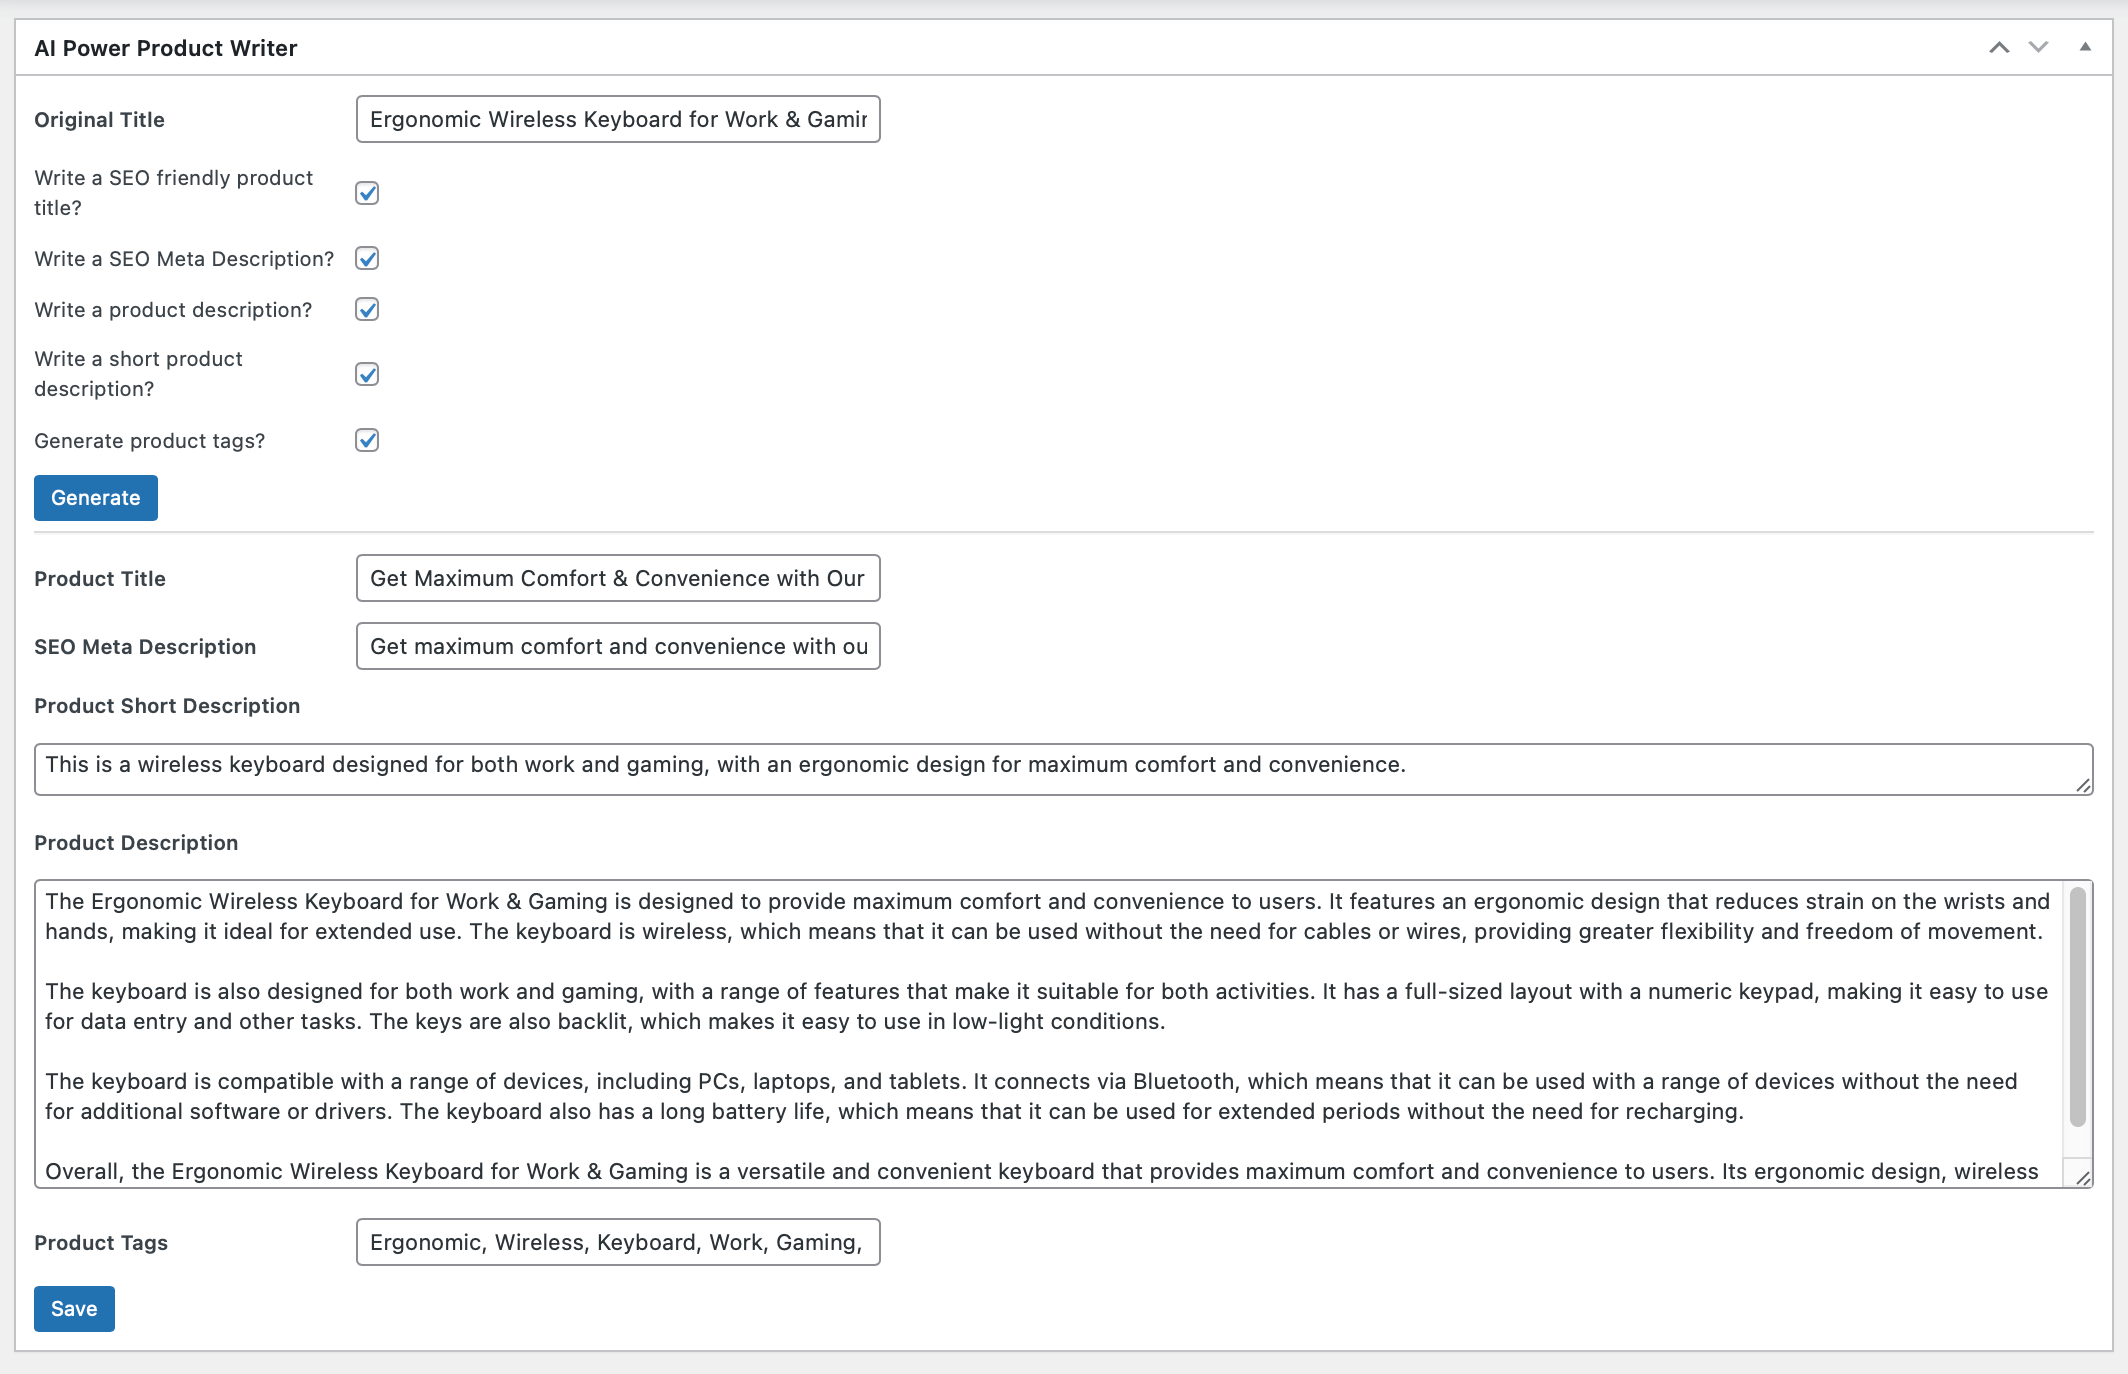
- Review the generated content for each field. You can edit or modify the content as needed before saving.
- Click on the Save Draft button to save your product listing.
Remember, you can always edit and tweak the generated content to better match your brand voice and style.
Saving Default Settings
To save default settings for the WooCommerce Product Writer, follow these steps:
- Log in to your WordPress admin dashboard.
- Navigate to the AI Power plugin on the left-hand side menu.
- Click on Settings in the drop-down menu.
- Within the Settings page, navigate to the WooCommerce tab.
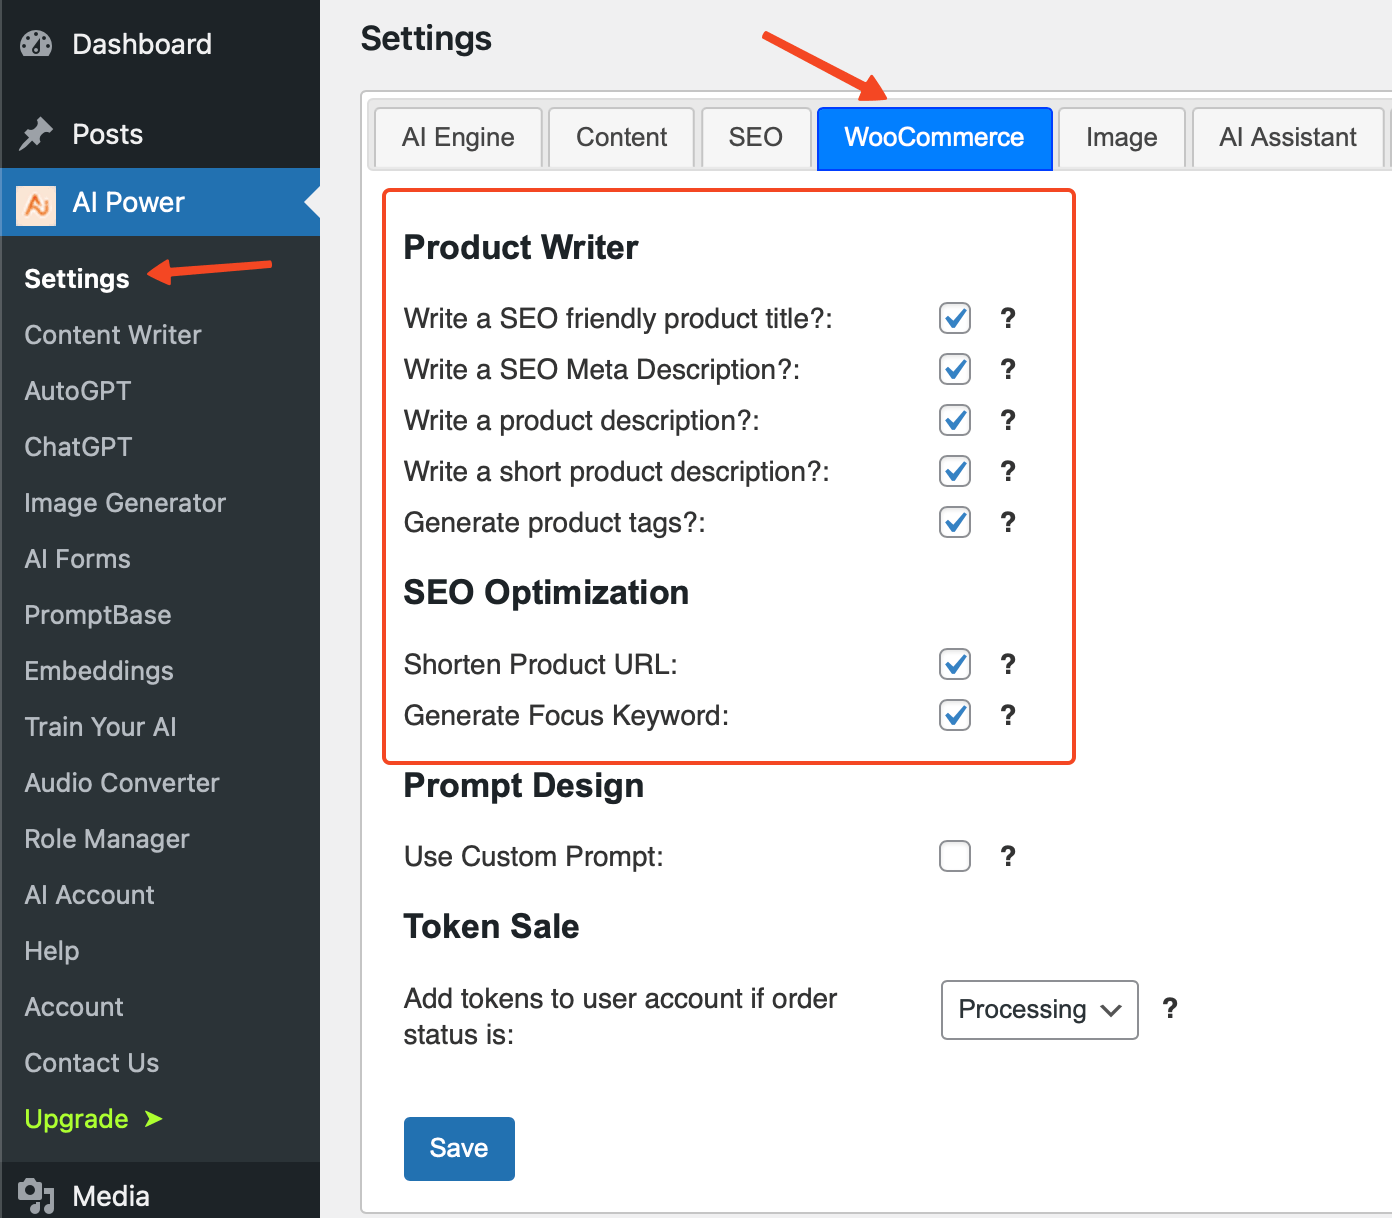
- Under the Product Writer section, you'll find a list of checkboxes corresponding to different features. These include:
- Write a SEO friendly product title
- Write a SEO Meta Description
- Write a product description
- Write a short product description
- Generate product tags
- Check the boxes for the features you want enabled by default whenever you create a new product listing.
- Click the Save button at the bottom of the page to save your default settings.
Customizing Prompts
AI Power allows you to customize the prompts for generating product content.
Here's how:
- In the Product Writer section under the WooCommerce tab, check the box next to Use Custom Prompt.
- Upon enabling Use Custom Prompt, five text fields will appear corresponding to the five features (Title, Meta Description, Description, Short Description, and Tags).
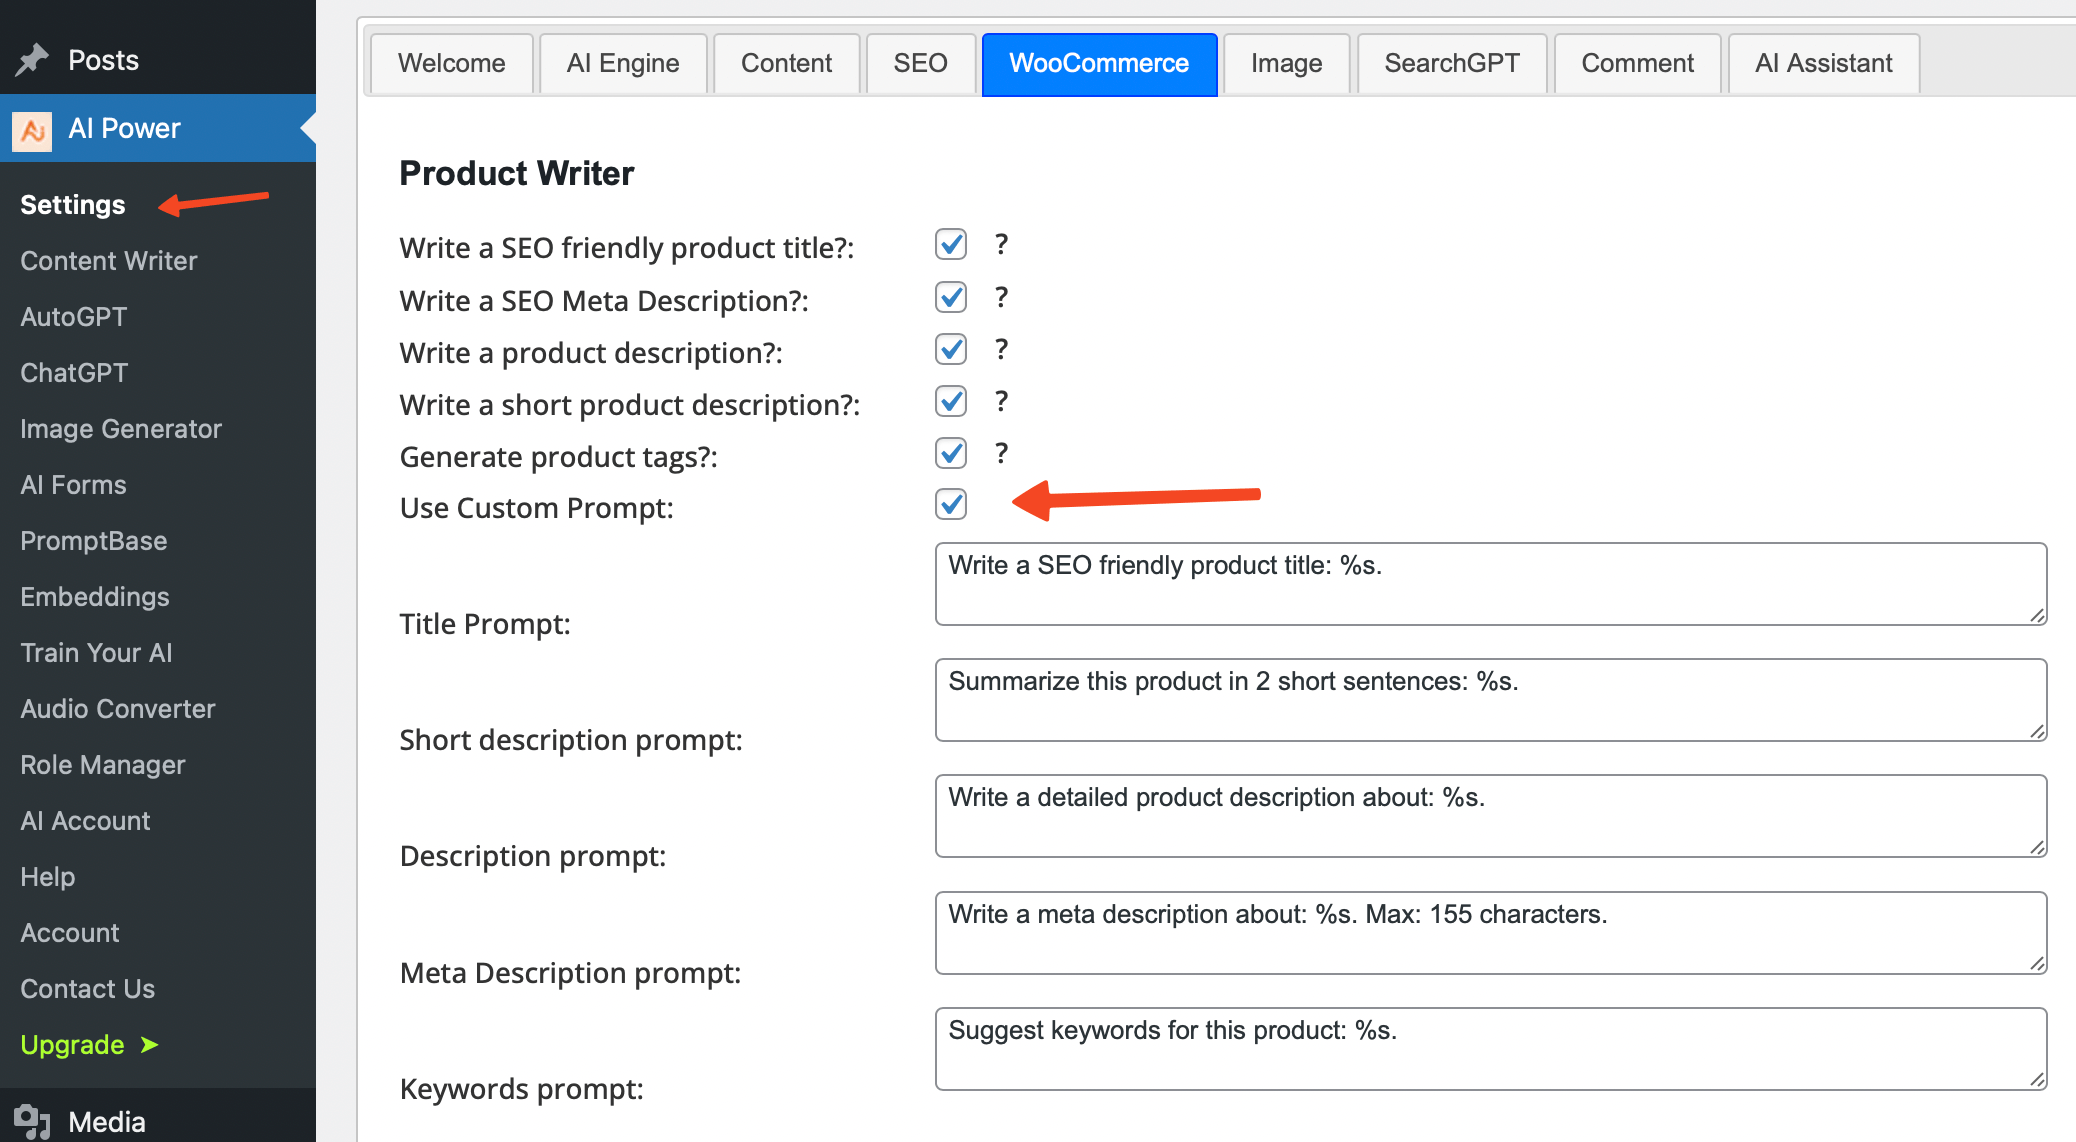
- Enter your custom prompt in each field. For example, the default prompt for generating a product title is "Write a SEO friendly product title: %s." You can change it to something like "Create a compelling product title that attracts clicks: %s."
- Click the Save button at the bottom of the page to save your custom prompts.
Remember, %s is a placeholder for your product's name. Make sure to include it in your custom prompts.
Available Variables
When creating your custom prompts, you can use the following variables to dynamically include product data:
%s: This will be replaced with the product's title.[current_short_description]: This shortcode will be replaced with the product's current short description.[current_full_description]: This shortcode will be replaced with the product's current full description.[current_attributes]: This shortcode will be replaced with a list of the product's current attributes.[current_categories]: This shortcode will substitute a list of the product's current categories.[current_focus_keywords]: This shortcode replaces with a list of the product's existing focus keywords, as created by plugins like Yoast SEO, Math Rank, and All in One SEO, if they are activated.[current_price]: This shortcode will be replaced with the product's current price, along with the currency symbol.[current_weight]: This shortcode will be replaced with the product's current weight in kilograms.[current_length]: This shortcode will be replaced with the product's current length in centimeters.[current_width]: This shortcode will be replaced with the product's current width in centimeters.[current_height]: This shortcode will be replaced with the product's current height in centimeters.[current_sku]: This shortcode will be replaced with the product's current SKU.[current_purchase_note]: This shortcode will be replaced with the product's current purchase note.
Feel free to use these variables to enhance your custom prompts. For example:
"Craft a meta description for the product: %s that succinctly highlights its key features and benefits. Aim to stay within 155 characters. Use current price: [current_price], current weight: [current_weight] kg, current length: [current_length] cm, current width: [current_width] cm, current height: [current_height] cm, current SKU: [current_sku], and current purchase note: [current_purchase_note] for your reference."
Here's another example to demonstrate how you can use these variables in a custom prompt:
Prompt: Create an SEO-friendly and eye-catching title for the product: %s. The title should emphasize its key features. Use the following for context: Attributes: [current_attributes], Short Description: [current_short_description], Full Description: [current_full_description], Product Categories: [current_categories].
In this example:
[current_short_description]will be replaced with the product's short description.[current_full_description]will be replaced with the product's full description.[current_attributes]will be replaced with a list of the product's attributes.[current_categories]will be replaced with a list of the product's current categories.
Note: If you include these shortcodes more than once in your prompt, each instance will be replaced with the same respective product data. Structure your prompts accordingly and make sure that your existing descriptions, attributes and categories are not empty.
Bulk Product Writer
The WooCommerce Bulk Product Writer offers a convenient way to generate content for multiple products simultaneously.
This feature helps to reduce the time spent on creating individual product listings by automating the process for several products at once.
Before you begin, it's recommended to use the Bulk Writer for a few products first and see the results. Once you're satisfied with the output, you can select more products. This ensures that you don't generate content for a large number of products only to find that the output doesn't meet your expectations.
Below, you'll find a step-by-step guide on how to use this powerful feature.
- Go to Settings - WooCommerce and adjust your default values.
- Navigate to WooCommerce > Products > All Products from the left-hand side menu.
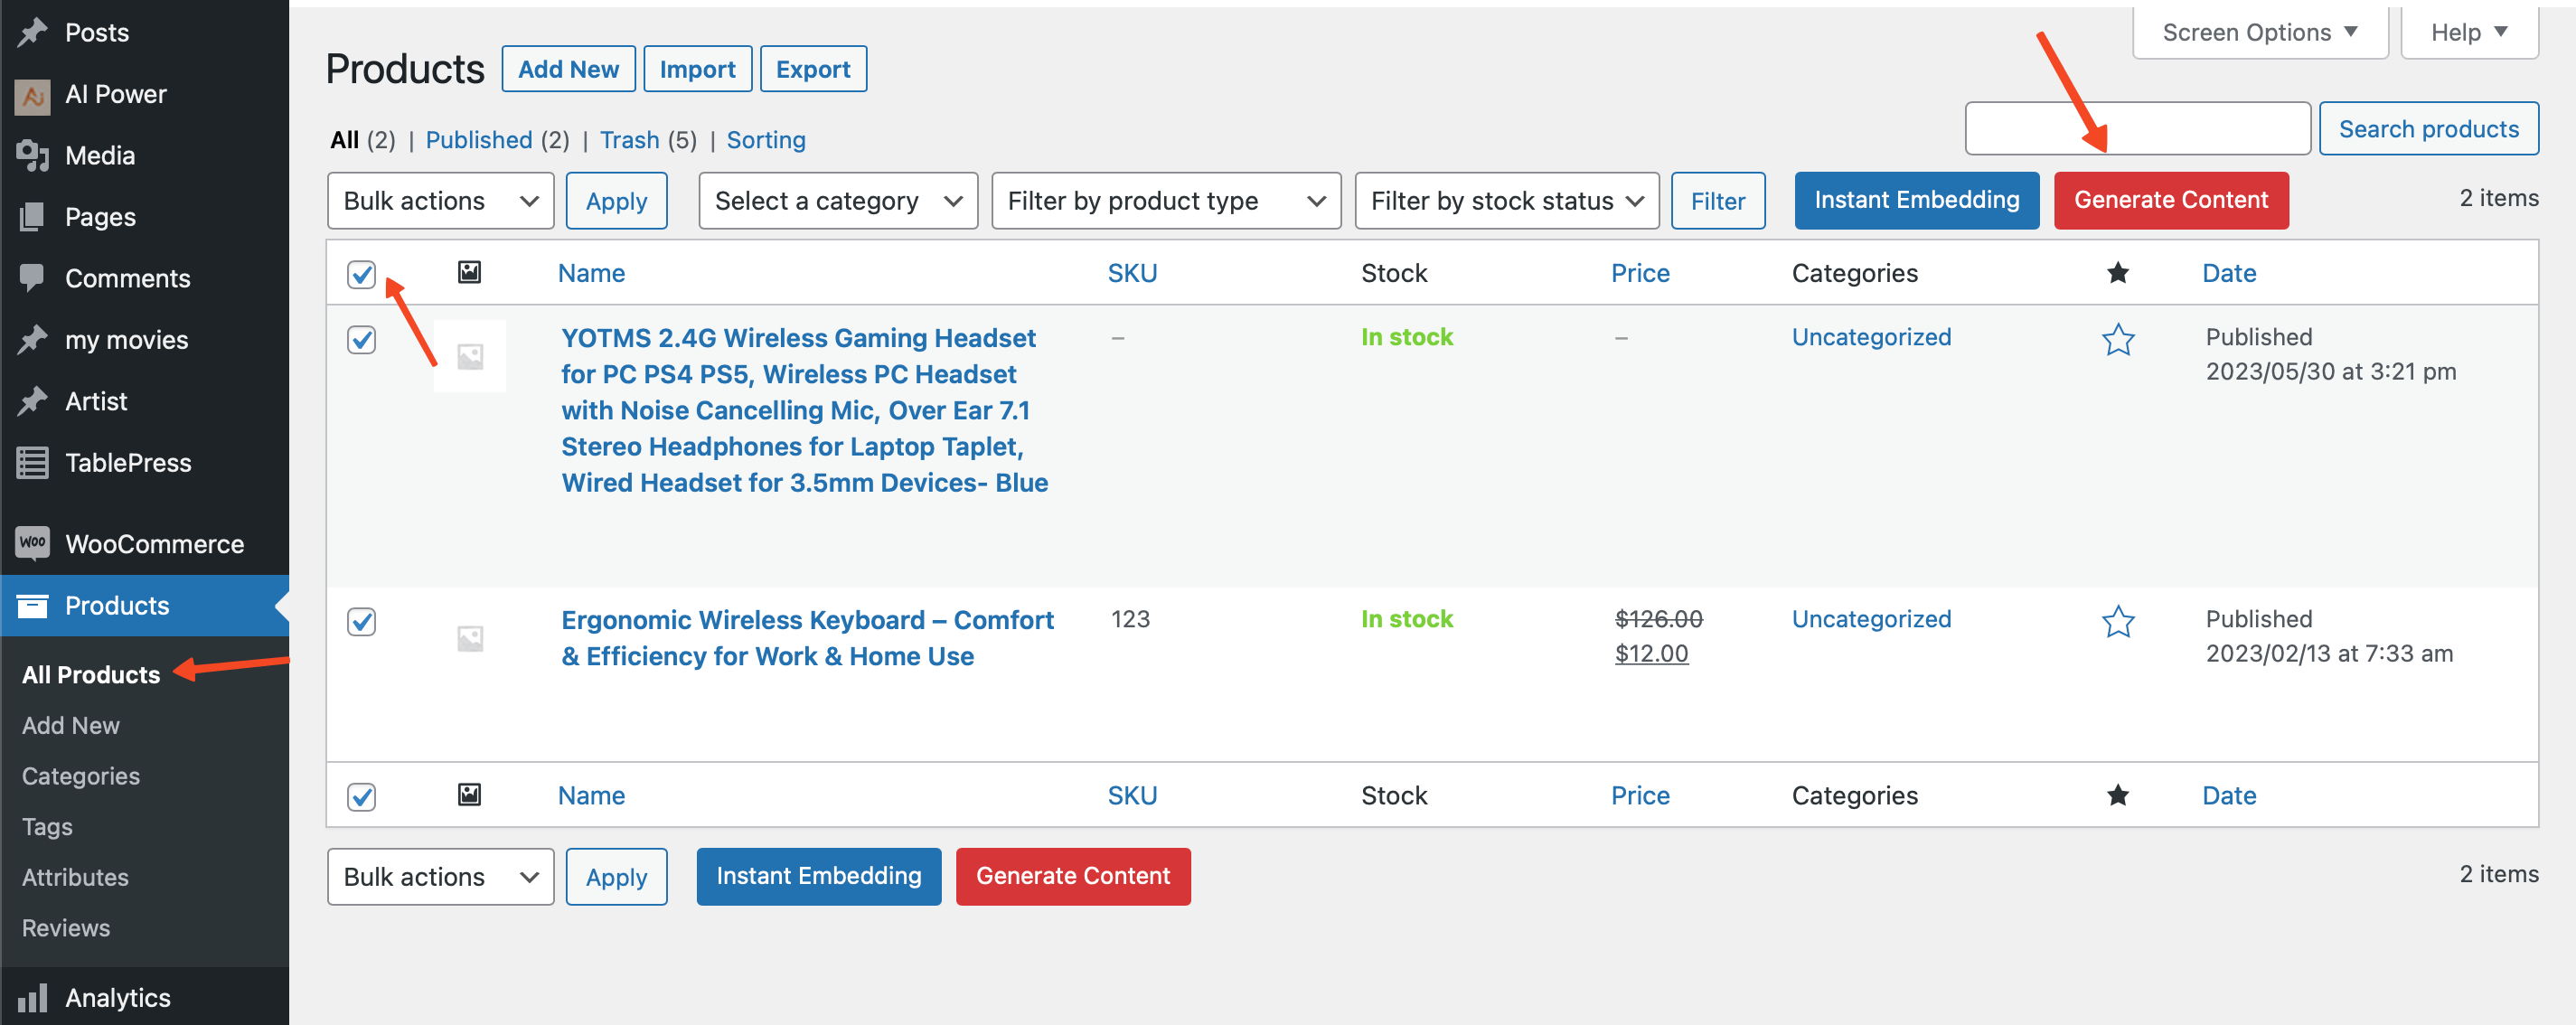
- Here, you can select one or multiple products for which you want to generate content.
- After selecting your products, click on the Generate Content button.
- A message will pop up, displaying the current settings for content generation.
- Along with the message, "This will generate content for
{n}products. Do you want to continue?".{n}is the number of products you have selected.
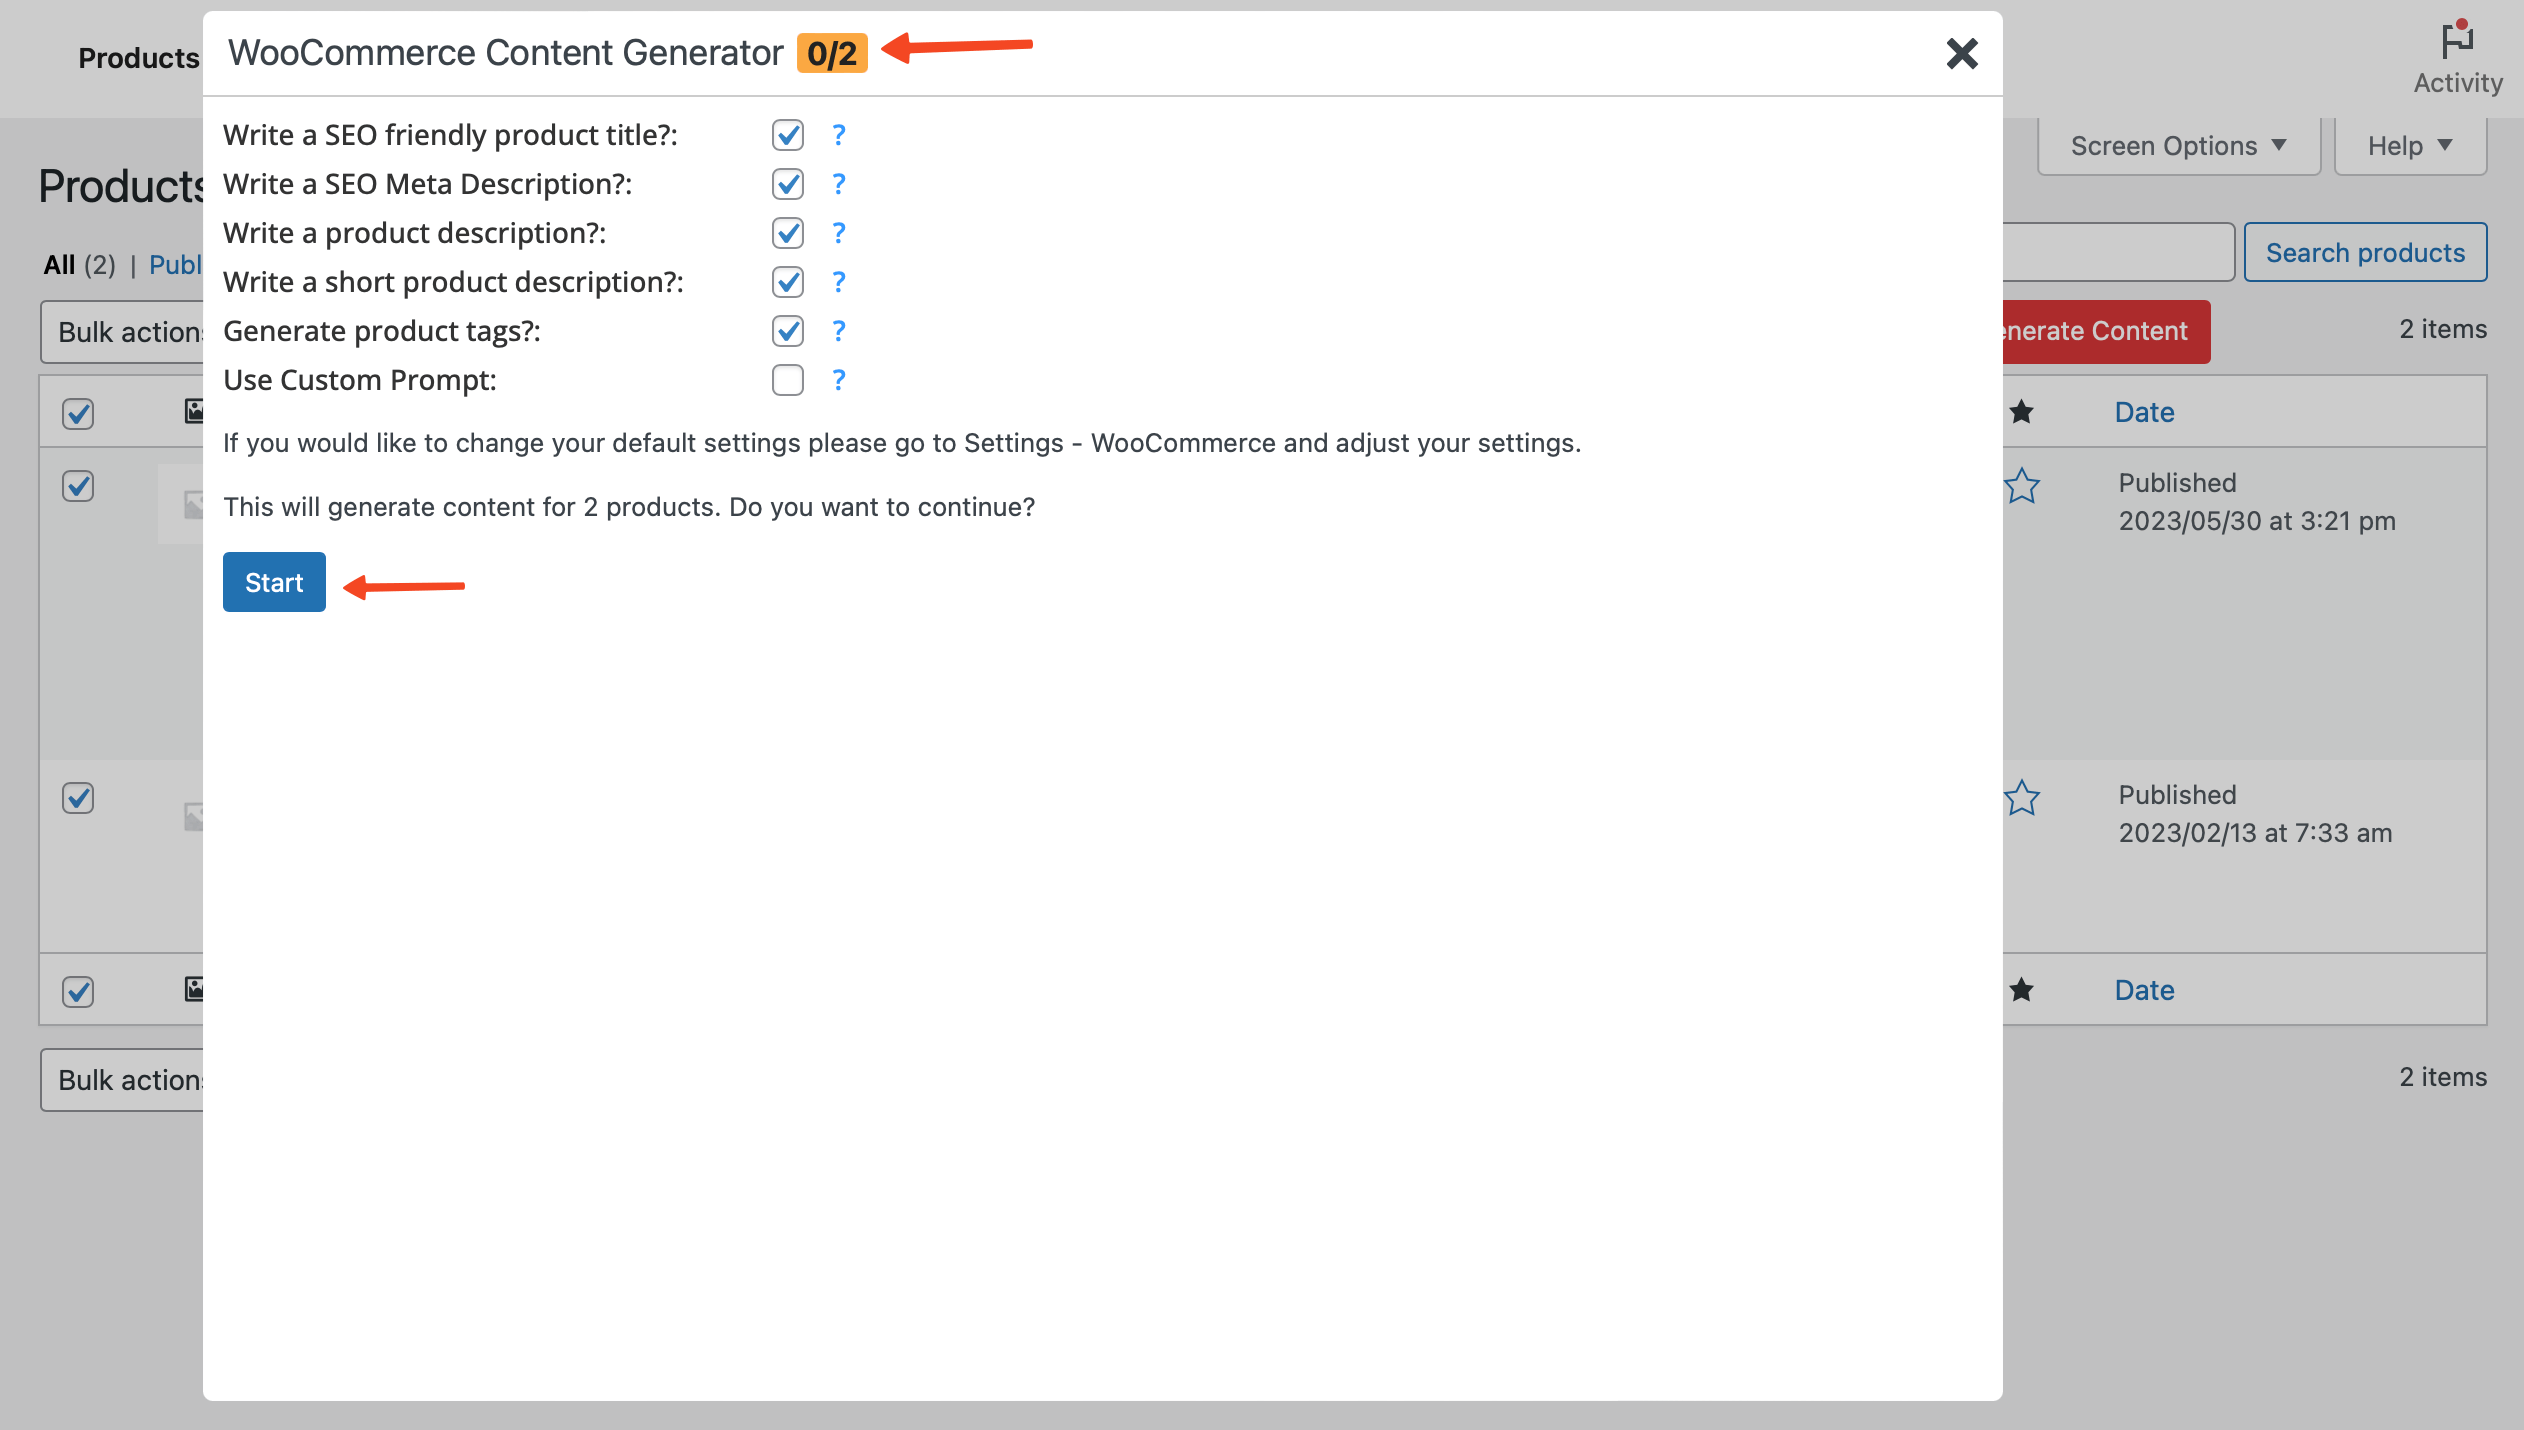
- If you are happy with your settings and ready to proceed, click Start. This will start the process of generating content for the selected products. A progress bar will appear, indicating the progress of the content generation.
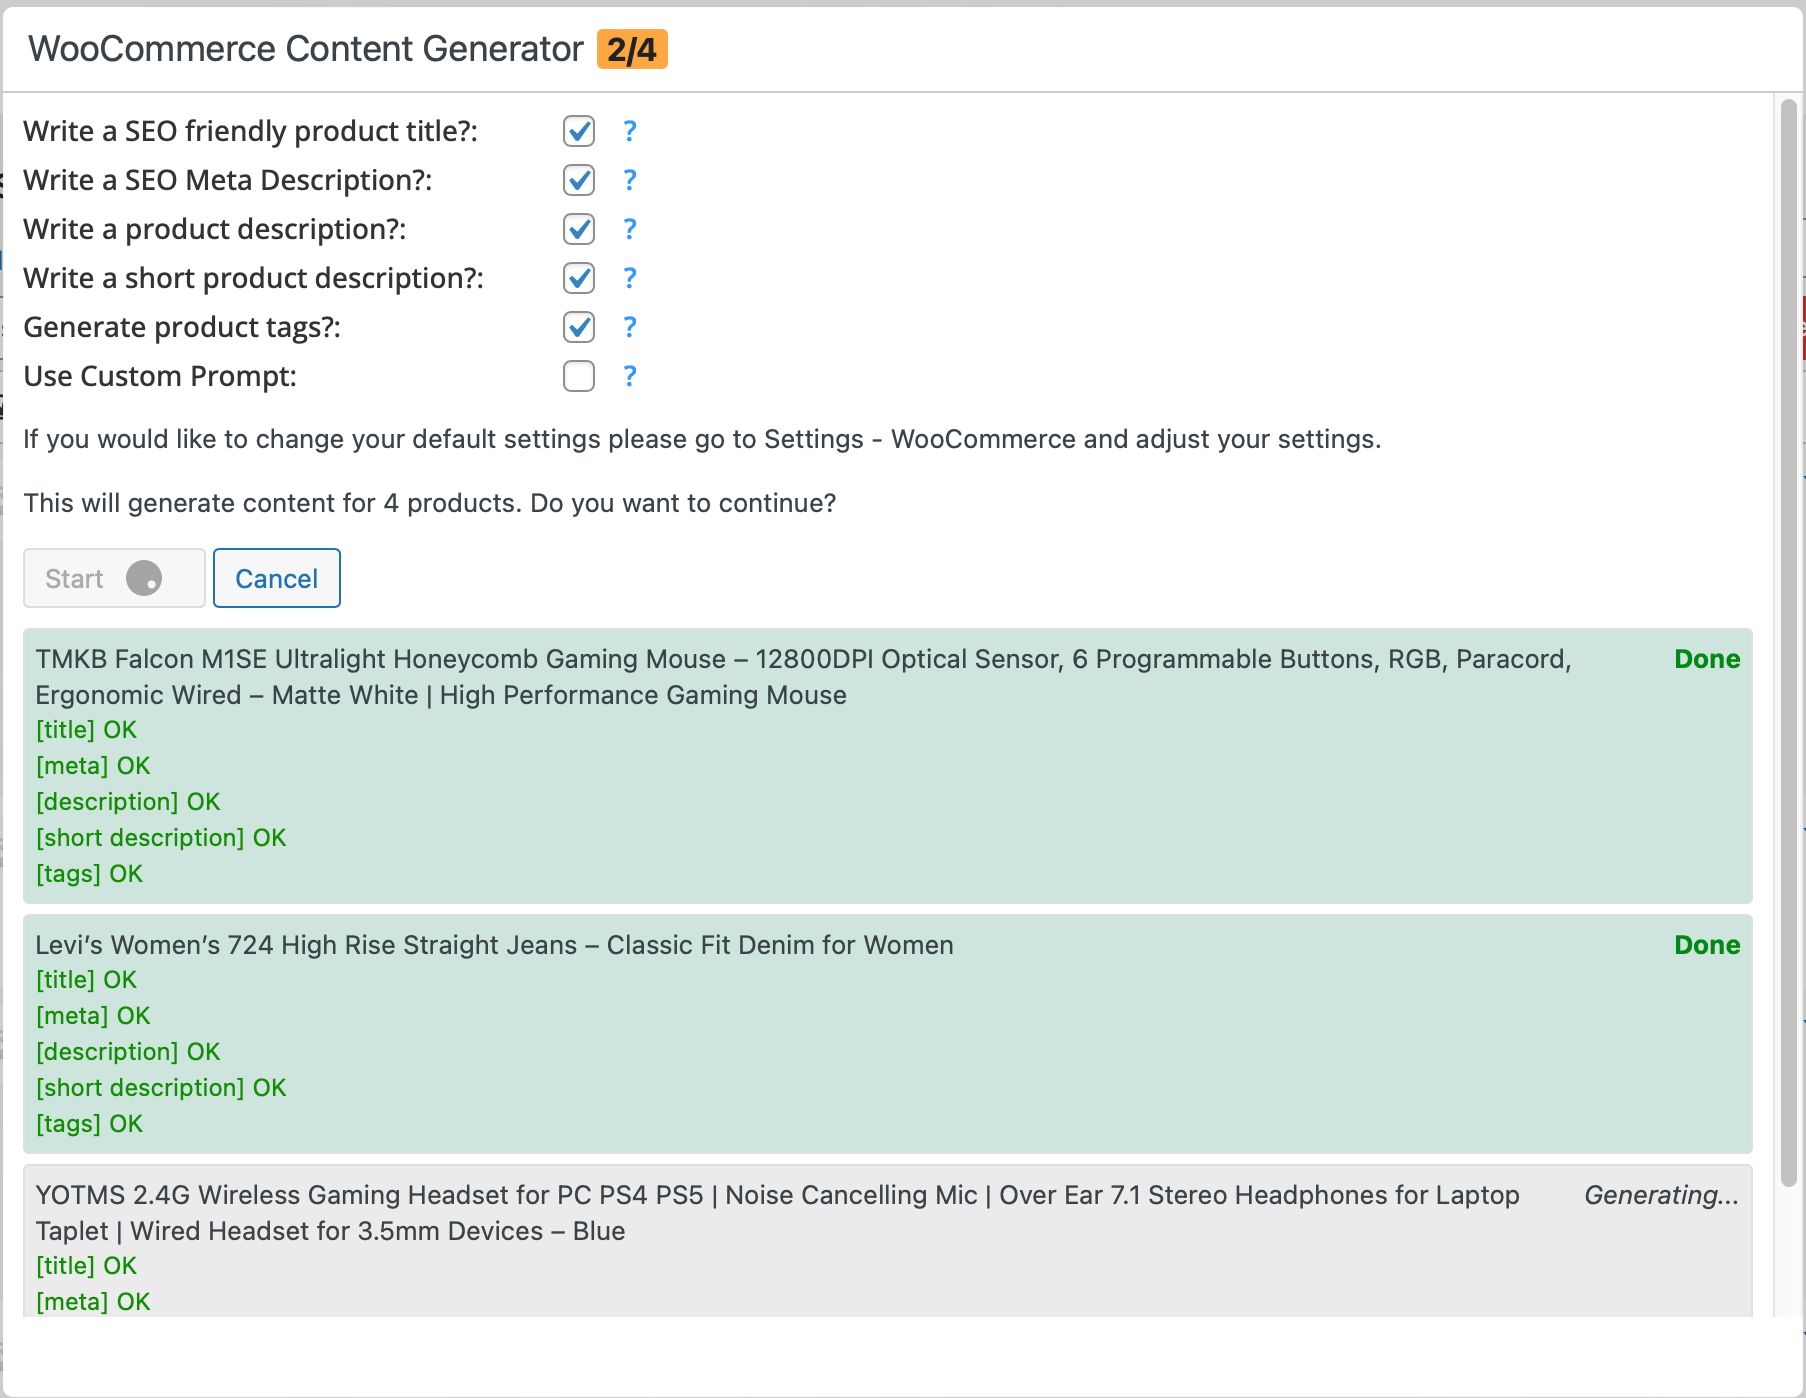
- Once the content generation process is complete, you can review the generated content for each product. This can be done by navigating to each individual product page.
That's it! You've now successfully used the WooCommerce Bulk Product Writer to generate content for multiple products simultaneously.
Please remember to check and adhere to any API rate limits when using this feature.
Also, don't forget that you can adjust the default settings for the content generation through Settings > WooCommerce in your WordPress dashboard.
This allows you to customize the generated content to better meet your needs and preferences.
Rate Limit Buffer
Rate limits are restrictions set by service providers to control the number of requests a user can send in a specified timeframe. These limits ensure that the services run smoothly and are available to all users without any disruptions. For services like OpenAI, rate limits are vital to manage the number of requests coming from various sources.
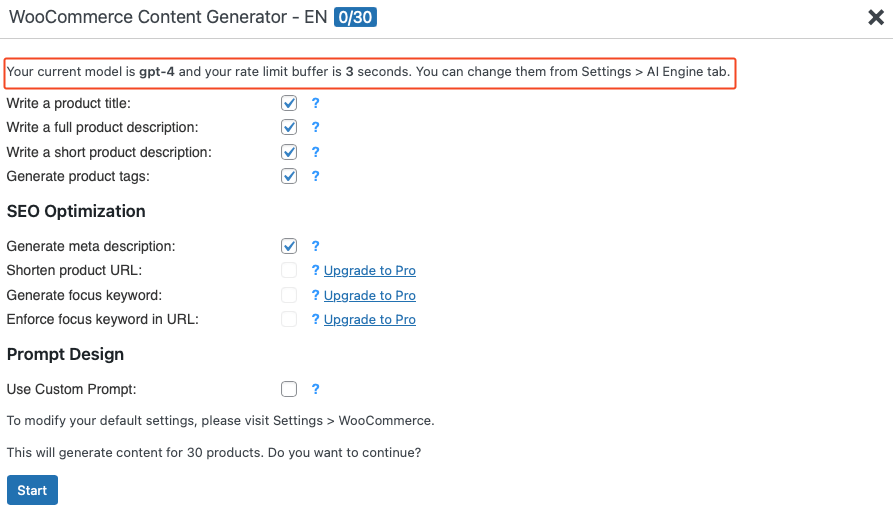
In the context of our plugin, when generating content for products, especially in bulk, there's a possibility of hitting these rate limits if requests are made rapidly in succession. That's where the Rate Limit Buffer comes into play.
The Rate Limit Buffer is a feature designed to introduce a brief pause or delay between consecutive API calls. This delay helps in preventing the plugin from exceeding the set rate limits.
This delay is necessary due to the rate limits imposed by OpenAI for these particular models.
To adjust the Rate Limit Buffer:
- Navigate to Settings > AI Engine tab.
- Here, you'll find an option to set the buffer ranging from 1 to 30 seconds.
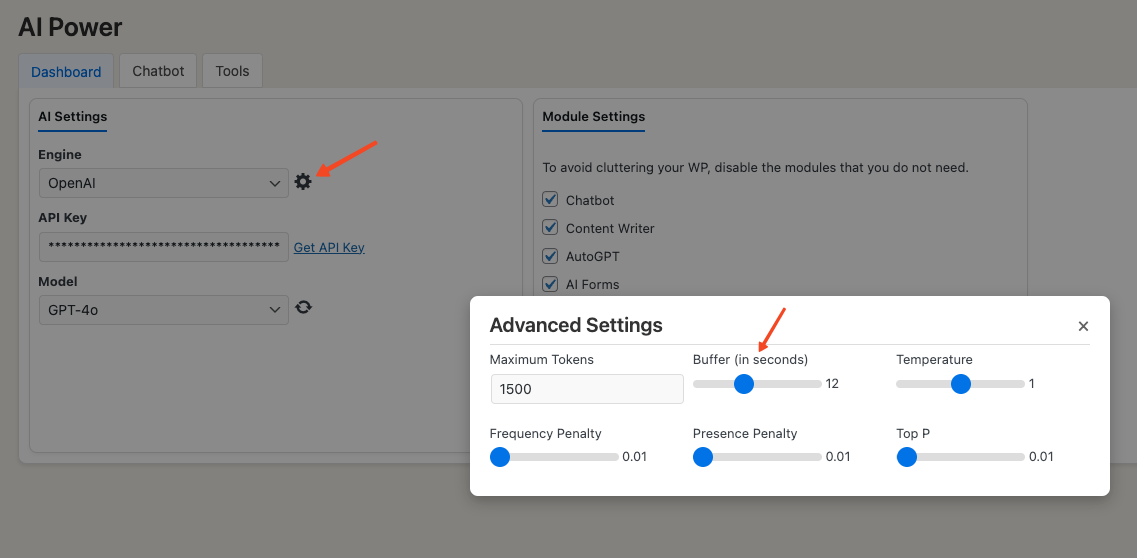
We recommend starting with the lowest value, for instance, 1 second. If you're still encountering rate limit errors, consider incrementally increasing this buffer. Adjust until you find an optimum value that provides a balance between response times and successful API calls without rate limit errors.
SEO Optimization
With the SEO Optimizer tool in our WooCommerce Product Writer module, you can significantly enhance your product's SEO score. This feature ensures your listings are optimized and ready to achieve higher visibility in search results.
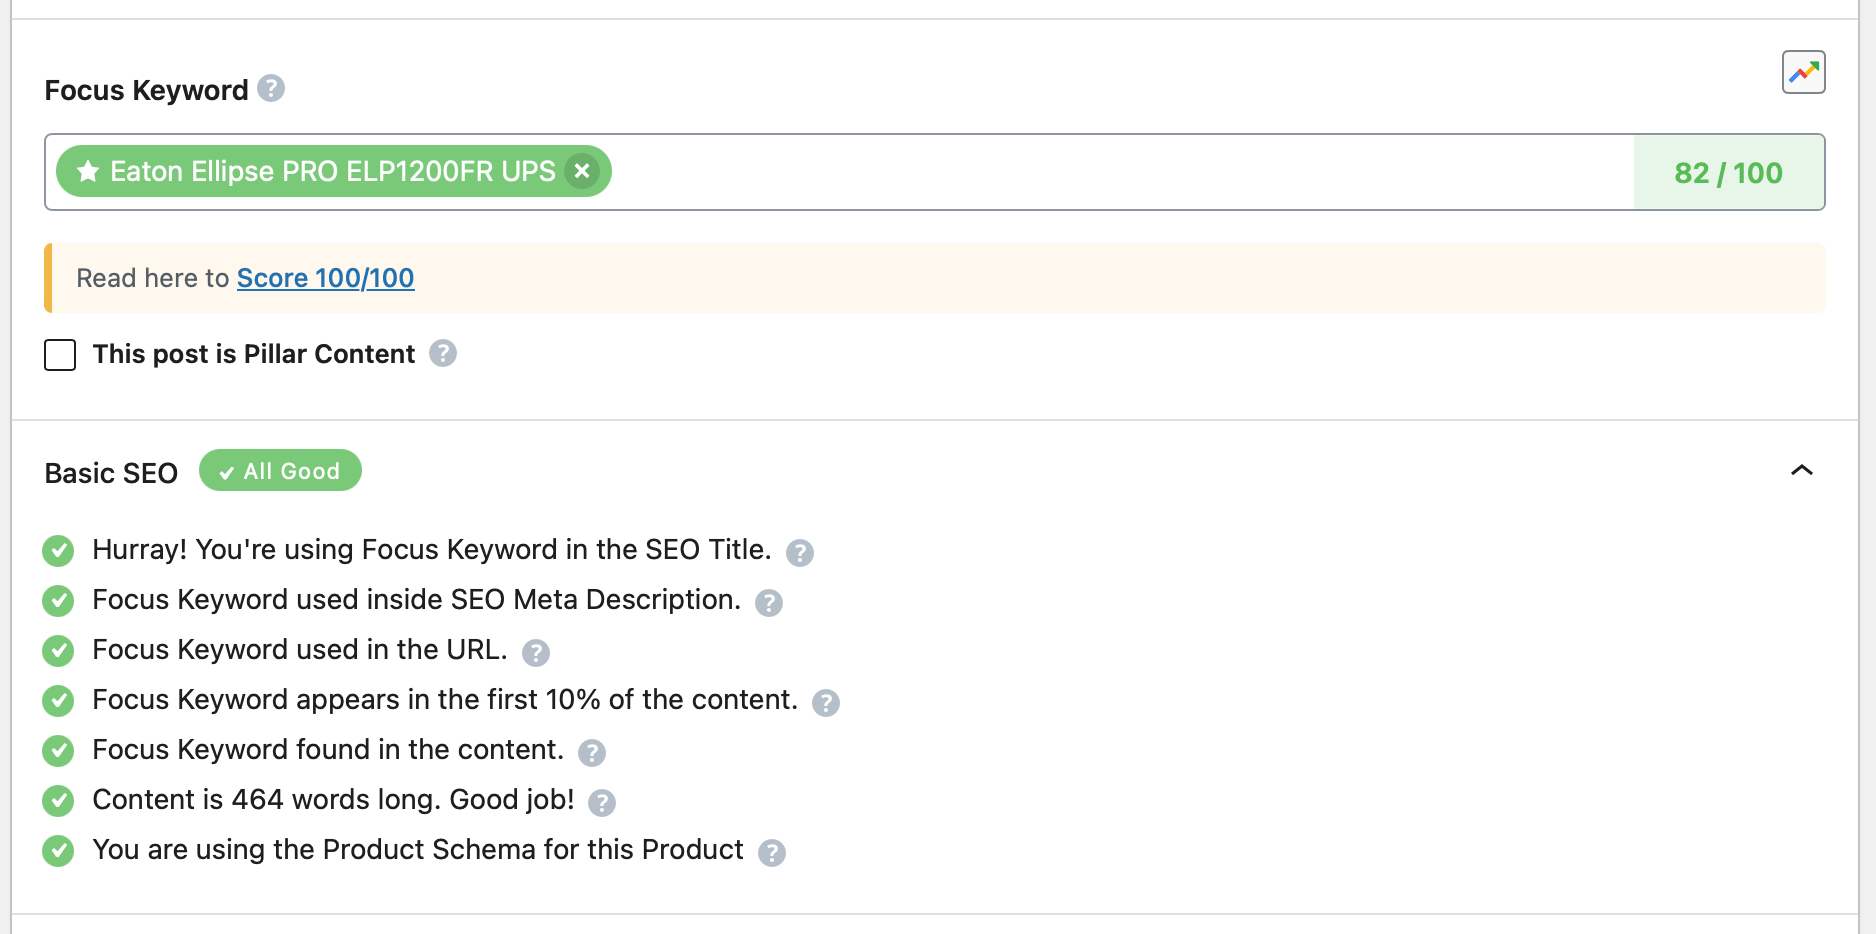
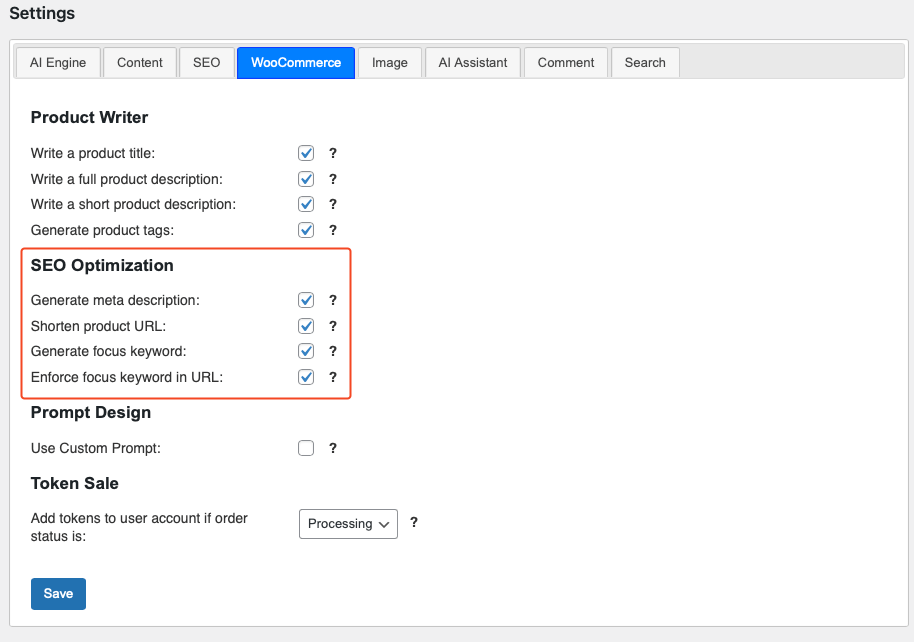
You can manage the SEO optimization feature under the Settings -> WooCommerce tab in the plugin.
Shorten URL
The Shorten URL feature will automatically compress the URL of your generated content, making it easier to share and more appealing to potential visitors.
Go to Settings -> WooCommerce tab in the plugin menu and look for the Shorten URL checkbox. Check it to enable and uncheck it to disable the feature.
When enabled, the feature evaluates the length of the current URL.
If the URL exceeds 70 characters, it will be automatically shortened.
If the URL is already under 70 characters or is empty, the feature will skip the shortening process.
Focus Keyword
The Focus Keyword feature allows you to optimize your WooCommerce product listings by selecting strategic keywords that you aim to rank for in search engines. These keywords are used as the cornerstone around which your content is built, thereby improving the SEO value of your product pages.
Supported SEO plugins:
- Yoast SEO
- Rank Math
- All In One SEO
- The SEO Framework
How to Enable/Disable
- Go to Settings -> WooCommerce tab in the plugin menu.
- Look for the Generate Focus Keyword checkbox.
- Check it to enable and uncheck it to disable the feature.
How It Works
- When the Generate Focus Keyword feature is enabled, the system will use the language you've selected in the Content tab to automatically generate focus keywords for your product listings based on built-in prompts.
- If you enable the Custom Prompt option, you'll be presented with a dropdown list of focus keyword templates. These templates offer various strategies for keyword selection, such as "SEO-Optimized and High-Volume", "Customer-Centric", "Niche-Specific and Unique", among others.
- After selecting a template from the dropdown, a text area will be populated where you can review or manually adjust the focus keyword prompt. You also have the option to write your own custom prompt in this area.
Enforce Focus Keyword in URL
The Enforce Focus Keyword in URL feature ensures that your chosen focus keyword is prominently featured in your product's URL.
This enhances SEO by aligning the product's URL with its primary keyword, thus providing clarity and context for both search engines and users.
How to Enable/Disable
- Go to Settings -> WooCommerce tab in the plugin menu.
- Look for the Enforce Focus Keyword in URL checkbox.
- Check it to enable and uncheck it to disable the feature.
How It Works
- Once enabled, the system checks if the focus keyword (set using your SEO plugin) is already present in the product's URL.
- If the focus keyword is absent, the system appends it to the beginning of the URL.
- If the addition of the focus keyword makes the URL exceed 70 characters, the system will intelligently shorten the URL while retaining the focus keyword's prominence. Common stop words may be removed during this process to ensure optimal URL length.
- If the focus keyword is already present in the URL, the system will skip the process.
Note: Ensure that your selected focus keyword is set using supported SEO plugins like Yoast SEO, Rank Math, The SEO Framework or All In One SEO for this feature to work effectively.
Product Title Suggester
If you're using WooCommerce, the Title Suggester feature also extends to your product listings.
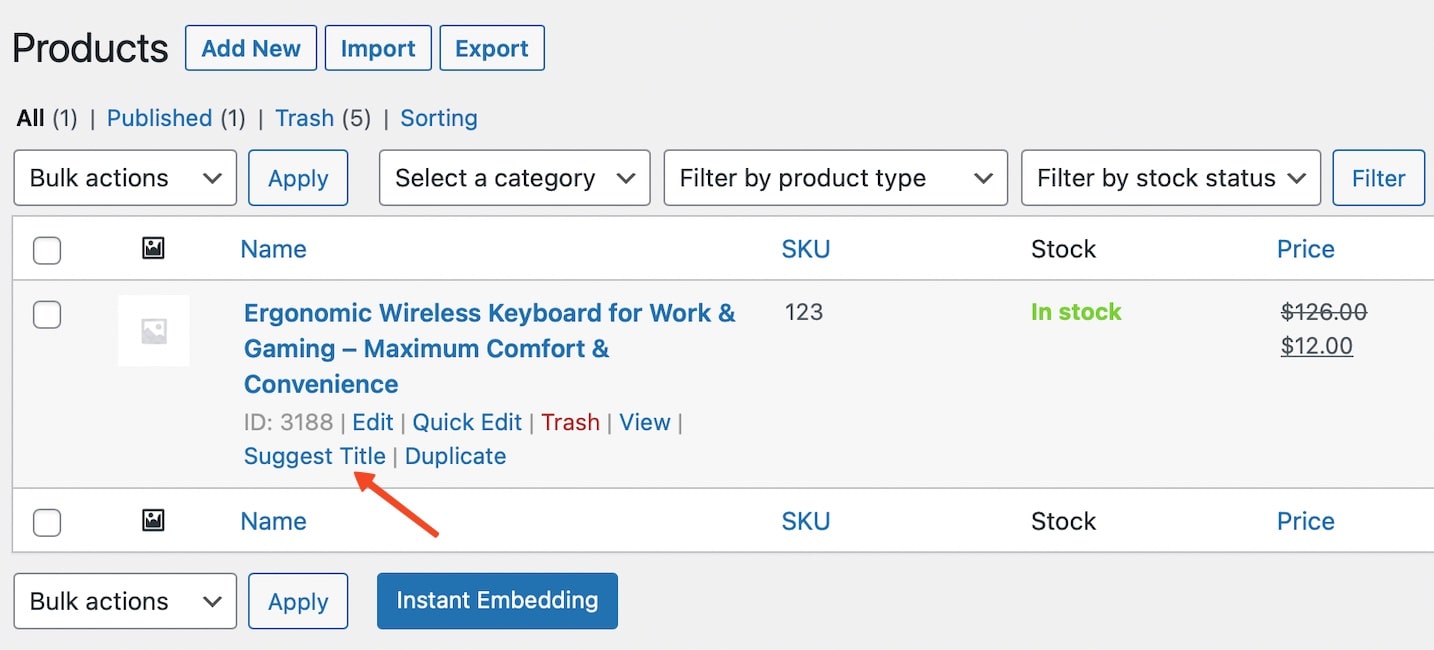
- Go to Products - All Products.
- Hover over the product for which you want a title suggestion, then click on the Suggest Title button.
- A popup with five title suggestions will appear. Review the suggested titles, select the one you prefer, and click on the Use This button.
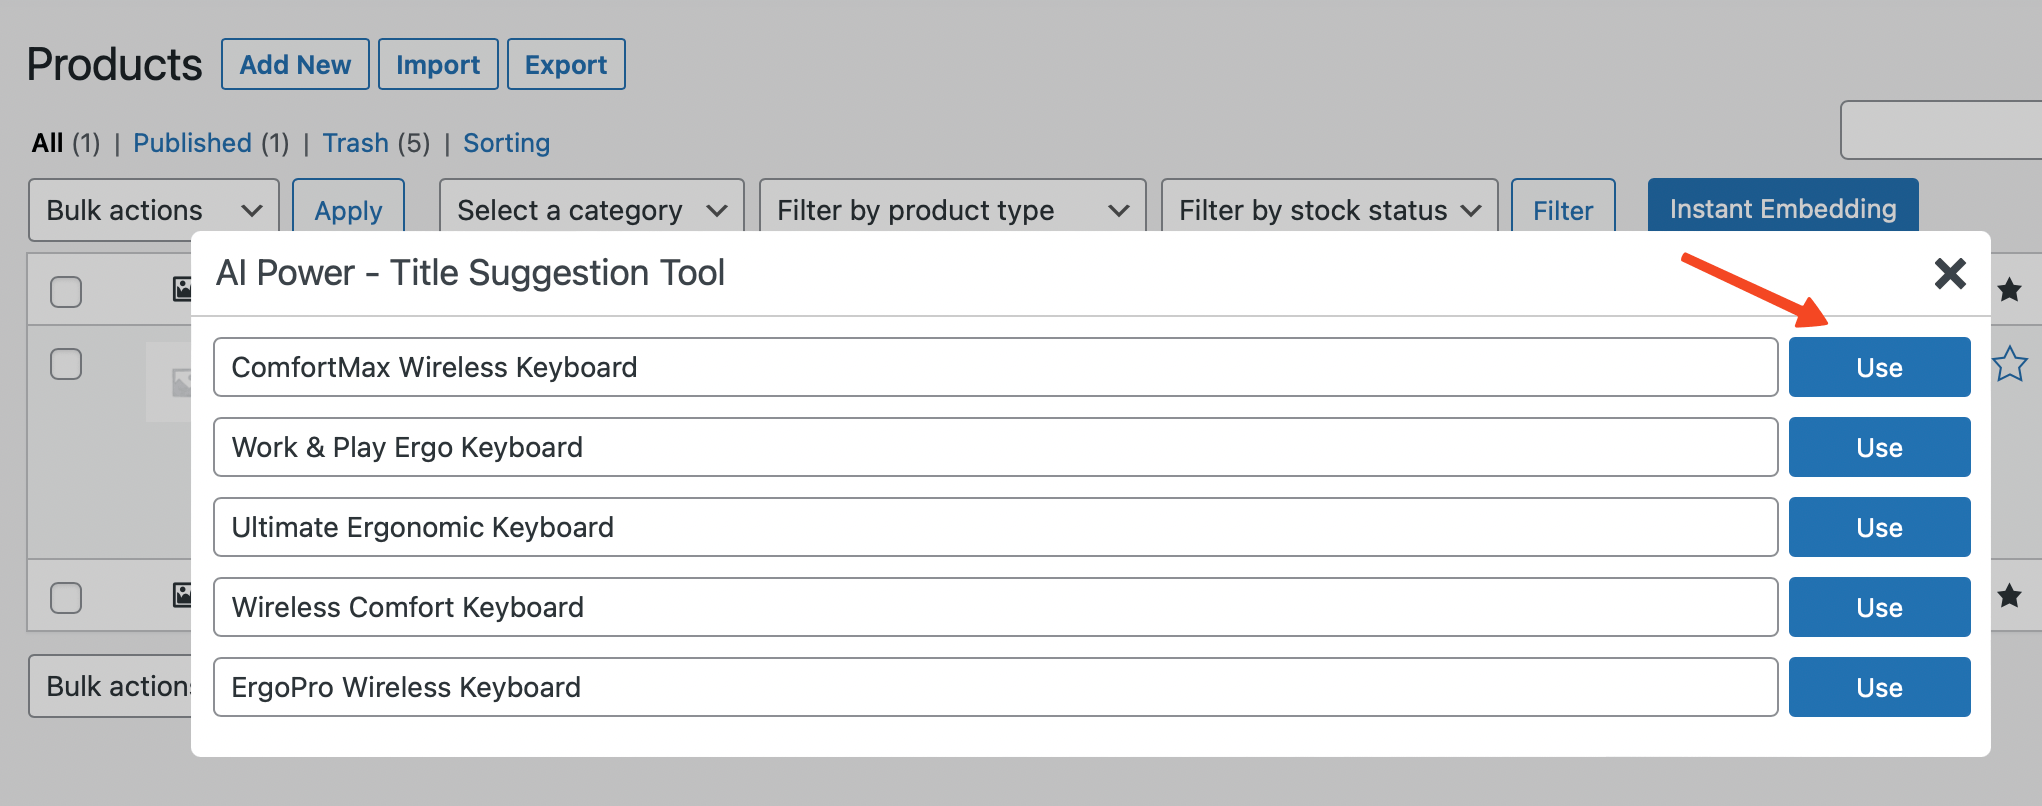
- The product title will be instantly updated.
Product Review Writer
If you're running an online store with WooCommerce, you'll be pleased to know that the Comment Replier feature also supports WooCommerce review management.
This integration allows for swift and effective management and responses to product reviews on your site.
To leverage this feature, go to WooCommerce Product – Reviews, hover over a review, and click on Generate Reply.
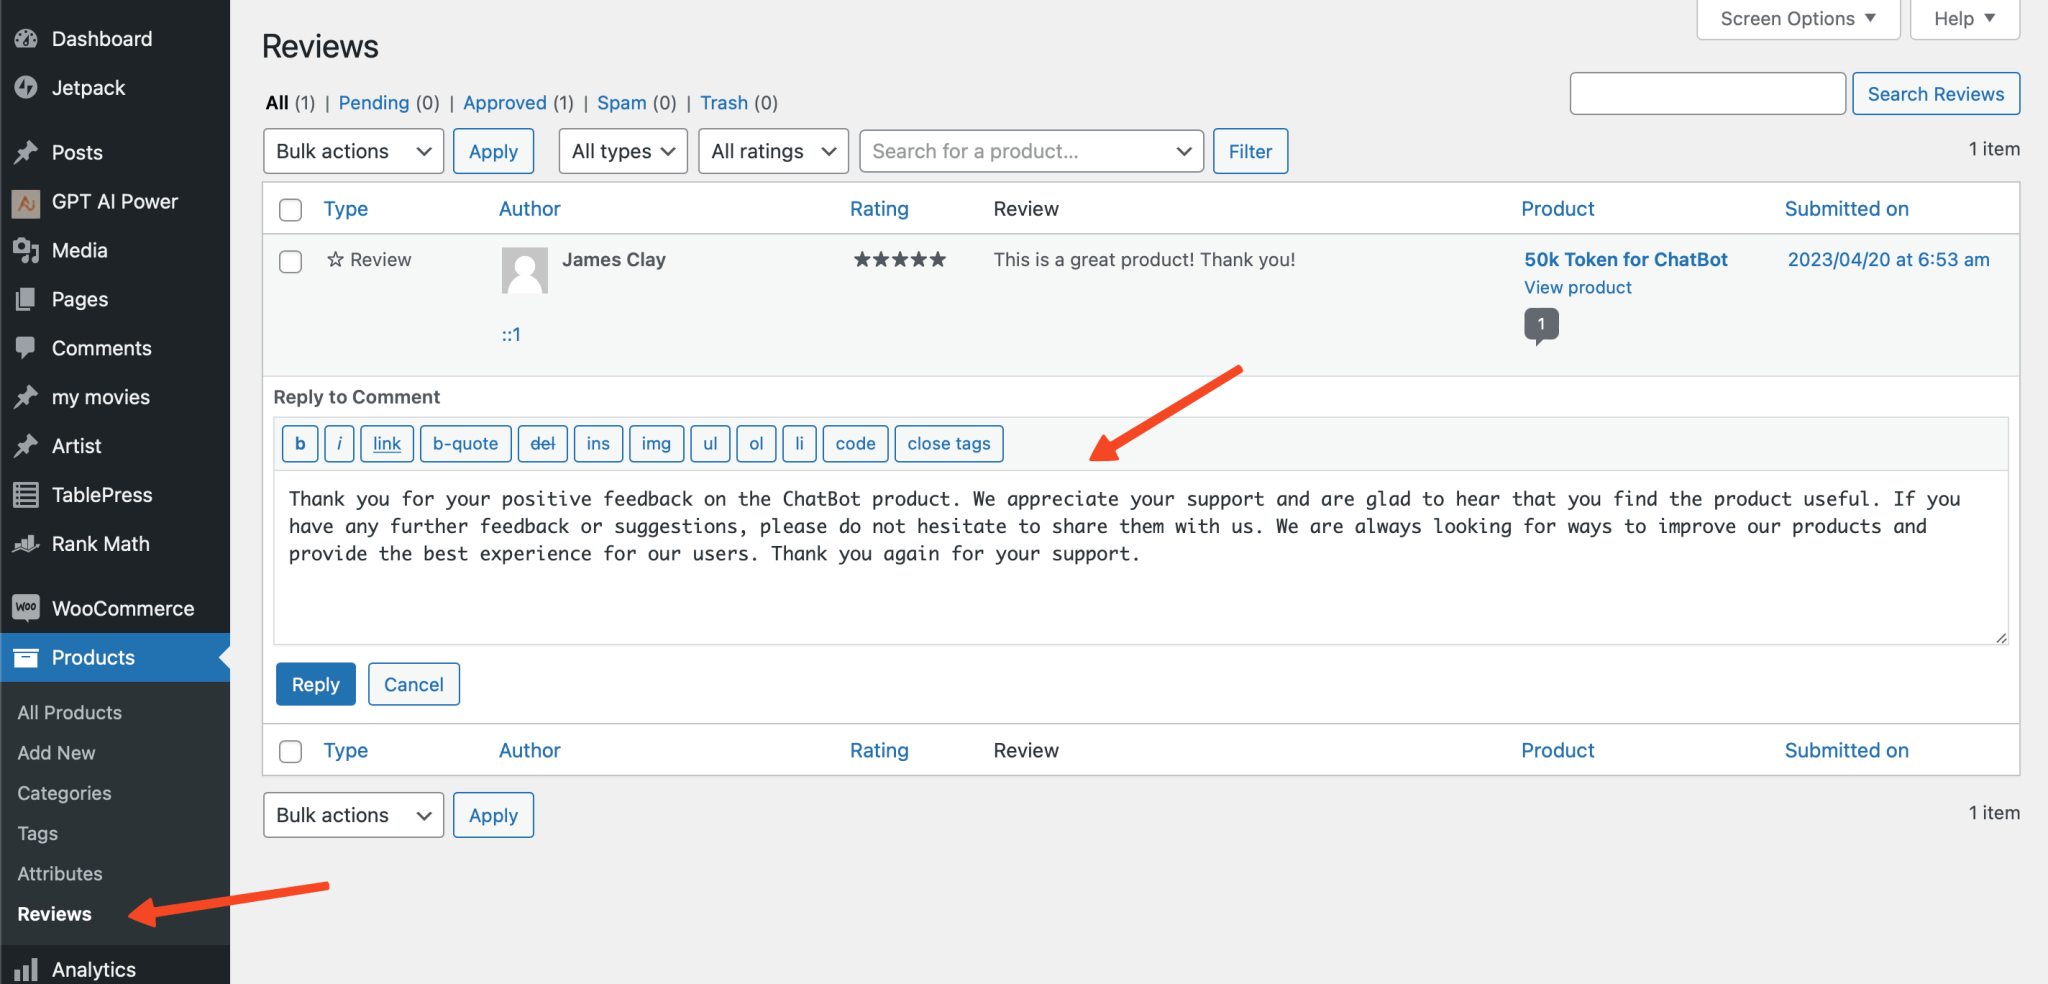
The AI-powered response will help you communicate more efficiently with your customers, enhancing the customer experience while saving you precious time.
Token Sale
Learn more about Token Sale here.