AI Training
OpenAI’s text embeddings measure the relatedness of text strings.
We use this technology to create a semantic search engine, KnowledgeBase and a chat bot.
To use this feature, you must first create a Pinecone account.
You can think of Pinecone as a long-term external memory for your bot.
OpenAI charges a cost of $0.00002 per 1,000 tokens for embeddings.
Assuming that 750 words are approximately equal to 1,000 tokens, let's consider a scenario where you have a website with 1,000 pages, and each page has 750 words.
In this case, the website would have a total of 750,000 words, which translates to 1,000,000 tokens. Therefore, the cost of embeddings for the entire website would be $0.02.
Please note that this is only an approximation. For the precise cost, please refer to OpenAI usage.
You can use embeddings for:
- Chat Bot - You can use the embeddings feature to create a chat widget that will respond to your visitors’ questions related to your website.
- Semantic Search - We have a feature called SearchGPT where you can create your own search engine. You can use the embeddings feature to create a semantic search engine. For example, if you search for “dog”, you will get results for “puppy”, “pooch”, “canine”, “hound”, etc. This is because the embeddings feature will find the most similar text strings to “dog”.
- AI Forms - Our AI forms use embeddings as well, enabling you to create forms that intelligently process and understand the input they receive based on the context of the embeddings. This enhances the interaction capabilities of forms, making them more dynamic and responsive to user input.
Now let's take a look at all the features in detail.
Embedding Models
Our plugin supports four different embedding models:
| Model | Provider | Description | Performance | Dimension |
|---|---|---|---|---|
| text-embedding-3-large | OpenAI | Most capable embedding model for both english and non-english tasks | 64.6% | 3,072 |
| text-embedding-3-small | OpenAI | Increased performance over 2nd generation ada embedding model | 62.3% | 1,536 |
| text-embedding-ada-002 | OpenAI | Most capable 2nd generation embedding model, replacing 16 first generation models | 61.0% | 1,536 |
| embedding-001 | Google's most capable embedding model | NA | 768 |
You can switch between models under the AI Training - Settings tab.
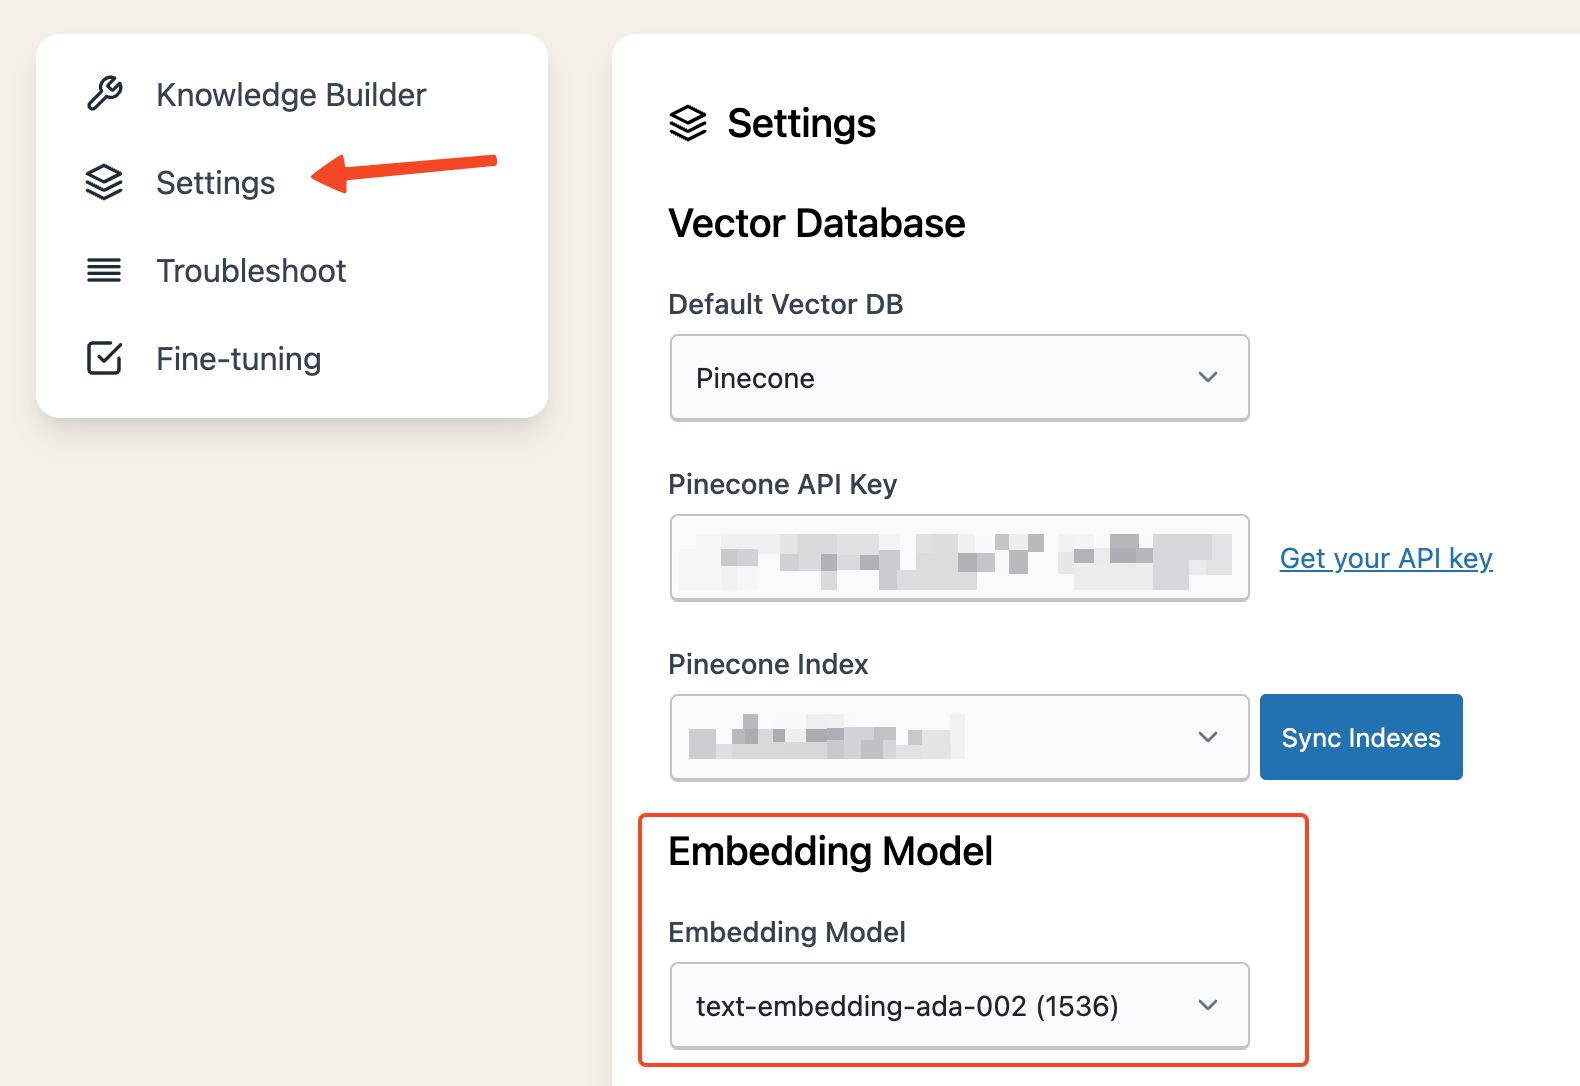
It's recommended to transition from the older text-embedding-ada-002 to text-embedding-3-small or text-embedding-3-large for enhanced efficiency and cost-effectiveness.
Should you opt to switch your embedding model, remember to reindex all your content. This step is crucial to ensure your bot functions correctly after the model change.
Vector DB
Pinecone Setup
To use the Embeddings feature in AI Power, you need to first create an account with Pinecone and obtain your API key.
Here's how:
- Visit Pinecone to sign up for a new account.
Pinecone is currently experiencing high demand. As a result, new users who wish to sign up for the Starter (free) plan may find themselves placed on a waitlist.
By providing your credit card information for a trial, you can start using Pinecone immediately. Don't worry, if you only wish to use the free plan, you can cancel the subscription after the trial period ends. This way, you can start using the free plan without having to wait.
- Once your account is created, go to the Pinecone dashboard.
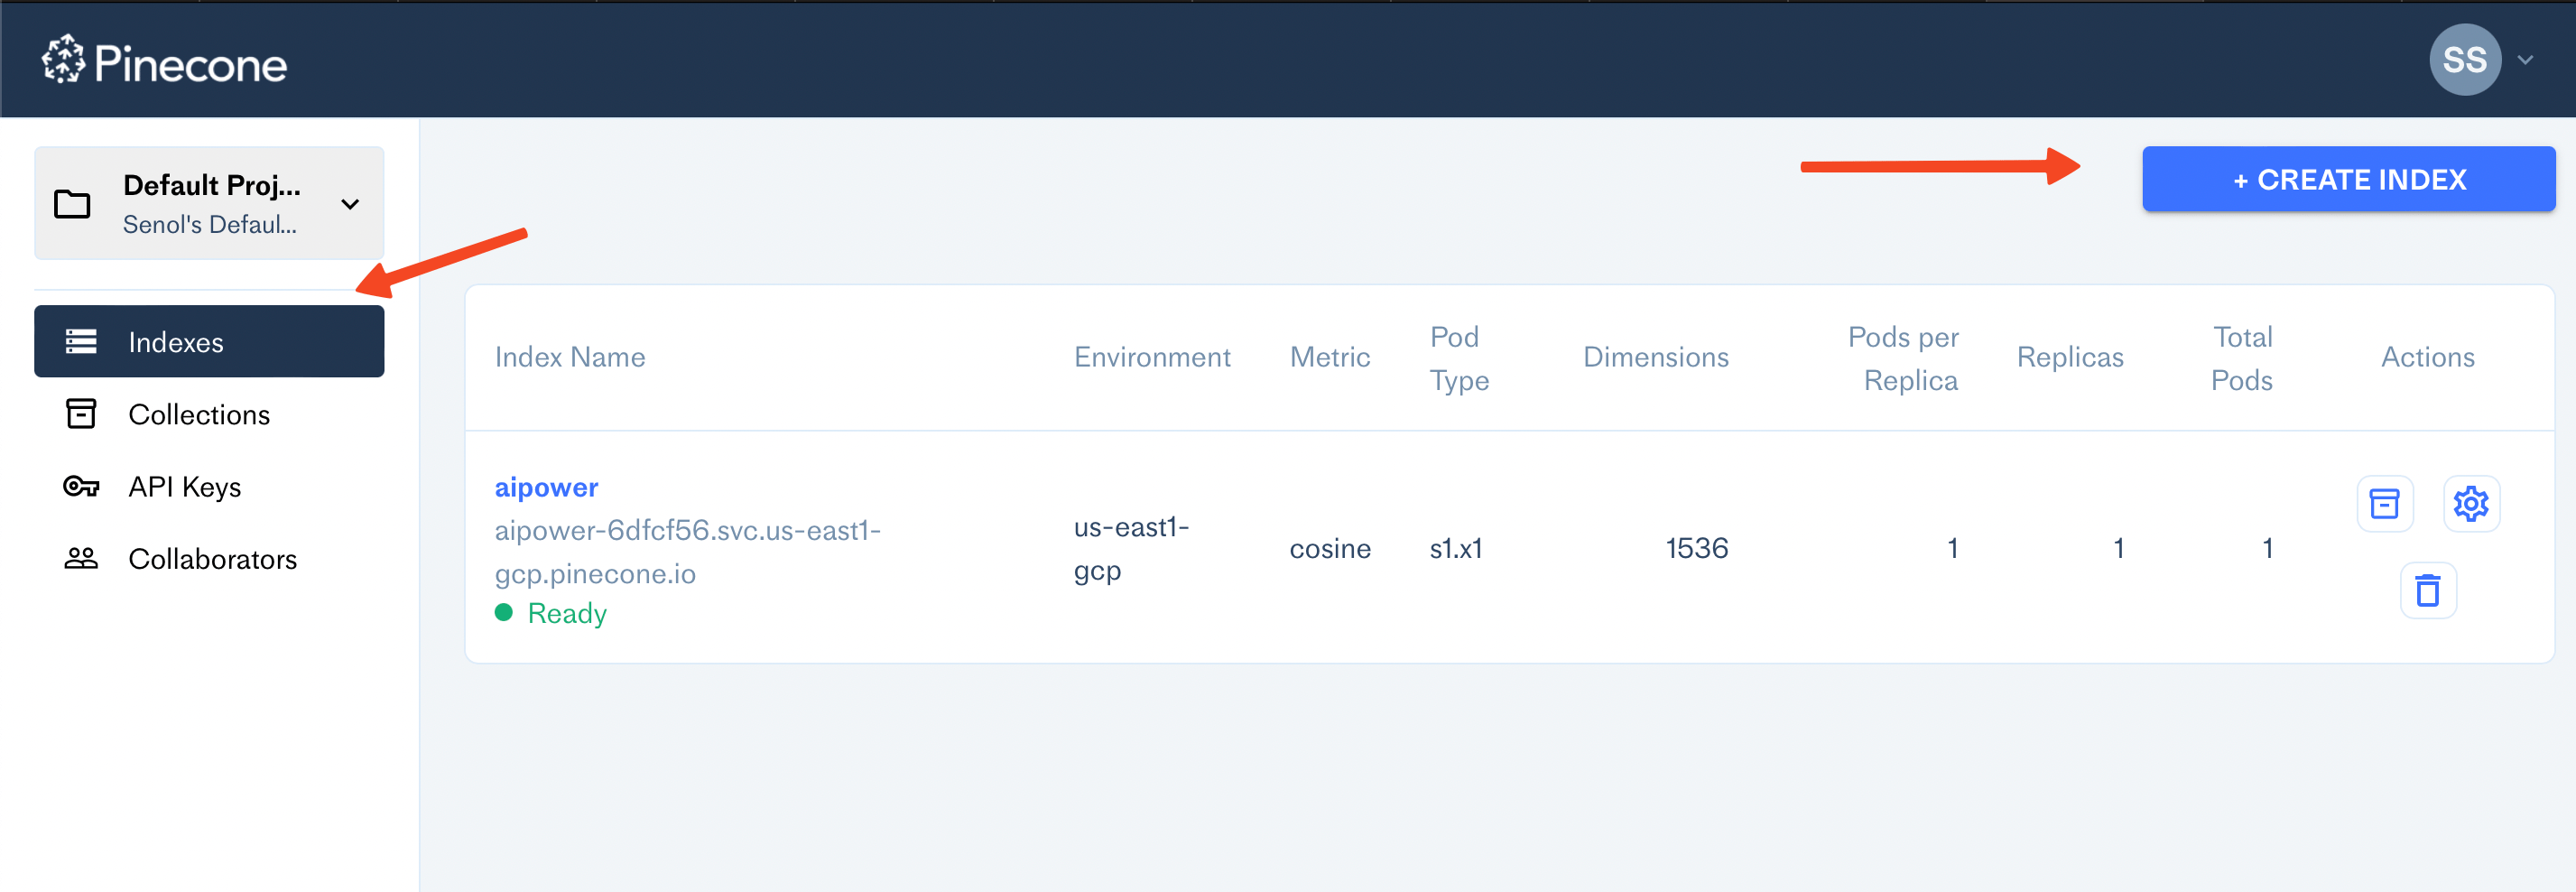
- To create an index, click on the Create Index button.
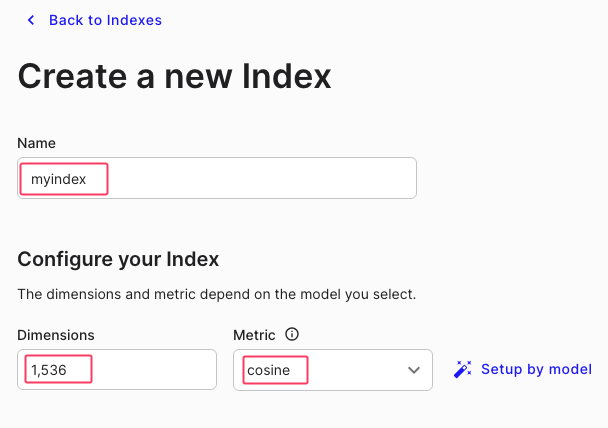
- Provide a unique name for your index, set the dimension to 1536, and choose cosine for the metric.
-
Click Create Index. Your index is now created!
-
Click on the API Keys option in the left side menu to generate your API key. Make sure to copy this key as you will need it later.

- Paste your Pinecone API Key in the corresponding field under the AI Training - Settings tab in AI Power and then hit Sync button. Select your index from the list. Be sure to save the changes after you've input the necessary information.
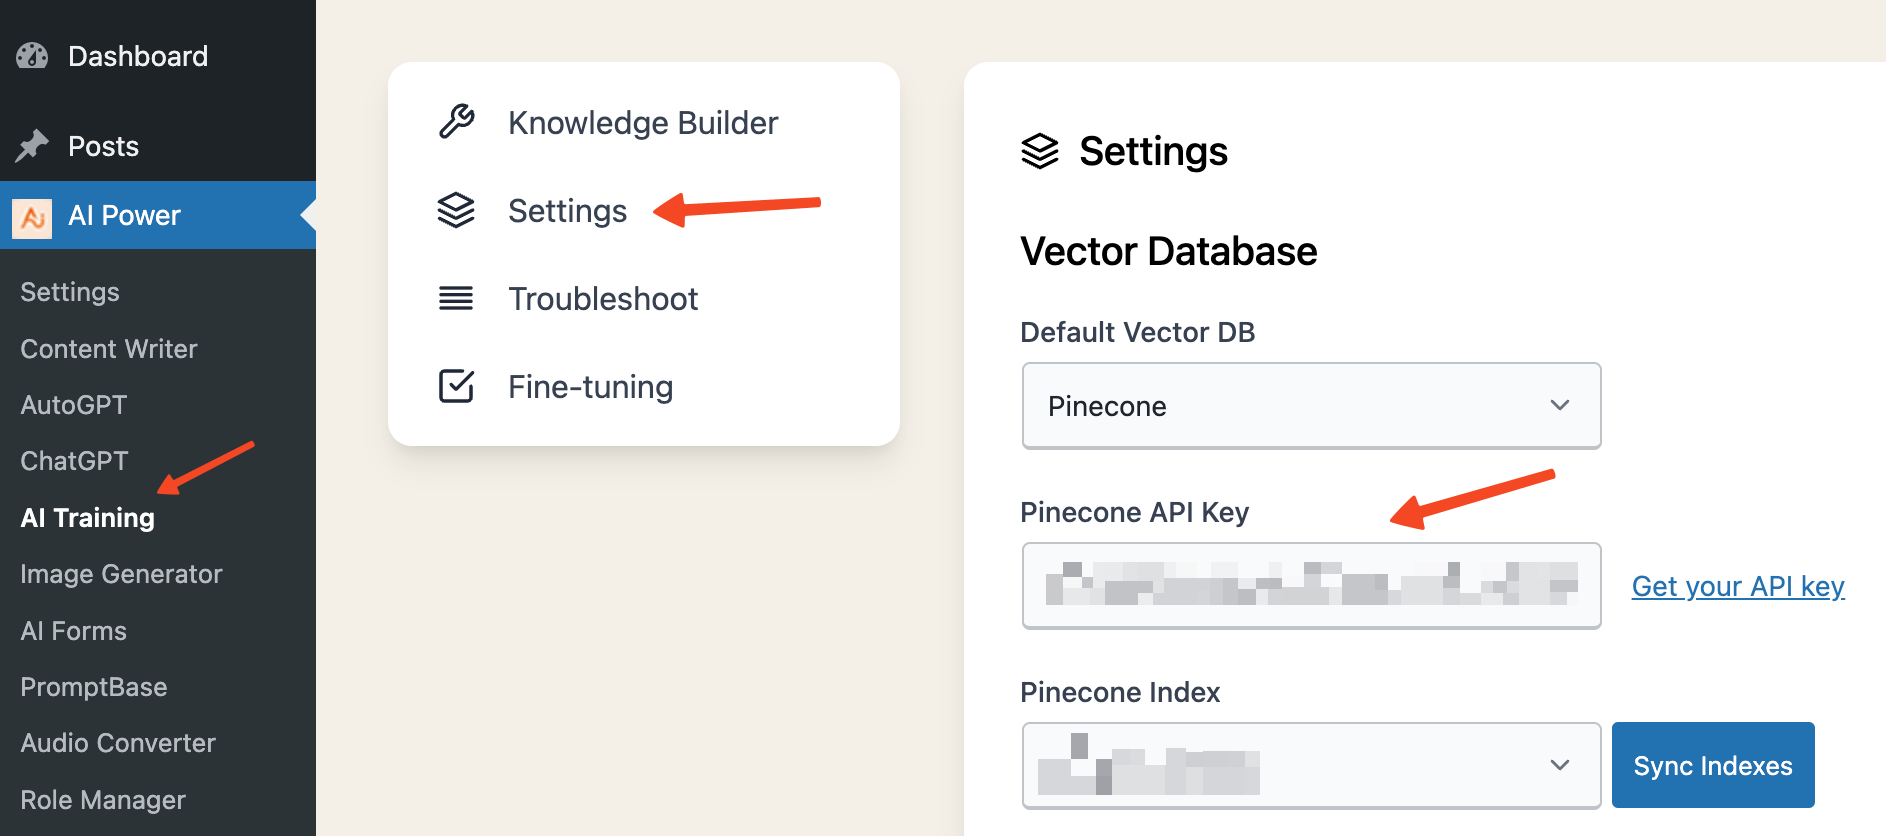
With these steps, you have successfully created an account with Pinecone, created an index, and configured AI Power to use this index.
Now you're ready to use the Embeddings feature!
If you have more than one index on Pinecone, you can specify your default index in AI Power. Navigate to the Embeddings - Settings tab and use the "Select Index" dropdown menu to choose your default index. Remember to save your changes!
Qdrant Setup
To use Qdrant as your vector database provider with AI Power, follow these steps to configure the plugin correctly:
- Change DB Provider to Qdrant: Navigate to the AI Training - Settings tab within the AI Power plugin. From the dropdown list for the database provider, select Qdrant. Upon selection, additional fields specific to Qdrant configuration will appear, including Qdrant API Key, Qdrant Cluster URL, and Qdrant Collections.
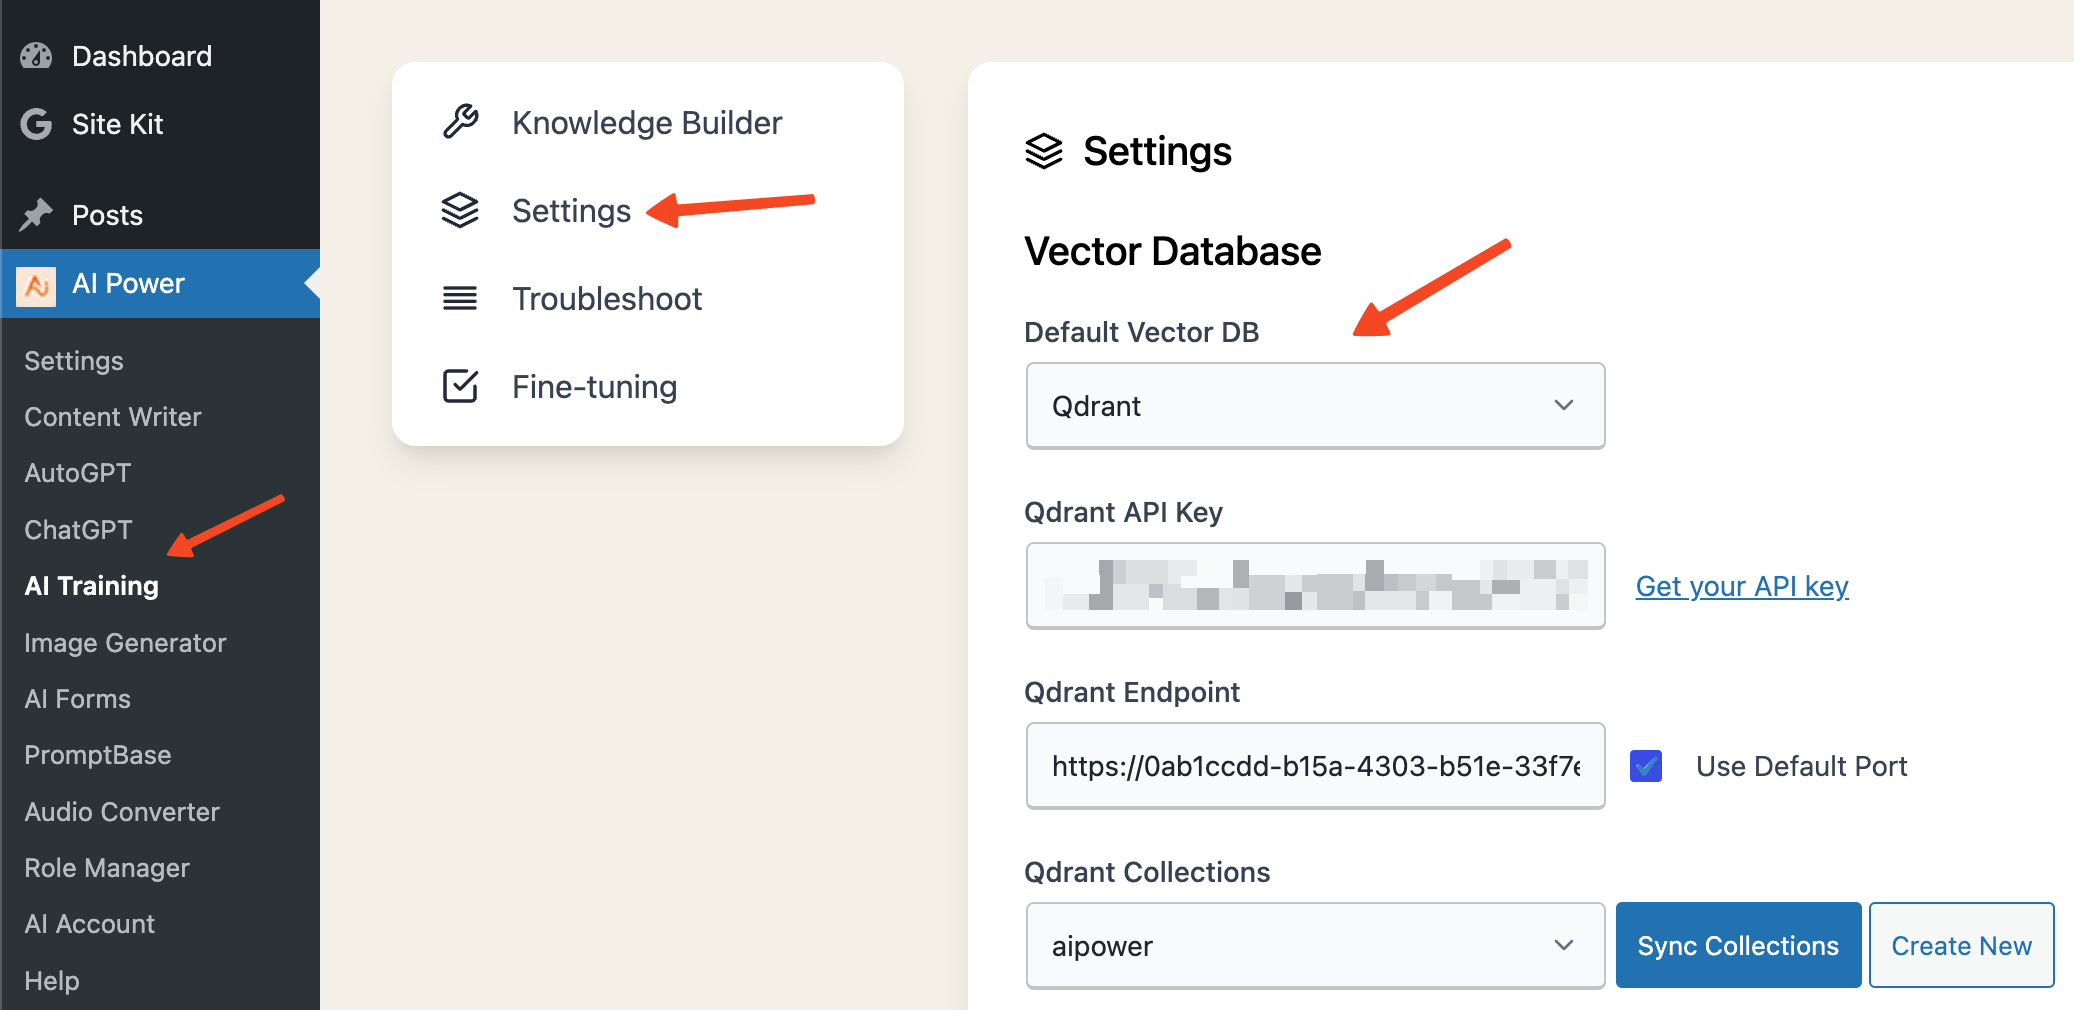
- Obtain Qdrant API Key:
- Visit Qdrant Cloud and sign up for an account if you do not already have one.
- Log in to the Qdrant console and select Clusters from the left menu.
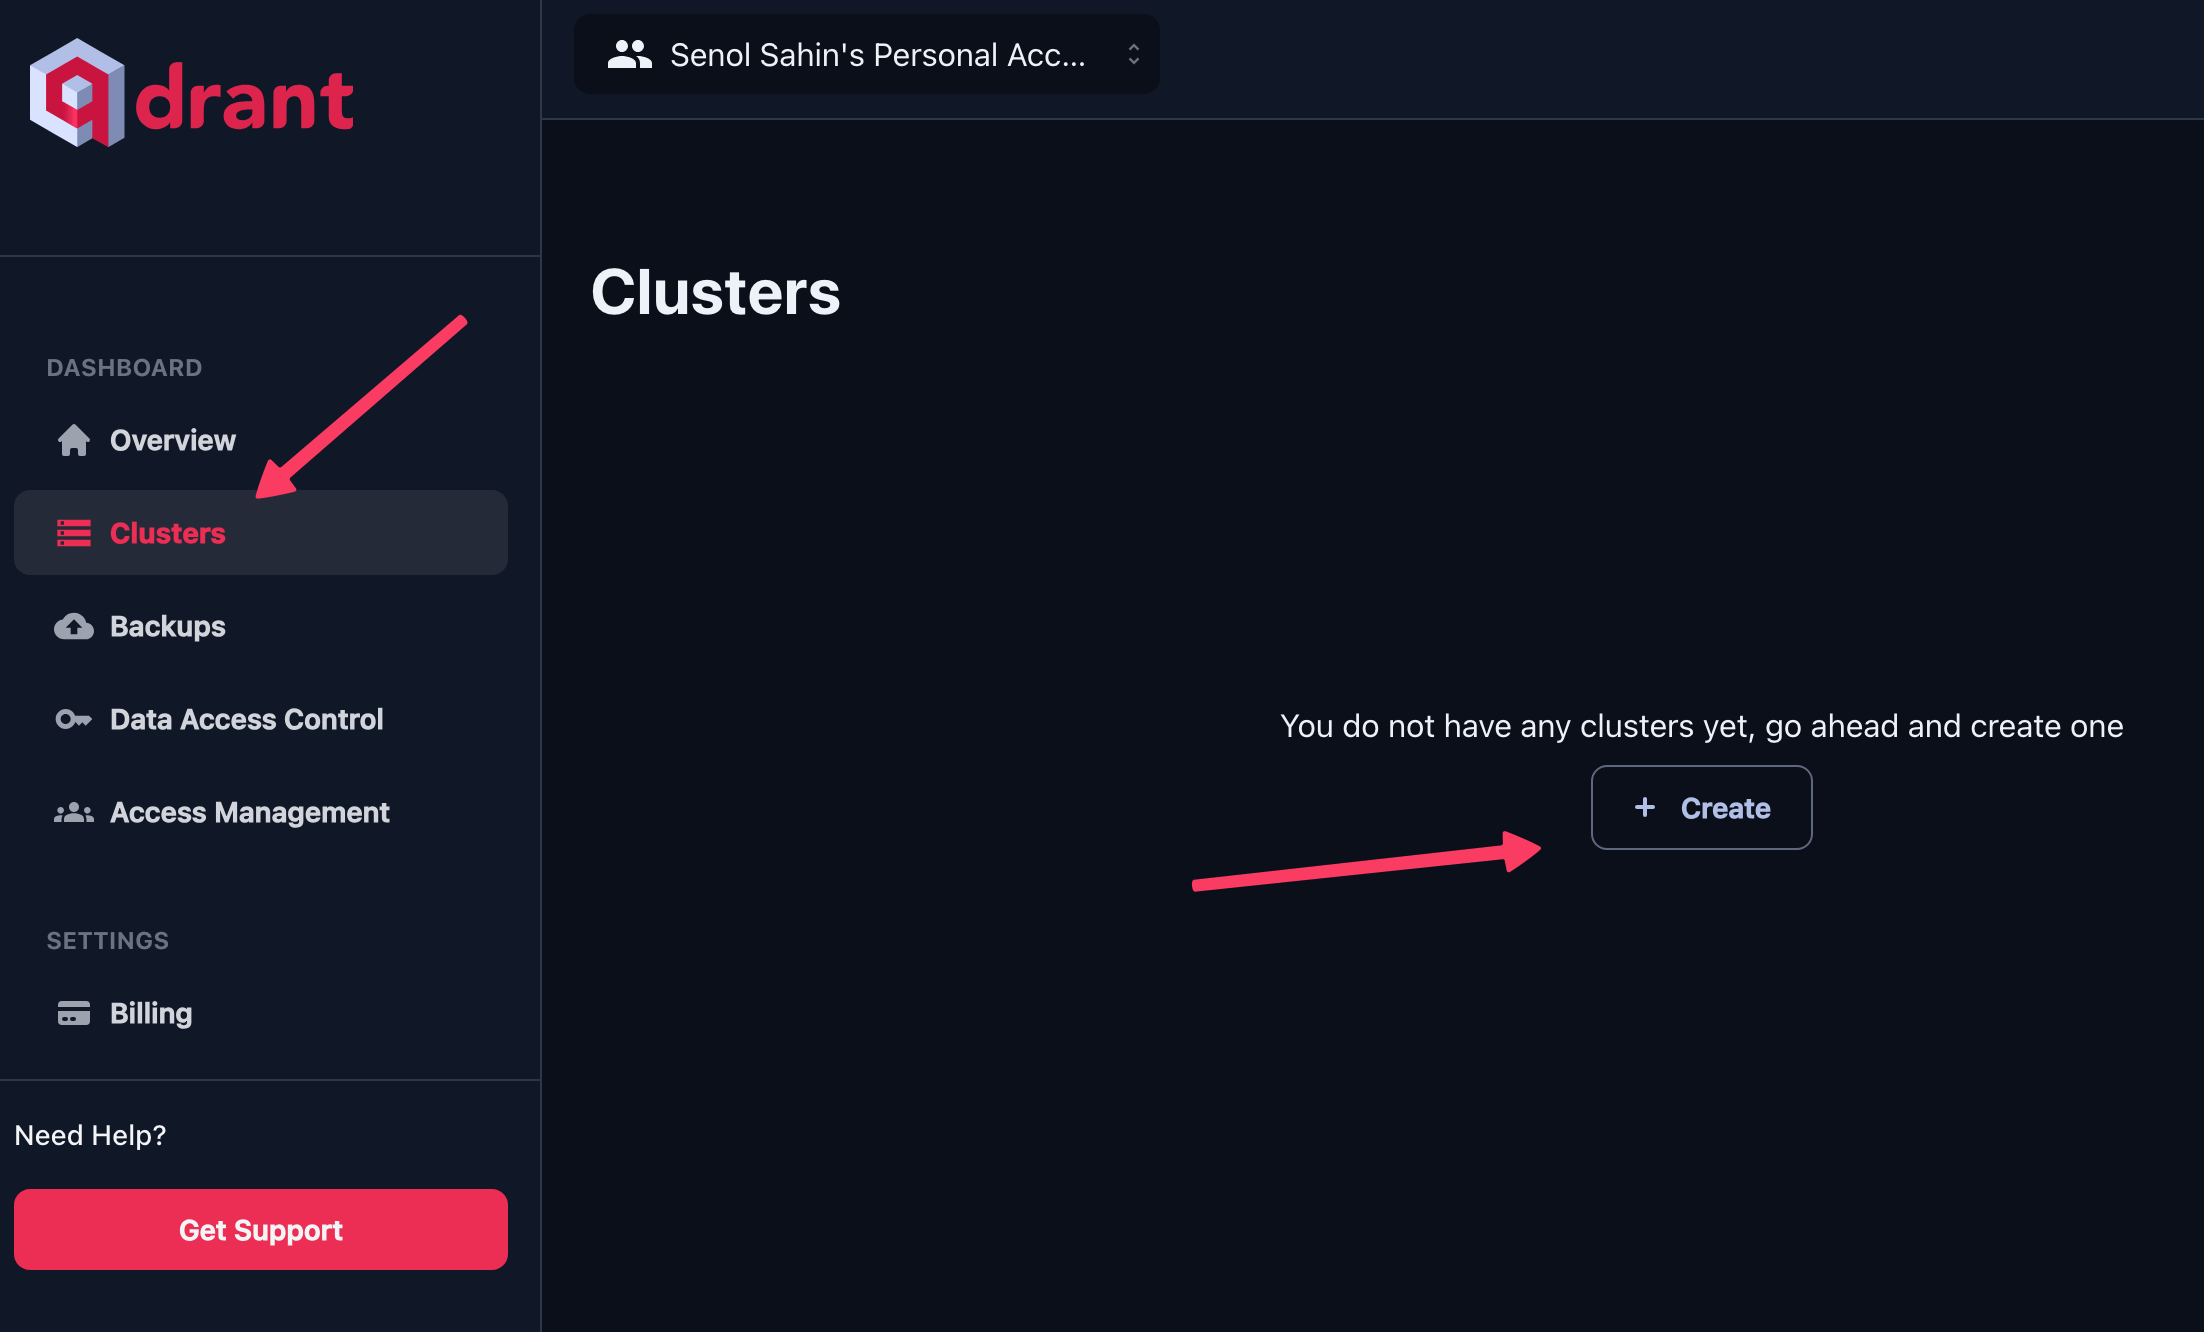
- Click the Create button to initiate a new cluster creation.
- Provide a name for your cluster and click Create.
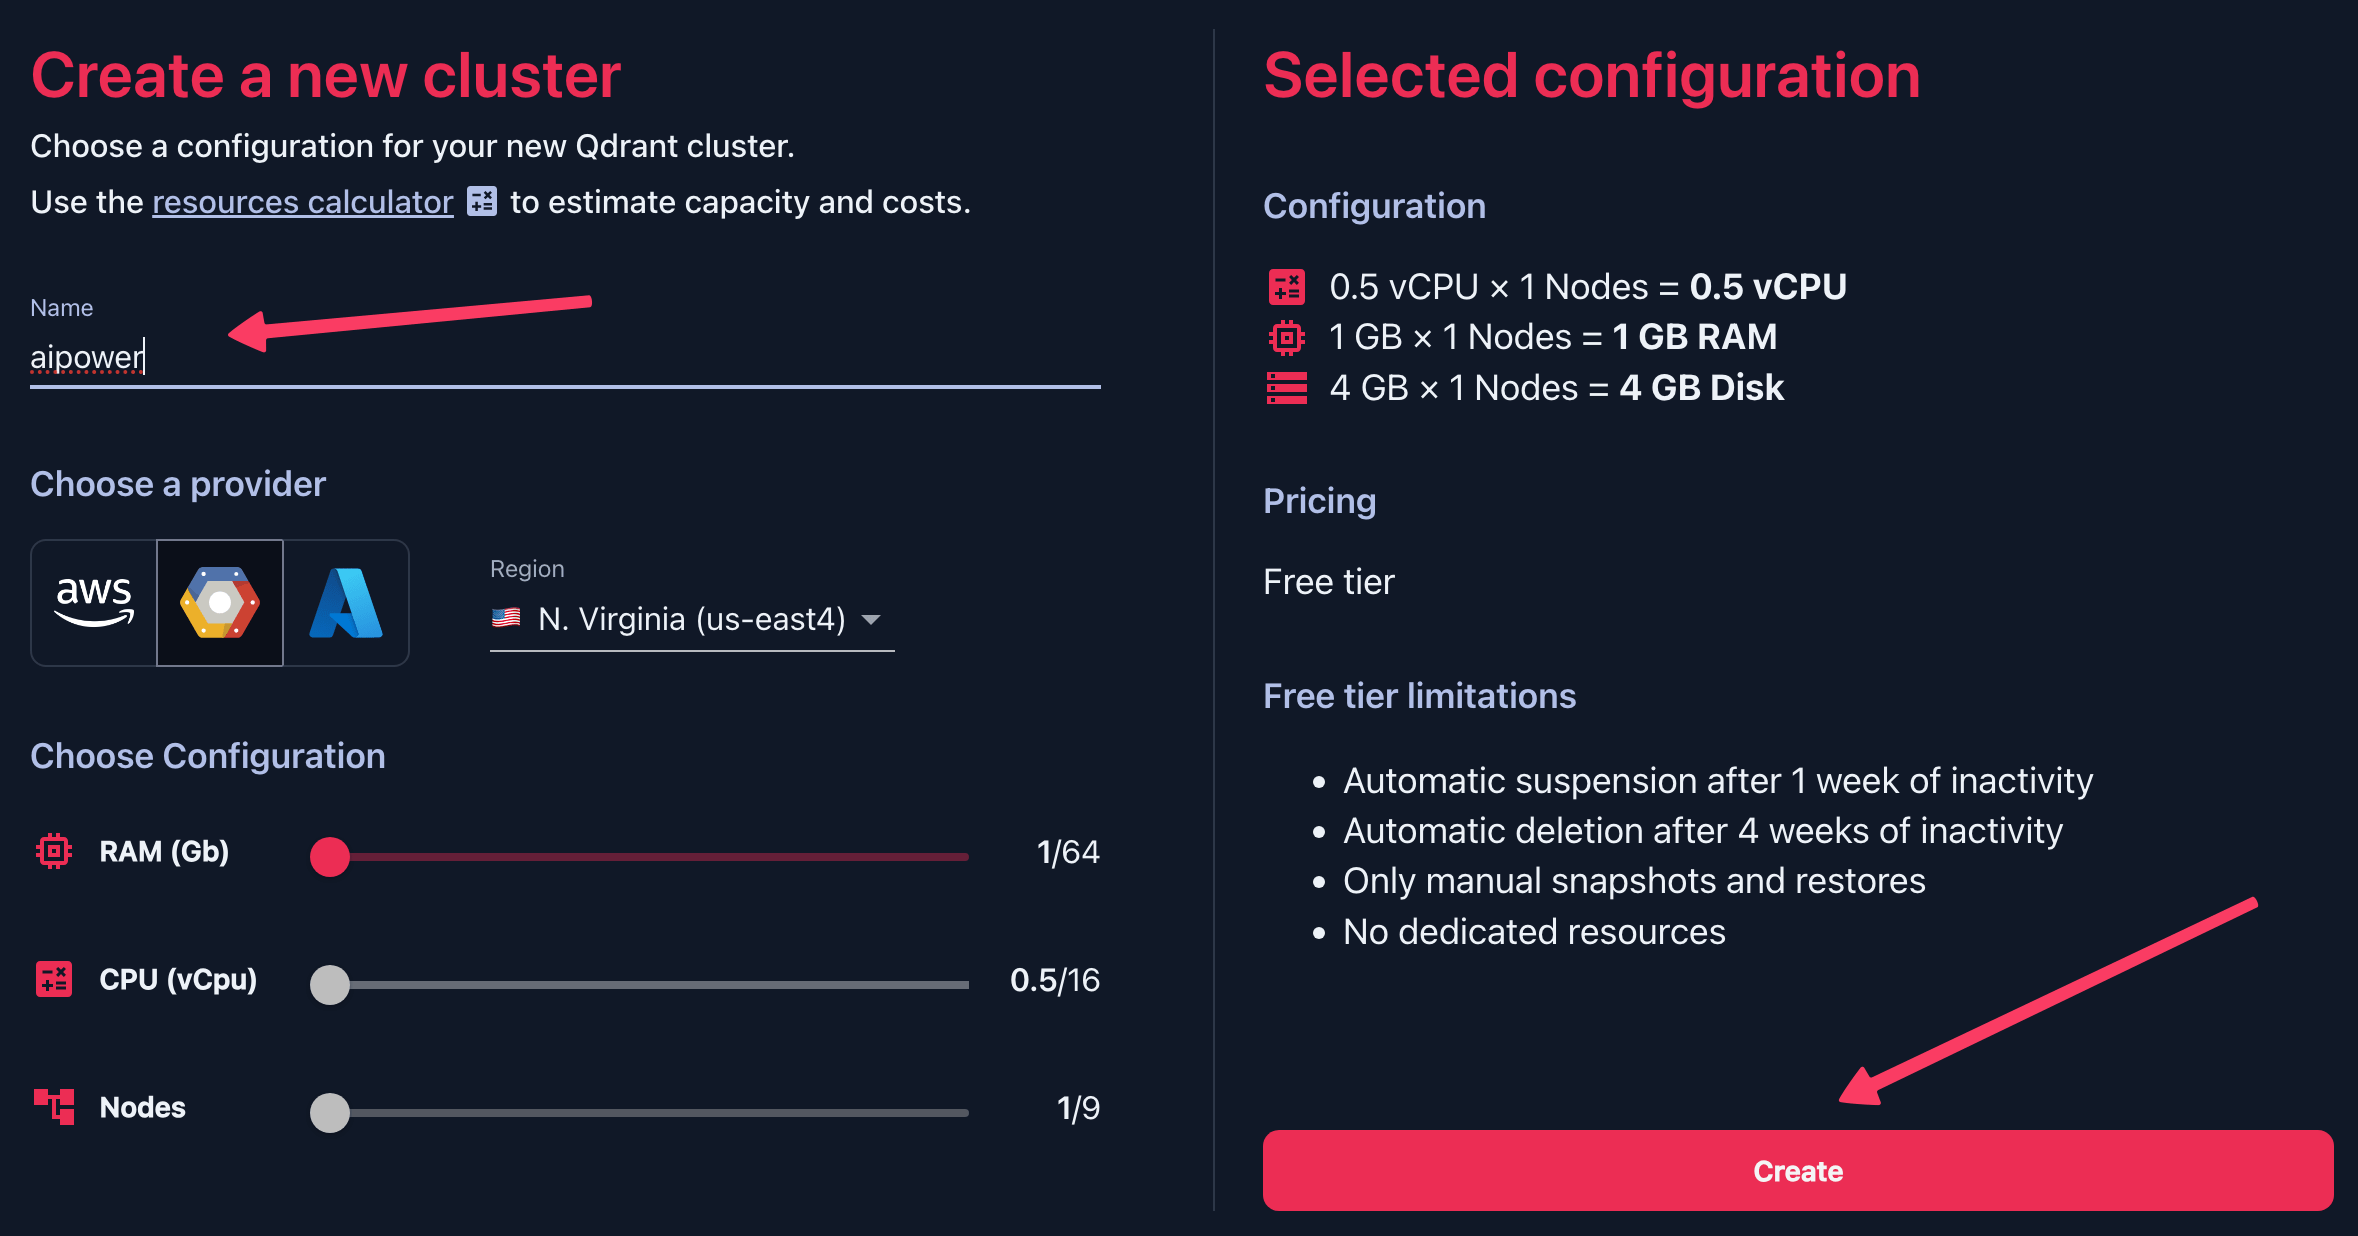
- Once your cluster is created, navigate to Data Access Control on the left menu.
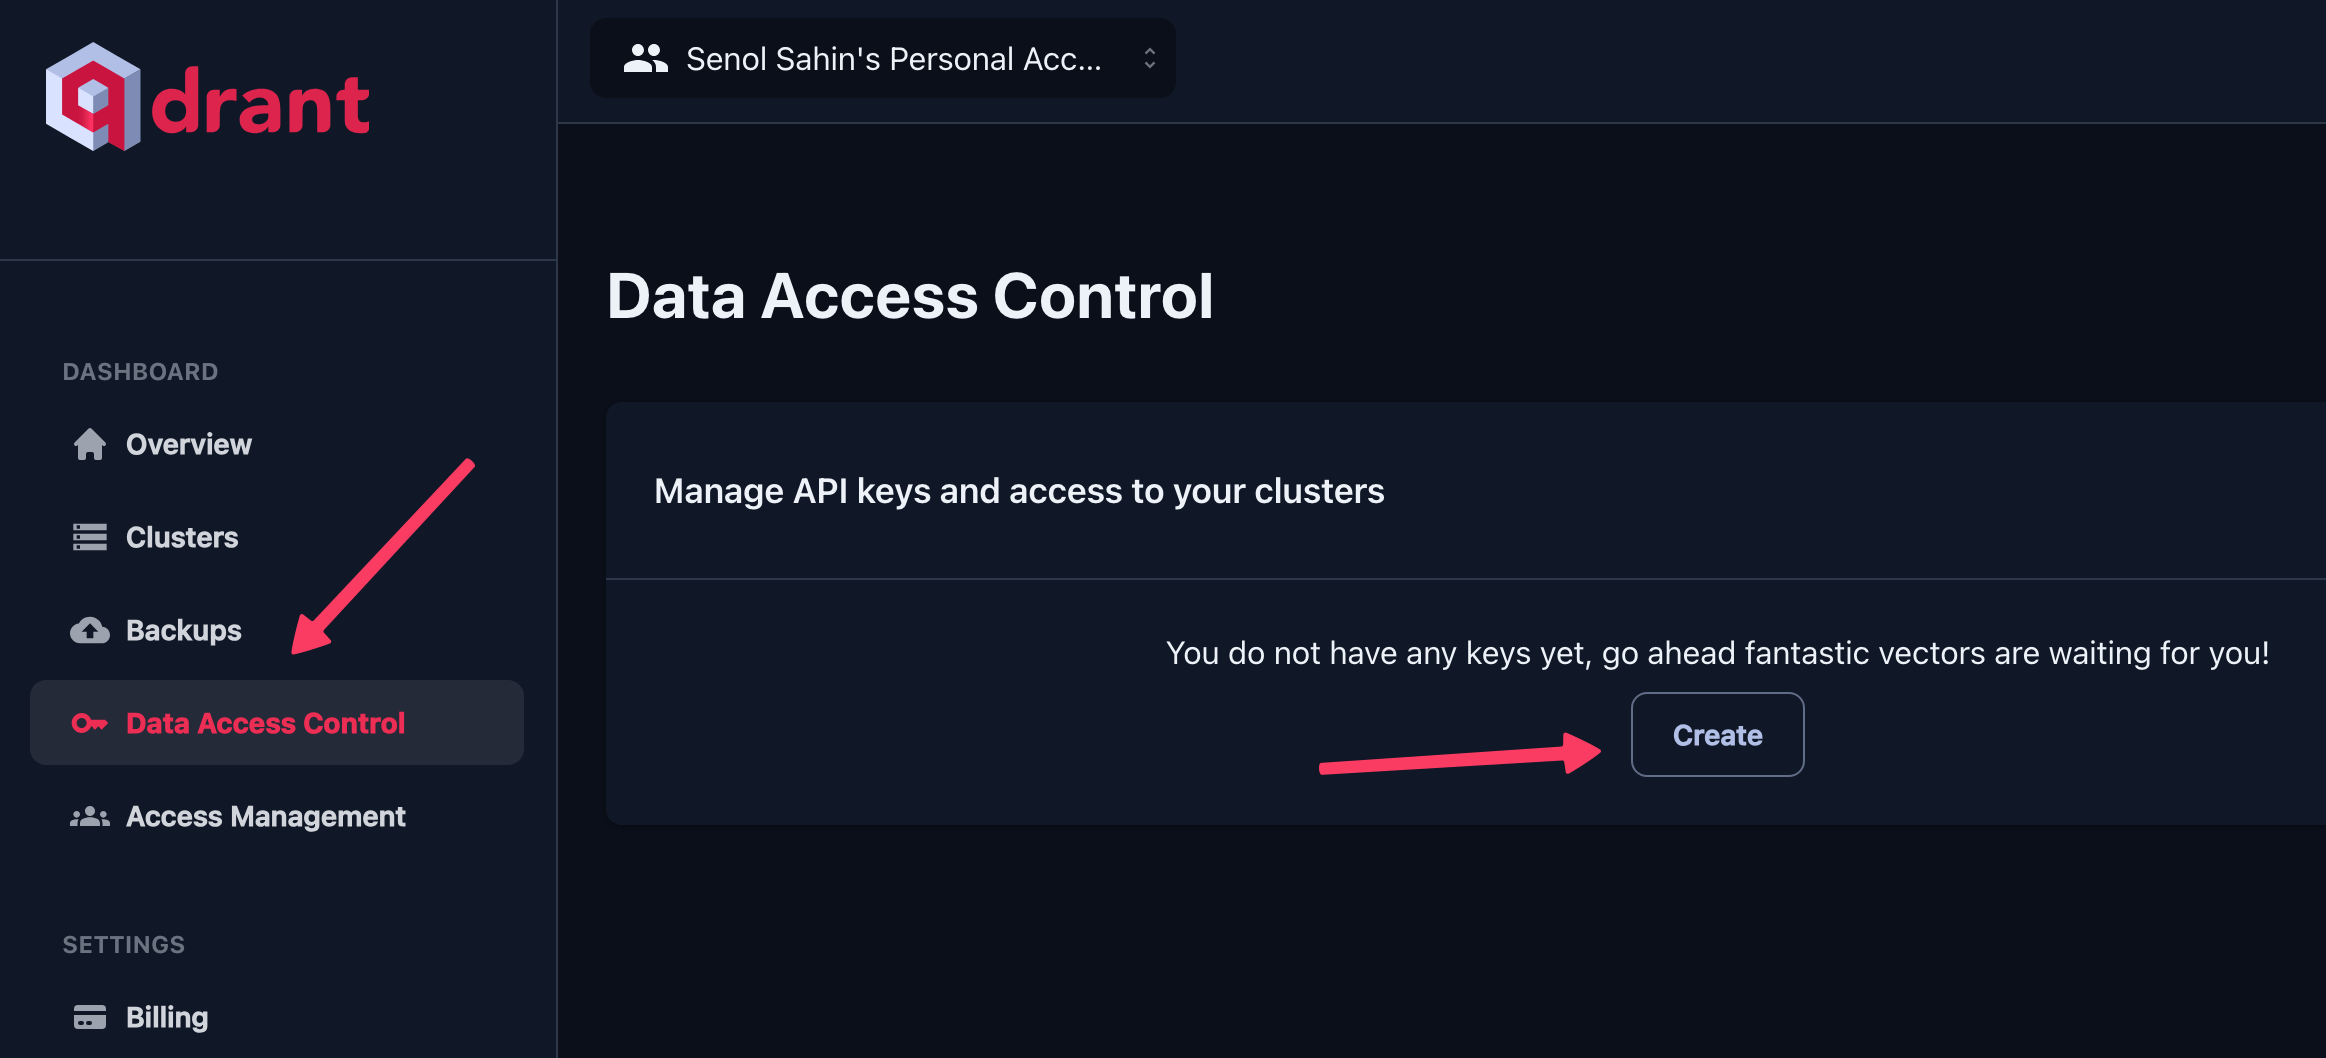
- Click the Create button. A modal window will prompt you to select the cluster for which you wish to generate an API key. Choose your cluster and click Ok.
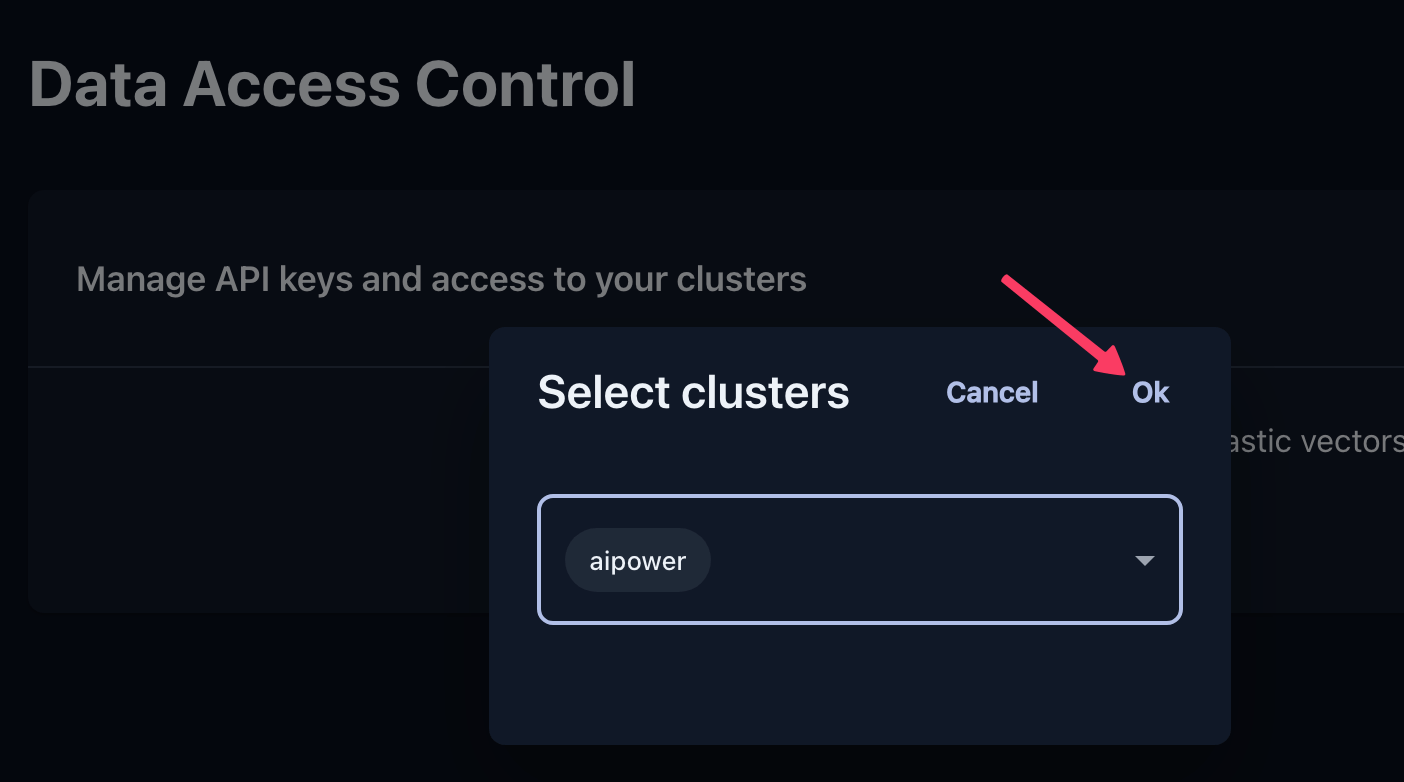
- Your API key will then be displayed. Click the Copy button to copy this key.

- Configure Qdrant in AI Power:
- Return to the AI Training - Settings tab in your AI Power plugin menu.
- Paste the copied API key into the Qdrant API Key field.
- To obtain the Qdrant Cluster URL, go back to the Qdrant console and click on Clusters in the left menu. Select your cluster to view its details and copy the endpoint URL.
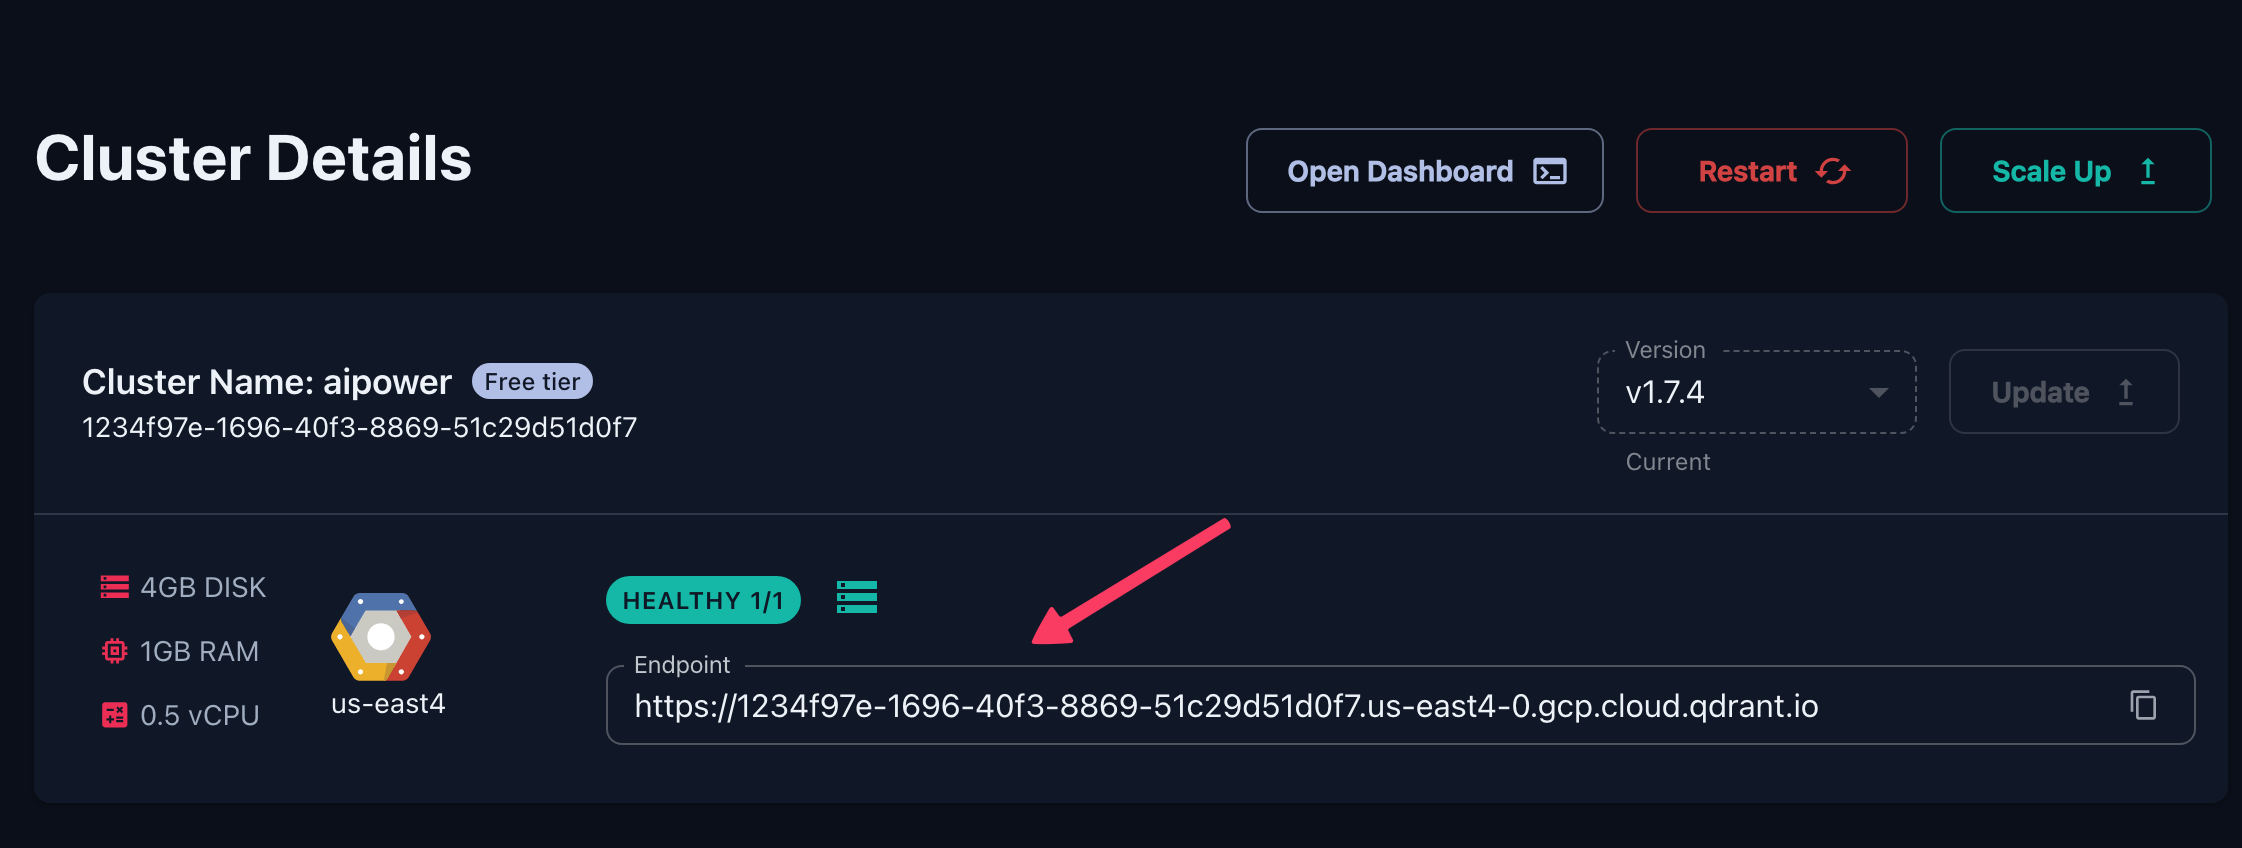
- Paste this URL into the Cluster URL field in the plugin settings.

- Create a New Collection:
- In the AI Power settings under AI Training - Settings, click the Create New button next to Qdrant Collections. This action will present a text field to enter a name for your new collection.
- Enter a desired name for your collection and click the Create button to establish a new collection.
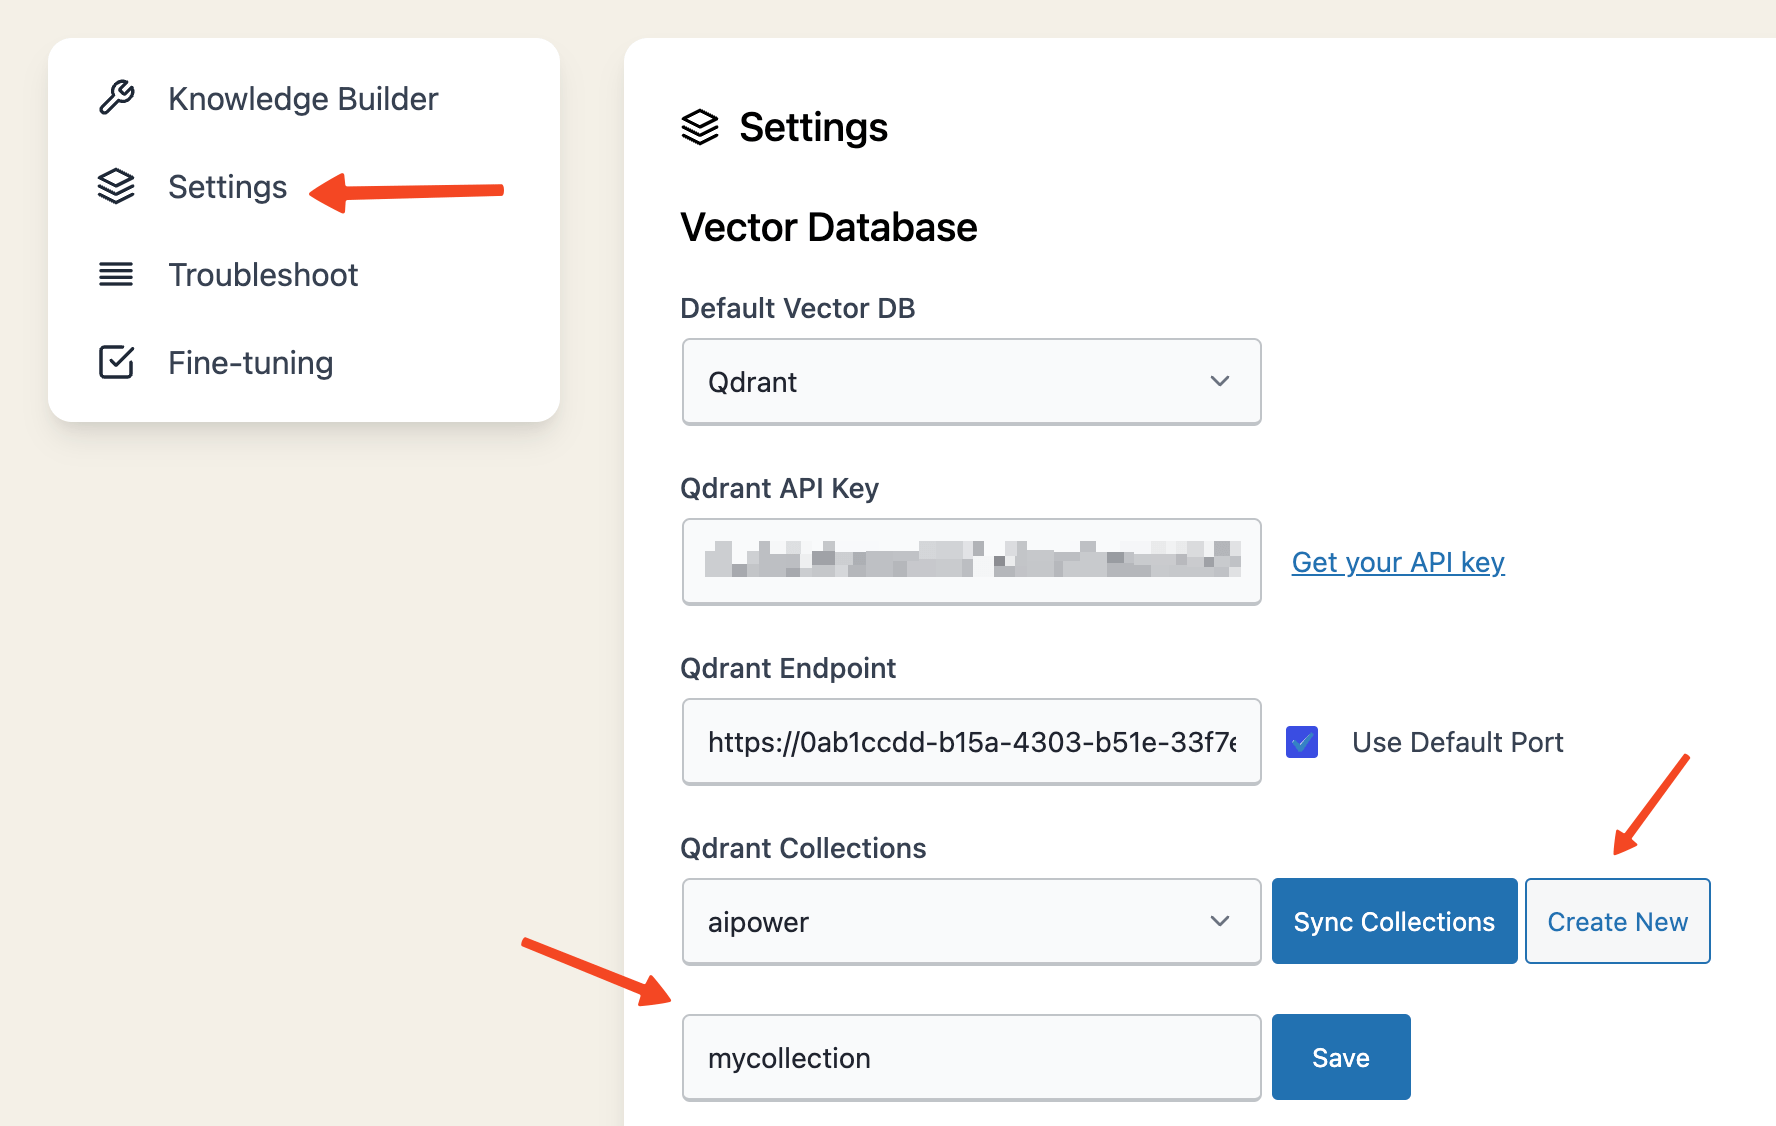
- Use the Sync button to synchronize your collections with AI Power.
- Save Your Configuration: Ensure all details are correctly entered and hit the Save button to apply your changes.
With these steps, you have successfully configured Qdrant as the vector database provider for AI Power. Your plugin is now ready to utilize Qdrant for embeddings and related AI functionalities.
Instant Embeddings
AI Power plugin features a robust tool called Instant Embeddings.
This feature allows you to generate embeddings for individual posts, pages, or products without the necessity of setting up a Cron Job or waiting for the Auto Scan to run.
This makes for a quicker and more flexible approach to generating embeddings.
To use Instant Embeddings, follow the steps below:
- Navigate to the post, page, or product for which you wish to create an embedding.
- Locate and select the checkbox next to the Instant Embedding option.
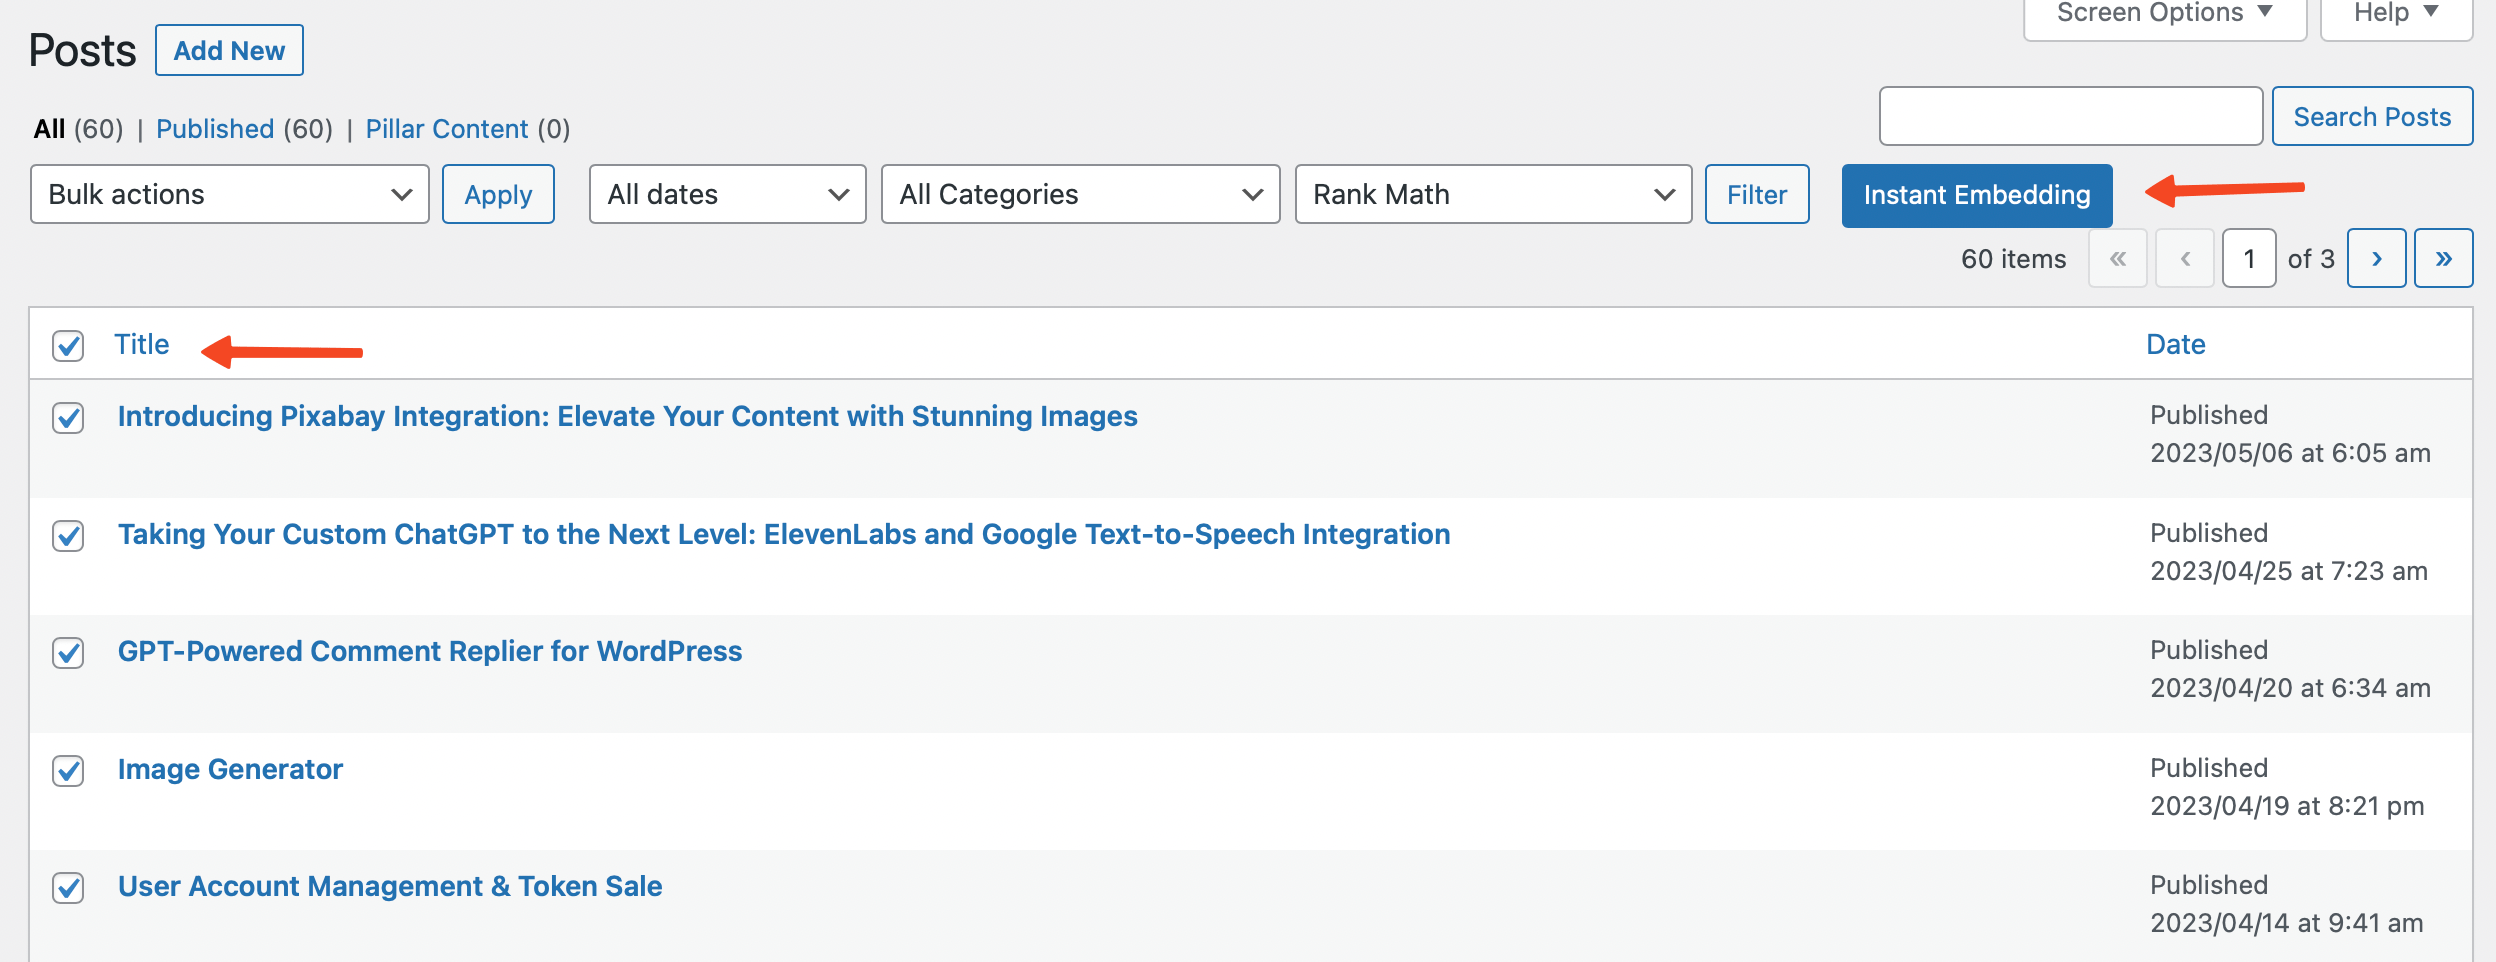
- The plugin will then generate an embedding for the selected content.
Custom Post Types
Pro plan users have the additional advantage of being able to create instant embeddings for custom post types.
Once you've upgraded to the Pro plan, you can easily generate embeddings for your custom post types.
- Navigate to any of your custom post type pages.
- Select your content.
- Click the Instant Embedding button.
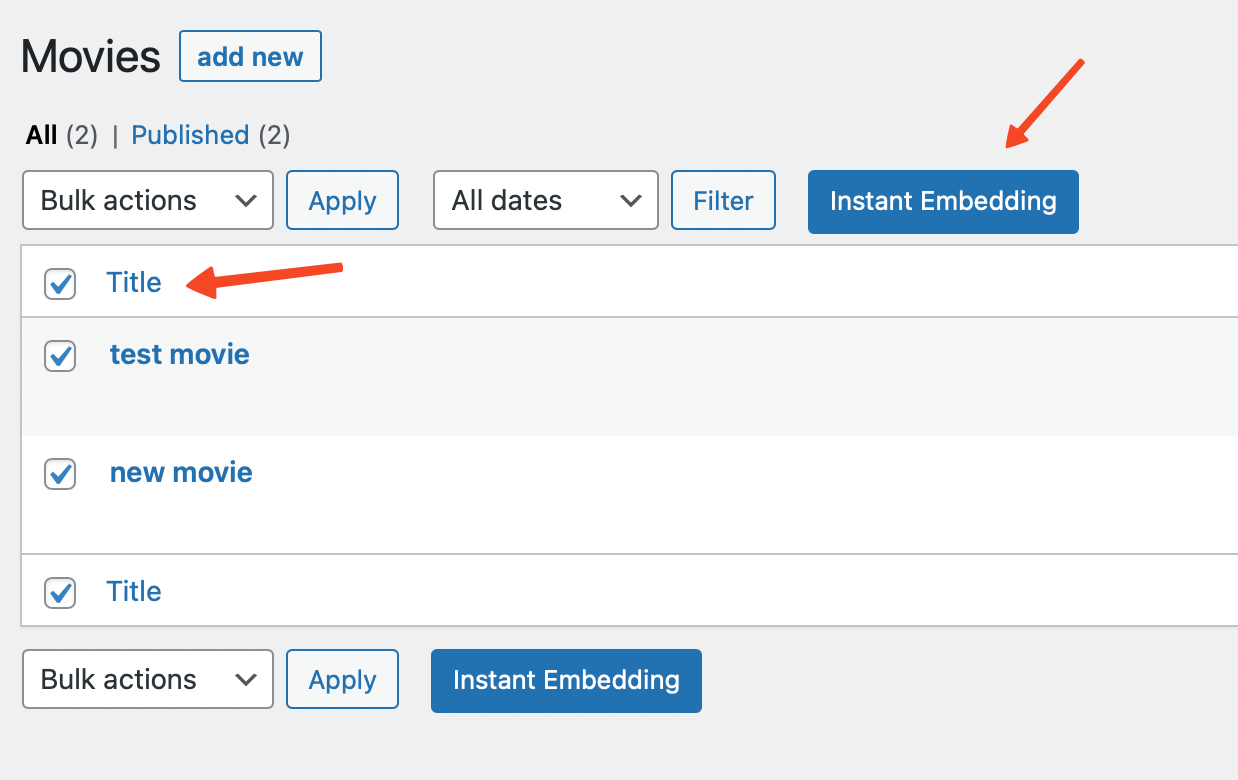
This action will create an instant embedding for your selected custom post type content.
This enhanced feature of the Pro plan empowers you to create embeddings for a wider range of content types, further enhancing the capabilities of your AI-powered chatbot.
Knowledge Builder
You can provide data to your bot using Knowledge Builder.
To use the Knowledge Builder, follow these steps:
- Go to AI Training - Knowledge Builder.
- Enter your data and hit save. That's it!
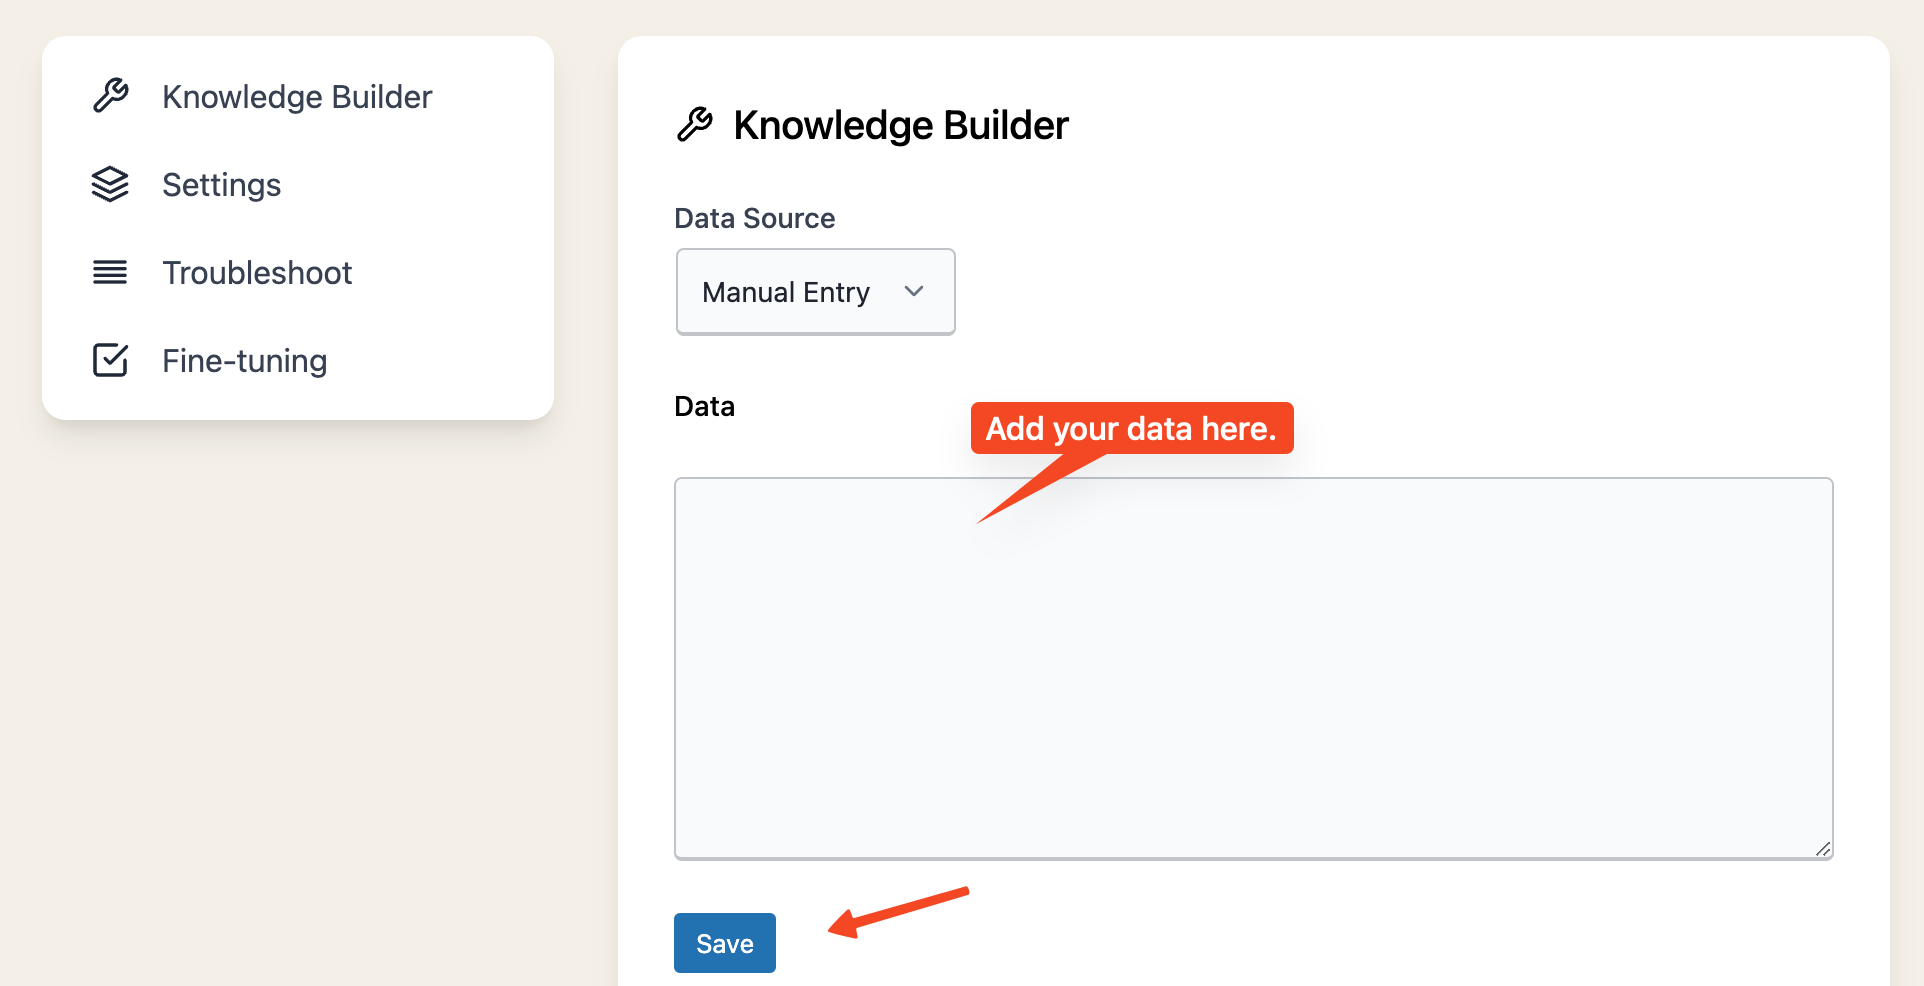
PDF Upload
The PDF Upload feature of AI Power allows you to upload and embed PDF documents, enabling your chat bot to read and understand the content within those documents.
This feature processes your PDF files by each page, making the information available on the same page.
Here's how to use this feature:
- Navigate to the AI Training page in AI Power.
- Select PDF Upload from data source.
- Click on the Browse button to select a PDF document from your device.
- After you have selected a PDF document, click on the Start button to begin the upload and embedding process.
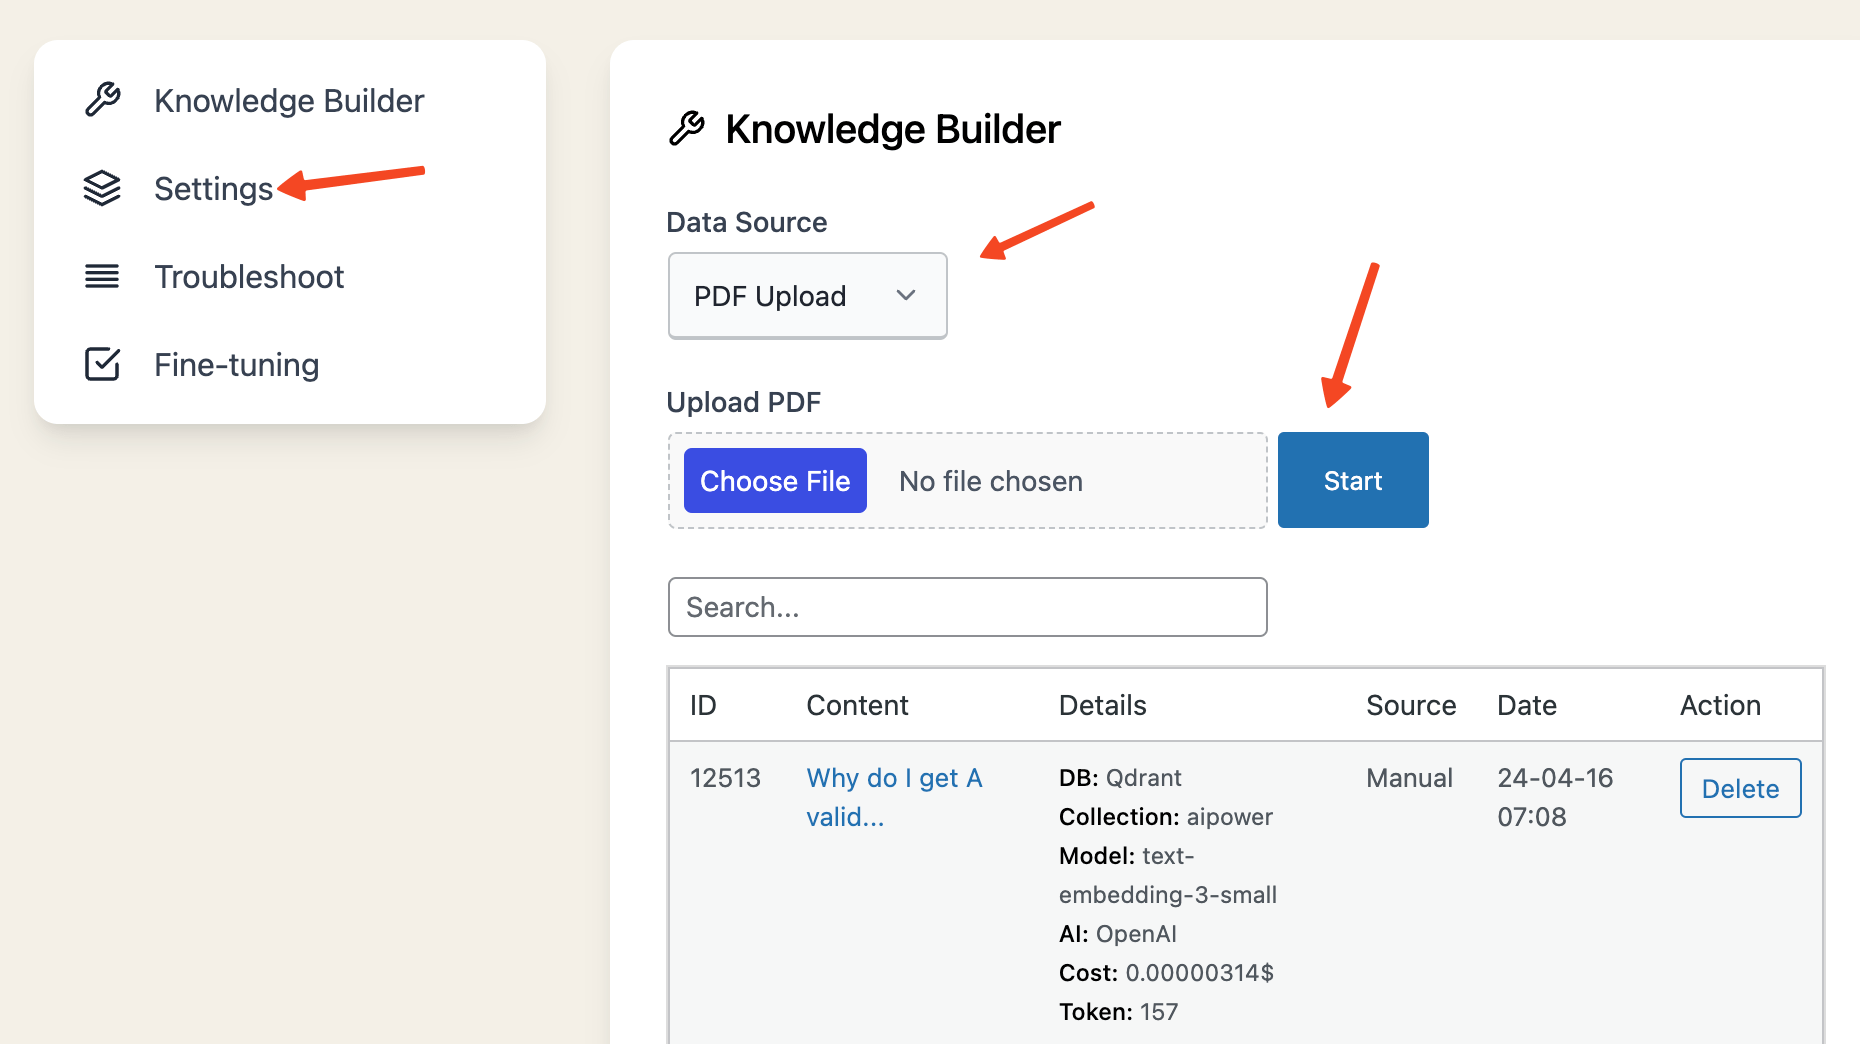
- Wait for the process to complete. You can monitor the progress from the progress bar on the screen. Please note that the duration of this process will depend on the size and complexity of the PDF document.
- Once the process is completed, your PDF document will be embedded and you will be able to see the content on the same page. Each page of the document is embedded separately, making it easy to understand the structure of the document.
This feature is an excellent way of making complex or large volumes of information readily available and understandable to your AI, thereby improving its ability to generate accurate and relevant responses.
For optimal results, it is recommended to upload PDF documents that are primarily text-based. Documents with numerous images or complex formatting may not be processed as accurately.
By using this feature, you can enhance the functionality and effectiveness of your AI-powered chatbot, making it an even more powerful tool for delivering high-quality, contextually relevant responses to user inquiries.
Auto-Scan
To be able to use auto-scan feature you need to setup a cron job.
Configuring Cron Jobs
- Follow the steps outlined in this guide to set up a Cron Job.
- Ensure that you include the specific PHP command for the Embeddings job in your Cron Job configuration to make it functional.
- You can find your php command under AI Training page.
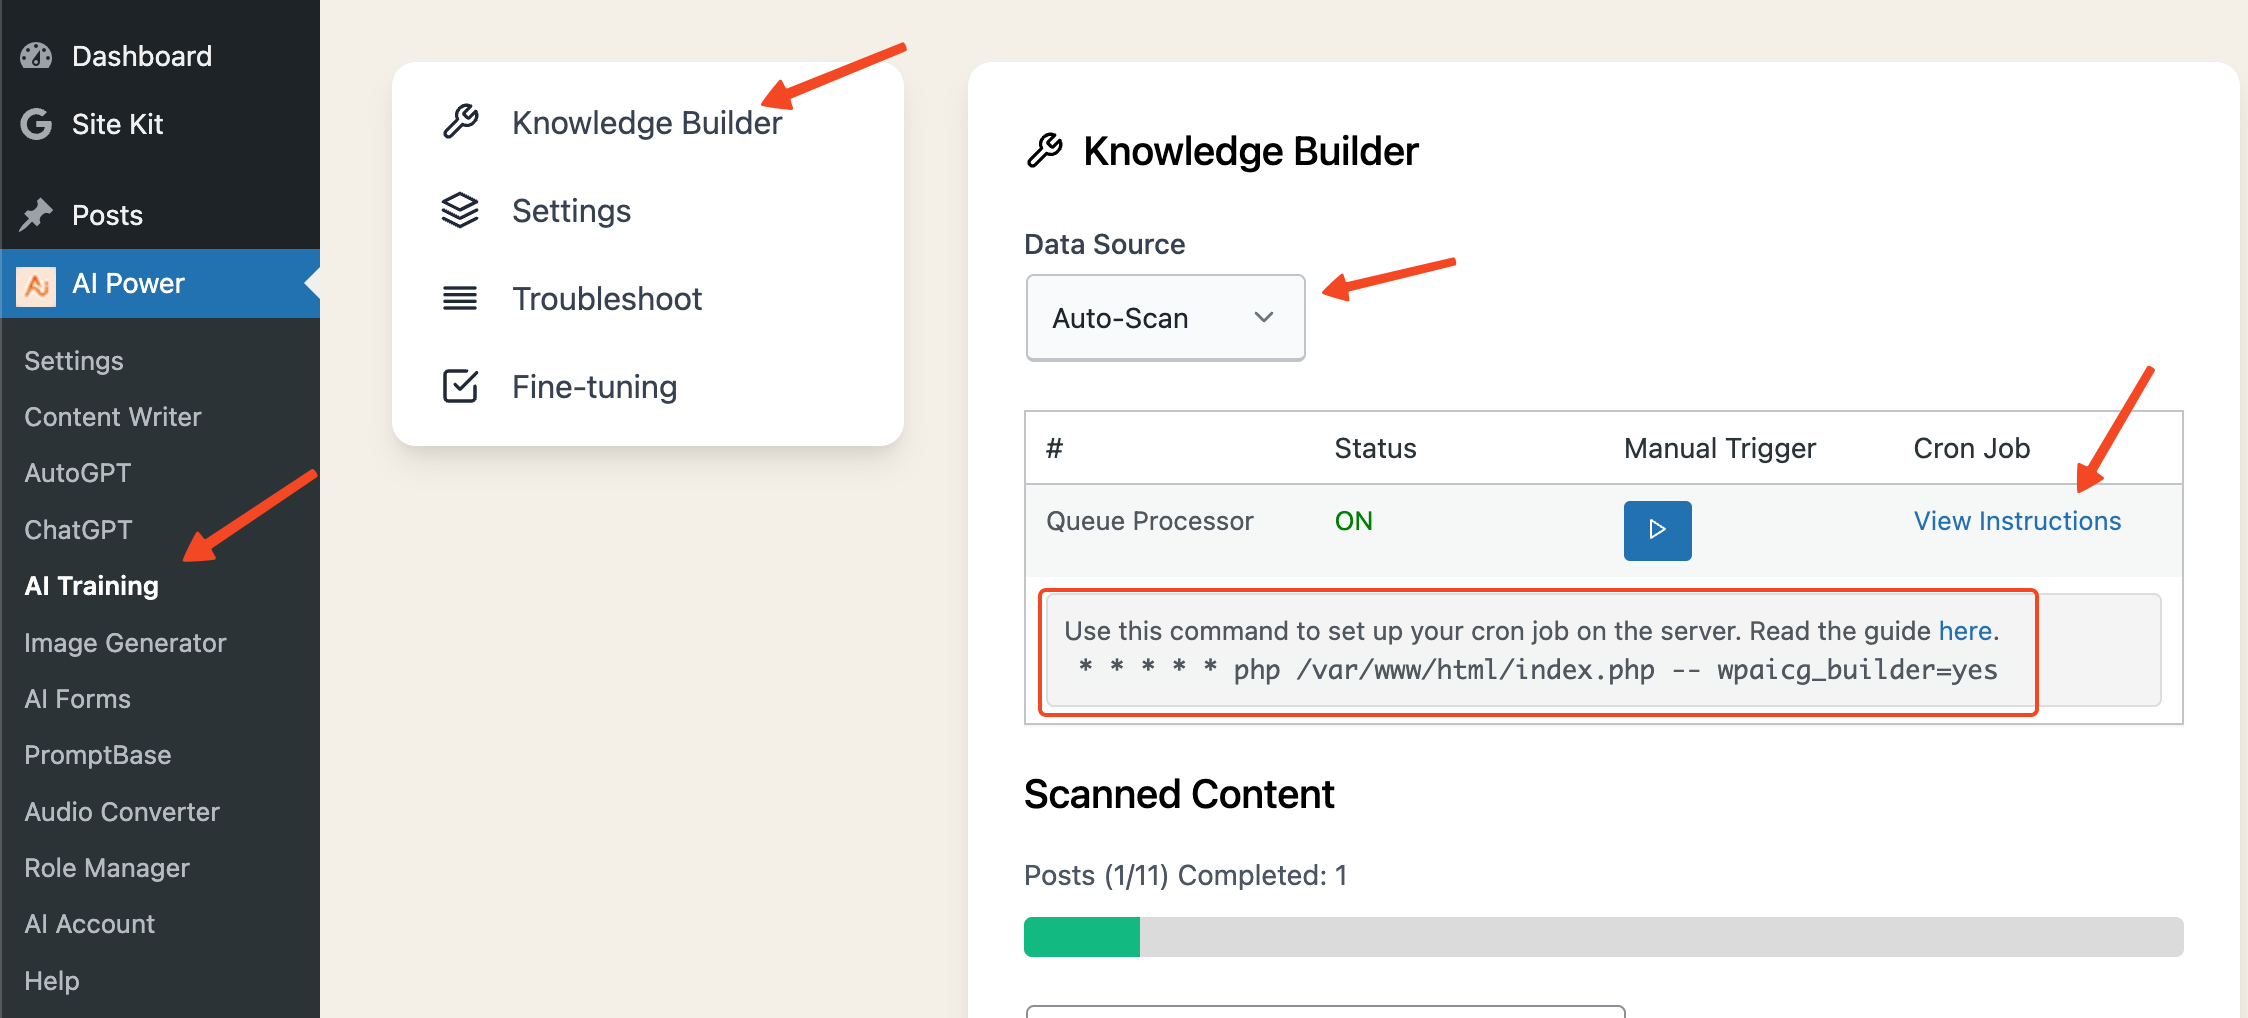
Your PHP command may vary depending on your server setup.
For the Embeddings module, you need to set up only one cron job.
Embeddings:
* * * * * php /var/www/html/index.php -- wpaicg_builder=yes
Learn how to setup a cron job here.
This is how my Cron setup looks like.
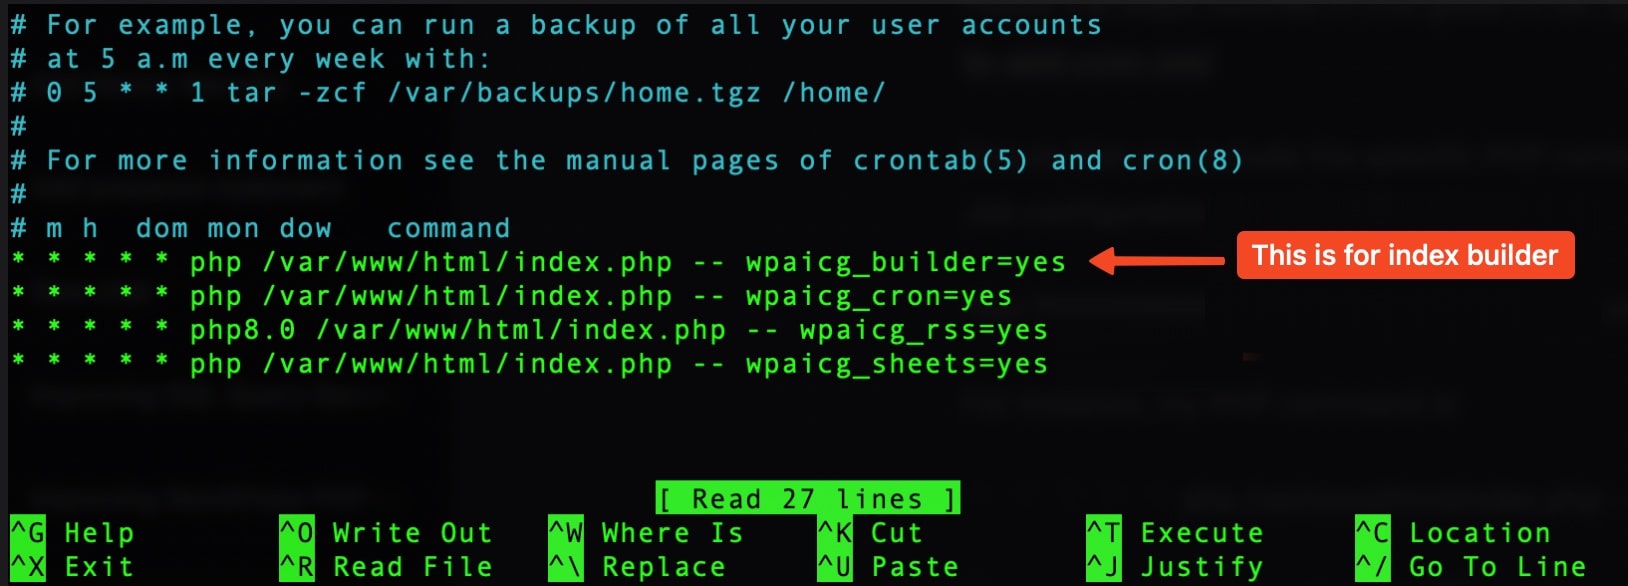
Once the Cron Job setup is complete, you should see a message stating, “Great! It looks like your Cron Job is running properly. You should now be able to use the Auto Scan."
Configuring the Auto-Scan
Once you have set up the Cron Job, you can start using the Auto Scan. Here's how:
- Navigate to the **AI Training - Settings ** page in AI Power.
- Toggle the Enable Auto-Scan option to Yes. Please note that enabling this option will start scanning your website content. Moreover, every time you create a new post, page, or product, it will be indexed automatically.
- Check the box for Posts, Pages, and Products.
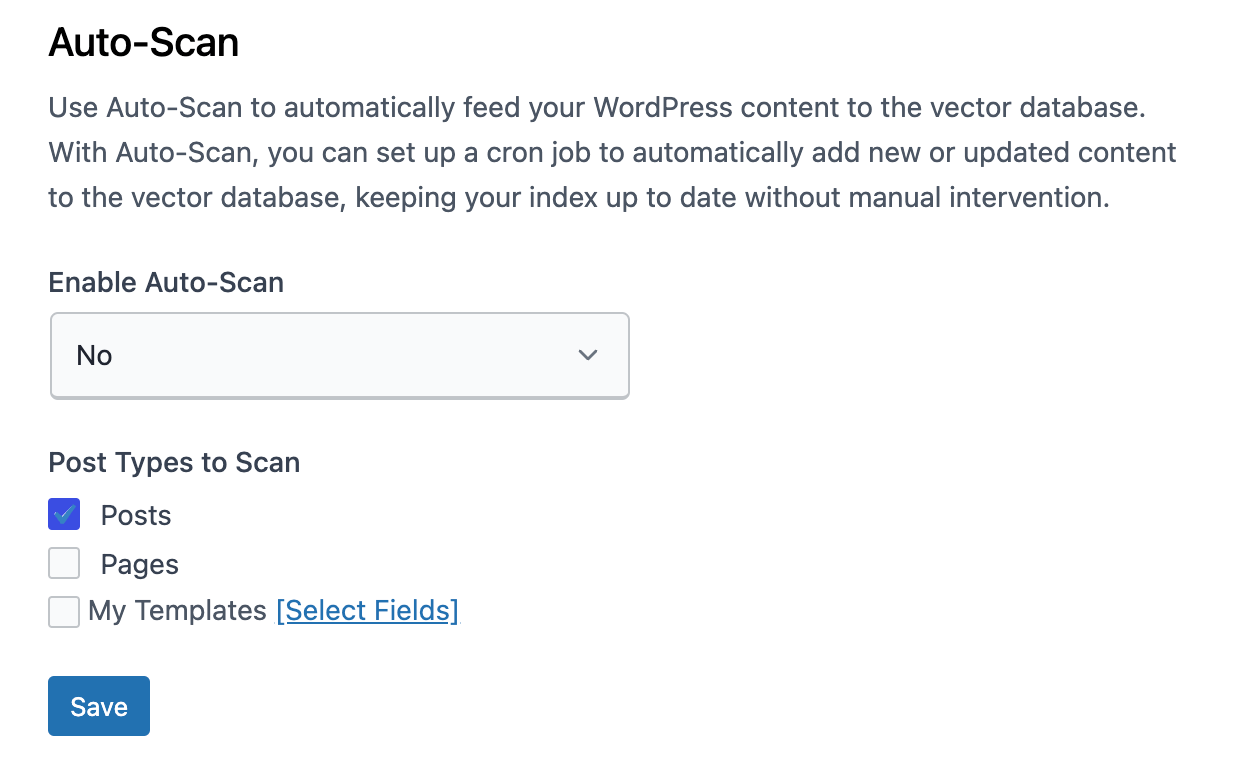
- Click on the Save button.
- Wait for the indexing process to finish.
- You can track the progress of the indexing in the Auto Scan tab.
Scanning Custom Post Types
The Pro plan of AI Power offers the ability to scan custom post types.
Once you have upgraded to the Pro plan, you can navigate to the AI Training - Settings tab.
Here, you will find the option Post Types to Scan:. If you have any custom post types, they will be listed here.
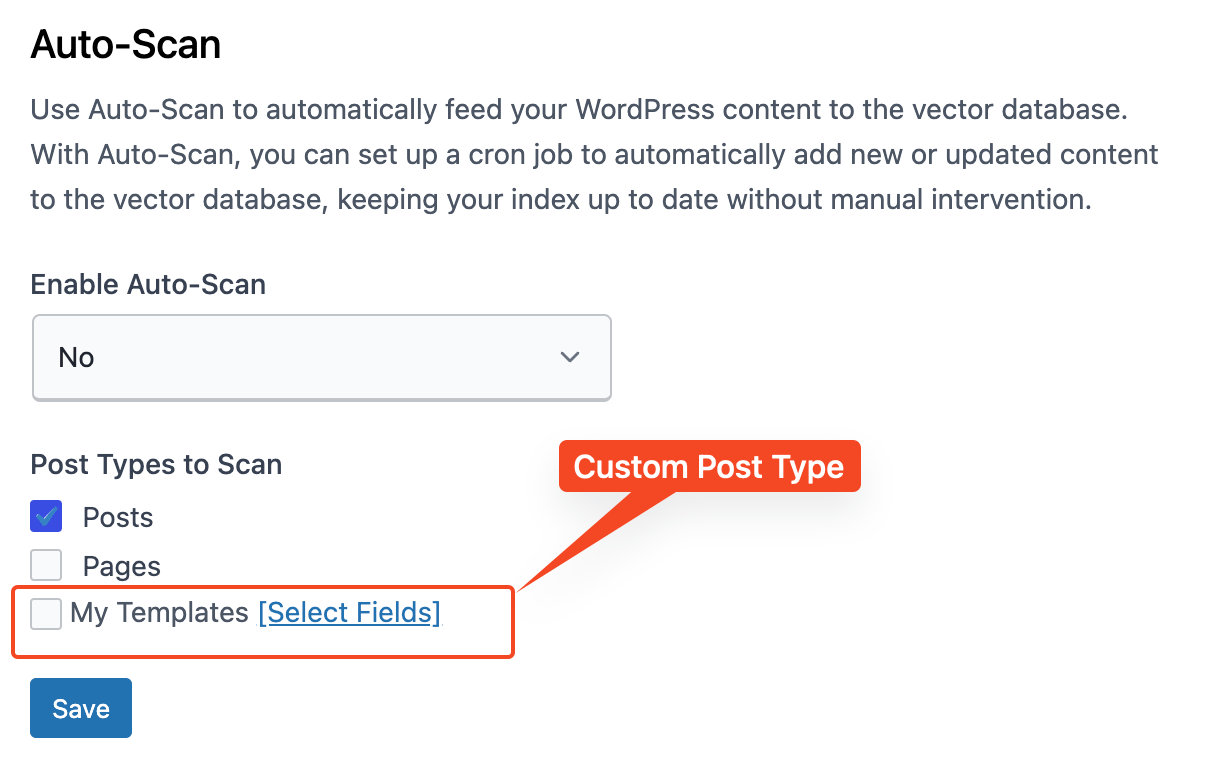
For each custom post type, you will find a button labeled Select Fields next to it.
Clicking on this button will open a modal window where you can select fields and assign them labels.
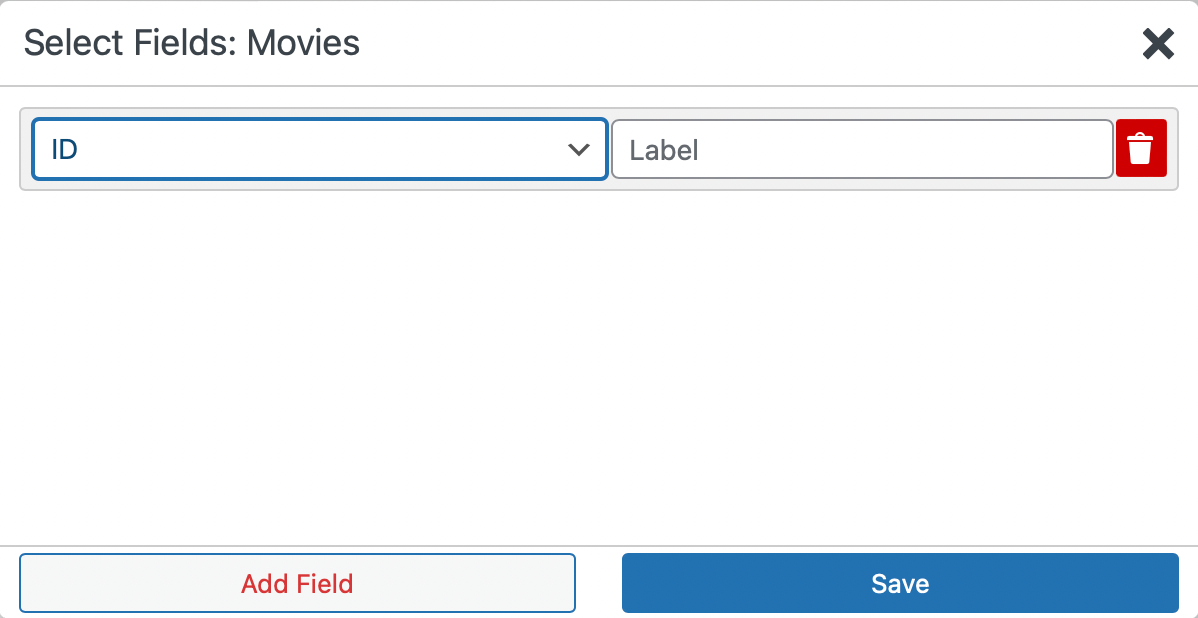
These metadata will be added into the embeddings to deliver better search results.
Using the Auto Scan
The Auto Scan is a powerful tool that allows you to manage and monitor the indexing of your website's content.
Once your Cron job is set up and running, all your content will be indexed and appear under the AI Training page in the AI Power.
The Auto Scan is divided into three tabs:
- Indexed: This tab displays a list of pages that have been successfully indexed.
- Failed: This tab lists the pages that failed to index. There can be several reasons why a page may not index, but the most common issue is related to encoding. If your pages have encoding problems, they may fail to index. To resolve this, you need to clean them up.
- Skipped: This tab shows a list of pages that have been skipped. The Auto Scan does not index pages if their content is less than 50 characters. Therefore, if you have shortcodes or other content that is less than 50 characters, they will likely not be indexed.

Understanding the Index List
The index list displays several columns:
- Title: This is the title of the page, post, product, or custom post type. It is clickable, and once clicked, it will show the embedded content.
- Token: Estimated token usage.
- Estimated: Estimated cost. OpenAI charges for embeddings based on the number of tokens, with the rate being $0.0004 per 1K tokens.
- Source: This shows the type of content that has been indexed (page, post, product, or custom post type).
- Status: This shows the status of the indexing process.
- Start: This shows the time when the indexing process started.
- Completed: This shows the time when the indexing process completed.
Managing Your Indexes
Under the Action column, there are two buttons:
- Reindex: This button allows you to reindex the content. This is particularly useful when you have updated a post, page, or product and you want the index to reflect the latest changes.
- Delete: This button allows you to delete an index.
Through the Auto Scan, you have full control over the indexing process, ensuring your website's content is properly embedded for optimal use by the AI Power plugin.
FAQ
Maximum Context Length
What does the error message "This model’s maximum context length is 4097 tokens. However, you requested 4893 tokens" mean?
This error message indicates that the total number of tokens (which include individual words and punctuation) in the content you're trying to generate is exceeding the maximum limit of 4097 tokens allowed by the model. Tokens are the smallest units of meaning that the model can process, and the limit exists to ensure optimal model performance. There are two primary ways to address this:
- Lower the maximum token value: You can adjust the maximum token value to a lower number in your plugin settings. We recommend setting it to 500-700 tokens for optimal performance without losing the quality of output.
- Split your content into chunks: If you are dealing with large content, consider dividing it into smaller pieces. Each piece should ideally not be more than 1000 words. This will ensure that each chunk of content remains within the model's token limit, and thus can be processed efficiently.