GPT Agents
GPT Agents are the key components of the AutoGPT module.
Each agent is responsible for a specific task, and they must be configured correctly for the entire system to function properly.
The current version supports four GPT Agents, with plans to add more in the future.
| GPT Agent | Description | Availability |
|---|---|---|
| Queue Processor | The central GPT Agent responsible for processing tasks in the Queue tab, submitted by other agents. This agent must be configured for the other GPT Agents to function. | All plans |
| Google Sheets | Responsible for retrieving data from configured Google Sheets at defined intervals and sending it to the Queue Processor agent for processing. | Pro plan |
| RSS | Responsible for retrieving data from entered RSS feeds at defined intervals and sending it to the Queue Processor for processing. | Pro plan |
| Embeddings | Responsible for monitoring new posts, pages, and WooCommerce products; once published, it embeds them in a vector database and indexes them to make the content available for the chatbot. | All plans |
| Twitter Bot | Responsible for writing a tweet for a post or sending tweets based on defined keywords and time intervals. | Pro plan |
Requirements
To ensure that AutoGPT and its GPT Agents function correctly on your website, there are several requirements that must be met:
| Requirement | Description |
|---|---|
| Server-side Cron Jobs | AutoGPT and GPT Agents rely on server-side Cron Jobs to automate tasks and maintain their functionality. WordPress Cron Job plugins are not supported; you must set up Cron Jobs at the server level. |
| PHP 7.4 and above | Your server must be running PHP version 7.4 or higher to ensure compatibility with AutoGPT and its GPT Agents. |
| Google Cloud Account | For the Google Sheets GPT Agent, you need to have a Google Cloud account. This is required to access and retrieve data from the configured Google Sheets. |
| PHP XML Extension | The RSS GPT Agent requires the PHP XML extension to be installed and enabled on your server. This allows the agent to retrieve and process data from the entered RSS feeds. |
| Twitter Account | For the Twitter Bot GPT Agent, you need to have a Twitter account. This agent will use your Twitter account to write and send tweets. |
By meeting these requirements, you'll ensure the smooth operation of the AutoGPT module and its GPT Agents on your website.
Cron Job Setup
AutoGPT's GPT Agents require the use of a server-level Cron Job for proper functioning. WordPress Cronjob plugins will not work for this purpose.
There are two types of cron jobs: real server-side cron jobs and WordPress cron jobs.
Real server-side cron jobs are scheduled tasks that run directly on the server, independent of WordPress.
They are more reliable and precise when it comes to execution time.
On the other hand, WordPress cron jobs are pseudo-cron jobs that depend on user visits to the site and only run when a user visits a WordPress page.
This approach can lead to delays or missed tasks if there are no visitors during the scheduled time.
GPT Agents in the AutoGPT module work exclusively with real server-side cron jobs, ensuring consistent and reliable performance without relying on user visits.
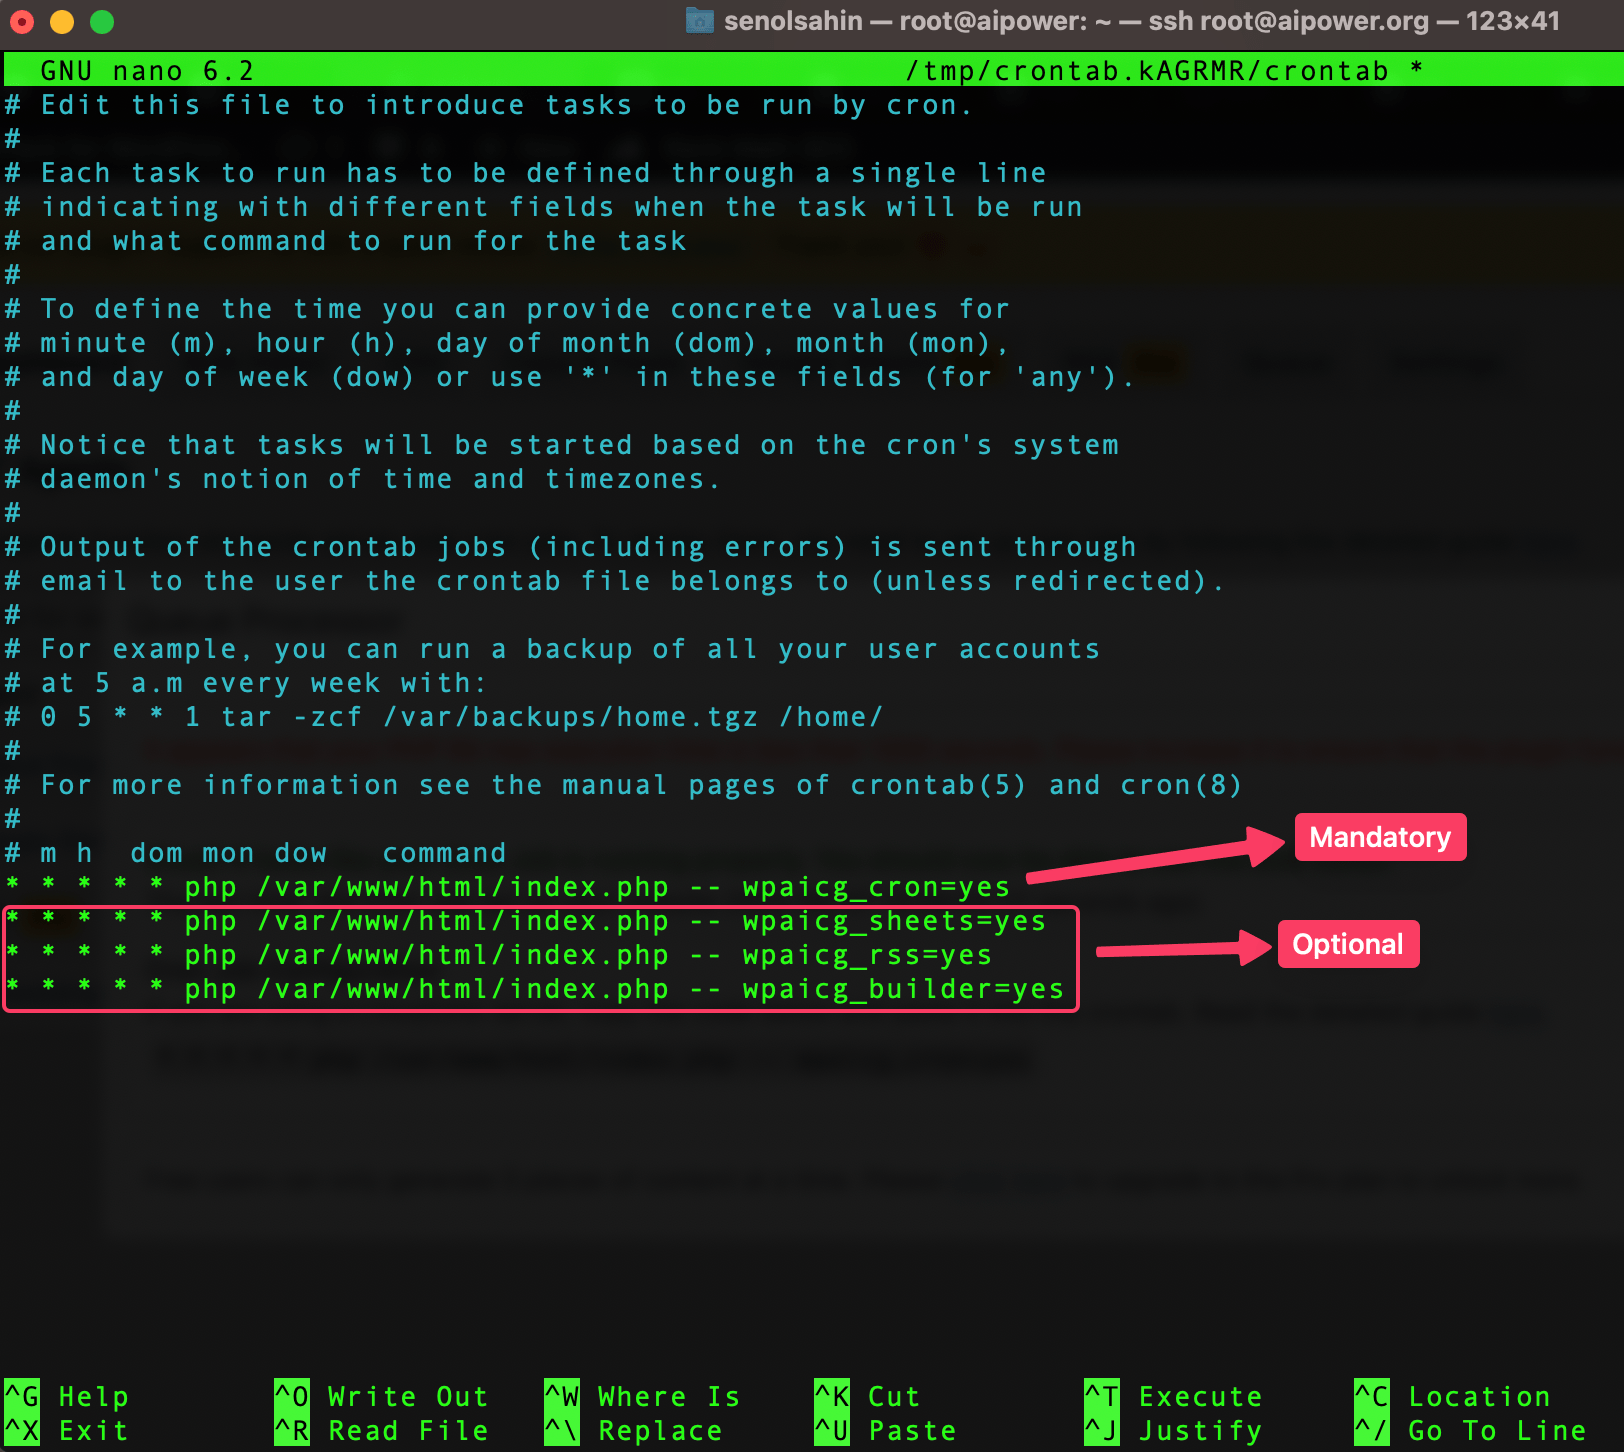
Below are the Cron Job configurations for each GPT Agent:
Queue Processor:
* * * * * php /var/www/html/index.php -- wpaicg_cron=yes
Google Sheets:
* * * * * php /var/www/html/index.php -- wpaicg_sheets=yes
RSS:
* * * * * php /var/www/html/index.php -- wpaicg_rss=yes
Embeddings:
* * * * * php /var/www/html/index.php -- wpaicg_builder=yes
Twitter Bot:
* * * * * php /var/www/html/index.php -- wpaicg_tweet=yes
You only need to set up Cron Jobs for the GPT Agents you plan to use. The Queue Processor is a required component and must always be configured, but other GPT Agents are optional. For example, if you only intend to use the Bulk Editor, CSV, or Copy-Paste features, you just need to configure the Queue Processor, and you can skip the other agents.
The path /var/www/html provided in the examples above is just a sample path.
Your actual path might be different. To find the correct Cron Job command for your setup, please refer to the AutoGPT page on your WordPress admin panel.
The accurate command for your website will be displayed there, which you should use when configuring the Cron Job.
Setting up Cron Jobs can vary depending on your hosting environment.
There are several methods for configuring Cron Jobs, but in this guide, we will focus on the three most common ones:
- Terminal Screen
- cPanel
- Plesk
These methods cover a broad range of hosting scenarios, helping you choose the best approach for your specific environment.
Terminal Screen
- Access your server using SSH.
- Open a terminal window and enter the following command:
crontab -e
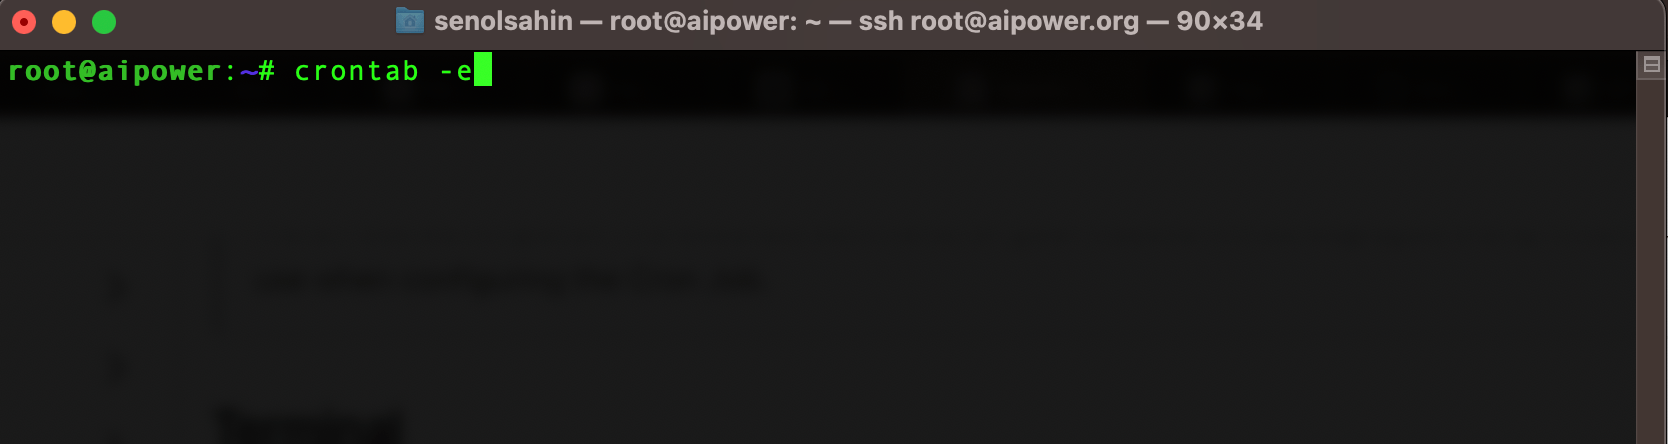
- This will open a text editor where you can enter the cron job configuration.
- Go to your WordPress admin panel and navigate to the AutoGPT - Dashboard page. Find the agent you want to activate and click on Details.
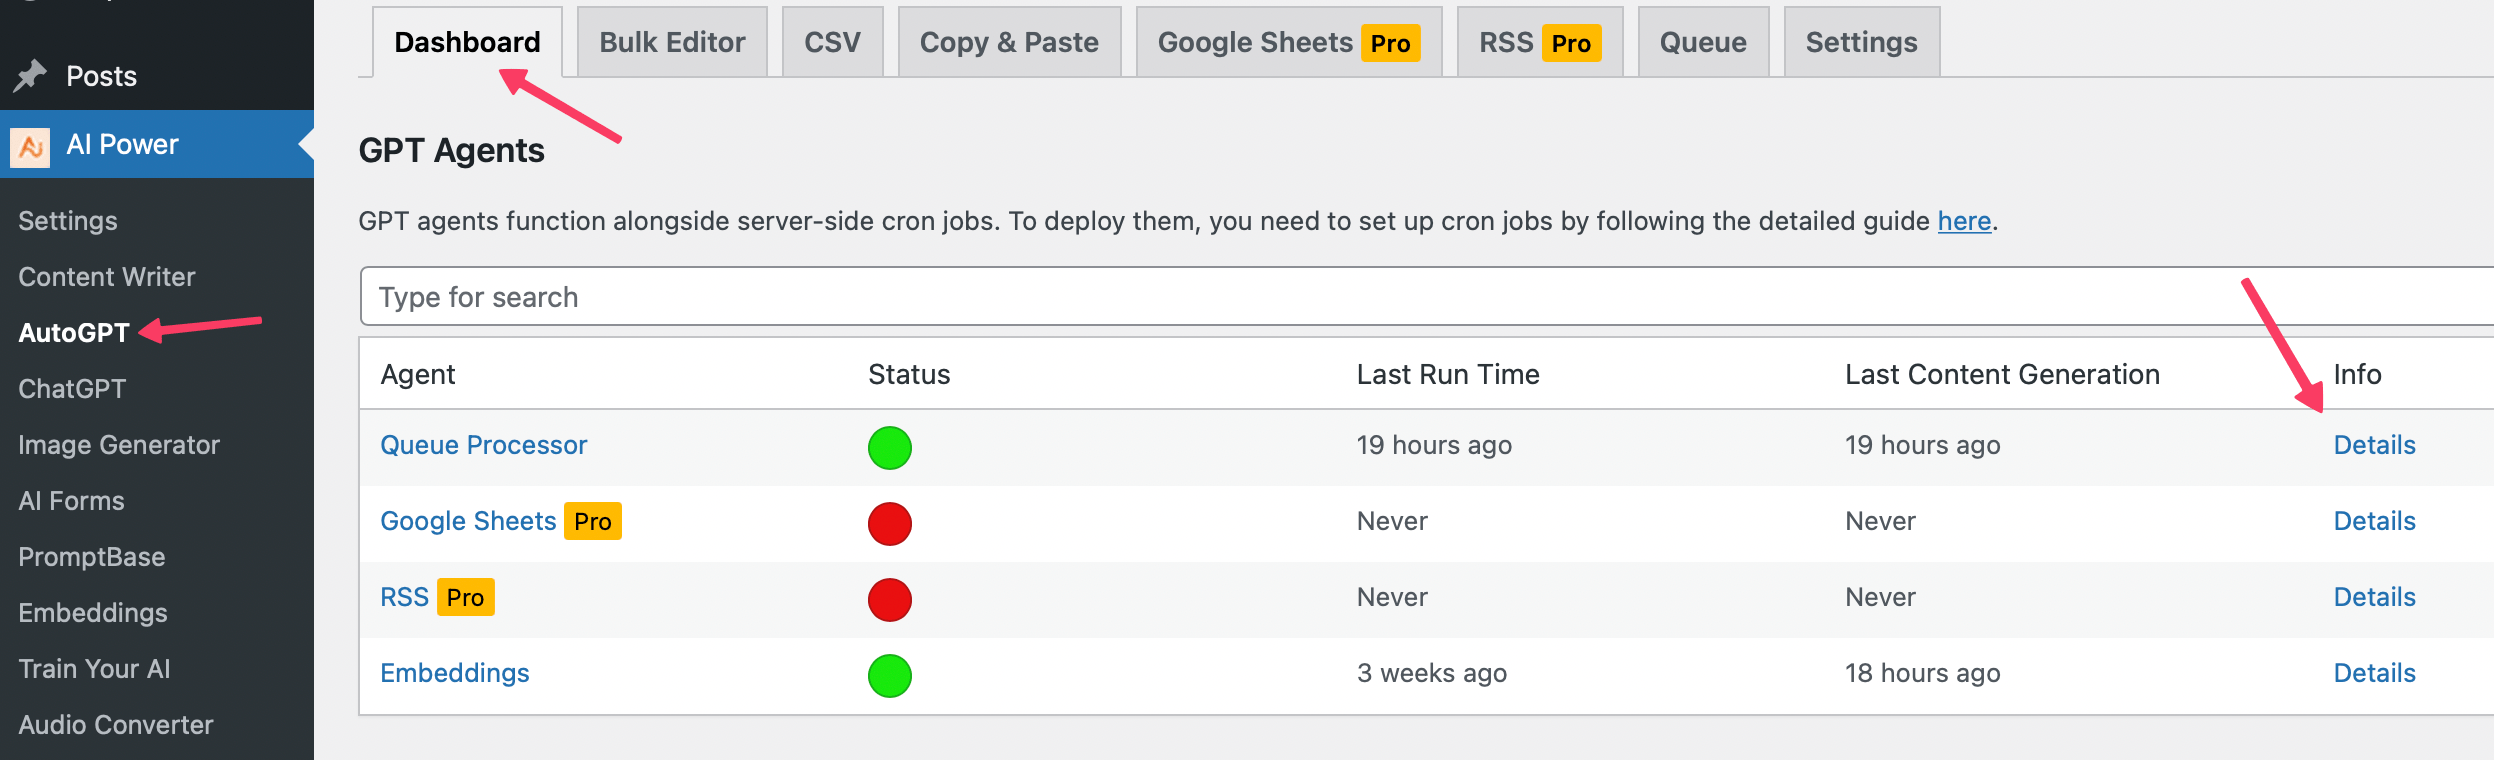
- You will see a message saying, "The Cron Job command for your website."
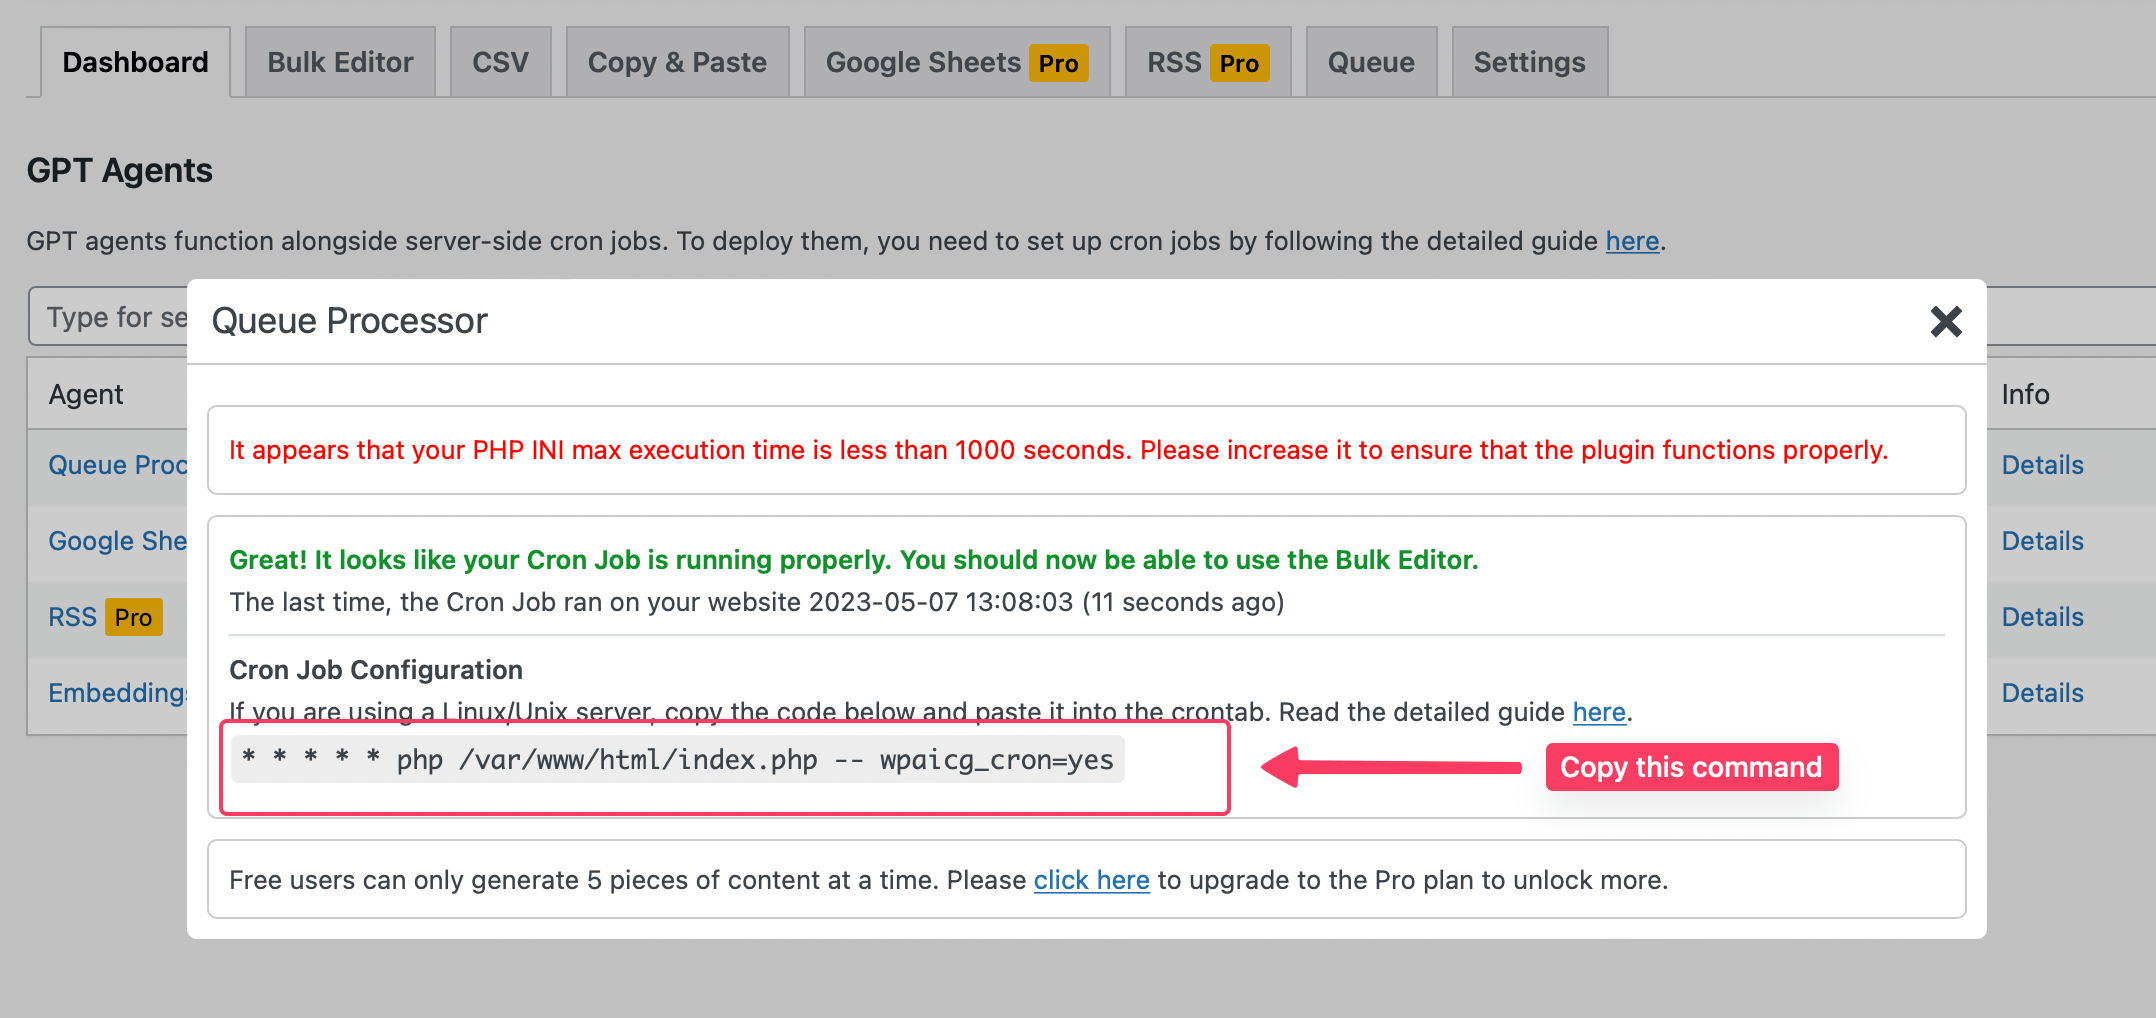
- Copy the command that starts with * * * * * and paste it at the bottom of the file in the text editor.
- This setup will run the agents every minute. You can customize the schedule by changing the timing values (e.g., 0 */6 * * * will run the feature every 6 hours).
- Save and close the file. The cron job will be automatically added.
- Wait a couple of minutes and refresh your page again. You will see a message saying, "Great! It looks like your Cron Job is running properly".
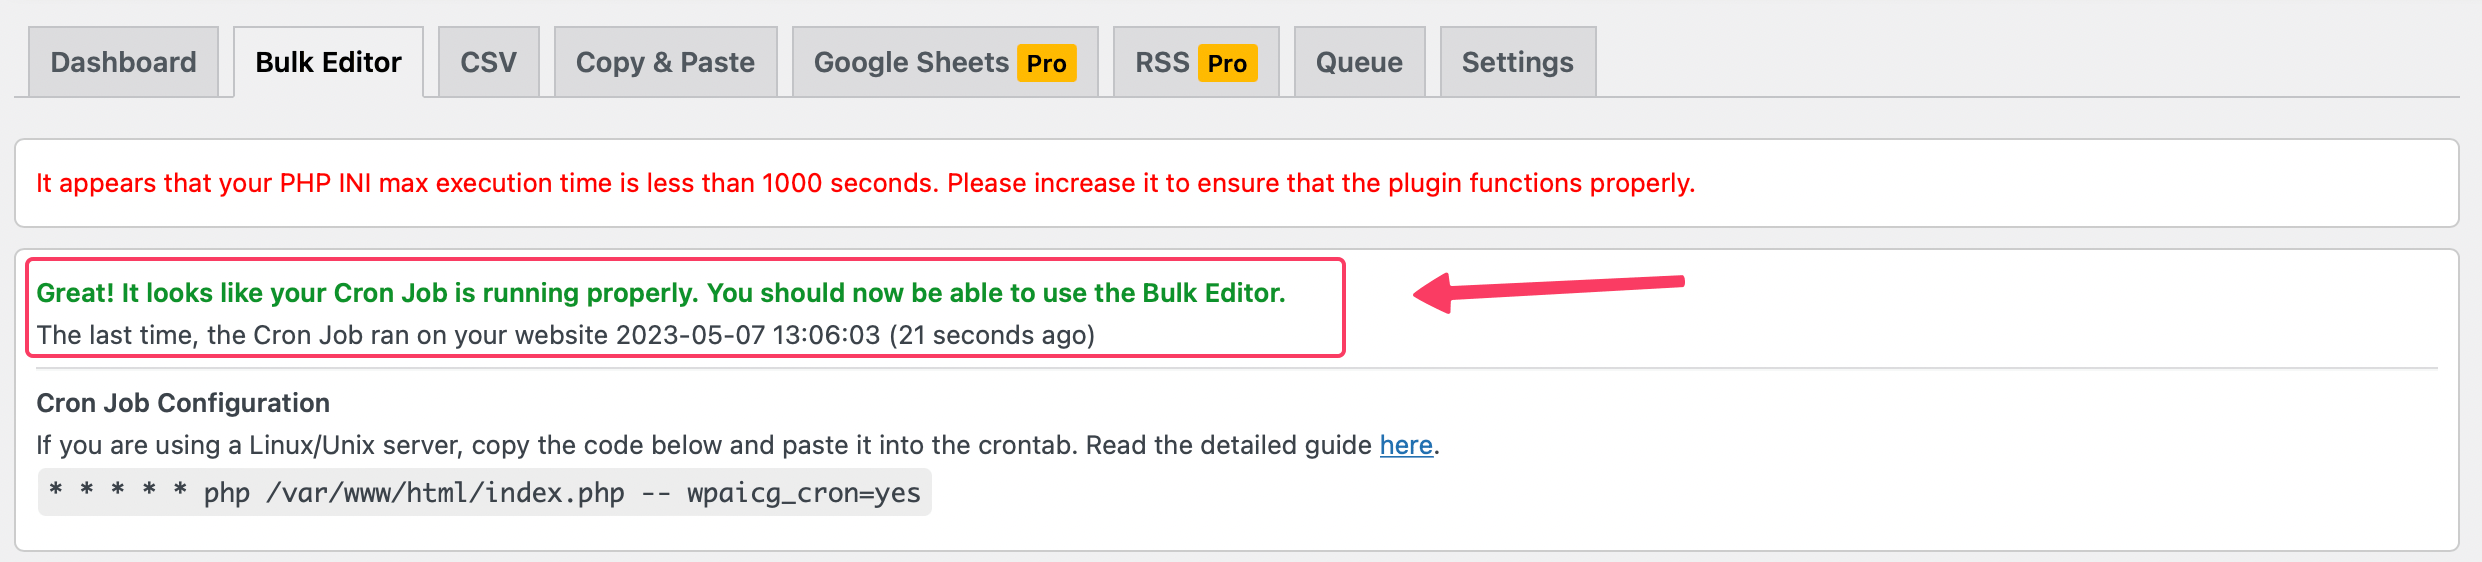
You should now be able to use the AutoGPT. This means everything went well, and you can use the Auto Content Writer.
cPanel
- Log in to your cPanel account.
- In the Advanced section, click on the Cron Jobs icon.
- Under Add New Cron Job, select the timing for the cron job (every minute, hour, day, month, and weekday).
- Go to your WordPress admin panel and navigate to the AutoGPT - Dashboard page. Find the agent you want to activate and click on Details.
- You will see a message saying, "The Cron Job command for your website."
- Copy the command that starts with php and paste it in the command field.
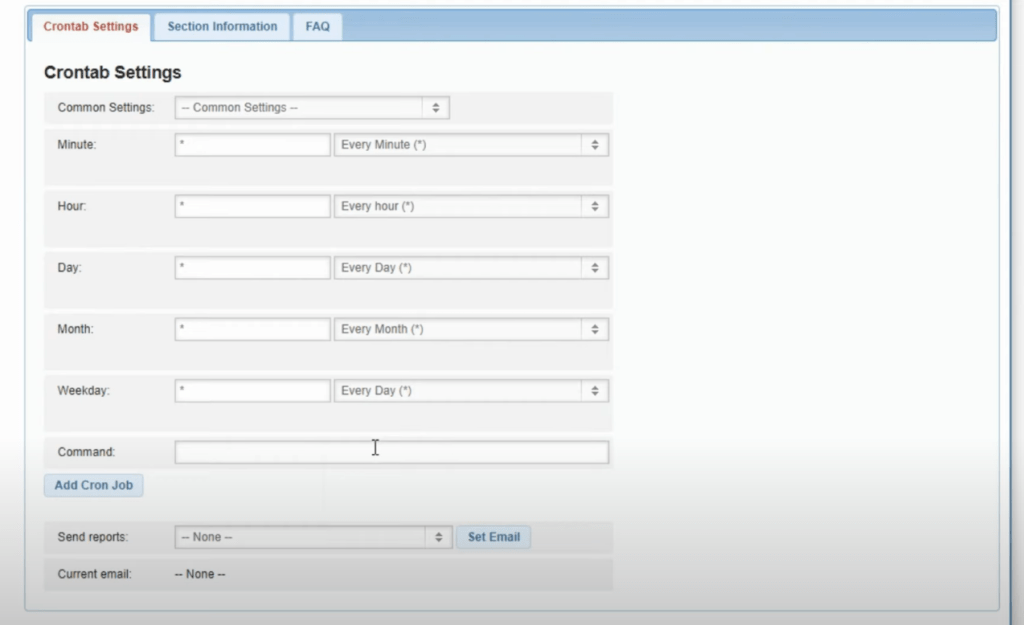
- Save and close the file. The cron job will be automatically added.
- Wait a couple of minutes and refresh your page again. You will see a message saying, "Great! It looks like your Cron Job is running properly".
You should now be able to use the AutoGPT. This means everything went well, and you can use the Auto Content Writer.
Plesk
Follow these steps to set up a Cron Job in your Plesk hosting environment:
- Log in to your Plesk account.
- Navigate to the Cron Jobs or Scheduled Tasks page.
- Click on Add New Task or Schedule a Task.
- Select Run a PHP script as the task type.
- Go to your WordPress admin panel and navigate to the AutoGPT - Dashboard page. Find the agent you want to activate and click on Details.
- You will see a message saying, "The Cron Job command for your website."
- Copy the path to your script from the AutoGPT page in your WordPress admin panel and paste it into the Script path field.
- Enter the arguments provided on the AutoGPT page into the Arguments field.
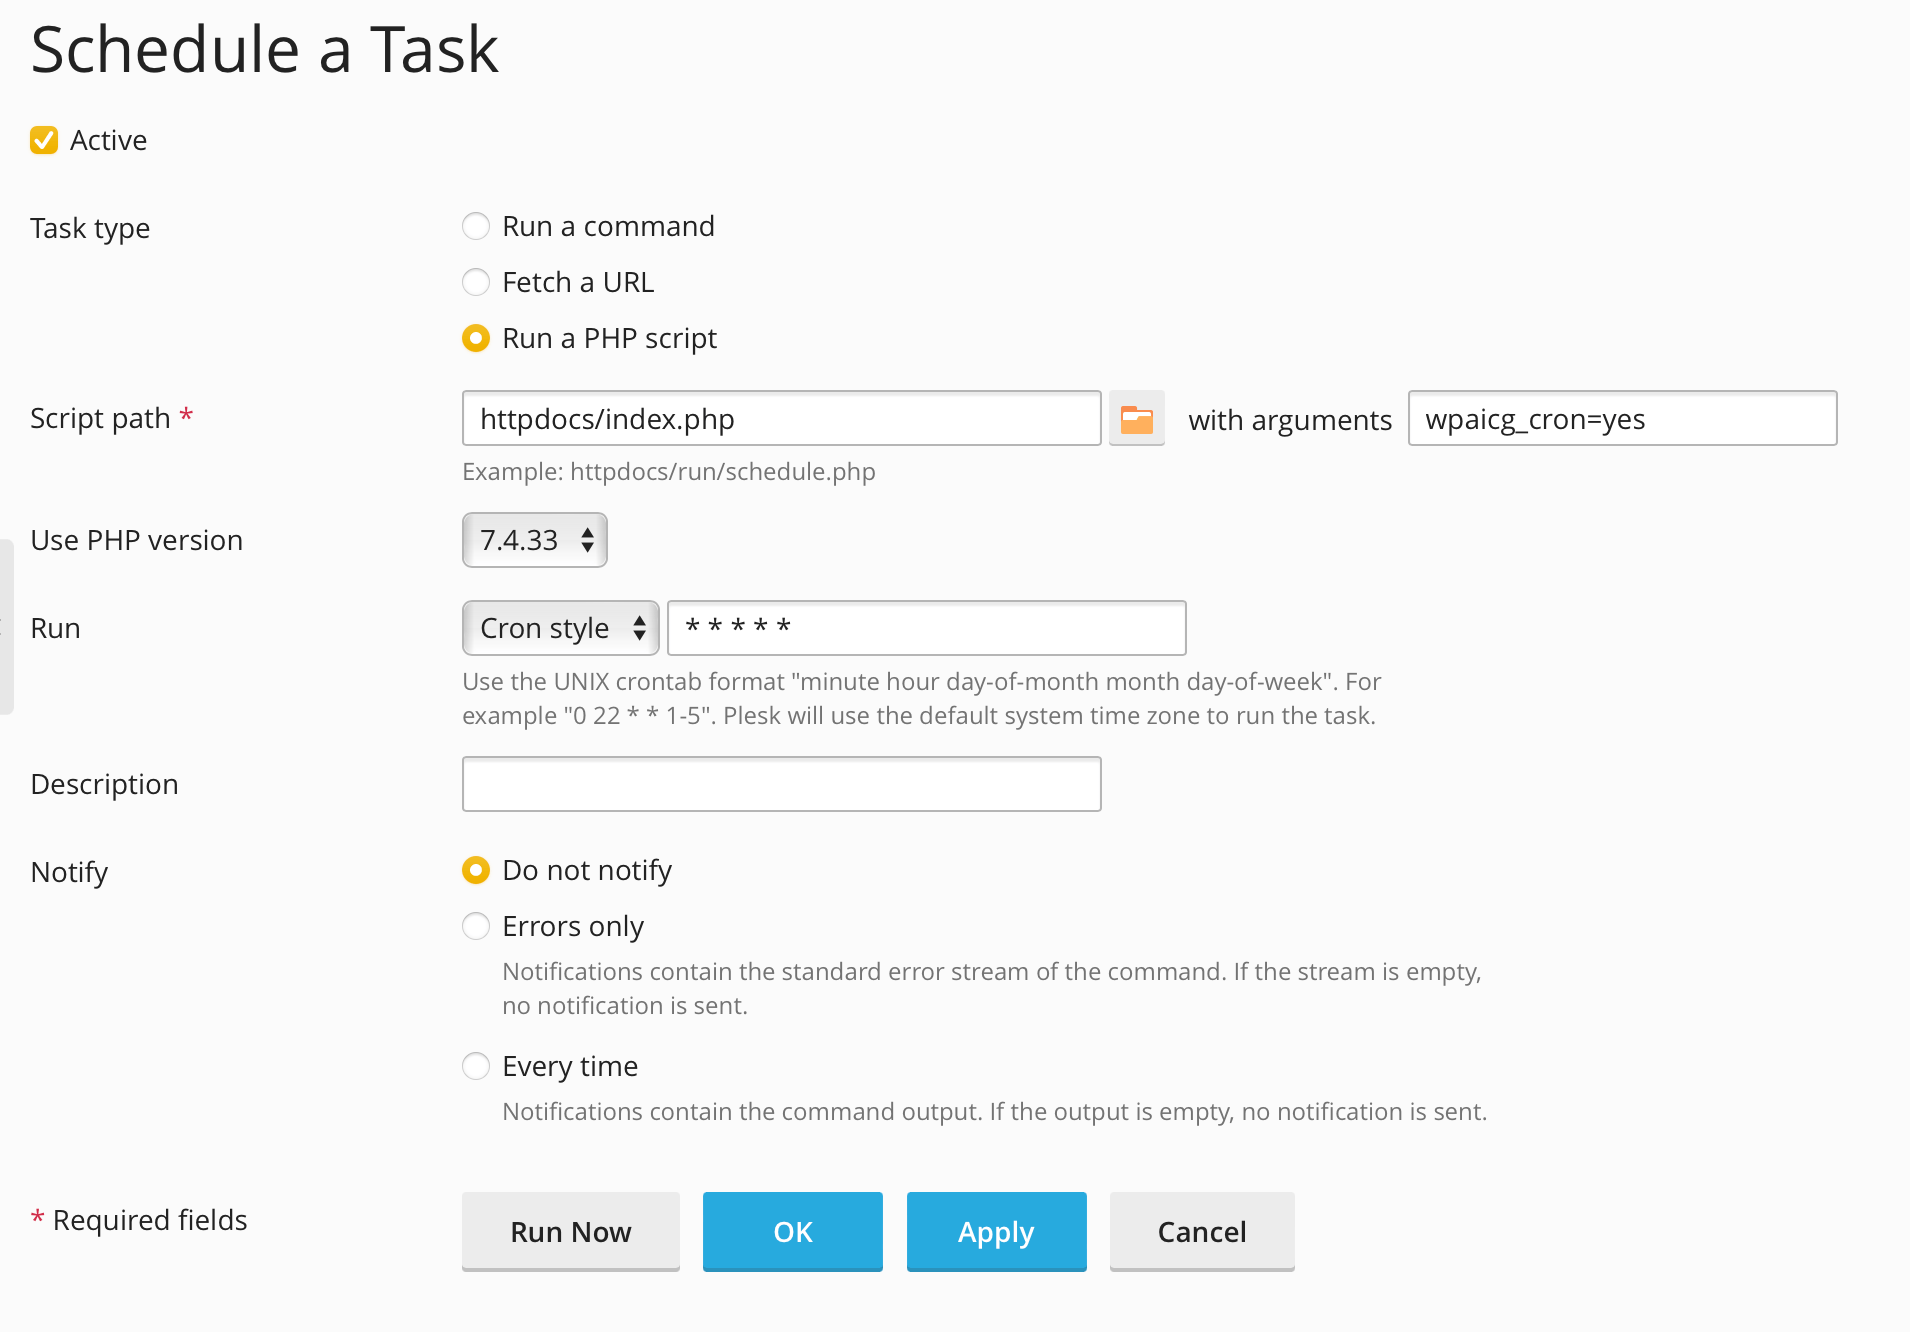
- Choose a PHP version equal to or above 7.4.
- Select Cron style for the schedule type and enter * * * * * in the corresponding field to run the task every minute. You can customize the schedule by adjusting the timing values if needed.
- Click Apply or Save to finalize the Cron Job setup.
After completing these steps, the Cron Job will be scheduled to run automatically based on your selected schedule.
Certain servers may require different commands to run cron jobs.
For example, instead of using the php command, some servers may use php81 or php74 or /usr/bin/php.
If you find that the command provided by the Auto Content Writer plugin doesn't work for your server, it's recommended to check with your hosting provider to determine the correct command to use.
You have the option to execute a cronjob directly from your browser.
Simply enter the following URL in your browser’s address bar:
https://your_url.com/index.php?wpaicg_cron=yes
Make sure to replace "your_url" with your actual website URL.
Keep in mind that this will only initiate the cronjob once. To run it in the background, you'll need to set up an appropriate cronjob.
Custom Workarounds
Some hosting providers (like Cloudways) do not permit running cron jobs with arguments.
In such situations, you can create a separate PHP file and invoke that PHP file from the cron job.
You can use the provided sample. Ensure that you place it in your root folder.
queue_trigger.php
<?php
require __DIR__.'/wp-load.php';
$wpaicg_cron = \WPAICG\WPAICG_Cron::get_instance();
$_GET['wpaicg_cron'] = 'yes';
$wpaicg_cron->wpaicg_cron_job();
embeddings_trigger.php
<?php
require __DIR__.'/wp-load.php';
$wpaicg_builder = \WPAICG\WPAICG_Embeddings::get_instance();
$_GET['wpaicg_builder'] = 'yes';
$wpaicg_builder->wpaicg_cron_job();
rss_trigger.php
<?php
require __DIR__.'/wp-load.php';
$wpaicg_rss = \WPAICG\WPAICG_RSS::get_instance();
$_GET['wpaicg_rss'] = 'yes';
$wpaicg_rss->wpaicg_cron_job();
sheets_trigger.php
<?php
require __DIR__.'/wp-load.php';
$wpaicg_sheets = \WPAICG\WPAICG_Google_Sheets::get_instance();
$_GET['wpaicg_sheets'] = 'yes';
$wpaicg_sheets->wpaicg_cron_job();
tweet_trigger.php
<?php
require DIR.'/wp-load.php';
$wpaicg_tweet= \WPAICG\WPAICG_Twitter::get_instance();
$_GET['wpaicg_tweet'] = 'yes';
$wpaicg_tweet->wpaicg_cron_job();
Hosting Providers
Bitnami
You need to use sudo for Bitnami.
Example:
* * * * * sudo php /opt/bitnami/your_path/index.php -- wpaicg_cron=yes
Digital Ocean
Example:
* * * * * php /var/www/html/index.php -- wpaicg_cron=yes
Monitoring GPT Agents
To ensure that your GPT Agents are functioning correctly, it's essential to monitor their performance. The AutoGPT Dashboard provides an overview of the GPT Agents' status and activity. Follow these steps to monitor your GPT Agents:
- Log in to your WordPress admin panel.
- Navigate to ** AutoGPT > Dashboard**.
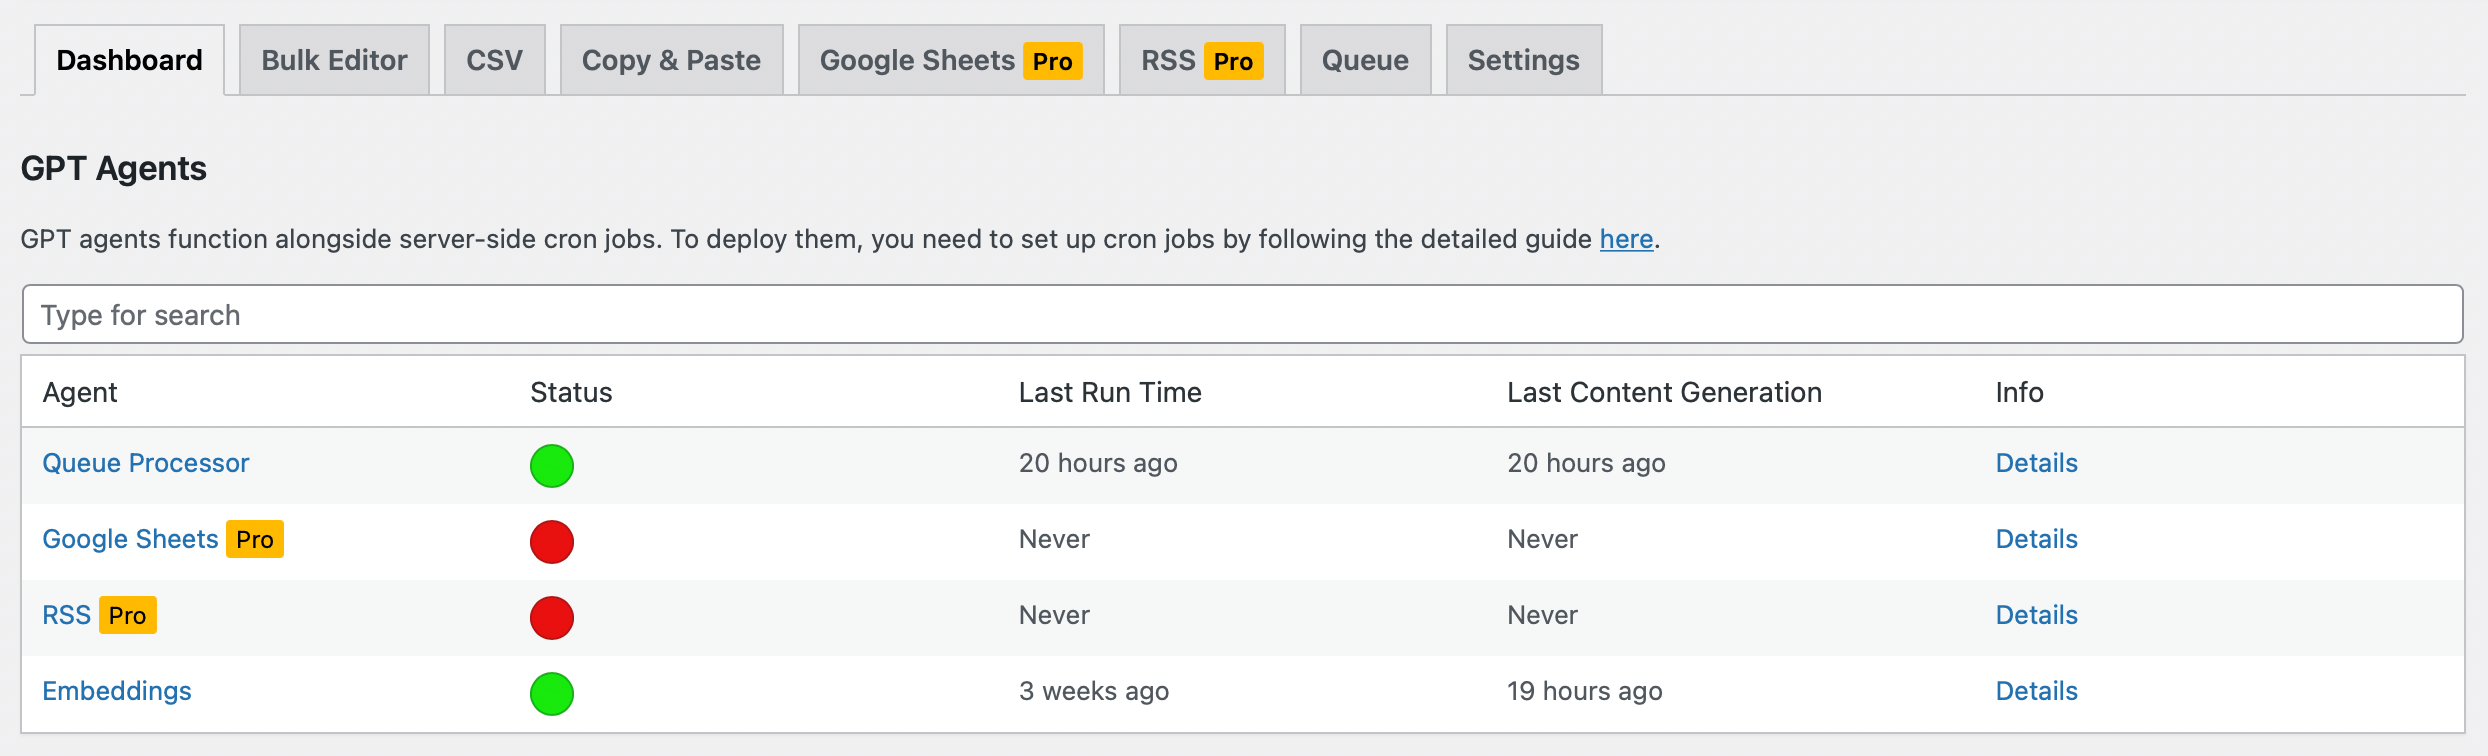
- You will see a list of GPT Agents in a table, with columns for Agent Name, Status, Last Run Time, and Last Content Generation.
- Agent Name: Displays the name of the GPT Agent. Clicking on the name will take you to the corresponding settings page for that agent.
- Status: Indicates the current status of the GPT Agent, with a green or red icon. A green icon means the agent is functioning correctly, while a red icon suggests the agent is not working properly.
- Last Run Time: Shows the last time the Cron Job ran for the agent. If the last run time is too old, it may indicate that the agent is not functioning correctly and requires investigation.
- Last Content Generation: Displays the last time the agent generated content. This can help you gauge the agent's activity and effectiveness.
By monitoring the GPT Agents using the AutoGPT Dashboard, you can ensure that they are functioning correctly and address any issues promptly.
Resolving the "Update failed: The update cannot be installed because some files could not be copied. This is usually due to inconsistent file permissions" error
This error typically arises due to inconsistencies in file permissions. It's a server and permissions issue rather than a plugin-related problem. It occurs when a file created by a cron job running as a root user cannot be altered by WordPress, which runs under a different user.
Solution:
You can resolve this issue by ensuring that your cron job runs under the same user as your WordPress installation. This will help avoid permission mismatch.
Here's how to do this:
Add the WordPress username in front of all your cron job tasks. This ensures that the cron job runs under the same user that runs your WordPress, resolving the permission mismatch.
The adjusted cron job command will look something like this:
* * * * * <WORDPRESS USERNAME> php /var/www/html/index.php -- wpaicg_cron=yes