Overview
Use Automations to create content, rewrite published WordPress content, keep a knowledge base current, or reply to new comments in the background. In WordPress admin, go to AI Puffer > Automations.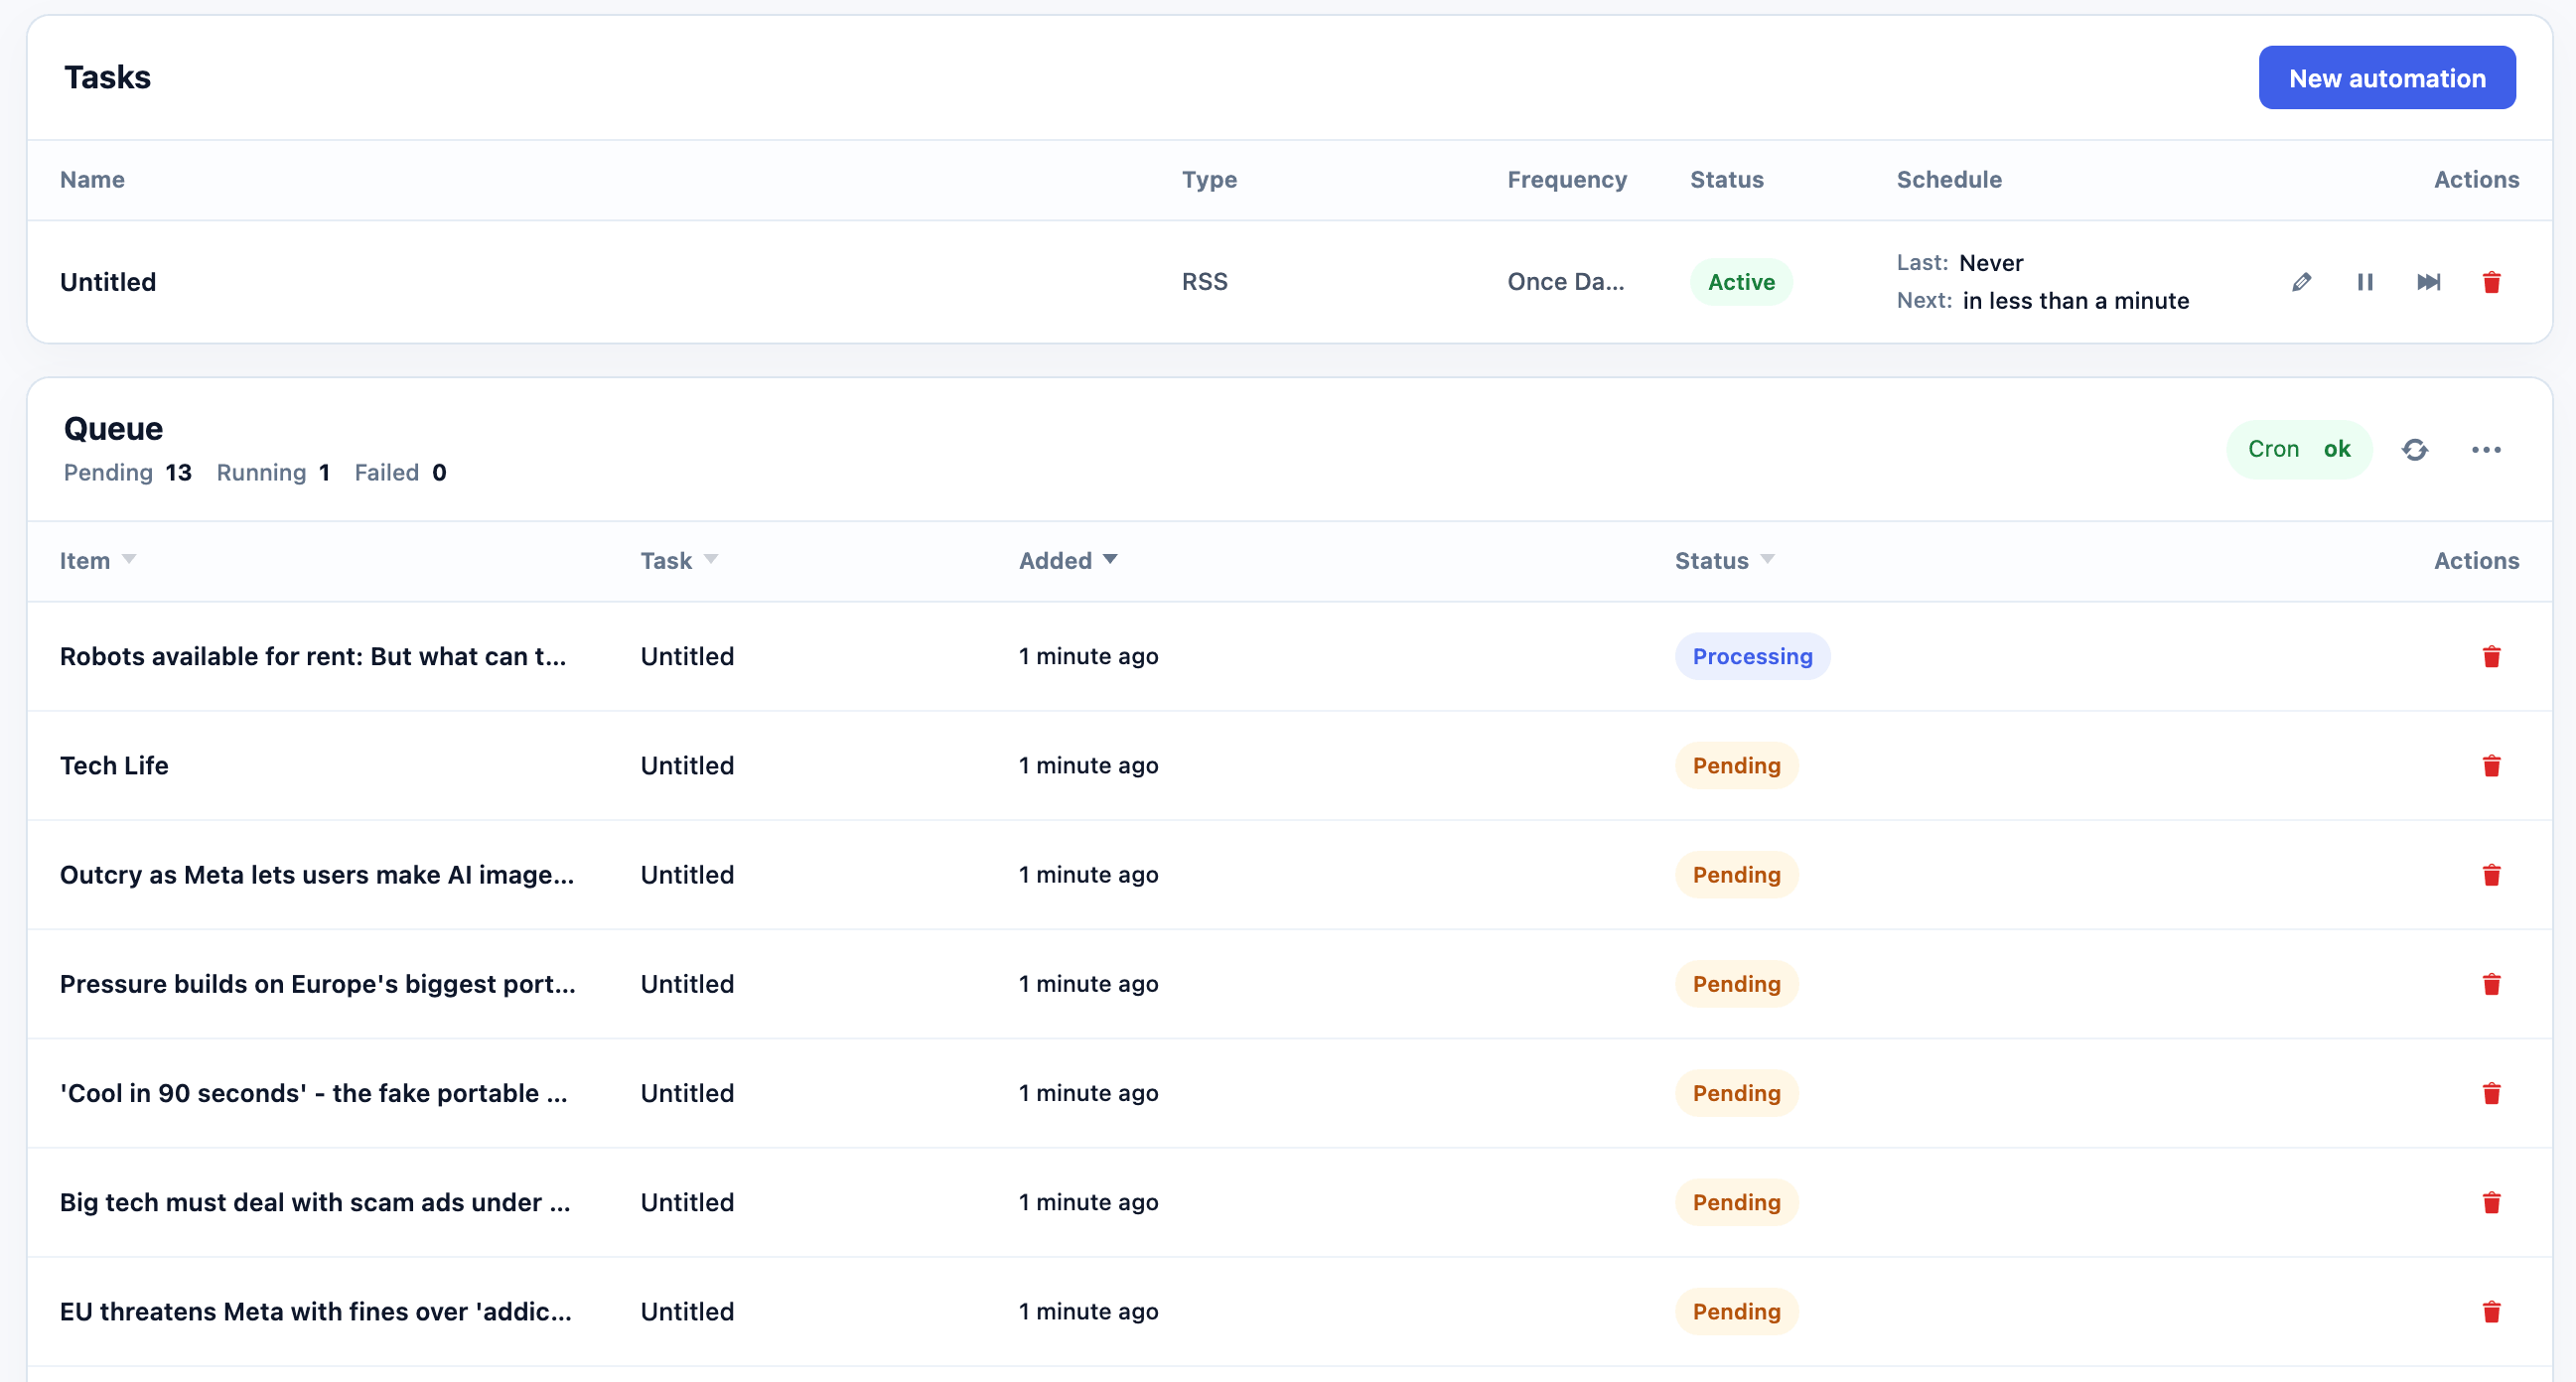
Create Content
Create posts from topics, CSV files, RSS feeds, URLs, or Google Sheets.
Optimize
Rewrite selected fields in published WordPress content.
Content Indexing
Add WordPress content to a vector store and keep it current.
Comment Replies
Generate replies for matching approved comments.
Settings
Configure AI, prompts, SEO, publishing, images, and knowledge.
Queue
Review pending, completed, and failed work.
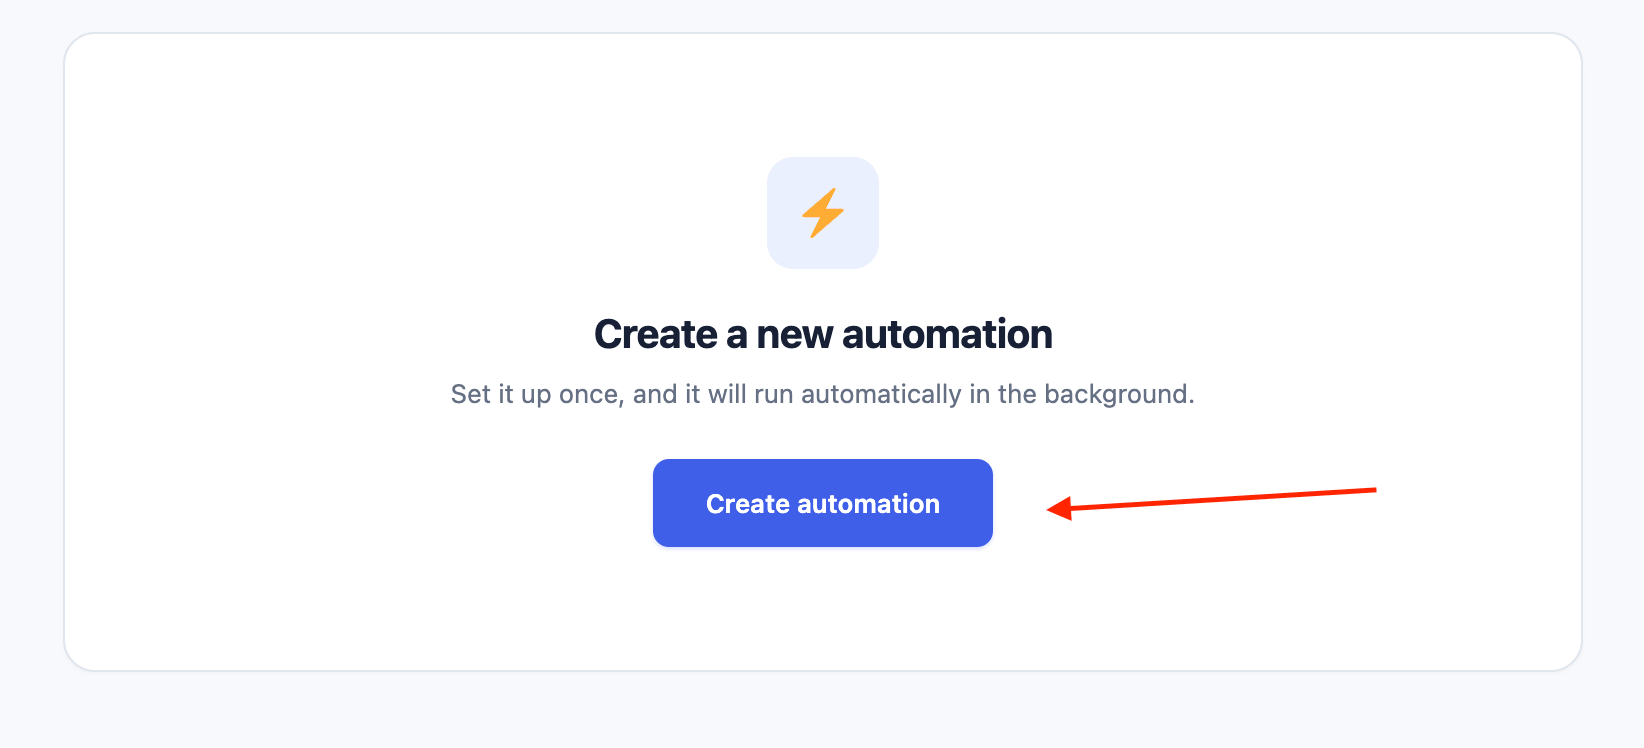
- Click Create automation on the welcome screen, or New automation above the task list.
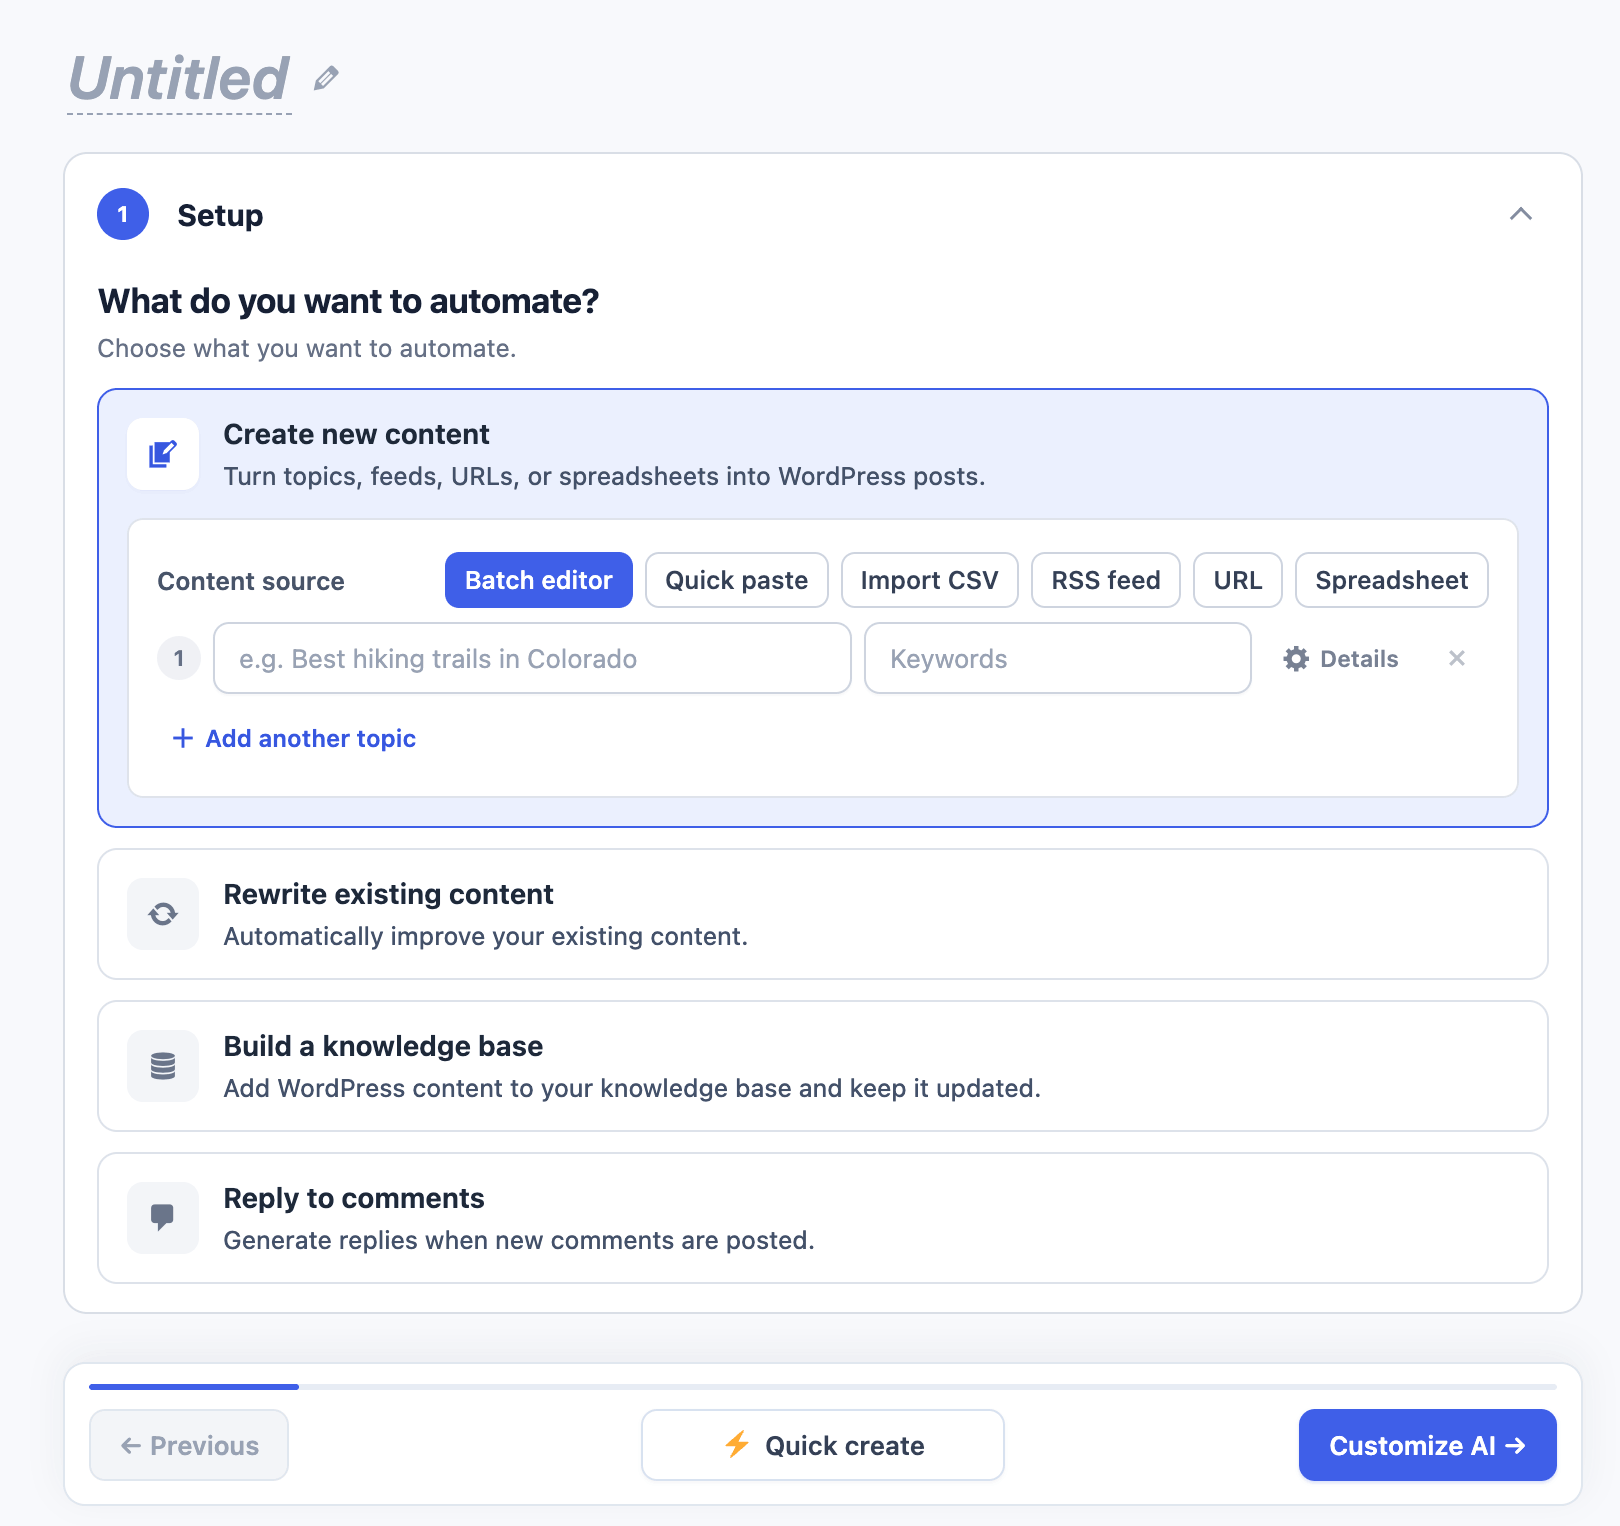
- Select what you want to automate.
- Complete Setup for that automation type.
- Click Untitled at the top if you want to name the task.
- Continue through the settings shown for the selected automation.
- Review Finish and click Save task.
To edit a task, click its edit icon, open any setting you want to change, then open Finish and click Save changes.
How Automations Run
Automations use .- The saved task runs at its selected frequency.
- It finds eligible work and adds queue items.
- The queue processor handles pending items in batches.
- Each item becomes Completed or Failed.
The queue processor handles up to 5 pending items per run. If more items remain, AI Puffer schedules another queue run about 30 seconds later.
Create Content
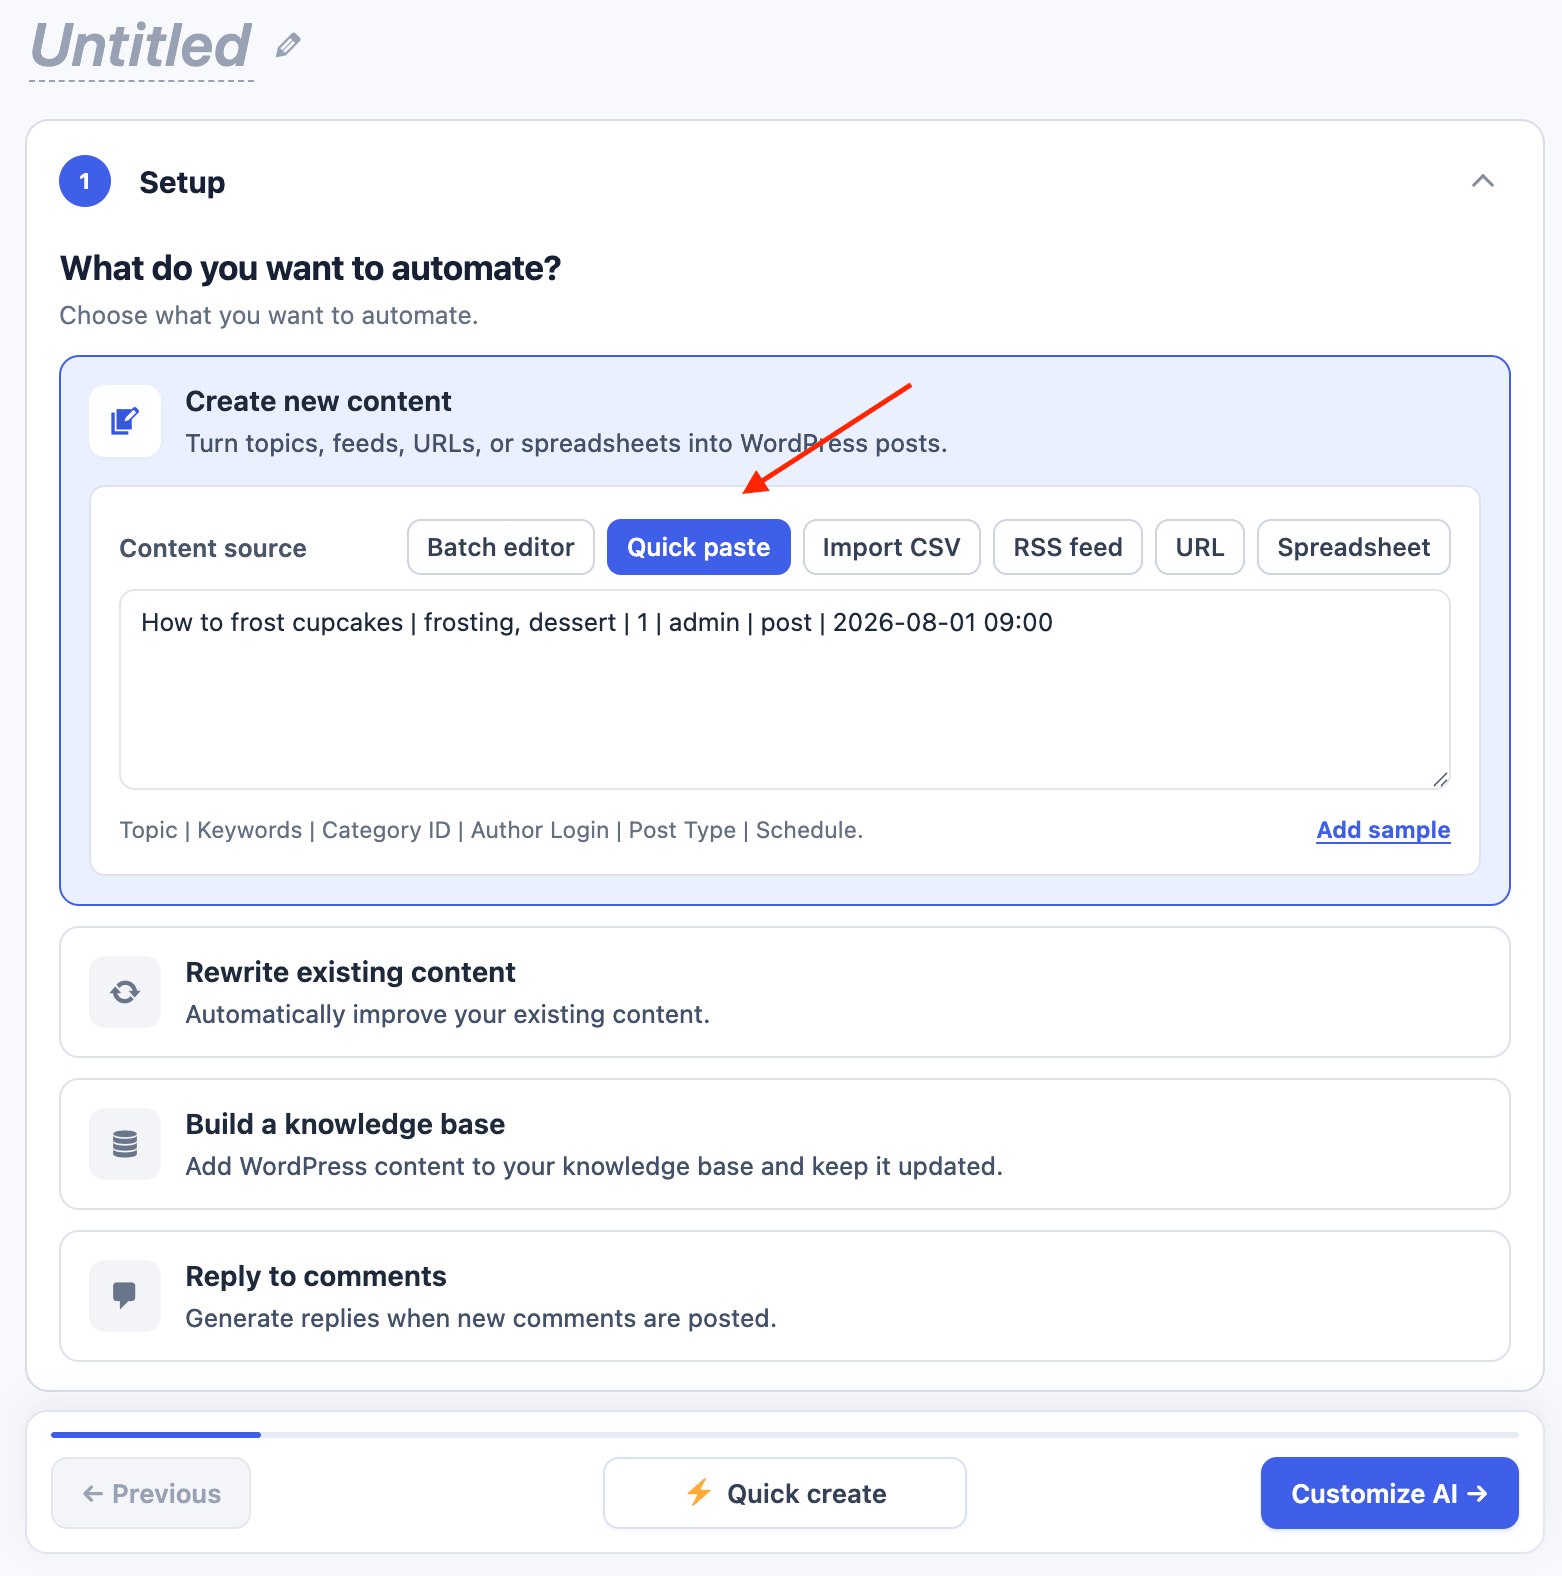
Select Create new content in Setup to create posts, pages, products, or other supported post types. The available settings are Setup, AI, Content, Images, SEO, Knowledge, and Finish. Use Quick create after entering a valid source when you want to keep the recommended defaults. Choose one source under Content source:
Each saved automation uses the source selected when you save it. Batch editor and Quick paste are synchronized views of the same Manual Entry topic list.
Manual Entry
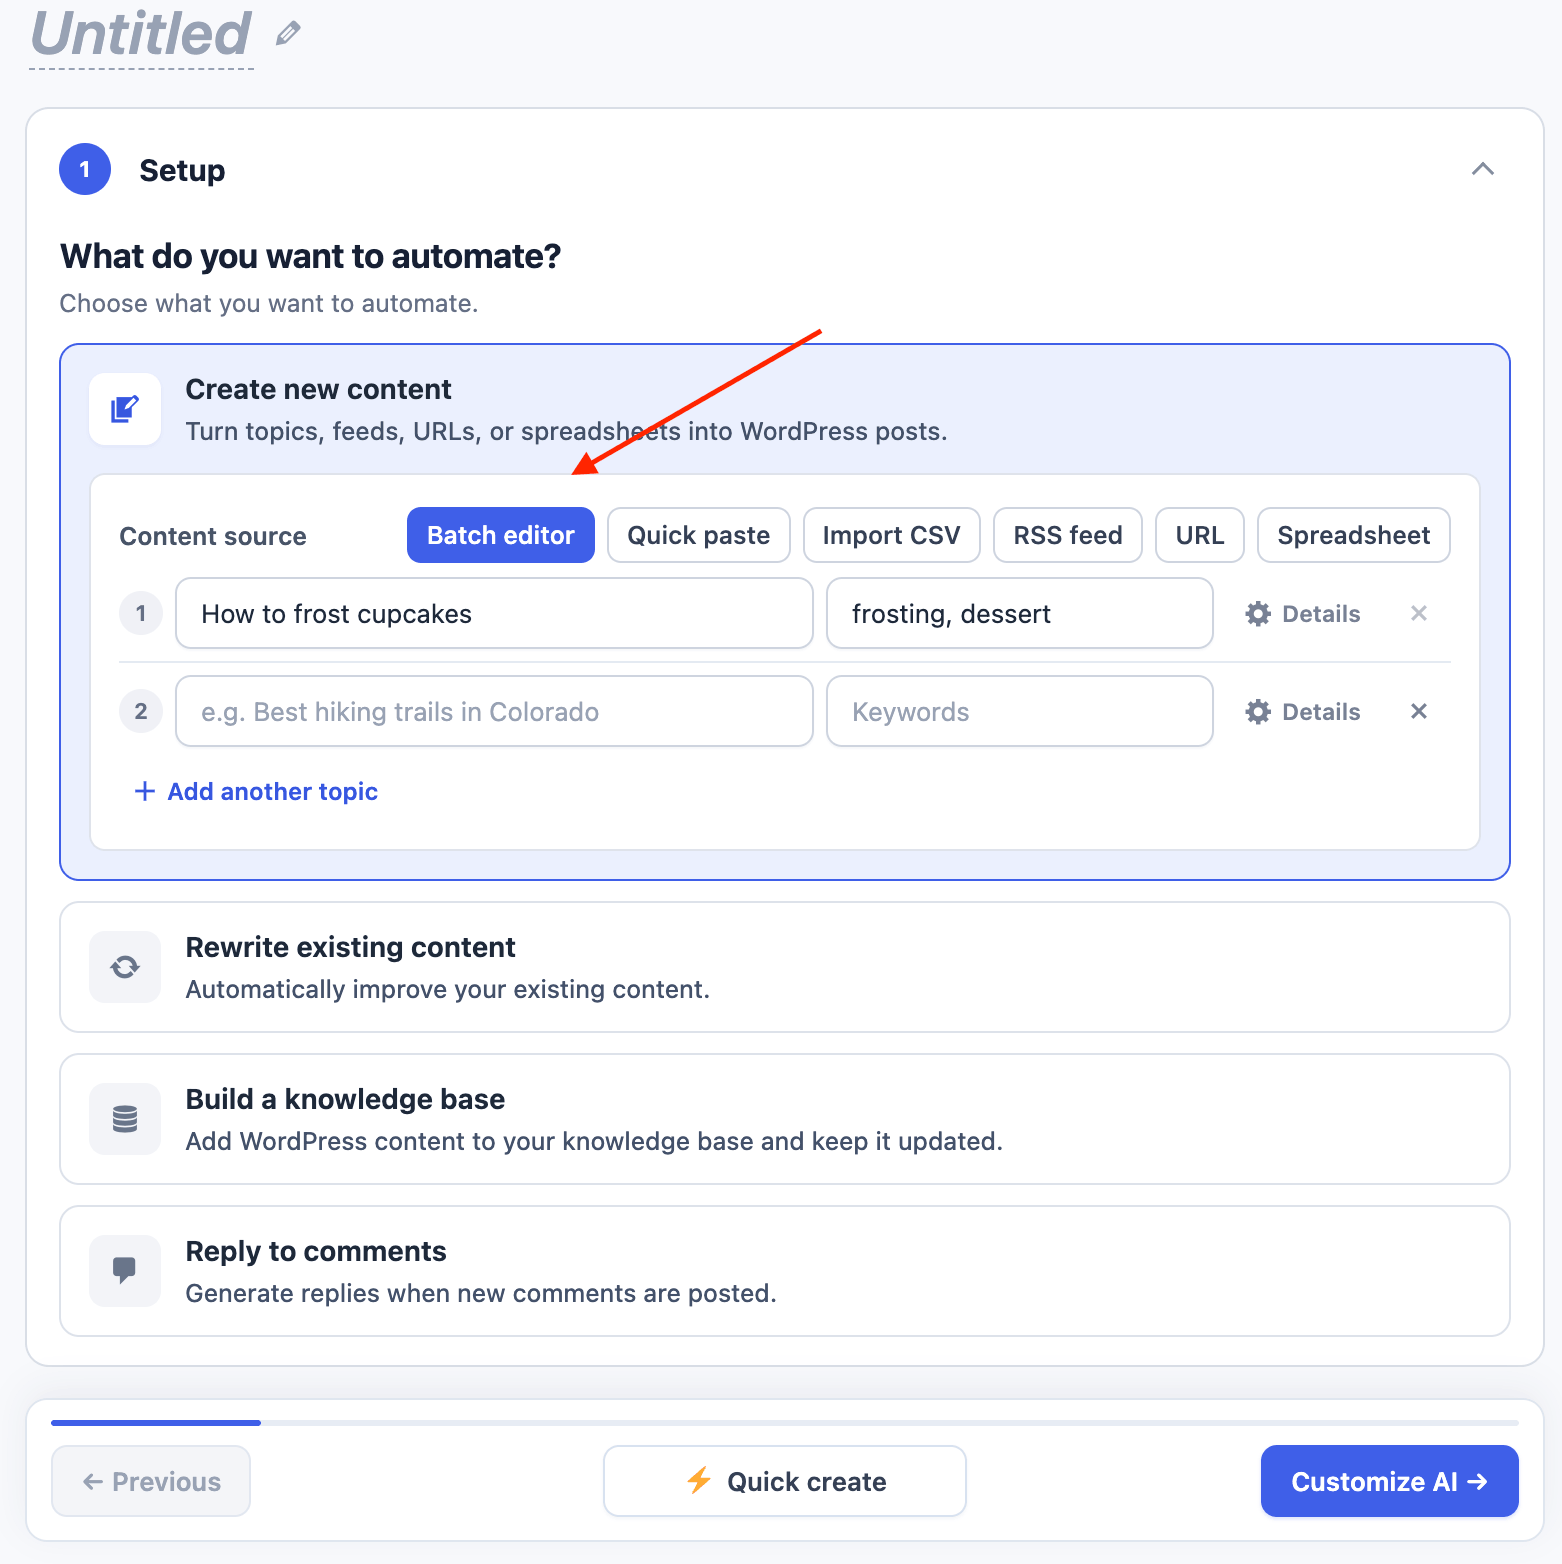
Use Batch editor or Quick paste for manual entry. Use Batch editor when you want to review each item as a row:- Select Create new content.
- Select Batch editor under Content source.
- Enter a topic and, if needed, keywords.
- Click Details to set a category, author, post type, or schedule for that row.
- Click Add another topic for more rows.
- Continue to AI, or click Quick create.
CSV
Use Import CSV to upload a structured topic list. Download the sample CSV- Select Import CSV.
- Drop a
.csvfile into the upload area, or click to browse. - Wait for AI Puffer to show how many topics were found.
- Continue to AI, or click Quick create.
Do not include a header row unless you want it treated as a topic.

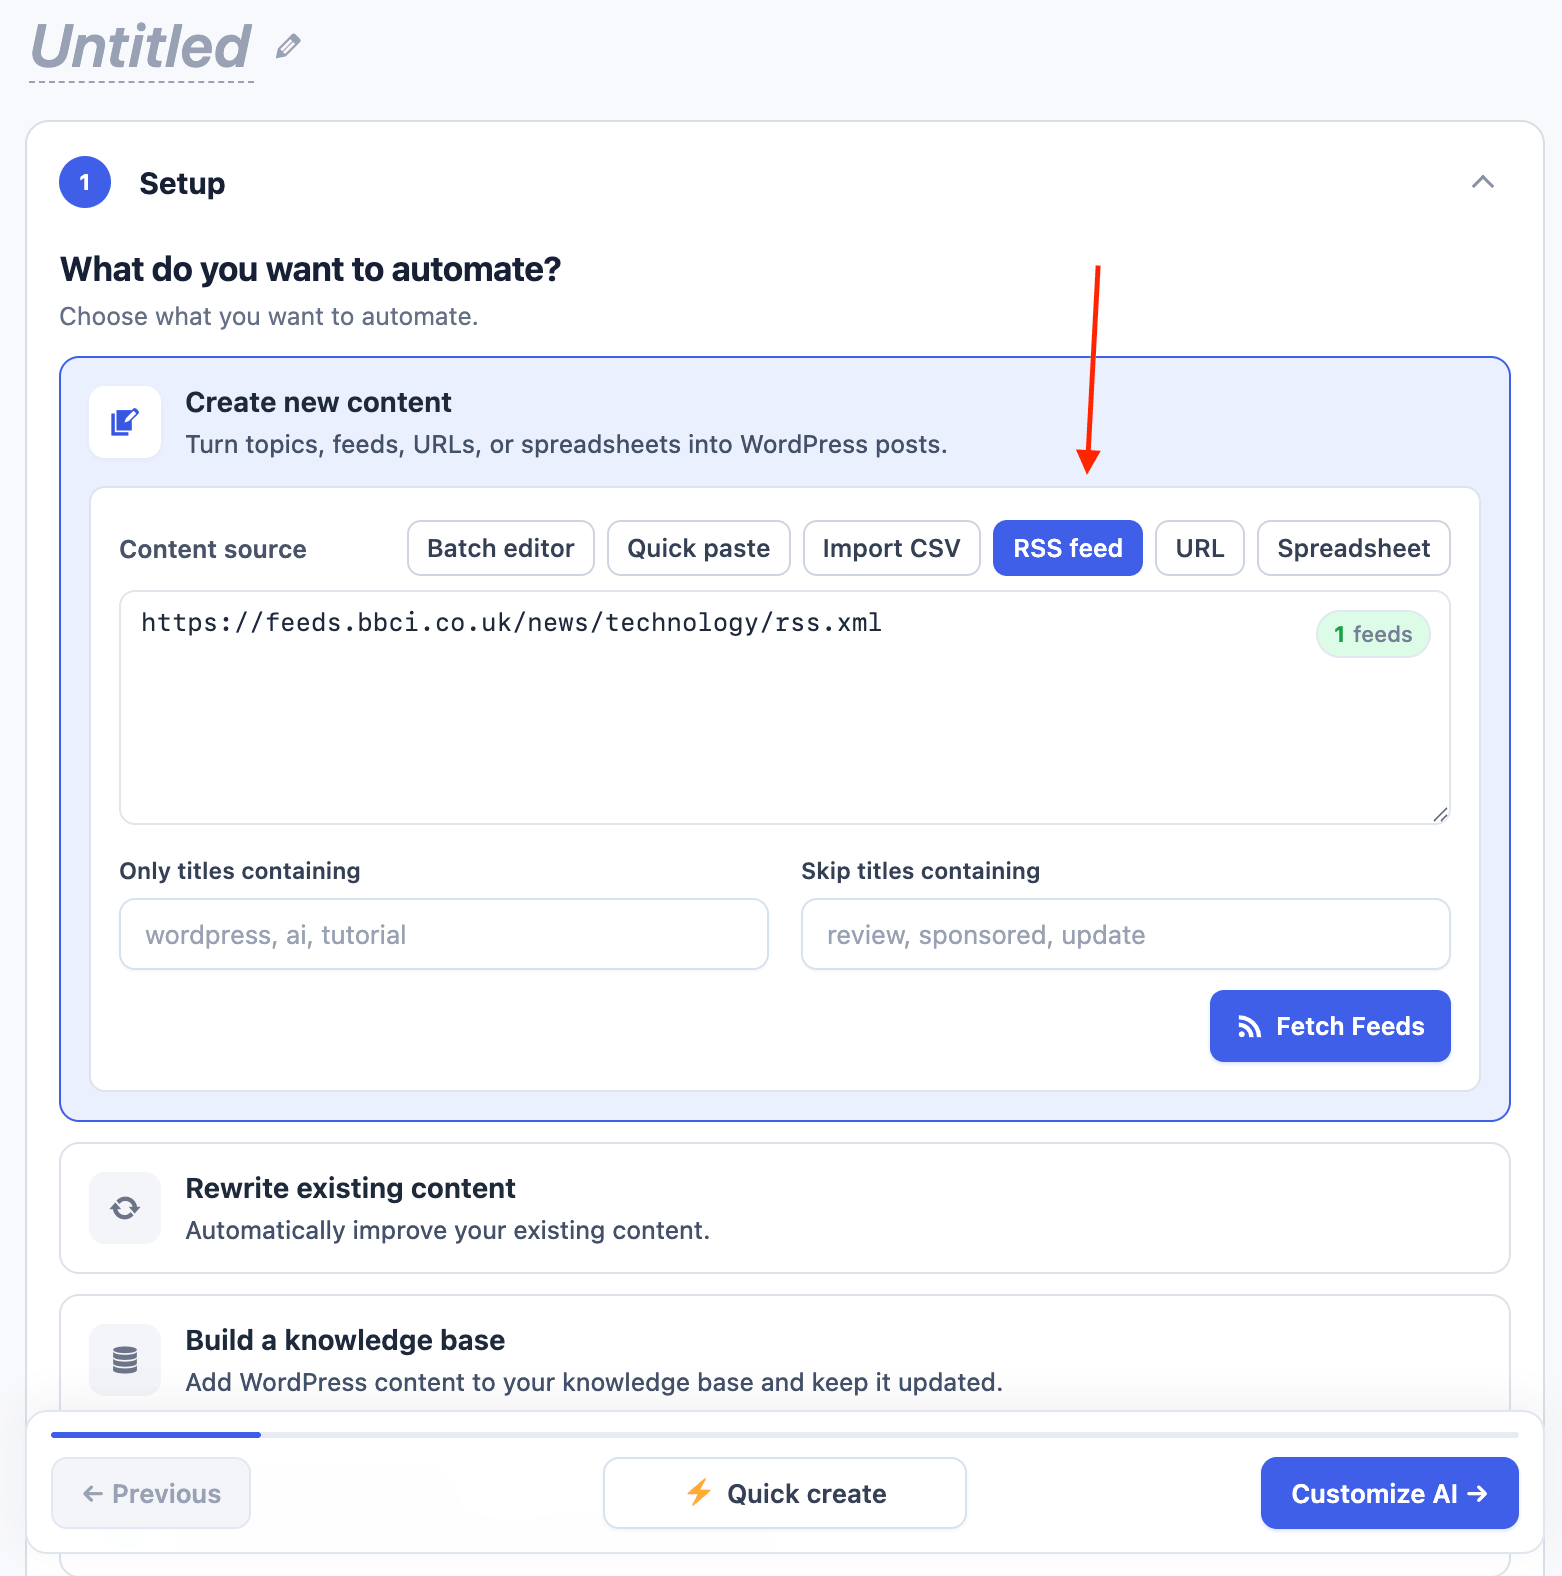
RSS Feed
RSS Feed is a Pro feature. Select RSS feed under Content source.- Enter one feed URL per line.
- Add Only titles containing keywords if only matching titles should be used.
- Add Skip titles containing keywords if matching titles should be ignored.
- Click Fetch Feeds to check the sources.
- Continue through the remaining settings.
- In Finish, choose how often the task should check the feeds.
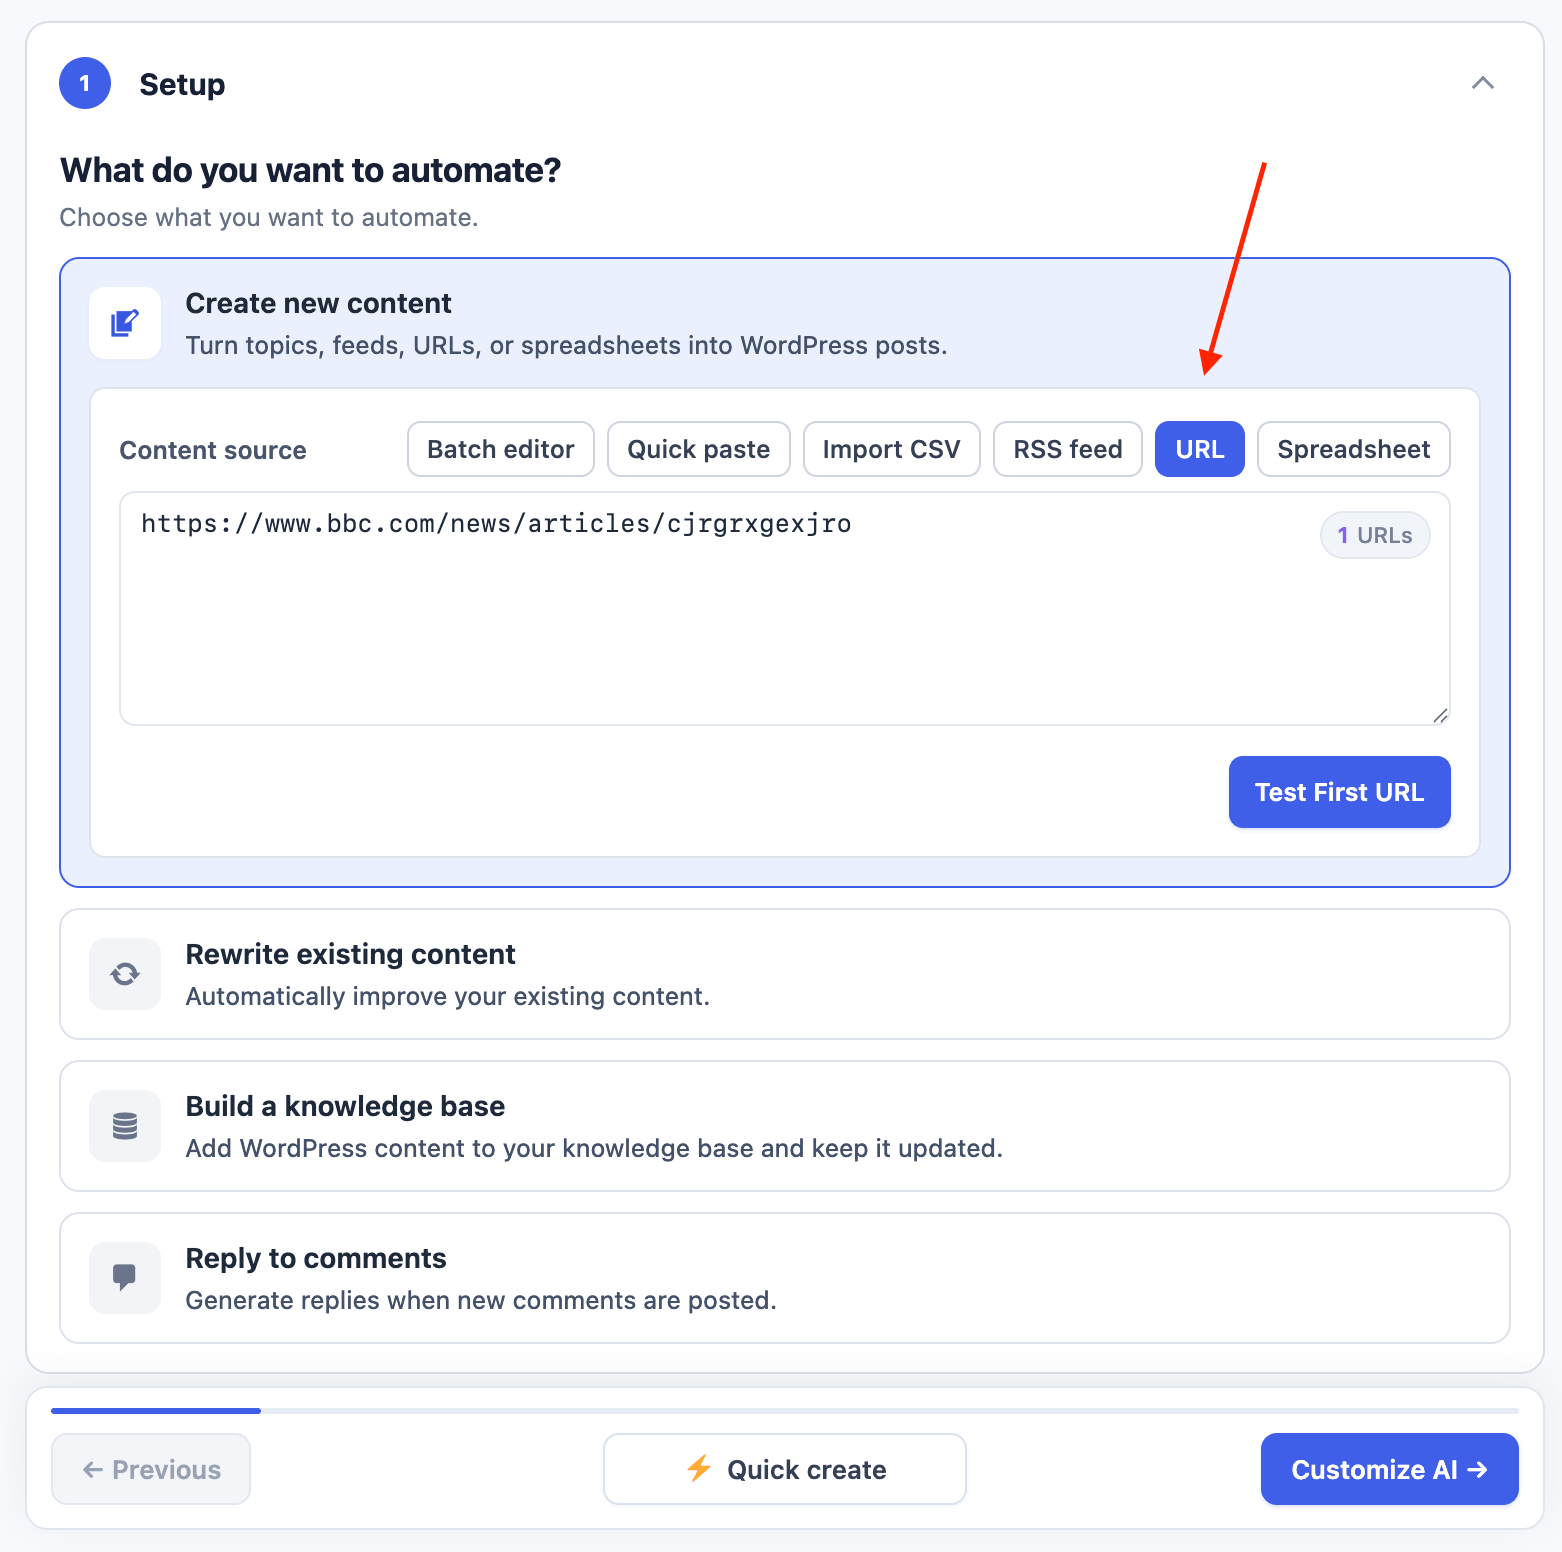
Web Page
Web Page is a Pro feature. Select URL under Content source.- Enter one page URL per line.
- Click Test First URL to preview the first page’s extracted content.
- Continue through the remaining settings.
- In Finish, choose how often the task should check the URLs.
Google Sheets
Google Sheets is a Pro feature. Select Spreadsheet under Content source. Open the sample Google Sheet, make a copy, and keep the same column order.
AI Puffer processes a row only when column A has a topic and column G is empty. After creating the post, it writes
Processed on ... to column G.
To connect the sheet:
- Paste the Sheet ID. It is the value between
/d/and/editin the sheet URL. - Upload the Google service-account JSON file under Credentials.
- Share the sheet with the JSON file’s
client_emailas an Editor. - Confirm that the sheet and credentials are detected.
- Use Lock when you want to keep the saved values visible but read-only.
- Continue through the remaining settings.
Keep the service-account JSON file private. Anyone with this file can use the permissions granted to that service account.

Optimize
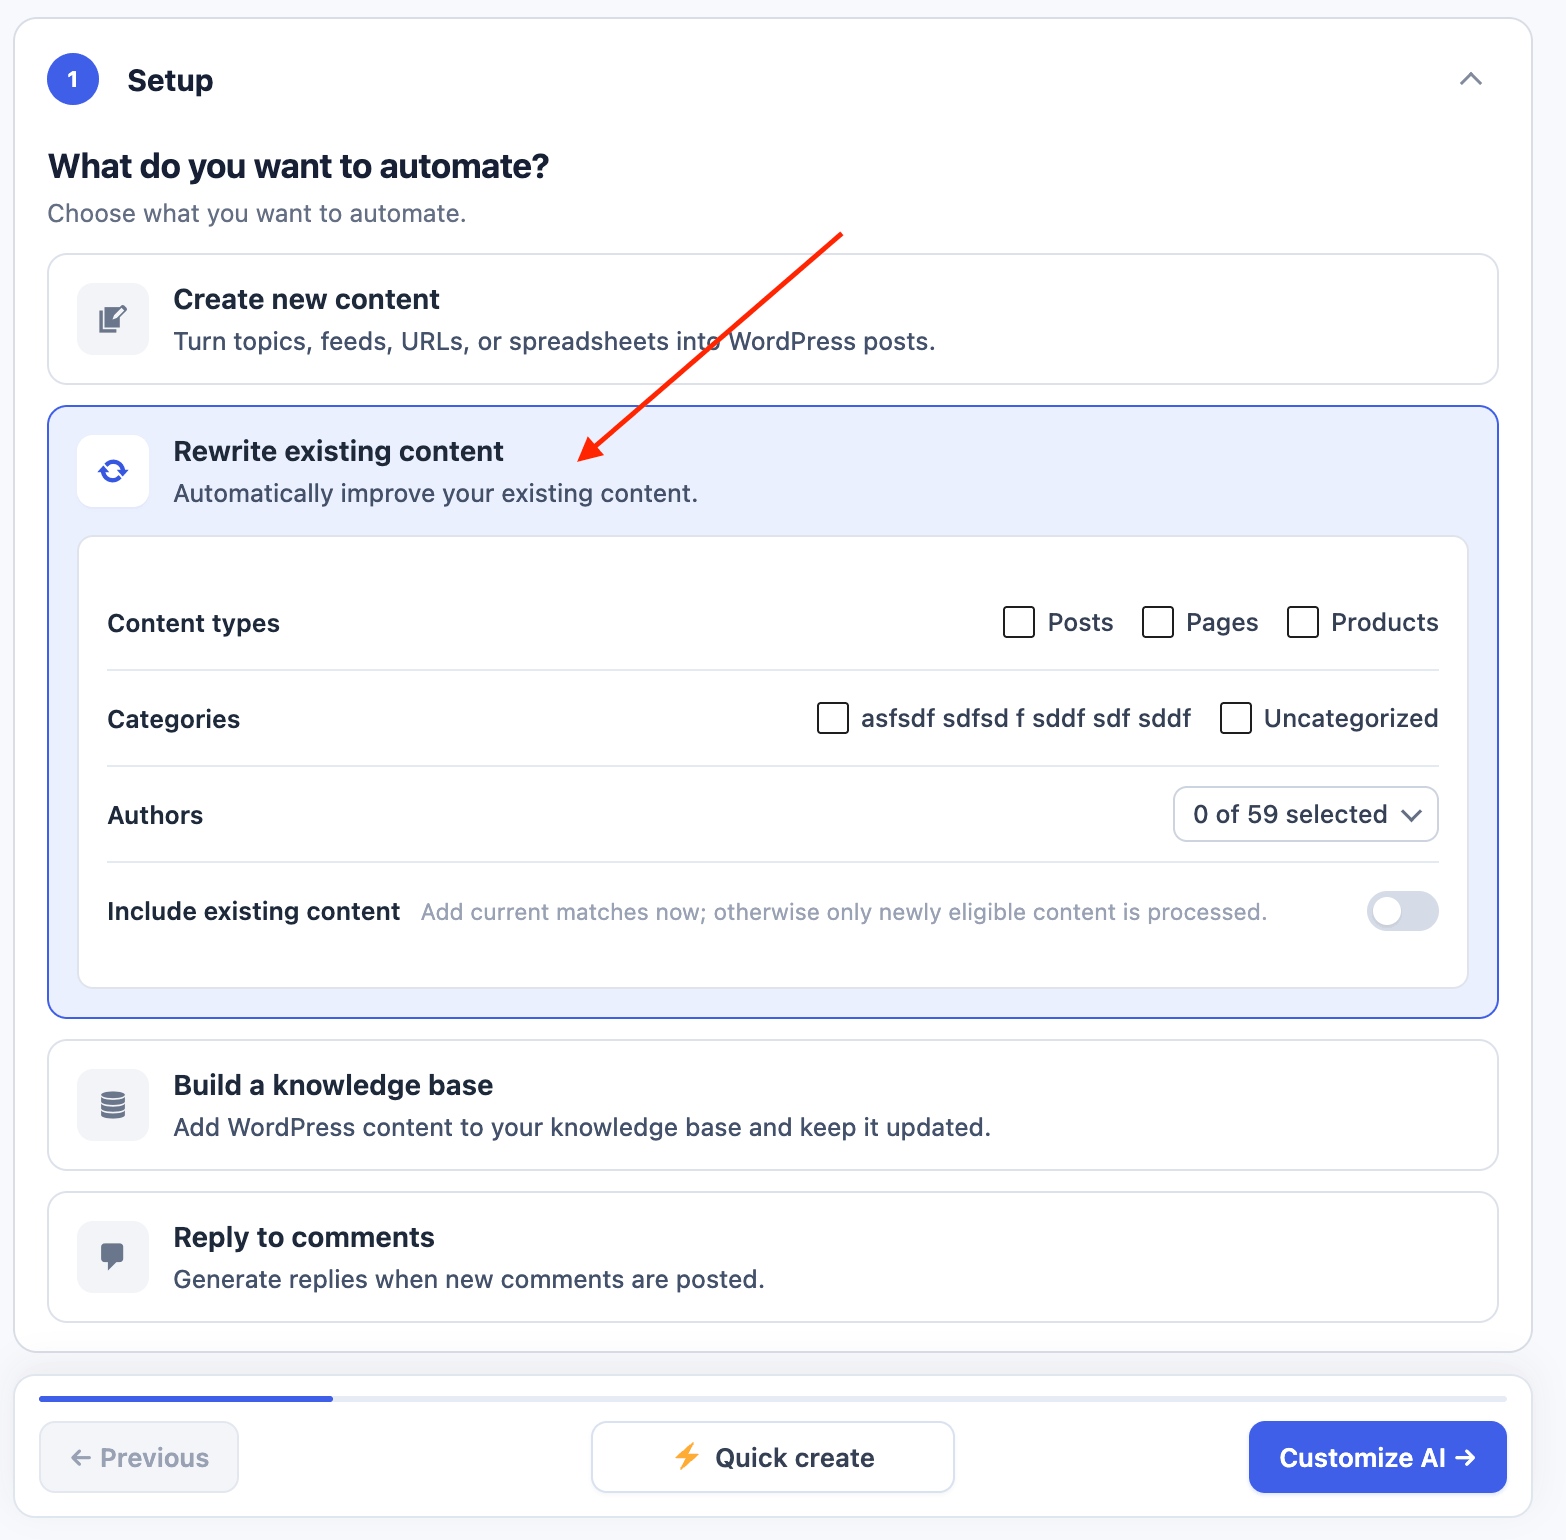
Select Rewrite existing content in Setup to update selected fields in published WordPress content. This is a Pro feature.Rewrite Posts and Pages
The available settings are Setup, AI, Content, optional Knowledge, and Finish.- Select one or more Content types.
- Optionally limit the task with Categories or Authors. Use search when an expanded list is long.
- Turn on Include existing content if current matches should be queued when the task is saved.
- In AI, select the model, writing style, maximum rewrite length, and supported reasoning level.
- In Content, enable at least one field and review its Instructions.
- Optionally configure Knowledge.
- In Finish, set the task frequency and save the task.
Click Instructions and the pencil icon beside an enabled field to edit its rewrite instructions.
Common rewrite placeholders:
WooCommerce Products
Selectproduct under Content types to rewrite WooCommerce product titles, main descriptions, short descriptions, or SEO meta descriptions.

AI Puffer uses those values as source data. The rewrite task does not change price, SKU, stock, dimensions, purchase note, categories, or attributes.
Content Indexing
Select Build a knowledge base in Setup to add published WordPress content to OpenAI, Pinecone, Qdrant, or Chroma and keep it current.- Select a Provider.
- Select the destination Store / Index.
- Select the Embedding Model. The picker includes the embedding provider and model.
- Select one or more Content types.
- Leave Queue all existing content now on to build the initial knowledge base.
- Leave Auto-index new and updated content on to keep it current.
- Continue to Finish, choose how often the task should run, and click Save task.

AI Puffer queues existing content in batches. Run now queues matching published content again.
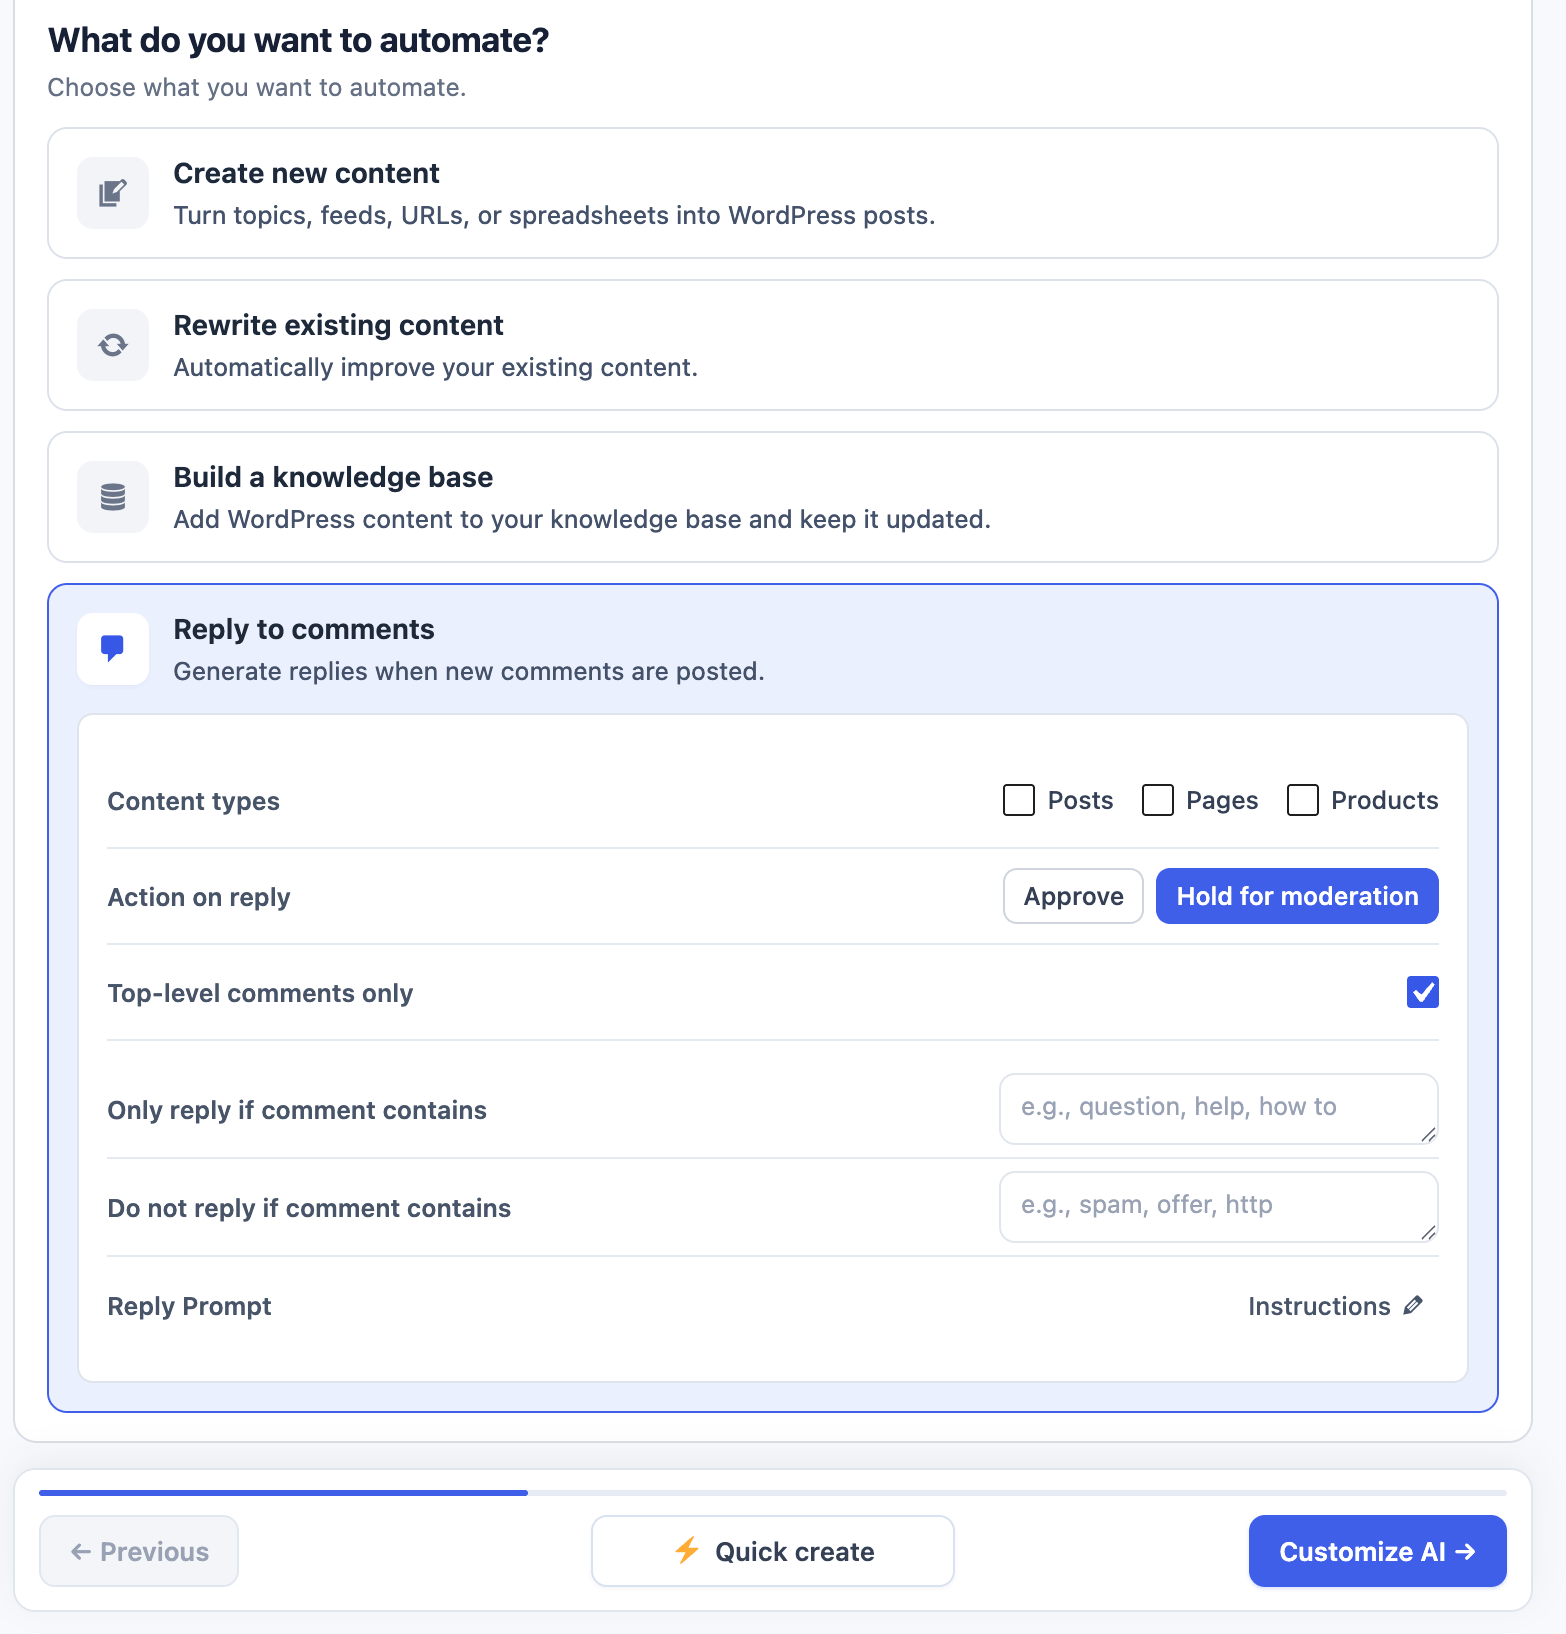
Comment Replies
Select Reply to comments in Setup to generate replies for matching approved WordPress comments.- Under Content types, select the post types to monitor.
- Under Action on reply, choose Approve or Hold for moderation.
- Select Top-level comments only if AI Puffer should not reply to other replies.
- Optionally complete Only reply if comment contains and Do not reply if comment contains.
- Click Instructions beside Reply Prompt to review or change the prompt.
- Continue to AI and select the text model.
- In Finish, choose the task frequency and save the task.
Scheduled runs avoid queueing a comment that the same task already queued or replied to. Replies are inserted as child comments. AI Puffer uses the post author when possible and falls back to the site administrator.
Settings
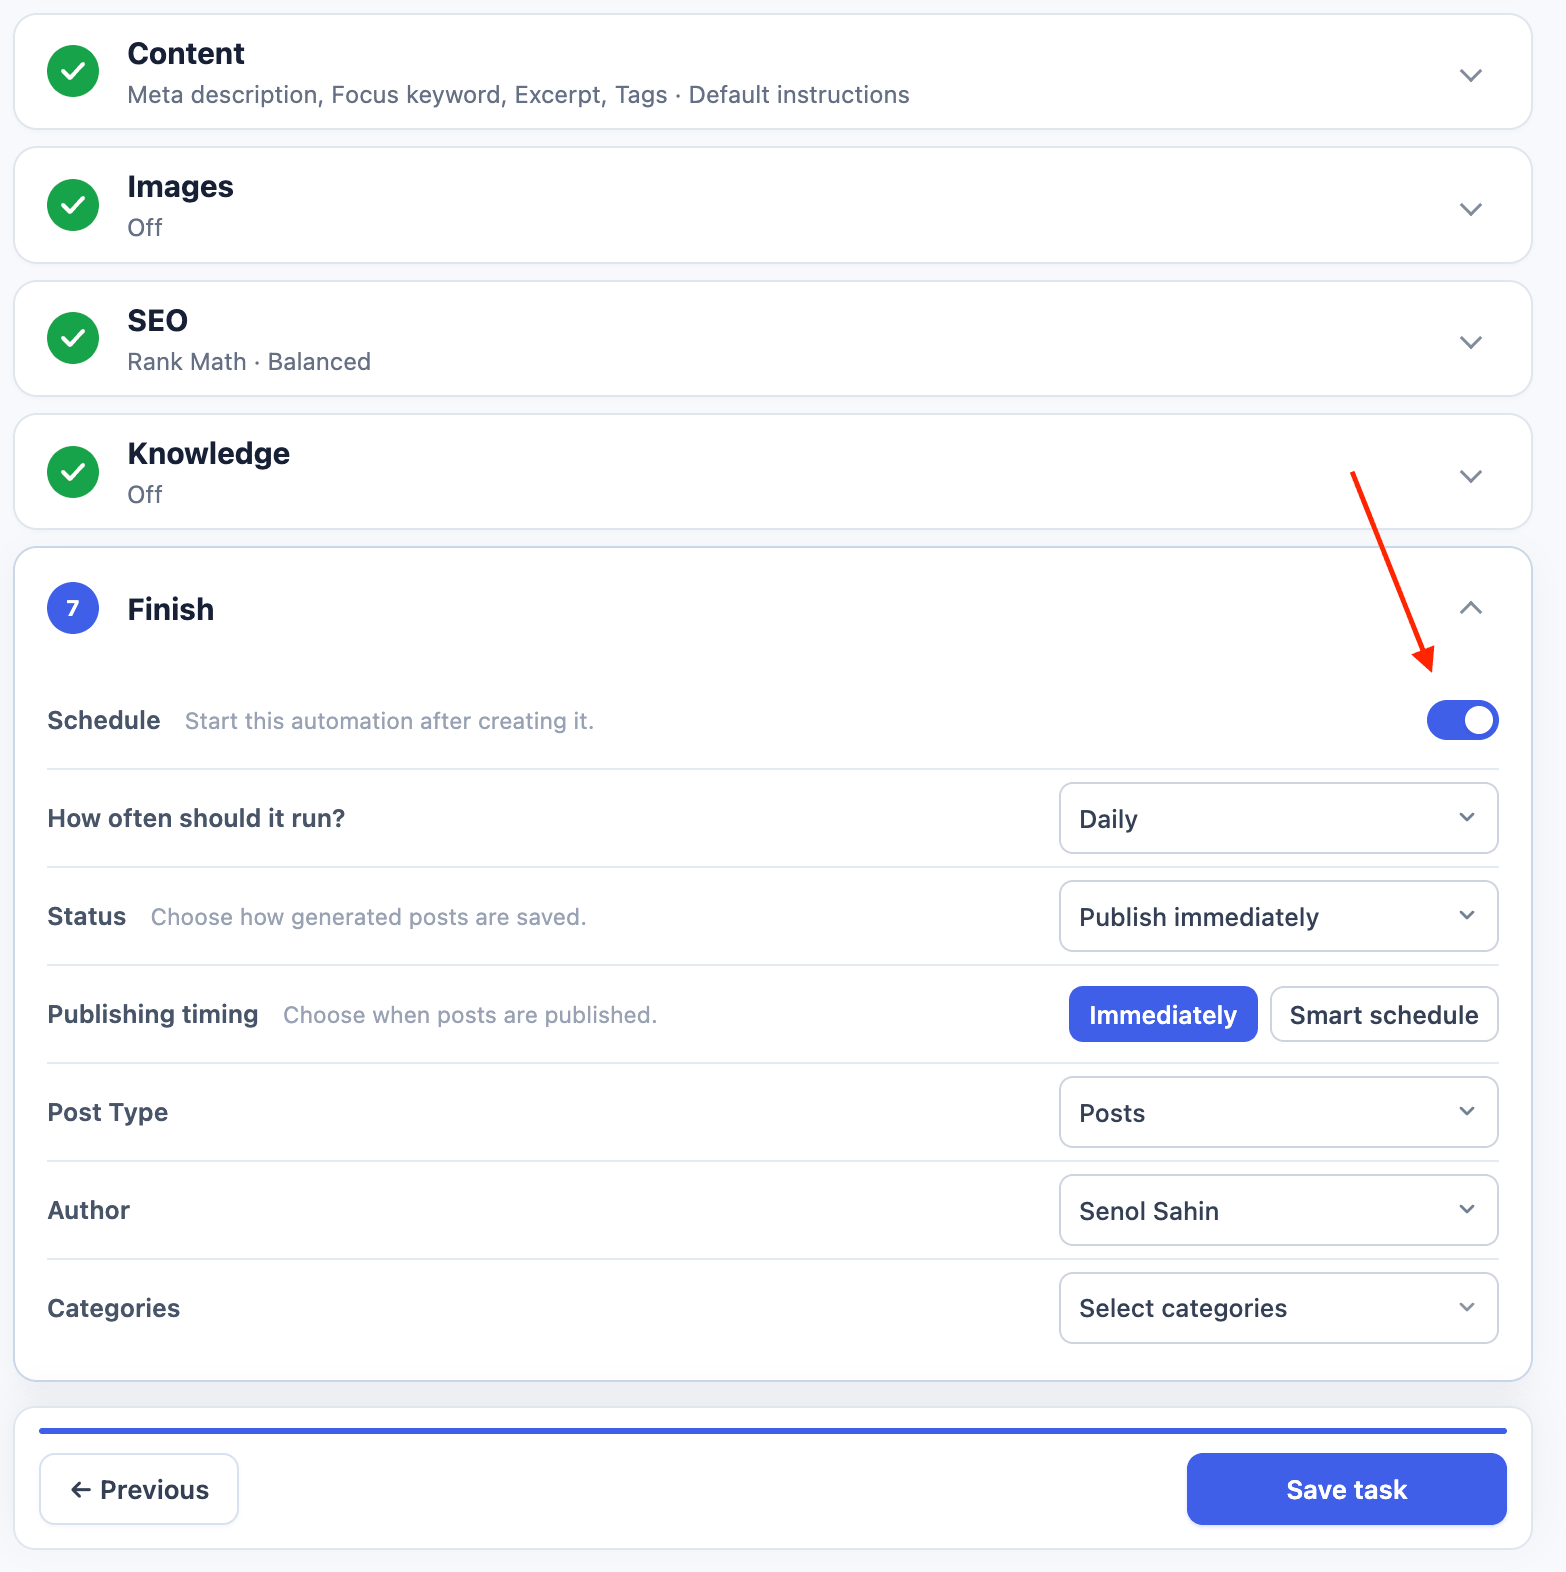
The available settings depend on the selected automation type.Task Schedule
Open Finish to configure the task schedule.
Batch editor and Import CSV are one-time sources, so their frequency row is hidden. Recurring sources and task types can use One-time, Every 5 Minutes, Every 15 Minutes, Every 30 Minutes, Hourly, Twice Daily, Daily, or Weekly.
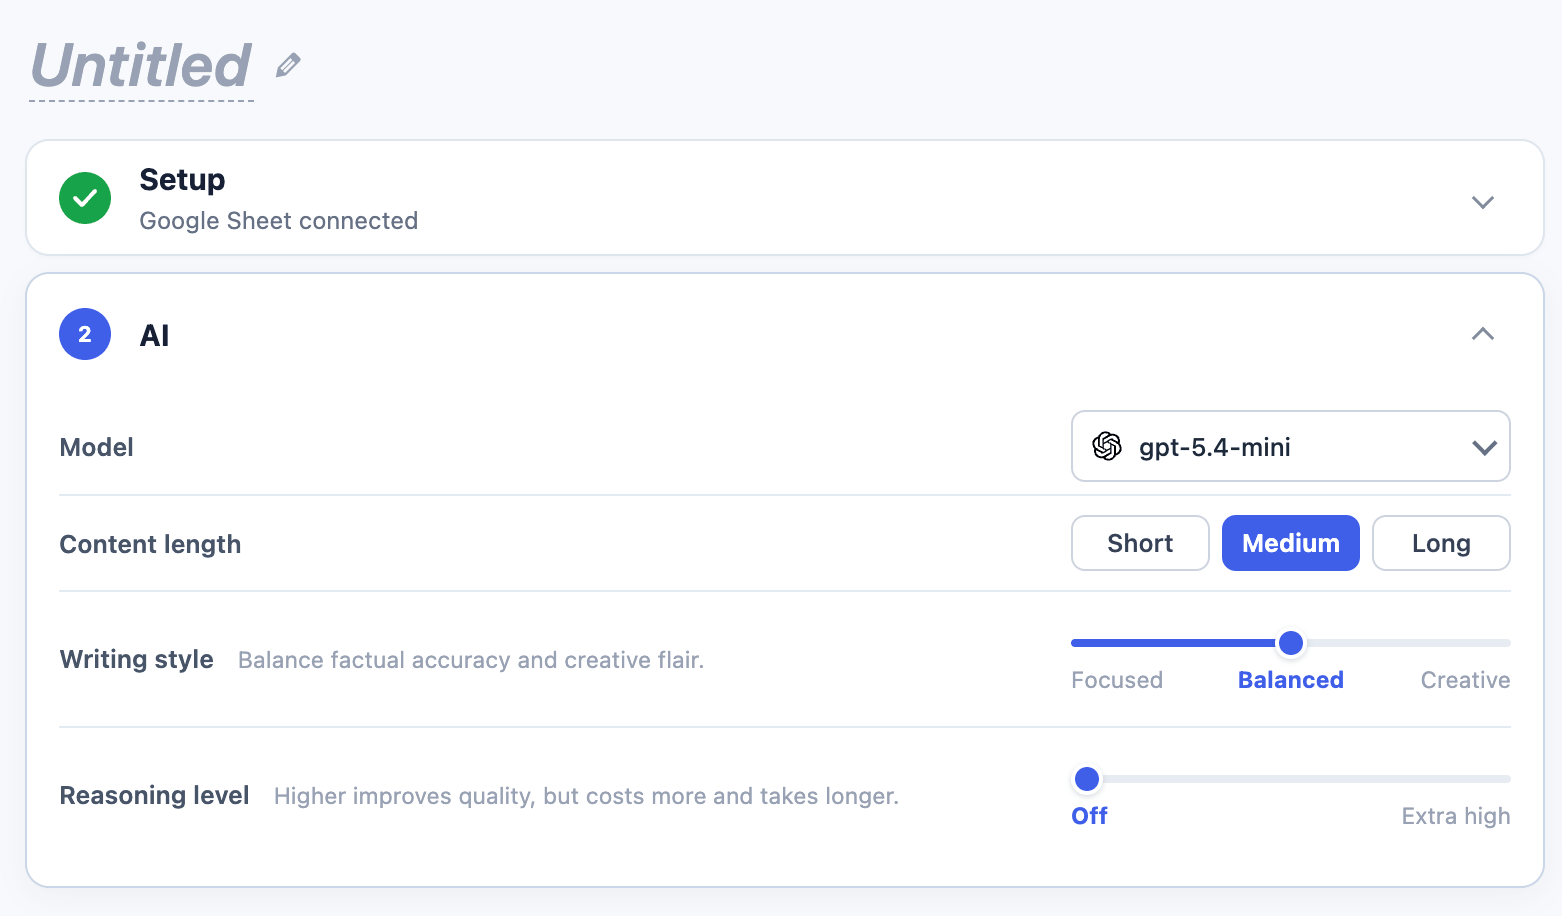
AI
Use AI to configure tasks that generate or rewrite text.
The model picker prefers a configured provider when one is available. If the selected provider needs setup, AI Puffer shows a warning and a link to settings.
Reasoning level appears only when the selected provider and model support it.
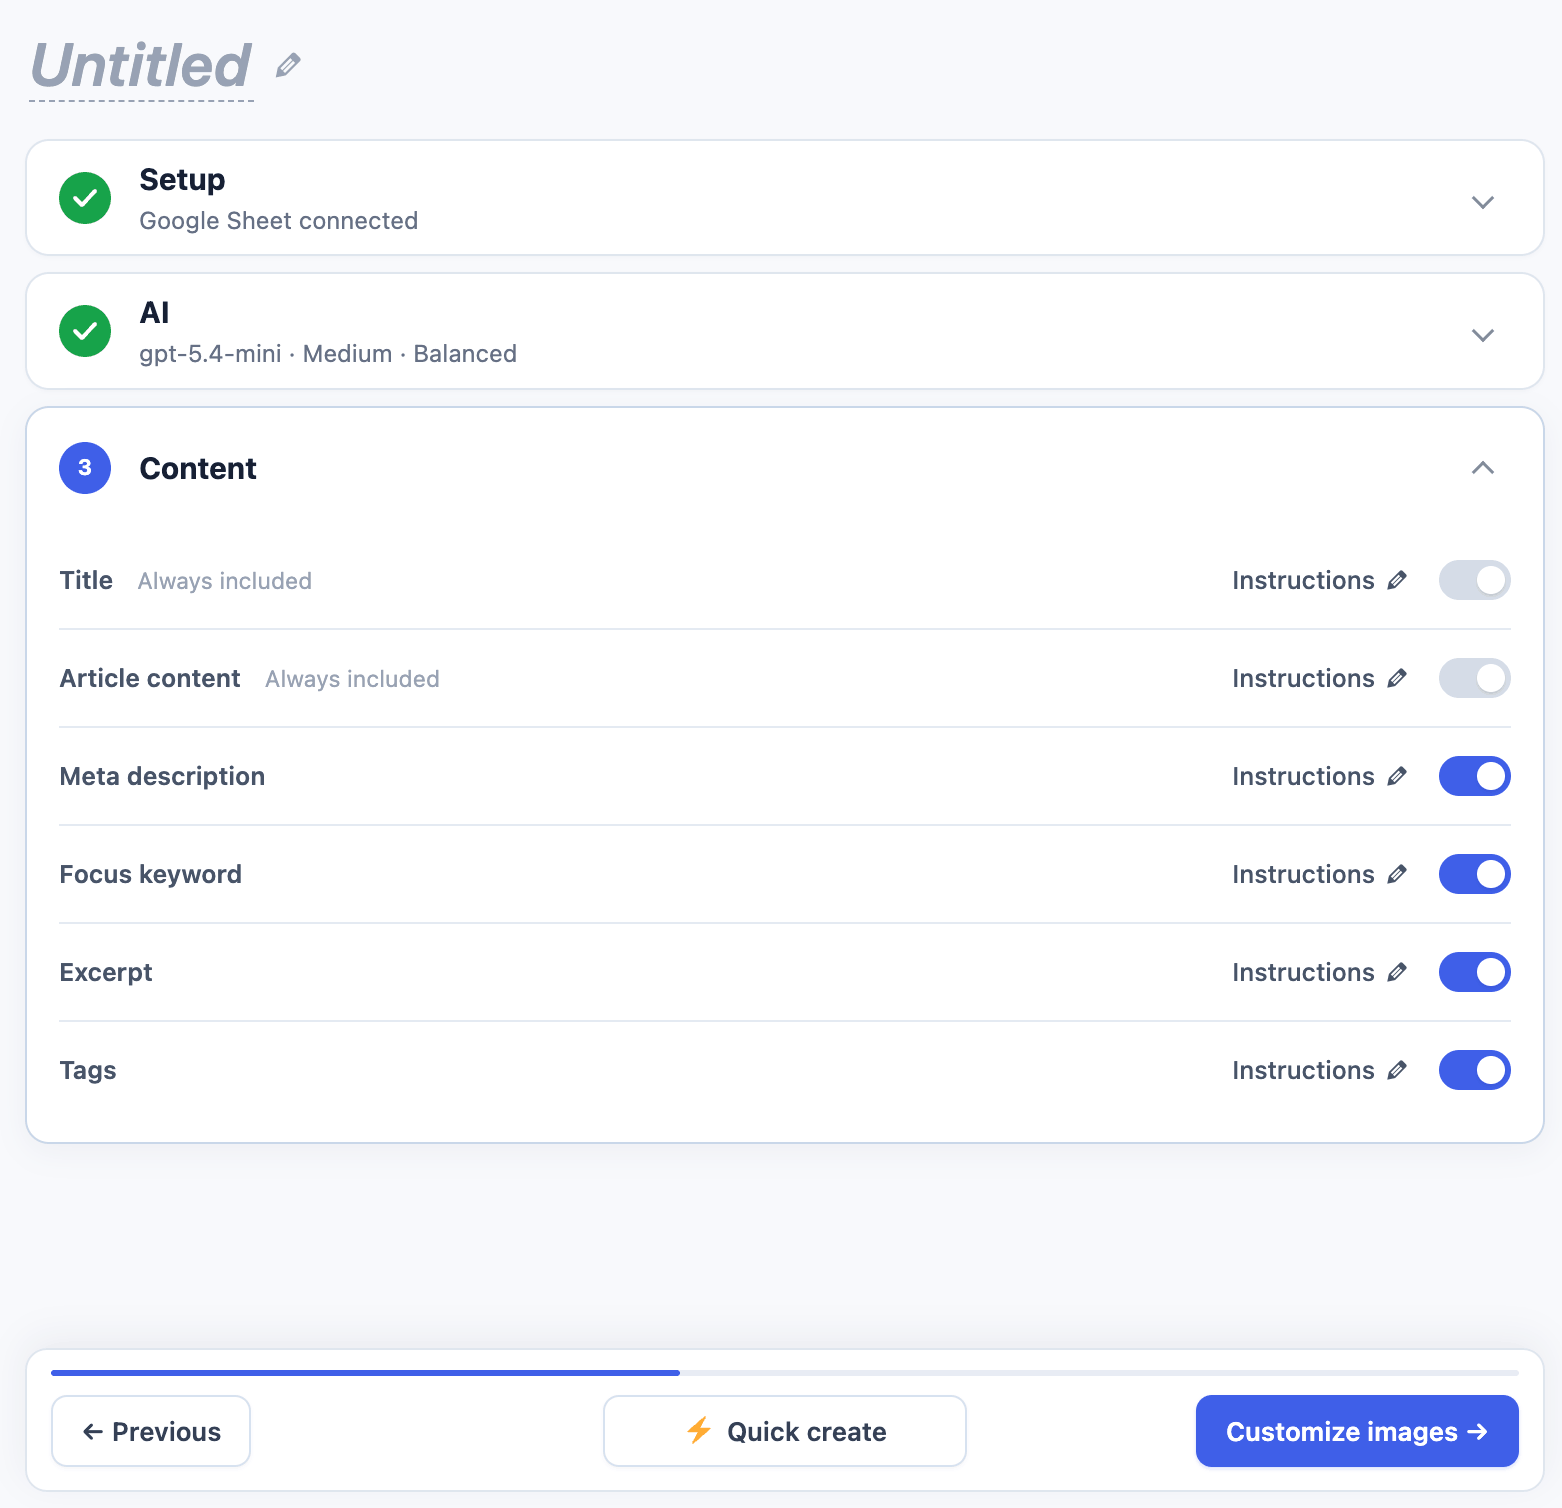
Prompts
Use Content to control which fields AI Puffer writes and how each one is generated. For new content, Title and Article content are always included. Meta description, Focus keyword, Excerpt, and Tags are optional. To customize a field:- Turn on an optional field if needed.
- Click Instructions and the pencil icon beside the field.
- Select a saved prompt or edit the instructions.
- Use the placeholders shown in the editor.
- Click Save.
Rewrite prompts are also edited through Instructions in Content. The Comment Replies prompt is edited through Instructions beside Reply Prompt in Setup.
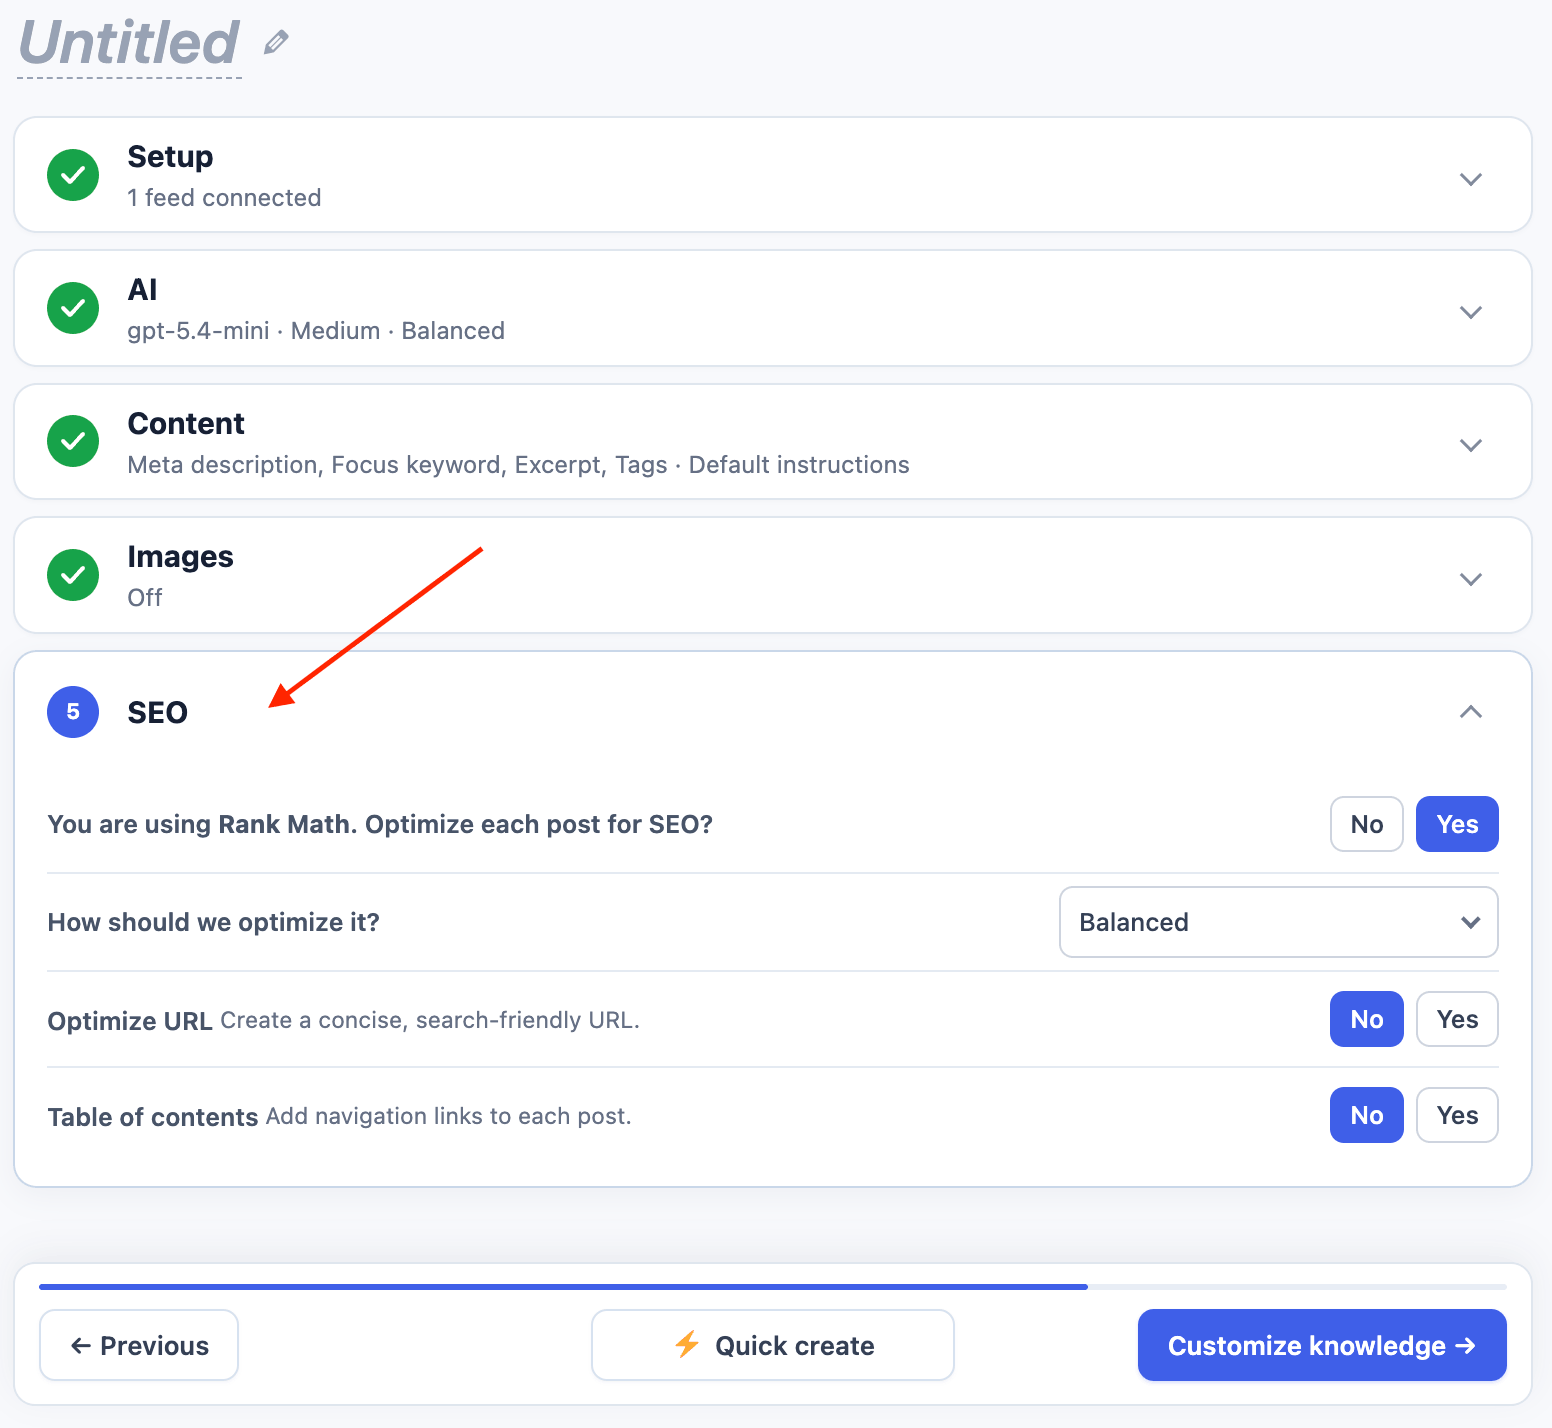
SEO
Use SEO in a Create Content automation to configure search optimization.
If a supported SEO plugin is active, AI Puffer shows its name in the first row.
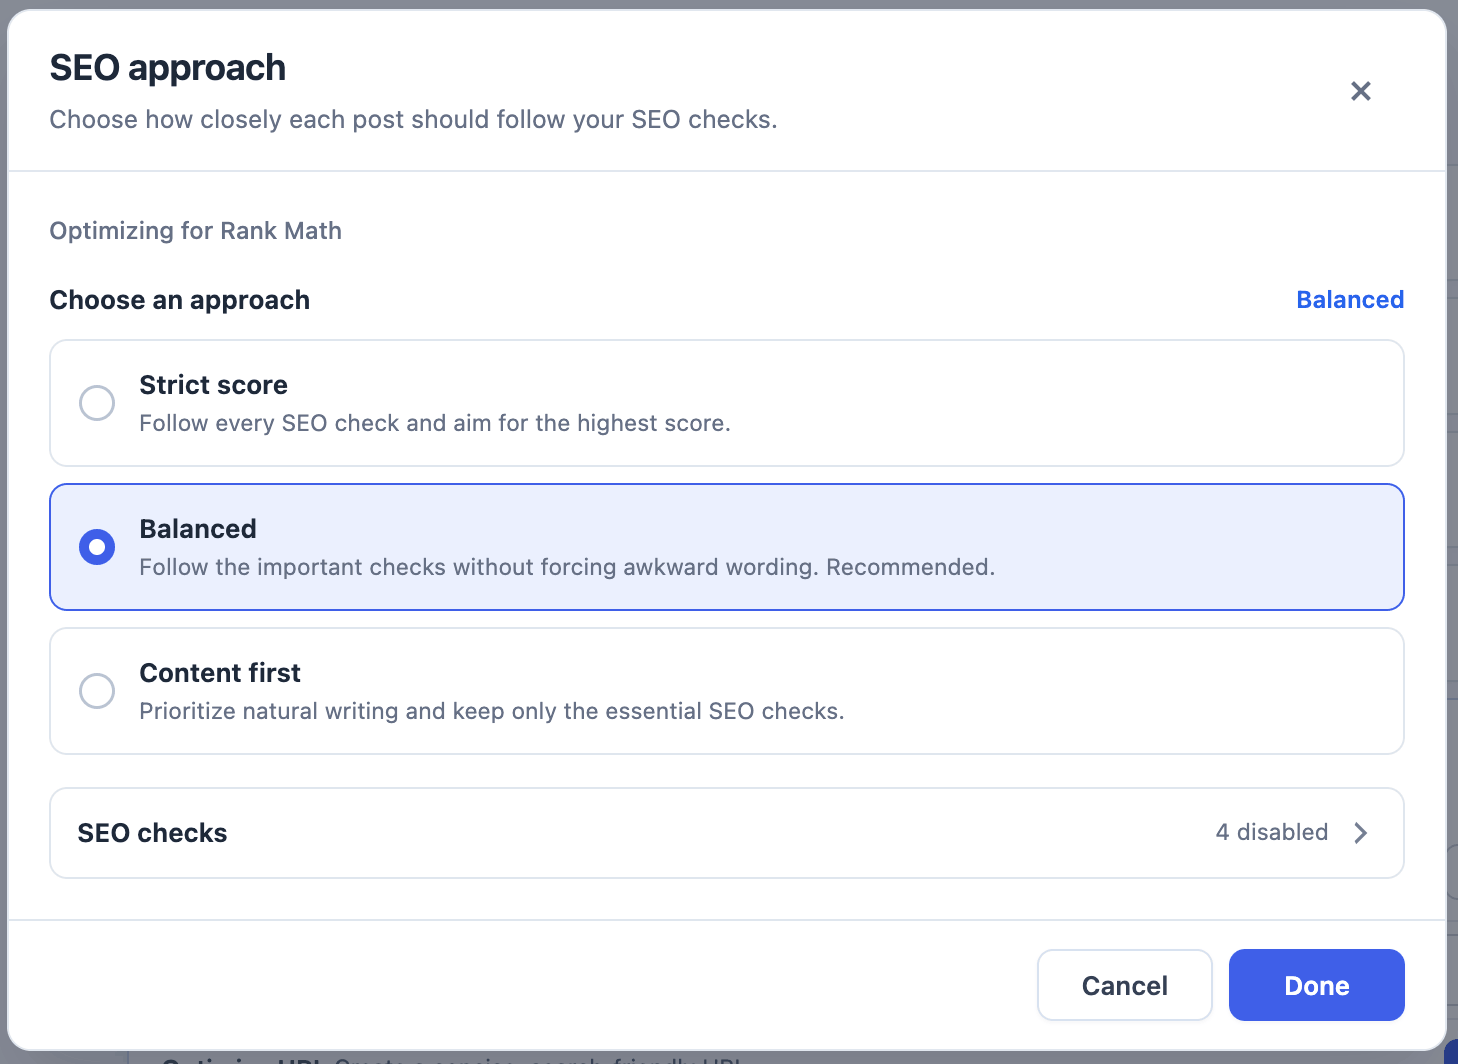
Smart SEO
Smart SEO is a Pro feature. It checks each generated post against the active SEO plugin profile and can revise the draft before the queue item completes. Choose an approach:
Click Manage checks to enable or disable individual rules. If Smart SEO cannot reach the target score, AI Puffer keeps the best revision.
Yoast SEO
AI Puffer saves the generated meta description to the Yoast description field and the generated focus keyword to the Yoast focus keyphrase field. Smart SEO uses Yoast analysis and readability checks.Rank Math
AI Puffer saves the generated meta description and focus keyword to Rank Math. Smart SEO uses Rank Math’s Basic SEO, Additional SEO, Title Readability, and Content Readability checks.All in One SEO
AI Puffer saves the generated meta description and focus keyphrase data to All in One SEO. Smart SEO uses TruSEO, keyphrase, readability, and headline checks.The SEO Framework
AI Puffer saves the generated meta description to The SEO Framework. The SEO Framework does not provide a native focus keyword field, so AI Puffer does not save one for this profile. If no supported SEO plugin is active, AI Puffer still saves fallback meta description data. WordPress tags and optimized URL slugs continue to work.Publishing
Use Finish to configure how generated WordPress posts are saved.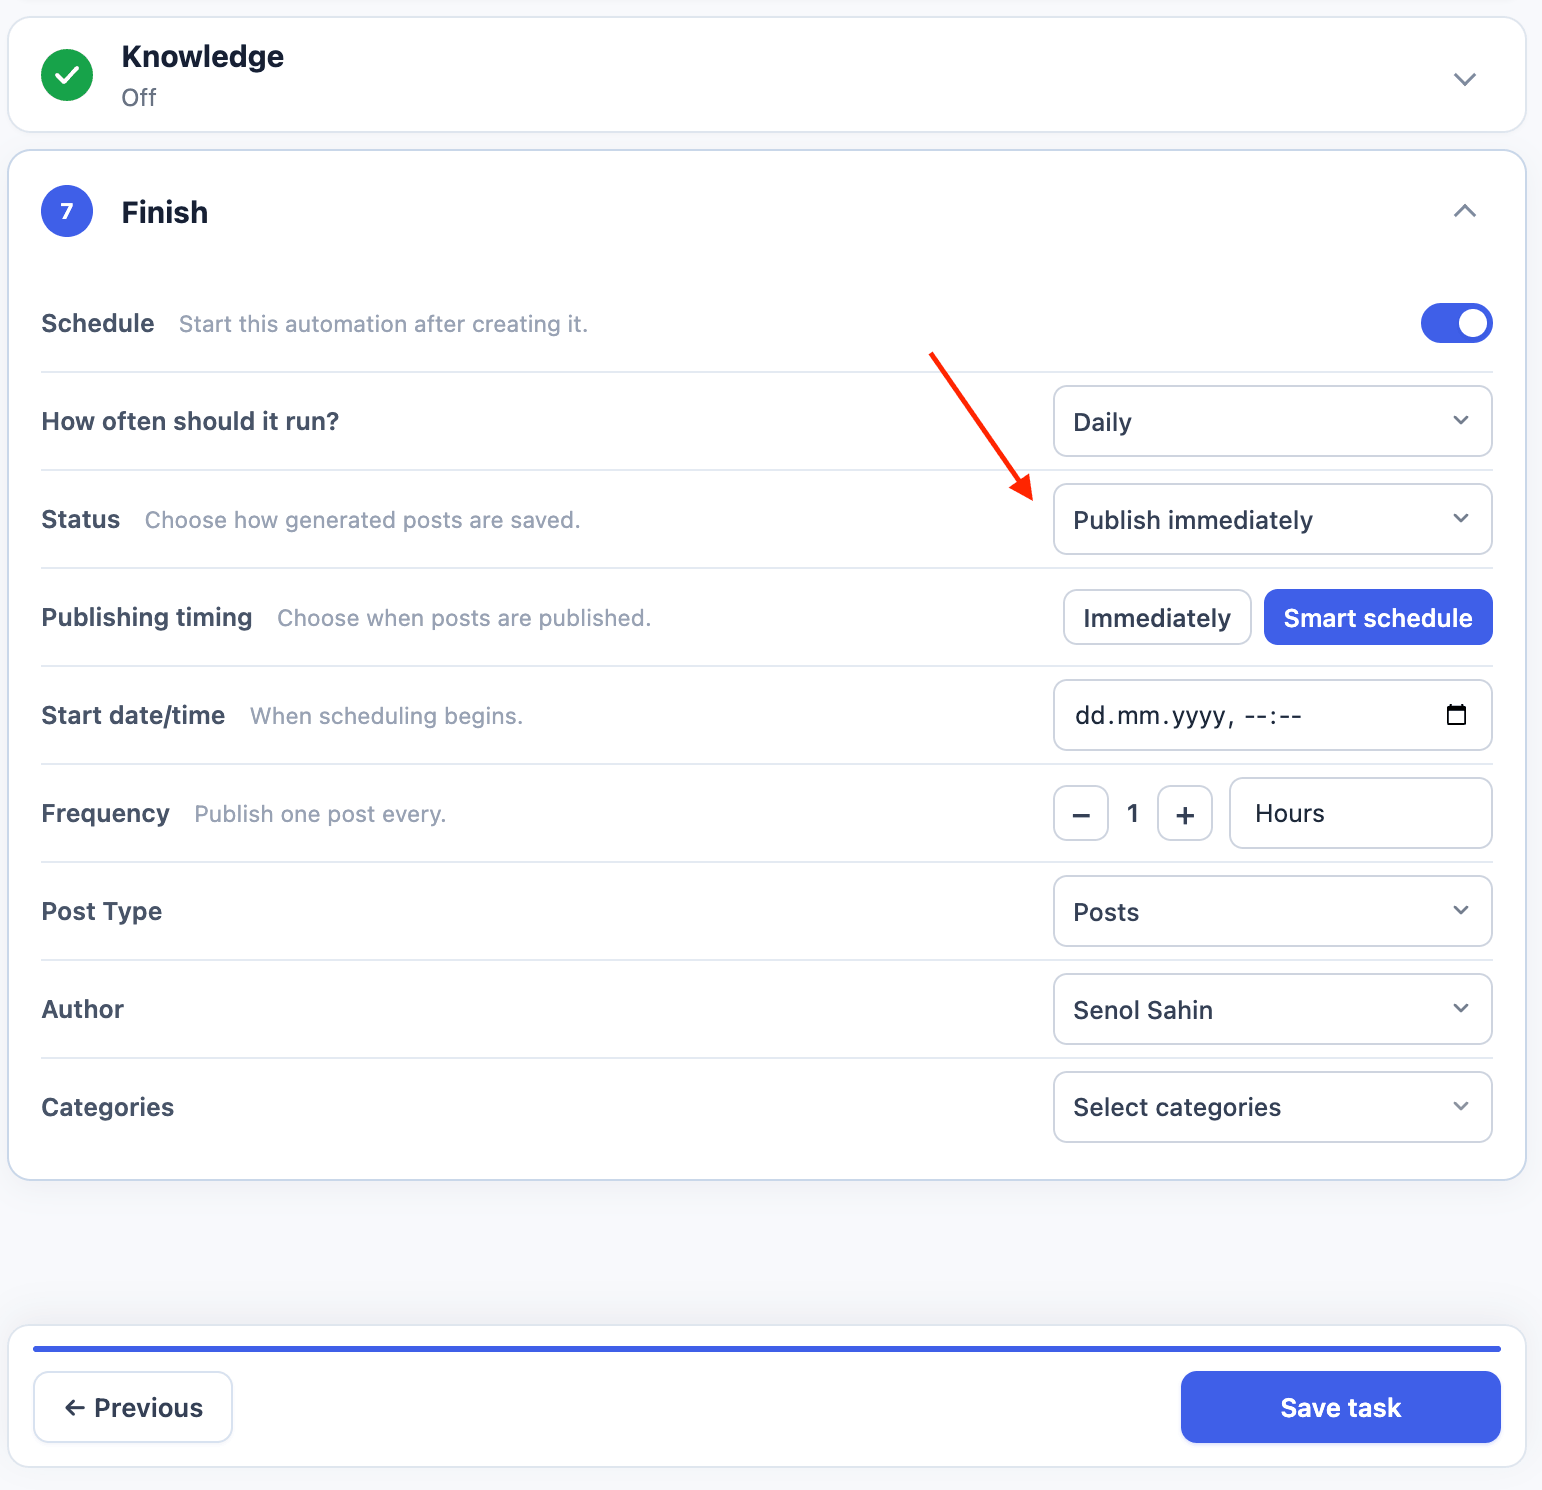
Schedule
When Status is Publish immediately, choose a publishing mode: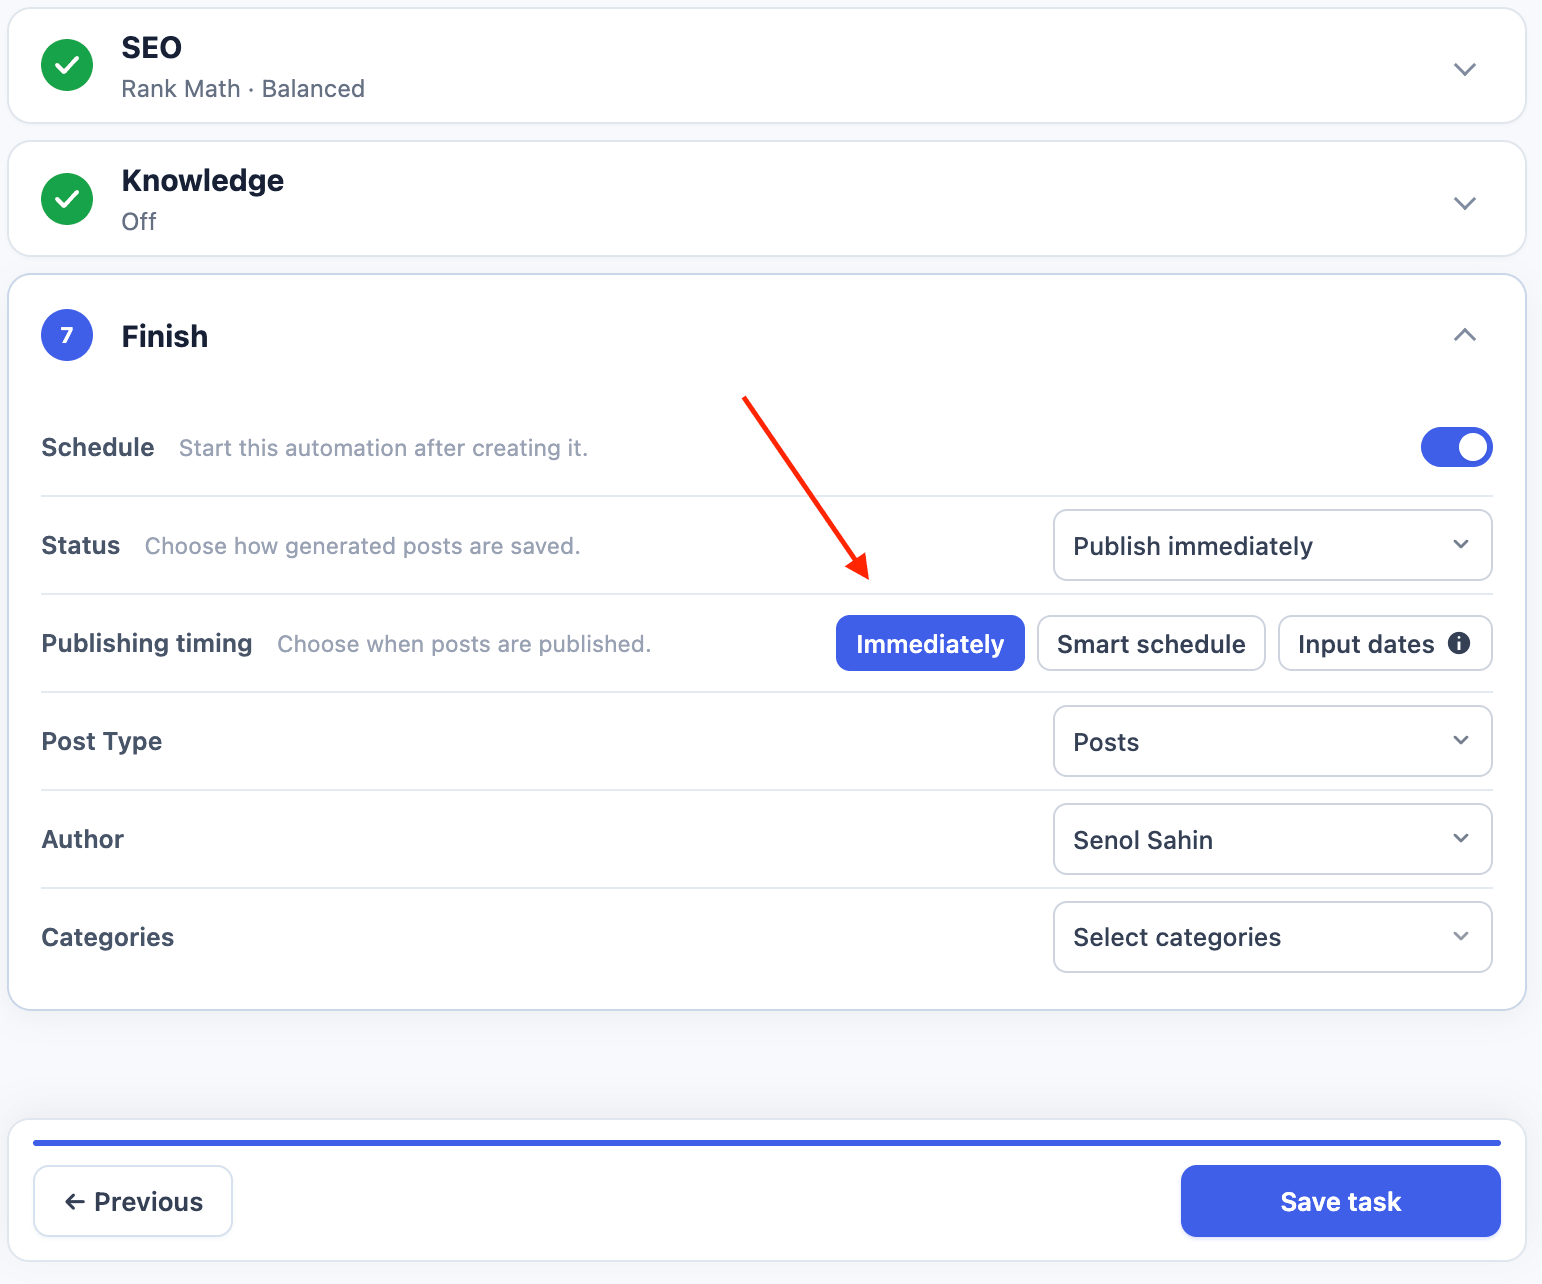
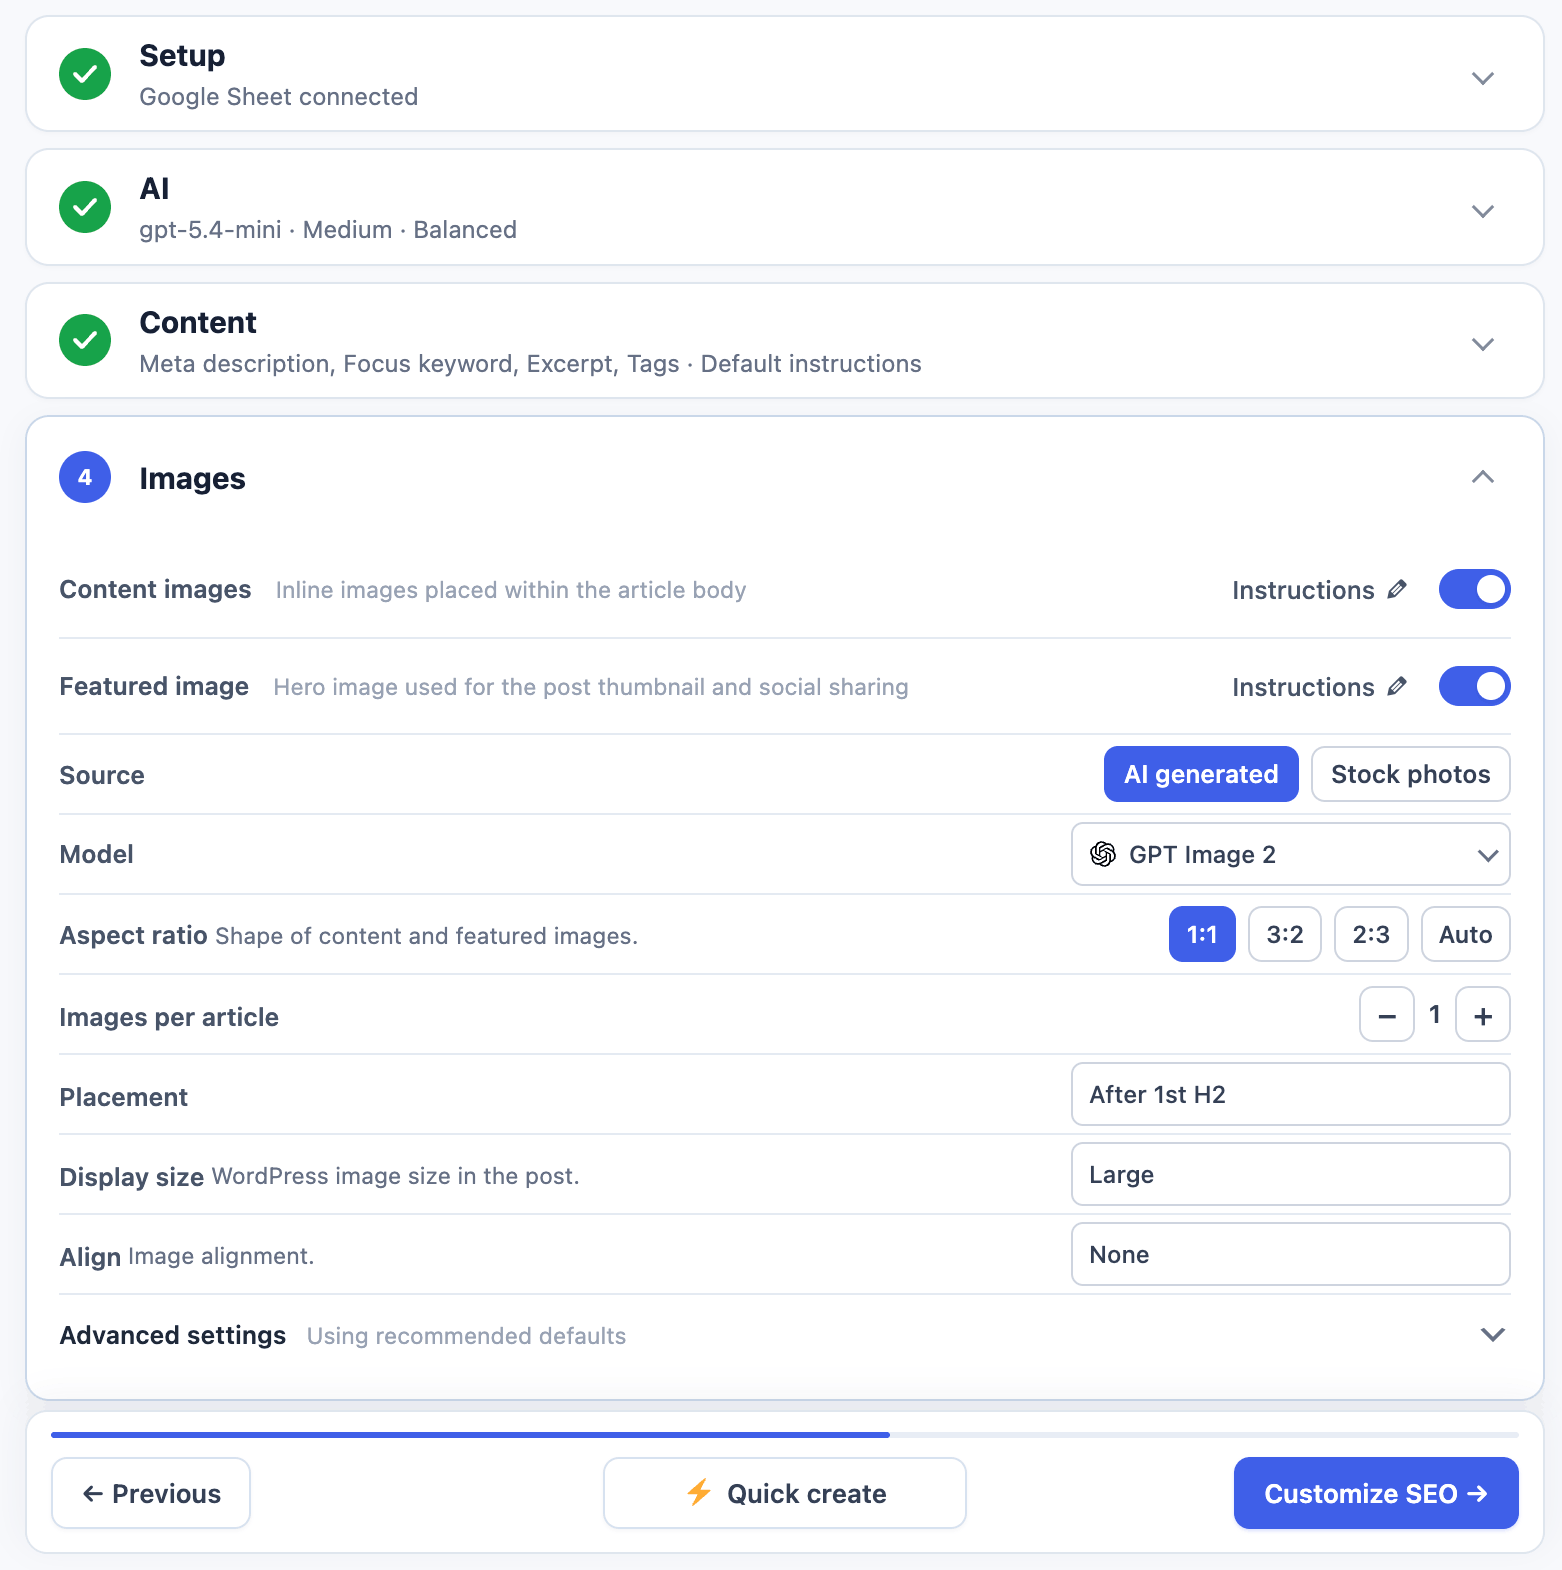
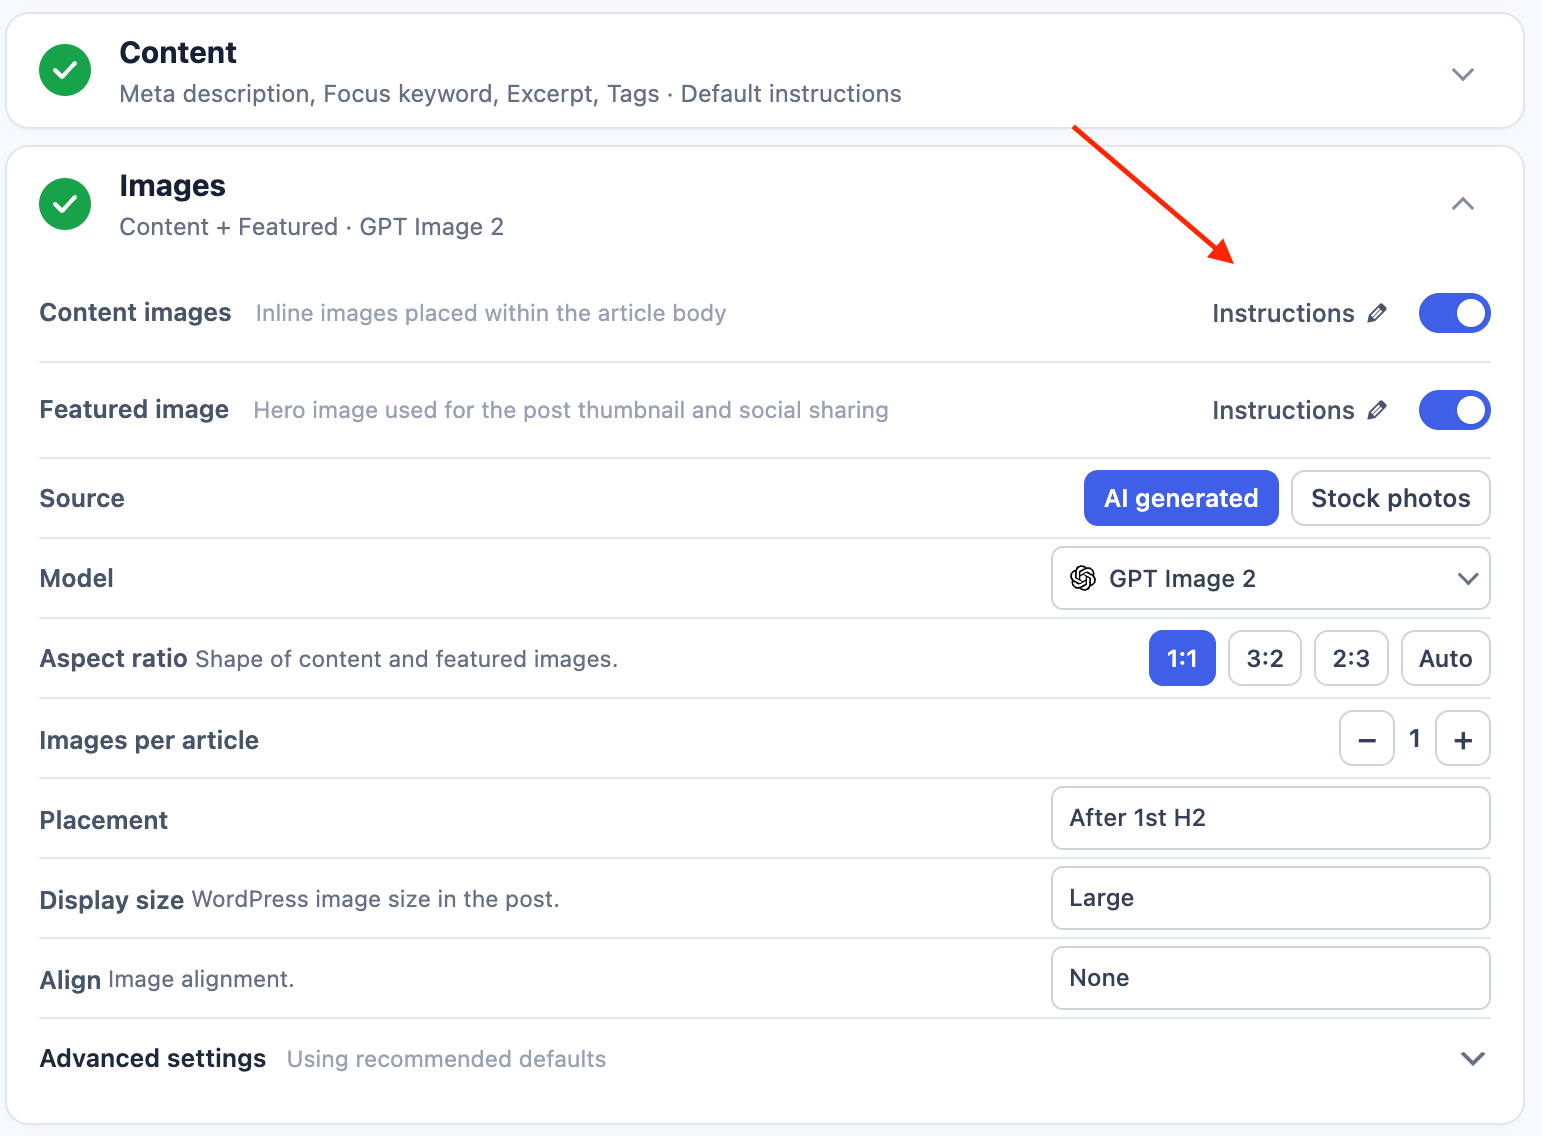
Images
Use Images in a Create Content automation to configure content images, a featured image, or both. Each image type has its own Instructions control. When either image type is enabled, choose AI generated or Stock photos.
Content-image-only settings include Images per article, Placement, Display size, and Align. When an interval placement such as Every X H2s is selected, use the minus and plus controls beside Placement to set the interval.
Open Advanced settings for provider-specific controls.
OpenAI
Add the OpenAI API key in AI Puffer > Settings > AI and sync image models. In Images, enable an image type, select AI generated, and choose an OpenAI image model.OpenRouter
Add the OpenRouter API key in AI Puffer > Settings > AI and sync image-capable models. If a selected model does not return images, choose another image-capable model.Azure
Add the Azure endpoint, API key, API version, and image deployment in AI Puffer > Settings > AI. Select that deployment after choosing AI generated.xAI
Add the xAI API key in AI Puffer > Settings > AI and sync image models. xAI image generation uses supported models such asgrok-imagine-image.
Replicate
Add the Replicate API key in AI Puffer > Settings > Integrations and sync text-to-image models. Select the required model after choosing AI generated.Pexels
Add the Pexels API key in AI Puffer > Settings > Integrations. In Images, select Stock photos, then select the Pexels provider chip. Pexels supports orientation, size, and color filters.Pixabay
Add the Pixabay API key in AI Puffer > Settings > Integrations. In Images, select Stock photos, then select the Pixabay provider chip. Pixabay supports orientation, type, and category filters.Provider Options
Only options supported by the selected source, provider, and model appear.
AI-generated aspect-ratio choices change with the selected model. Stock-photo orientation choices change with the selected provider.
Image Prompts
Click Instructions and the pencil icon beside Content images or Featured image to customize what AI Puffer should create. The two image types keep separate instructions. Common placeholders include{topic}, {keywords}, {post_title}, and {excerpt}.
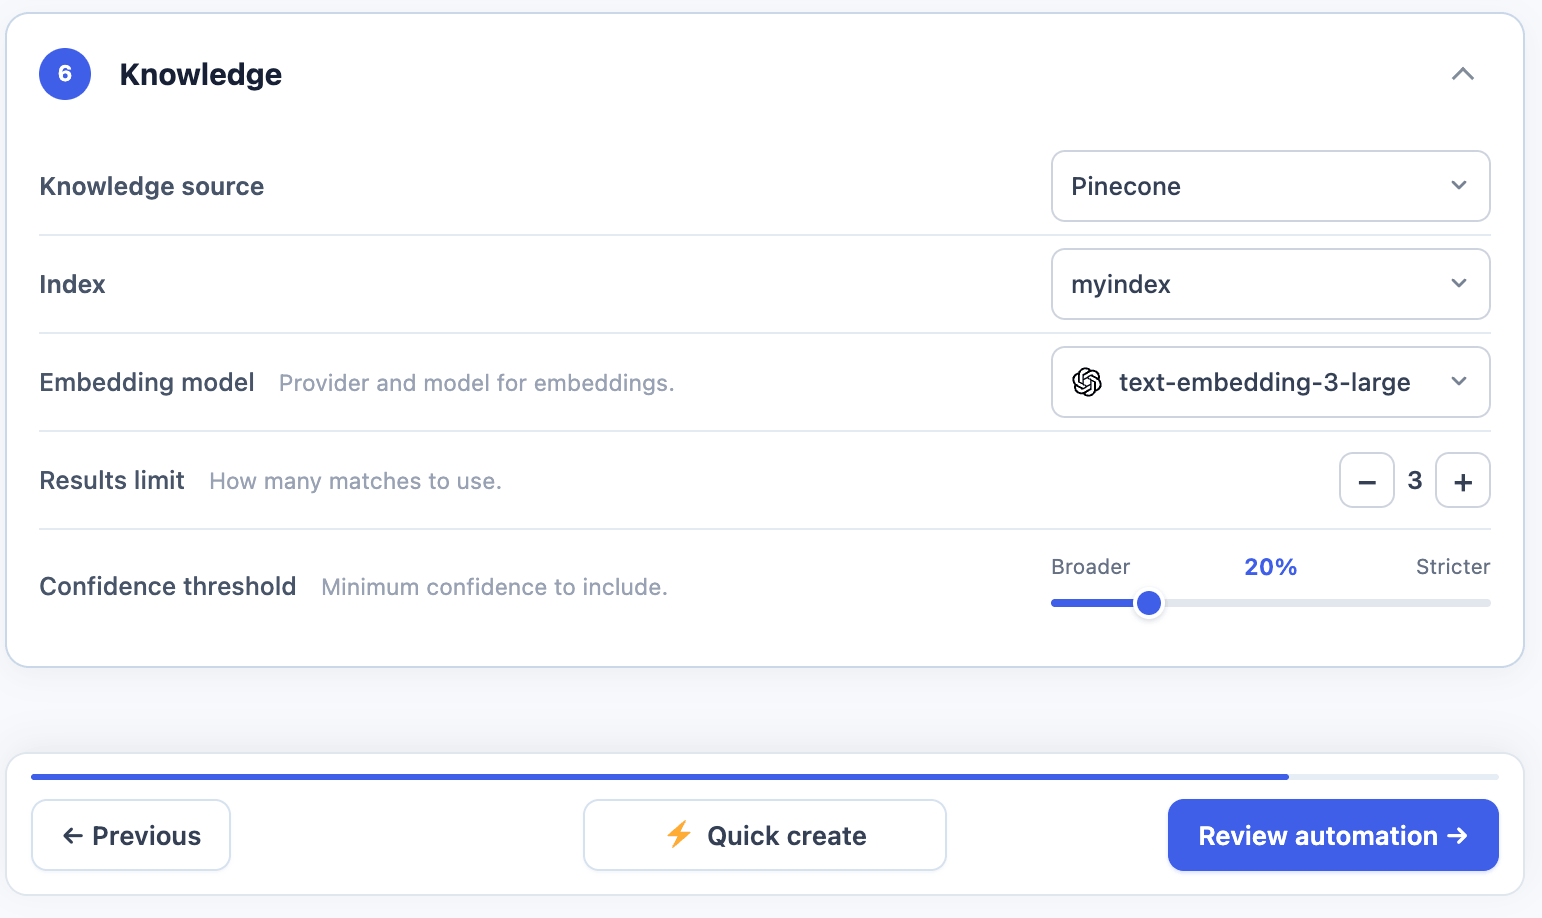
Knowledge Base
Use optional Knowledge settings when generated or rewritten text should include information from a vector database.- Select a Knowledge source.
- Select the provider’s vector stores, index, or collection.
- For Pinecone, Qdrant, or Chroma, select the Embedding model used to index the data.
- Set Results limit.
- Adjust Confidence threshold only when needed.
OpenAI
OpenAI uses OpenAI Vector Stores. Add data in AI Puffer > Knowledge Base > Data, select OpenAI under Knowledge source, then select one or more Vector stores.Pinecone
Add Pinecone credentials in AI Puffer > Settings > Integrations. Select the Pinecone index and the same embedding model used when the data was added. The index dimension must match the embedding model.Qdrant
Add the Qdrant URL and API key in AI Puffer > Settings > Integrations. Select the Qdrant collection and the same embedding model used when the data was added. The collection vector size must match the embedding model.Chroma
Add the Chroma endpoint, tenant, database, and API key in AI Puffer > Settings > Integrations. Select the Chroma collection and the same embedding model used when the data was added.Limit and Threshold
Use the default threshold until you have tested retrieval quality. A very high value can return few or no results. A very low value can include weak matches. AI Puffer warns when you move away from the recommended value.
For complete provider setup, see Knowledge Base.
Queue
The queue shows work created by saved tasks and Run now actions.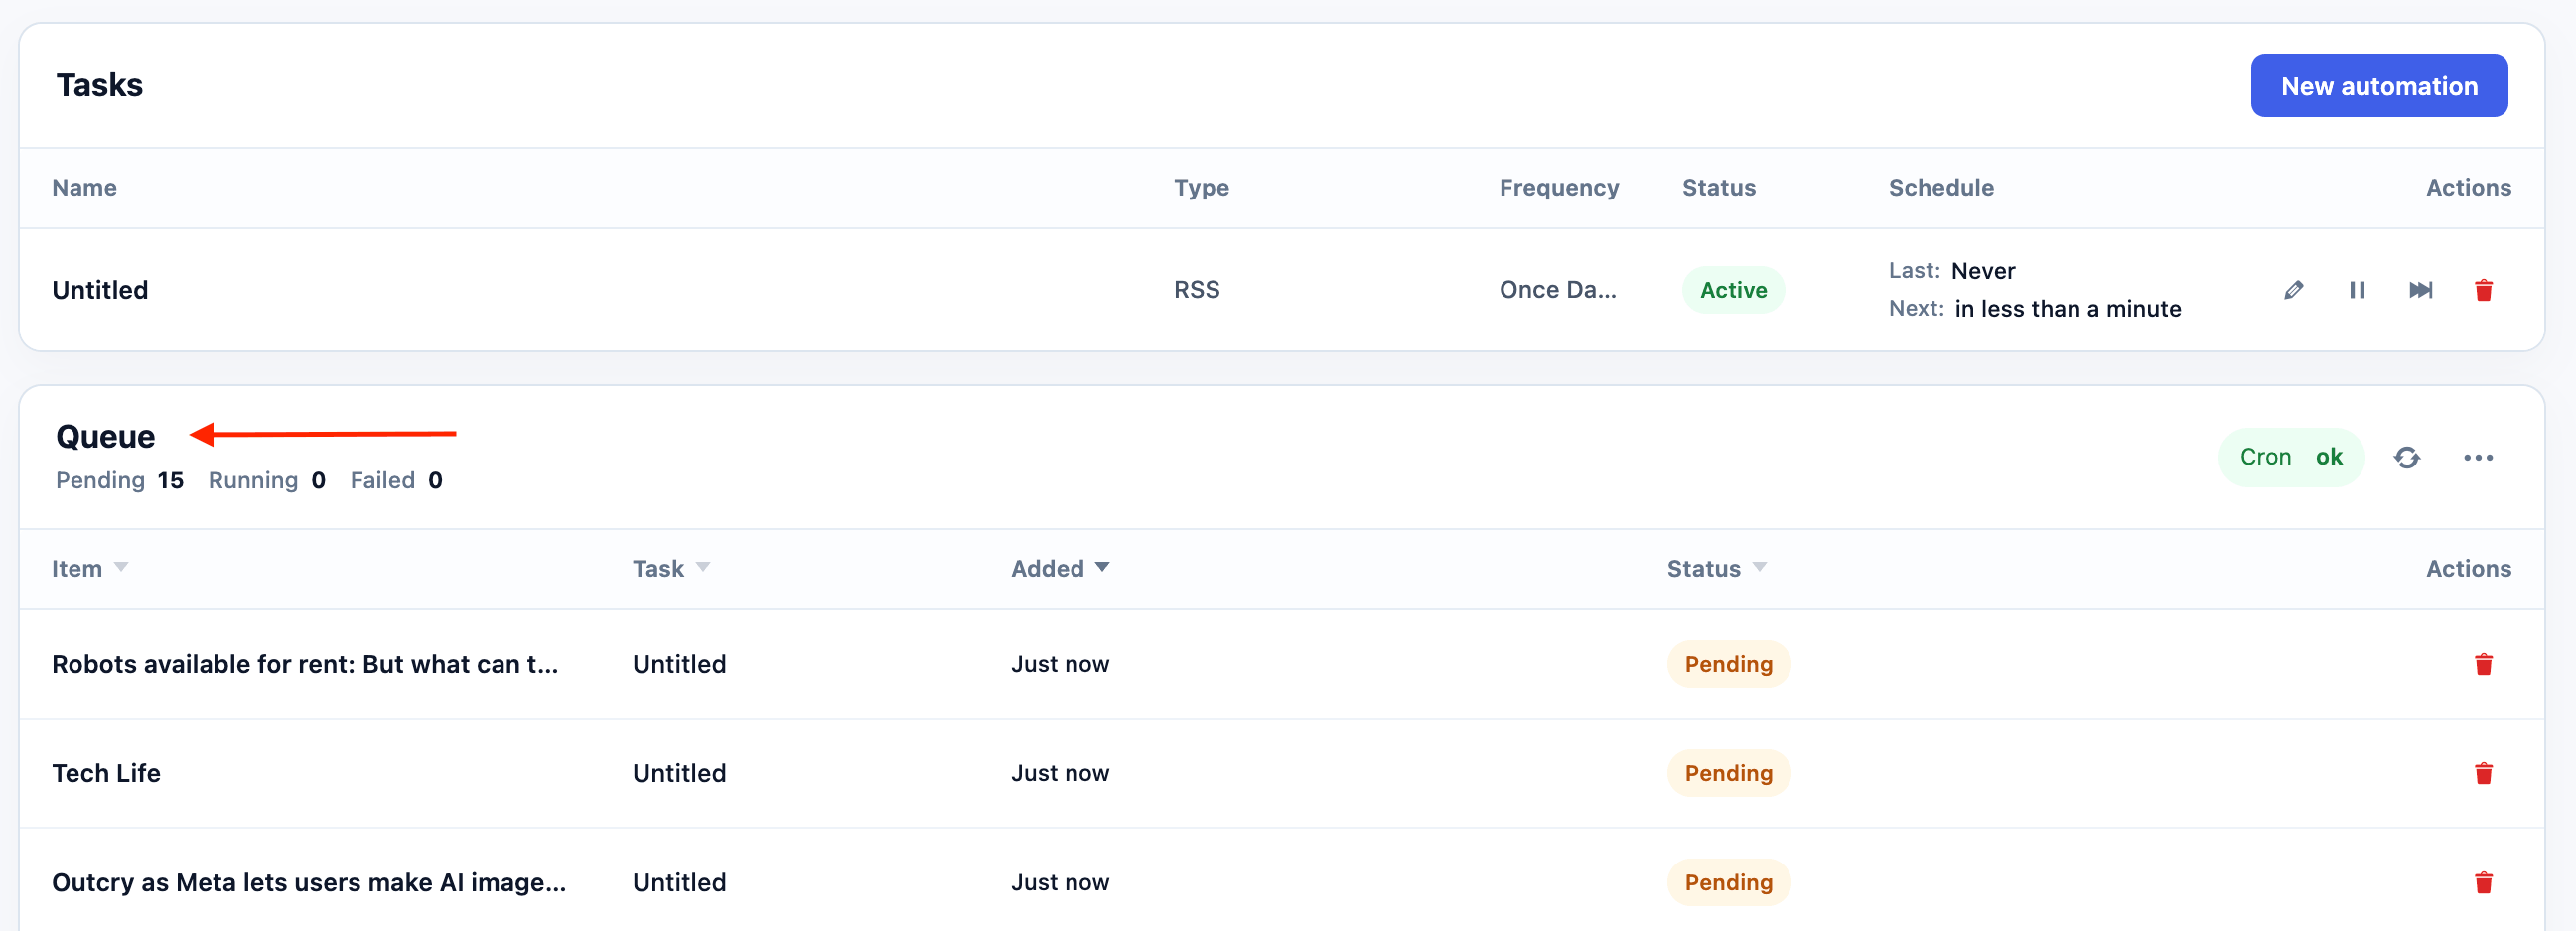
Click the queue menu to open Queue tools. Search item or task names, filter by status, or delete the currently filtered items. A failed item also has a retry action.
The Cron badge opens the cron status panel. Use it to check whether WordPress cron is healthy, disabled, or delayed. Click the refresh icon to reload the queue.
Deleting a task, queue item, or filtered queue set opens a destructive confirmation dialog that names what will be removed. Review it before clicking Delete. The action cannot be undone.
Completed content-creation items can link to the generated post when a WordPress post ID is available.
Connected Apps
Automations can send results to Connected Apps and webhooks.
Use these events when another system needs the generated post, task result, or queue item details. See Event Webhooks for event payloads and delivery setup.
Logs
Automation activity can appear in AI Puffer logs.
Queue status and error messages also remain visible in the Automations queue.
Troubleshooting
Task did not run
Task did not run
- Confirm the task status is Active.
- Check Last and Next in the Tasks table.
- Open the Cron status panel and confirm WordPress cron is healthy.
- If
DISABLE_WP_CRONis enabled, configure a server cron job. - Check whether the task already has pending or processing queue items.
- Edit the task and confirm that its provider, model, source, and destination are still configured.
No items were queued
No items were queued
Queue item failed
Queue item failed
- Read the error shown for the queue item.
- Fix the provider, model, source, prompt, or destination setting.
- Use the retry icon on the failed item.
Google Sheets rows are not processed
Google Sheets rows are not processed
- Confirm the Sheet ID is correct.
- Confirm the service-account JSON file is valid.
- Share the sheet with the service-account email as an Editor.
- Put the topic in column A.
- Leave column G empty until AI Puffer processes the row.
Content indexing fails
Content indexing fails
- Confirm the selected store, index, or collection still exists.
- For Pinecone, Qdrant, and Chroma, select an embedding model.
- Confirm the destination dimension matches the embedding model.
- Confirm the selected content types contain published content.
- Check the provider connection in AI Providers.
Comment replies are not created
Comment replies are not created
- Confirm the original comment is approved.
- Check the selected content types.
- Review the include and exclude keyword filters.
- Confirm the comment was not already queued or replied to by the task.
- Check the selected AI provider and model.