You can now integrate Twitter with our plugin, allowing you to generate tweets directly from GPT agent.
Requirements
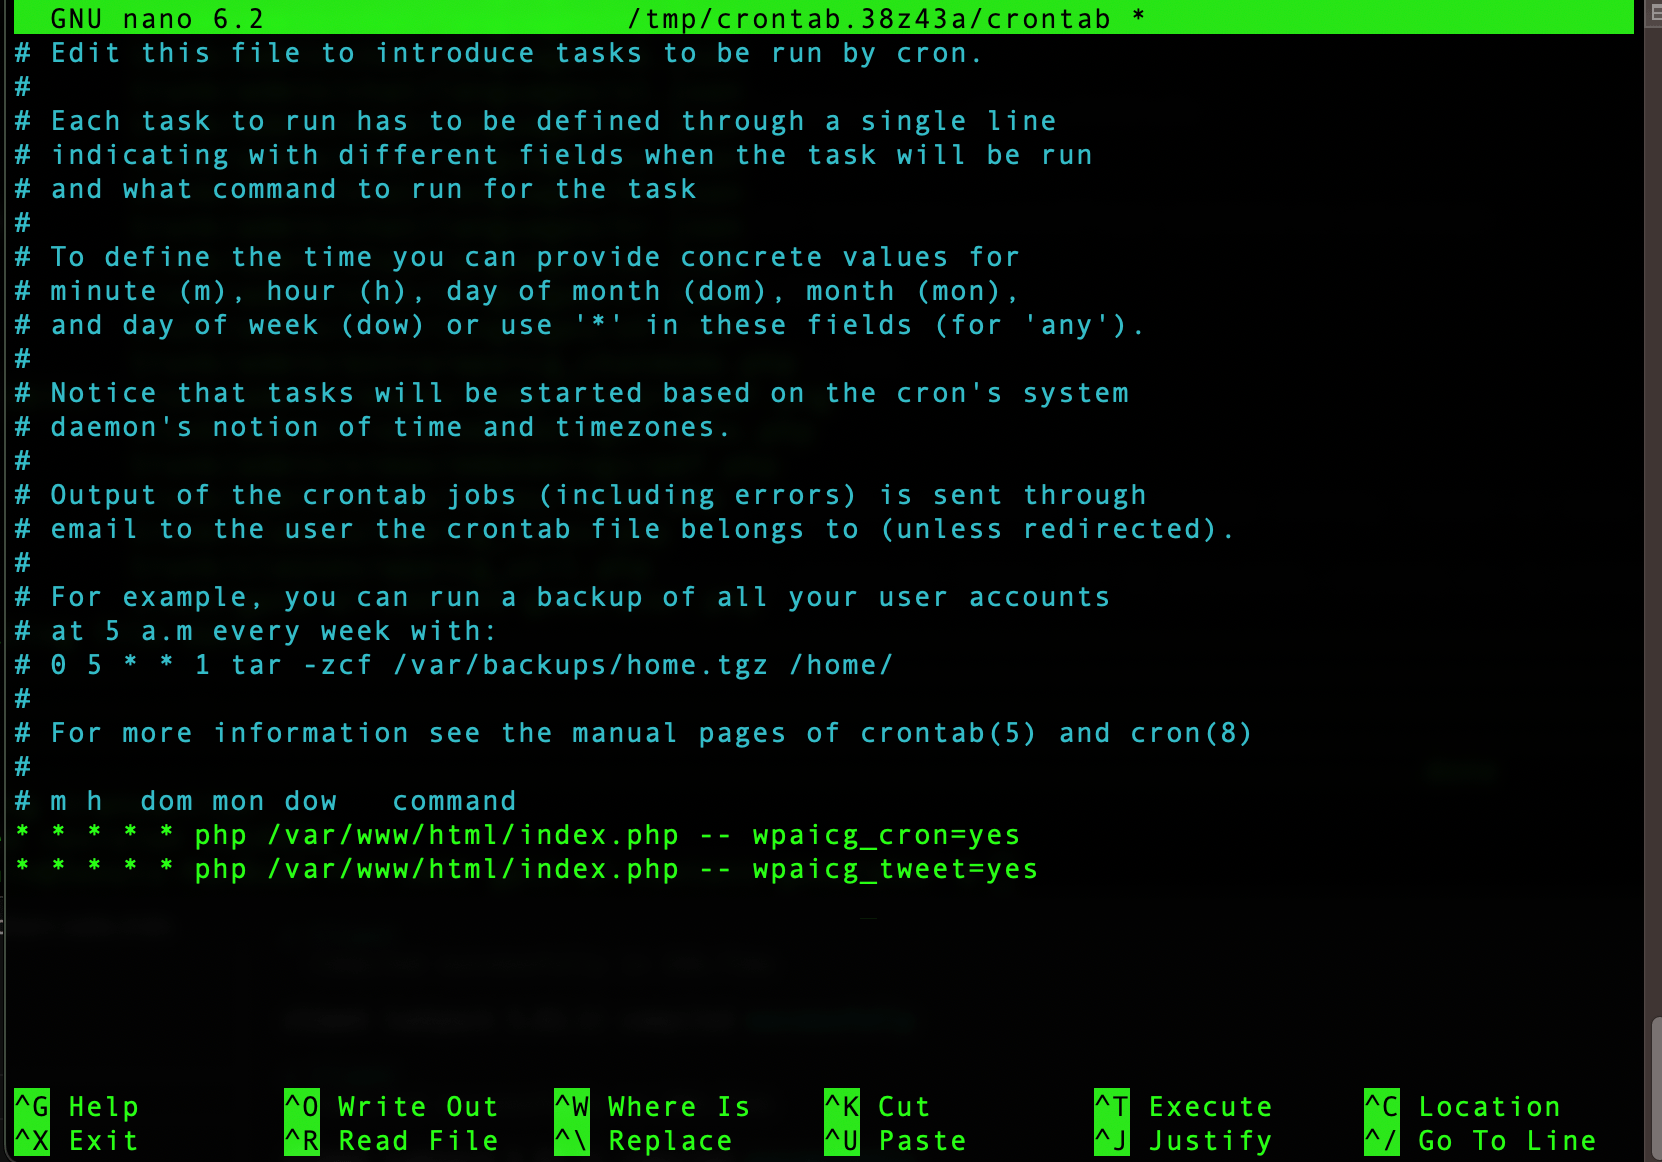
For the Twitter module, you need to set up two cron jobs: one for generating Tweet and putting them in the queue and another for processing the queue.
Queue Processor:
* * * * * php /var/www/html/index.php -- wpaicg_cron=yes
Twitter:
* * * * * php /var/www/html/index.php -- wpaicg_tweet=yes
Learn how to setup a cron job here.
You also need to have a Twitter account. This account will be used to send tweets.
Setup
Creating a Twitter App
To use the Twitter feature, you need to create a Twitter app in your Twitter Developer Portal and paste api your keys to the plugin.
Follow these steps:
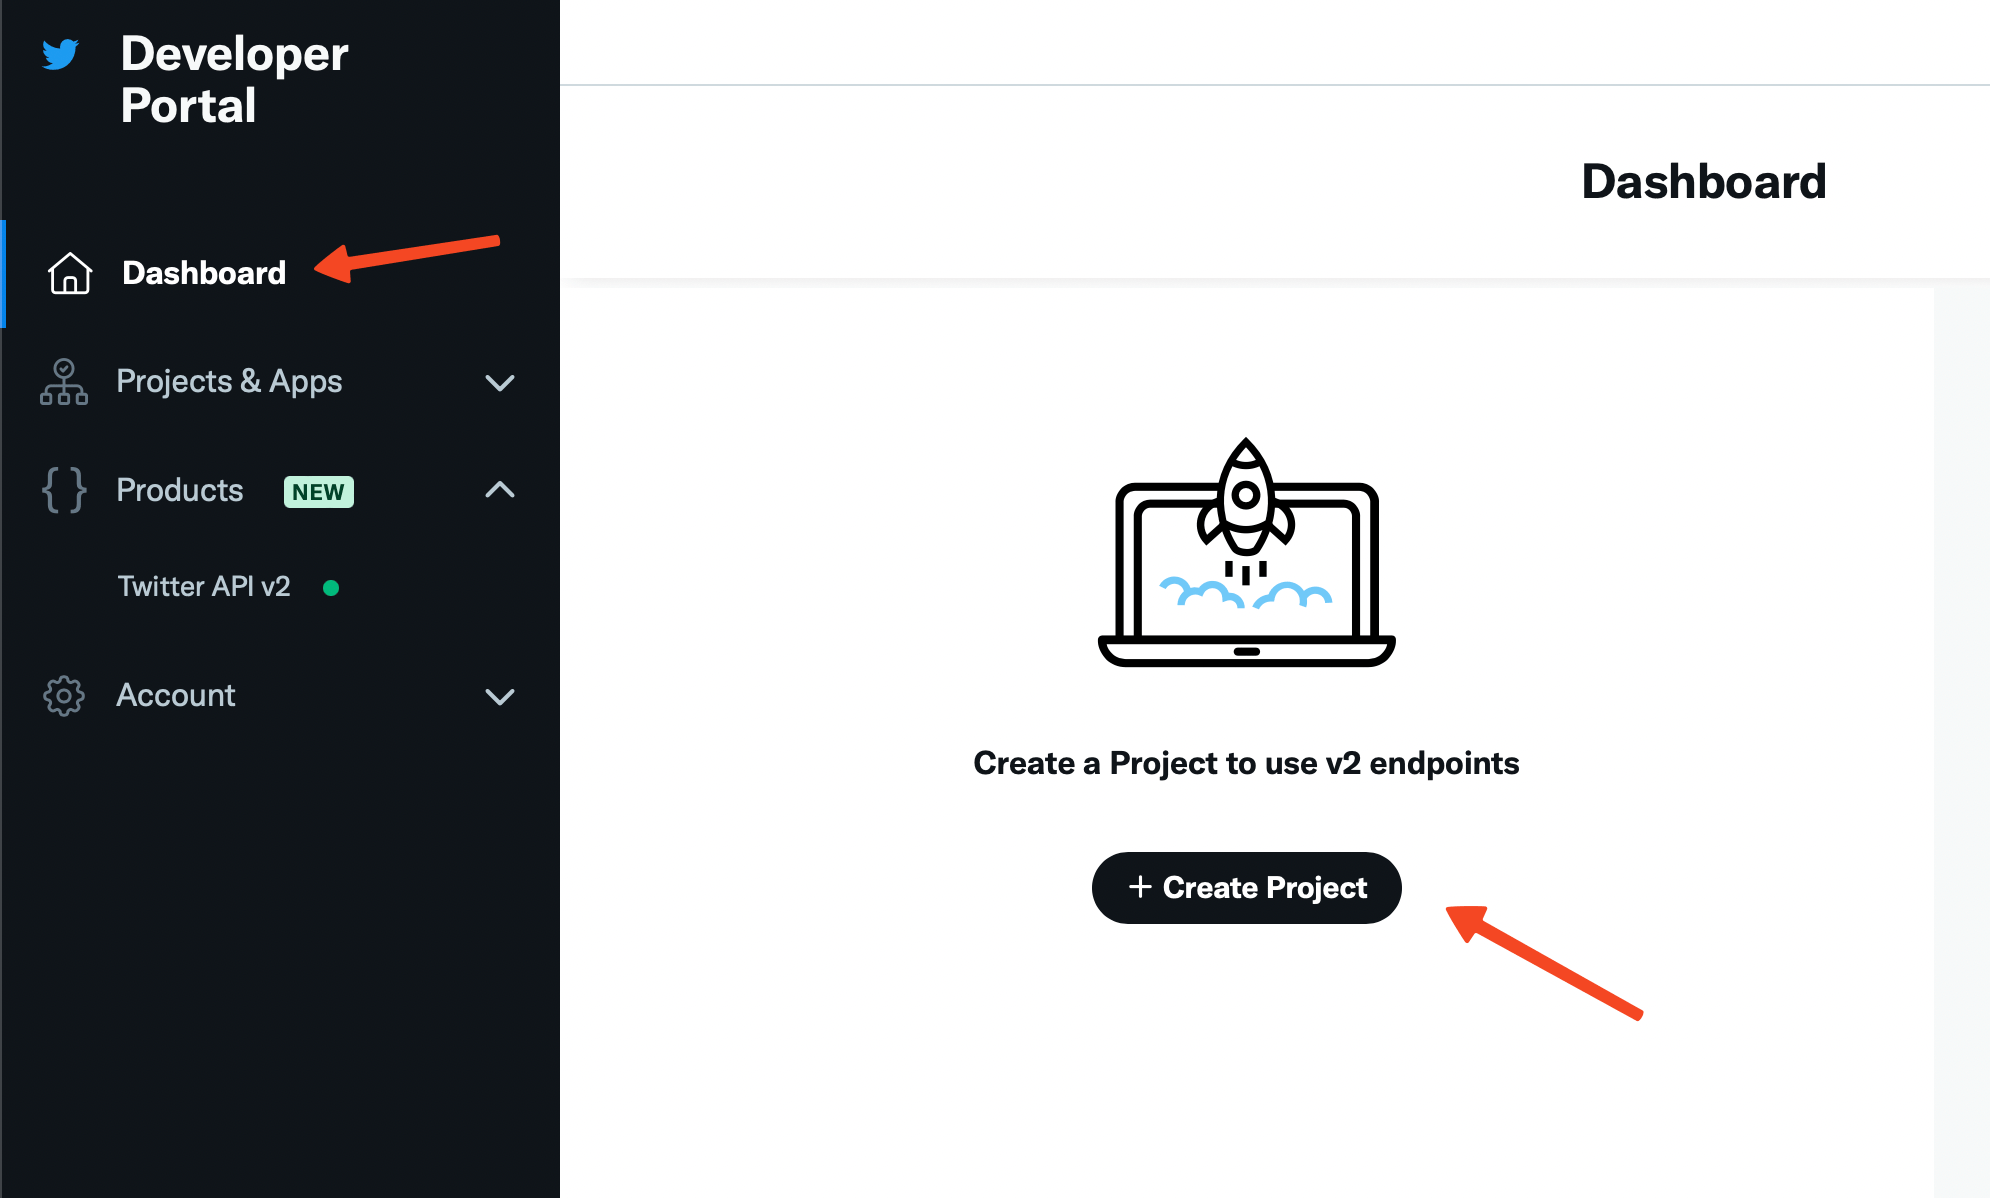
- Go to the Twitter Developer portal.
- On the left menu, find and click on Dashboard.
- Next, click on Create Project.
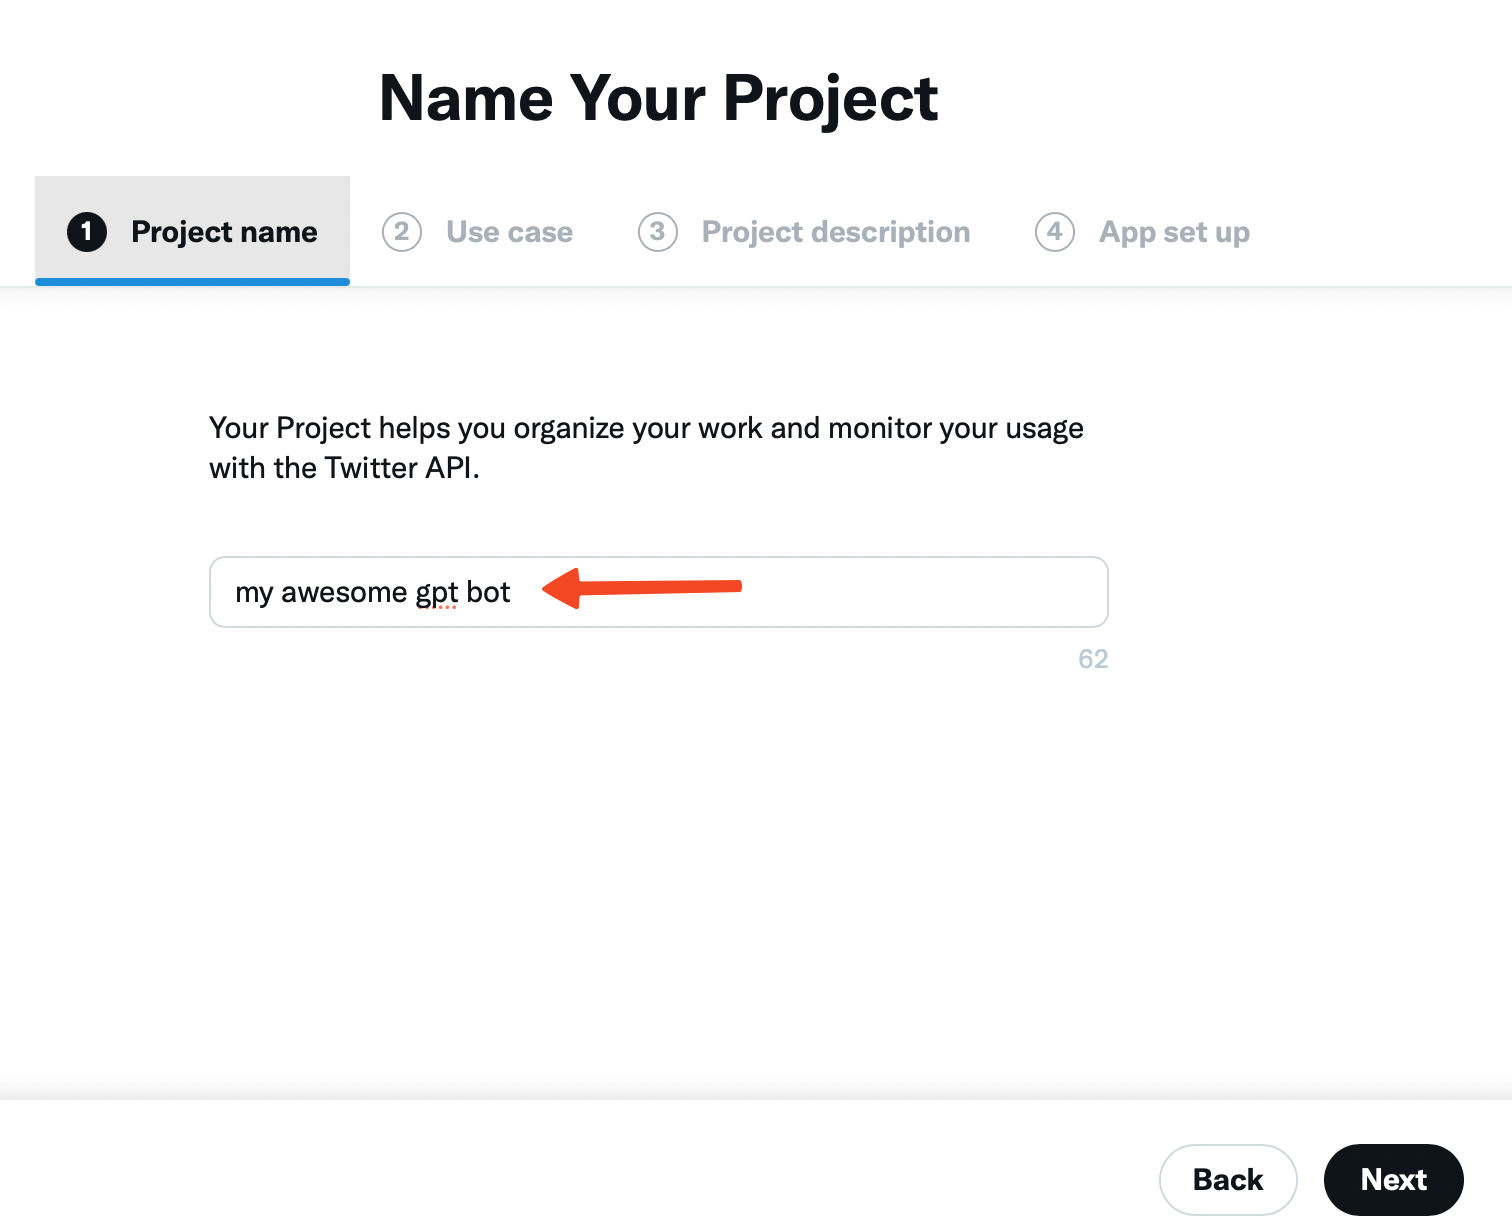
- On the page that opens up, enter a suitable name (for example: my awesome gpt bot) for your bot and hit Next.
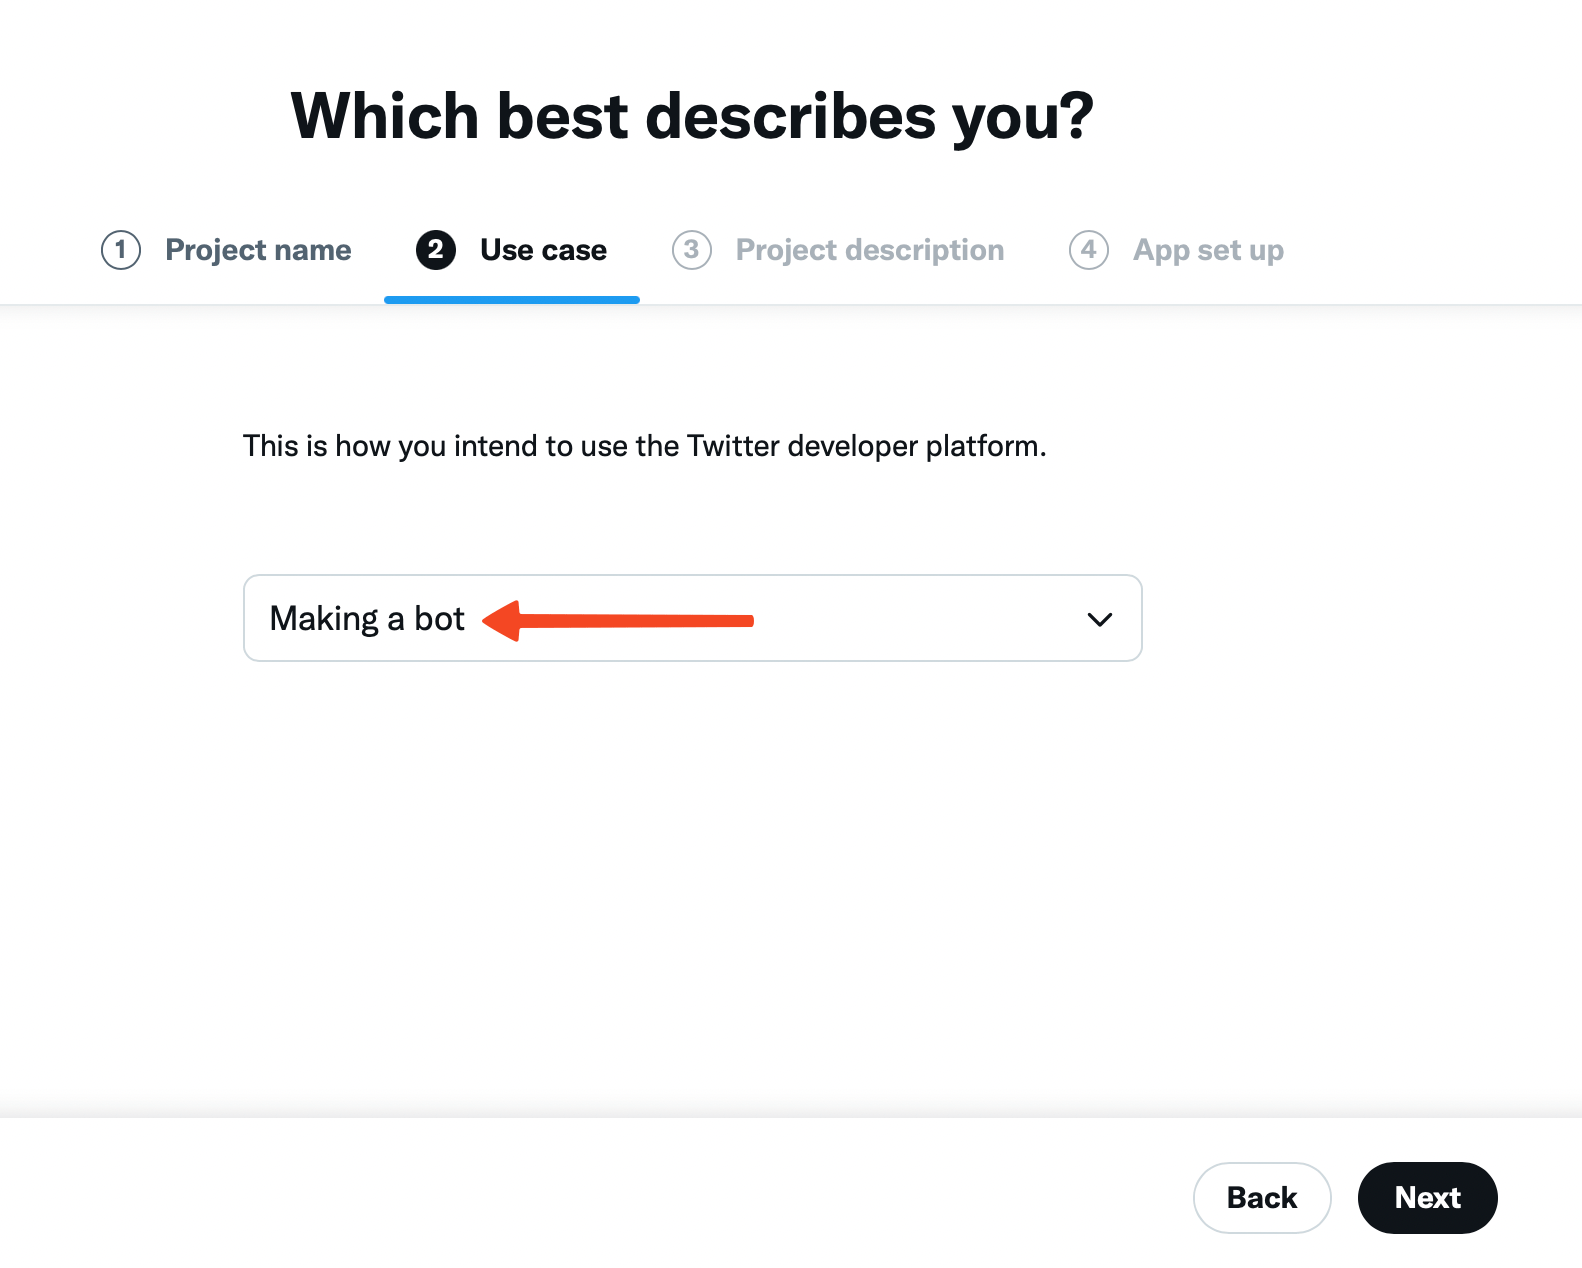
- Select Making a bot as use case.
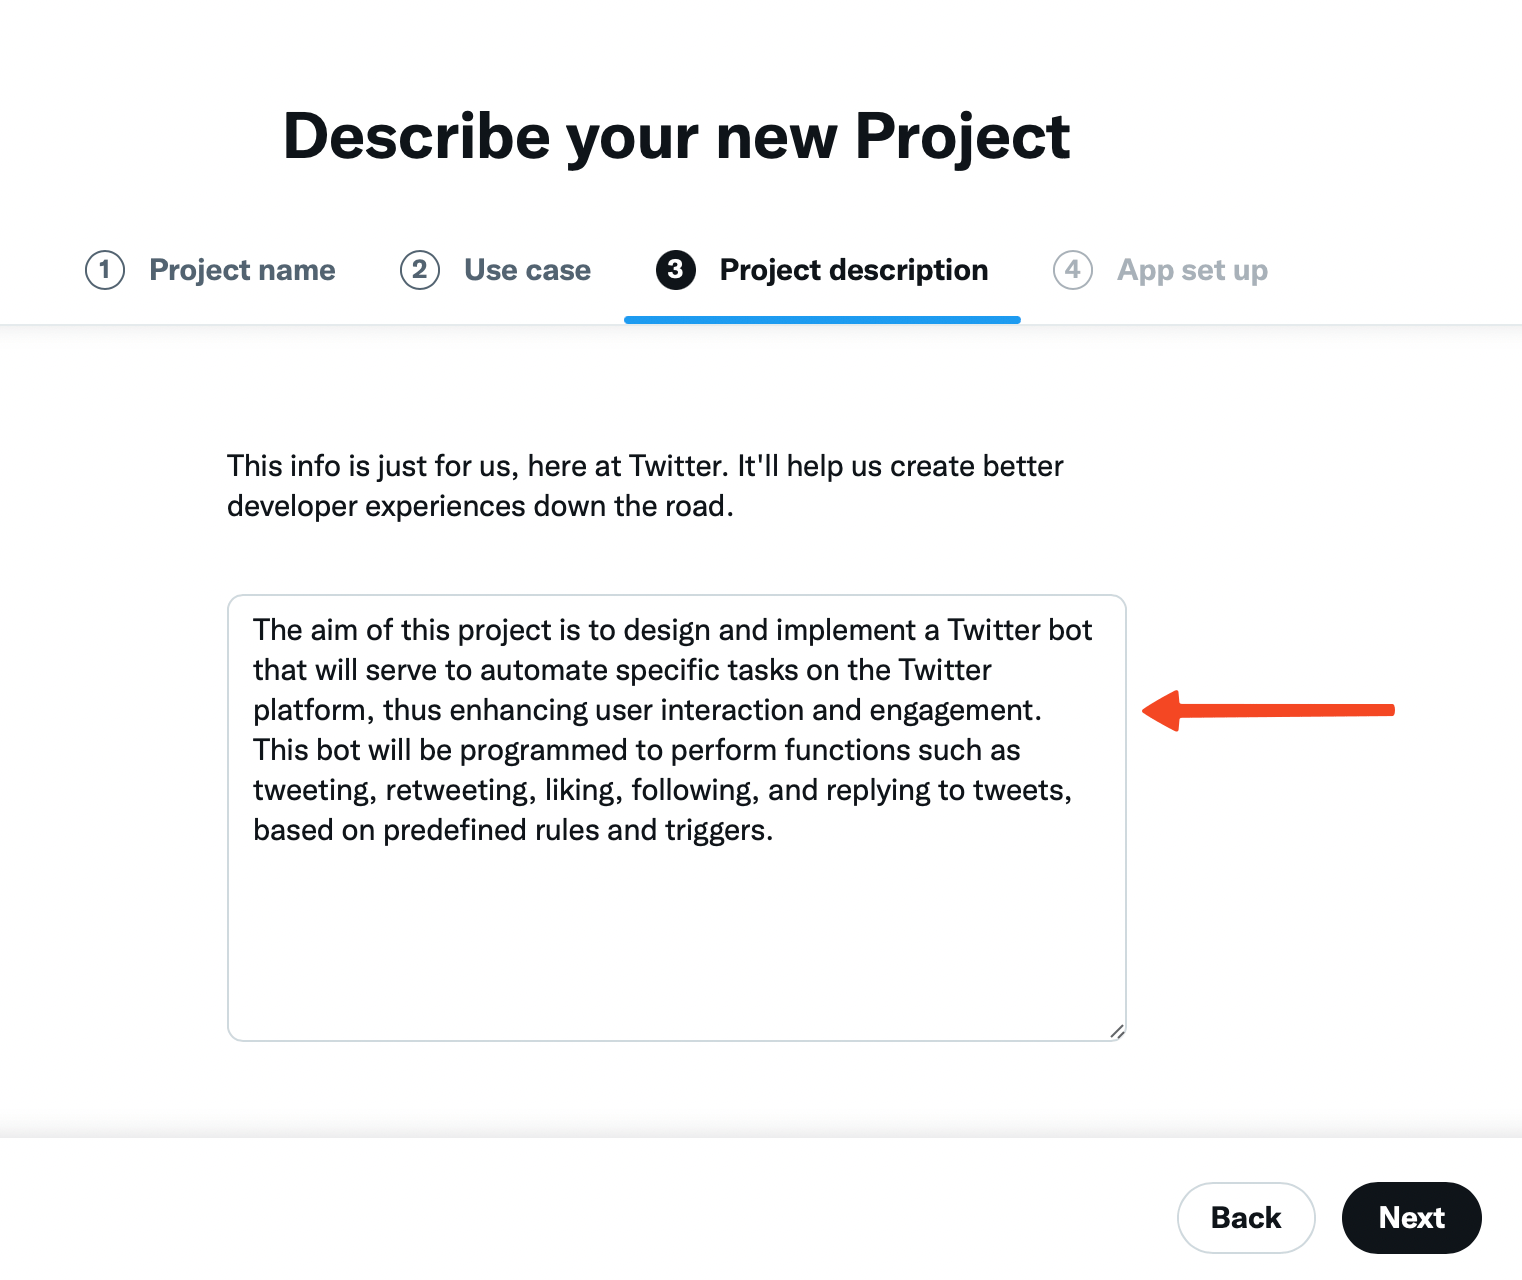
- Enter a Description for your bot. You can use this: "The aim of this project is to design and implement a Twitter bot that will serve to automate specific tasks on the Twitter platform, thus enhancing user interaction and engagement. This bot will be programmed to perform functions such as tweeting, retweeting, liking, following, and replying to tweets, based on predefined rules and triggers."
- Now give a name to your app. You can use same name as your project.
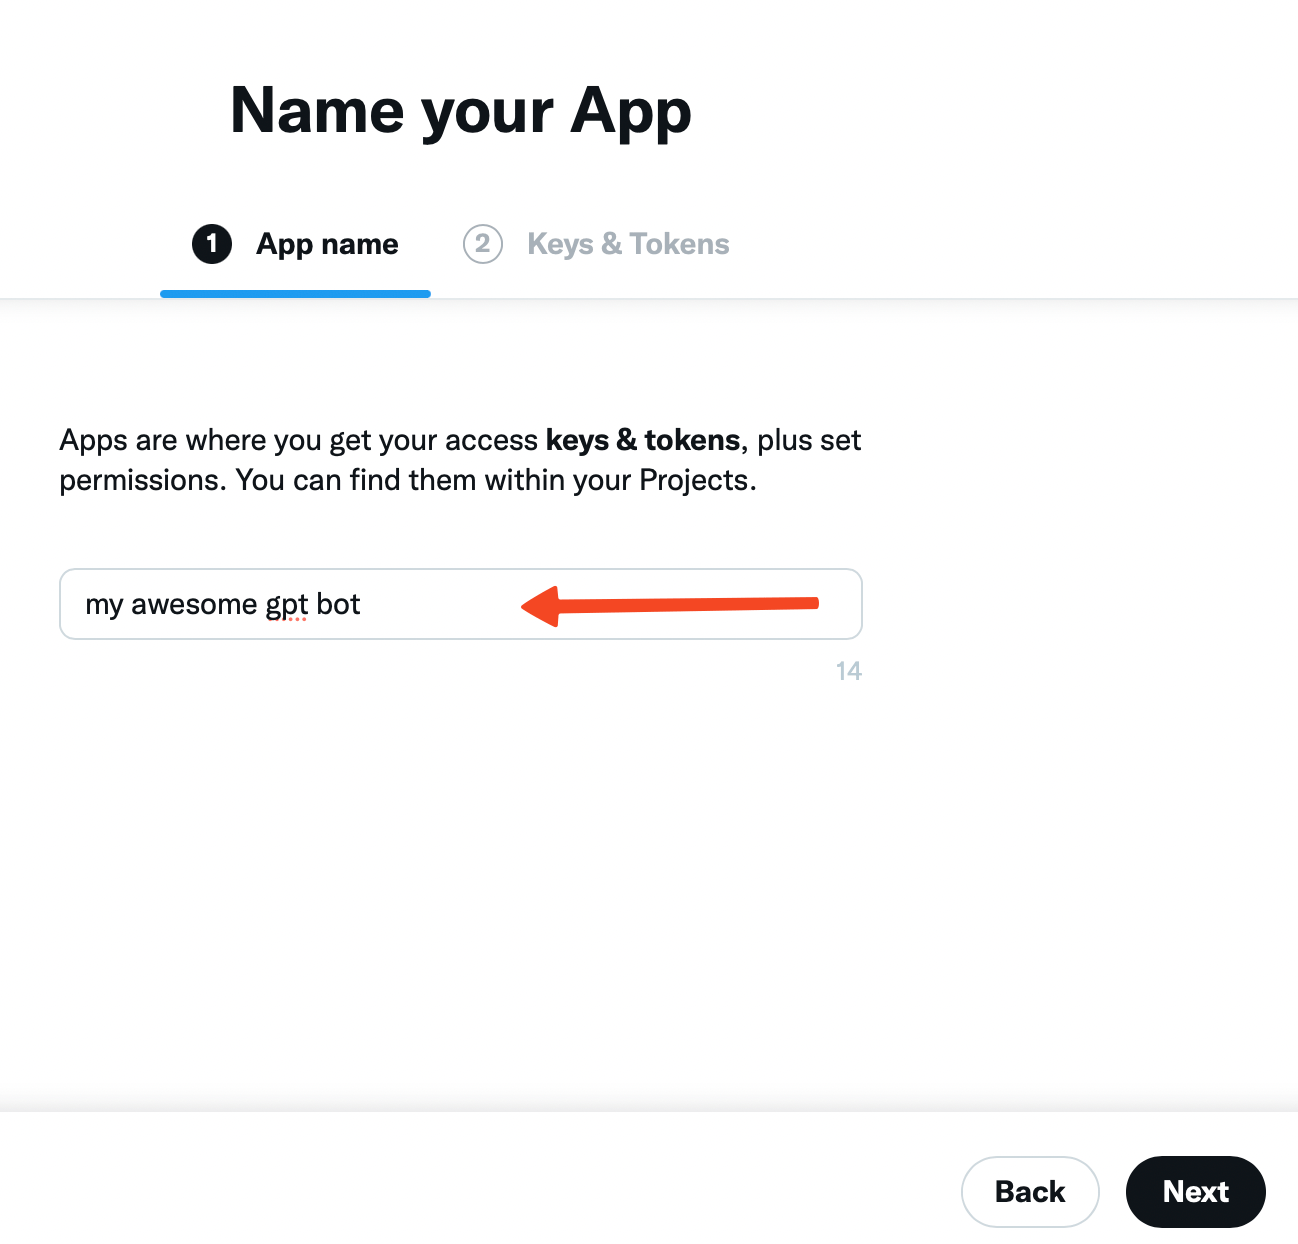
- Congratulations, your app is now created!
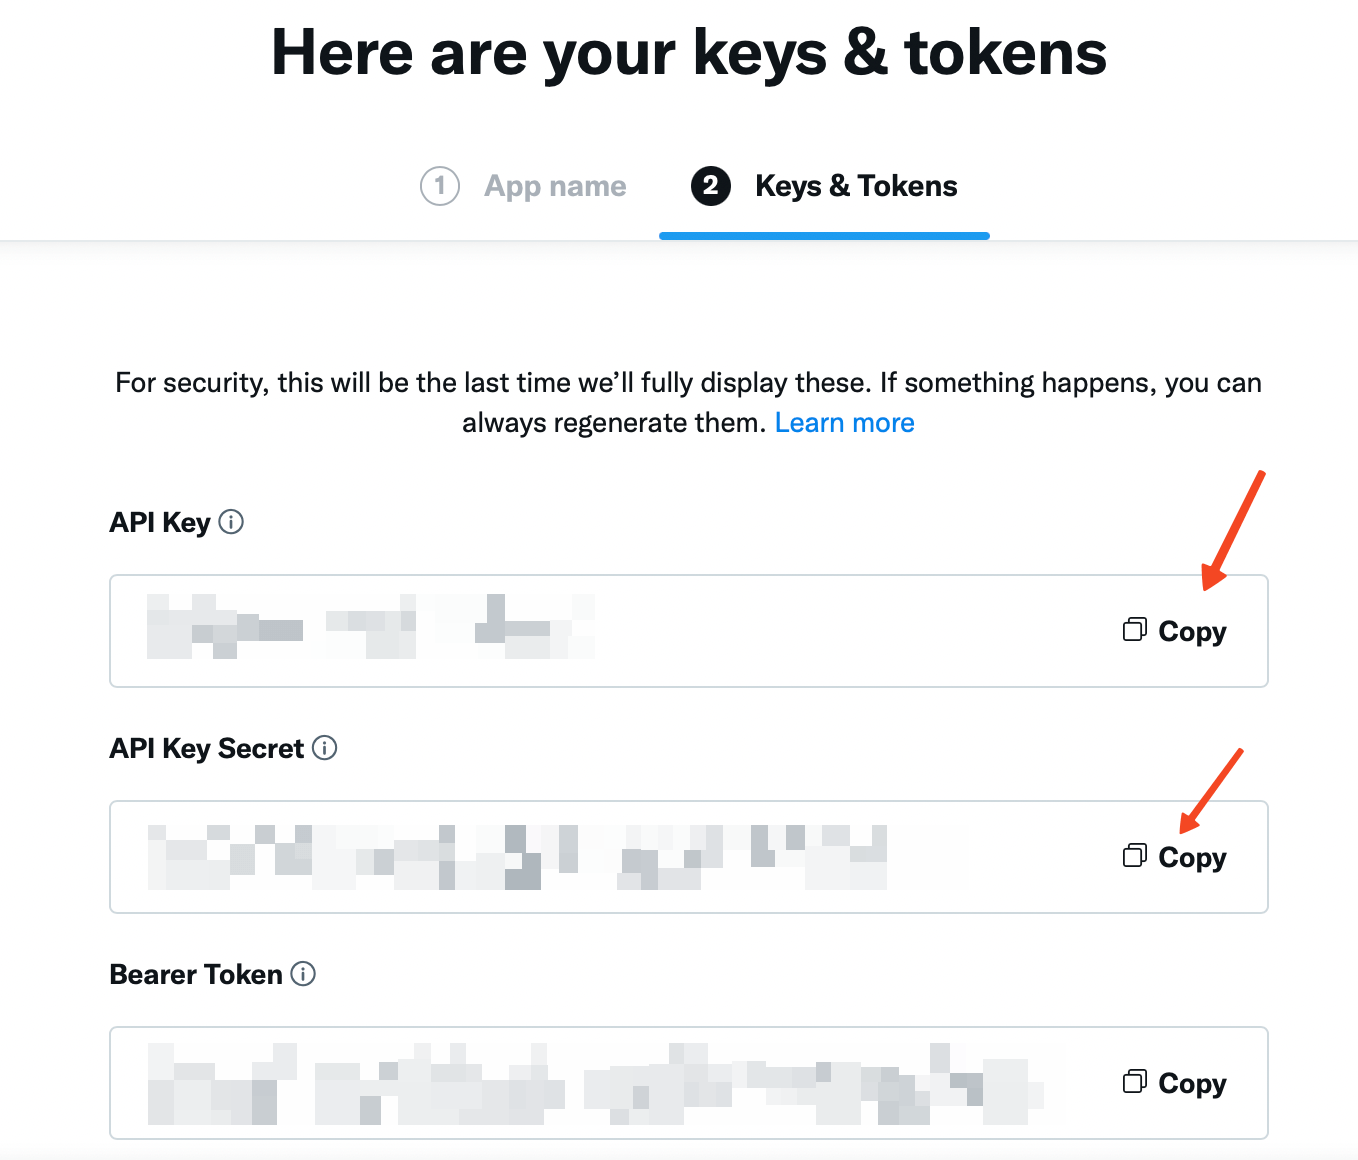
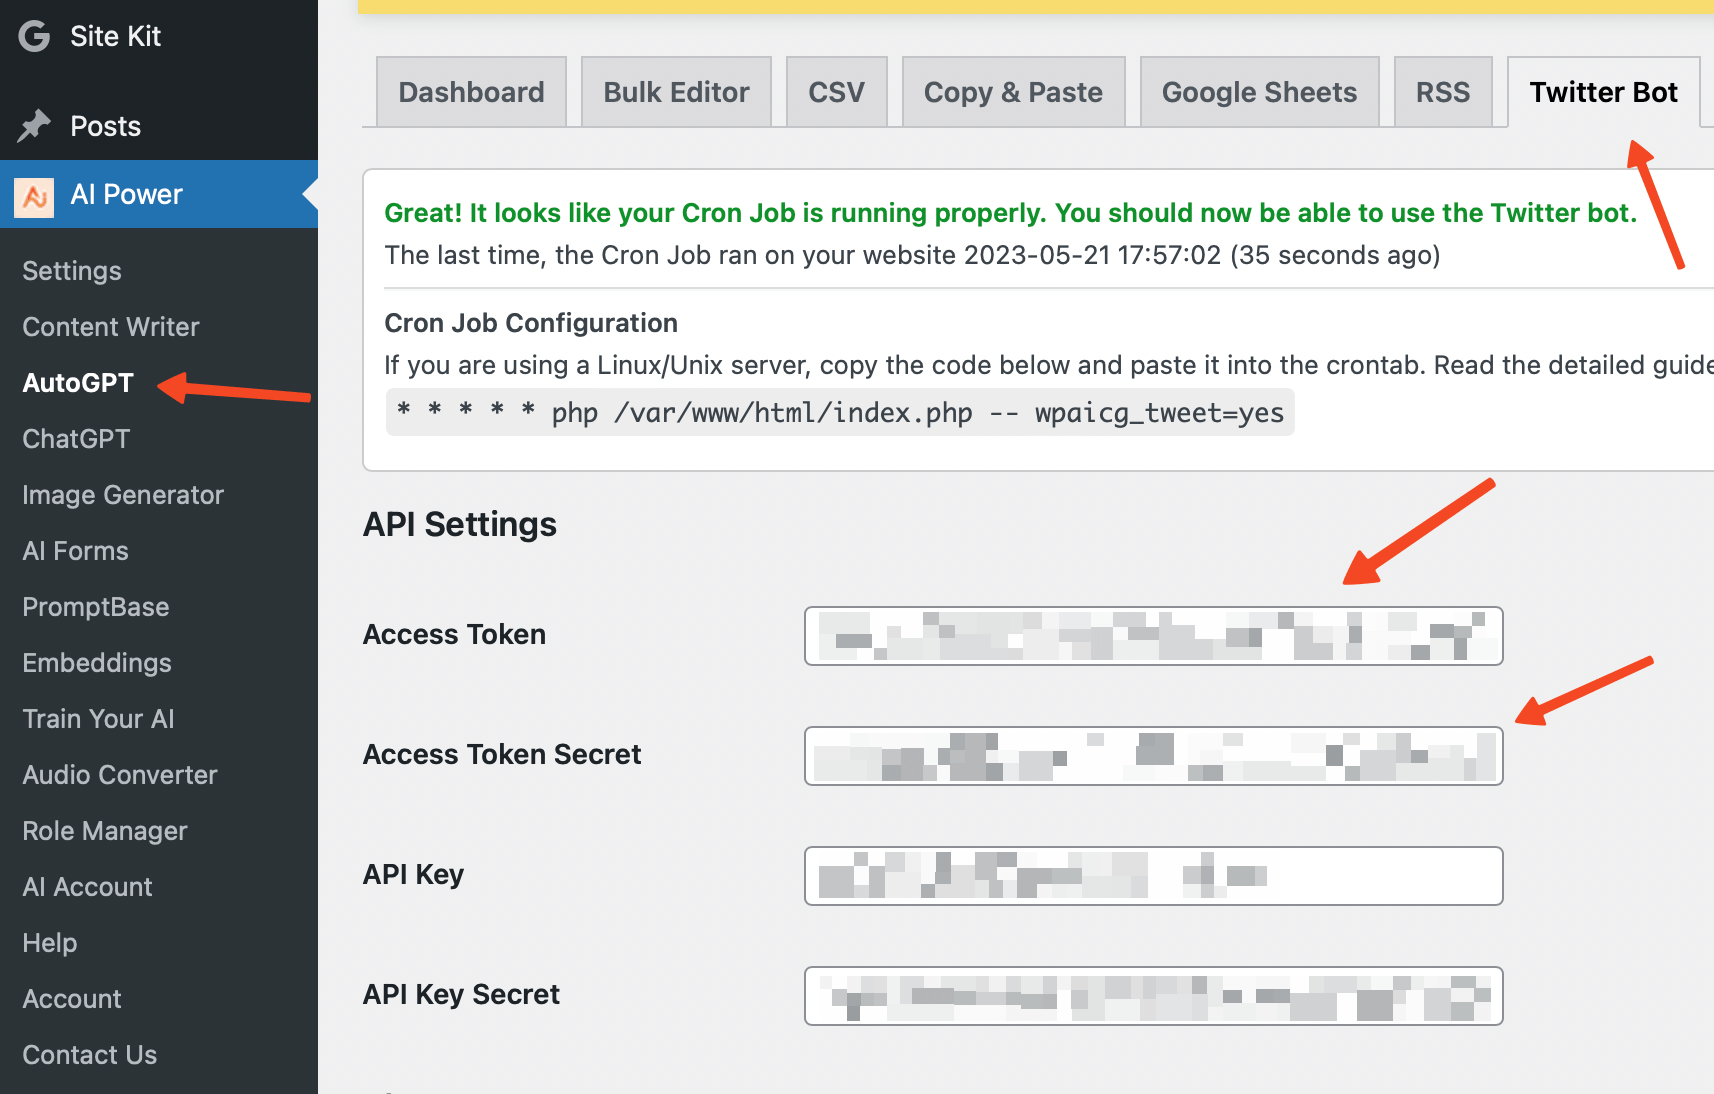
- Now, copy the API key and API key secret that have been generated for your app.
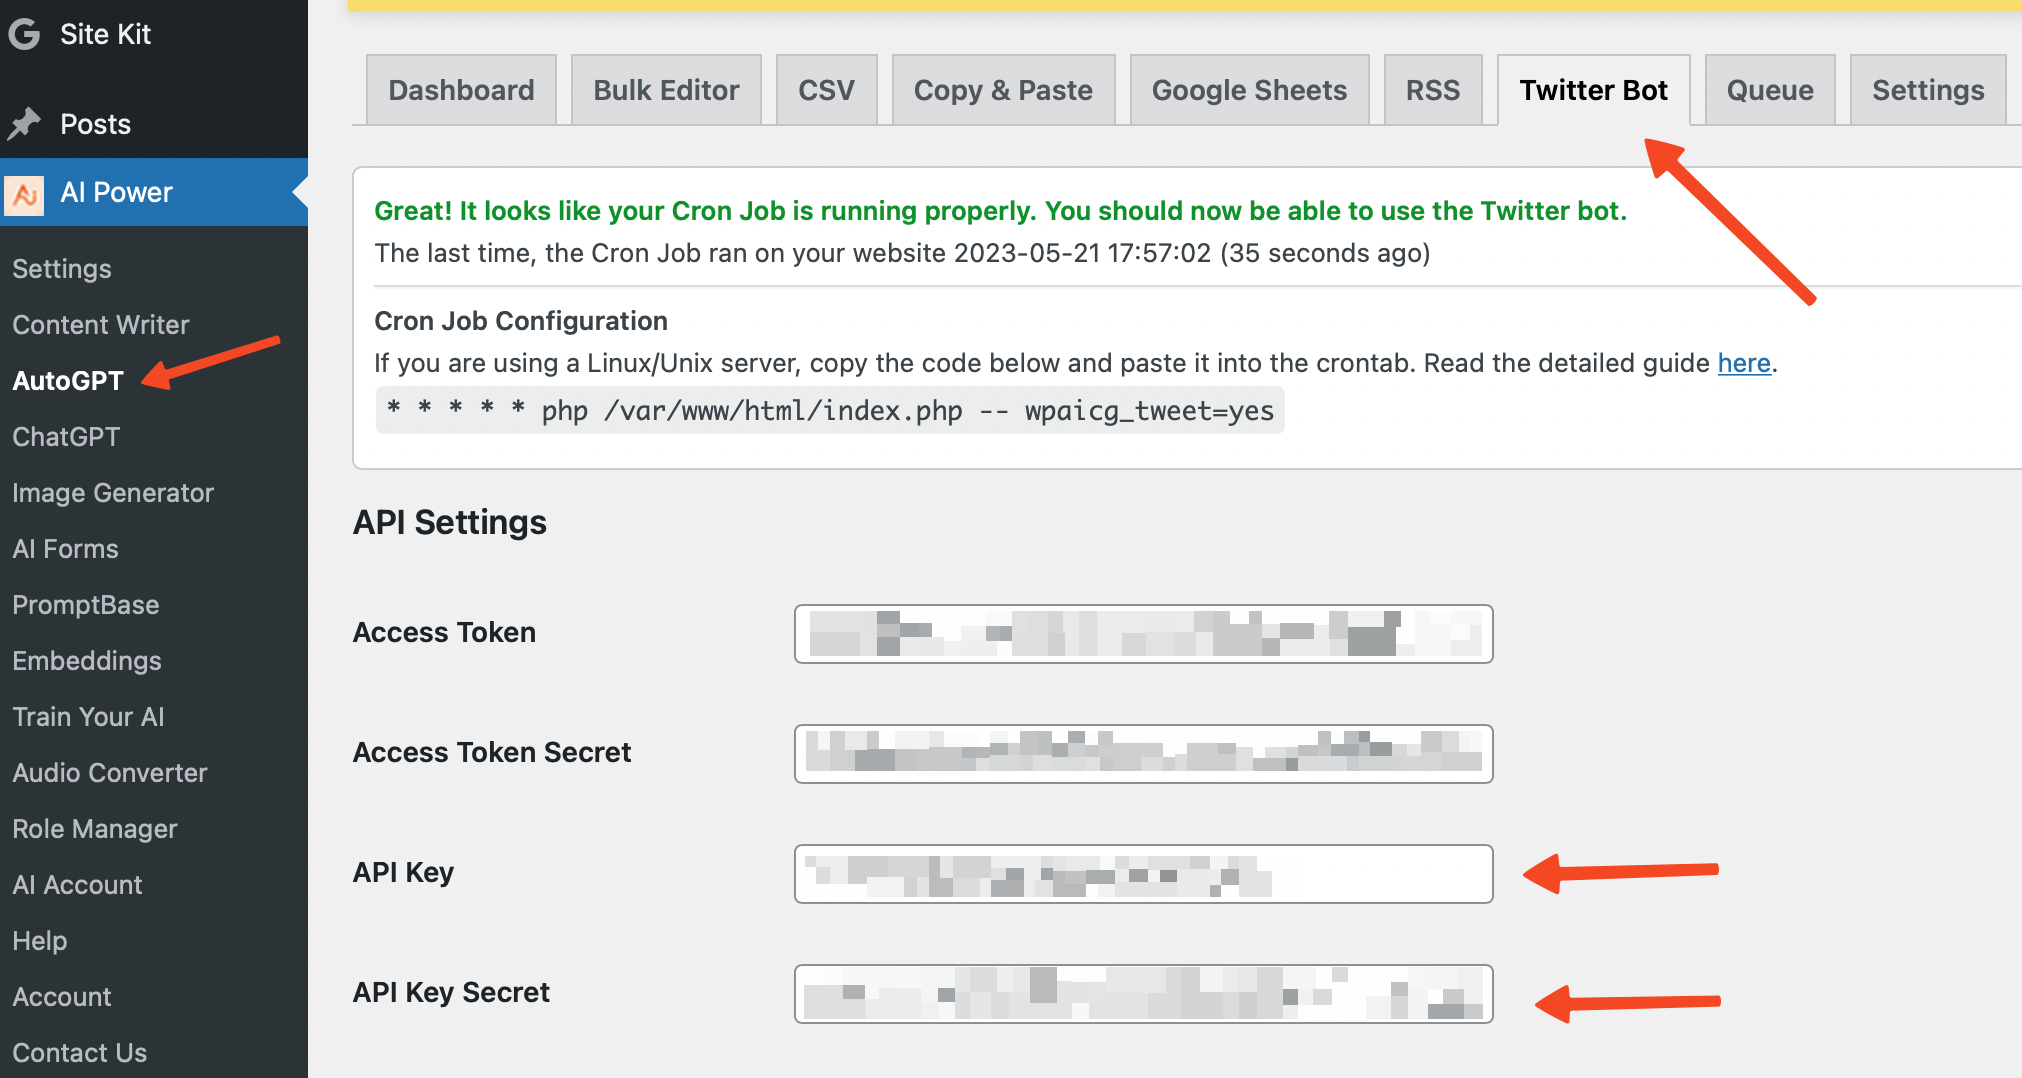
- Go to your WordPress dashboard, and navigate to the AutoGPT - Twitter. Here, paste your API key and API key secret into the respective fields. Note: At this point, we're not finished yet. We still need to get the access token and access token secret.
- Navigate back to the Twitter Developer portal and click on your app. Scroll down to find the User authentication settings section and click on the Setup button.
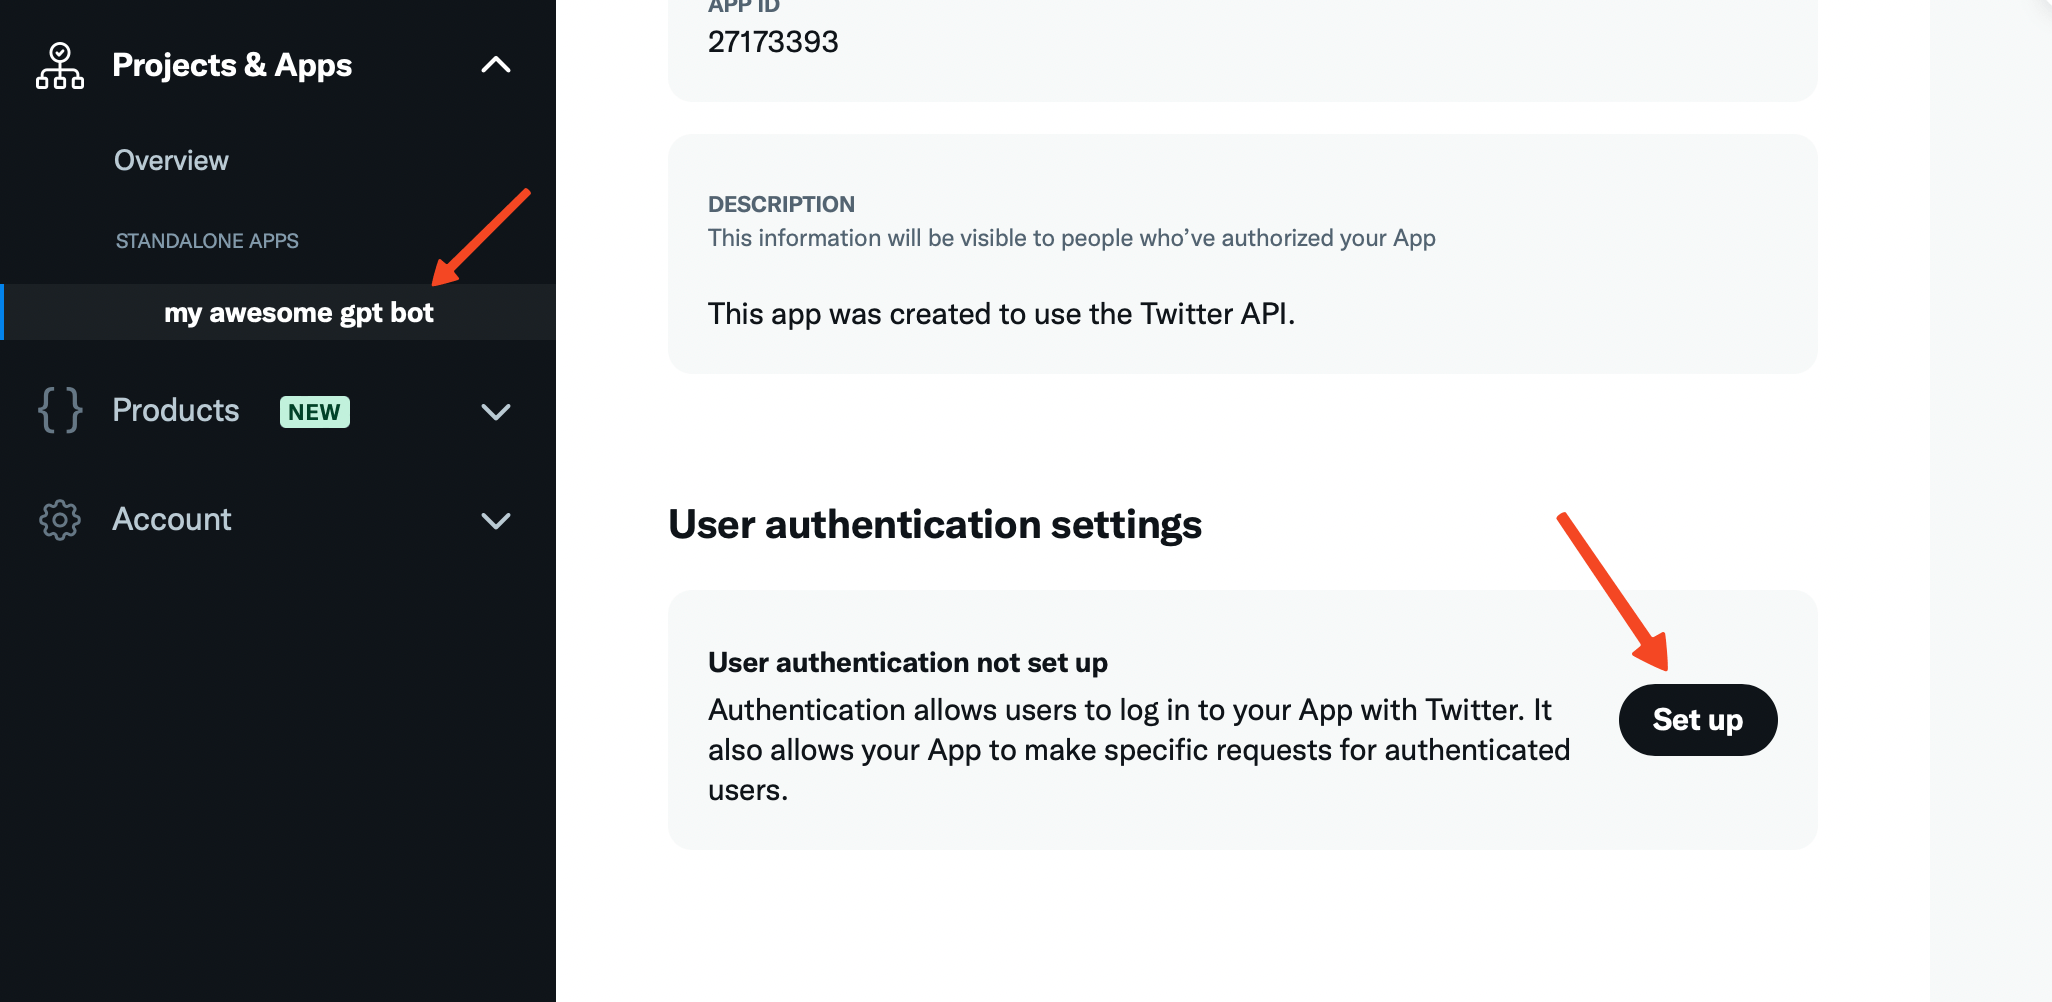
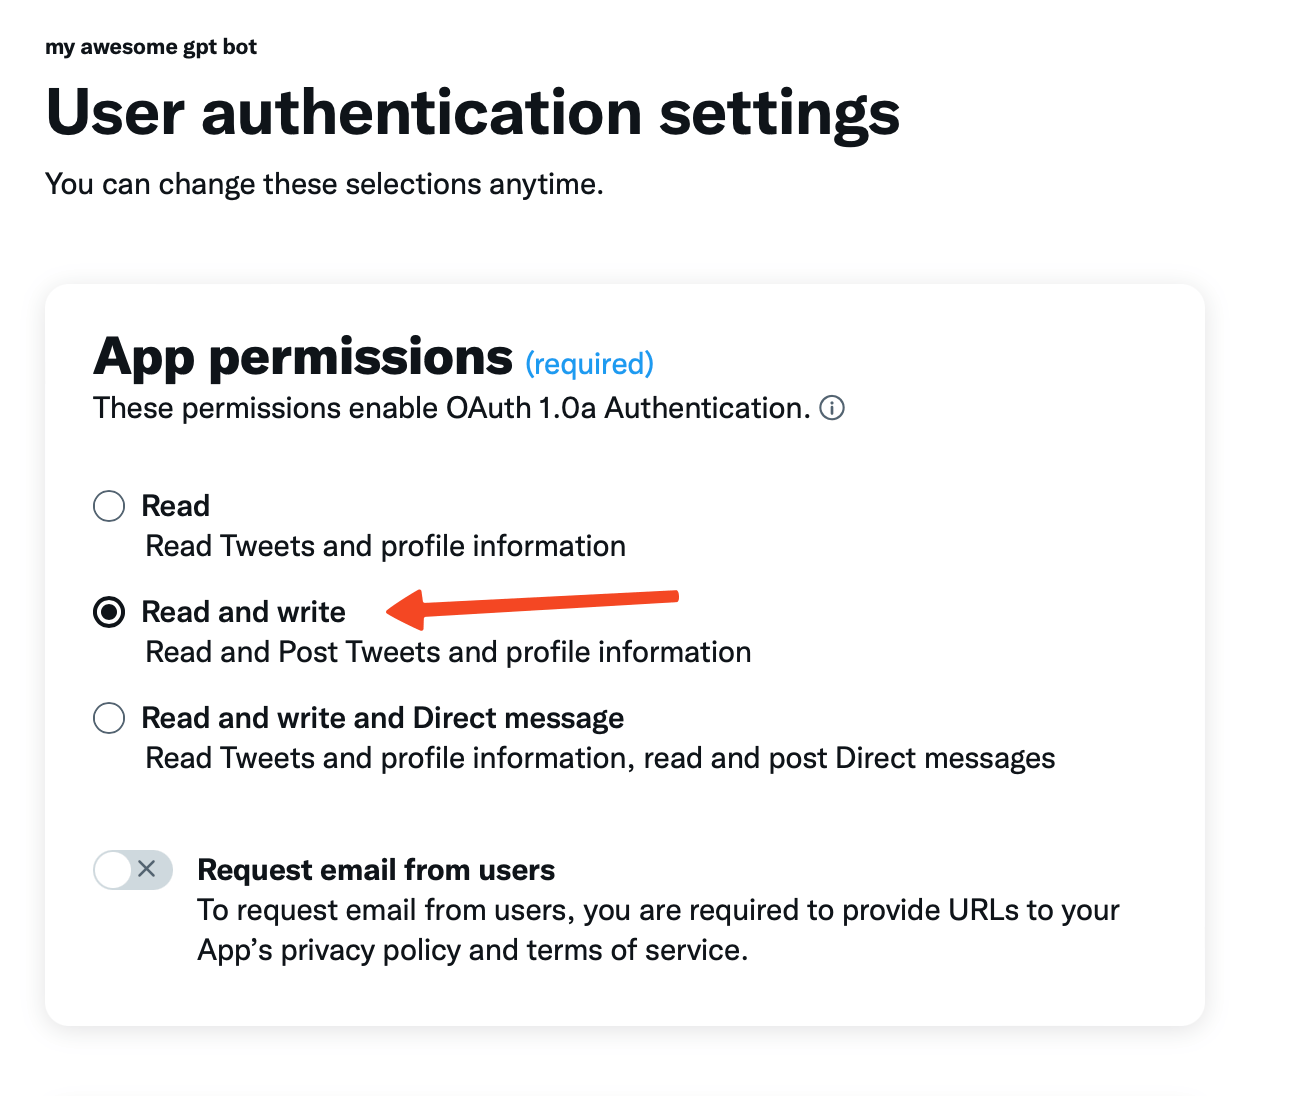
- On the page that opens up, under App permissions, select Read and Write.
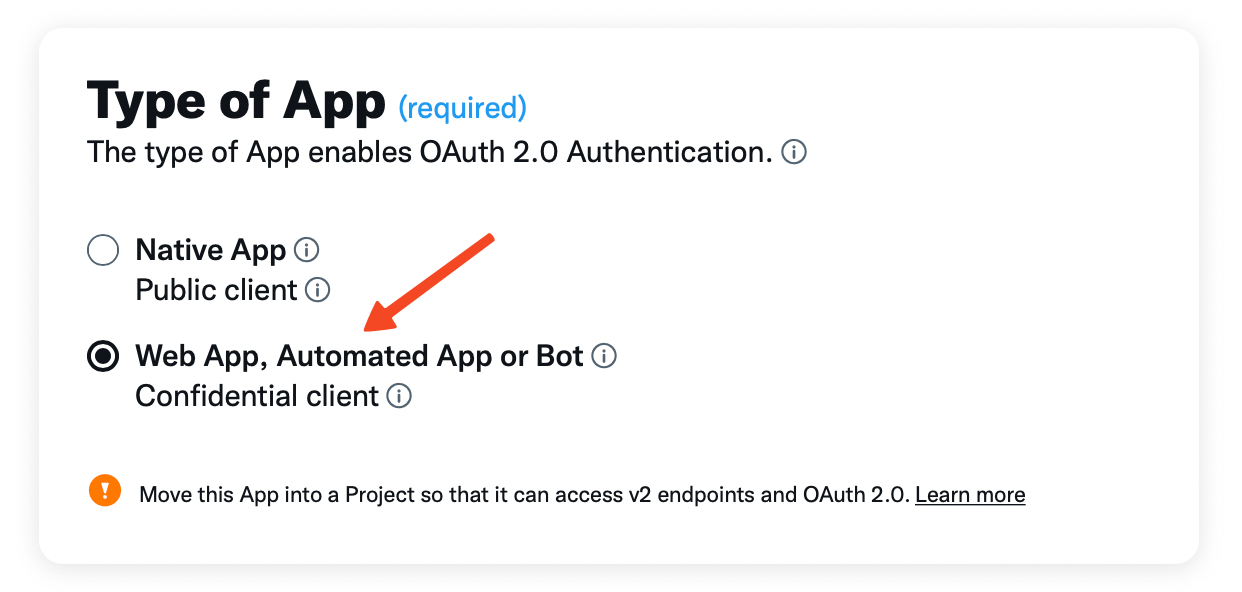
- In the Type of app section, select Web App, Automated App or Bot.
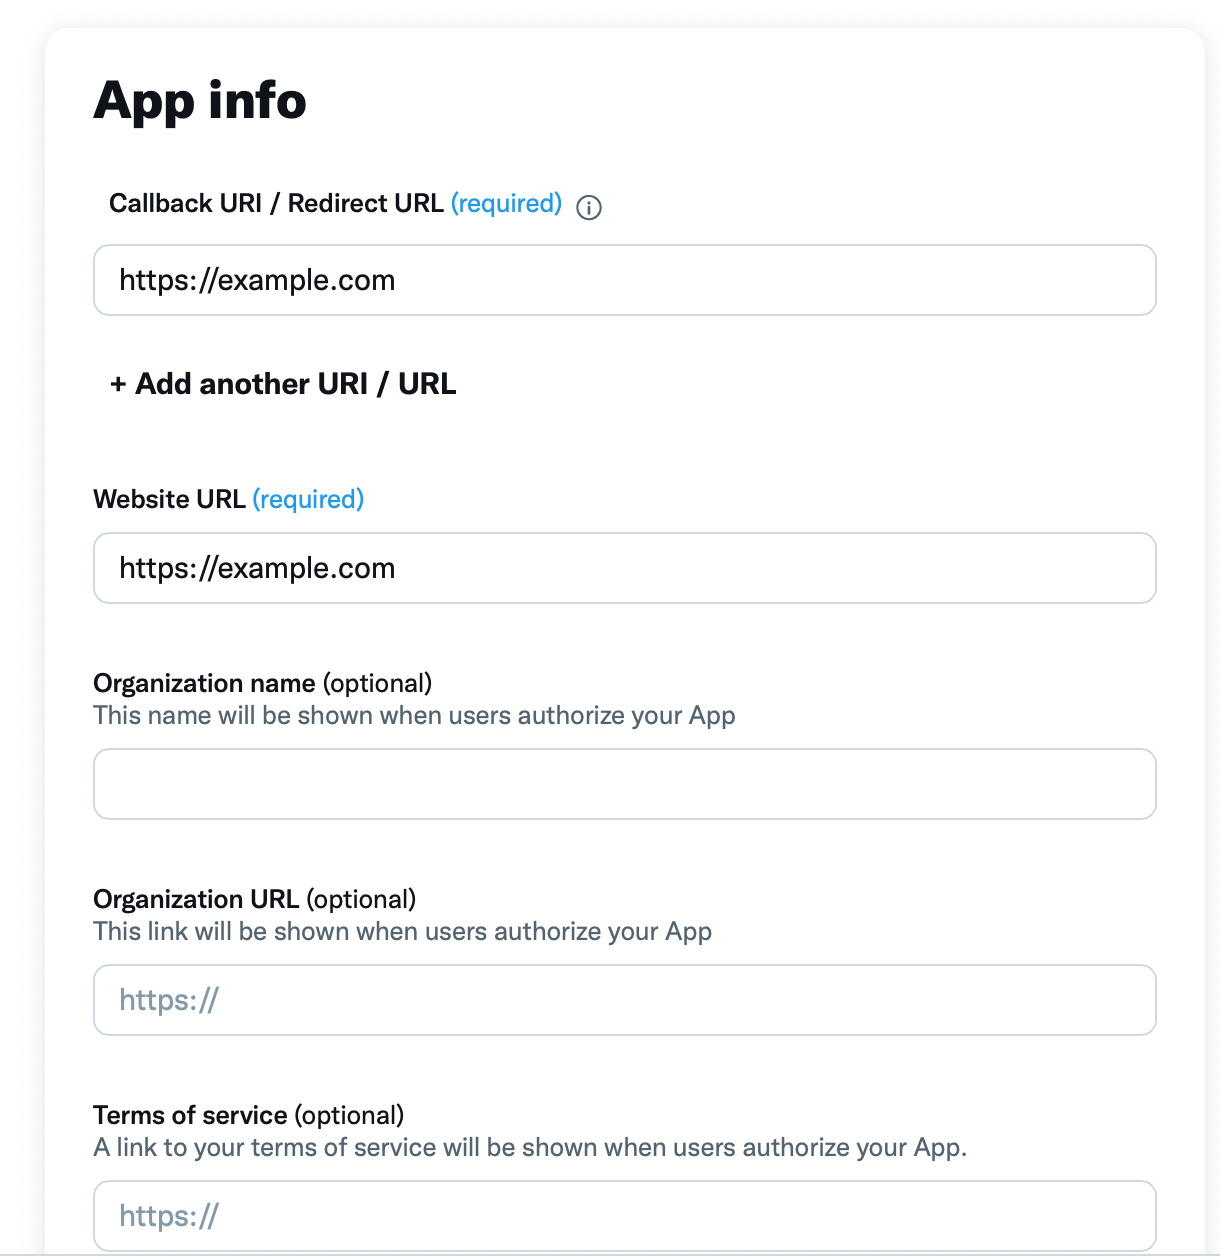
- In the App info section, you're required to enter a domain for Callback URI. It isn't critical what you enter here, but a valid domain is required by Twitter. You can enter any domain here, for example, "https://example.com".
- In the Website URL field, enter the same URL or any other valid URL. This is also required.
- You can leave other fields empty as they are optional. After you've filled all the required fields, click Save.
- Navigate to Keys and Tokens and click on the Generate button to generate your access token and secret.
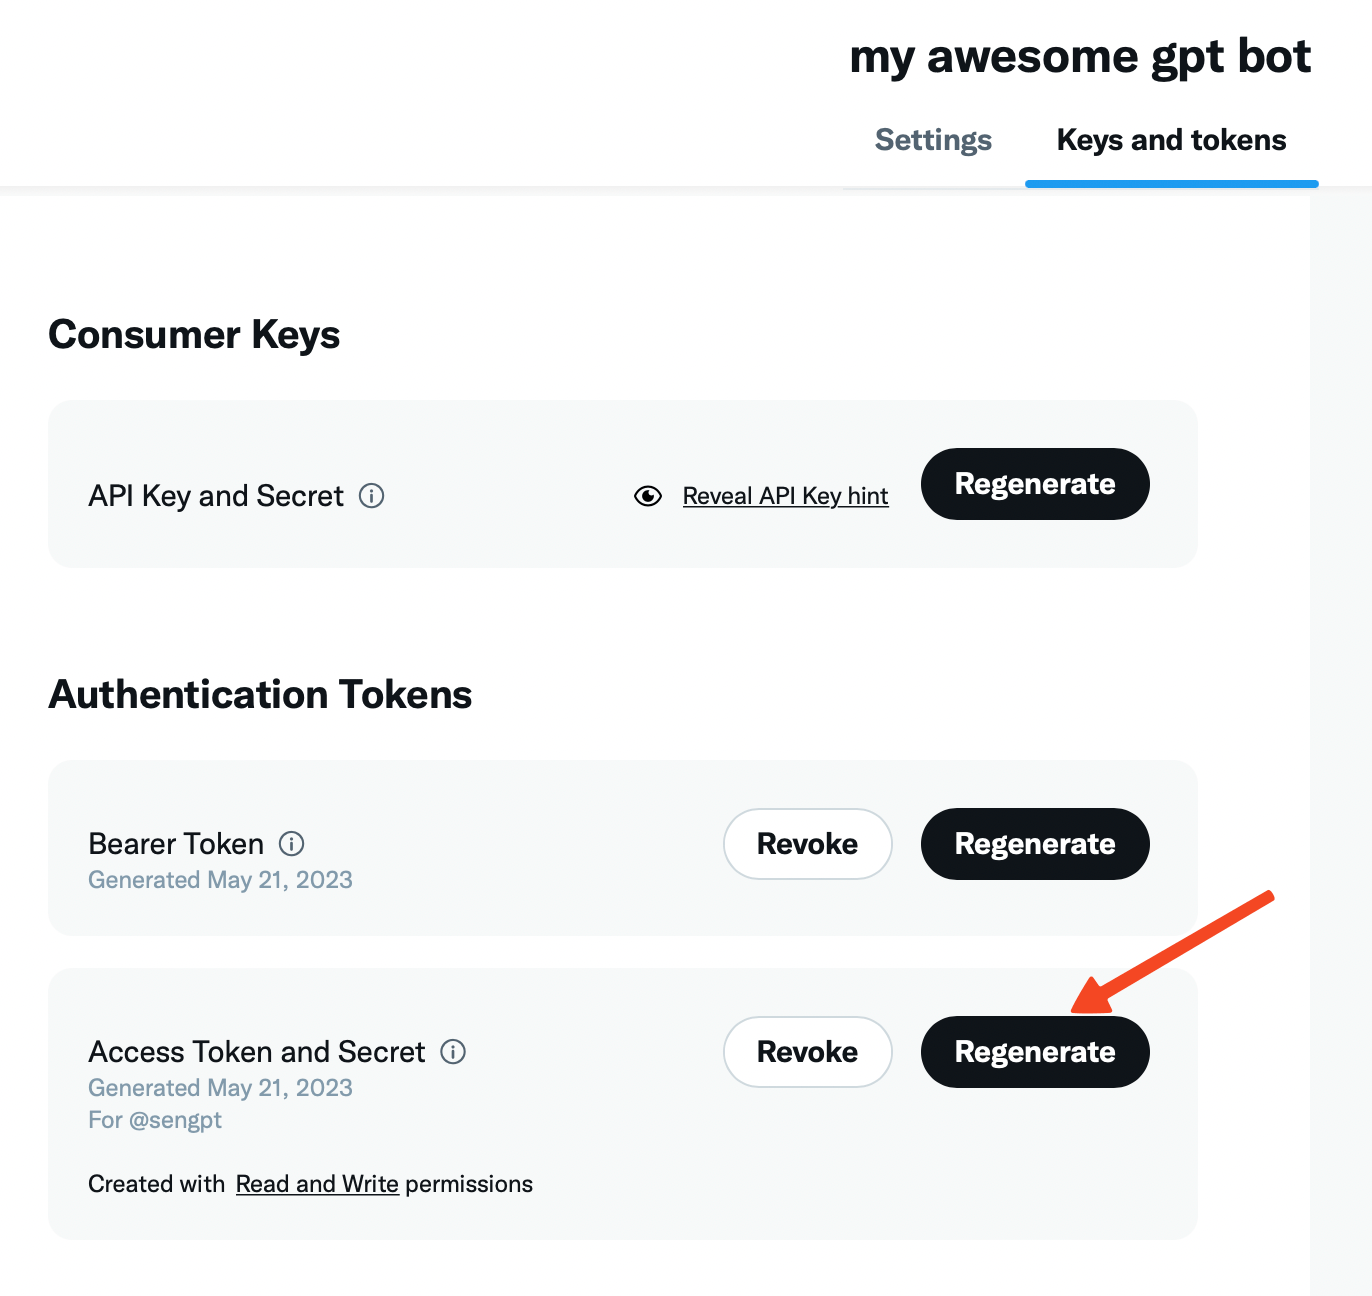
- A popup window will open, displaying your access tokens. Copy the access token and access token secret.

- Go back to the AutoGPT - Twitter tab in your WordPress dashboard and paste the access token and access token secret into their respective fields.
-
Click Save to finalize your settings.
-
Congratulations! You've successfully set up the new Twitter feature for your AI Power WordPress plugin.
Configuring Cron Jobs for Twitter
- Follow the steps outlined in this guide to set up a Cron Job.
- Ensure that you include the specific PHP command for the Twitter job in your Cron Job configuration to make it functional.
- You can find your php command under Twitter tab.
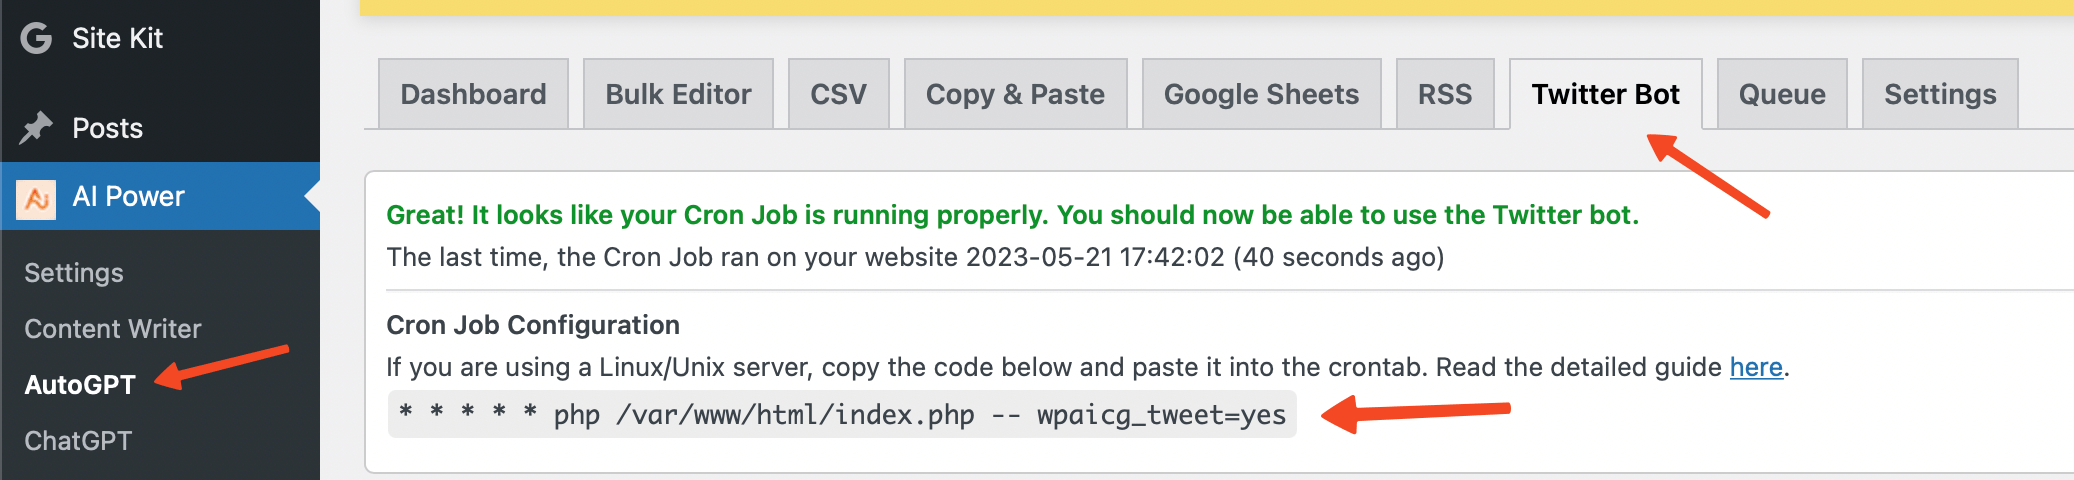
Your PHP command may vary depending on your server setup.
For the Twitter module, you need to set up two cron jobs: one for generating Tweet and putting them in the queue and another for processing the queue.
Queue Processor:
* * * * * php /var/www/html/index.php -- wpaicg_cron=yes
Twitter:
* * * * * php /var/www/html/index.php -- wpaicg_tweet=yes
Learn how to setup a cron job here.
However, your command might differ.
This is how my Cron setup looks like.
Once the Cron Job setup is complete, you should see a message stating, “Great! It looks like your Cron Job is running properly. You should now be able to use the Twitter bot."
Additionally, all previously greyed-out fields will be activated, allowing you to proceed to the next steps.
Blog2Tweet
Blog2Tweet is an automated feature that enables each published post on your WordPress site to be sent as a tweet.
To configure this, navigate to the AutoGPT - Twitter tab in your WordPress dashboard, and scroll down to the Blog2Tweet section.
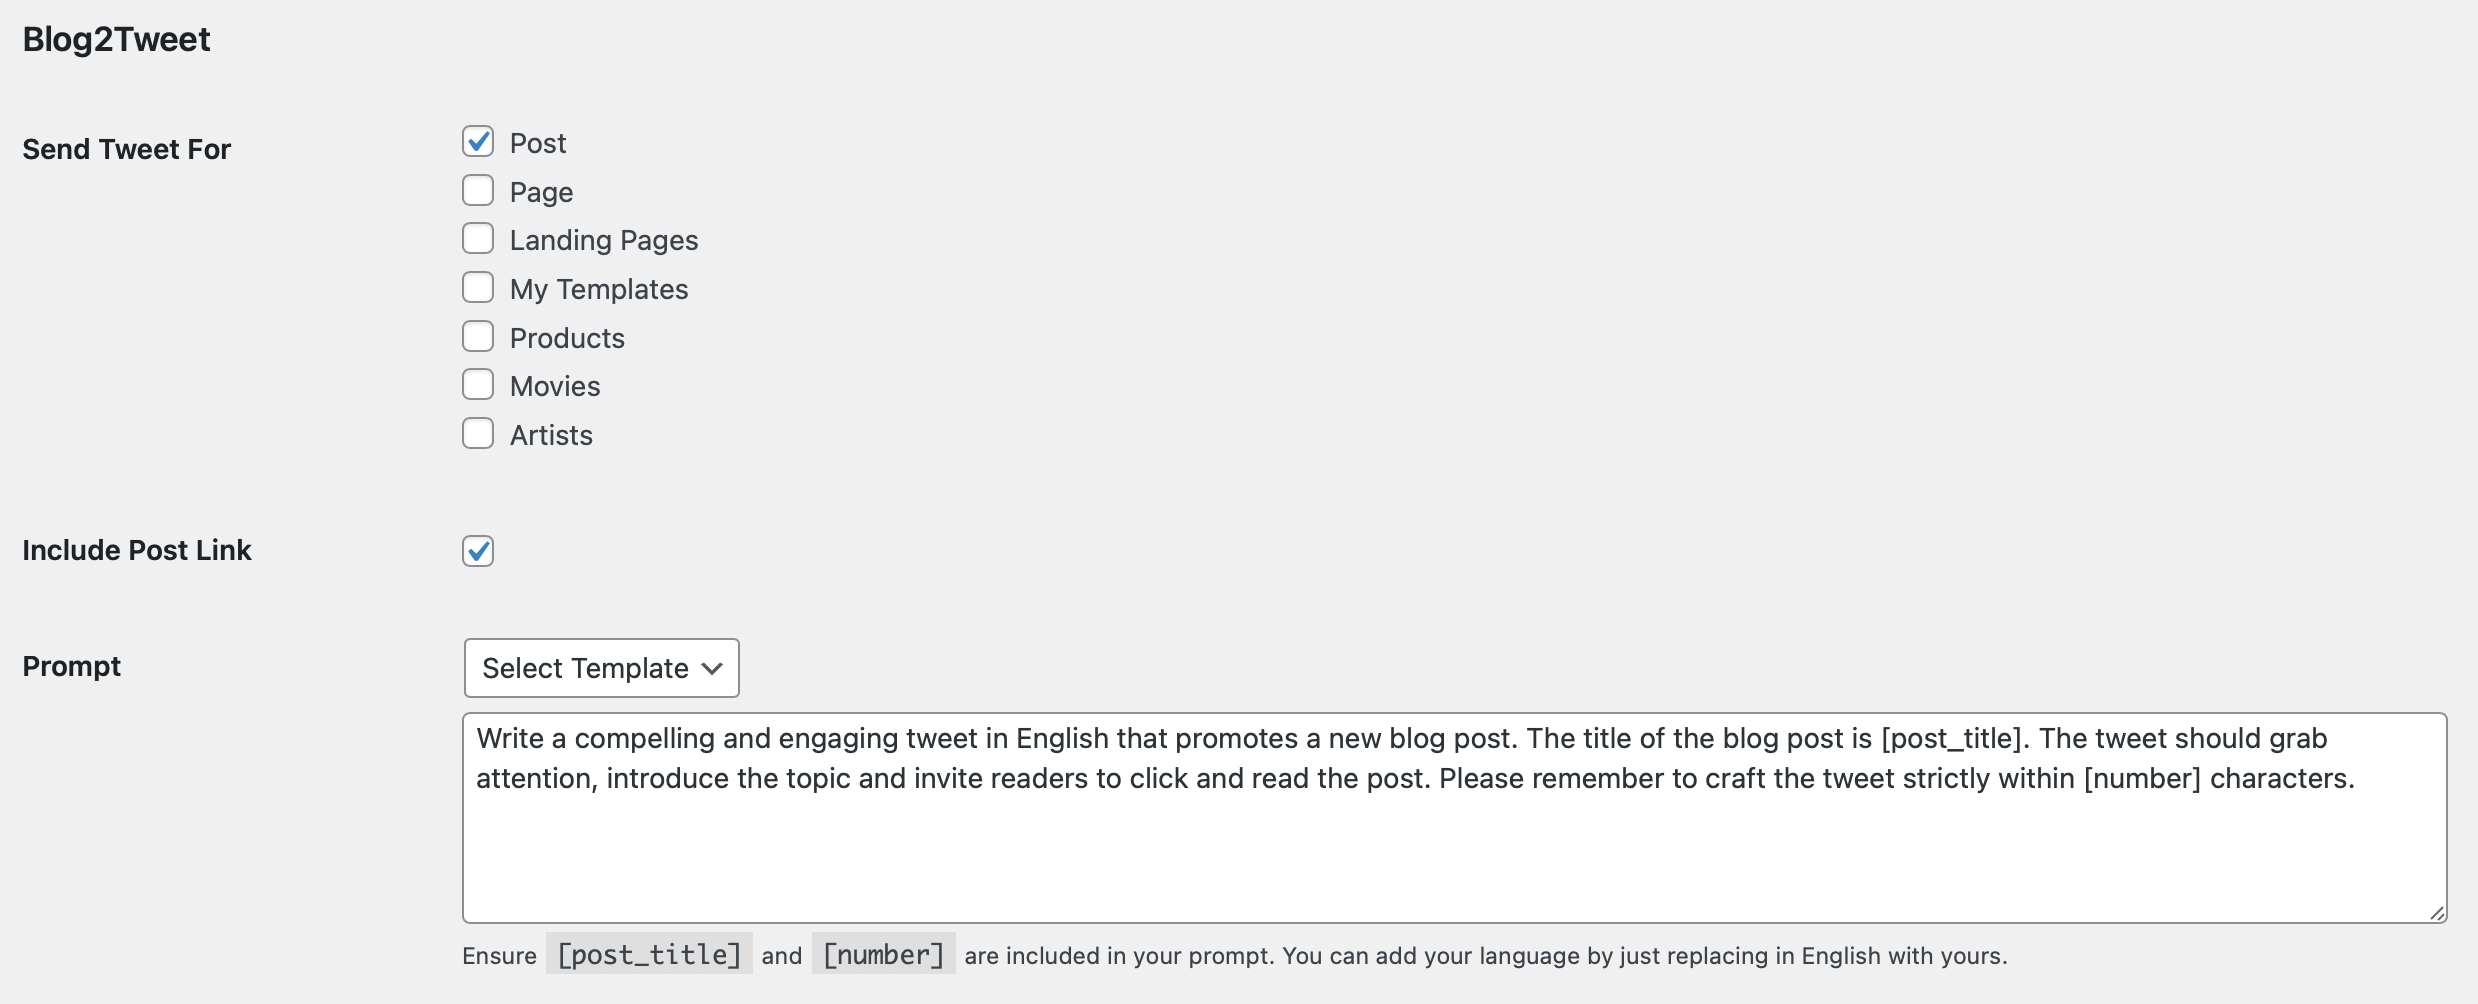
This feature has three configurable options:
- Send Tweet For: Here, you can select the post types that should trigger an automatic tweet. This includes standard posts, pages, and any custom post type. Simply check the box next to the post type to enable tweeting for that type.
- Include Post Link: Enabling this option will include a link to your post in the automatic tweet.
- Prompt: This is where you customize the text of the automatic tweet.
The default prompt is:
"Write a compelling and engaging tweet in English that promotes a new blog post. The title of the blog post is [post_title]. The tweet should grab attention, introduce the topic and invite readers to click and read the post. Please remember to craft the tweet strictly within [number] characters."
Above the text area is a dropdown called Template. Here you can select the tone of the automated tweet. Options include sarcastic, cheerful, humorous, professional, inspirational, and informative. When you select one of these options, the corresponding predefined prompt will appear in the text area.
Make sure the placeholders [post_title] and [number] remain in your custom prompt.
You can adapt the prompt to other languages by replacing in English with your preferred language.
Twitter Writer
Twitter Writer is a feature that leverages GPT to compose and send tweets based on your specified keywords at predefined intervals.
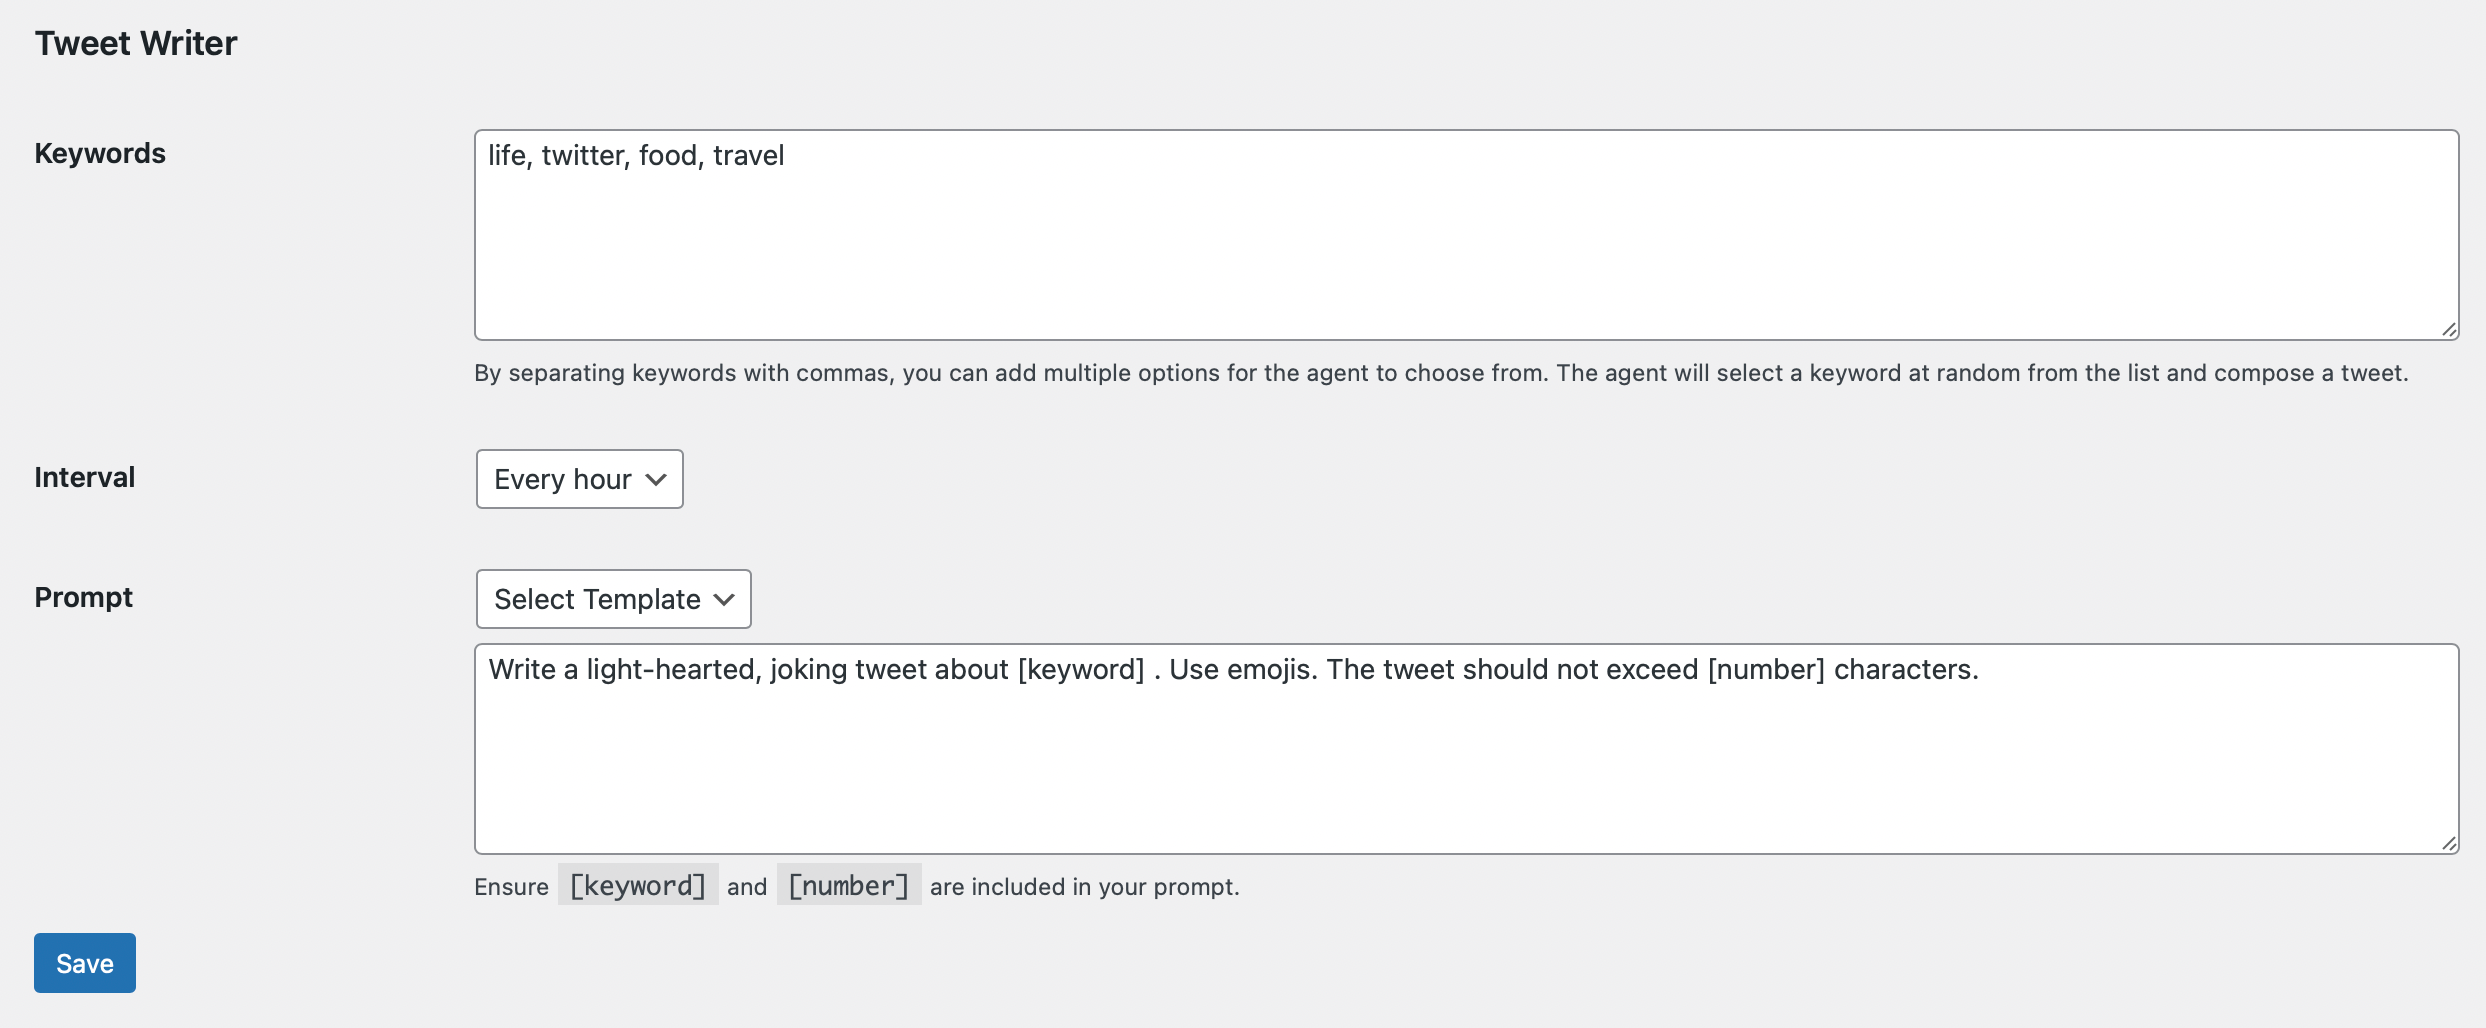
This feature also offers three configurable options:
- Keywords: Here, you enter the keywords that will inform the content of the tweets. These should be subjects that interest you, separated by commas (e.g., life, food, travel). The GPT agent will select a random keyword each time and generate a tweet on that topic.
- Interval: From the dropdown menu, select how often you want to send a tweet. The options range from every 1 hour to every 24 hours.
- Prompt: This is where you customize the text of the automated tweet.
The default prompt is:
"Write a compelling and engaging tweet in English about [keyword]. Please remember to craft the tweet strictly within [number] characters."
Sample tweet generated by GPT with pre-defined keywords:

Above the text area, there's a dropdown menu titled Template. This allows you to choose the tone of the tweet. Options include a question, fact, opinion, sarcastic, cheerful, humorous, etc.
Ensure that the placeholders [keyword] and [number] are included in your custom prompt.
As with Blog2Tweet, you can adapt the prompt to other languages by replacing "in English" with your preferred language.
Following these steps will help you maximize the potential of the AI Power WordPress plugin's Twitter module, automating the process of keeping your Twitter followers updated and engaged.
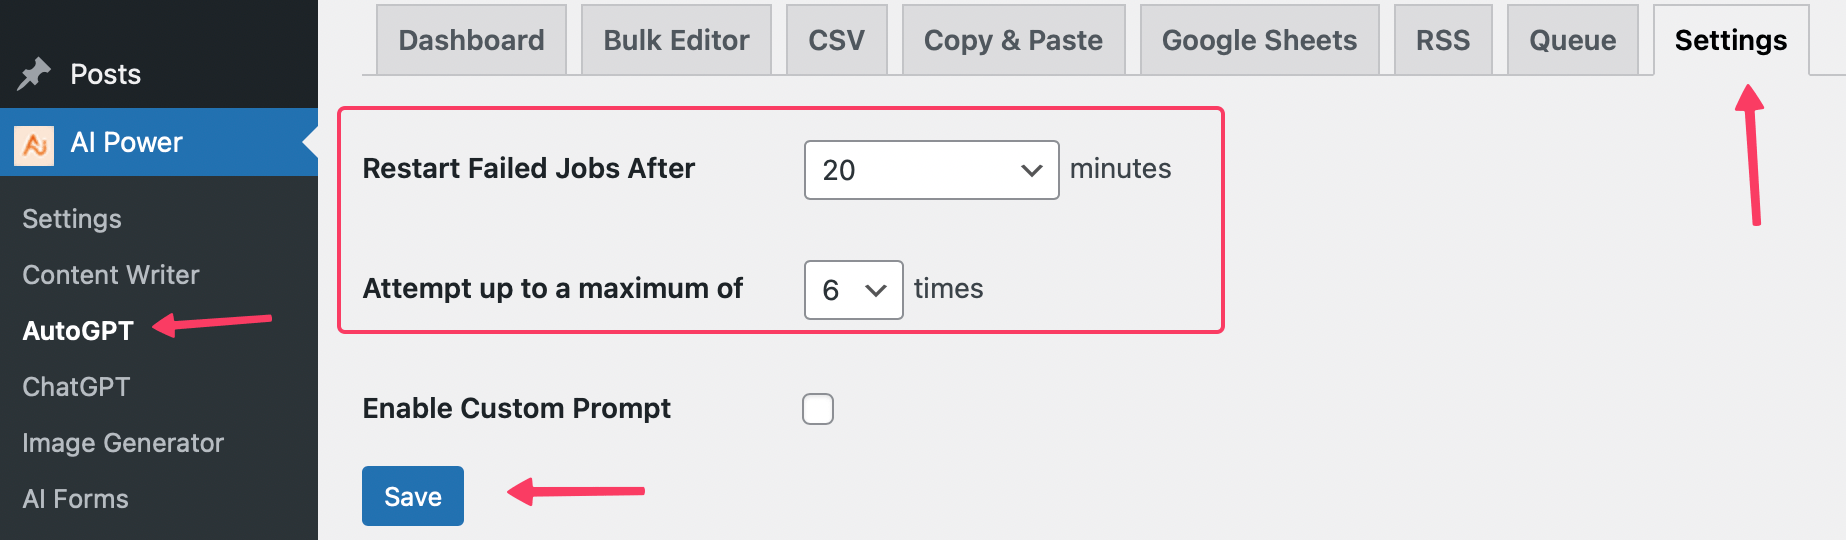
Auto Restart Failed Jobs
You can choose to automatically restart failed jobs after a specific amount of time or after a certain number of attempts.
To enable the restart feature, go to the AutoGPT - Settings tab.
-
Restart Failed Jobs After: Set the amount of time after which the tool should attempt to restart a failed job. Available options: Do not restart, 20, 30, 40, 50 and 60 minutes.
-
Attempt up to a Maximum of: Define the maximum number of times the tool should try to restart a failed job before giving up. Available options: 1 to 10 times.
By configuring these settings, you can ensure that your tweet generation process continues smoothly even if there are temporary issues with the OpenAI servers or if you run out of quota.
For example, if a bulk job fails due to unforeseen circumstances such as OpenAI servers being down or you are out of quota, the tool will automatically attempt to restart the failed job based on the settings you have selected.
Monitoring
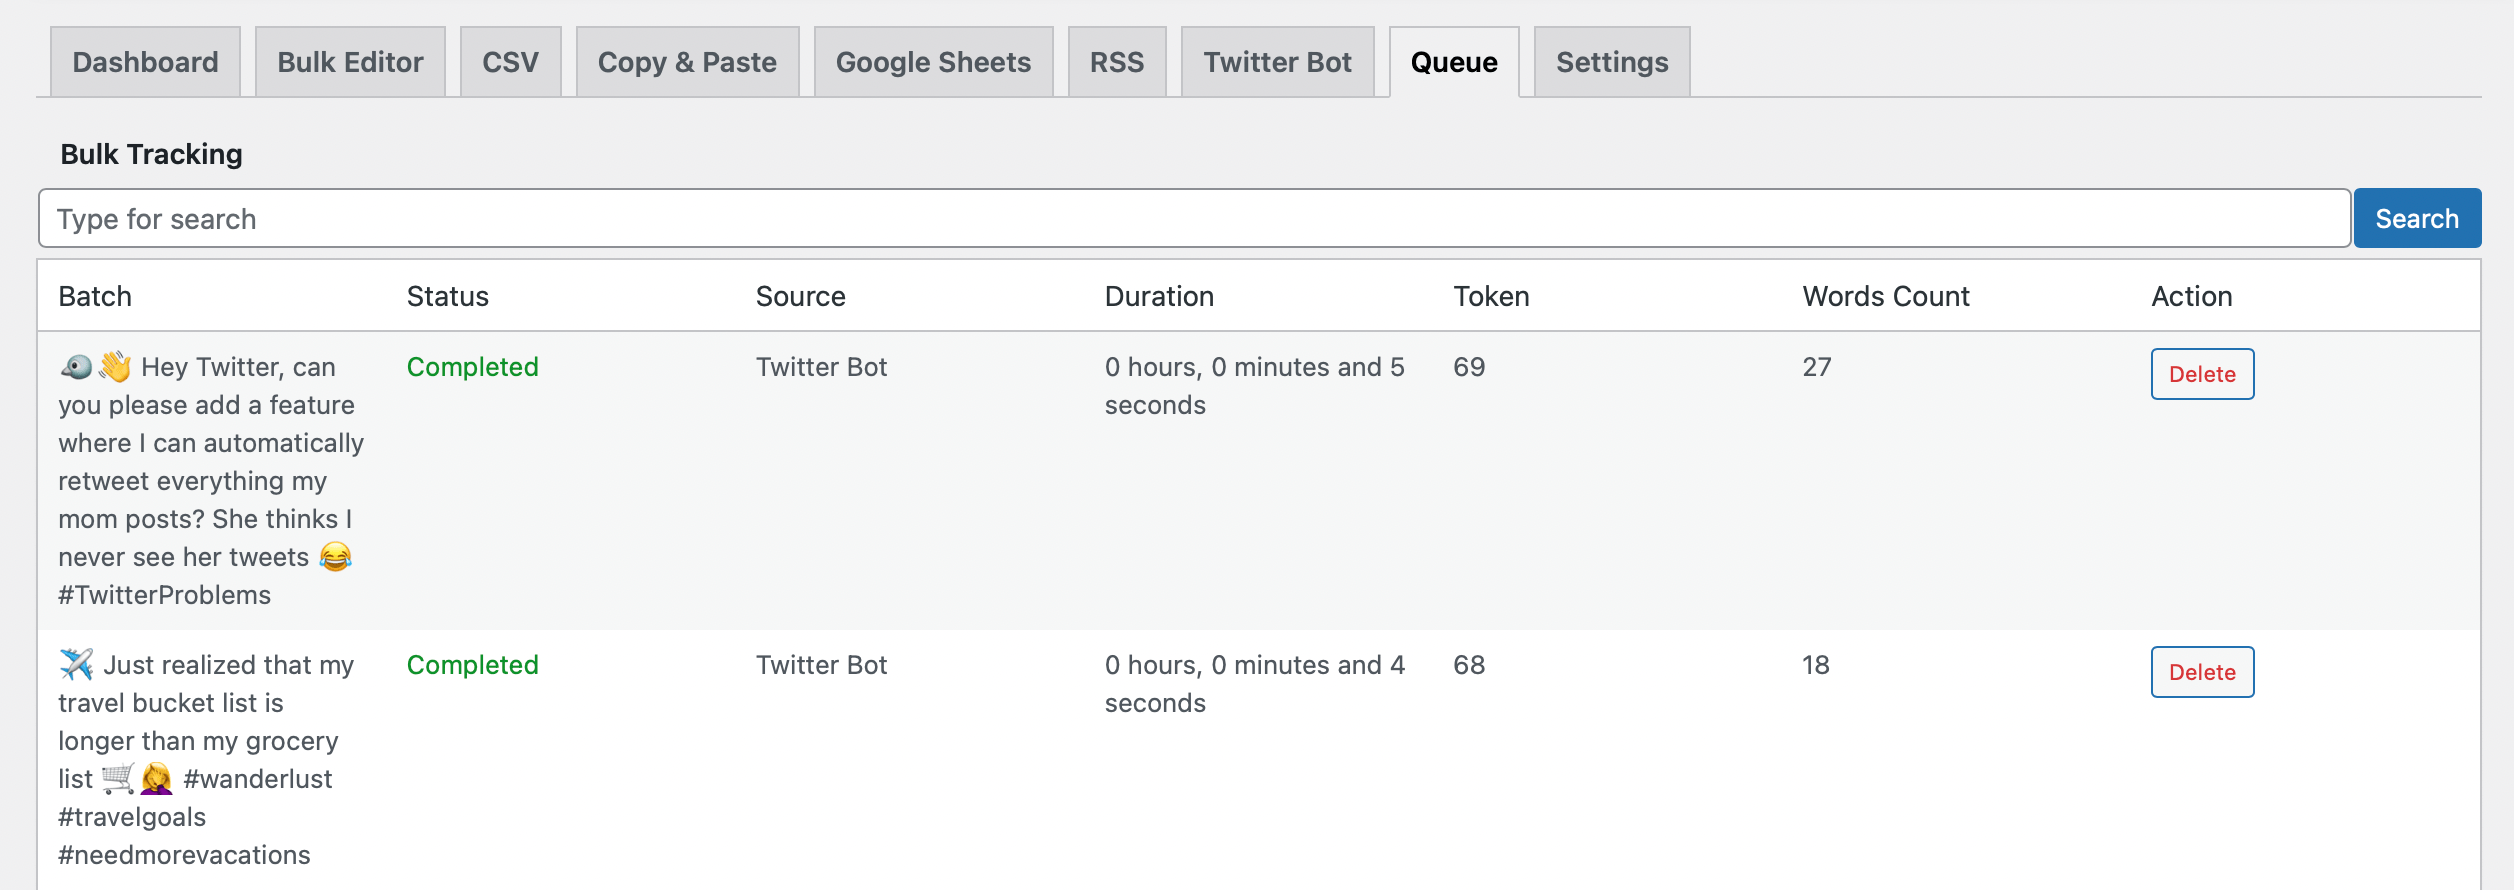
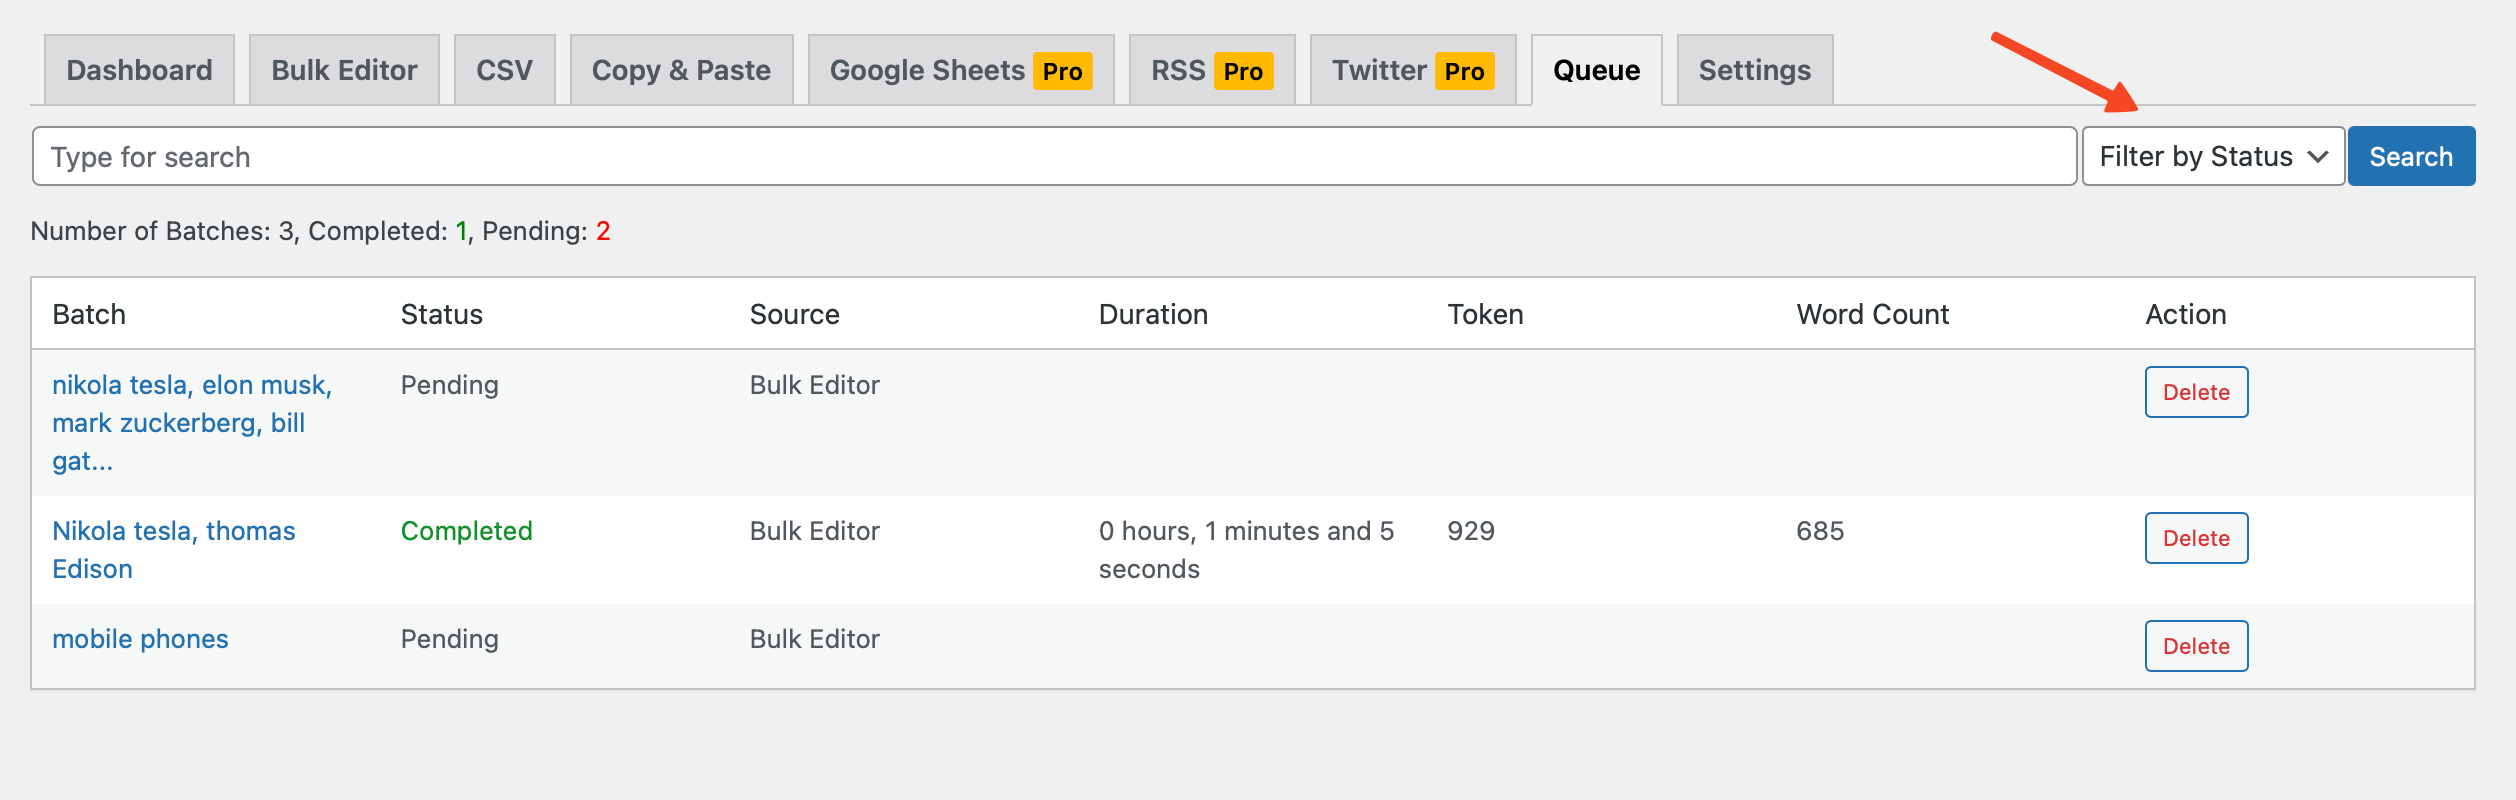
The queue feature in AutoGPT is a helpful tool that allows users to keep track of the progress of their content creation.
You can monitor the status of each your Tweet batch in the Queue tab.
There are seven fields in the Queue tab that give you information about each batch of content.
| Field | Description |
|---|---|
| ID | The ID field shows the unique identifier for each batch. |
| Batch | The Batch field shows you the list of titles in that batch. It is clickable, and once you click on it, you can see the list of titles in that batch. |
| Status | The Status field shows whether the batch is pending, cancelled, in progress, or completed. |
| Source | The Source field shows where the batch was created, whether in the Bulk Editor, CSV, Copy-Paste, RSS or Google Sheets feature. |
| Duration | The Duration field shows how long it took to generate all the contents in that batch. |
| Token | Token field shows how many tokens were spent to generate the content. |
| Word Count | The Word Count field shows how many words are in that batch. |
| Action | The Action field provides a delete button to delete the batch if you no longer need it. Please note that deleting a batch will not delete the content that was generated. |
In addition to the monitoring capabilities, you can also filter batches based on their status.
This allows you to quickly view batches that are completed, pending, or in other states, enhancing your ability to manage the content creation process.
Furthermore, the Queue tab provides a summary of the total number of batches, as well as the number of pending and completed batches. This gives you a quick overview of your content generation activities.
With the Queue feature, you can easily keep track of the progress of your content creation and stay organized. You can also cancel a batch if it is taking longer than expected or if you no longer need the content.
Deleting a job from the queue will only remove the job from the queue and will not delete the content that was generated.
Limitations
Even with its robust feature set, there are a few limitations and critical considerations to keep in mind when using the AutoGPT Twitter plugin.
Twitter API Rate Limit
Twitter imposes restrictions on how often you can call their API, often referred to as rate limiting. For most endpoints, this limit is 15 calls every 15 minutes per application-user pair. It means if you try to post tweets too frequently, your requests will be denied until the rate limit window resets.
It is crucial to configure the plugin so that it respects these rate limits, to avoid having your Twitter App being temporarily or permanently suspended by Twitter. Carefully consider your tweet frequency and adjust it accordingly to prevent exceeding these limits.
You can read more about Twitter Rate Limits here.
API Availability
Though Twitter's API is generally reliable, there might be periods when it's temporarily unavailable due to maintenance or unexpected issues on Twitter's end. In such cases, the plugin may fail to post a tweet or fetch user data. The plugin has features like automatic restart of failed jobs to deal with such scenarios.
You can monitor Twitter API status here.
Character Limit
When using the Include Post Link feature of our plugin, it's important to keep in mind Twitter's character limit.
The standard Twitter limit is 280 characters. This includes the characters used in your post link.
As a result, our plugin will ensure that the total character count of the AI-generated tweet combined with the post link doesn't exceed 280 characters.
If the combined character count exceeds this limit, our plugin will automatically trim the AI-generated tweet to fit within the limit.
On the other hand, if you are using a paid Twitter account, this character limit does not apply and you can enjoy extended character limits.
Content Restrictions
While the AutoGPT plugin allows for the generation of a broad range of content, it's important to remember that all content must comply with Twitter's rules and policies.
Tweets that violate these rules may lead to your Twitter App or your Twitter account being suspended.
Also, keep in mind that OpenAI has its own set of usage policies that generated content must adhere to.