Knowledge
In a chatbot, one of the most important aspects is the knowledge or context it uses to understand and respond to conversations.
Providing the right context allows the chatbot to make sense of the conversation, remember past interactions, and offer relevant, personalized responses.
Let's explore how you can customize the context for your chatbot.
Instructions
You can give custom instructions to guide how your chatbot responds.
For example, on our website, we use a chatbot named Lisa.
We've instructed Lisa to respond only to questions related to our plugin. Here's an example of our custom instructions:
"You are a helpful AI assistant. Your name is Lisa. Your primary purpose is to provide accurate, relevant, and helpful information exclusively about the AI Power WordPress plugin. If a user asks a question or initiates a discussion that is not directly related to the plugin or its features, functionalities, and usage, do not provide an answer or engage in the conversation. Instead, politely redirect the user's focus back to the AI Power plugin and its related content."
You can create your own instructions based on your specific needs.
Check out our Chatbot Prompt Library
Configuring Custom Instructions
Here’s how you can configure the Custom Instructions feature for your chatbot:
- Go to the Dashboard - Chatbot tab.
- In the General Settings tab of the bot, you will see a switch called Instructions.
- By default, this is enabled.
- If you don't want to provide any custom instructions, you can turn this switch off.
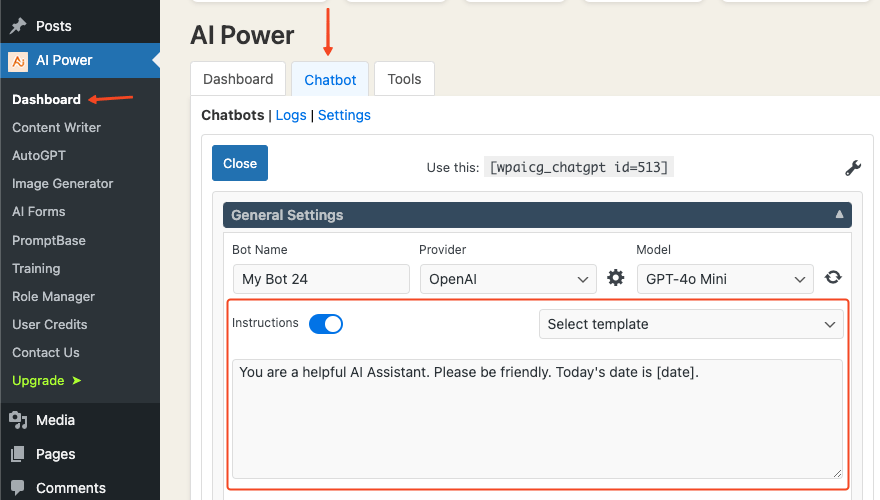
- Next to the switch, there is a Template dropdown where you can select pre-made instruction templates.
- Below the switch, there is a text area where you can write your own instructions if you prefer.
- The default instruction is: "You are a helpful AI Assistant. Please be friendly. Today's date is [date]."
- You can modify this instruction as needed.
- The
[date]variable is dynamic and will insert the current date into the instructions.
This allows you to fully customize how your chatbot responds and what context it use
Knowledge
By enabling the Knowledge feature, the chatbot can generate responses based on the data source you choose.
To configure the Knowledge feature:
- Go to the Dashboard - Chatbot tab.
- In the General Settings tab, you will see a switch called Knowledge. This is enabled by default. You can turn it on or off here.
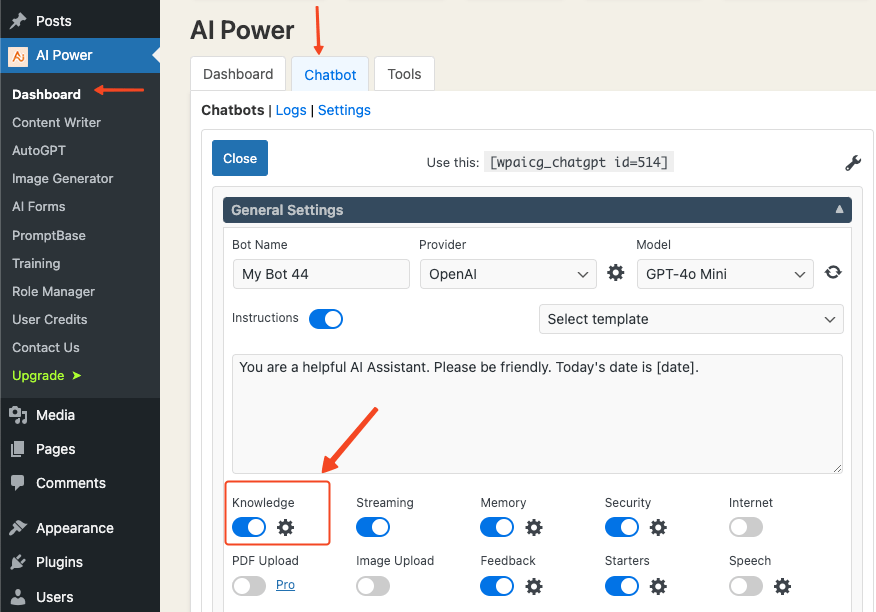
- Next to the Knowledge switch, there is a settings icon. Clicking it will open the configuration options for data sources.
In this window, you will find the following options:
- User Aware: Toggle this switch to allow the chatbot to recognize logged-in users.
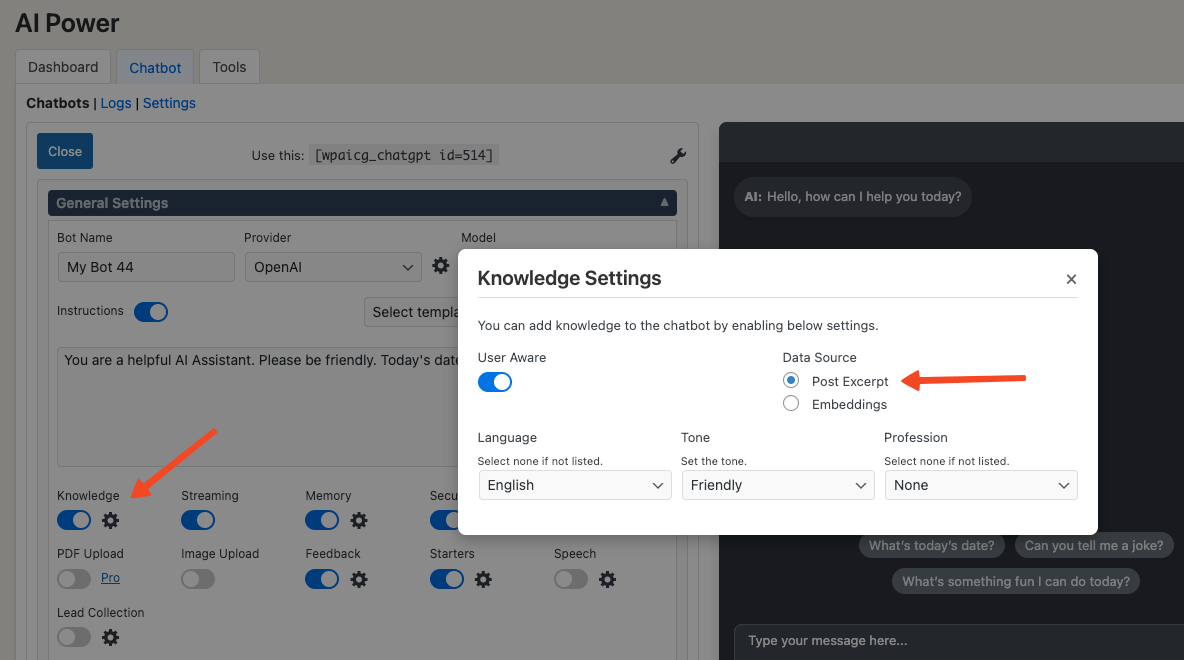
- Data Source: Choose between Excerpt or Embeddings for the chatbot's knowledge base.
User Aware
The User Aware option, which is enabled by default, allows the chatbot to retrieve the current user's name (if logged in) and provide personalized responses.
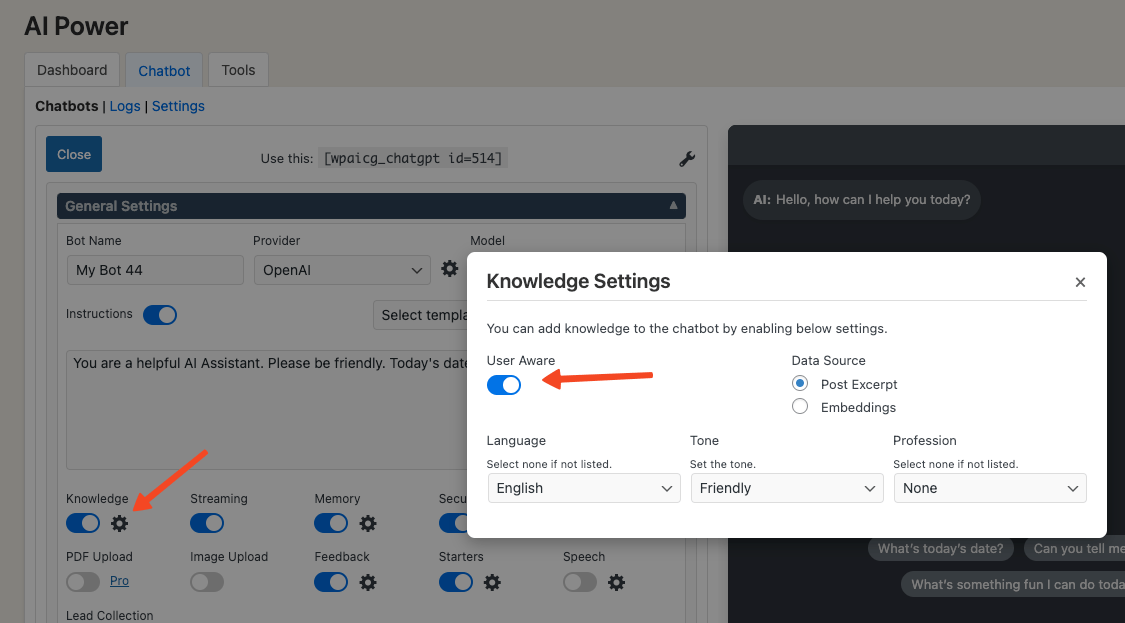
If this feature is turned off, the chatbot won't have access to user-specific information.
Excerpt
By default, the chatbot uses the Excerpt as its data source.
It pulls the summary of the WordPress post from the page it’s on and uses it to understand the topic and provide relevant responses.
If no custom excerpt is provided, WordPress automatically uses the first 55 words of the post.
Embeddings
To use embeddings, you need to set up either Pinecone or Qdrant and add their API details in the AI Trainings - Settings tab.
If you haven’t done this yet, please follow the tutorial here.
Once the setup is complete, follow these steps to configure embeddings for your chatbot.
Pinecone
- Go to the Dashboard - Chatbot tab.
- In the General Settings tab, enable the Knowledge switch.
- Click the Settings icon next to the Knowledge switch.
- In the configuration window, select Embeddings from the Data Source.
- Select Pinecone from the Vector DB radio group.
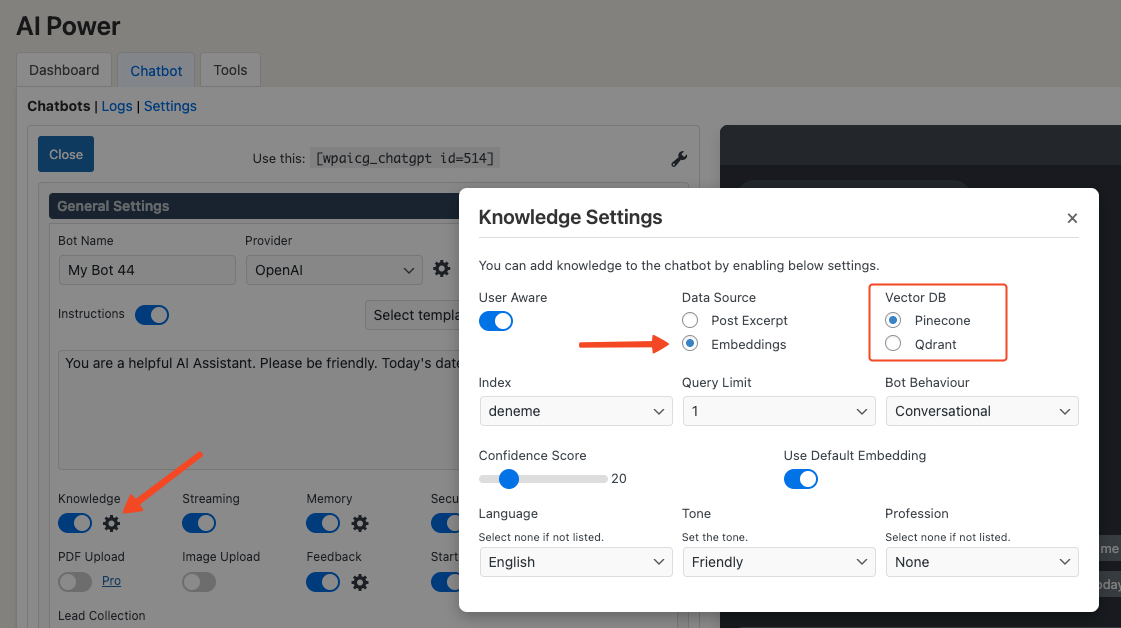
Once Pinecone is selected, three additional fields will appear:
- Pinecone Index: All your Pinecone indexes will be listed. Select the one you want to use.
- Query Limit: Choose how many nearest matches (from 1 to 5) should be fed to the bot. The default is 1, meaning only the top match will be used as context.
- Bot Behavior: Choose between Conversational and Non-Conversational modes. The default is Conversational, where the bot interacts normally. In Non-Conversational mode, the bot behaves more like a semantic search engine, displaying results without interaction.
Qdrant
The configuration process for Qdrant is the same as for Pinecone.
Follow the same steps, but select Qdrant from the Vector DB radio group.
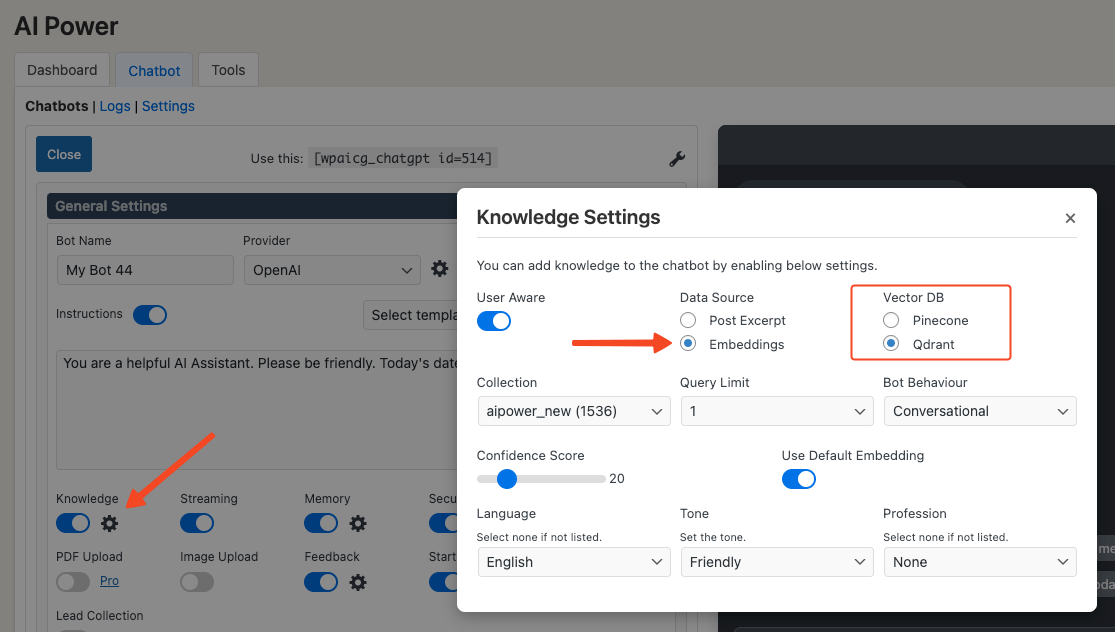
Once Qdrant is selected, three additional fields will appear:
- Qdrant Collection: All your Qdrant collections will be listed. Select the one you want to use.
- Query Limit: Choose how many nearest matches (from 1 to 5) should be fed to the bot. The default is 1.
- Bot Behavior: Choose between Conversational and Non-Conversational modes.
Selecting Embedding Model
Using the embeddings feature also requires selecting an embedding model along with the vector database. Our plugin currently supports the following models:
- OpenAI:
text-embedding-ada-002(1536 dimension)text-embedding-3-large(3072 dimension)text-embedding-3-small(1536 dimension)
- Google:
embedding-001(768 dimension)text-embedding-004(768 dimension)
- Azure: Any embedding model you have set up in your Azure account.
You can view and configure these models under the AI Training - Settings tab, where you can set a default embedding model for your chatbot. We recommend using text-embedding-ada-002, which has provided good results in our tests.
When configuring the Knowledge feature, you will see another switch called Use Default Embedding.
This is enabled by default, meaning the bot will use the default embedding model set in the AI Training - Settings tab.
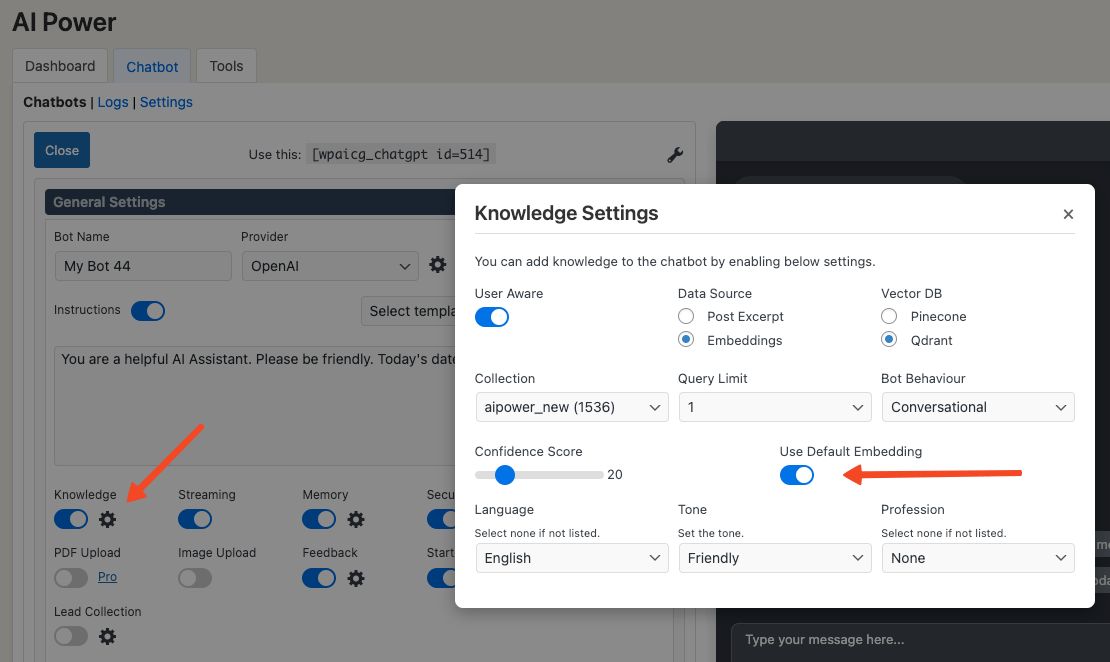
If you want to use a different model for a specific chatbot, you can turn off this switch.
When it's off, an embedding model dropdown will appear, allowing you to select a different model.
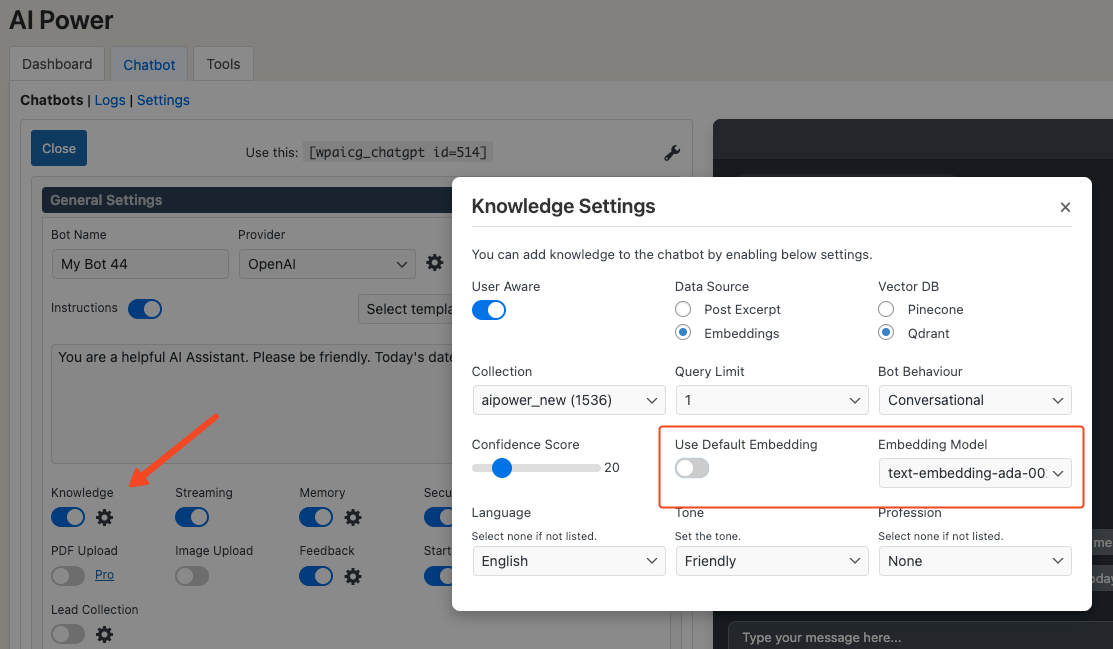
Make sure that the vector dimension of the selected embedding model matches the dimension of the vector database you created.
For example, if your vector database is set to 1536 dimensions, you must select an embedding model with the same dimension, like text-embedding-ada-002. Mismatched dimensions will cause errors.
Confidence Score
The Confidence Score Threshold lets you set a minimum confidence level for the retrieved answers. You can choose a threshold between 1 and 100, with the default set at 20.
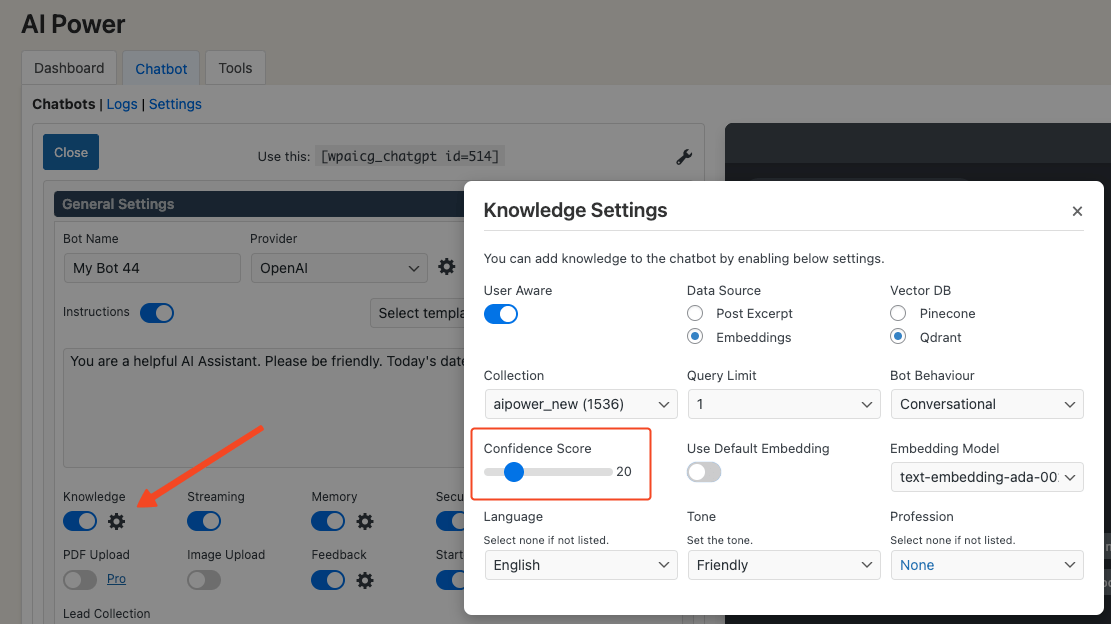
How Confidence Score Works
When a user asks a question, the plugin sends the query to the embedding API to generate a vector. This vector is then sent to Pinecone or Qdrant to retrieve the closest results from the vector database.
- The number of results retrieved depends on the Query Limit setting. If the limit is set to 1, only the nearest result is retrieved. If set to 5, the top 5 nearest results are retrieved.
- Each result has a score between 0 and 1, indicating how closely it matches the query.
The Confidence Score Threshold determines which results are used as context for the bot:
- If the threshold is set to 50, only results with a score above 0.5 will be used. Lower-scored results are ignored.
By setting a higher confidence threshold, you ensure that only highly relevant data is used in the chatbot's responses.
Viewing and Revising Answers
You can view the confidence score for each AI response under the Dashboard - Chatbot - Logs tab.
When you click on a message in the log table, the details will appear on the right.
There, you can see the confidence score for each response.
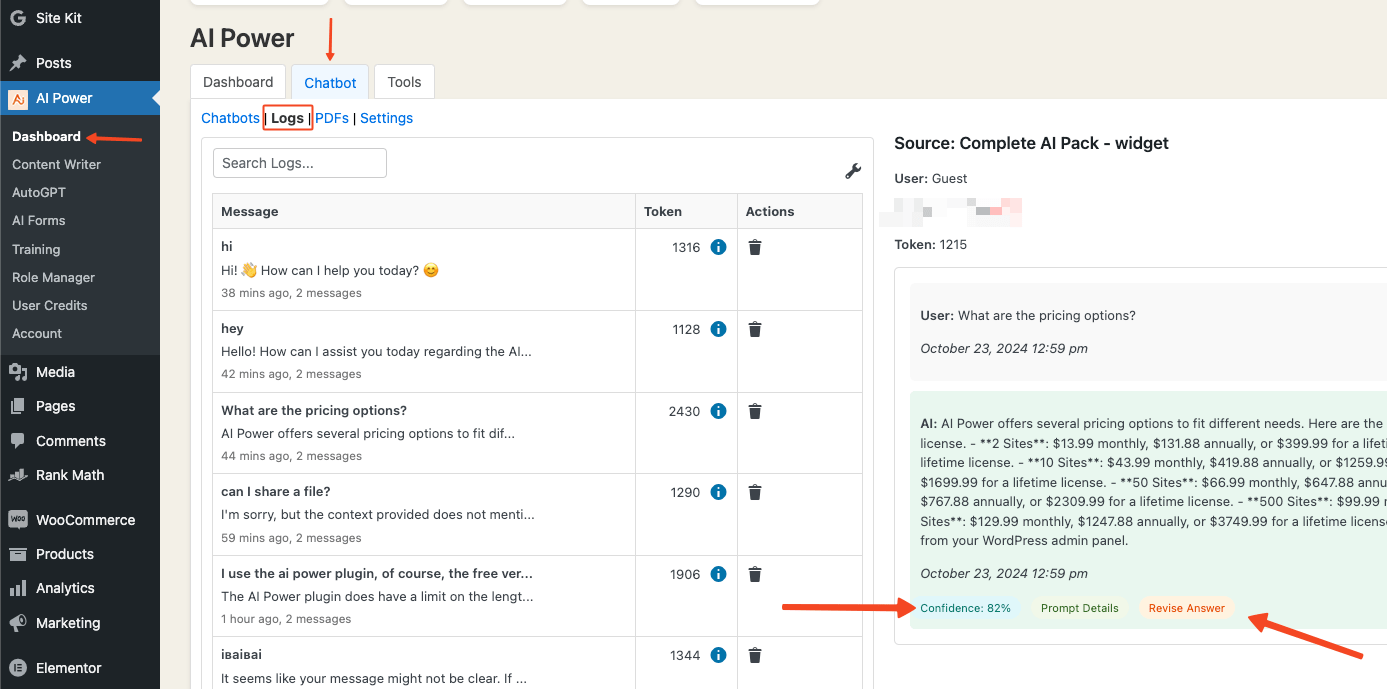
Next to the confidence score, there is a Revise Answer button.
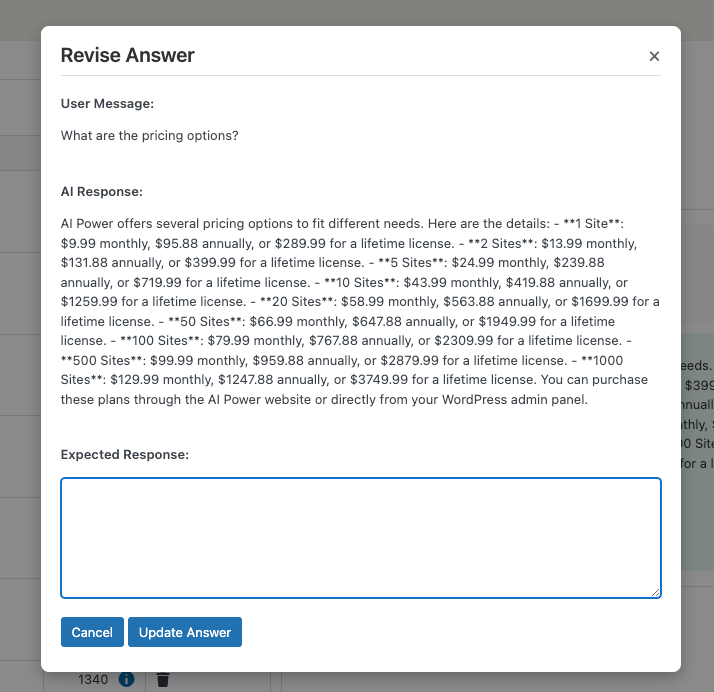
If you see a low score, you can click the button and revise the response. This ensures future users get an improved answer for similar queries.
Things to Keep in Mind:
- Low Threshold: A lower threshold may feed less relevant data to the bot, affecting response quality.
- High Threshold: A very high threshold might exclude useful information, reducing the richness of the bot’s responses.
Memory
Our plugin has a feature called Memory.
When enabled, the bot will remember previous conversations with users.
The plugin stores past conversations in the user's browser local storage. As long as the user doesn't clear their browser history, the bot will remember the past interactions.
You can enable Memory from the Dashboard - Chatbot under the General Settings tab.
There is a switch called Memory which is turned on by default. You can turn it off if you don’t want the bot to remember past conversations.
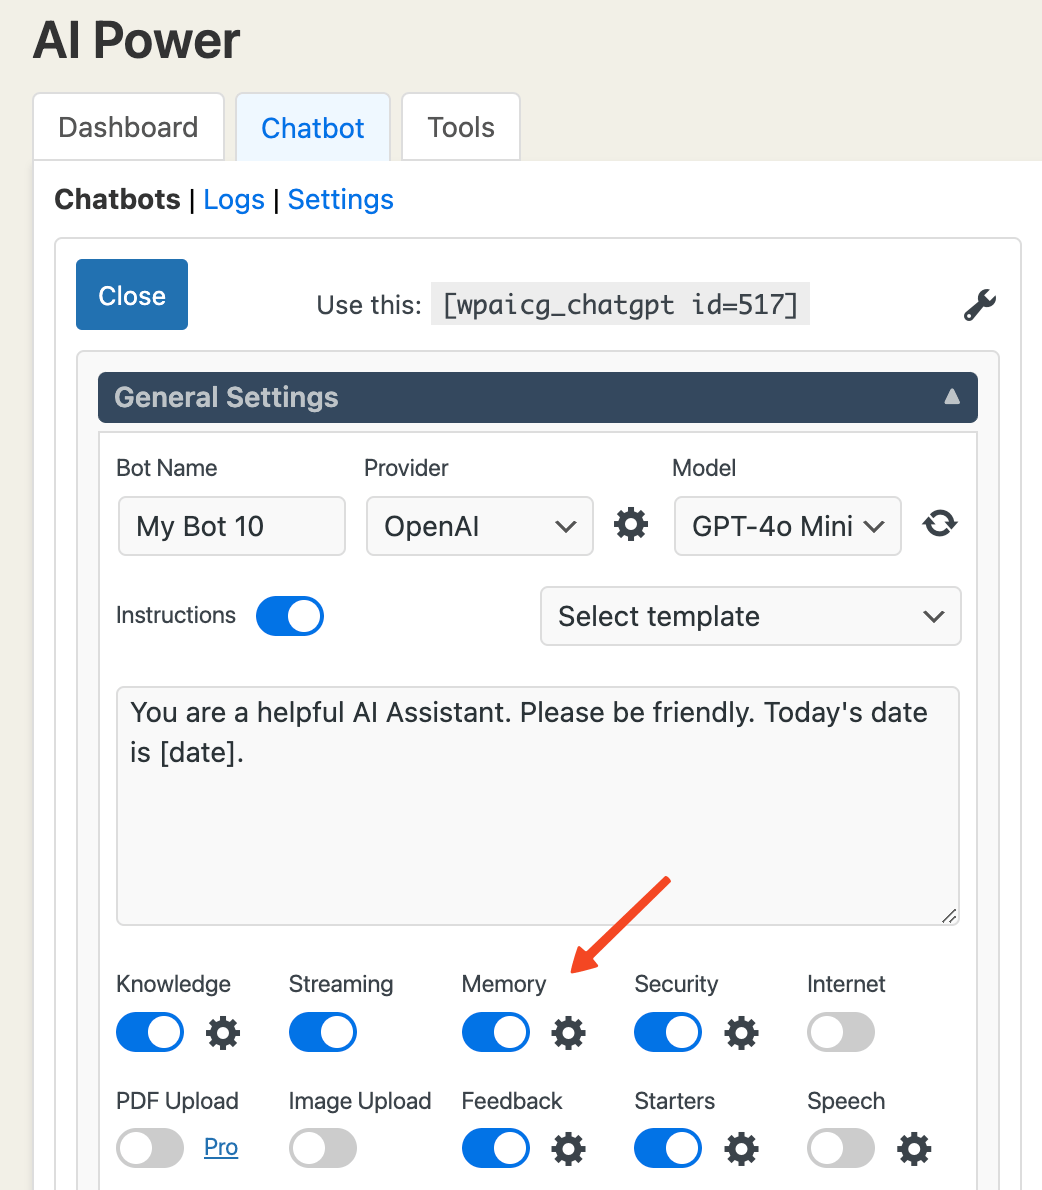
Next to the Memory switch, there is a gear icon.
Clicking on it will open the Memory Configuration window.
Here, you can use the slider to set the memory limit.
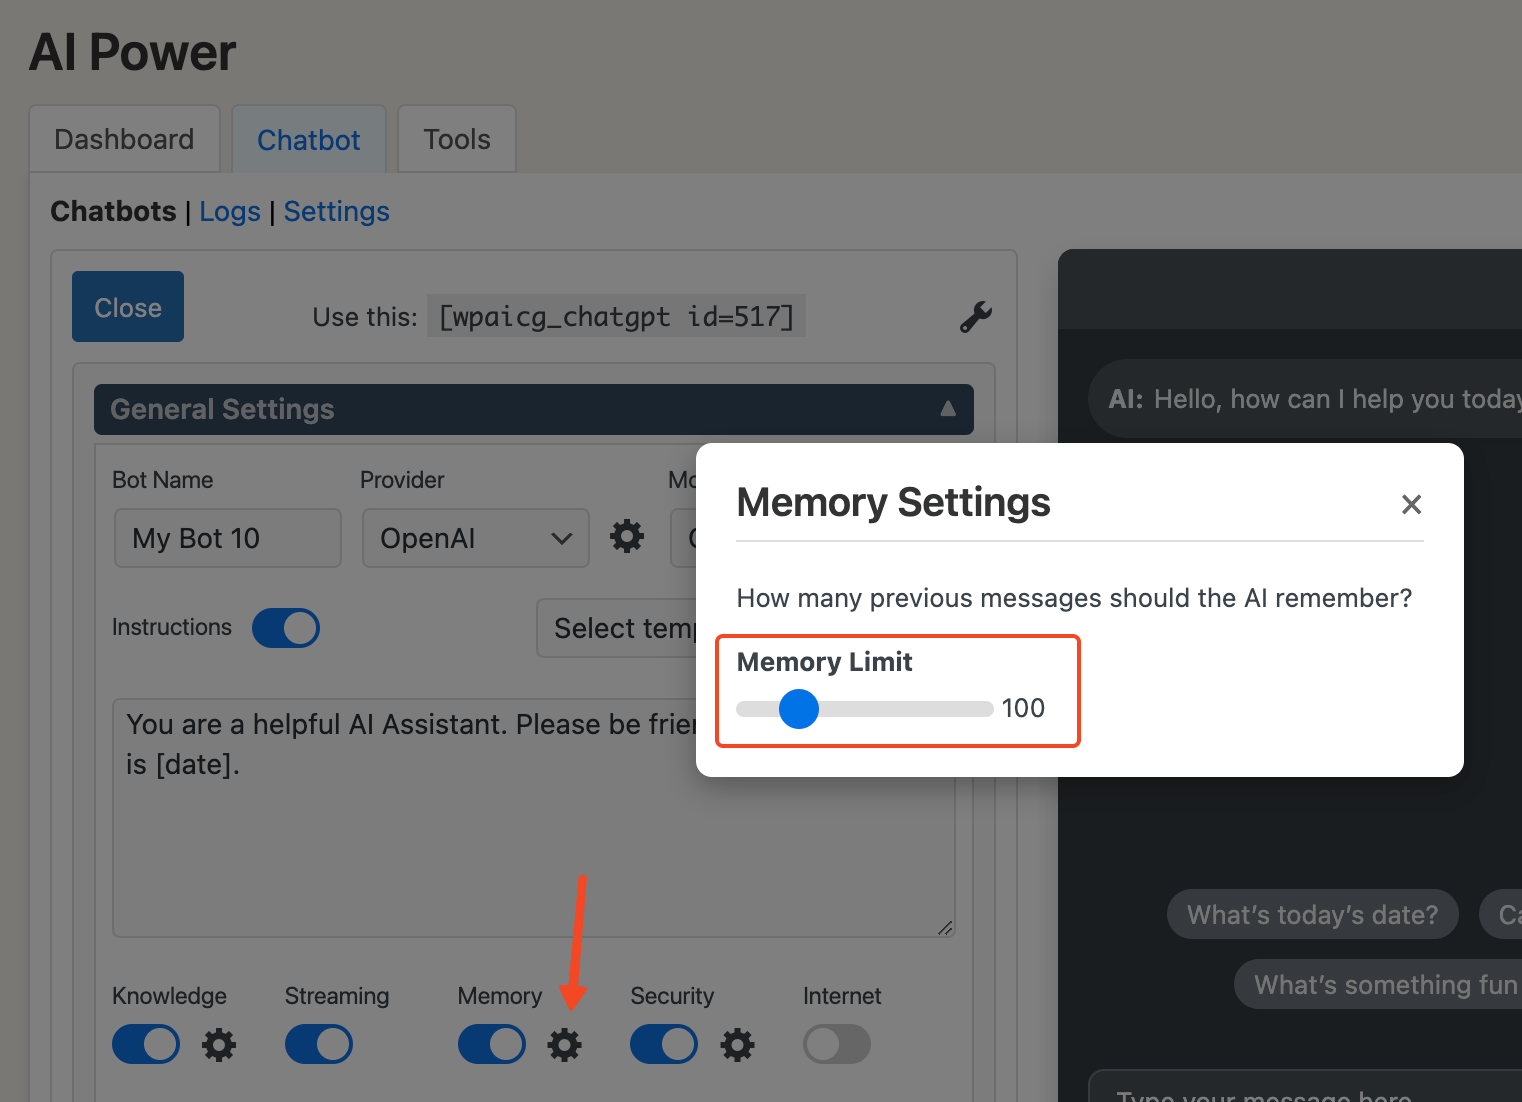
By default, it is set to 100, meaning the bot will remember the last 100 conversations. You can adjust the slider to a value between 3 and 500.
When a user clicks the Clear button on the chat window, it will also clear the conversation history.
PDF Chat
The PDF Chat feature lets users upload PDF files and interact with them directly in the chat.
Users can quickly access and retrieve information from their PDF documents through this feature.
PDF Chat feature is available only in the Pro plan.
You can try out the demo here: https://aipower.org/chatpdf/
You can enable the PDF upload option in the Dashboard - Chatbot under General Settings.
Turn on the PDF Upload switch.
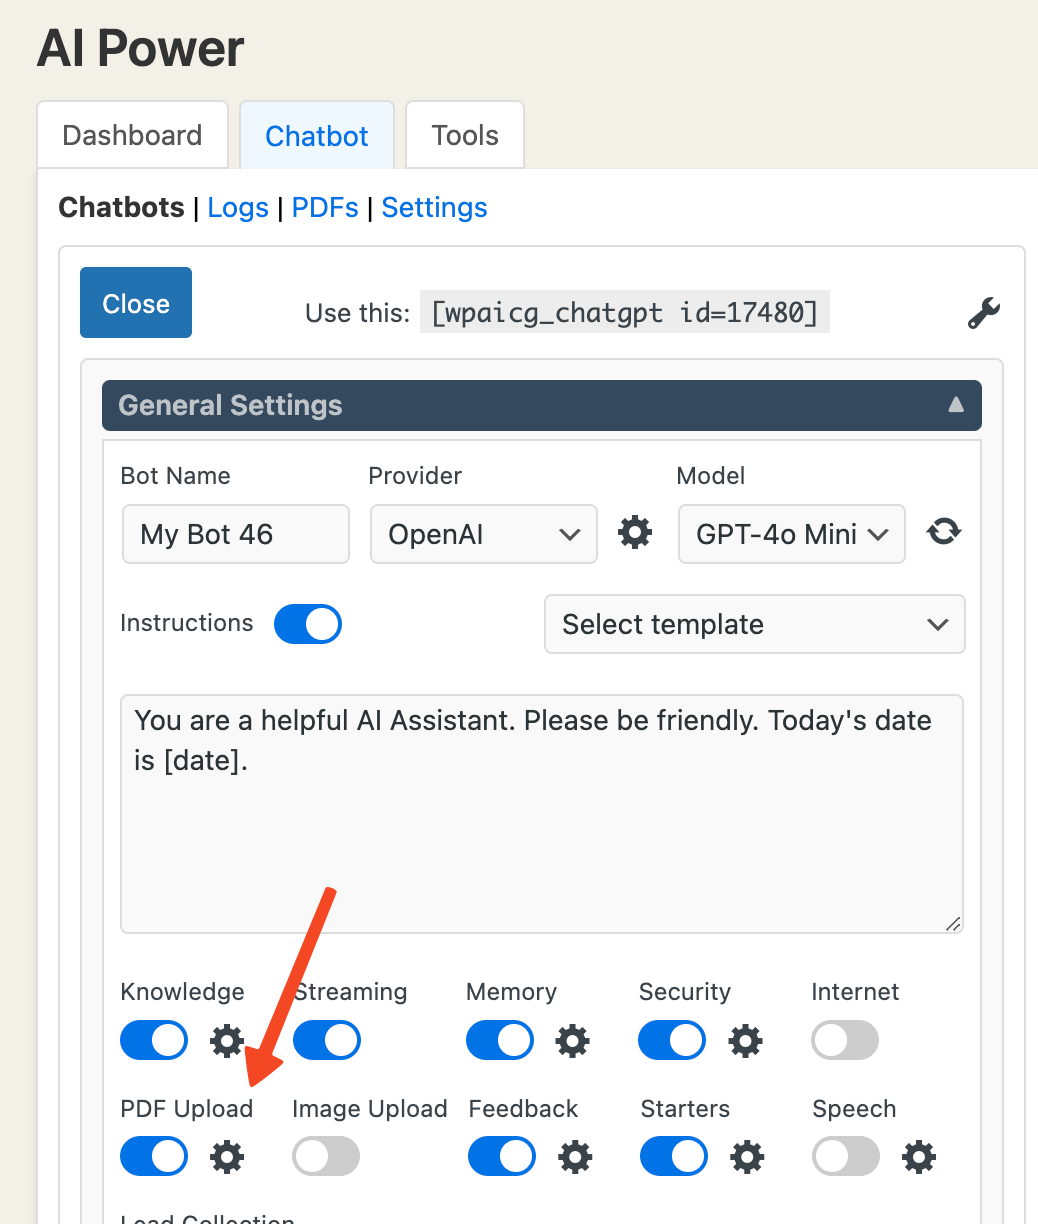
Next to the switch, there is a gear icon. Clicking it opens the PDF upload settings window, where you can configure the following options:
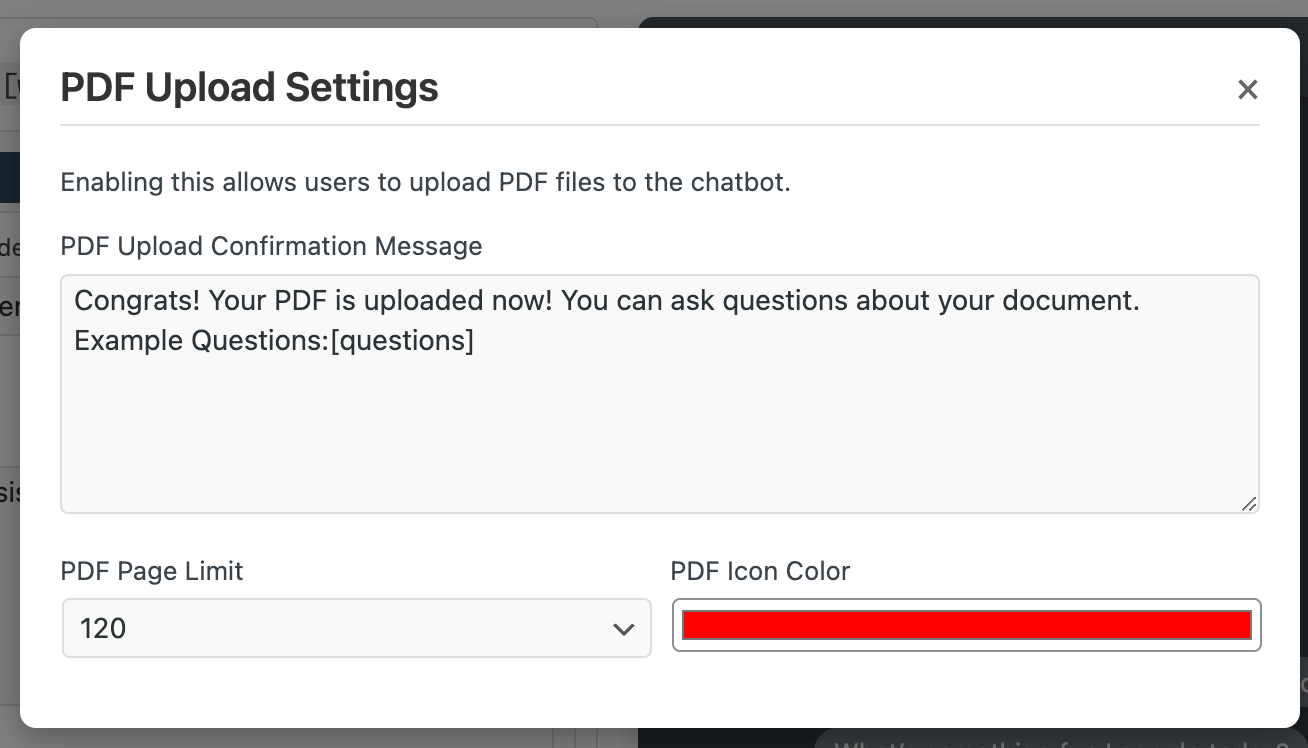
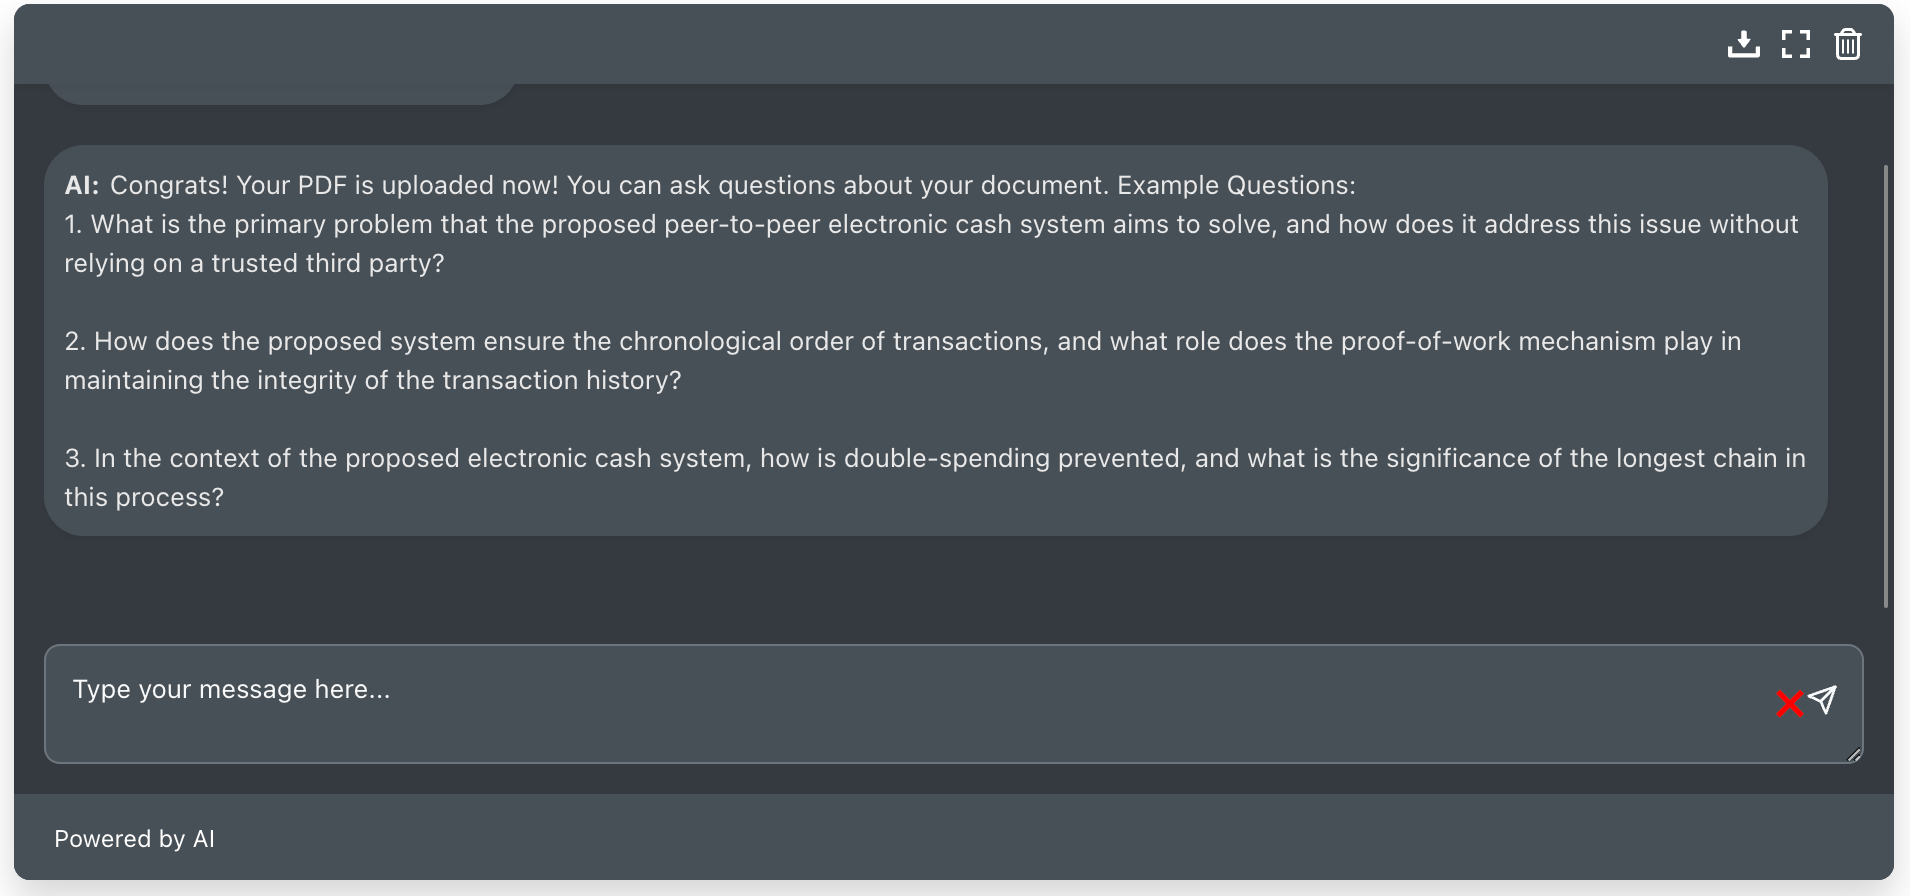
- PDF Confirmation Message: By default, it's set to "Congrats! Your PDF is uploaded now! You can ask questions about your document. Example Questions: [questions]". You can customize this message, but keep the
[questions]placeholder to retrieve suggested questions. - Page Limit: Set the maximum number of pages users can upload, between 1 and 120. The default is 120 pages.
- PDF Icon Color: Customize the color of the PDF upload icon.
Once these steps are completed, go to your chatbot.
You will notice a PDF icon appearing next to the send button. This allows users to upload PDF files directly in the chat interface.
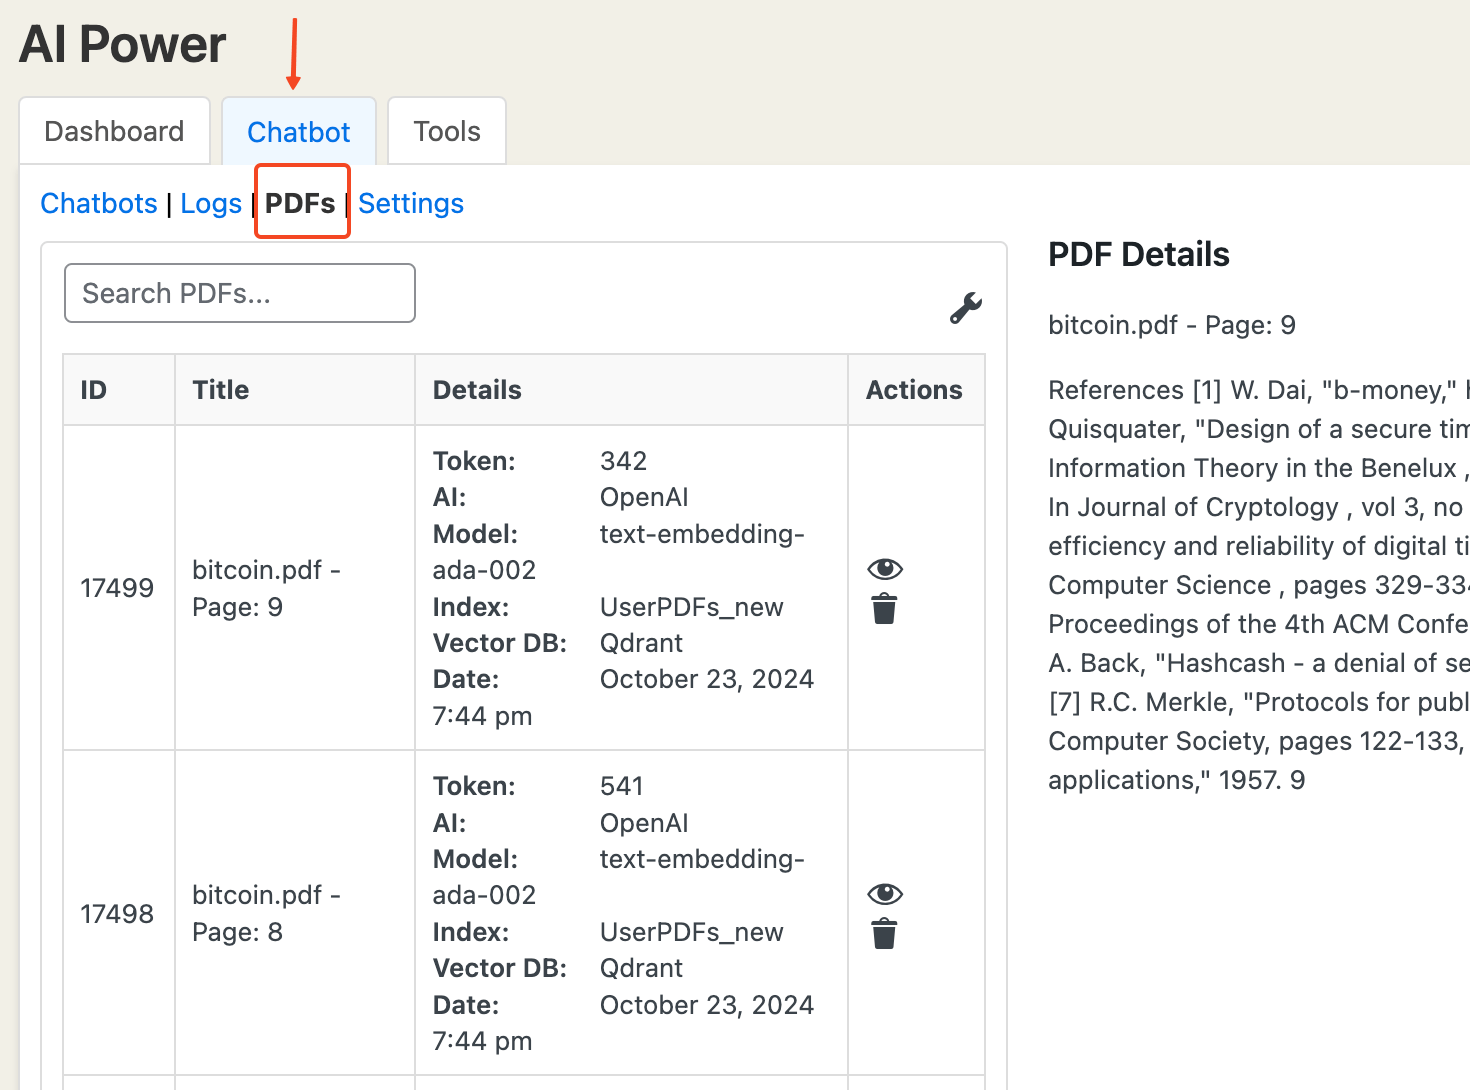
You can view and manage user-uploaded PDFs in the Dashboard - Chatbot page under the PDFs tab.
To keep website content separate from user-uploaded PDFs, create separate bots for each and assign different indexes. This ensures the chatbot retrieves the correct information and prevents mixing content.
While the PDF Chat feature is useful, keep these limitations in mind:
- Specific Questions: You need to ask precise questions about the PDF content. General questions like "Summarize the document" won't work well.
- Page Limit: Each page should be under 1000 words for proper processing.
- Text Only: The bot can only work with text, not images or charts.
- Pinecone GCP-Starter Limitation: The GCP-Starter environment doesn’t support namespaces, so PDF Chat won’t work there. You’ll need to upgrade your Pinecone plan to use this feature.