Tools
Streaming
This feature allows the chatbot to display responses in real-time, showing parts of the response as they arrive from the API, rather than waiting for the full response.
You can enable or disable streaming from the Dashboard - Chatbot under the General Settings tab.
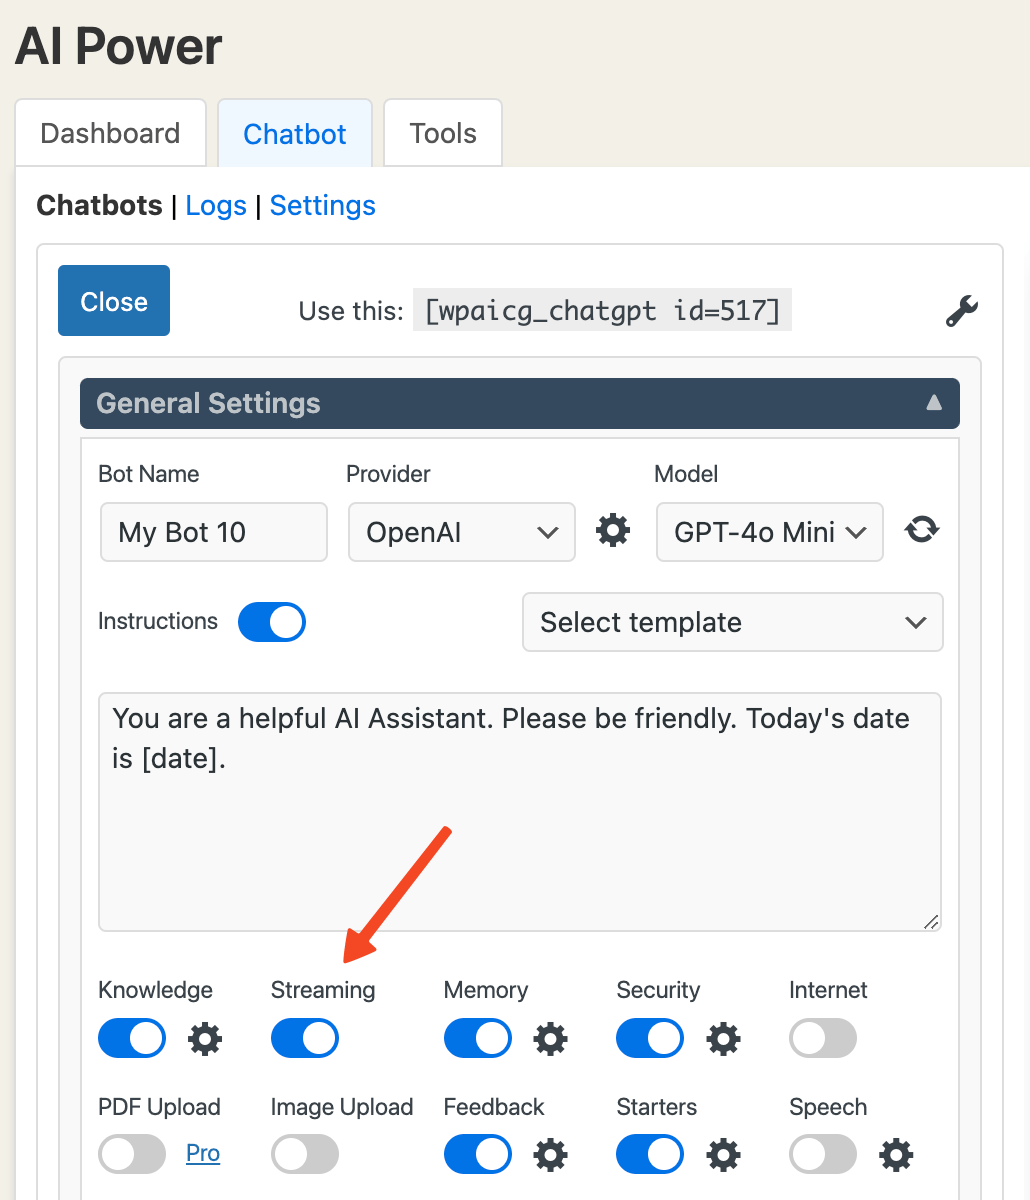
The Streaming switch is on by default.
With streaming enabled, the chatbot displays each part of the response as soon as it's received, speeding up interactions.
Image upload and audio features like text-to-speech and speech-to-text don't work with streaming, as they require the full response to function.
Internet Browsing
Internet Browsing allows your chatbot to search the web for answers.
This feature helps in providing up-to-date information by accessing the internet directly.
When enabled, the chatbot can perform searches using a Google Custom Search Engine (CSE). The chatbot sends search queries to the CSE, retrieves results, and uses them to generate responses.
For example, you can ask for the current bitcoin price:
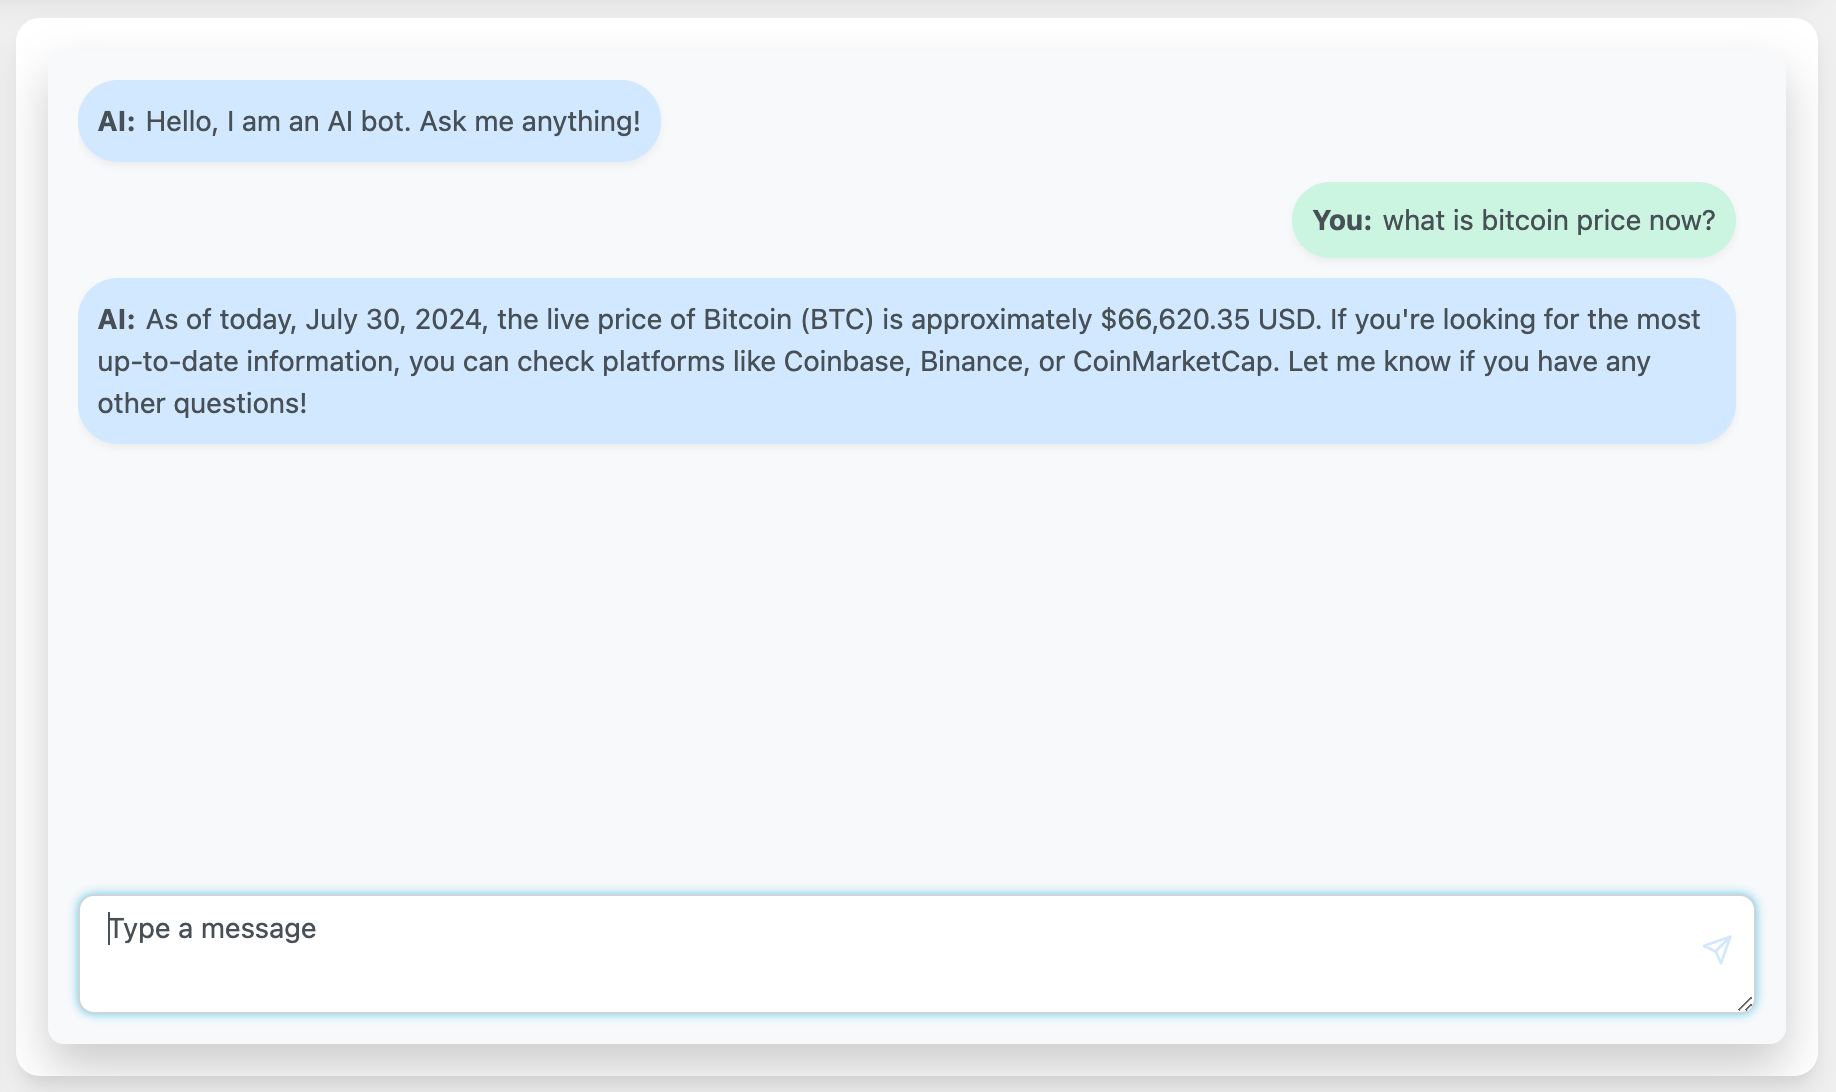
Demo here: https://aipower.org/openai-gpt-4o-mini-chat-bot-demo/
To configure the settings for Internet Browsing, go to the Dashboard - Chatbot - Settings tab and click on the gear icon next to the Internet Browsing label, as shown below, to open the settings window.
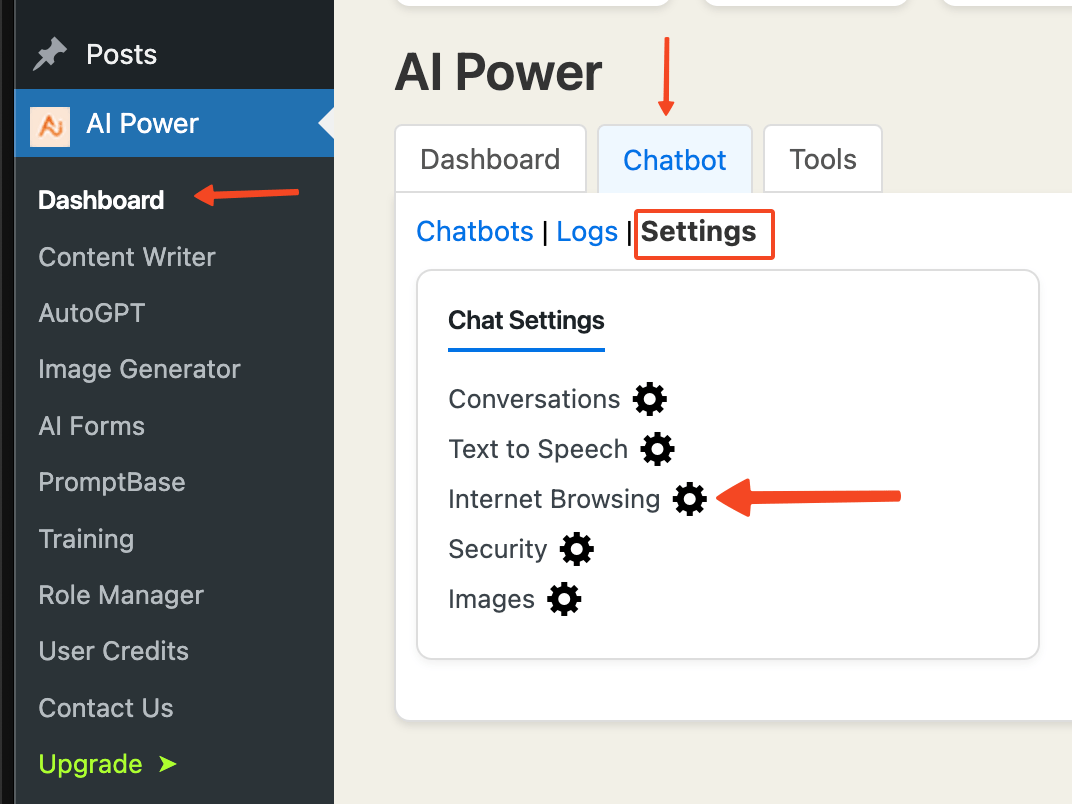
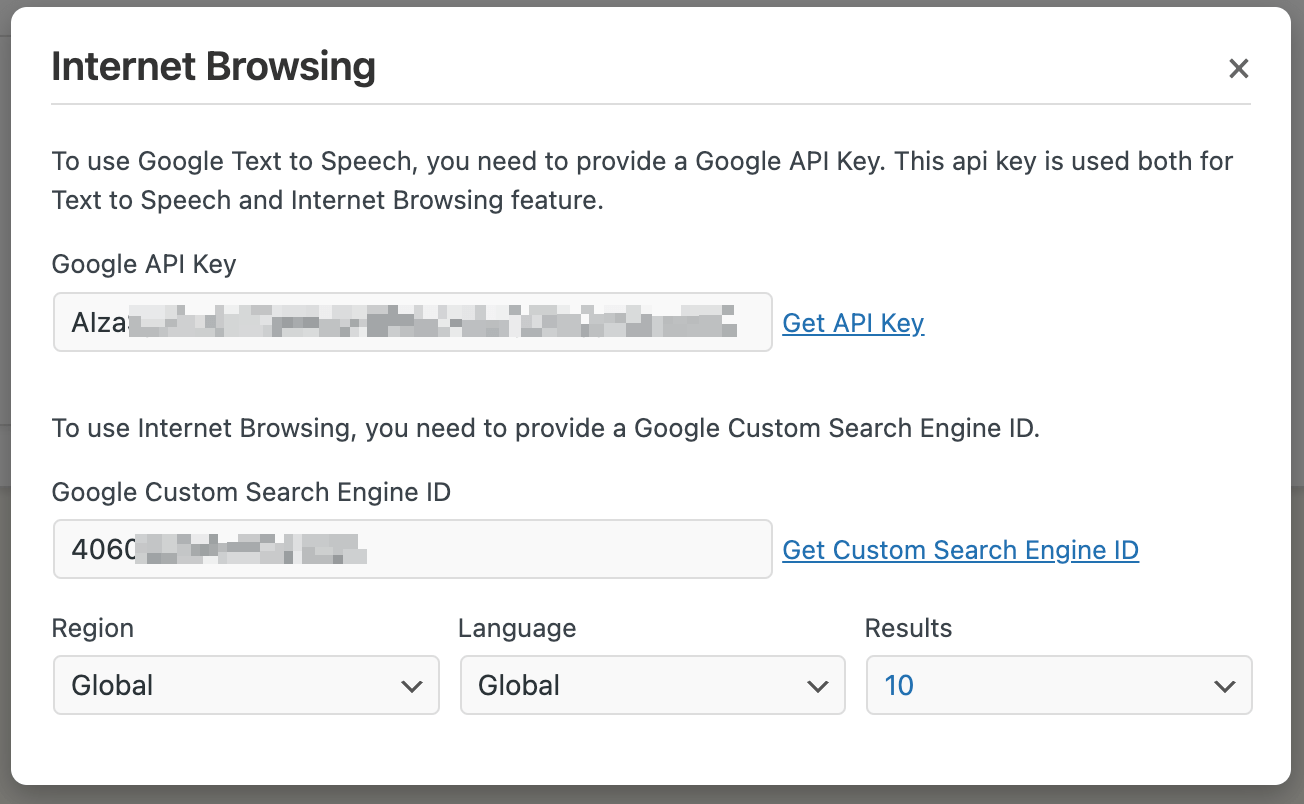
- Enter your Google API Key in the provided field.
- Enter your Google Custom Search Engine ID in the provided field.
- Optionally, configure the Region, Language, and Number of Results.
Here’s how to create your Google API key and Custom Search Engine ID:
Creating Google API Key
If you are already using Google Voices and have an API key, you can use the same key for Internet Browsing. You just need to enable "Custom Search API" in Google Cloud Console.
If you do not have an API key, follow these steps:
- Go to the Google Cloud Console.
- Sign in with your Google account.
- Create a new project or select an existing project.

- Give your project a name and then hit Create.
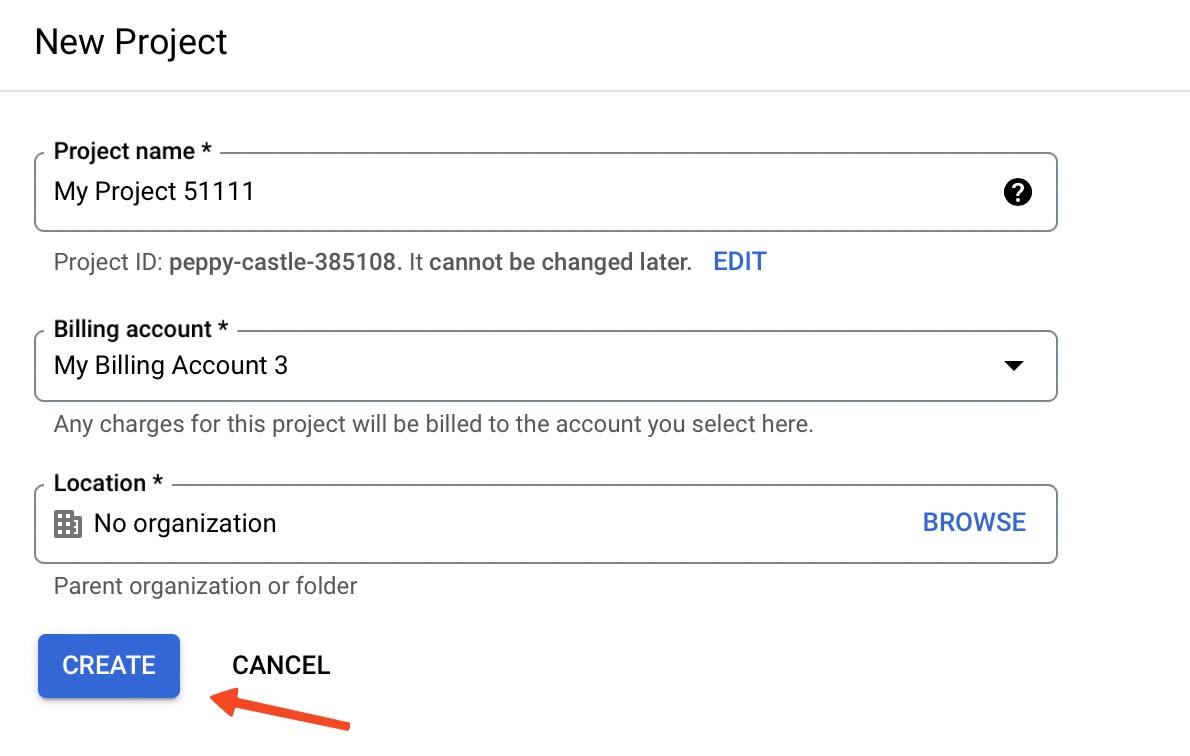
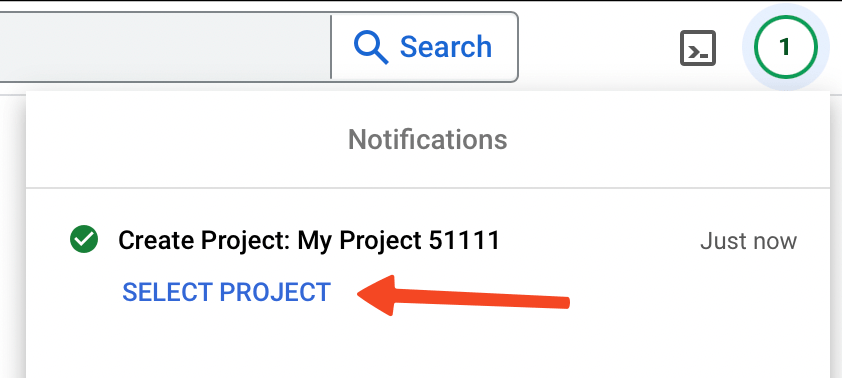
- After it has been created, make sure that you select it.
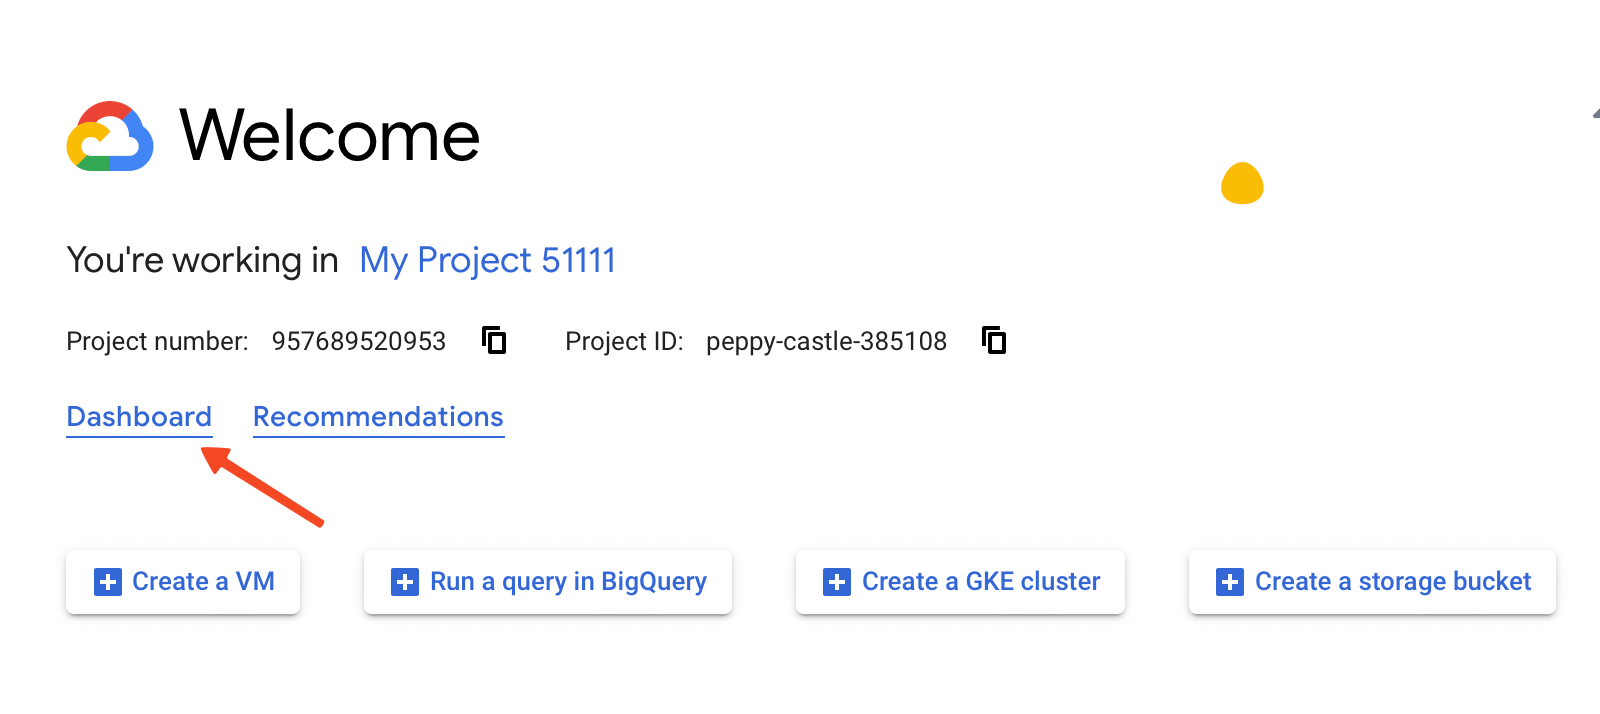
- Click on Dashboard.
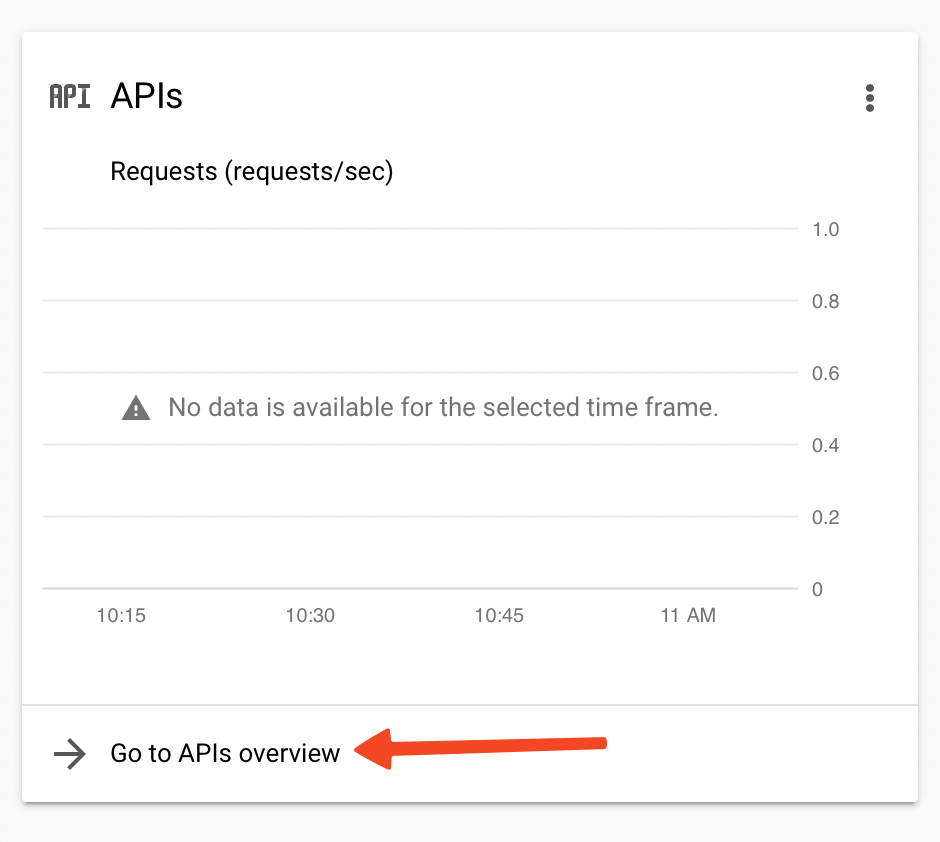
- Click on Go to APIs Overview.
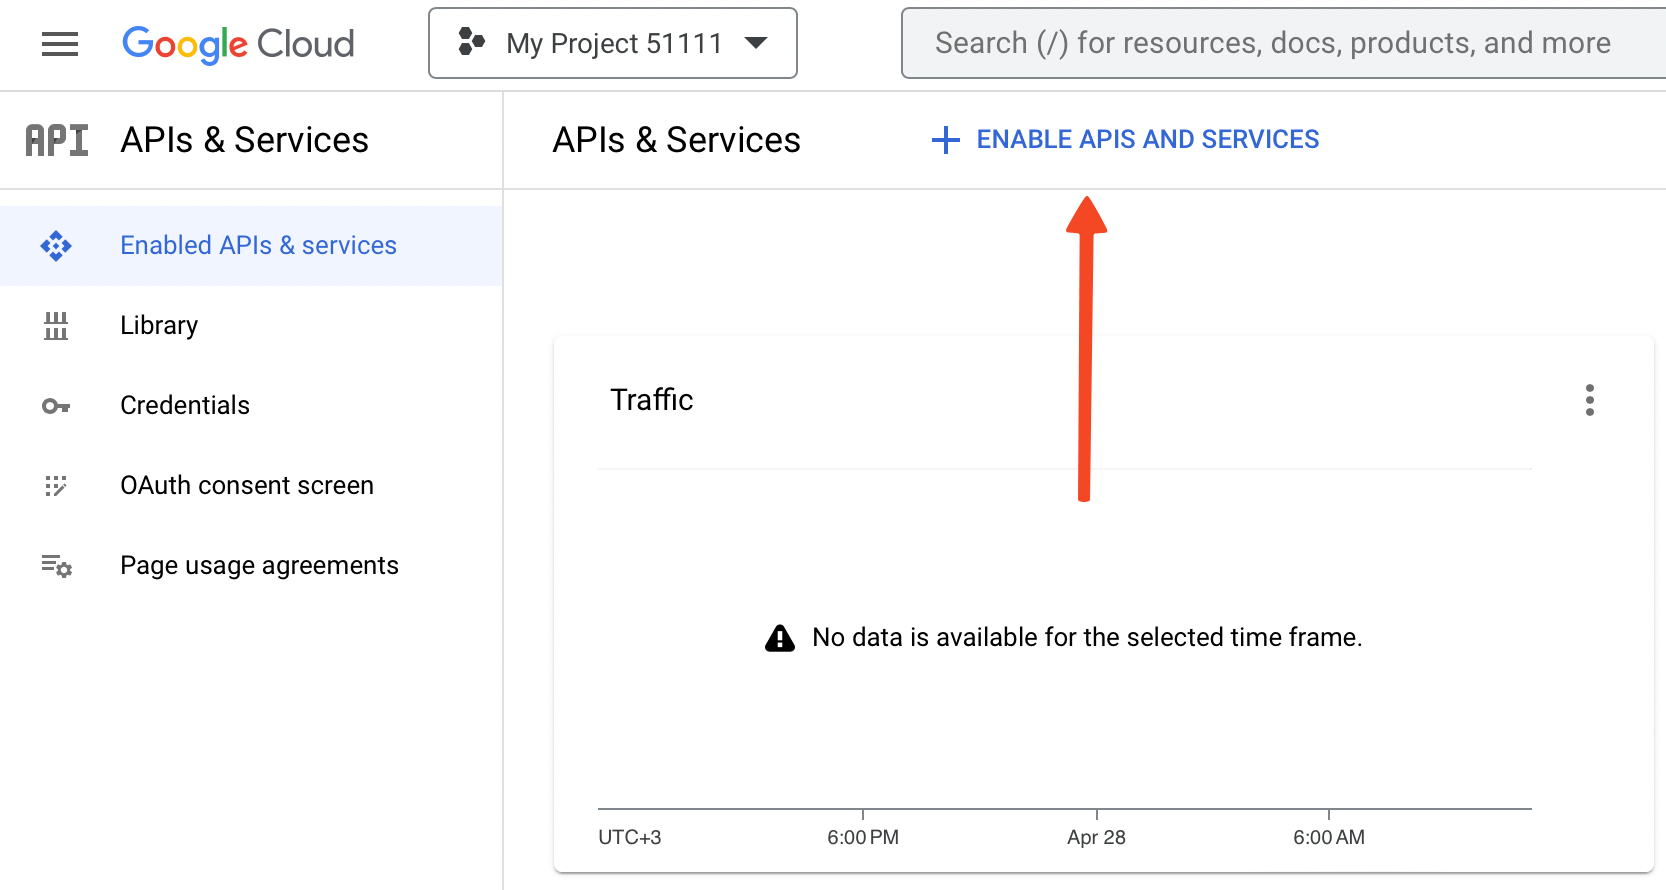
- Click on Enable APIs and Services.
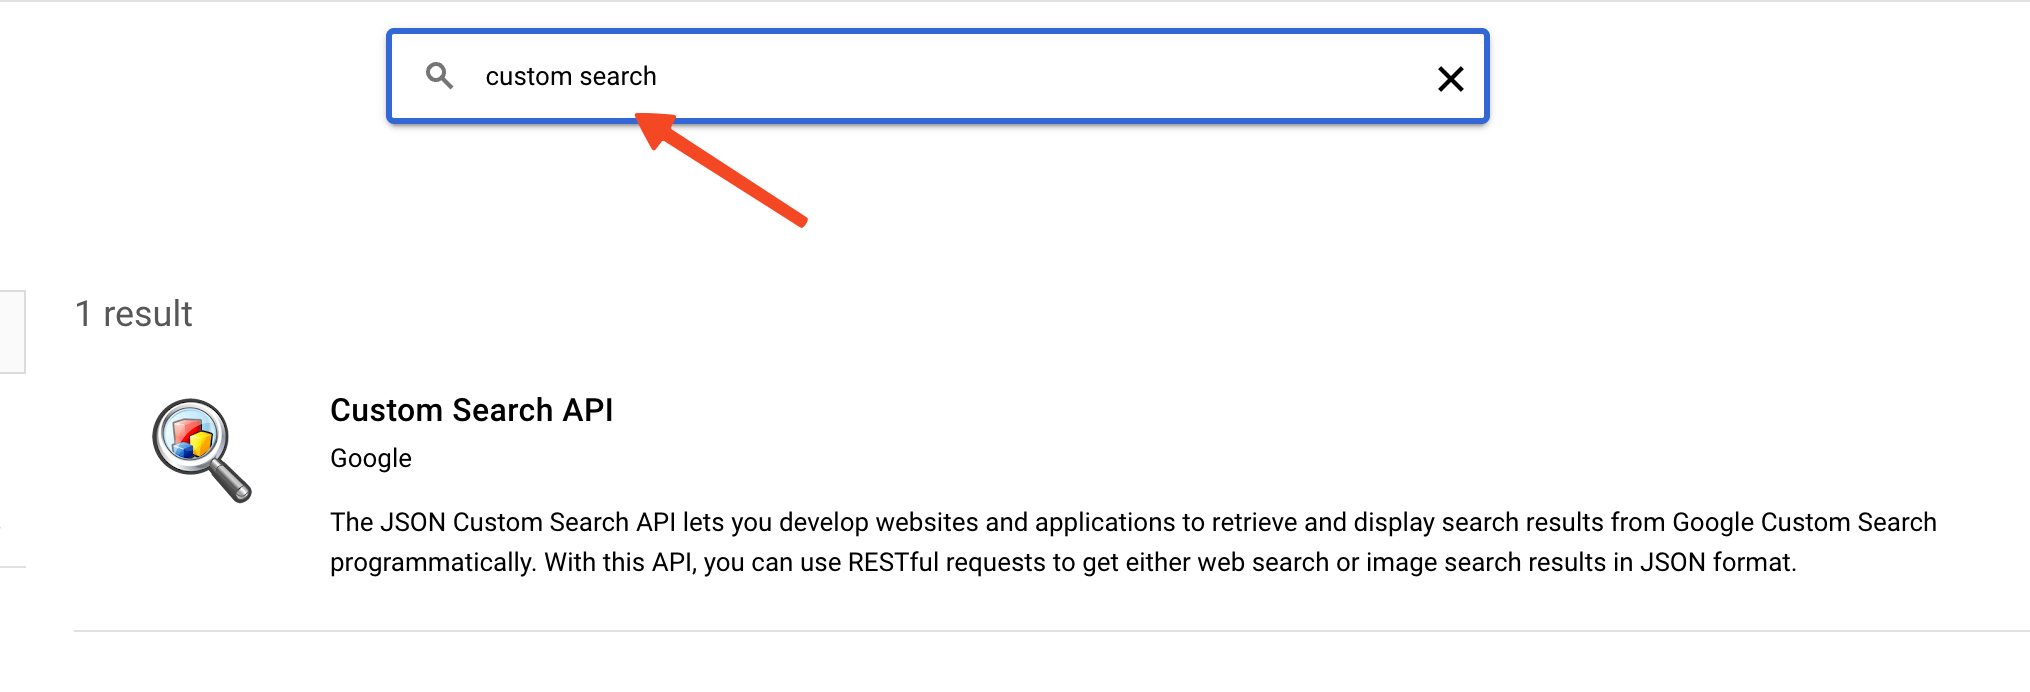
- Search for Custom Search API and select it.
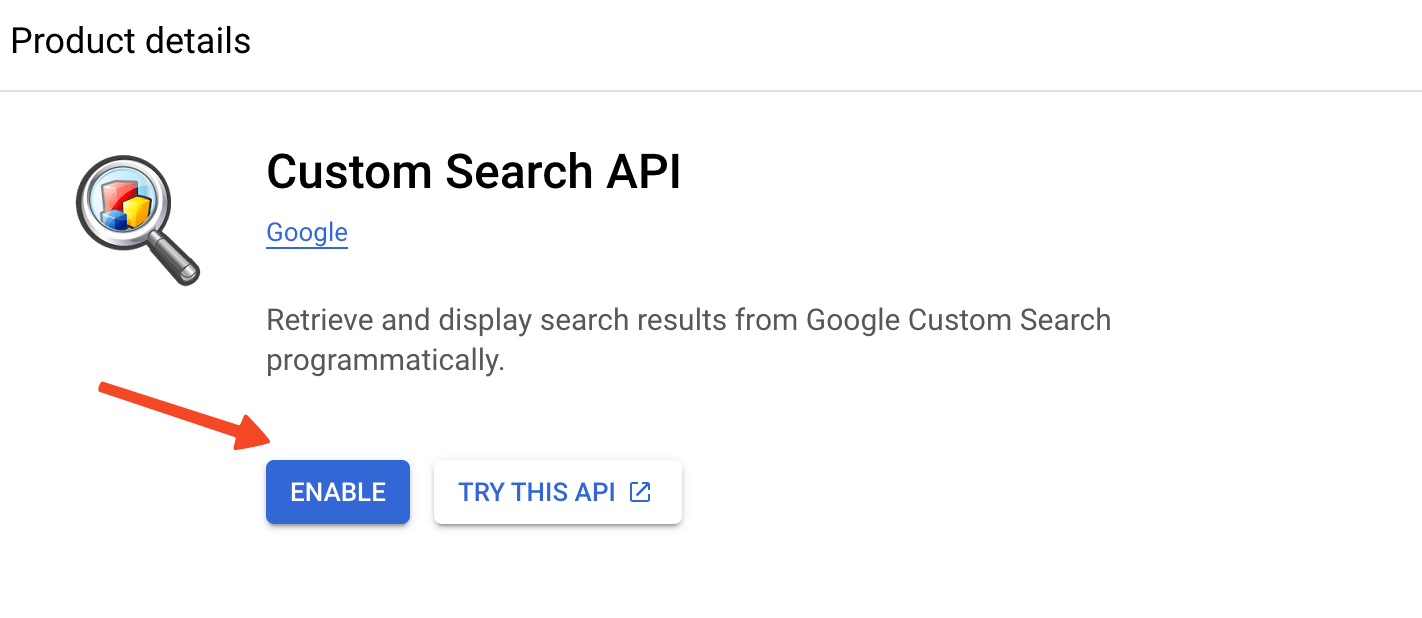
- Click on Enable to enable this API.
- You need to activate your Google Cloud Billing Account to use this feature. You can learn how to create a billing account here.
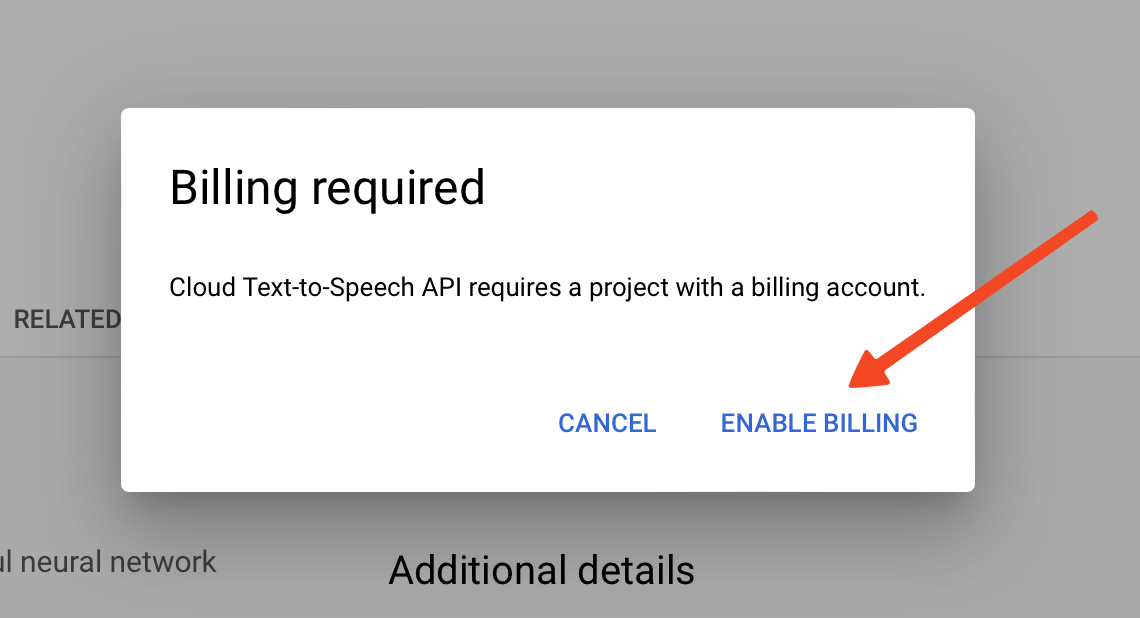
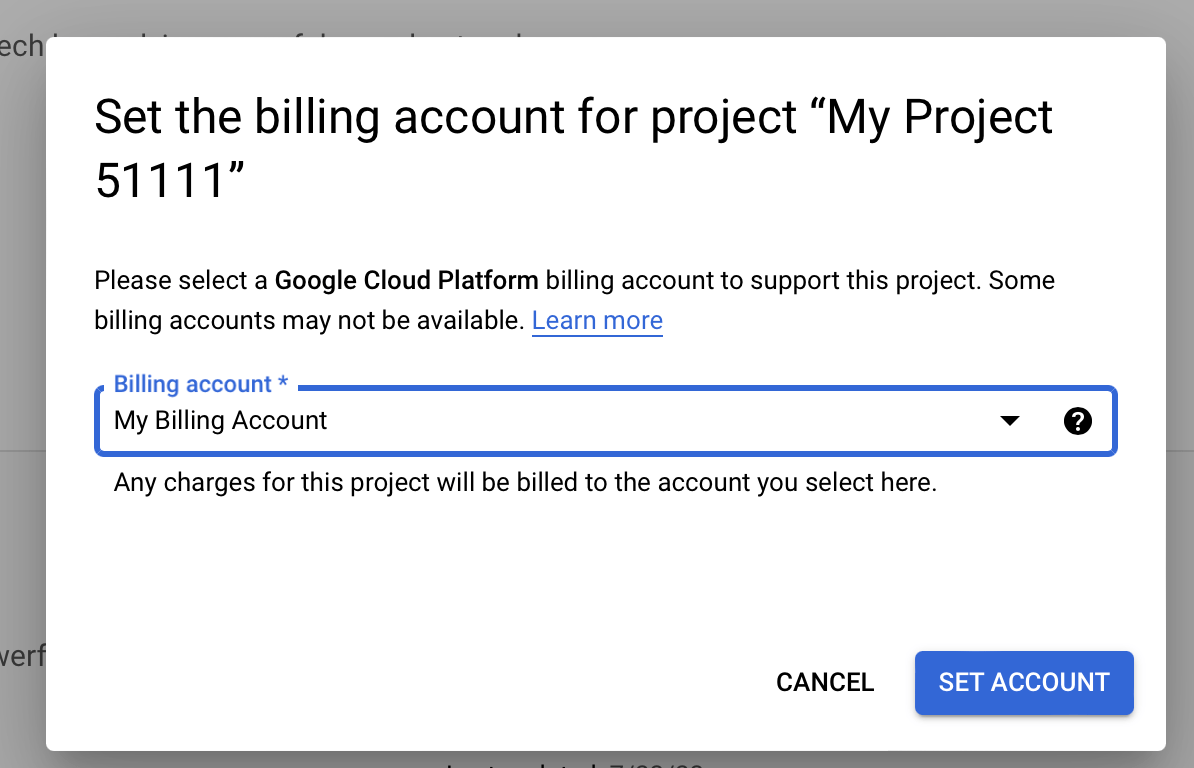
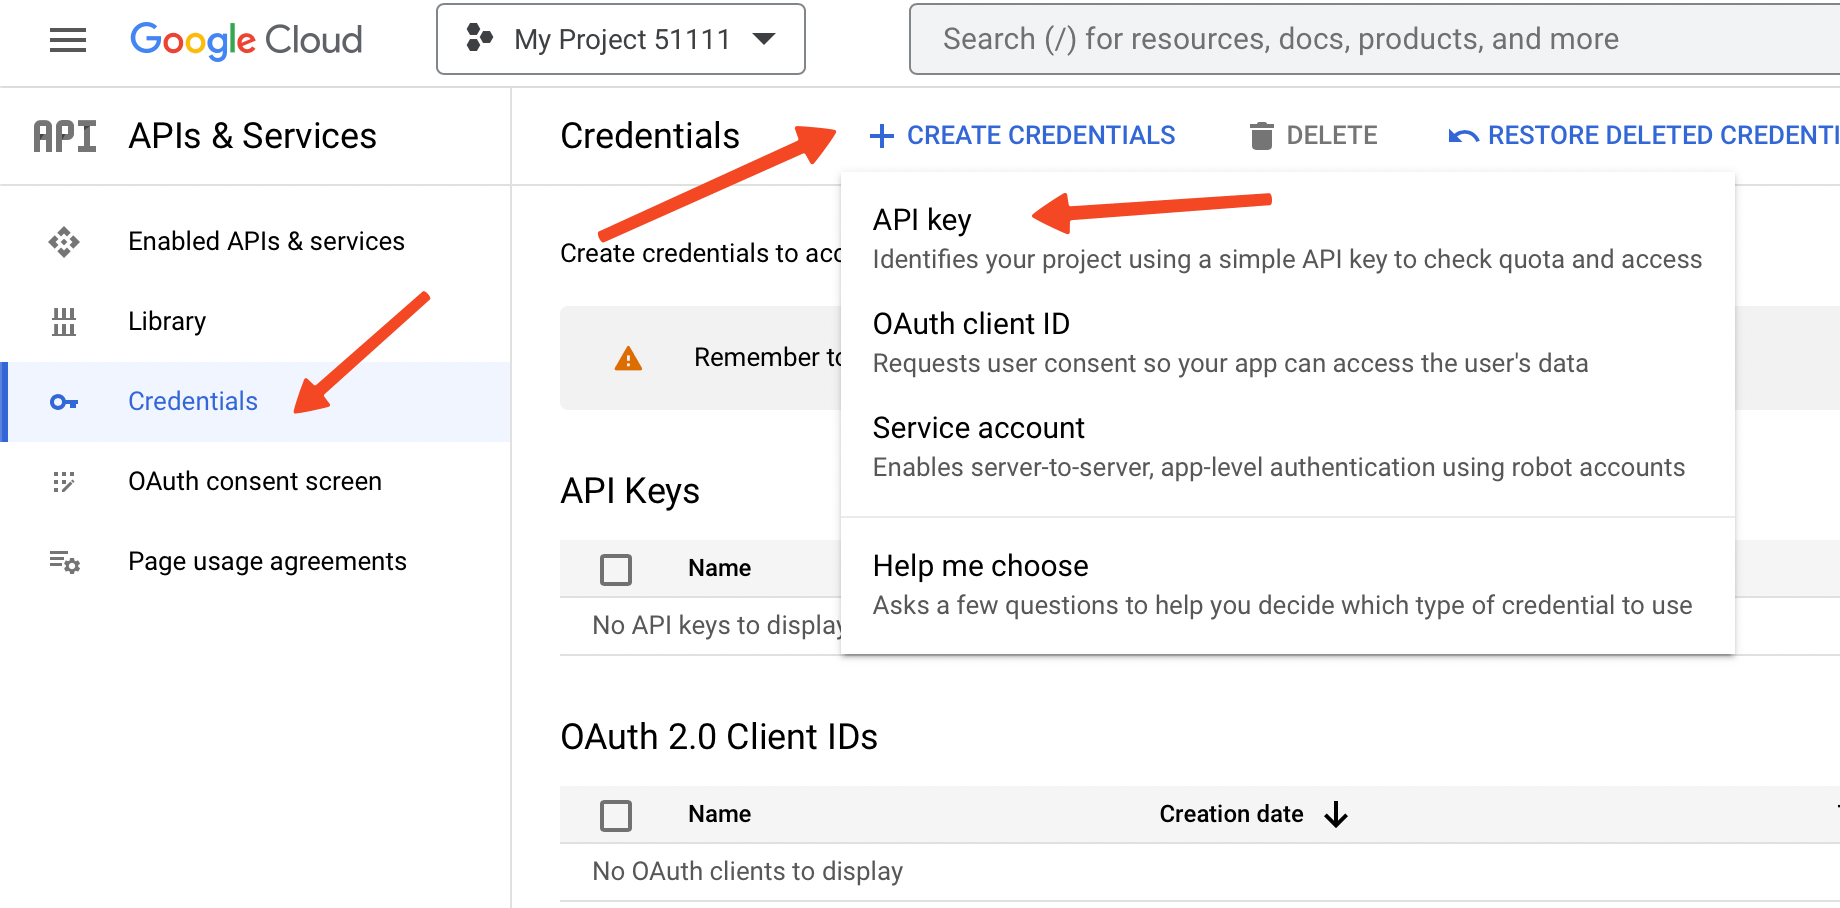
- After setting up your billing account and enabling the API, you’re now ready to create an API key. Navigate to the Credentials page, click on Create Credentials, and then choose API Key.
- After your API key has been generated, click on the Copy button to copy it.
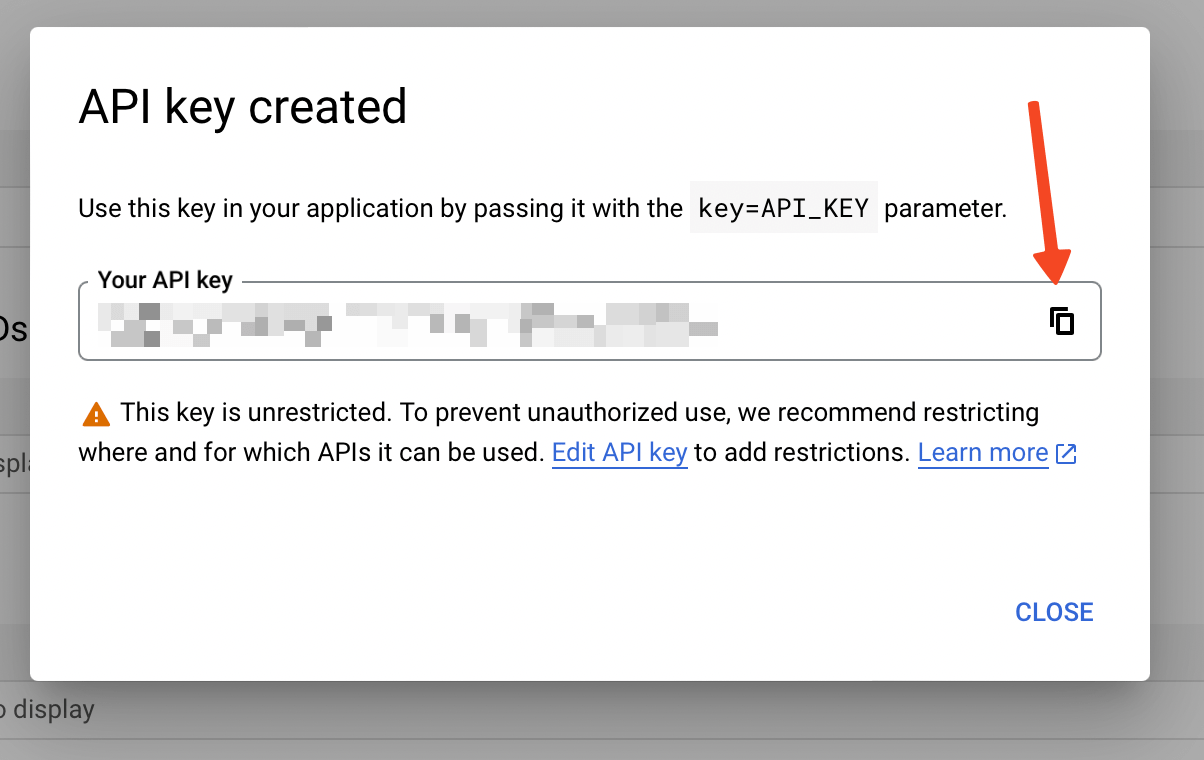
Once you have your API key, open the plugin’s Dashboard - Chatbot page. Go to the Settings tab and enter your API key in the provided field.
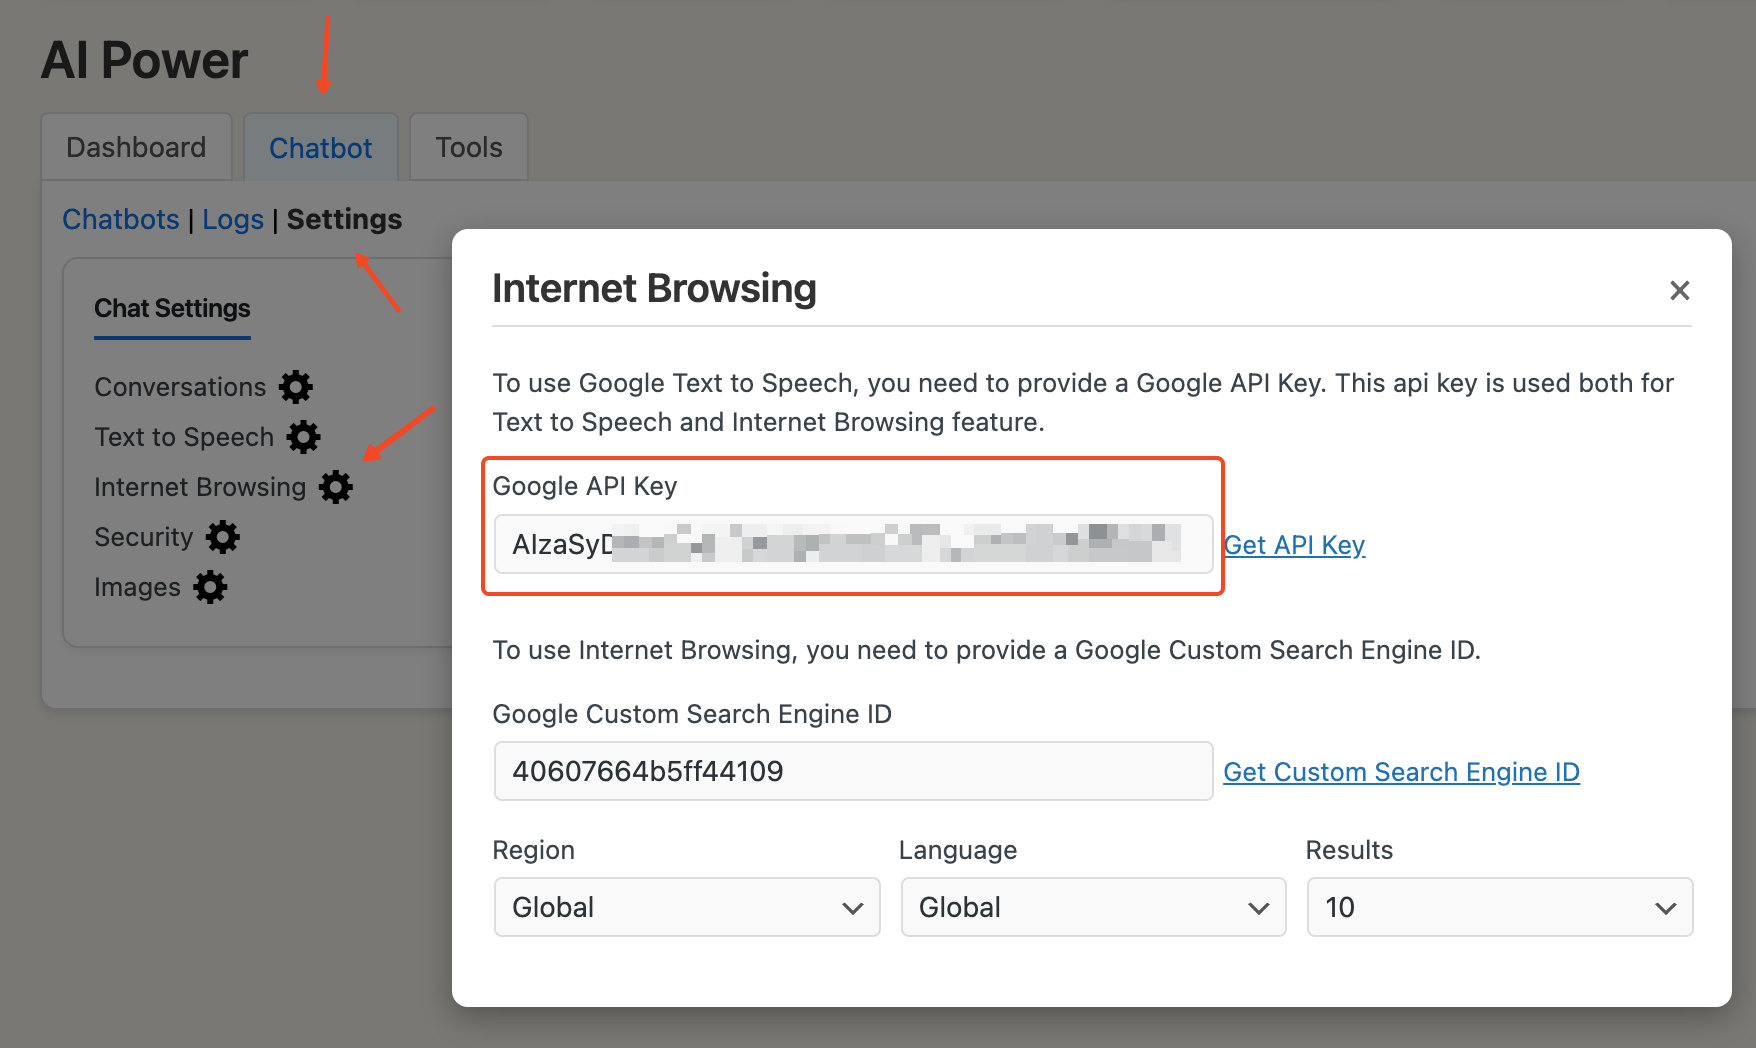
By following these steps, you will create a Google API key that can be used to enable Internet Browsing for your chatbot.
Creating Custom Search Engine
To enable your chatbot to use the internet browsing feature, you need to create a Google Custom Search Engine (CSE) and obtain its ID. Follow these steps:
- Go to the Google Programmable Search Engine page.
- Click on Get started if you don't have a search engine yet, or Add if you want to create a new one.

- Enter the necessary details:
- Name of the search engine: Give your search engine a name.
- What to search?: You can specify certain sites or entire web to search. Select "Search the entire web" if you want to search entire web.
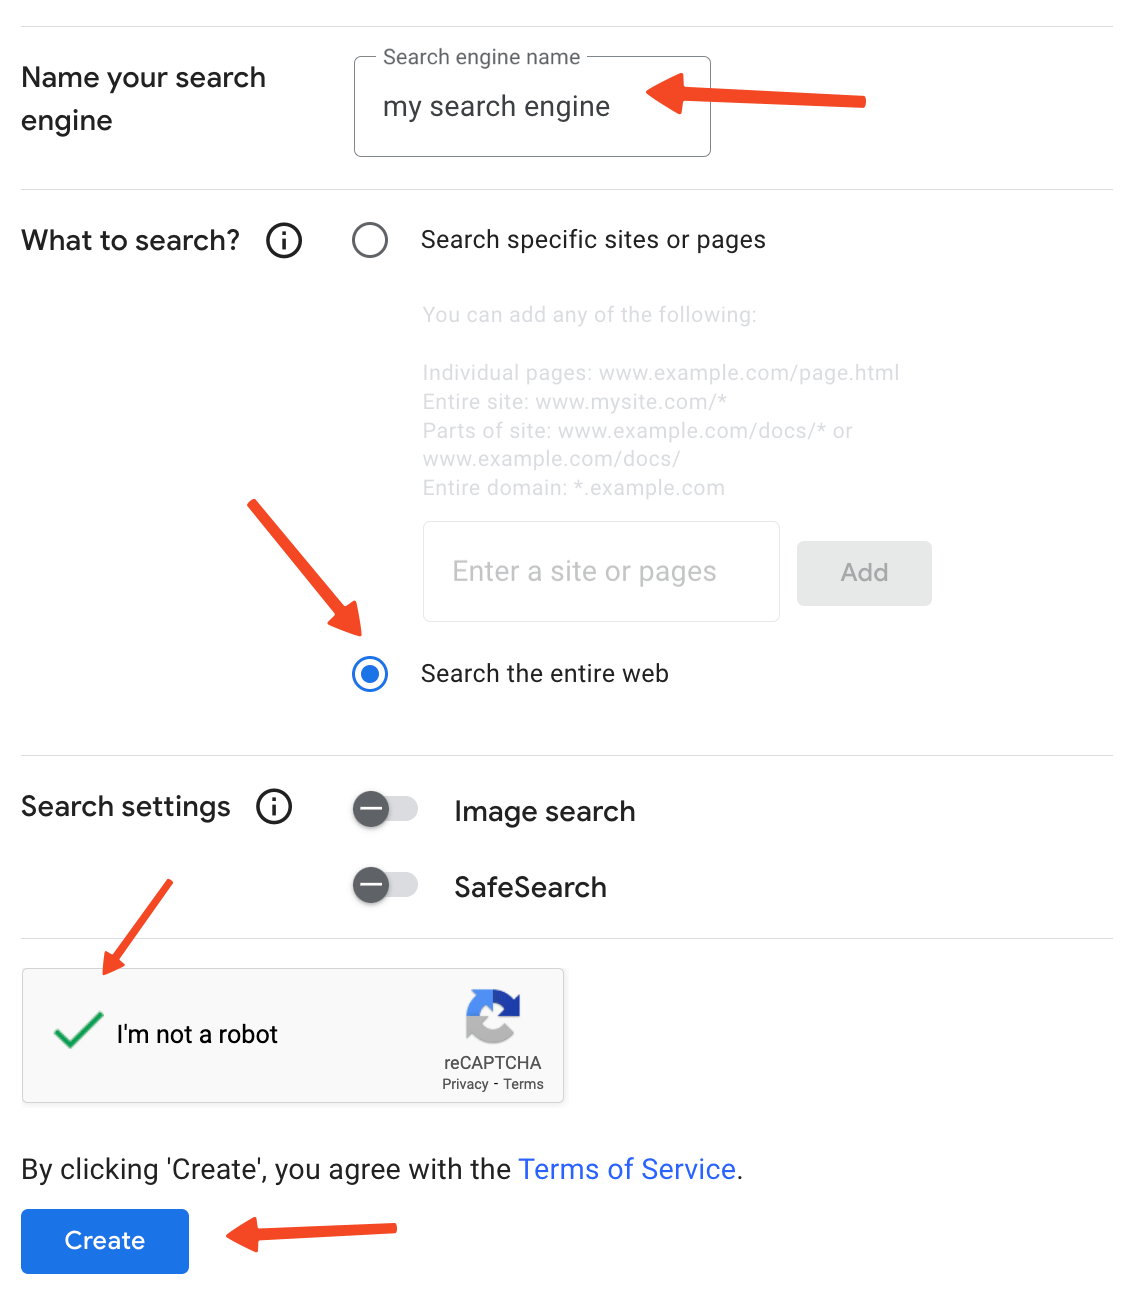
- Click on Create.
- Once created, click on Control Panel to access the settings of your new search engine.
- Under the Basics tab, you will find your Search Engine ID. Copy this ID.
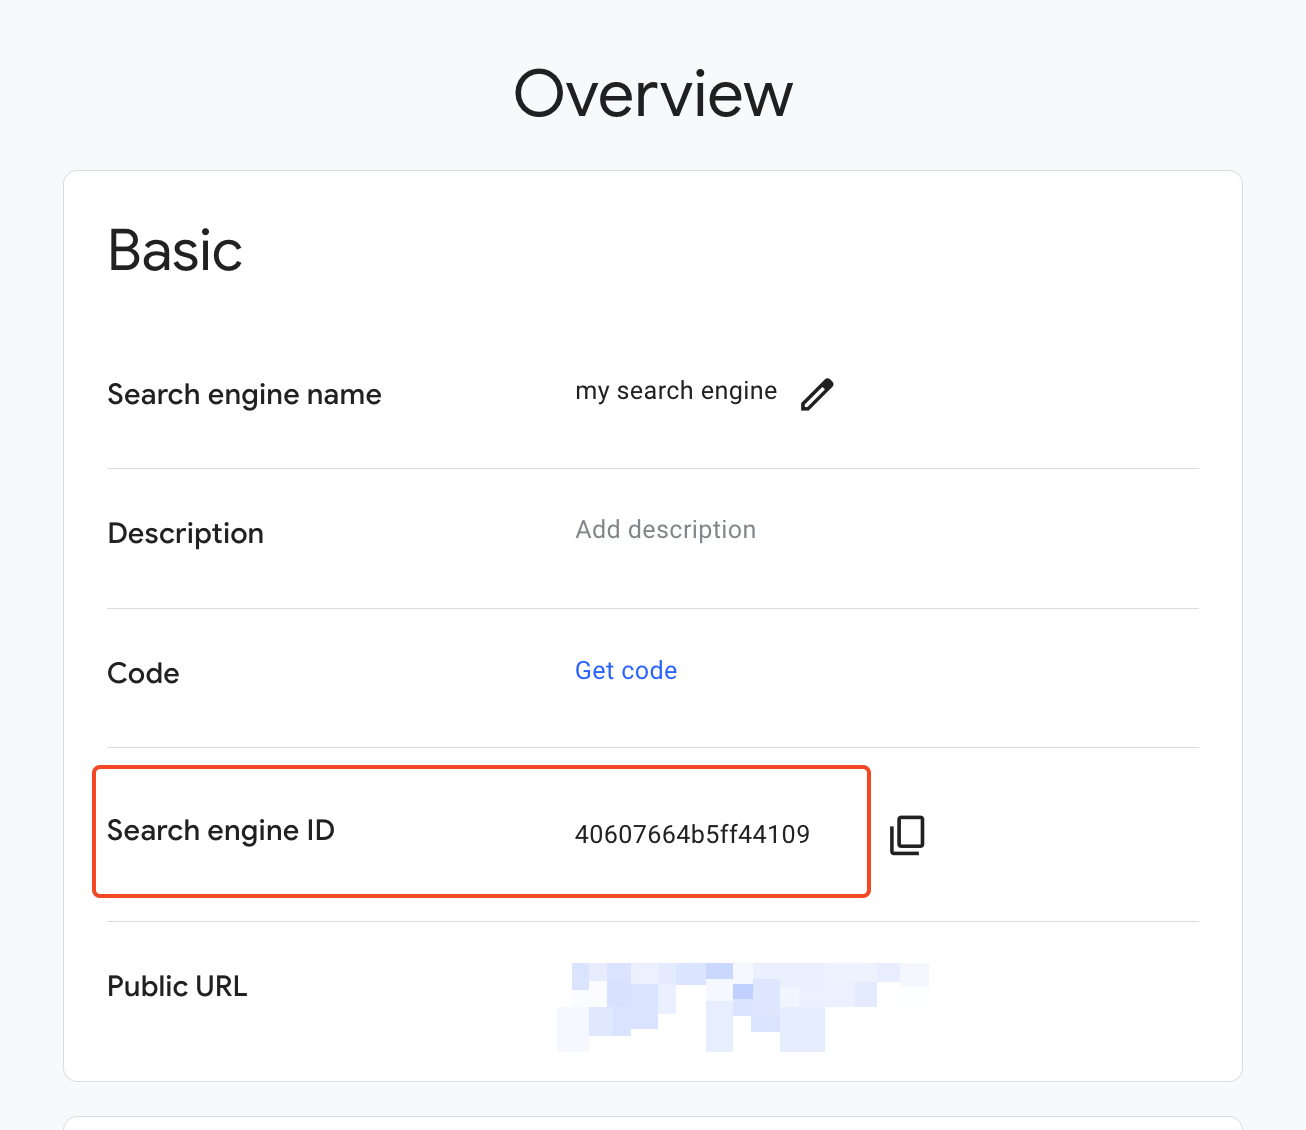
- Enter this Search Engine ID in the Internet Browsing section of the plugin’s settings.
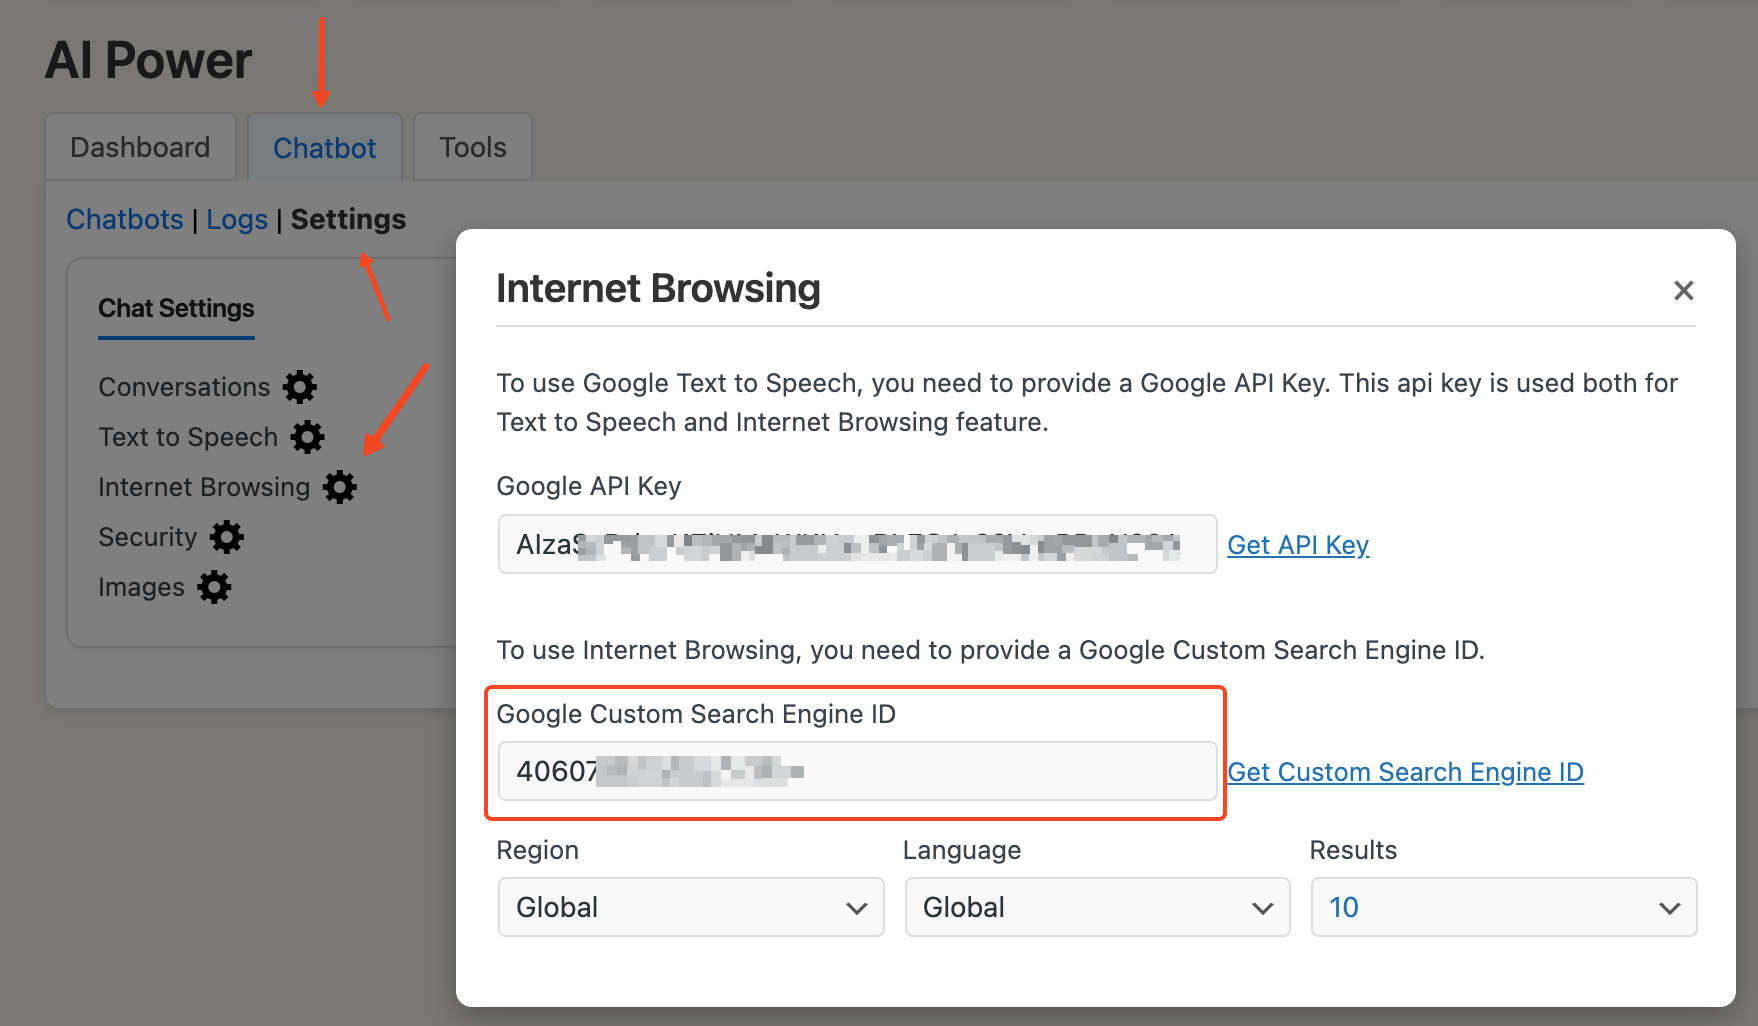
By following these steps, you will have created a custom search engine and obtained the necessary ID to enable internet browsing for your chatbot.
Limitations
- Beta Feature: The internet browsing feature is still in beta. We are continually learning and improving its functionality.
- Query Optimization: Currently, the plugin sends user queries directly to Google without optimization. For example, if a user asks, "What is the bitcoin price now?" the exact query is sent to Google. However, if the user follows up with "What about Ethereum?" the plugin sends this follow-up query directly, which may not yield relevant results. We plan to improve this by adding query optimization using AI models to provide more relevant content.
- Pricing: Google Custom Search API offers 100 free queries per day. Beyond this limit, Google charges $5 per 1000 additional queries, up to 10k queries per day. If you need more queries, you will need to sign up for billing in the Google API Console. Google charges $5 per 1000 additional queries, up to 10k queries per day.
Feedback Collection
This feature allows you to gather user feedback when they interact with the chatbot.
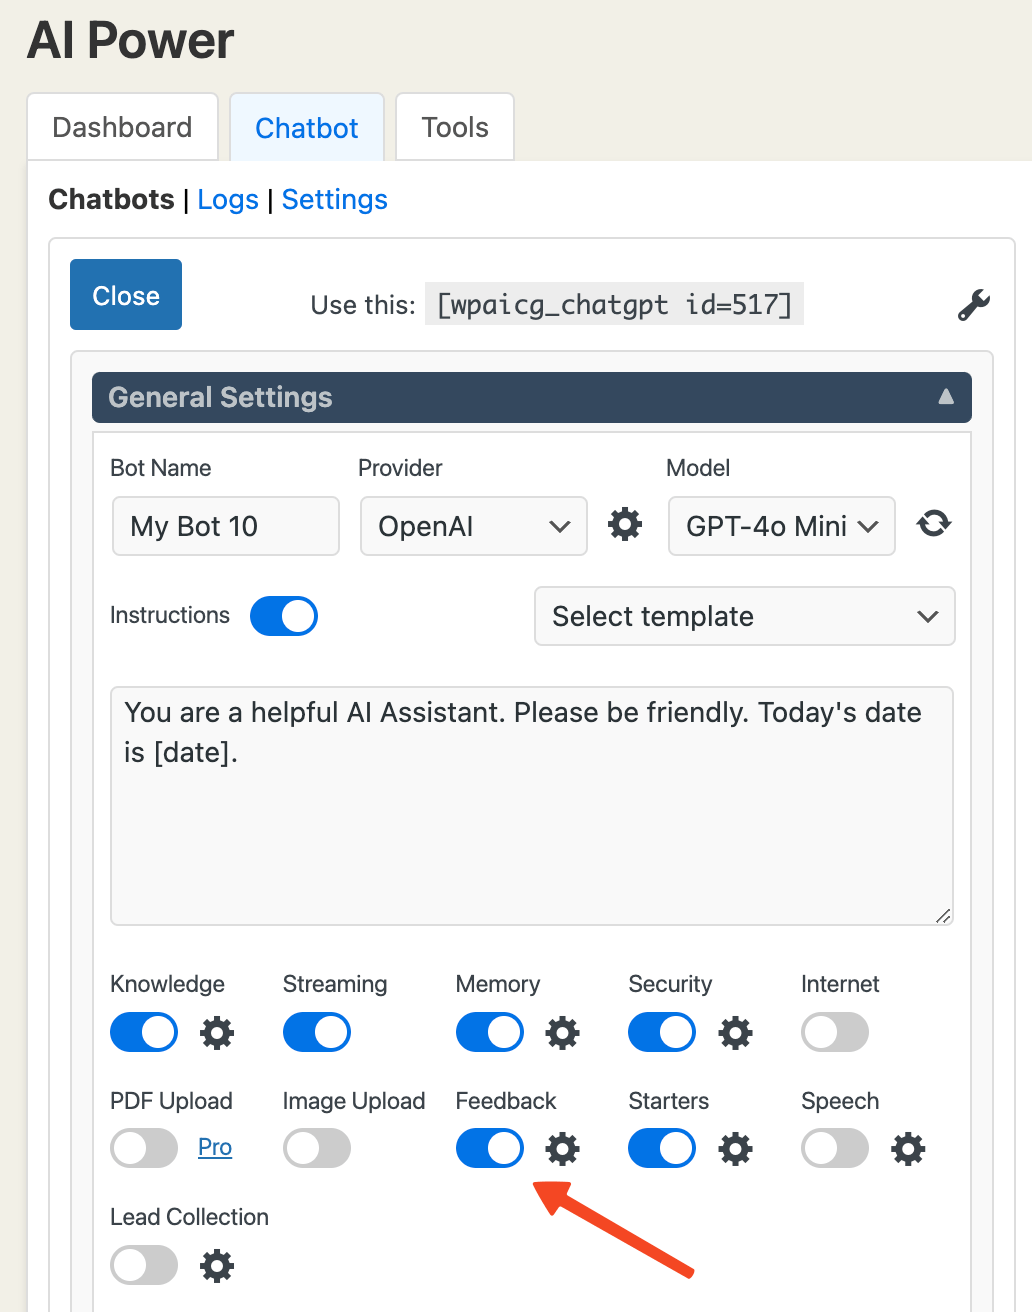
You can enable feedback collection option in the Dashboard - Chatbot under General Settings.
Turn on the Feedback switch.
Next to the switch, there is a gear icon. Clicking it opens the feedback collection settings window, where you can configure the following options:
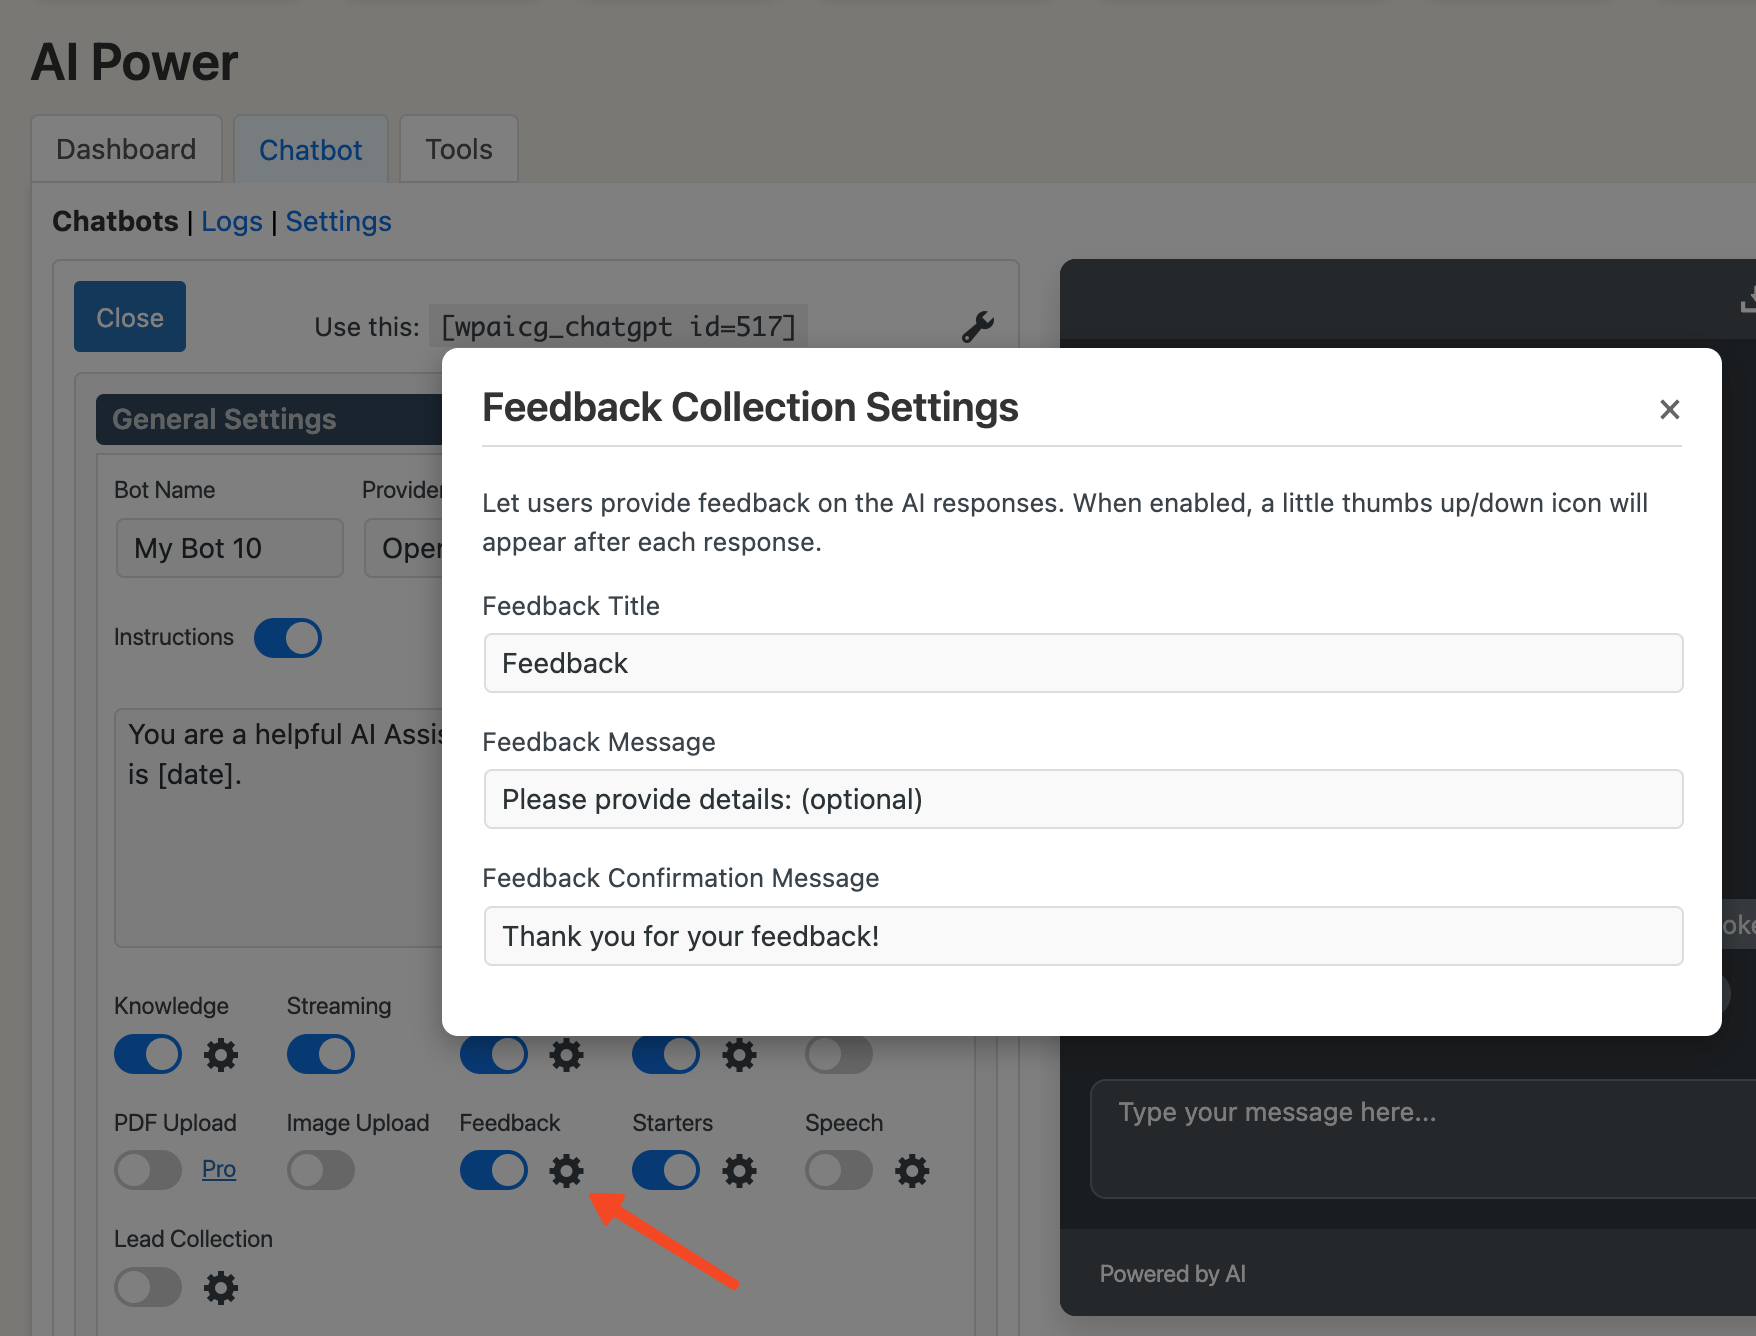
Here, you can customize or translate the feedback text:
- Feedback Title: Default is "Feedback."
- Feedback Message: Default is "Please provide details: (optional)."
- Feedback Success Message: Default is "Thank you for your feedback!"
When feedback collection is enabled, logging is automatically activated. This means the system will save logs of conversations to store the feedback provided by users.
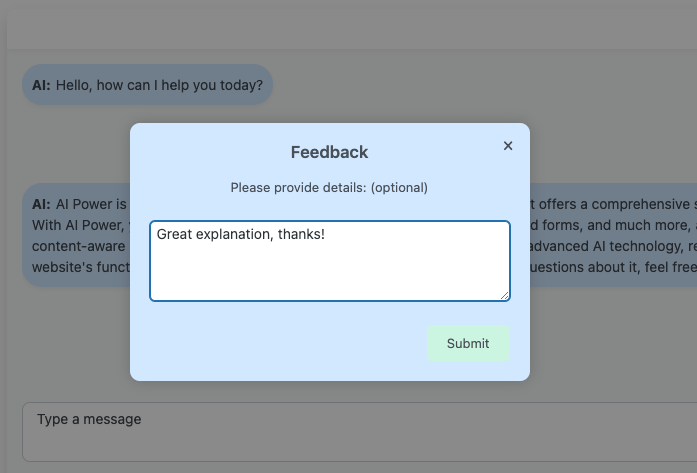
When feedback collection is enabled, thumbs up and thumbs down icons appear under each AI response. Users can click them to give feedback. The feedback window matches the chat window's style for a consistent look.
You can view user feedback from the Dashboard - Chatbot page under the Logs tab.
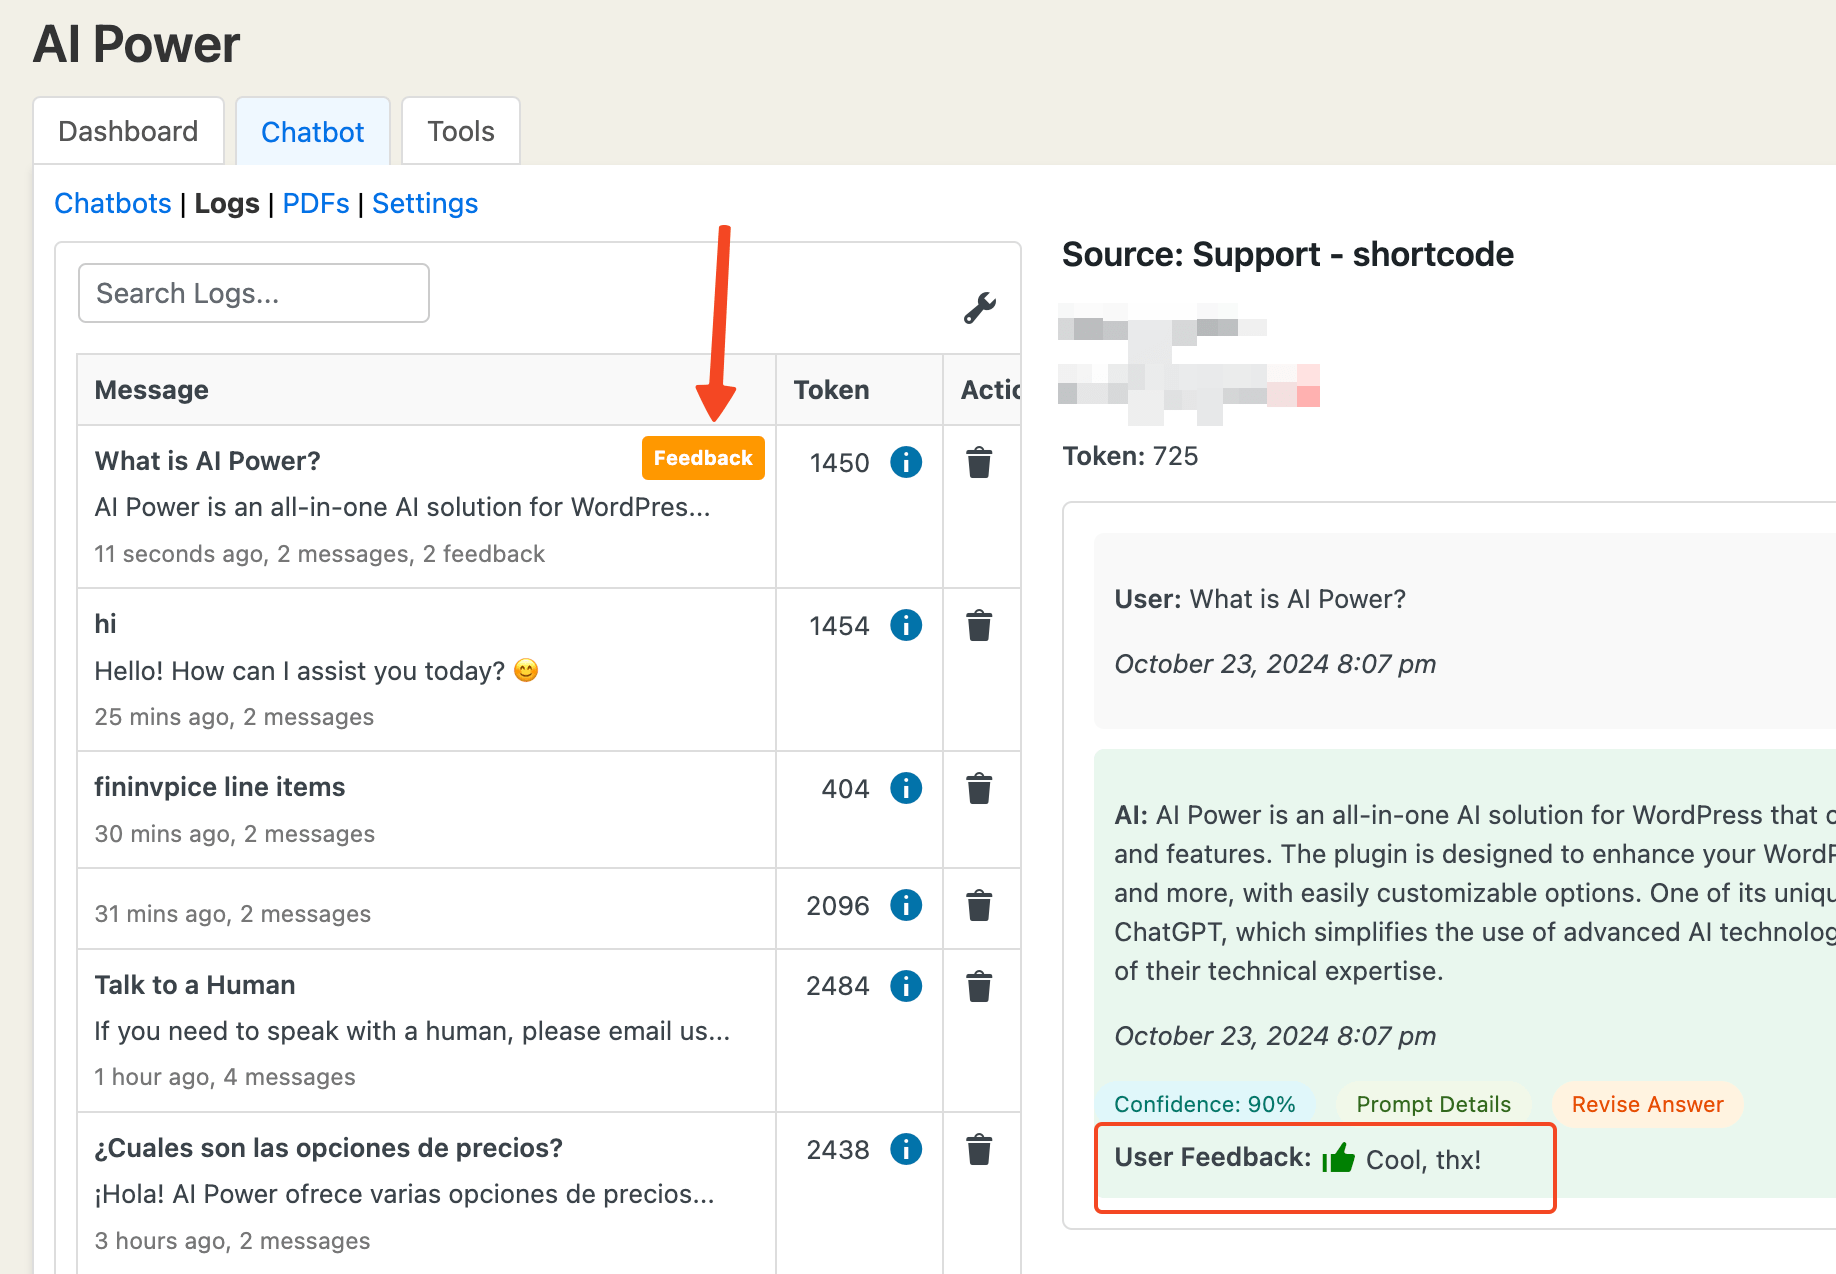
Image Upload
This feature allows users to upload images directly into the chat for analysis by supported models like GPT-4o and GPT-4o Vision.
You can view demo here: https://aipower.org/gpt-4o-chat-bot-demo-image-interpreter/
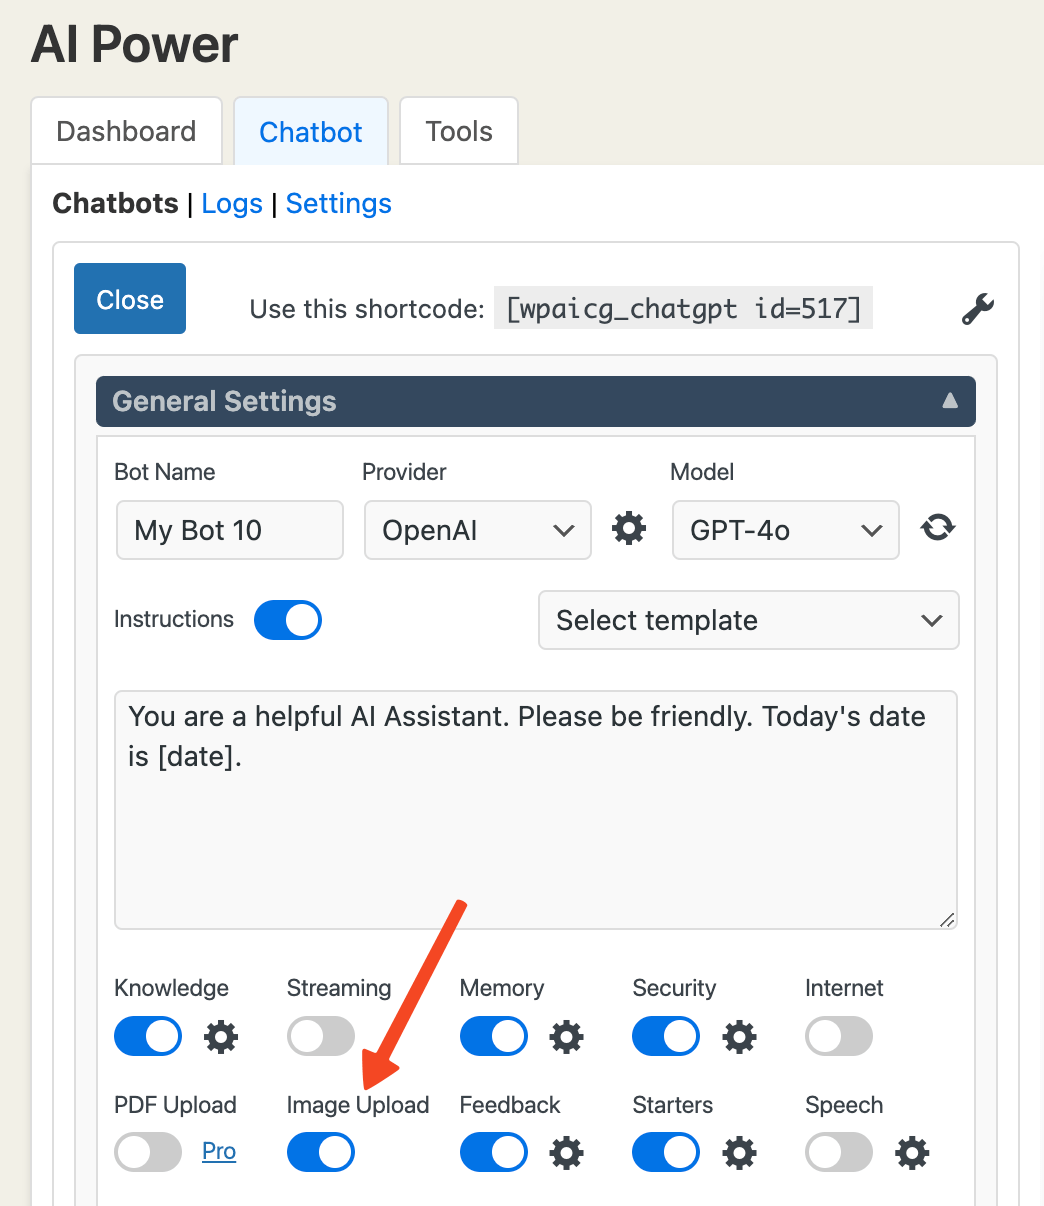
You can enable or disable this feature from the Dashboard - Chatbot under General Settings. Simply toggle the Image Upload switch.
When enabled, an image upload icon will appear next to the send button, allowing users to upload images for analysis.
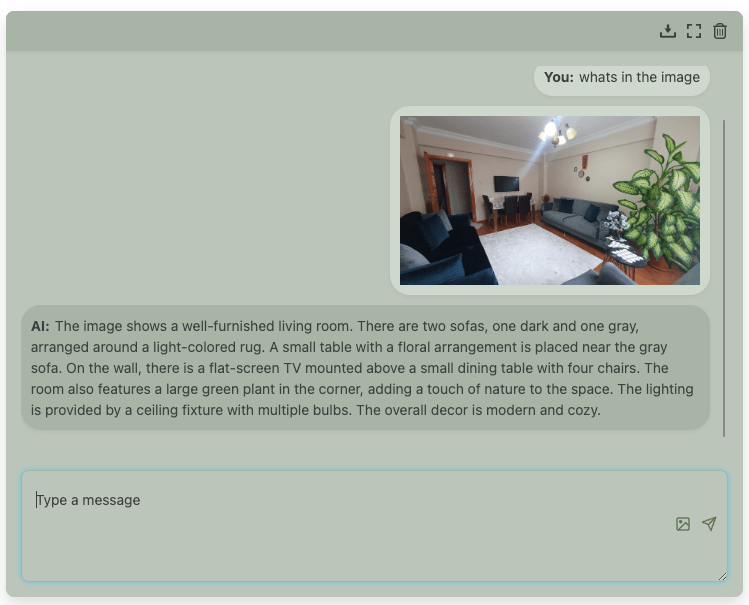
Image Upload and streaming cannot work concurrently. This function only works in non-streaming mode.
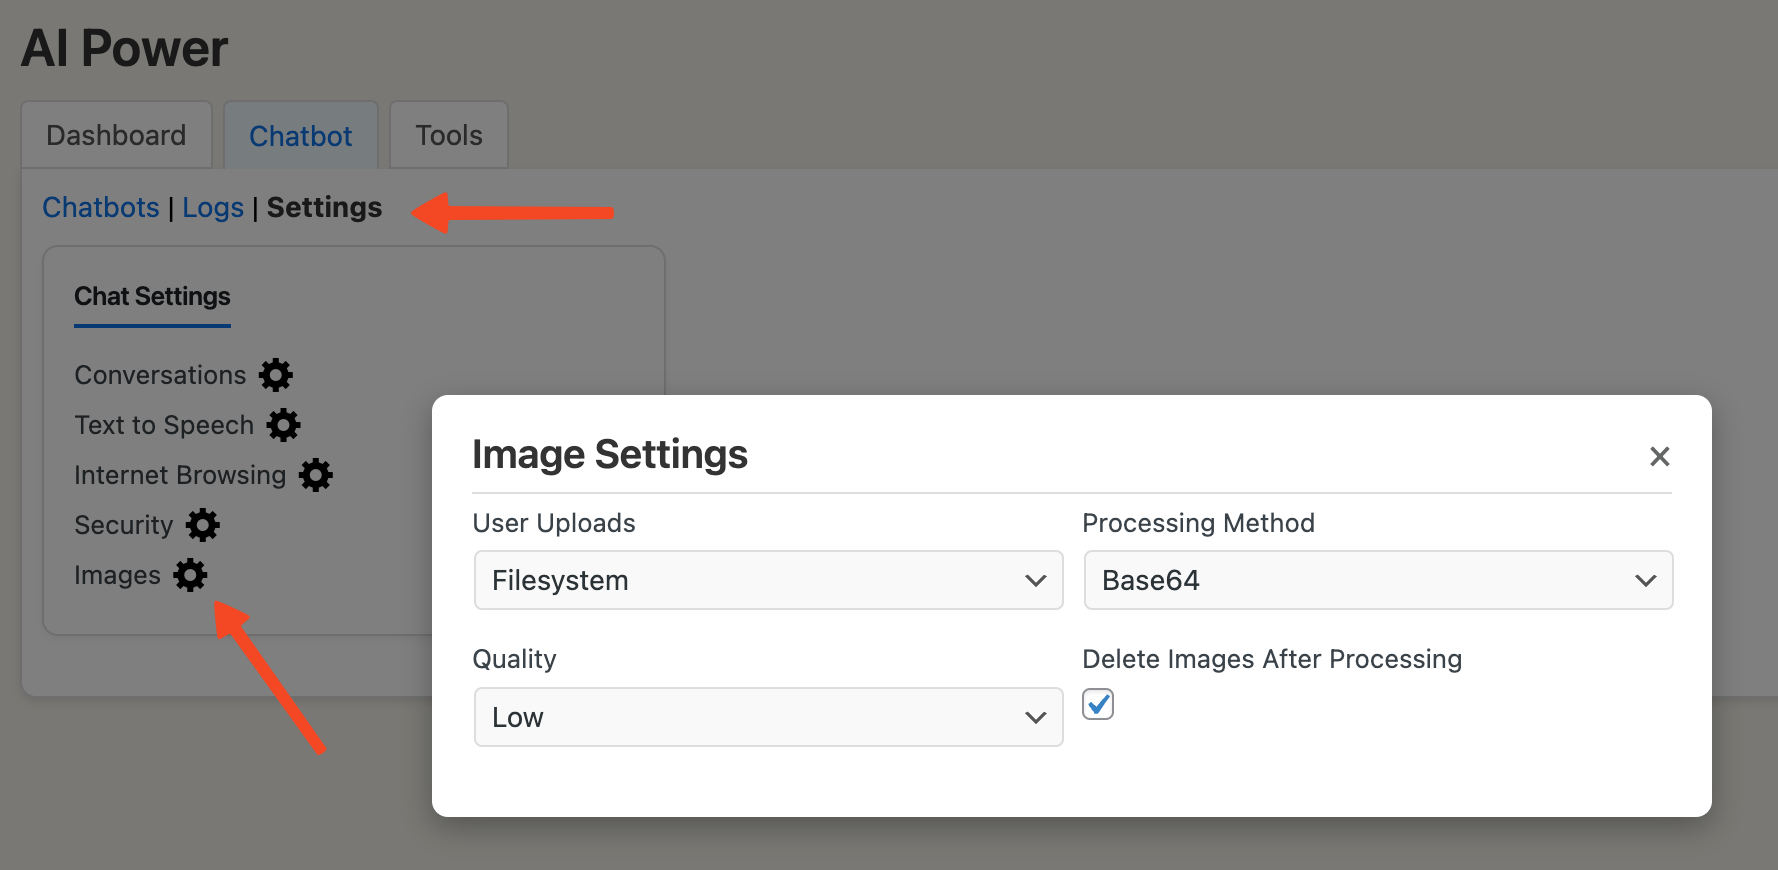
To configure how images are processed and stored, go to the Dashboard - Chatbot tab and click the gear icon next to Images in the Settings tab.
You can choose;
- where to store images (WordPress upload folder or media library),
- set the image processing method (URL or Base64),
- adjust image quality (Auto, Low, or High),
- and enable automatic deletion of images after processing. For automatic deletion, the image processing method must be set to Base64.
Voice Chat
Our plugin has voice integration with both Speech to Text and Text to Speech features.
Speech to Text
Using Whisper from OpenAI, users can speak directly to the chatbot.
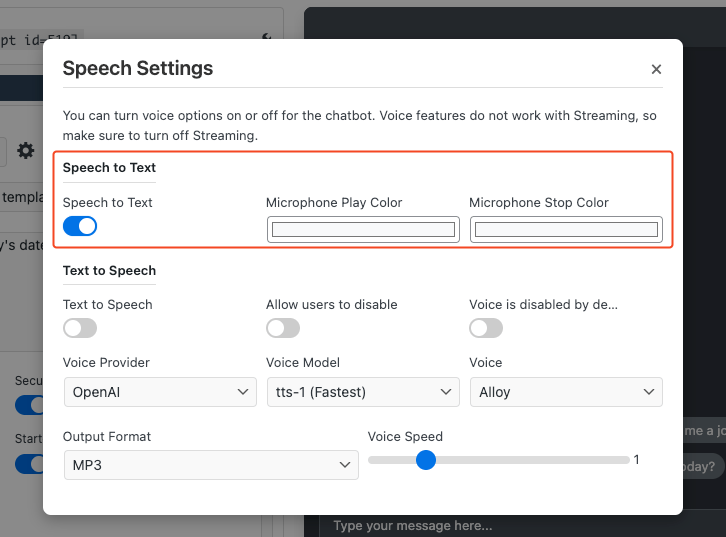
When enabled, a microphone icon appears, allowing users to talk, and the chatbot converts speech to text. You can customize the microphone and stop button colors.
You can view a live demo here.
To enable Speech to Text; go to the Dashboard - Chatbot page. In the General Settings tab, find the Speech switch (it’s off by default).
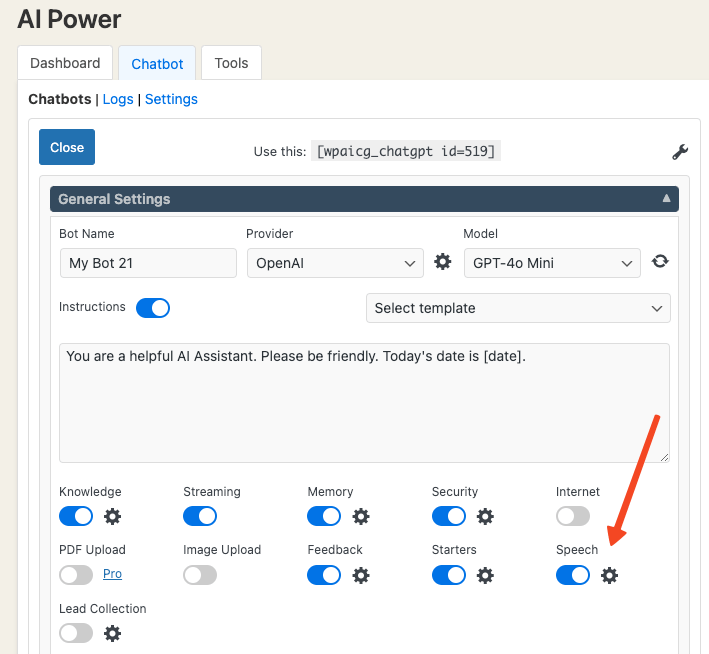
Turn it on by clicking the switch.
Next to the Speech switch, there's a gear icon. Click it to open the speech settings, where you can customize the microphone icon colors.
Text to Speech
Our plugin supports Text-to-Speech (TTS) from OpenAI, Google, and ElevenLabs.
OpenAI
OpenAI provides two Text-to-Speech models:
- tts-1: Optimized for real-time use.
- tts-1-hd: Optimized for higher quality.
You can choose from six voices (alloy, echo, fable, onyx, nova, shimmer) and select audio formats like MP3, OPUS, AAC, or FLAC.
You can also control the speed of the voice, ranging from 0.25 to 4.0, with 1.0 being the default.
To enable Text to Speech for OpenAI: go to the Dashboard - Chatbot page.
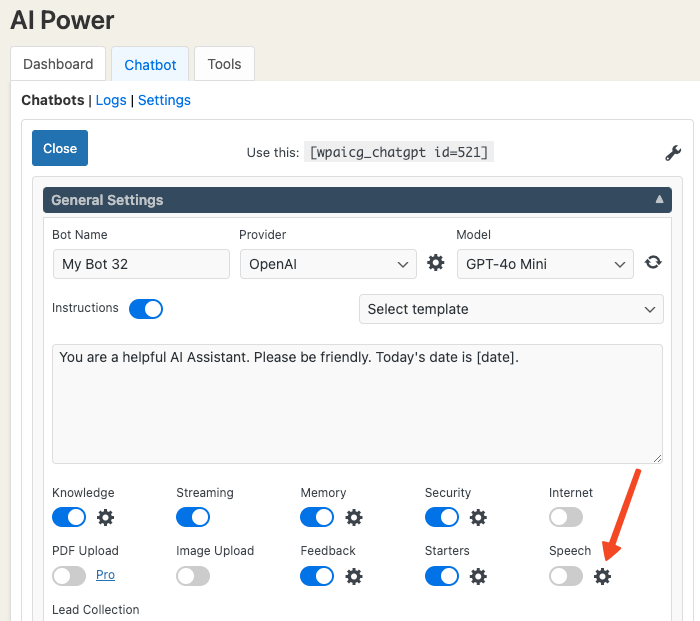
In the General Settings tab, click the gear icon next to the Speech switch to open settings. Select OpenAI as the provider, and configure the voice model, voice, format, and speed.
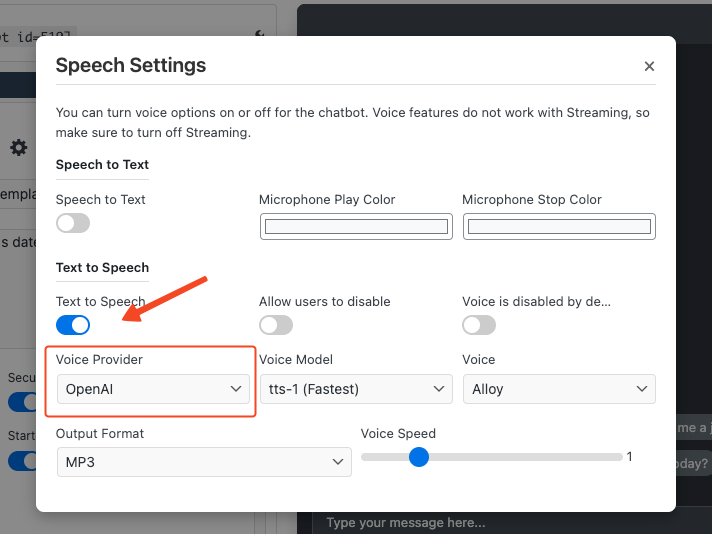
Additionally, there are two options:
- Allow users to disable voice: Adds a button for users to enable/disable voice.
- Voice disabled by default: The voice is muted until the user enables it.
Google
Google Text-to-Speech API is a service that allows you to convert text into natural-sounding speech.
You can view demo here: https://aipower.org/gpt-4o-chat-bot-demo-text-to-speech/
Google provides new customers with $300 in free credits to spend on their Text-to-Speech service. However, please be aware that costs will apply beyond these initial credits. For a detailed breakdown of costs, please refer to Google’s official pricing page. In terms of limitations, voice customization and language options might vary depending on your region and the specific features of the Google Text-to-Speech service.
Here's how you can enable and customize the Google integration:
- Navigate to the Google Cloud Console.
- Create a new project or you can use one of your existing project.

- Give your project a name and then hit Create button.

- After it has been created, make sure that you select it.

- Click on Dashboard link.

- Click on Go to APIs Overview.

- Click on Enable APIs and Services button.

- Search for Text to Speech and select the first option that appears, labelled Cloud Text-to-Speech API.

- Click on Enable to enable this API.

- Please note that you need to activate your Google Cloud Billing Account in order to use this feature. You can learn how to create a billing account here.


- After successfully setting up your billing account and enabling the API, you’re now ready to create an API key. To accomplish this, navigate to the Credentials page, click on Create Credentials, and then choose API Key.

- After your API key has been generated, click on the Copy button to copy it.

Once you have your API key, open the plugin’s Dashboard - Chatbot page. Go to the Settings tab and enter your API key in the provided field.
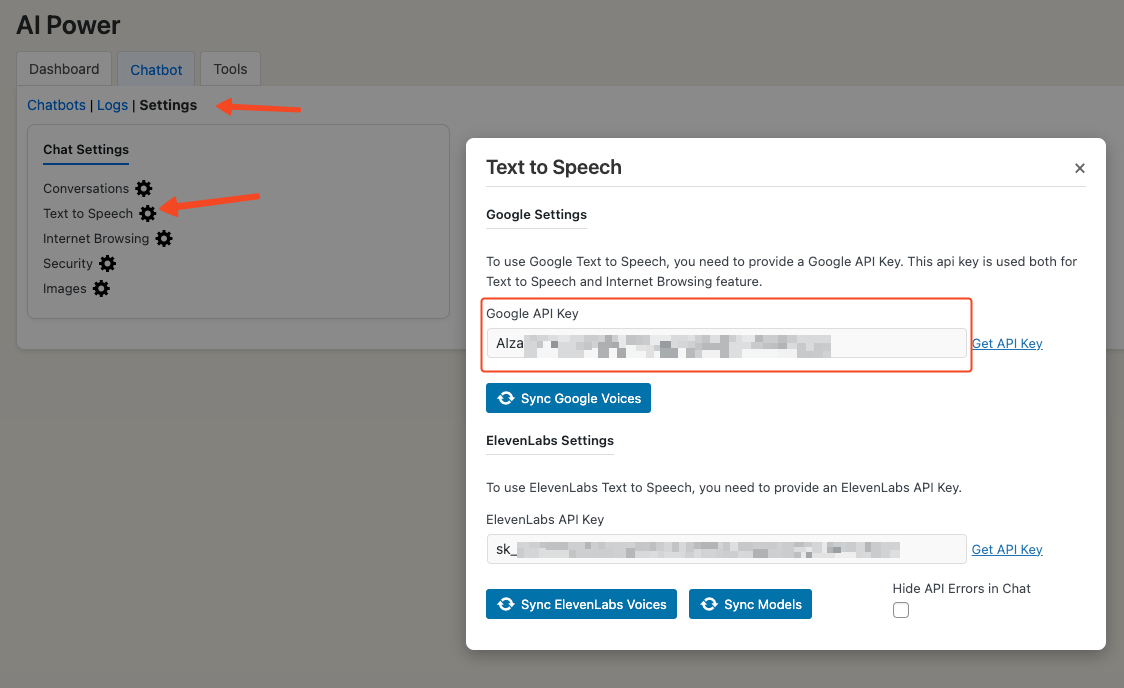
- After saving the api key, now click on "Sync Google Voices" to synchronize the voices with the plugin.
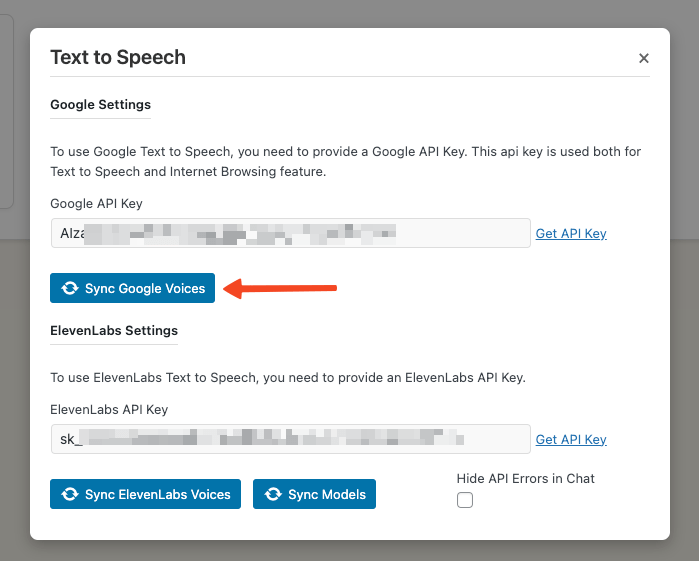
To enable Text to Speech for Google, go to the Dashboard - Chatbot page. In the General Settings tab, click the gear icon next to the Speech switch to open the settings. Select Google as the provider, and configure the options that appear.
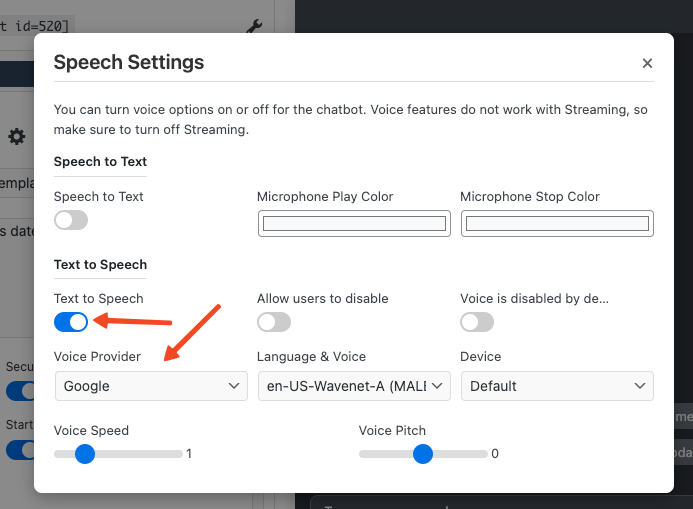
You can choose the voice language, select a specific voice model, optimize the audio for different devices, and adjust the voice speed and pitch.
Your bot is now set up to use Google Text-to-Speech with the voice and settings you chose.
ElevenLabs
ElevenLabs has an impressive portfolio of voice technology capabilities that include state-of-the-art voice cloning.
You can view demo here: https://aipower.org/gpt-4o-chat-bot-demo-text-to-speech-elevenlabs/
Here's how you can enable and customize the ElevenLabs integration:
- First, you need to get an API key from ElevenLabs. Visit https://beta.elevenlabs.io/ and register for an account. They offer different plans, including a free plan that allows you to access Long-Form Speech Synthesis, 10,000 characters per month, create up to 3 custom voices, and use Voice Design for random voices.
- Once you’ve created your account, click on your profile in the top right corner and select the Profile link.You will find your API key there.
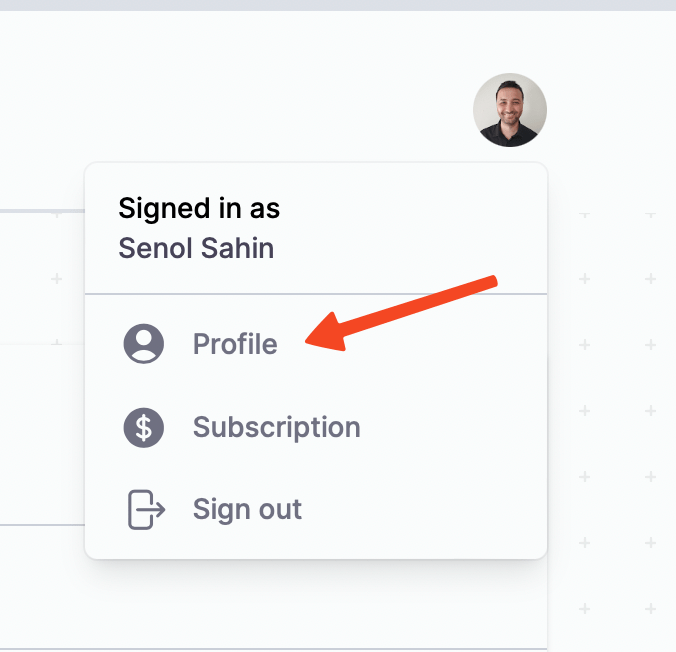
- Copy your API key.
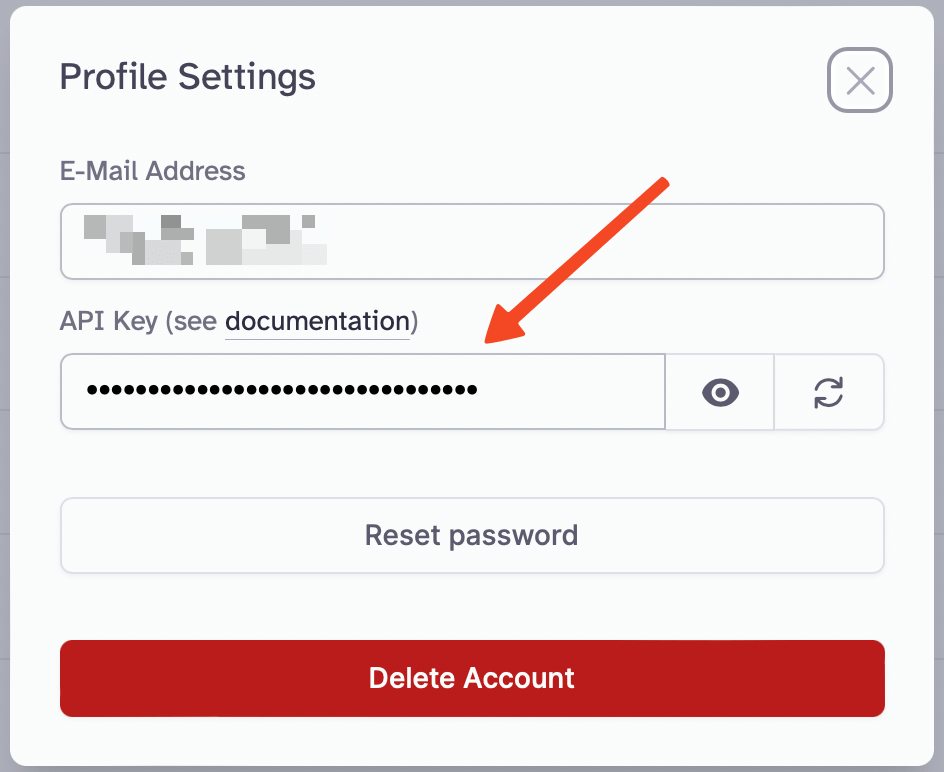
Once you have your API key, open the plugin’s Dashboard - Chatbot page. Go to the Settings tab and enter your API key in the provided field.
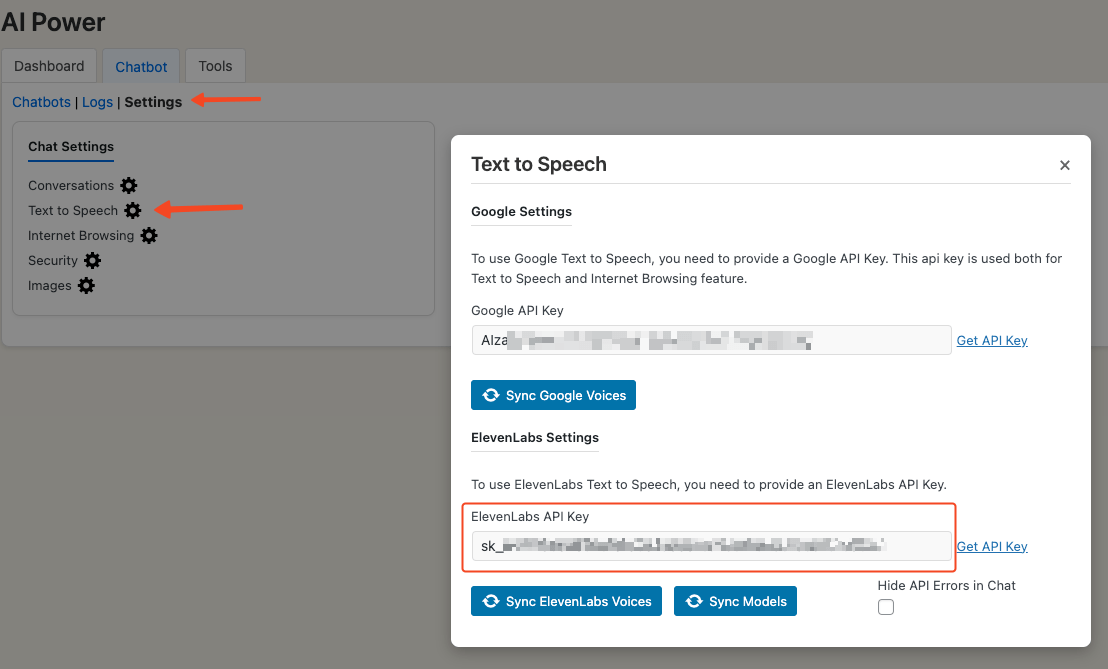
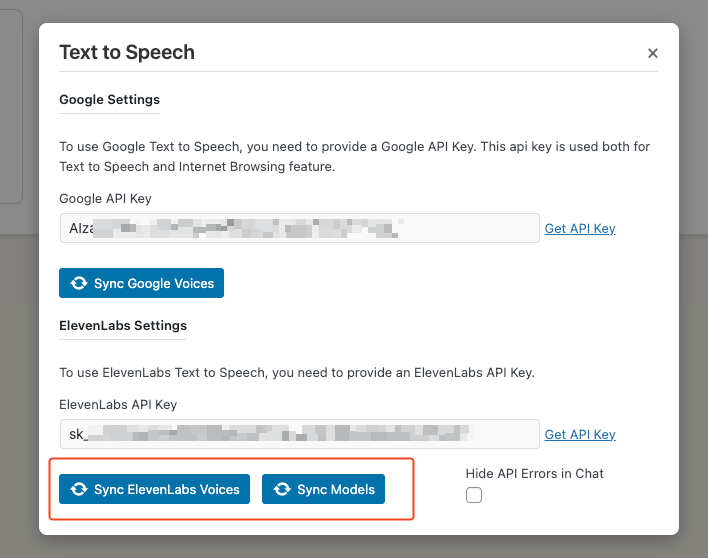
- After saving the api key, click on "Sync ElevenLabs Voices" and "Sync ElevenLabs Models" to synchronize the voices and models with the plugin.
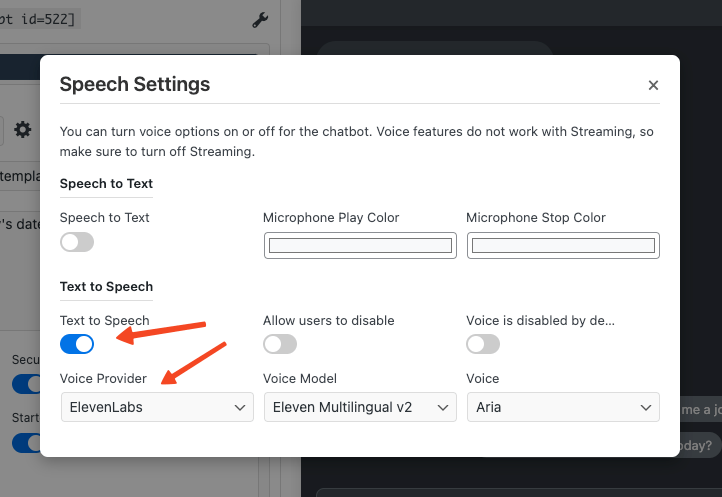
To enable Text to Speech for ElevenLabs, go to the Dashboard - Chatbot page. In the General Settings tab, click the gear icon next to the Speech switch to open the settings. Select ElevenLabs as the provider, and configure the options that appear.
Conversation Starters
Conversation starters allow you to create and define your own engaging questions that appear in the chat window.
Users can simply click on these starters to instantly receive answers.
To enable Conversation Starters, go to the Dashboard - Chatbot page.
In the General Settings tab, click the gear icon next to the Starters switch to open the settings.
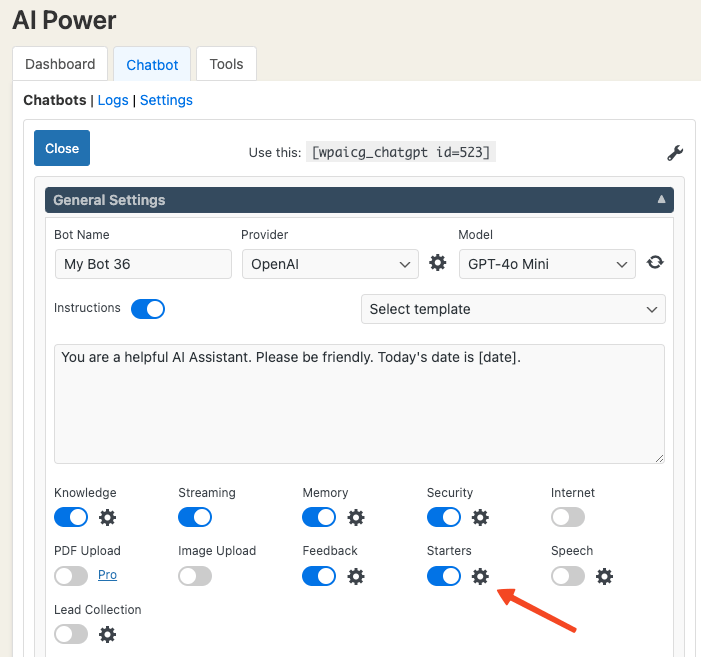
Enter up to 10 conversation starters, one per line.
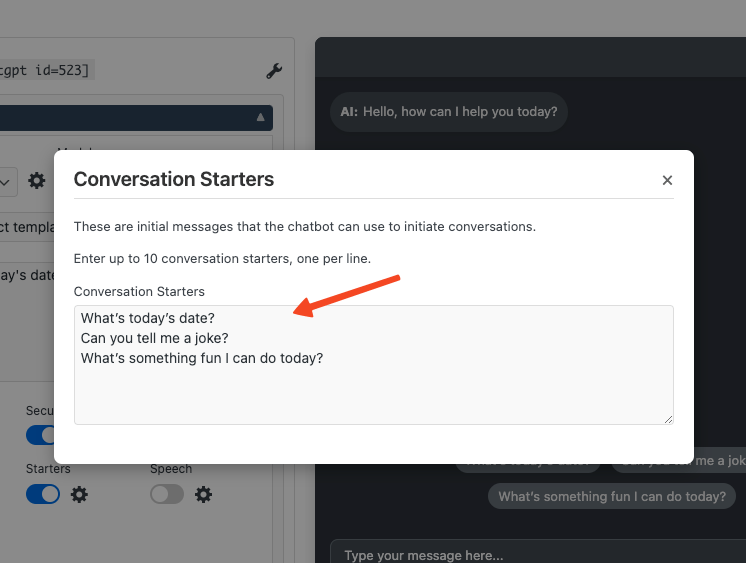
Conversation starters are not shown again if a user revisits the page.
The chatbot displays the starters only for first-time users.
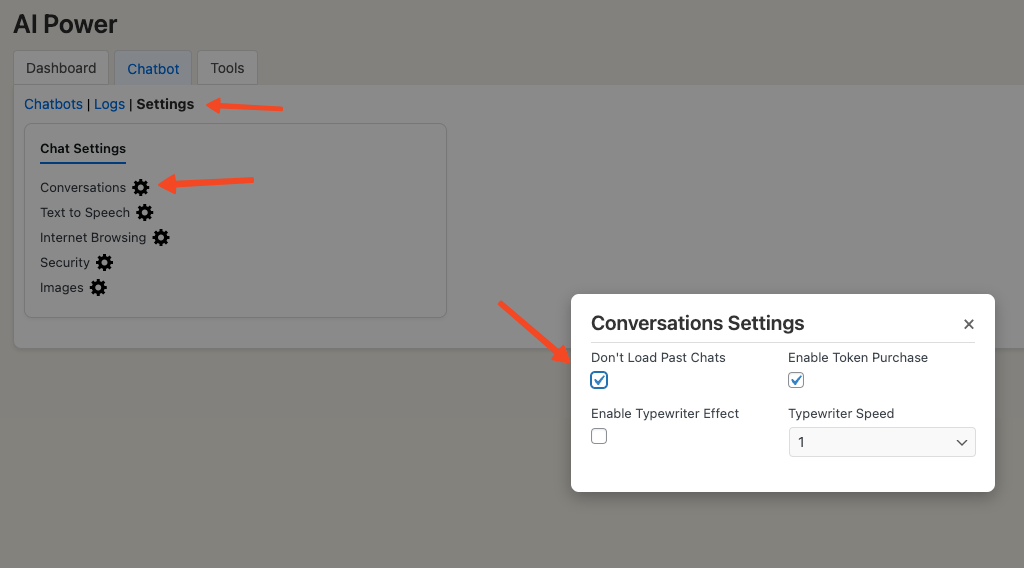
If you want to display the conversation starters all the time, then you need to disable auto-loading past conversations.
You can disable it under the Dashboard - Chatbot page under Settings tab.
Lead Collection
Lead Collection allows you to gather contact details from users during their interaction with the chatbot.
You can enable this feature from the Dashboard - Chatbot under the General Settings tab. Toggle the Lead Collection switch to enable it.
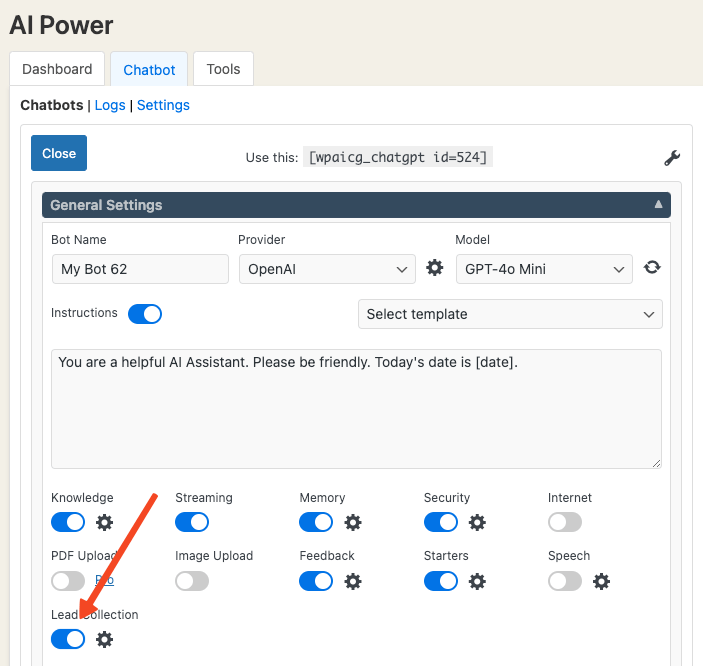
Next to the switch, there is a gear icon. Clicking it opens the Lead Collection settings window, where you can customize the form’s title and choose to show or hide the fields.
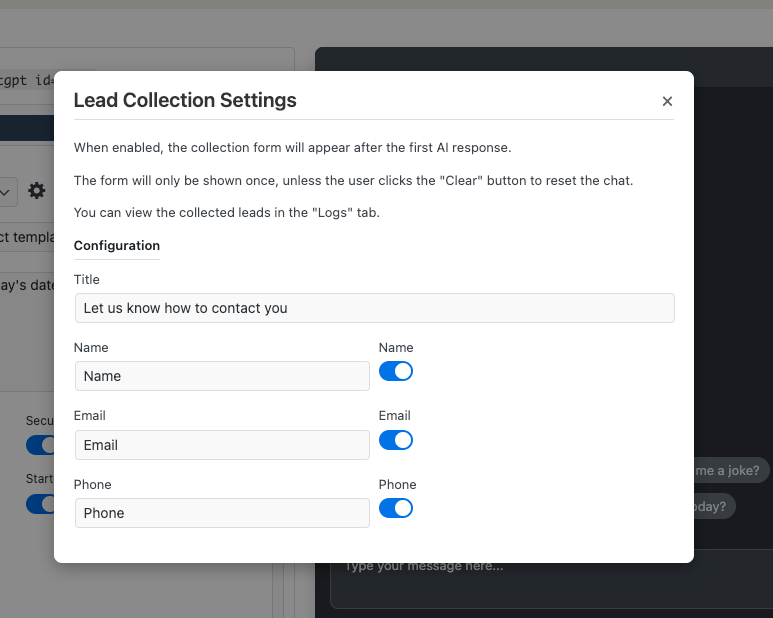
Once Lead Collection enabled, a form will appear after the first AI response, prompting users to fill in their name, email, and phone number.
The form is shown only once unless the user clicks the Clear button to reset the chat.
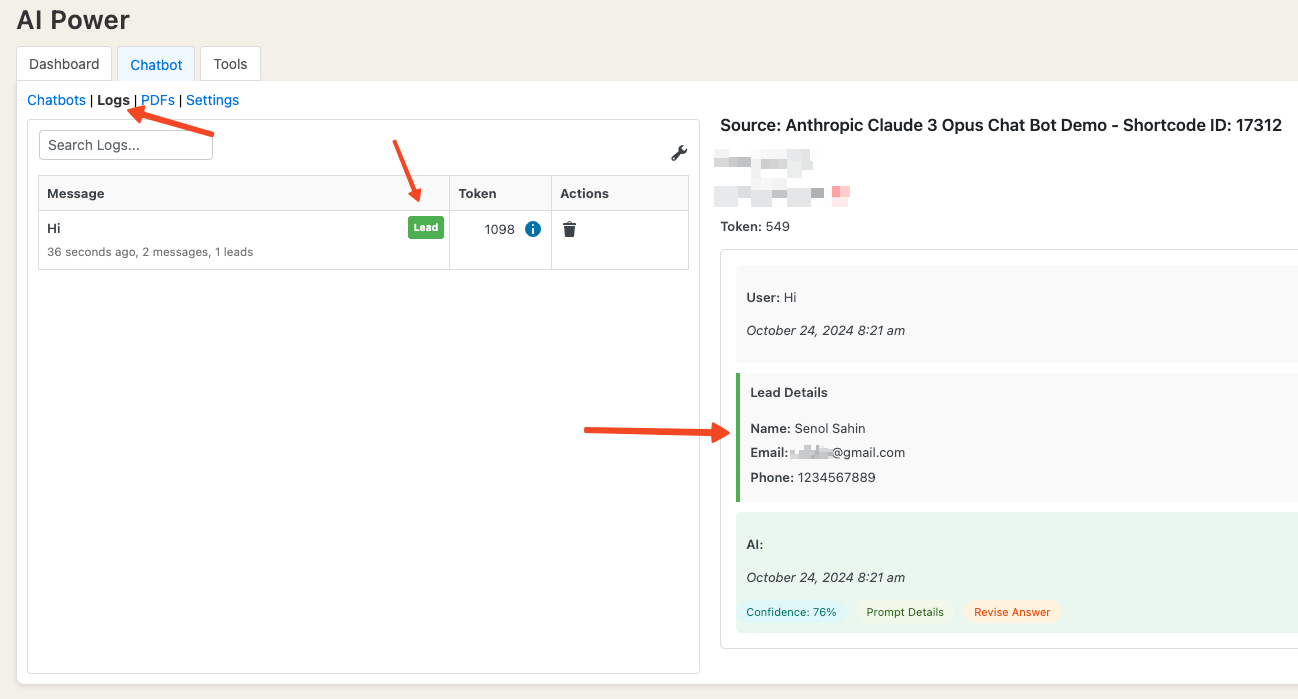
Collected leads can be viewed in the Logs tab.
