

Overview
Choose either connection method:- AI Puffer Cloud: connect without an API key. Eligible verified accounts receive 25 monthly free credits; optional top-ups pay for more hosted usage.
- Your own provider: enter the provider’s API key and pay that provider directly.
Pro unlocks plugin features. Cloud credits, your direct provider’s API billing, and the visitor credits you may sell on your WordPress site are separate from the Pro license.
AI Puffer Cloud
Hosted models without an API key, with monthly free credits.

OpenAI
Text, images, embeddings, speech, web, and realtime.

Gemini, images, video, embeddings, TTS, and grounding.

Anthropic
Text, web search, and supported image analysis.

OpenRouter
Access many text, image, embedding, and web-capable models.

Azure
Azure OpenAI deployments for text, images, embeddings, and speech.

DeepSeek
Text generation for chat, writing, forms, and automations.
xAI
Grok text models, web search, supported image analysis, and image generation.

Ollama
Local or self-hosted text and embedding models.
✓ means supported. - means not supported in the current provider strategy. Support also depends on the model and module. Cloud images means generation; image editing and video use supported direct providers. Cloud image analysis requires a text model with image-input capability. Realtime voice uses a separate OpenAI connection.
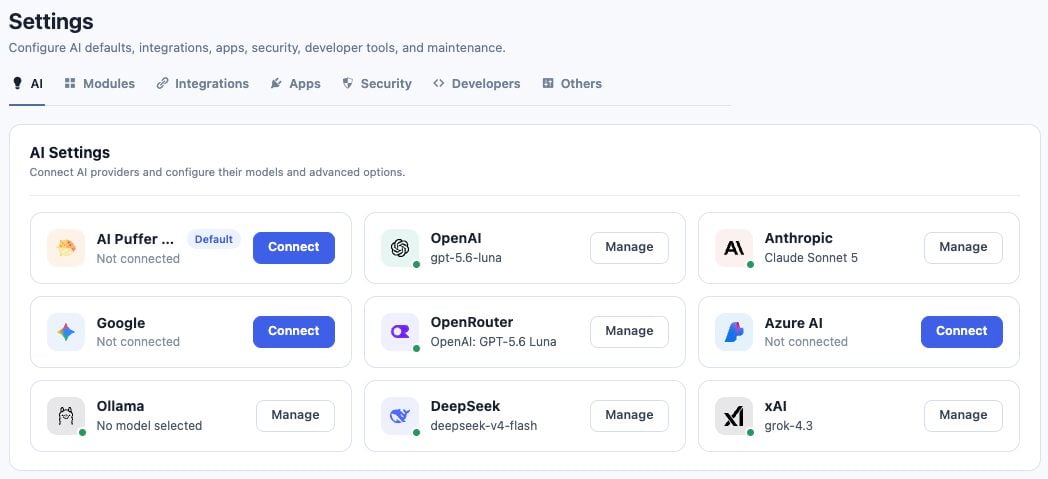
AI Puffer > Settings is the central area for managing your connections to different AI providers.
Connect your own provider
- Open AI Puffer > Settings > AI.
- Click Connect on the provider card, or Manage if it is already connected.
- Enter or update that provider’s key and any required endpoint fields. Use Show/Hide to inspect the key.
- Click Connect to validate and save it. A rejected replacement is not saved.
- Refresh or sync the provider’s models when needed, then choose a model in your module.
OpenAI
OpenAI supports the widest set of AI Puffer features.- Open AI Puffer > Settings > AI.
- Click Connect or Manage on the OpenAI card.
- Paste your OpenAI API key.
- Keep the default base URL unless you use a compatible custom endpoint.
- Click Sync models beside the default model.
- Select the model you want to use by default.
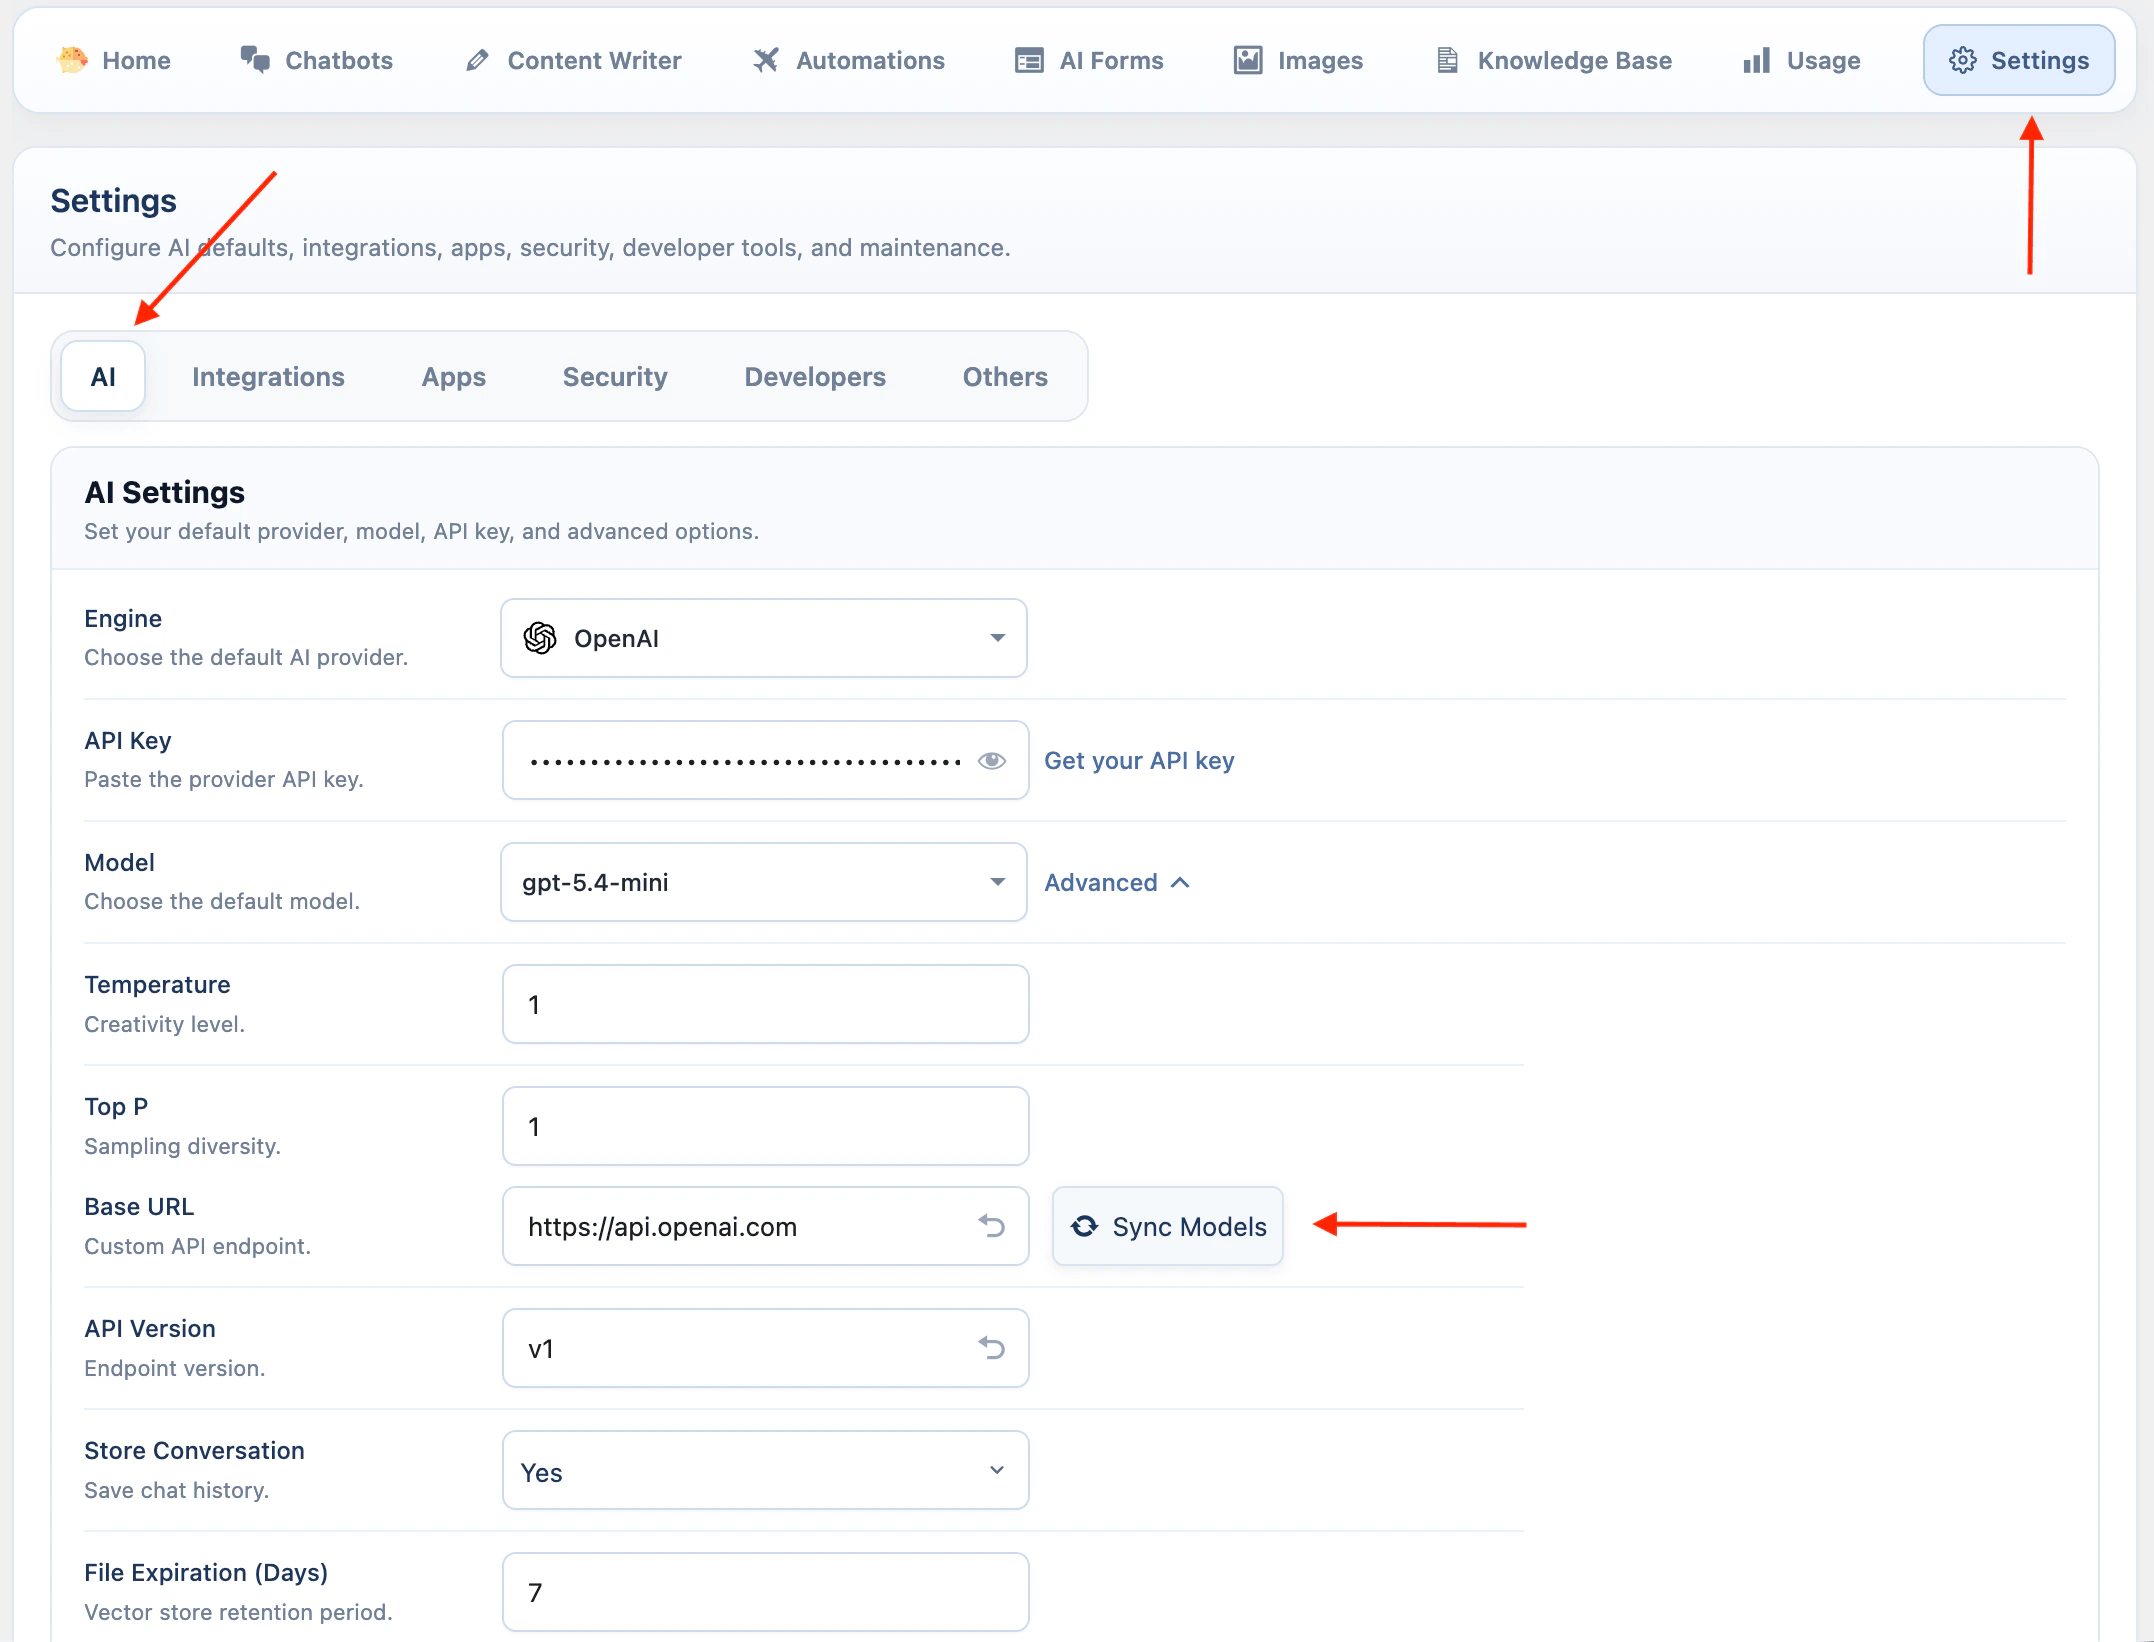
- Open AI Puffer > Settings > AI.
- Click Connect or Manage on the Google card.
- Paste your Google API key.
- Click Sync models beside the default model.
- Select the default model.
- Review Google safety settings if you need to change blocking thresholds.
Google safety settings can block some responses. Change them only when the default behavior is too restrictive for your site.
Anthropic
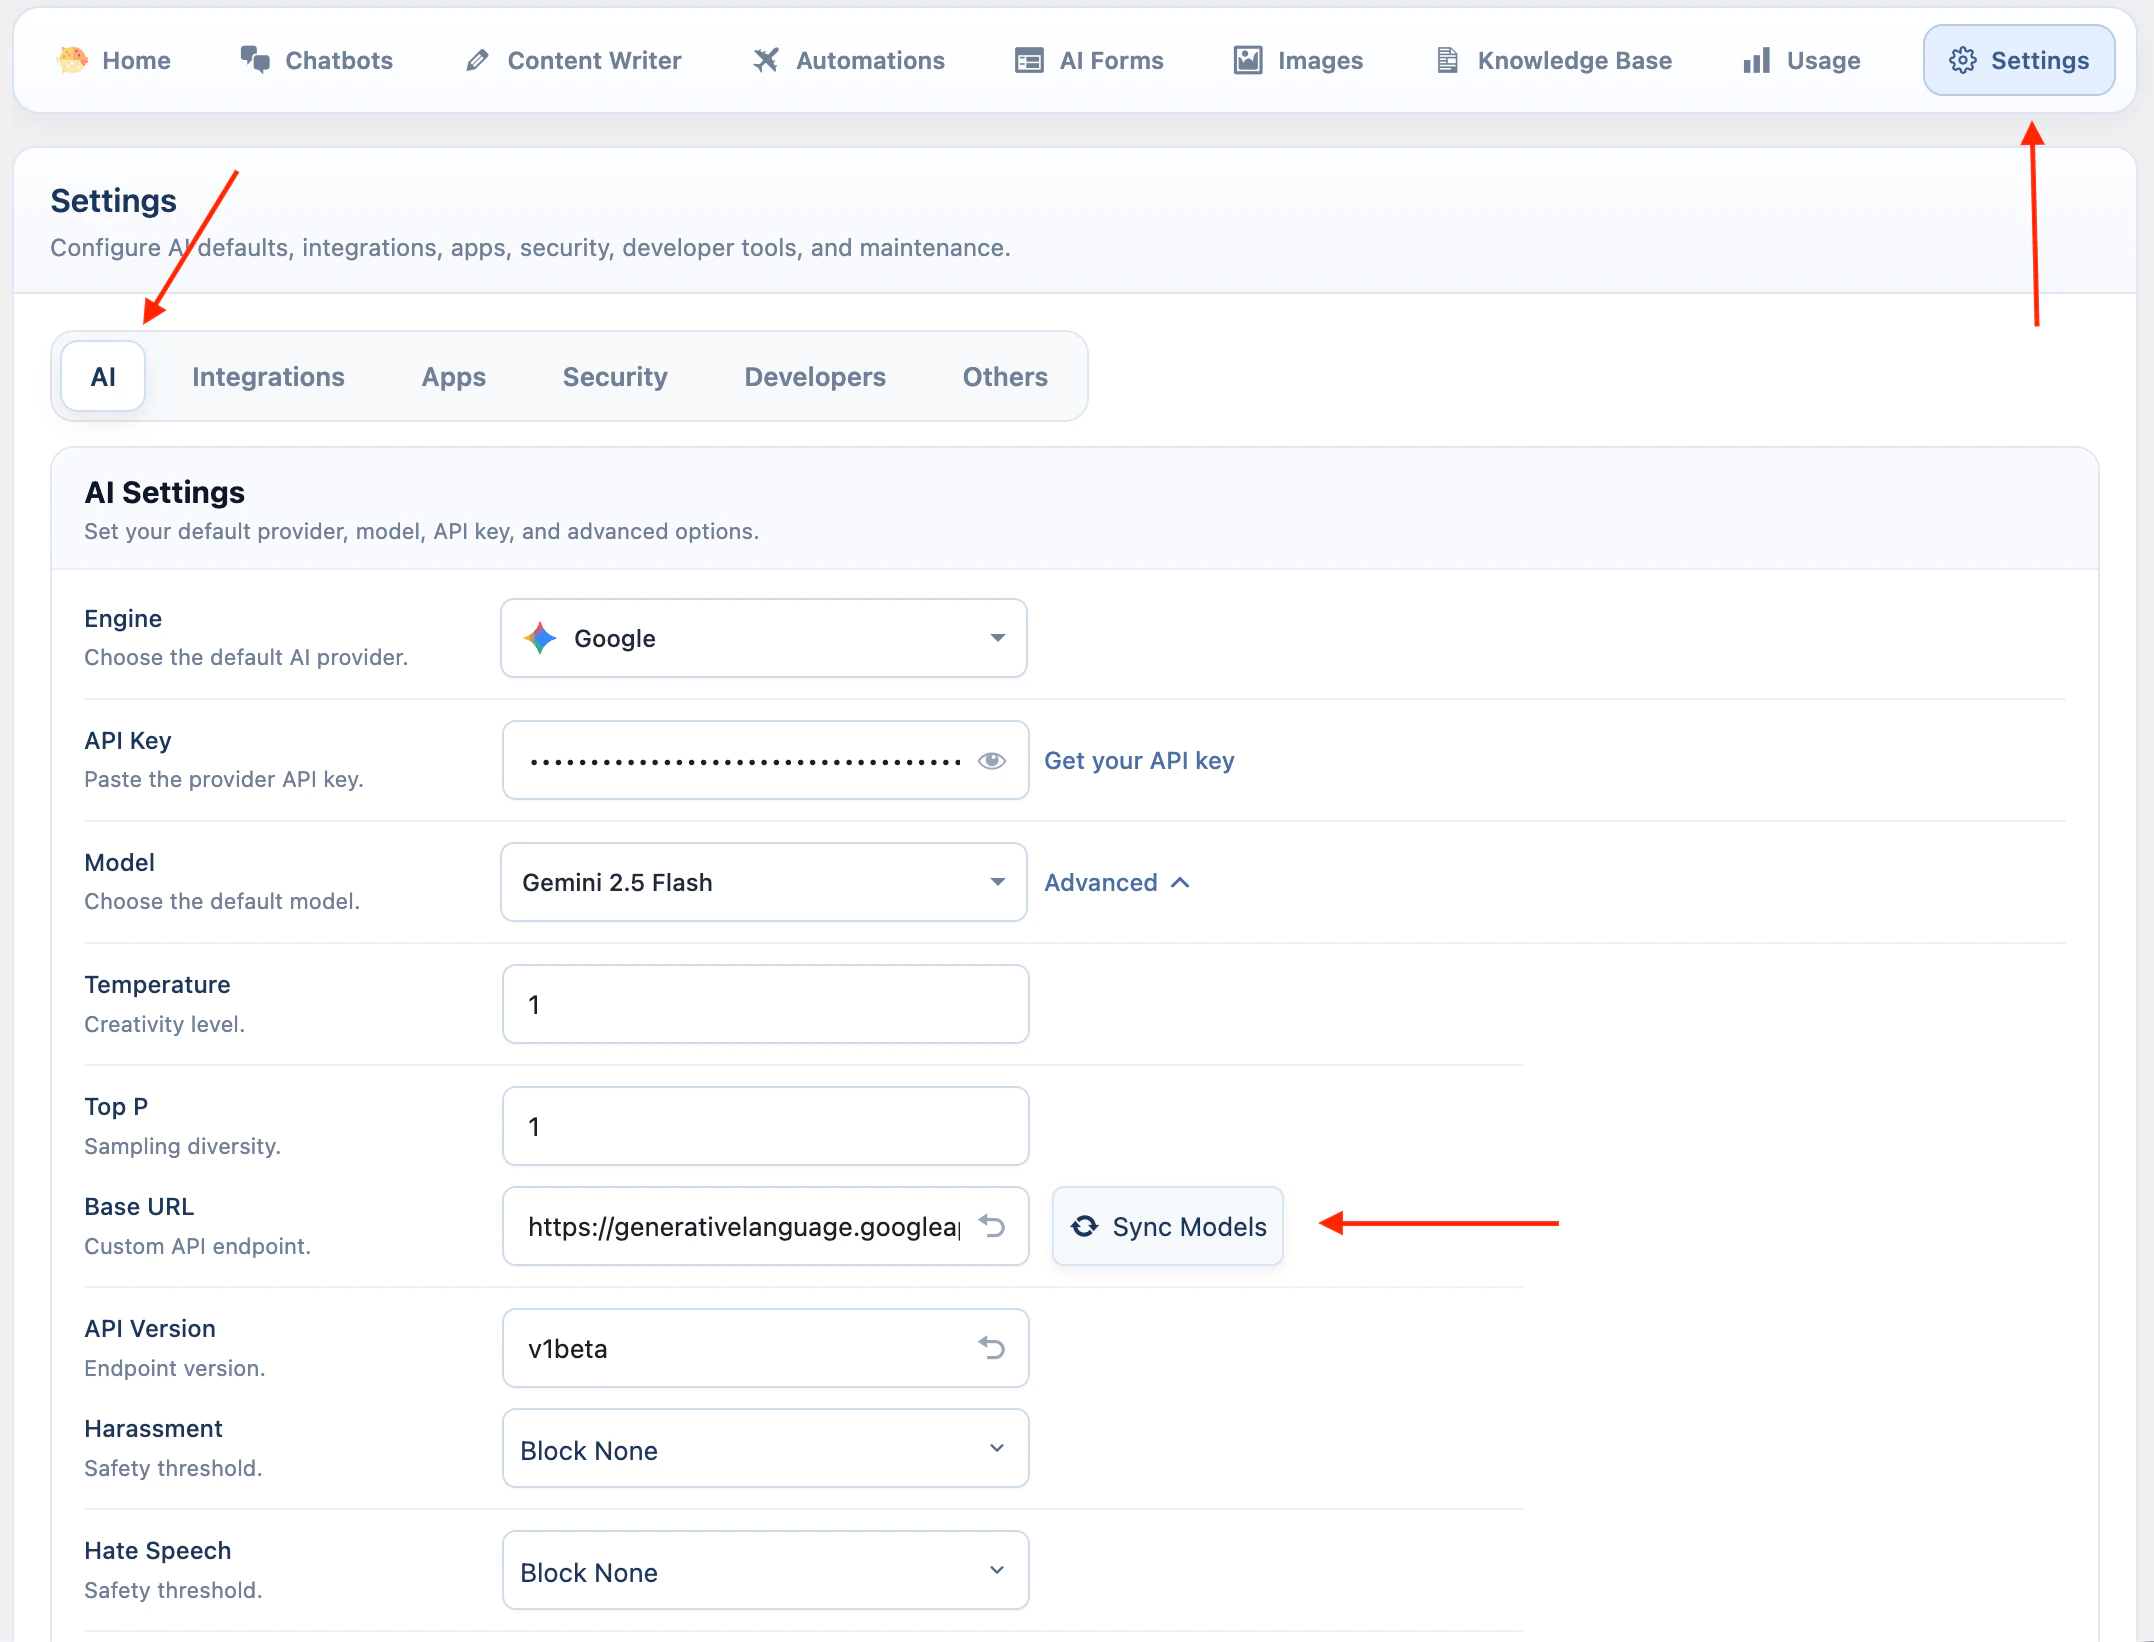
Anthropic is available for text workflows, web search, and supported Claude image analysis models.- Open AI Puffer > Settings > AI.
- Click Connect or Manage on the Anthropic card.
- Paste your Anthropic API key.
- Click Sync models beside the default model.
- Select the default model.
OpenRouter
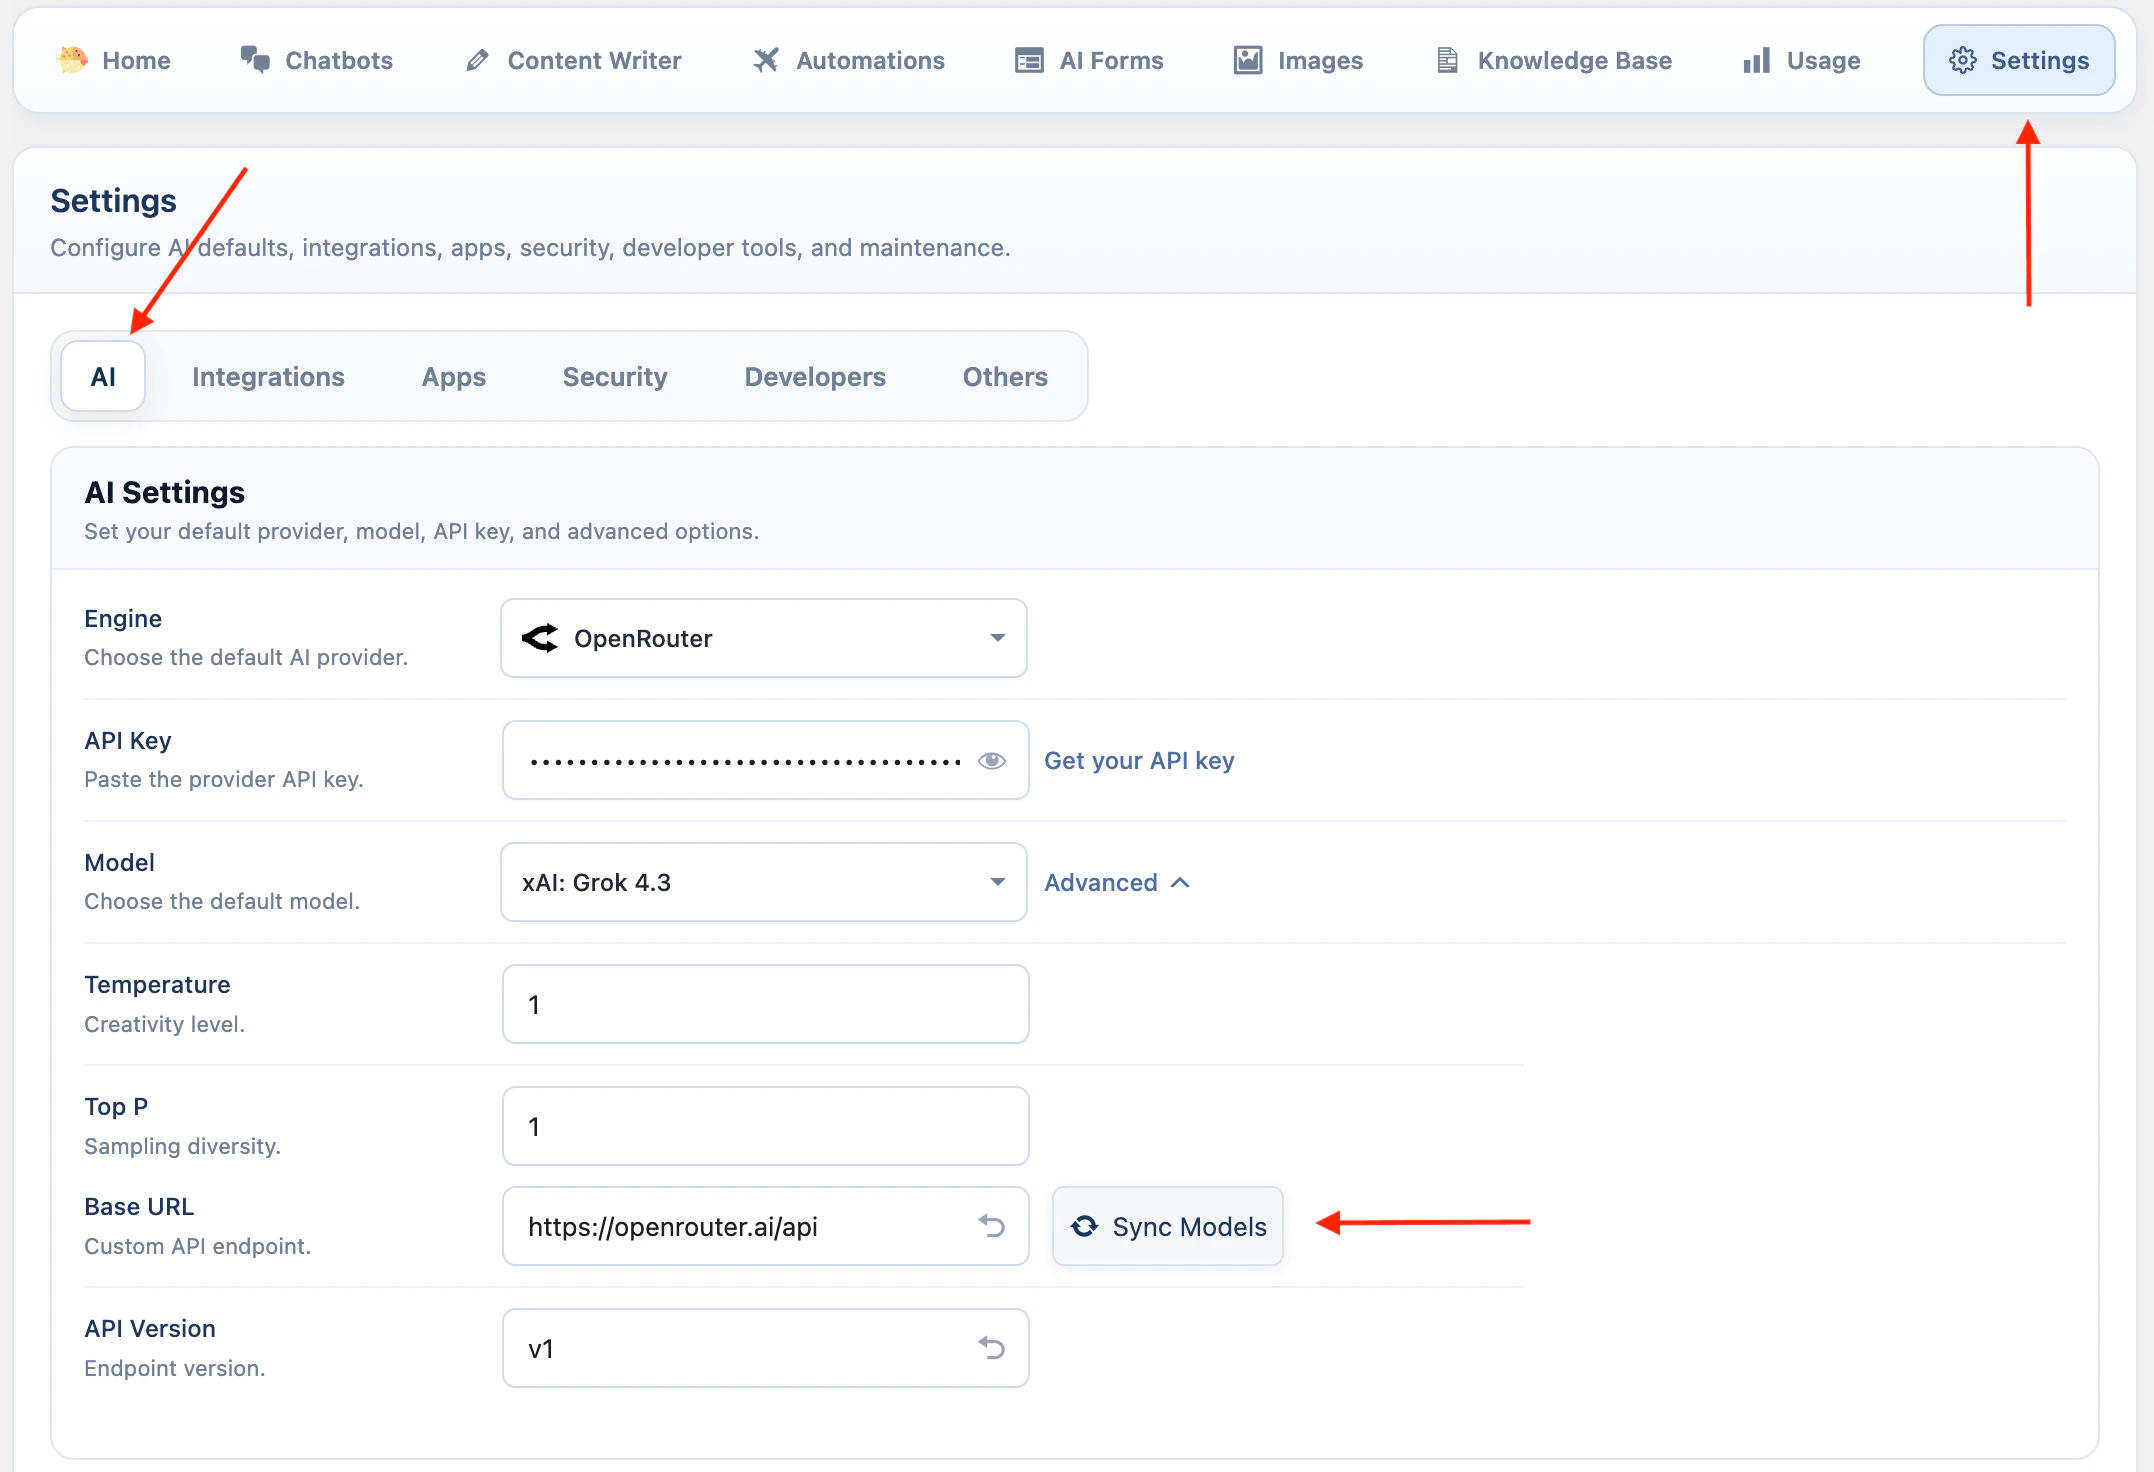
OpenRouter gives access to models available in your OpenRouter account.- Open AI Puffer > Settings > AI.
- Click Connect or Manage on the OpenRouter card.
- Paste your OpenRouter API key.
- Click Sync models beside the default model.
- Select the default model.
OpenRouter support depends on the model you select. Check the model capabilities before using image, embedding, or web features.
Azure
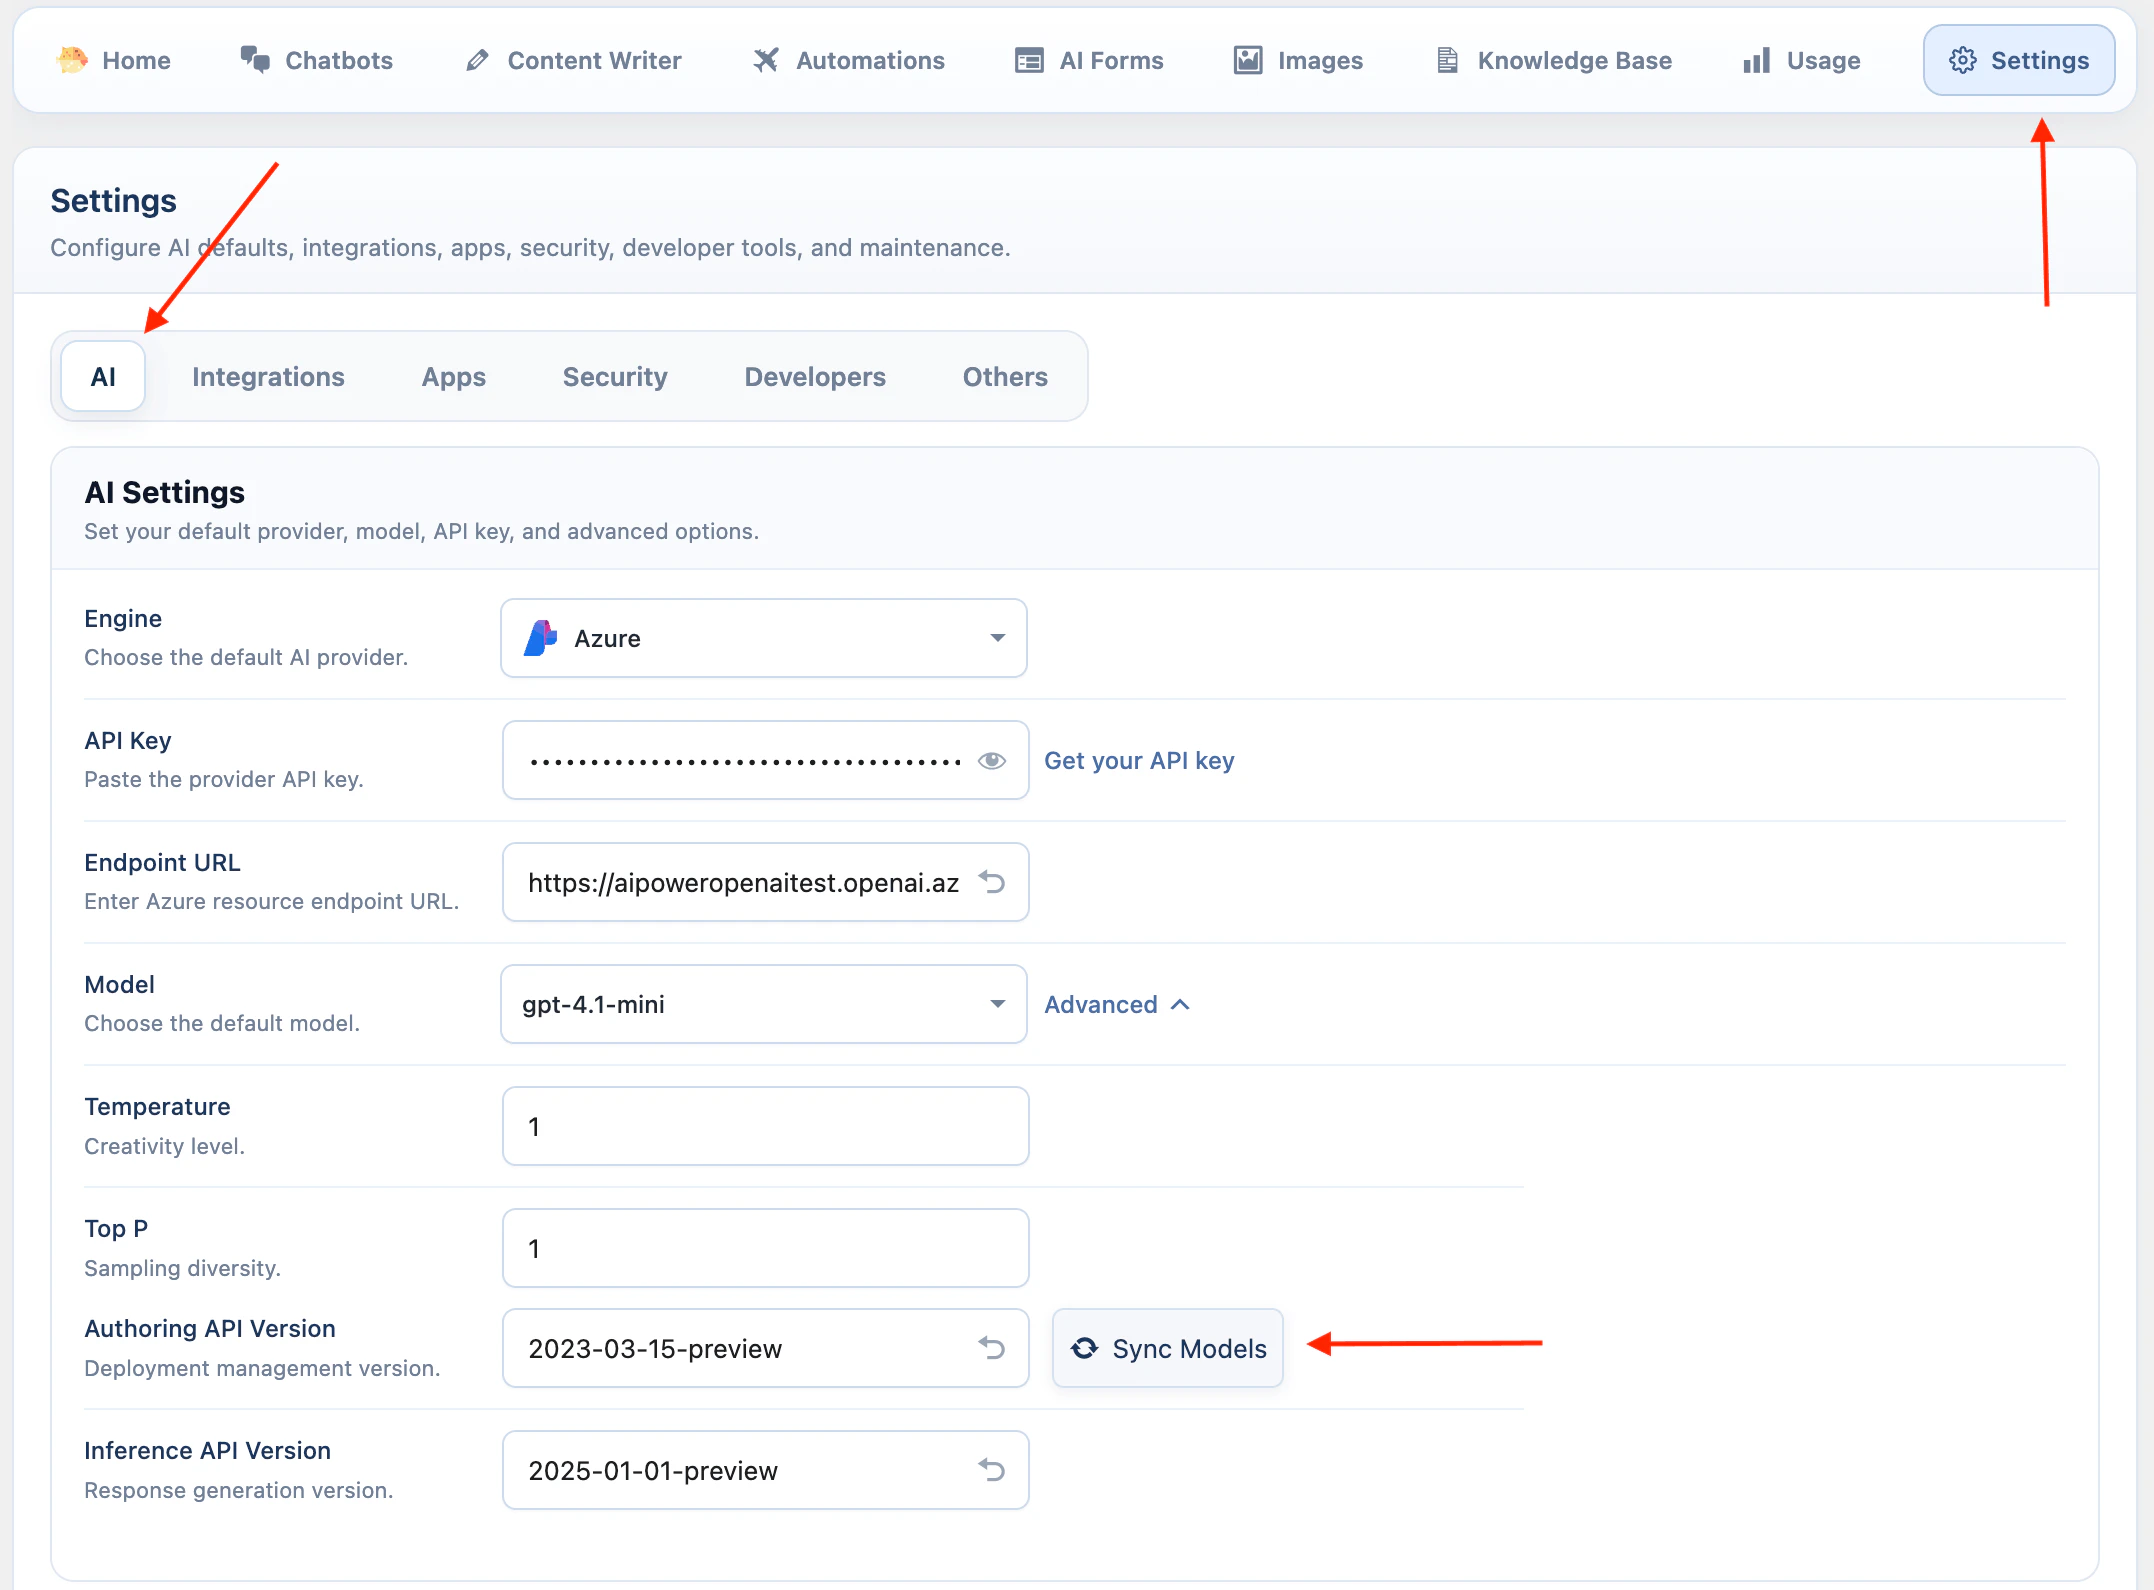
Azure uses your Azure OpenAI .- Open AI Puffer > Settings > AI.
- Click Connect or Manage on the Azure card.
- Paste your Azure API key.
- Enter the Azure endpoint URL for your resource.
- Open Advanced settings.
- Check the API versions if your Azure resource requires different versions.
- Click Sync models to load deployments.
- Select the deployment to use as the default model.
Azure uses deployment names. If a deployment does not appear, confirm it exists in Azure and that the endpoint and API key belong to the same resource.
DeepSeek
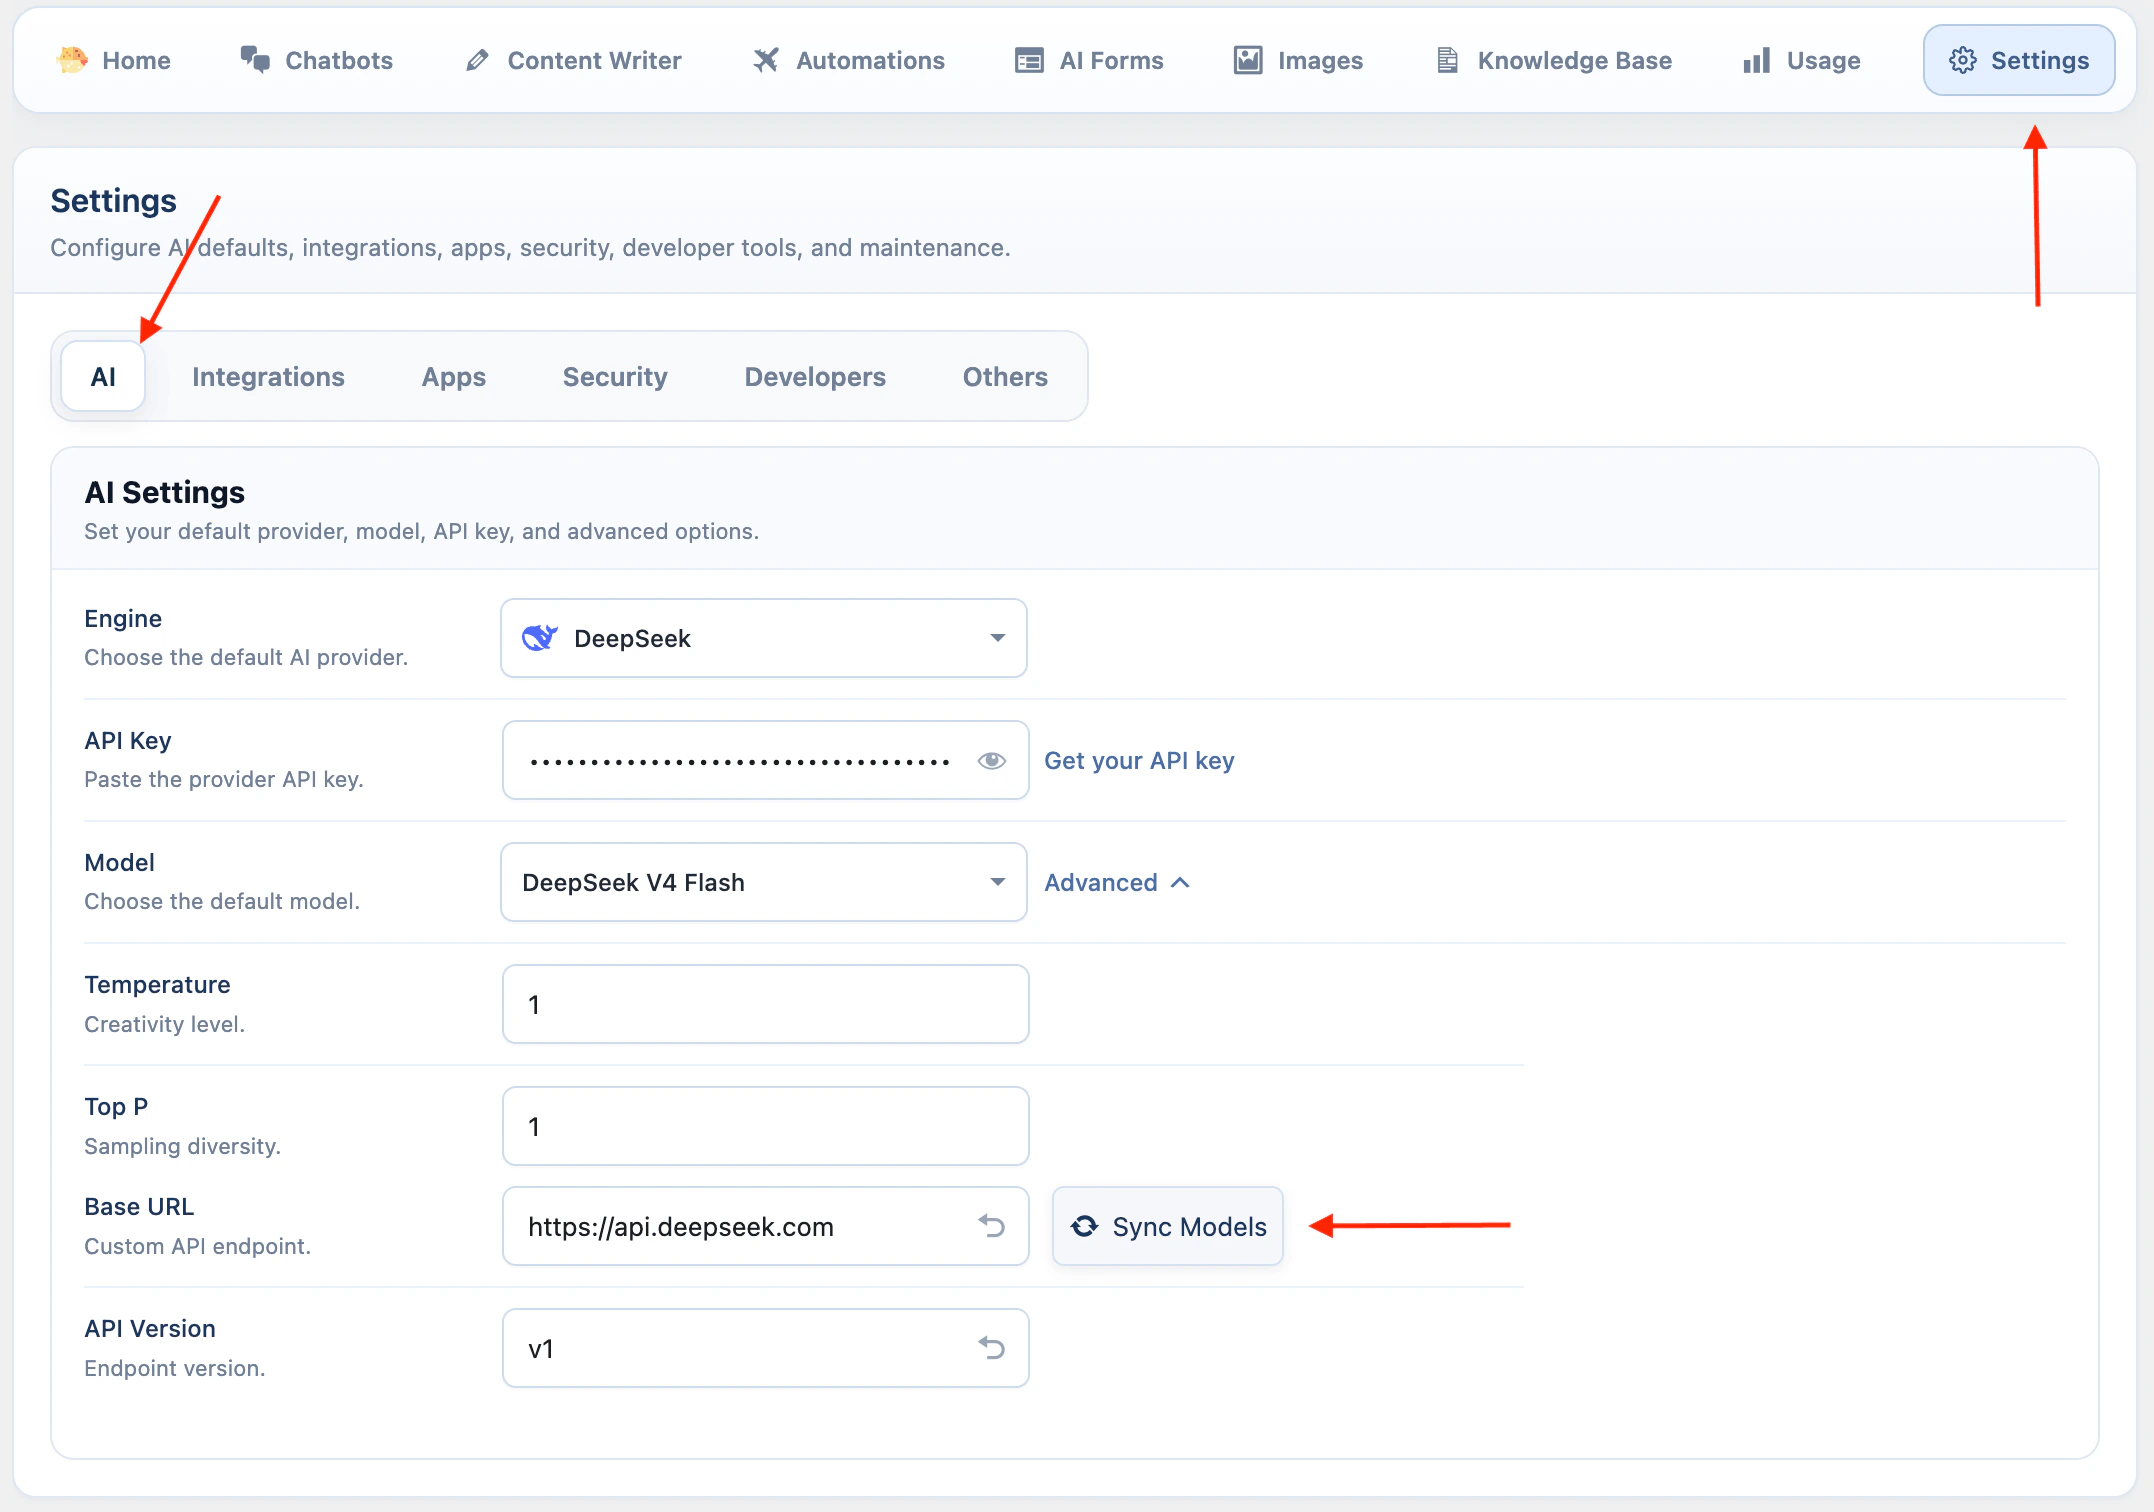
DeepSeek is available for text workflows.- Open AI Puffer > Settings > AI.
- Click Connect or Manage on the DeepSeek card.
- Paste your DeepSeek API key.
- Click Sync models beside the default model.
- Select the default model.
xAI
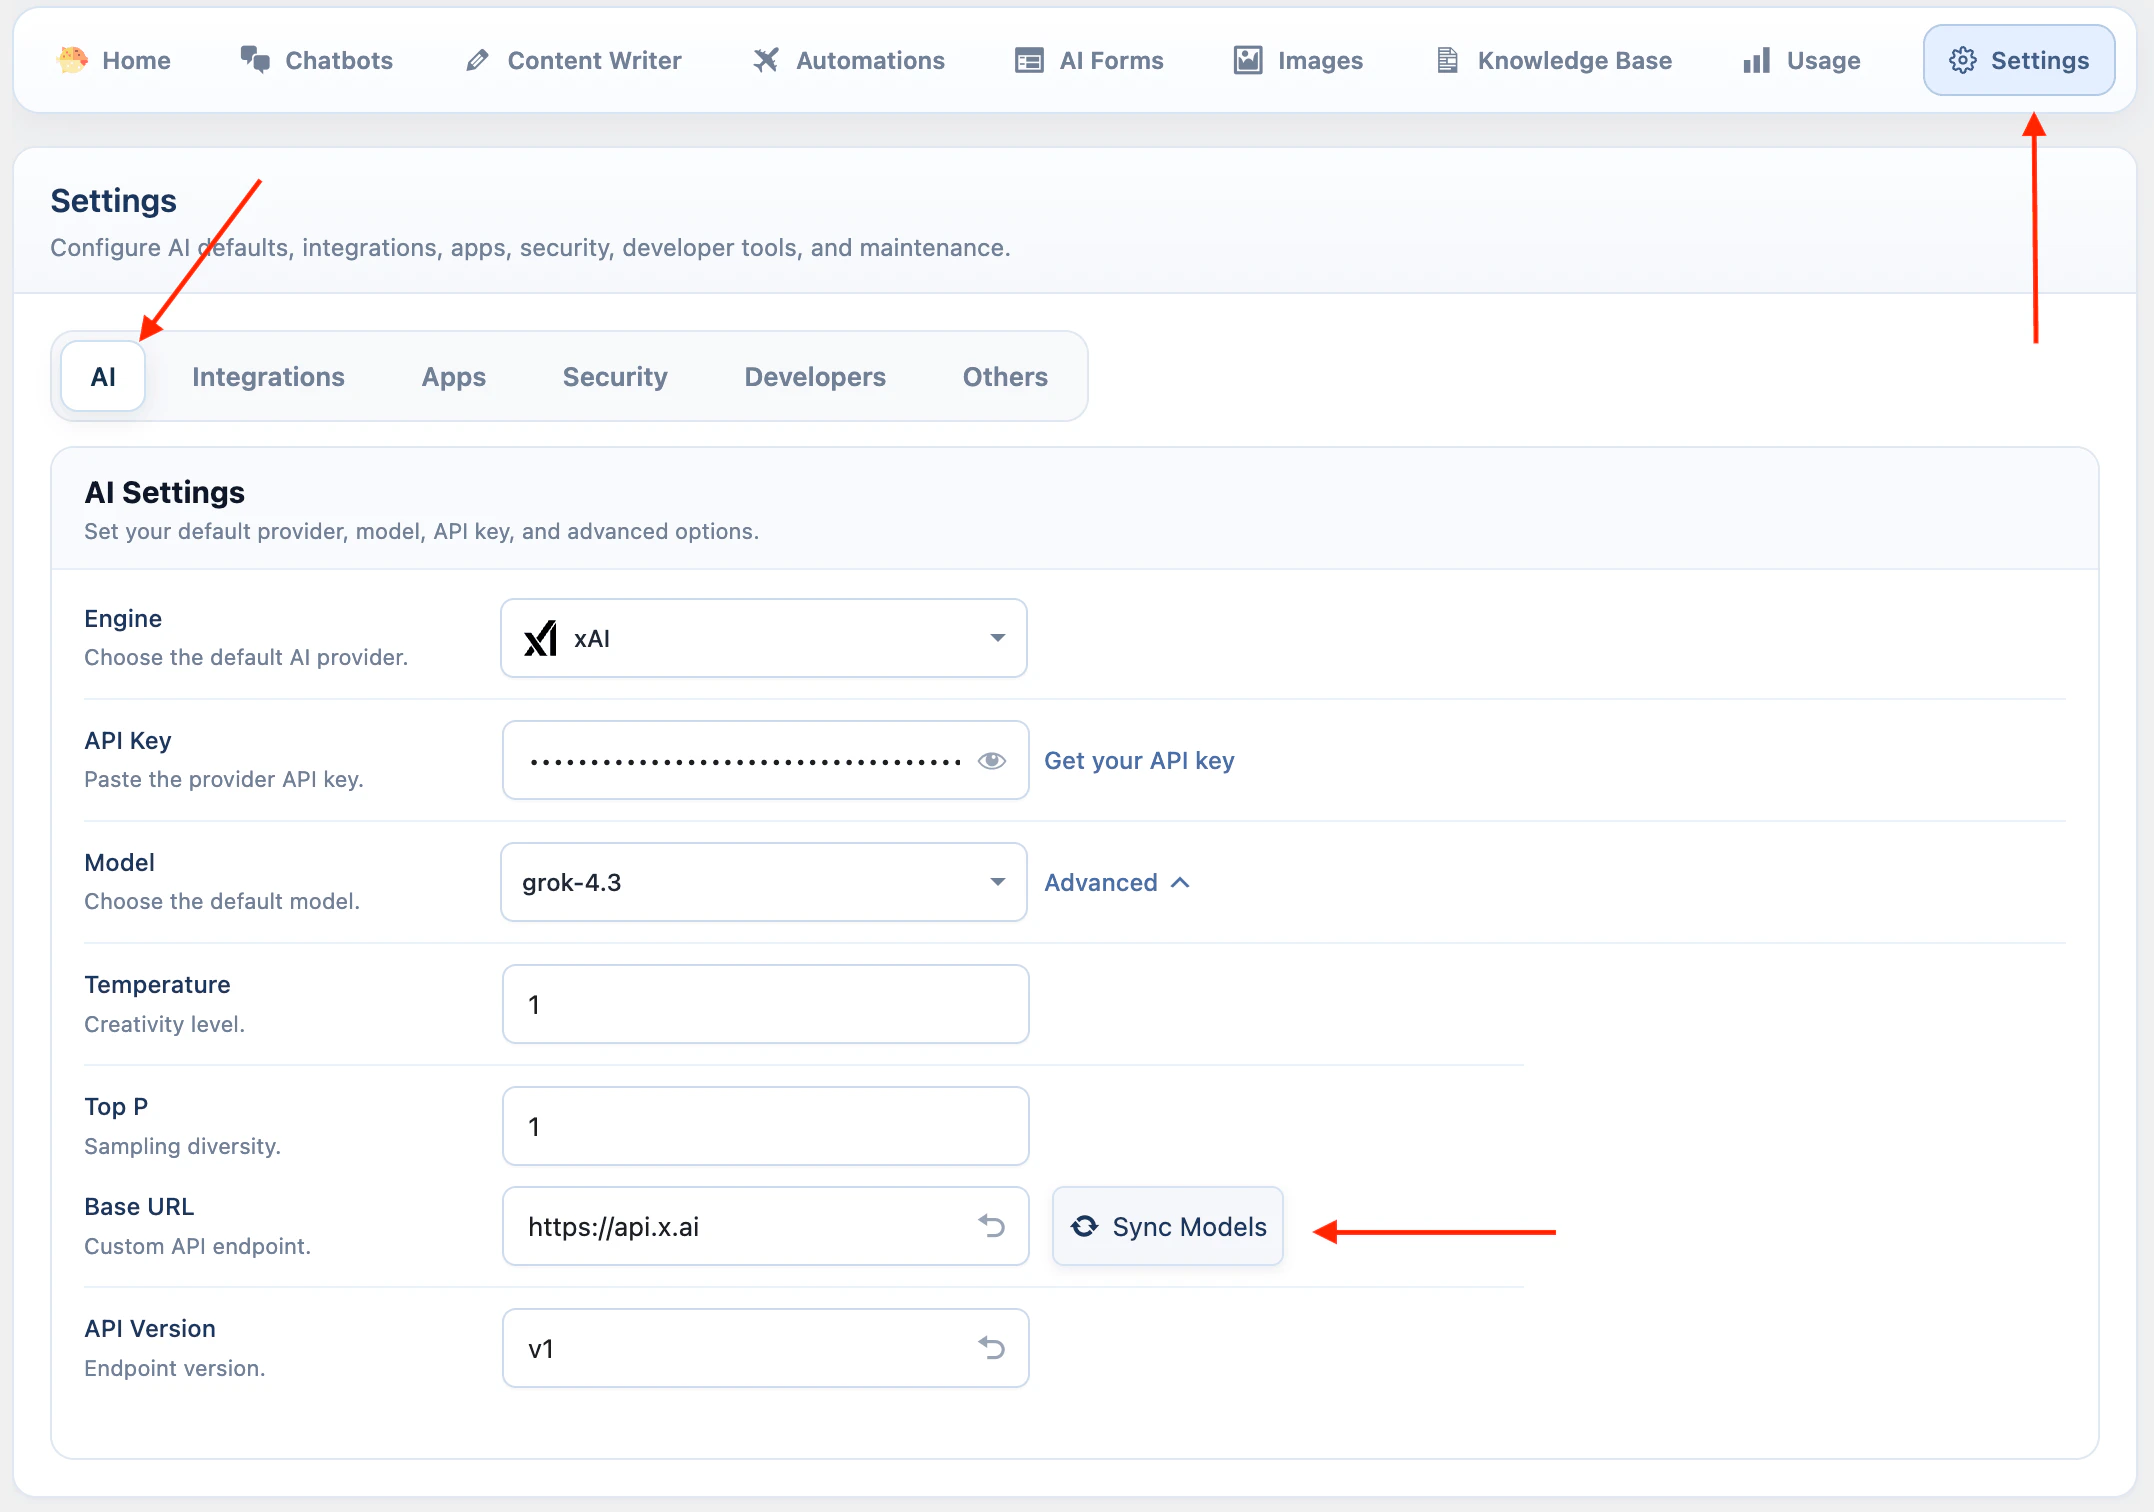
xAI is available for text workflows, Grok models, web search, supported image analysis models, and image generation.- Open AI Puffer > Settings > AI.
- Click Connect or Manage on the xAI card.
- Paste your xAI API key.
- Keep the default base URL unless you use a compatible xAI endpoint.
- Keep the API version as
v1. - Click Sync models beside the default model.
- Select the default text model.
grok-imagine-image. xAI image understanding uses Grok language models that support image input.
xAI is not available as an embedding provider, vector store provider, video provider, speech provider, or realtime voice provider in the current integration.
Ollama
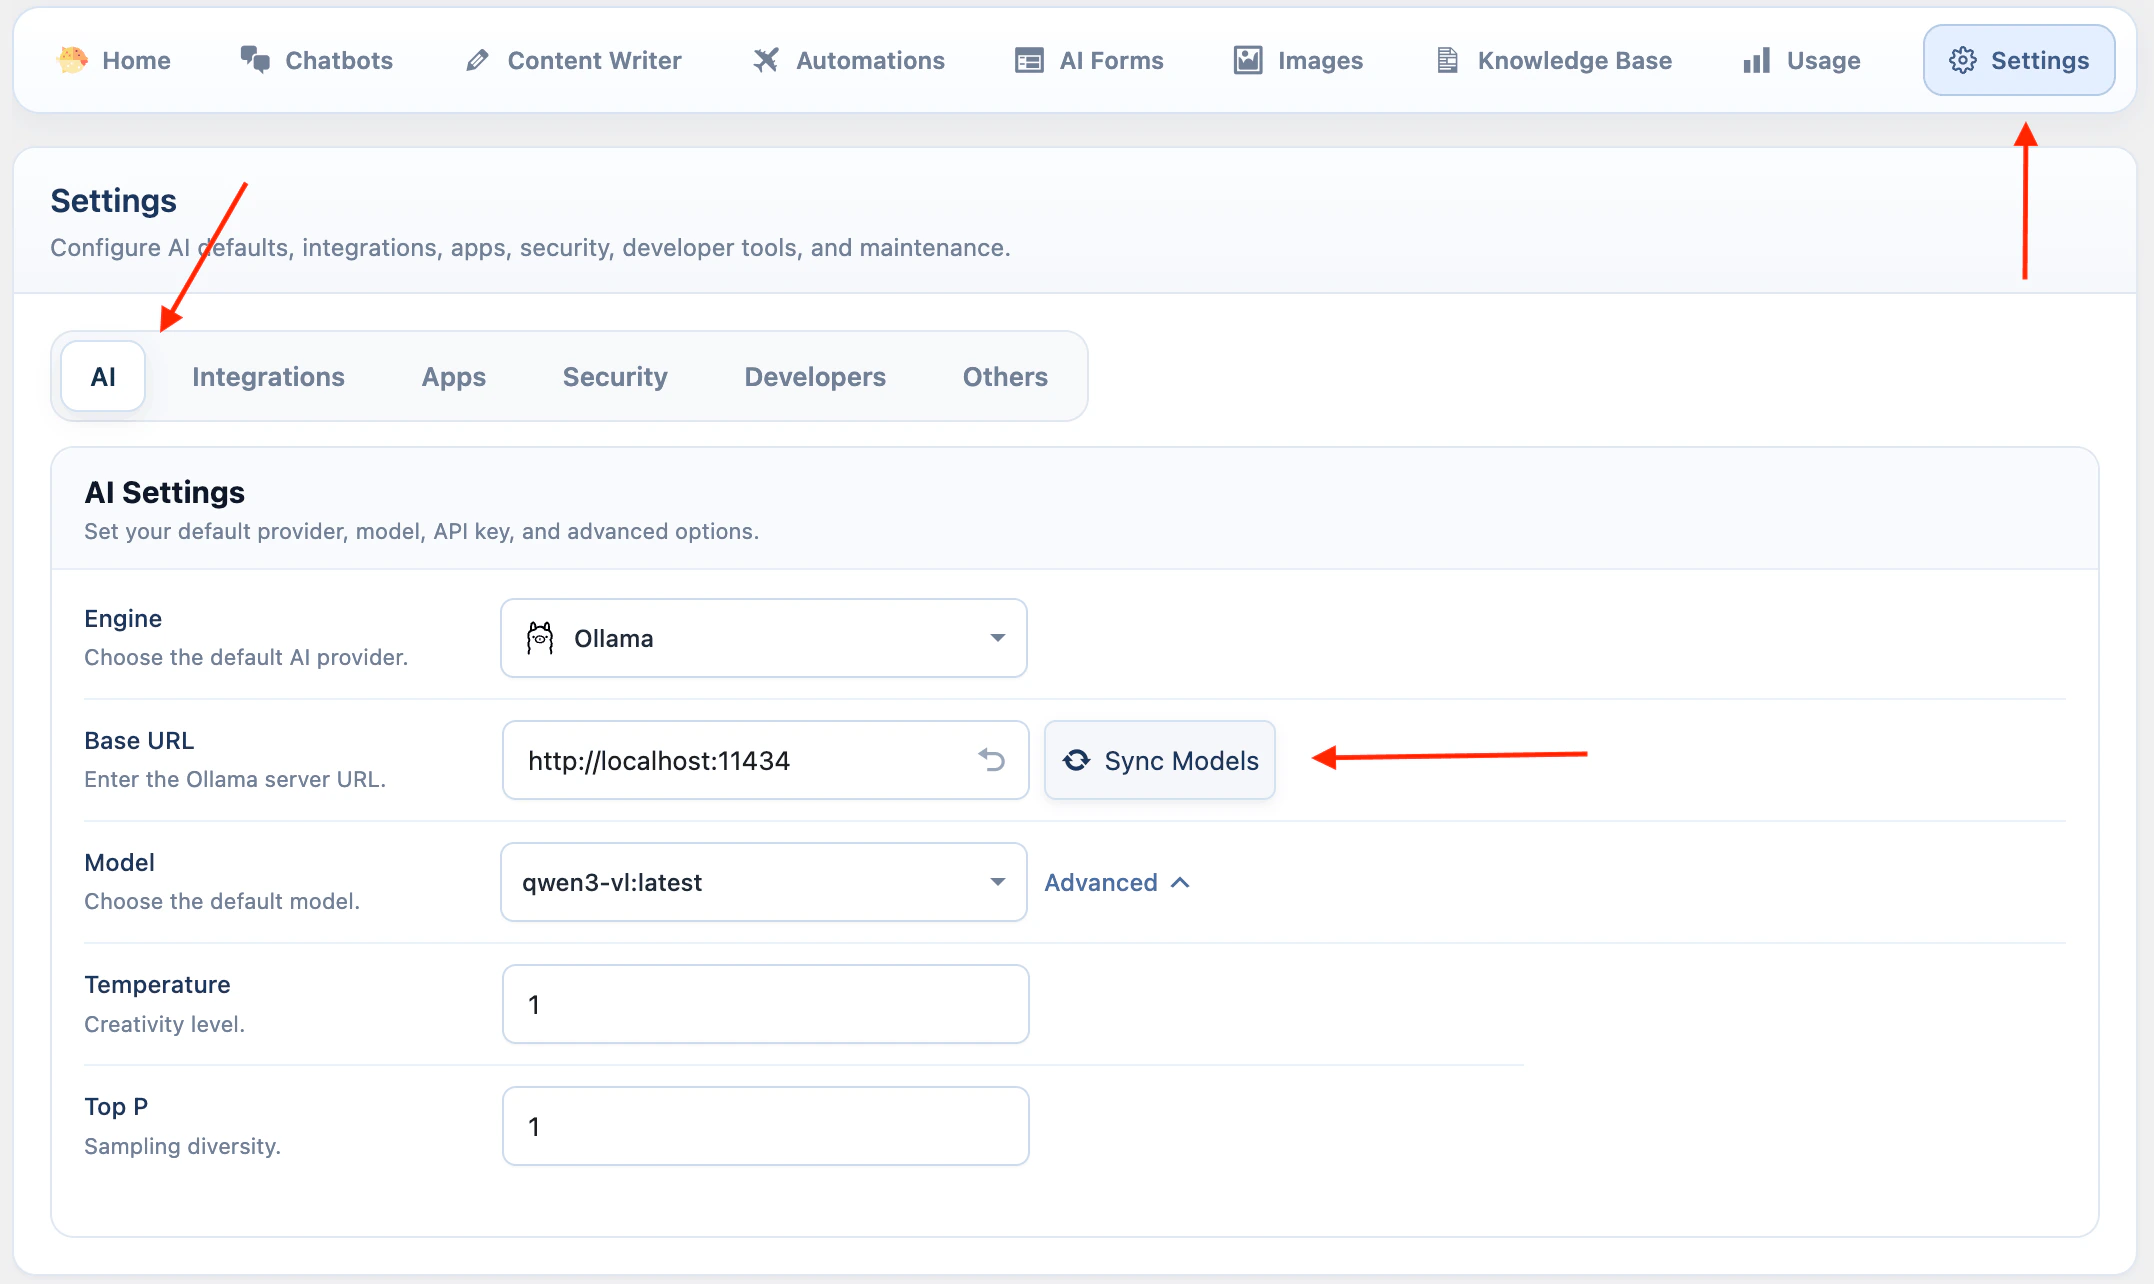
Ollama connects local or self-hosted models.- Install Ollama from ollama.com/download.
- Run Ollama on the computer or server you want to use as the AI server.
- Pull a model:
- Open AI Puffer > Settings > AI.
- Click Connect or Manage on the Ollama card.
- Enter the Ollama base URL. The default is
http://localhost:11434. - Click Sync models.
- Select the default model.
You can pull more than one model. AI Puffer shows synced Ollama models after Sync models runs.
Do not expose Ollama publicly without access controls. Anyone who can reach the Ollama server can send model requests to it.
WordPress AI Connectors
WordPress 7.0 includes a built-in AI Client and a Settings > Connectors screen. AI Puffer can manage those WordPress AI connectors so WordPress AI features, themes, and plugins that callwp_ai_client_prompt() use your AI Puffer provider setup.
This does not replace the provider setup above. Add your provider keys in AI Puffer > Settings > AI first, then enable connector management when you want WordPress AI Client requests to route through AI Puffer.
AI Puffer exposes OpenAI, Google, Anthropic, OpenRouter, Azure OpenAI, DeepSeek, xAI, and Ollama to the WordPress AI Client. Replicate remains available in AI Puffer’s Images module, but it is not exposed as a WordPress AI connector.
See WordPress AI Connectors.
Troubleshooting
Quota exceeded
Quota exceeded
The provider account is out of credits, has reached a spend limit, or is blocked by billing settings.Check these items:
- Open the provider billing page.
- Check credits, usage limits, and monthly spend limits.
- Add credits or update billing if needed.
- If you just changed billing, wait a few minutes and try again.
Incorrect API key
Incorrect API key
The saved key is wrong, old, revoked, copied with extra spaces, or belongs to a different account or organization.Check these items:
- Create or copy a fresh API key from the provider dashboard.
- Paste it again in AI Puffer > Settings > AI.
- Save the setting.
- Sync models again.
Model is missing
Model is missing
AI Puffer uses saved model catalogs so opening a module does not wait for each provider. Connect or sync the provider to update its catalog.Check these items:
- Open AI Puffer > Settings > AI.
- Click Manage on the provider card.
- Click Sync models beside the default model and wait for it to finish.
- Reopen the model picker in the module.
- For frontend Images, check any restriction in Images > Settings > Frontend Models.
Organization must be verified
Organization must be verified
Some OpenAI models require a verified API organization.Check these items:
- Open OpenAI Platform settings.
- Go to Organization > General.
- Complete organization verification.
- Wait up to 30 minutes.
- Generate a new API key if the error continues.
- Make sure AI Puffer is using a key from the verified organization.
Unexpected JSON error
Unexpected JSON error
A WordPress security plugin or firewall may be blocking AI Puffer settings requests.Check these items:
- Check your security plugin or firewall logs.
- Whitelist AI Puffer admin requests if your tool supports allow rules.
- If using Wordfence or a similar firewall, switch to learning mode.
- Save AI Puffer settings and use the affected module a few times.
- Switch the firewall back to normal mode after it learns the requests.