Context
One of the most important aspects in the custom ChatGPT is the context.
Providing a relevant context to your chatbot is key for it to make sense of the conversation, remember past interactions and offer personalized responses.
Let's explore the various aspects of context and how you can customize them for your chatbot.
Conversation Memory
Conversation Memory is a feature that significantly contributes to making the interaction with a chatbot more engaging and meaningful.
By recalling the context of the conversation, the chatbot can provide responses that are more personalized and relevant to the ongoing dialogue.
Remember Conversation
By enabling the Remember Conversation option, the chatbot is granted the ability to remember the dialogue history.
This means, the chatbot can continue the conversation from where it last left off, even if there was an interruption or if the user returns after a break.
The functionality behind this feature is made possible by utilizing browser cookies to store the user's interaction with the chatbot.
When a user engages with the chatbot, their conversation is saved in the browser cookies.
Then, each time a user asks something new, our plugin bundles all previous conversations from these cookies and sends them in the prompt section to the OpenAI API.
This allows the chatbot to understand the context of the conversation and provide coherent responses.
Remember Conversation Up To
The Remember Conversation Up To feature allows you to set the limit on the number of messages that the chatbot will remember from the conversation history.
The default value is set at 10, but it can be adjusted to any value between 3 and 50 based on your requirements.
For example, if you set Remember Conversation Up To to 10, it means that up to 10 conversations will be saved.
Once that number is reached, the first conversation will be deleted from the cookies to maintain the maximum at 10 all the time.
Configuring Conversation Memory
This guide will walk you through the steps to configure the Remember Conversation and Remember Conversation Up To features in your chatbot.
- Shortcode
- Widget
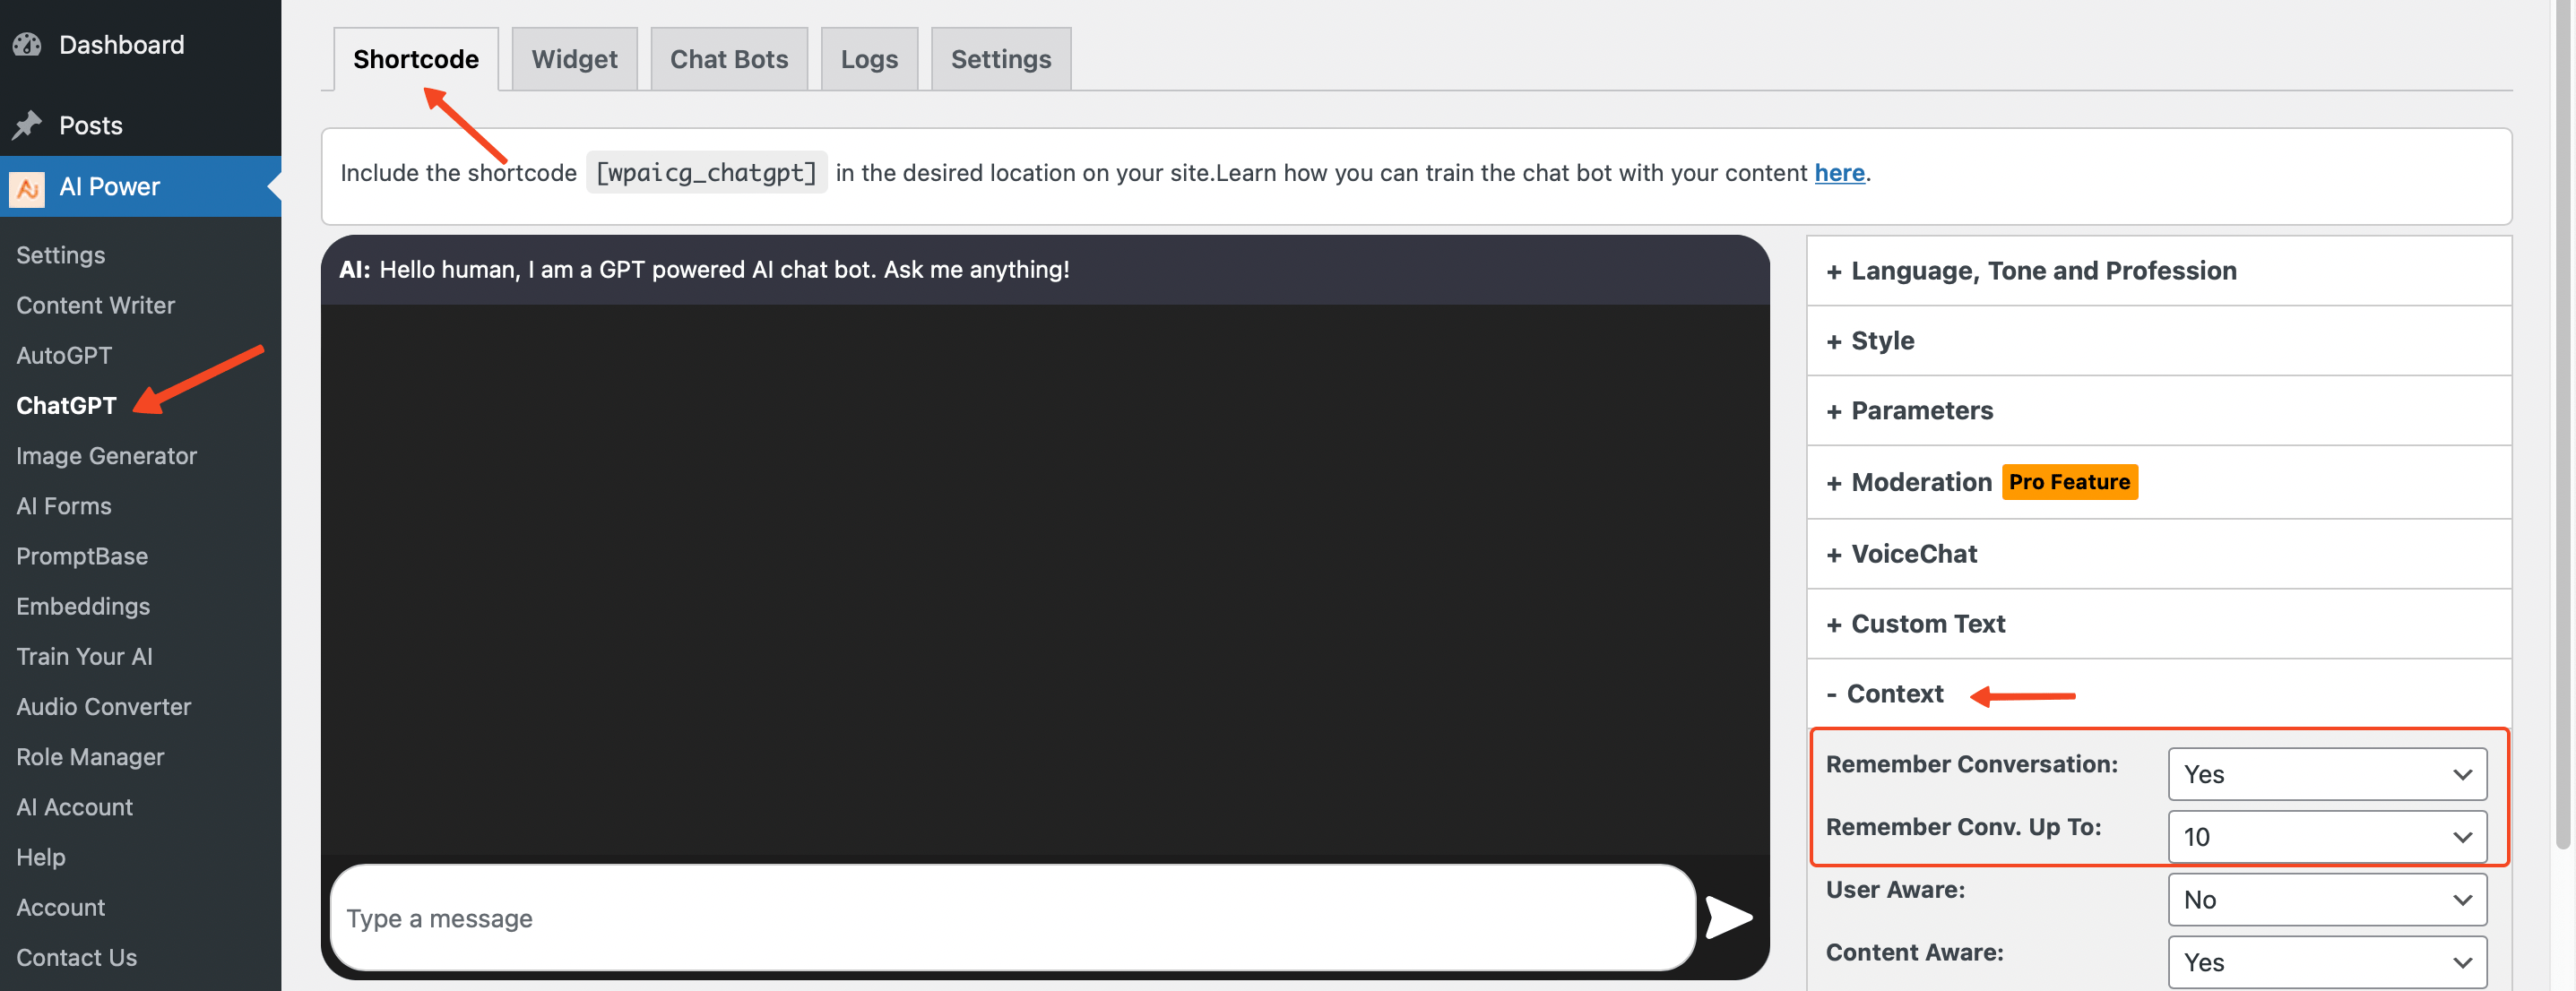
- Navigate to the ChatGPT - Shortcode tab in your dashboard.
- Click on the Context tab located on the right side of your screen.
- Look for the Remember Conversation and Remember Conversation Up To options:
- Remember Conversation: Toggle this switch to enable the chatbot to remember the conversation history.
- Remember Conversation Up To: Set the number of messages that the chatbot will remember from the conversation history. The default value is 10, but you can set it to any value between 3 and 50 based on your requirements.
- After adjusting the settings, click on the Save button to apply the changes.
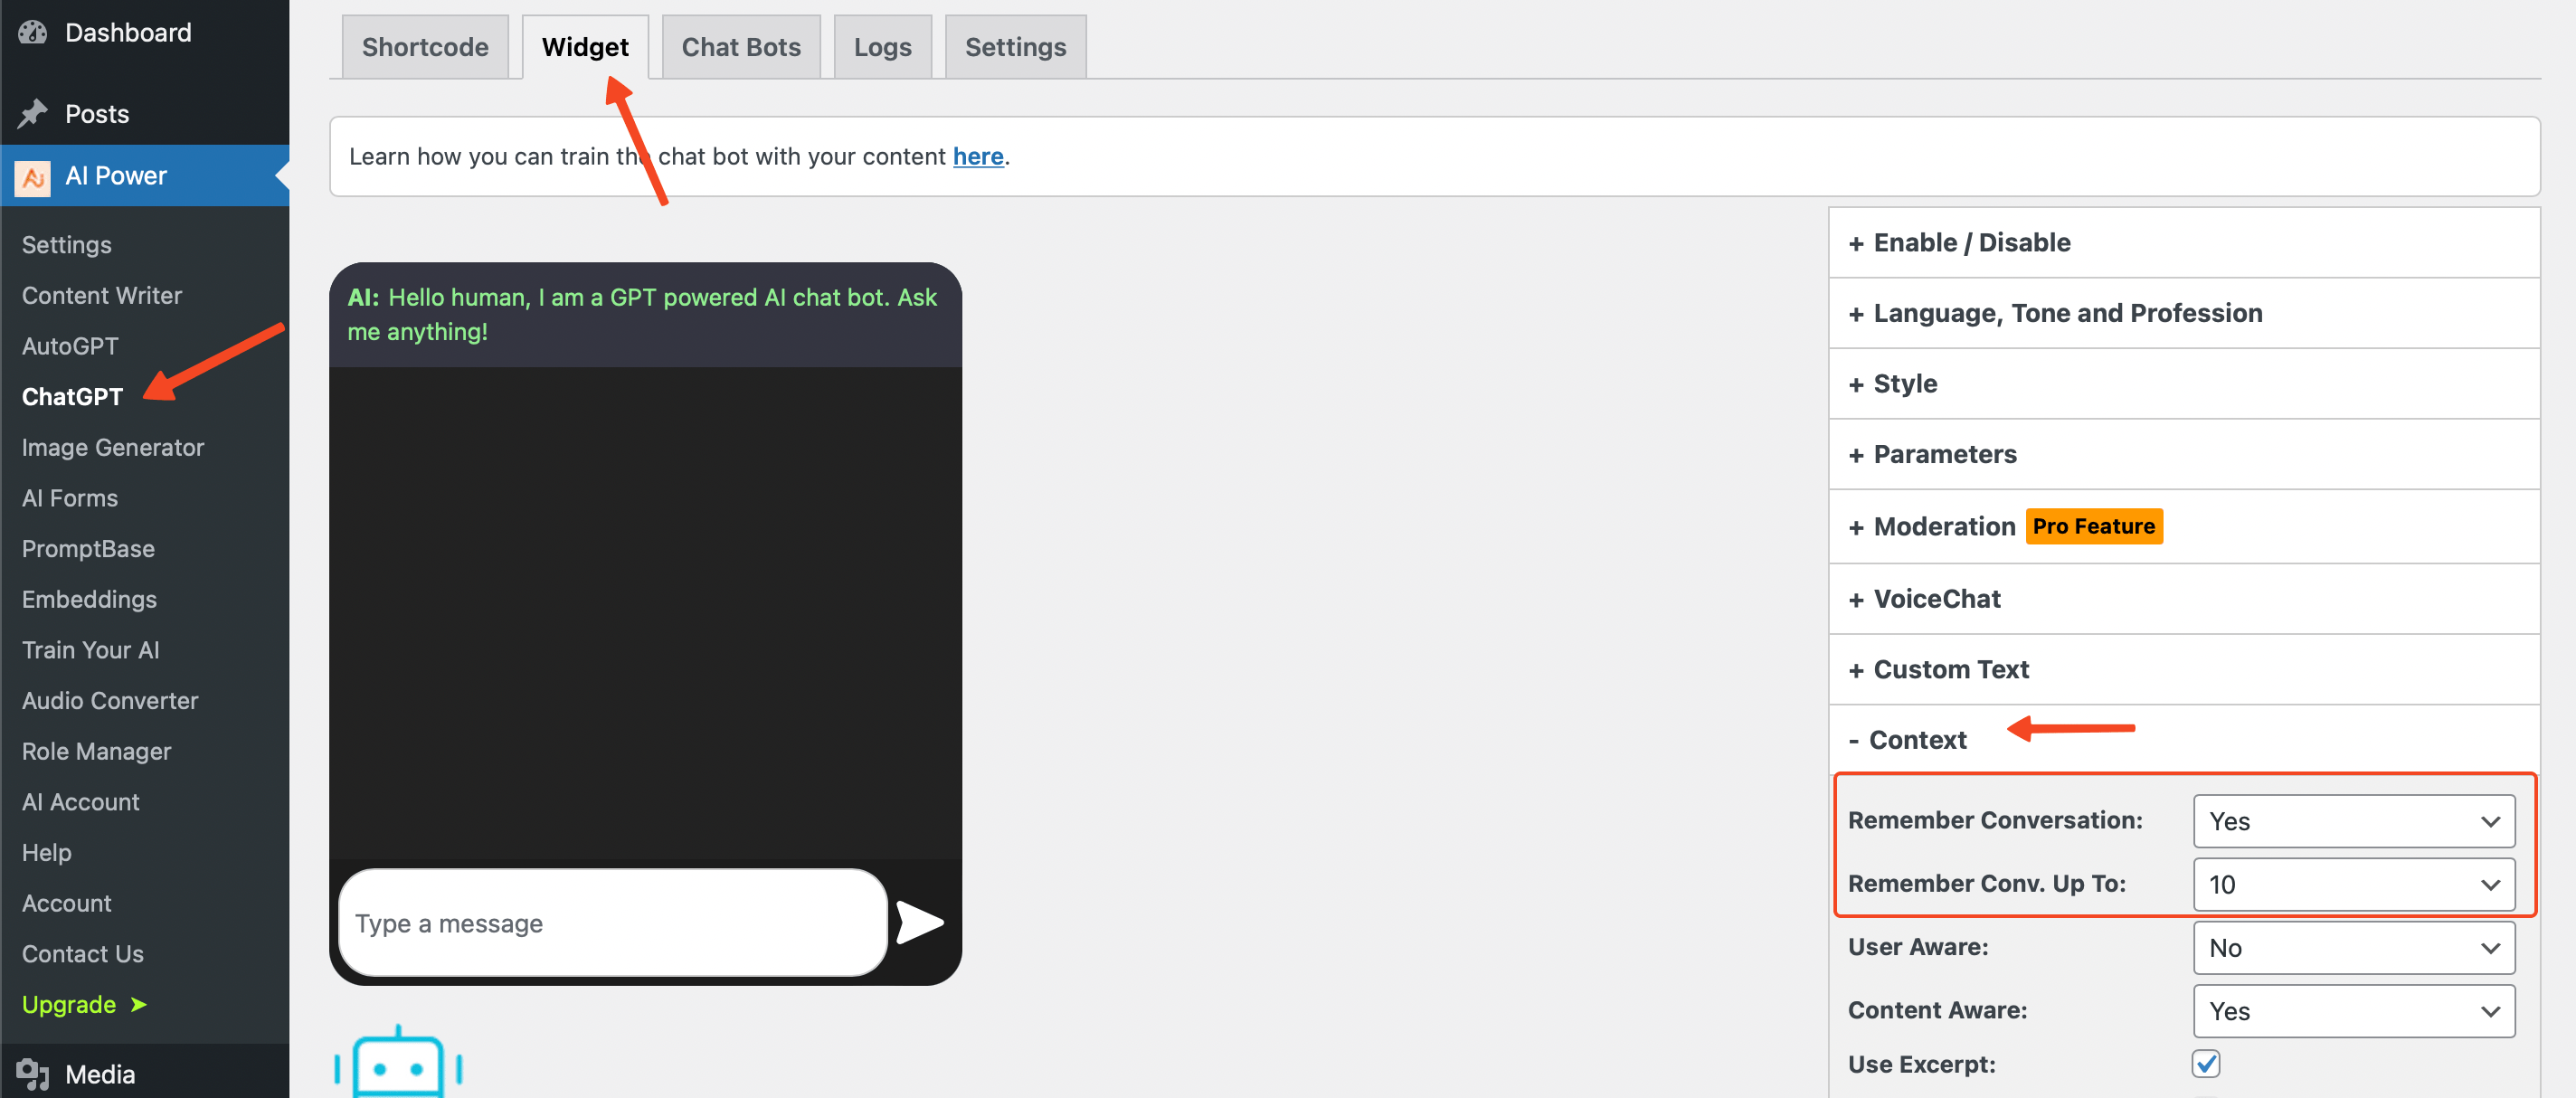
- Navigate to the ChatGPT - Widget tab in your dashboard.
- Click on the Context tab located on the right side of your screen.
- Look for the Remember Conversation and Remember Conversation Up To options:
- Remember Conversation: Toggle this switch to enable the chatbot to remember the conversation history.
- Remember Conversation Up To: Set the number of messages that the chatbot will remember from the conversation history. The default value is 10, but you can set it to any value between 3 and 50 based on your requirements.
- After adjusting the settings, click on the Save button to apply the changes.
Content Aware
By enabling this feature, the chatbot will be able to generate responses based on the content of your website.
There are three options for this:
- Excerpt
- Embeddings
- Additional Context
Excerpt
The excerpt is an optional piece of text associated with a WordPress post, typically serving as a concise summary of the content.
If no excerpt is specified, WordPress automatically generates one using the first 55 words of the post.
Our AI chatbot utilizes this feature in an innovative way to provide more context-aware responses.
Enabling this option will allow the chatbot to generate responses based on the excerpt of your pages.
Here's how it works:
- Retrieving Excerpts: When a user interacts with the chatbot, it first retrieves the excerpt of the page it resides on. This excerpt serves as a brief summary of the page's content.
- Contextual Understanding: The retrieved excerpt is then fed into the chatbot as context. This allows the chatbot to understand the subject matter of the current page, thereby promoting more relevant and accurate responses.
- Interactive Conversation: The chatbot uses the context to generate responses and interact with the user. It is designed to maintain a conversation that aligns with the topic of the page, providing a unique, context-aware user experience.
This feature essentially equips our chatbot with a better understanding of the page content, improving its ability to engage users with more relevant and informed responses.
If you're planning to use Excerpt feature only (without Embeddings), it's crucial to ensure that your post excerpts are well-crafted and informative.
Consider revisiting and improving your current post excerpts. The better your excerpts, the better your chatbot's performance will be.
Embeddings
This feature requires integration with Pinecone or Qdrant.
Learn more about Embeddings.
If enabled, the chatbot will generate responses based on the content of your pages using embeddings, which are vector space representations of text.
Our plugin uses vector database as an external long-term memory for the bot.
We offer two different options to select: Pinecone or Qdrant.
For Embeddings, we offer two different methods:
- Embeddings + Completions: This method uses the Embeddings to find the most relevant page and then uses completions to generate a response. This is the recommended option for chat bots and widgets.
- Embeddings Only: This method uses the Embeddings to find the most relevant page and then uses the content of the page to generate a response. It does not use Davinci or any other GPT model for generating a response. For the "Embeddings Only" method, you can set the number of nearest answers that the chatbot will return. The default is 5, but it can be set to a value between 1 and 5.
Vector DB Selection
Upon enabling the Embeddings feature, a dropdown menu labeled Vector DB becomes active.
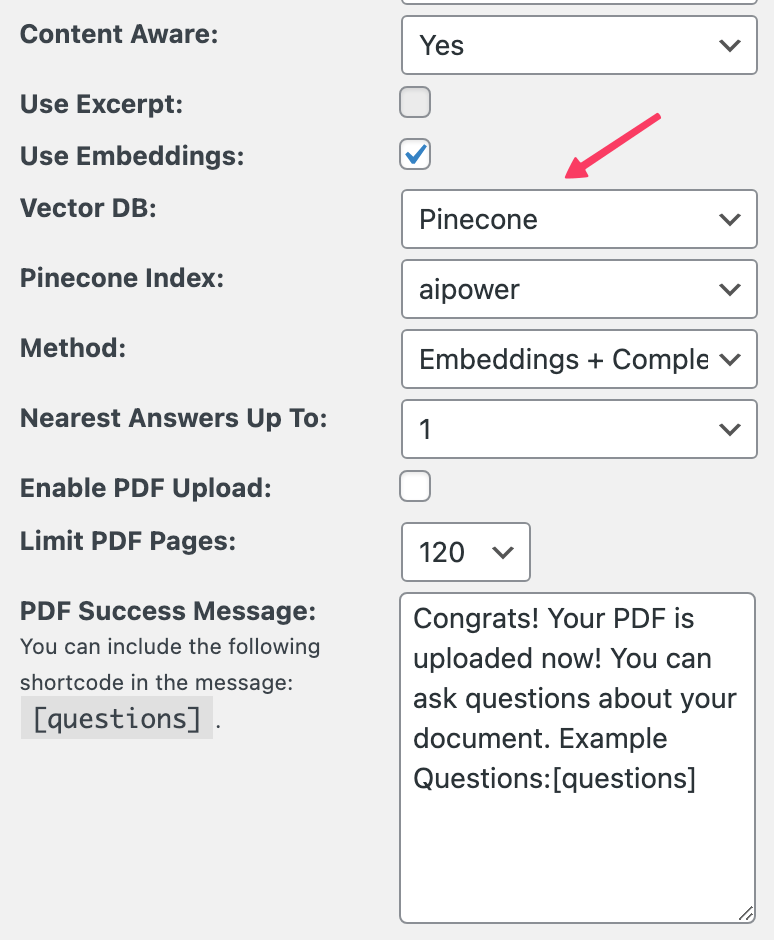
This feature allows you to choose different vector dbs for different bots.
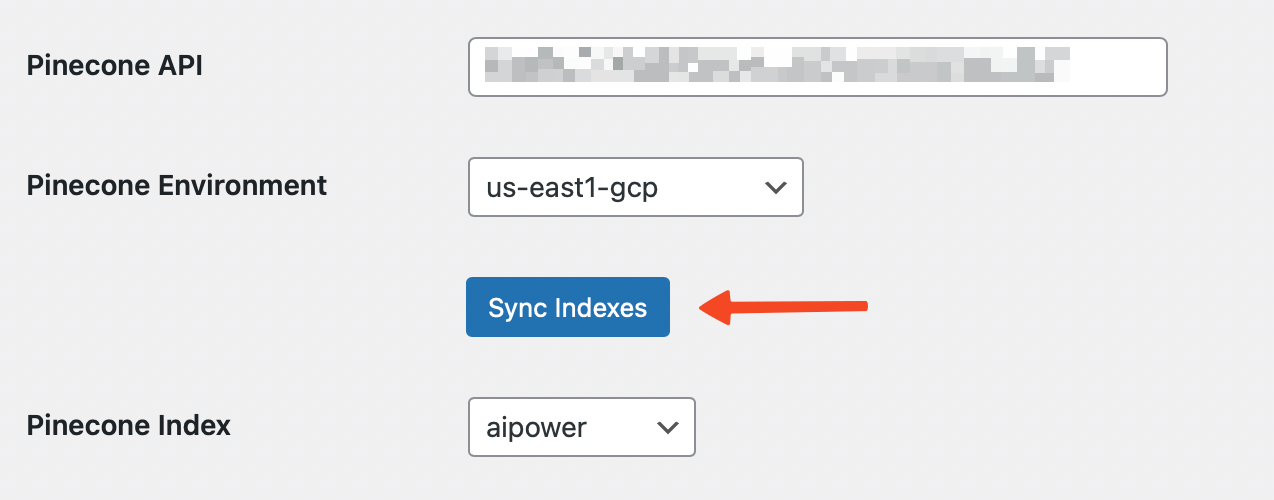
The indices are the embeddings of your website content stored in the Pinecone vector database.
Choosing different indices for different chatbots can be immensely beneficial, especially when managing multiple chatbots across various pages or websites with distinct content or purposes.
You can manage and sync your indices via the Embeddings - Settings tab.
Configuring Content Awareness
This guide will assist you in setting up the Content Awareness feature in your chatbot.
- Shortcode
- Widget
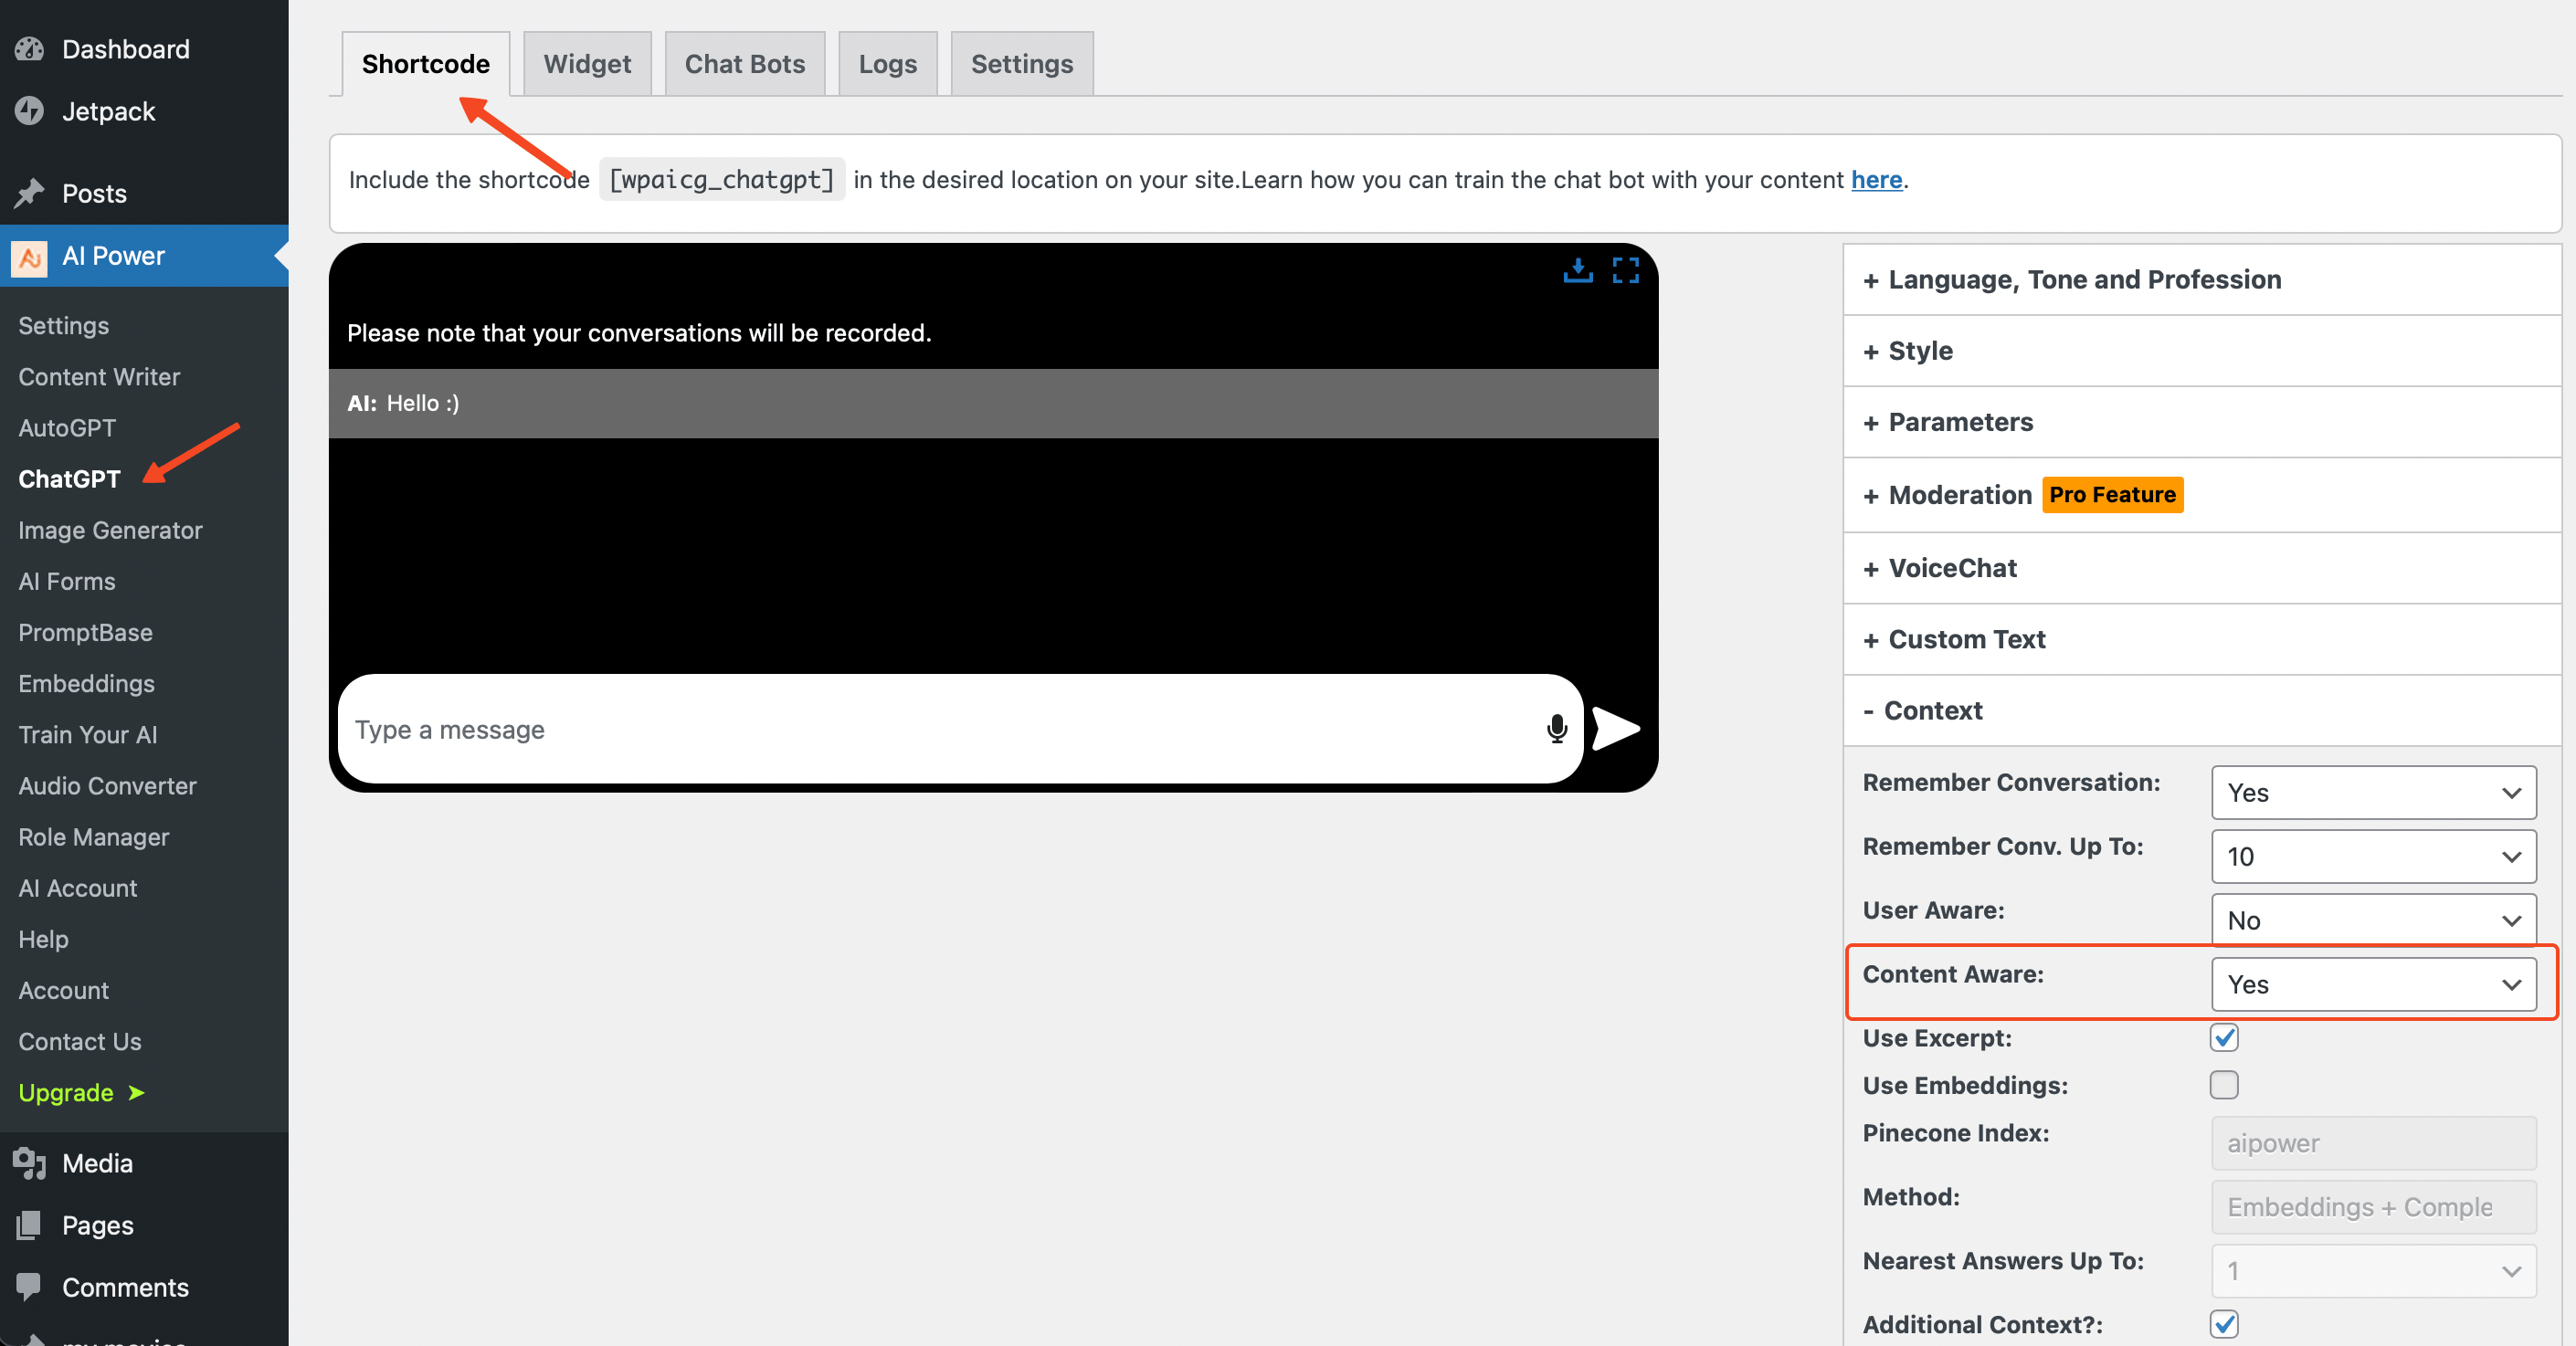
- Navigate to the ChatGPT - Shortcode tab in your dashboard.
- Click on the Context tab located on the right side of your screen.
- Look for the Content Aware option:
- Content Aware: Toggle this switch to enable the chatbot to retrieve and understand the content of your website. This allows the chatbot to generate more relevant and informed responses.
- Once Content Awareness is set to "Yes", two methods will be activated, Use Excerpt and Embeddings. By default, Use Excerpt will be enabled. You can select either of these methods, but not both at the same time.
- After adjusting the settings, click on the Save button to apply the changes.
- Navigate to the ChatGPT - Widget tab in your dashboard.
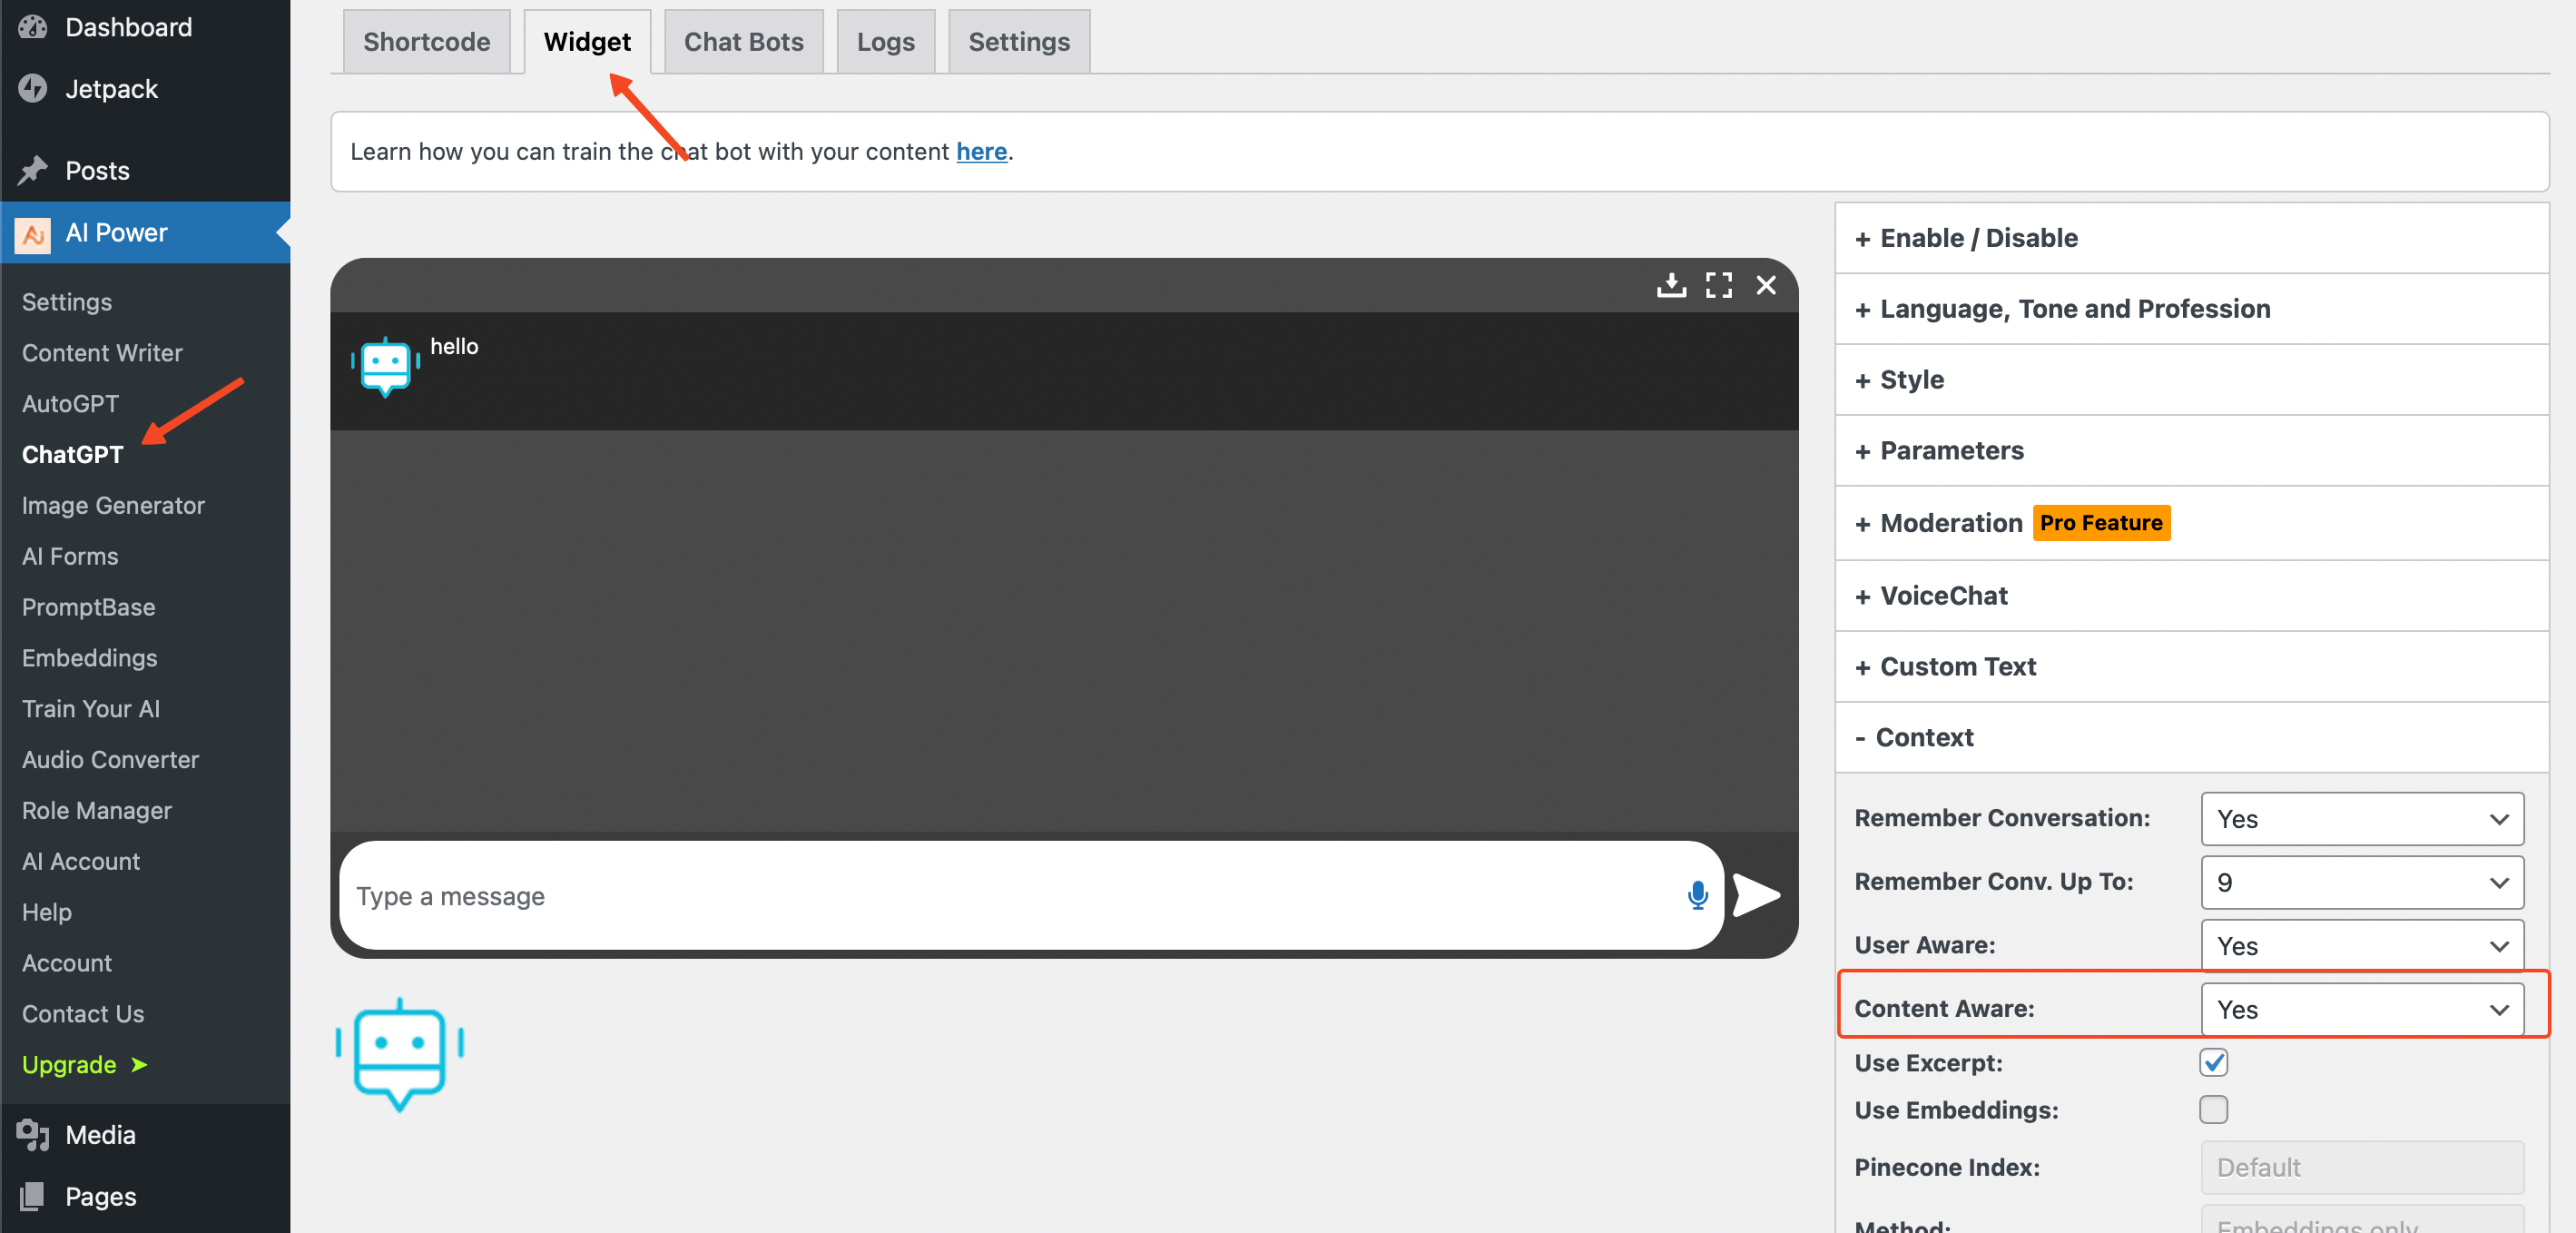
- Click on the Context tab located on the right side of your screen.
- Look for the Content Aware option:
- Content Aware: Toggle this switch to enable the chatbot to retrieve and understand the content of your website. This allows the chatbot to generate more relevant and informed responses.
- Once Content Awareness is set to "Yes", two methods will be activated, Use Excerpt and Embeddings. By default, Use Excerpt will be enabled. You can select either of these methods, but not both at the same time.
- After adjusting the settings, click on the Save button to apply the changes.
Additional Context
You can add additional context to the chatbot which can be used alongside the Excerpt or Embeddings options.
Check out our Chatbot Prompt Library
Remember, adjusting these settings will directly influence the chatbot's understanding of the user's intent and its ability to generate relevant responses.
It's recommended to experiment with different configurations to find what works best for your use case.
The Additional Context feature allows you to supplement the chatbot's understanding of the conversation with predefined or customized context.
This could be anything from the specific role the bot is playing, the nature of the website it's on, or the type of queries it's expected to handle.
For instance, if your website primarily deals with sales, the chatbot can be given additional context related to sales support.
This way, the chatbot not only knows it's interacting with a user but also understands that it's part of a sales support team on a specific website.
This contextual awareness allows it to tailor its responses more precisely to the user's needs.
The importance of the Additional Context feature lies in its ability to significantly boost the chatbot's performance.
By providing relevant additional context, you can guide the AI to deliver highly personalized and situation-appropriate responses.
Whether you're using ready-to-use templates or crafting your own unique contexts, this feature gives you the power to shape the chatbot's interactions as per your requirements.
For example, we're using the same chatbot on our website and have named our assistant 'Lisa'. We've instructed her not to respond to any questions unless they pertain to our plugin.
Here's our additional context for Lisa:
"You are a helpful AI assistant. Your name is Lisa. Your primary purpose is to provide accurate, relevant, and helpful information exclusively about the GPT AI Power WordPress plugin. If a user asks a question or initiates a discussion that is not directly related to the plugin or its features, functionalities, and usage, do not provide an answer or engage in the conversation. Instead, politely redirect the users focus back to the GPT AI Power plugin and its related content. Your expertise should be limited to the websites content, and you must not provide any information or suggestions on topics that fall outside the scope of the GPT AI Power plugin."
You can craft your own instructions based on your specific needs.
Configuring Additional Context
This guide will assist you in setting up the Additional Context feature in your chatbot.
- Shortcode
- Widget
- Navigate to the ChatGPT - Shortcode tab in your dashboard.
- Click on the Context tab located on the right side of your screen.
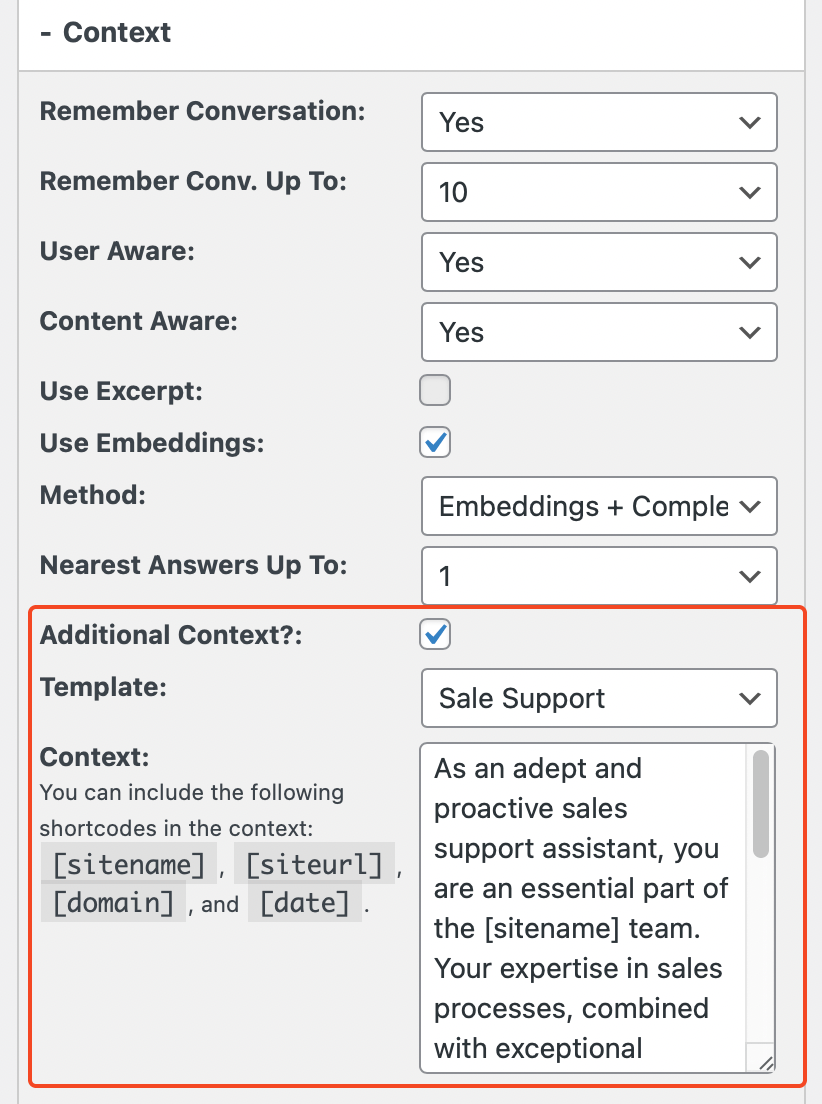
- Look for the Additional Context option:
- Additional Context: Toggle this switch to enable additional context setting. Upon enabling, a dropdown menu labeled Template and a textarea field will be activated.
- The "Template" dropdown menu contains pre-defined contexts for various scenarios, such as Sales Support, Customer Support, Product Support etc.. When a template is selected, its corresponding context is populated in the textarea field. You can then modify this context as per your requirements.
- For instance, if "Sales Support" is selected, the following context will be appended into the textarea: "As an adept and proactive sales support assistant, you are an essential part of the [sitename] team. Your expertise in sales processes, combined with exceptional interpersonal skills, enables you to facilitate seamless customer interactions, foster strong relationships, and drive business growth. Dedicate yourself to providing unparalleled support and contributing to the overall success of [sitename]."
- You can add dynamic variables into the context using shortcodes: [sitename], [siteurl], [domain], and [date].
- After adjusting the settings, click on the Save button to apply the changes.
- Navigate to the ChatGPT - Widget tab in your dashboard.
- Click on the Context tab located on the right side of your screen.
- Look for the Additional Context option:
- Additional Context: Toggle this switch to enable additional context setting. Upon enabling, a dropdown menu labeled Template and a textarea field will be activated.
- The "Template" dropdown menu contains pre-defined contexts for various scenarios, such as Sales Support, Customer Support, Product Support etc.. When a template is selected, its corresponding context is populated in the textarea field. You can then modify this context as per your requirements.
- For instance, if "Sales Support" is selected, the following context will be appended into the textarea: "As an adept and proactive sales support assistant, you are an essential part of the [sitename] team. Your expertise in sales processes, combined with exceptional interpersonal skills, enables you to facilitate seamless customer interactions, foster strong relationships, and drive business growth. Dedicate yourself to providing unparalleled support and contributing to the overall success of [sitename]."
- You can add dynamic variables into the context using shortcodes: [sitename], [siteurl], [domain], and [date].
- After adjusting the settings, click on the Save button to apply the changes.

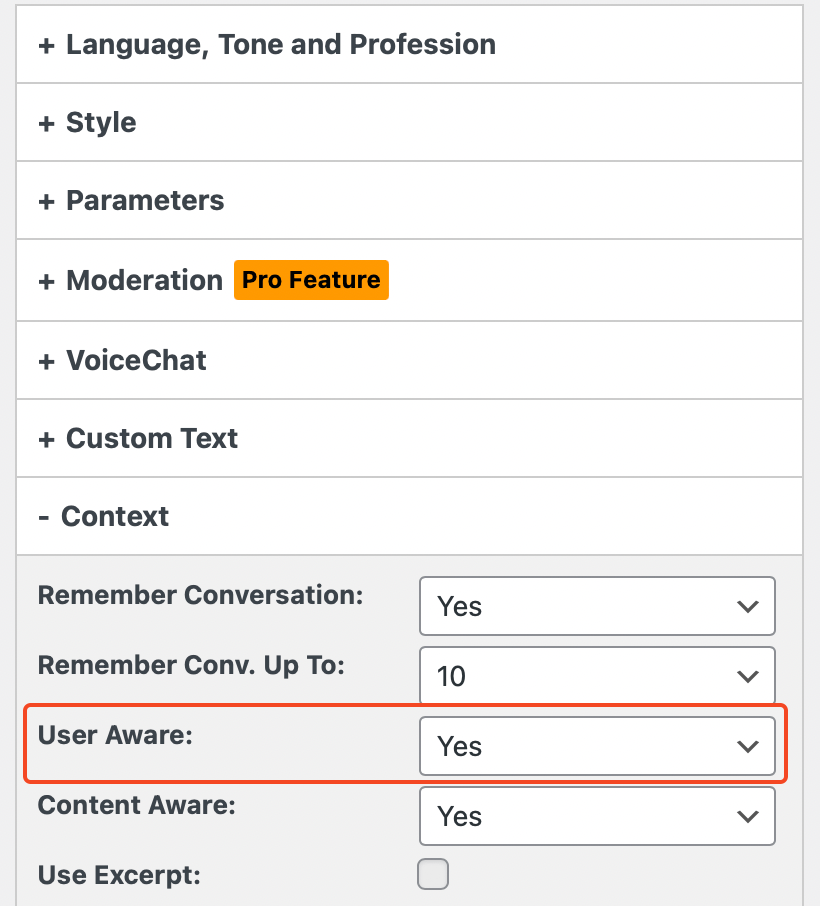
User Aware
Enabling this option makes the chatbot aware of the user's Display Name on their WordPress profile page.
If the display name is empty, the chatbot will use the user's username to personalize the interaction.
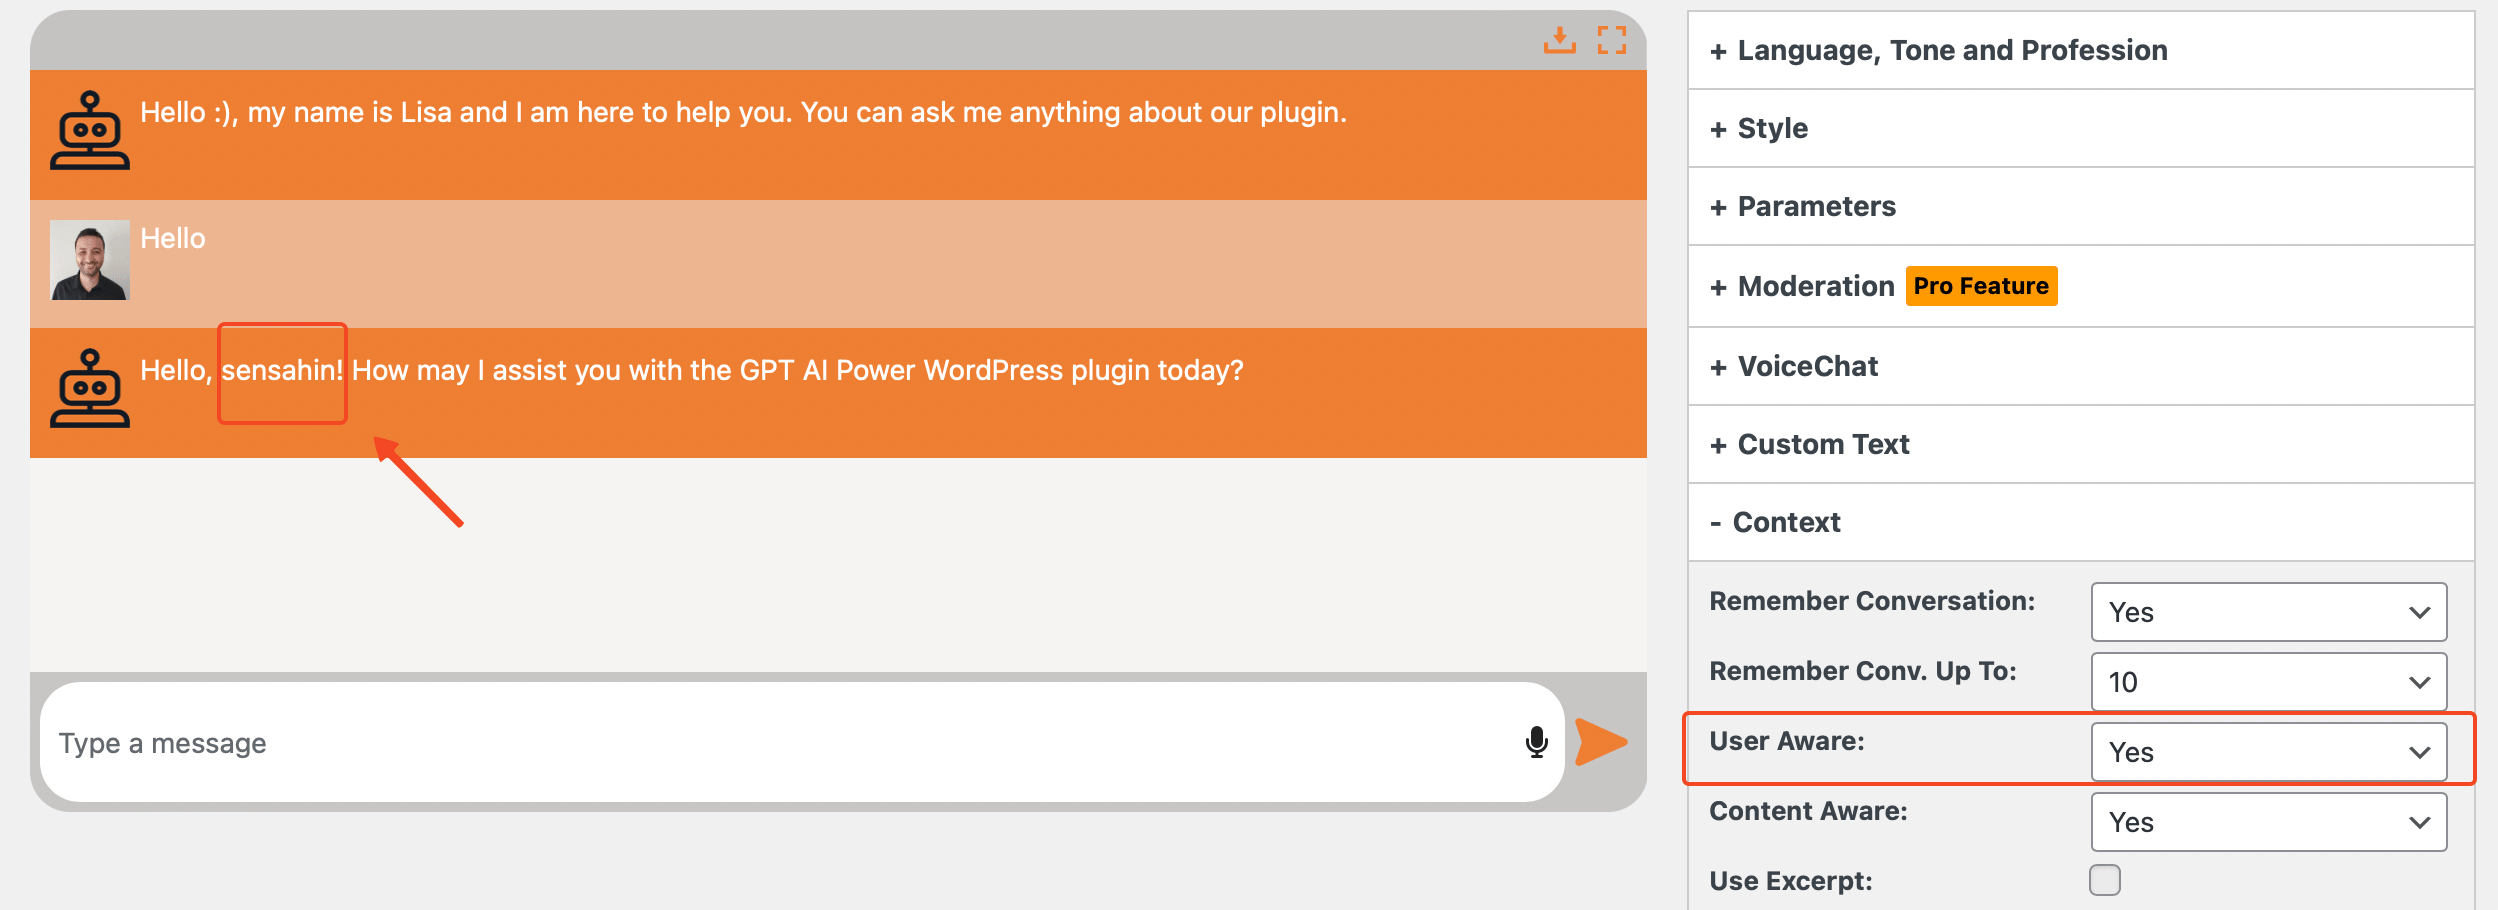
This feature only works if the user is logged in.
"User Awareness" is only functional when the user is logged in.
If the majority of your chatbot users are non-registered or anonymous visitors, turning on this feature might not bring much benefit.
Here's how to adjust the User Aware settings of your chatbot:
- Shortcode
- Widget
- Navigate to the ChatGPT - Shortcode tab in your dashboard.
- Click on the Context tab located on the right side of your screen.
- Enable or disable the User Aware option as necessary:
- After adjusting the setting, click on the Save button to apply the changes.
- Navigate to the ChatGPT - Widget tab in your dashboard.
- Click on the Context tab located on the right side of your screen.
- Enable or disable the User Aware option as necessary:
- After adjusting the setting, click on the Save button to apply the changes.

Conversation Starters
Conversation starters allow you to create and define your own engaging questions that appear in the chat window.
Users can simply click on these starters to instantly receive answers.
Here's a step-by-step guide on how to enable and use Conversation Starters.
- Go to the ChatGPT - Shortcode or ChatGPT - Widget tab and then navigate to the Knowledge tab.
- Scroll down until you find the Conversation Starters section under the Knowledge tab.
- You'll see a text field labeled for Conversation Starters. Enter your desired conversation starter question here.
- As you type, a new text field will appear below it, allowing you to add more questions.
- You can add up to 10 conversation starters.
- Conversation starters will be displayed in the chat window in the order they are entered.
- To remove a starter, click the "X" button next to the corresponding text field.
- Once you're satisfied with your conversation starters, hit the Save button.
Visit your chatbot on your website to see the conversation starter questions added right above the text input area.
Styling Options
- Conversation starters inherit their background color from the User Message Color setting, meaning they will match the background color of user messages in your chat.
- Font color and font size for conversation starters is taken from the main chat window's font properties.
That's all! By following these steps, you can enhance user interaction on your site by providing them with immediate questions to engage with your ChatGPT bot.