Overview
Use Chatbots to add AI chatbots to WordPress. Each chatbot has its own model, instructions, knowledge sources, capabilities, display settings, popup settings, limits, connected apps, and rules. If the Chatbots menu is not visible, enable Chatbots under AI Puffer > Settings > Modules and confirm that your WordPress role has access to it.Live chatbot demo
Open the frontend chatbot example.
Deploy
Use popup, on-page, or external embed.
Model
Choose the provider, model, instructions, and memory.
Knowledge
Use vectors, page context, and knowledge sources.
Capabilities
Enable file upload, web search, images, and voice.
Display
Customize colors, popup, suggested questions, consent, and labels.
Limits
Set usage limits and credit behavior.
Connected Apps
Send chatbot events to Slack, HubSpot, Notion, and more.
Rules
Trigger actions from chatbot events and conditions.
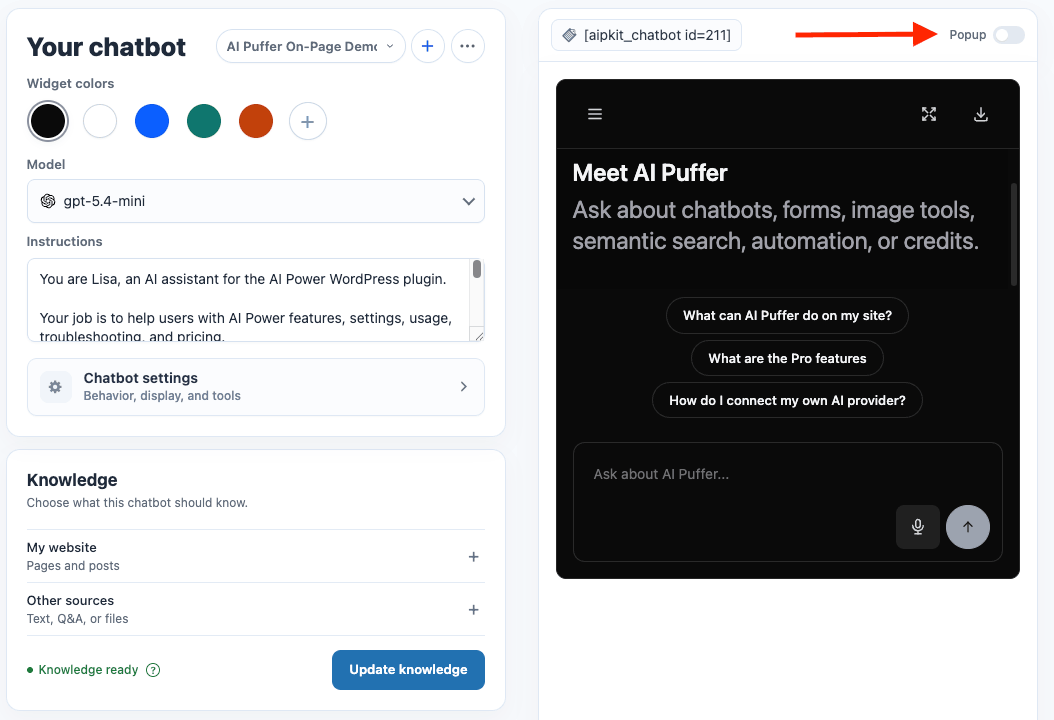
Create a Chatbot
- Go to AI Puffer > Chatbots.
- Click the + button next to the chatbot selector.
- A new bot is created immediately with the default name New Chatbot.
- Select the chatbot from the dropdown.
- Open Chatbot settings > Display > Chat text to rename it.
- Use the live preview to test the chatbot before publishing it.
Deploy a Chatbot
Each chatbot has a . For example:On-page Chatbot
- Select the chatbot.
- Turn Popup off in the preview bar.
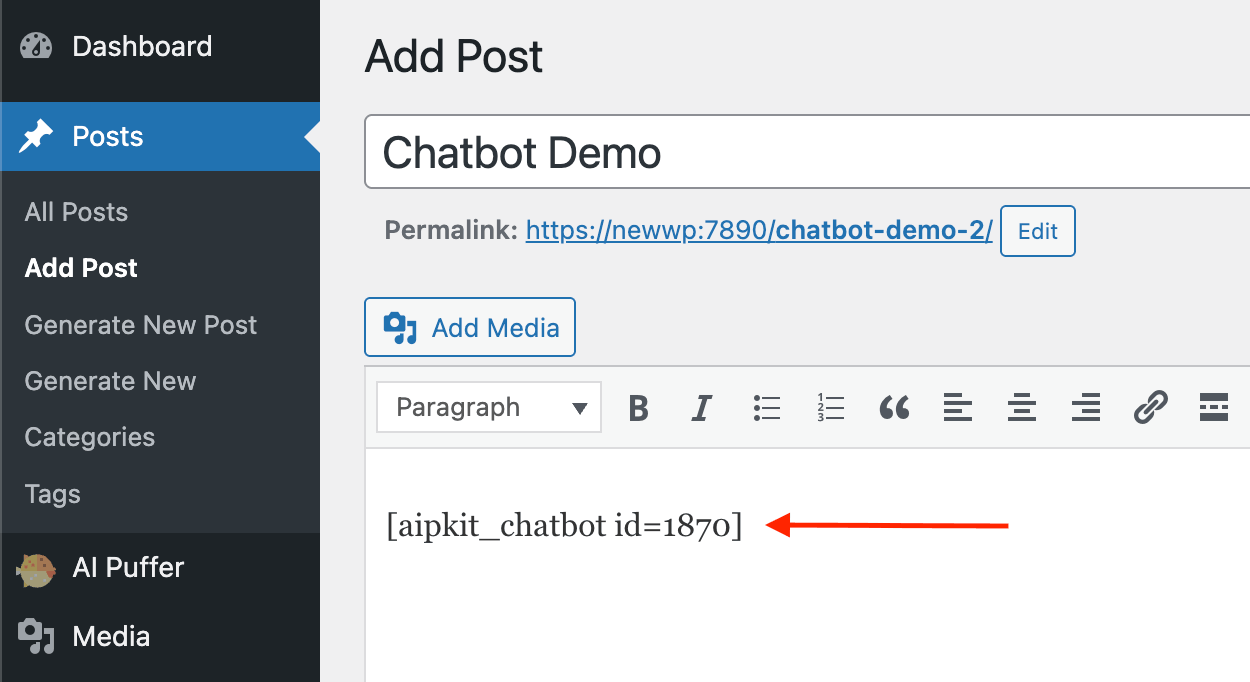
- Copy the shortcode from the preview bar, or open Chatbot settings > Publish > WordPress shortcode.
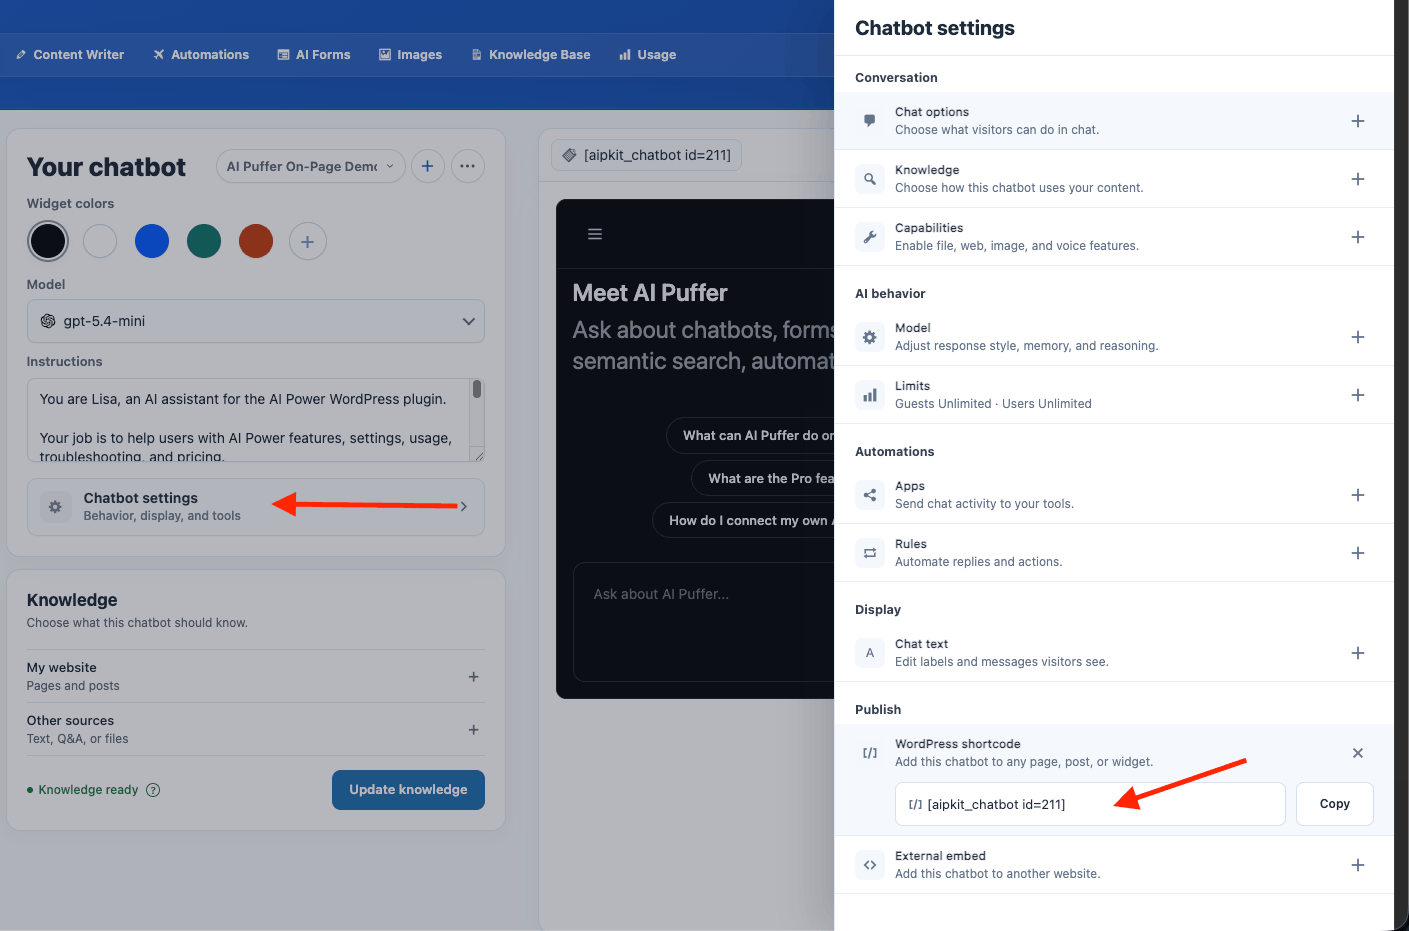
- Paste it into a page, post, block, or shortcode area.
- Publish or update the page.

Popup Chatbot
- Select the chatbot.
- Turn Popup on in the preview bar.
- Turn Site-wide on if the launcher should appear across the site.
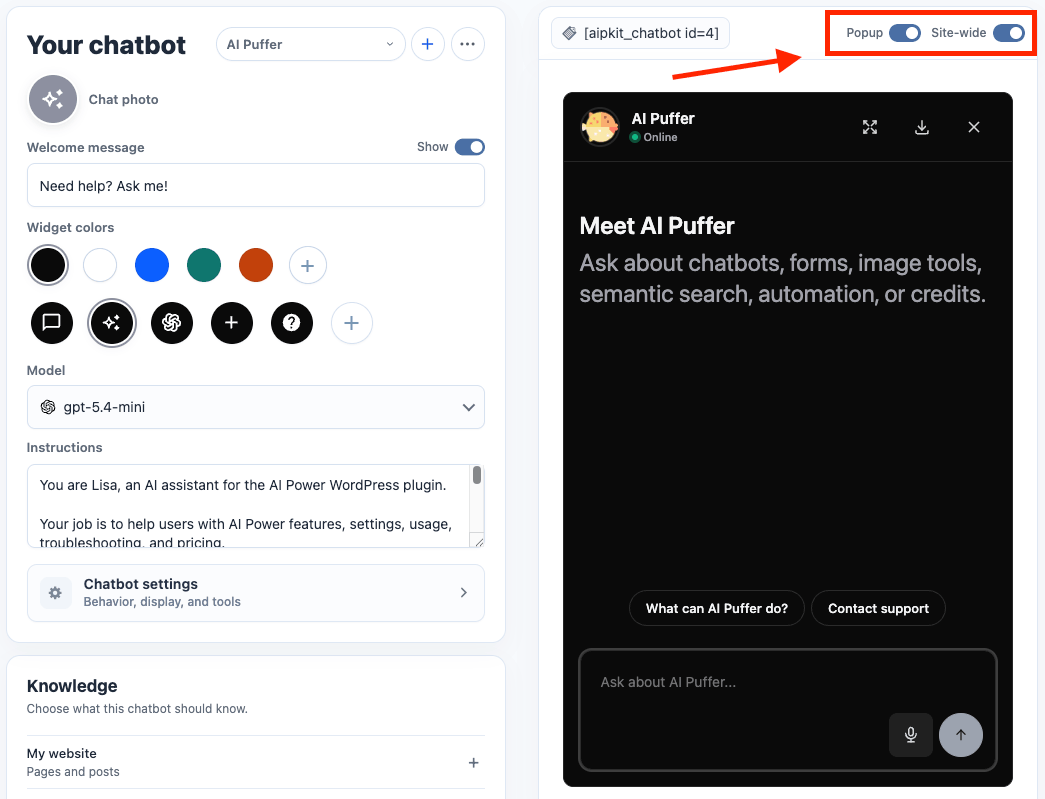
- Configure the popup design on the main screen, or open Chatbot settings > Display for more popup options.
- Save and test the site frontend.
Site-wide popup mode is global. Enabling it for one chatbot turns it off for the previous site-wide popup chatbot.
External Embed
External Embed lets you place a chatbot on a non-WordPress site while managing it from WordPress.- Select the chatbot.
- Open Chatbot settings.
- Open Publish > External embed.
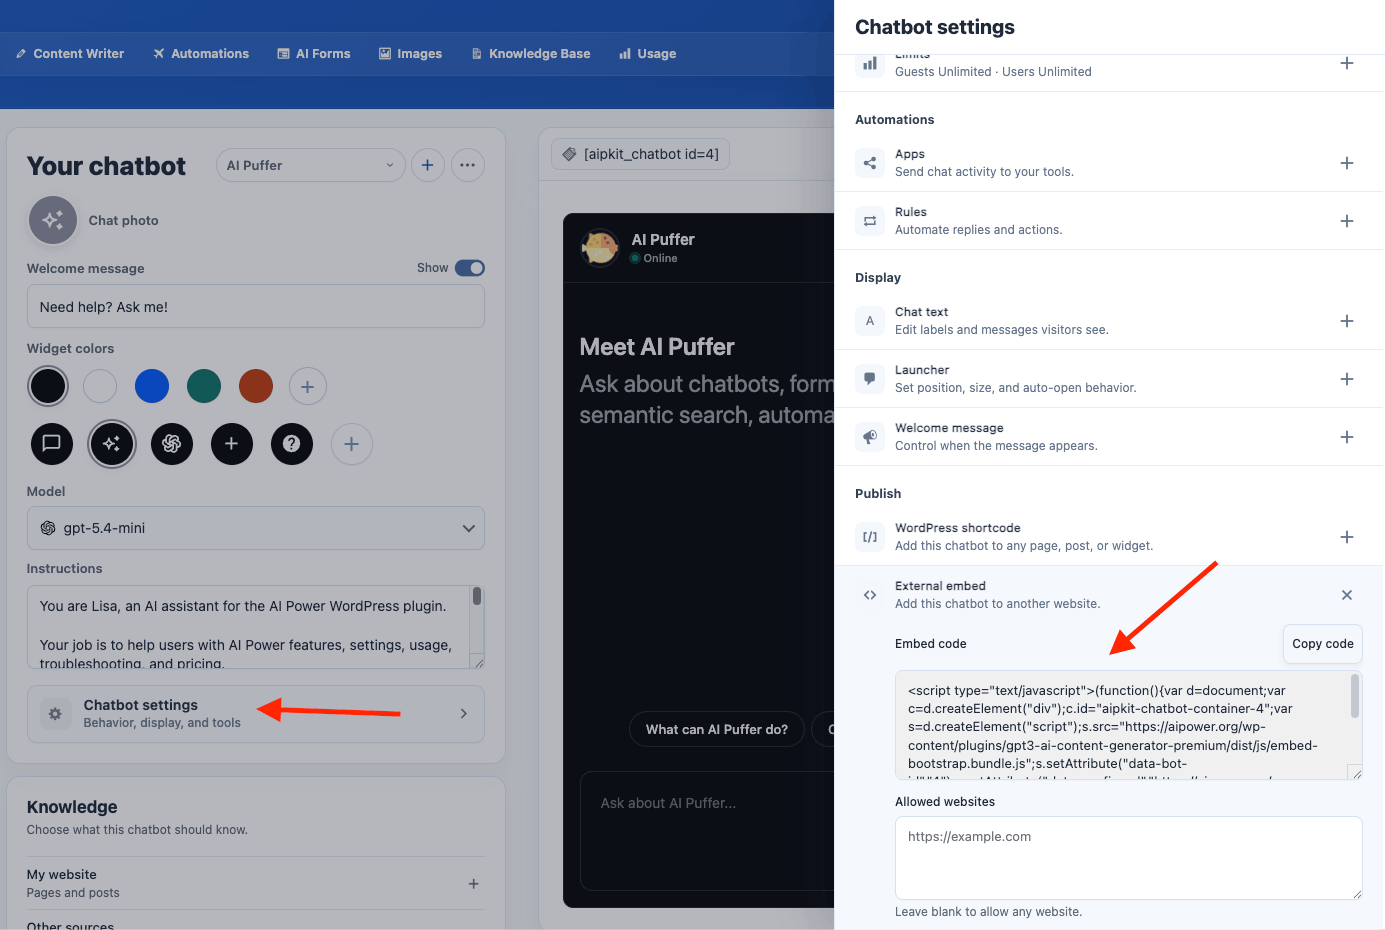
- Copy the embed code.
- Add allowed websites, one URL per line.
- Paste the embed code into the external site.
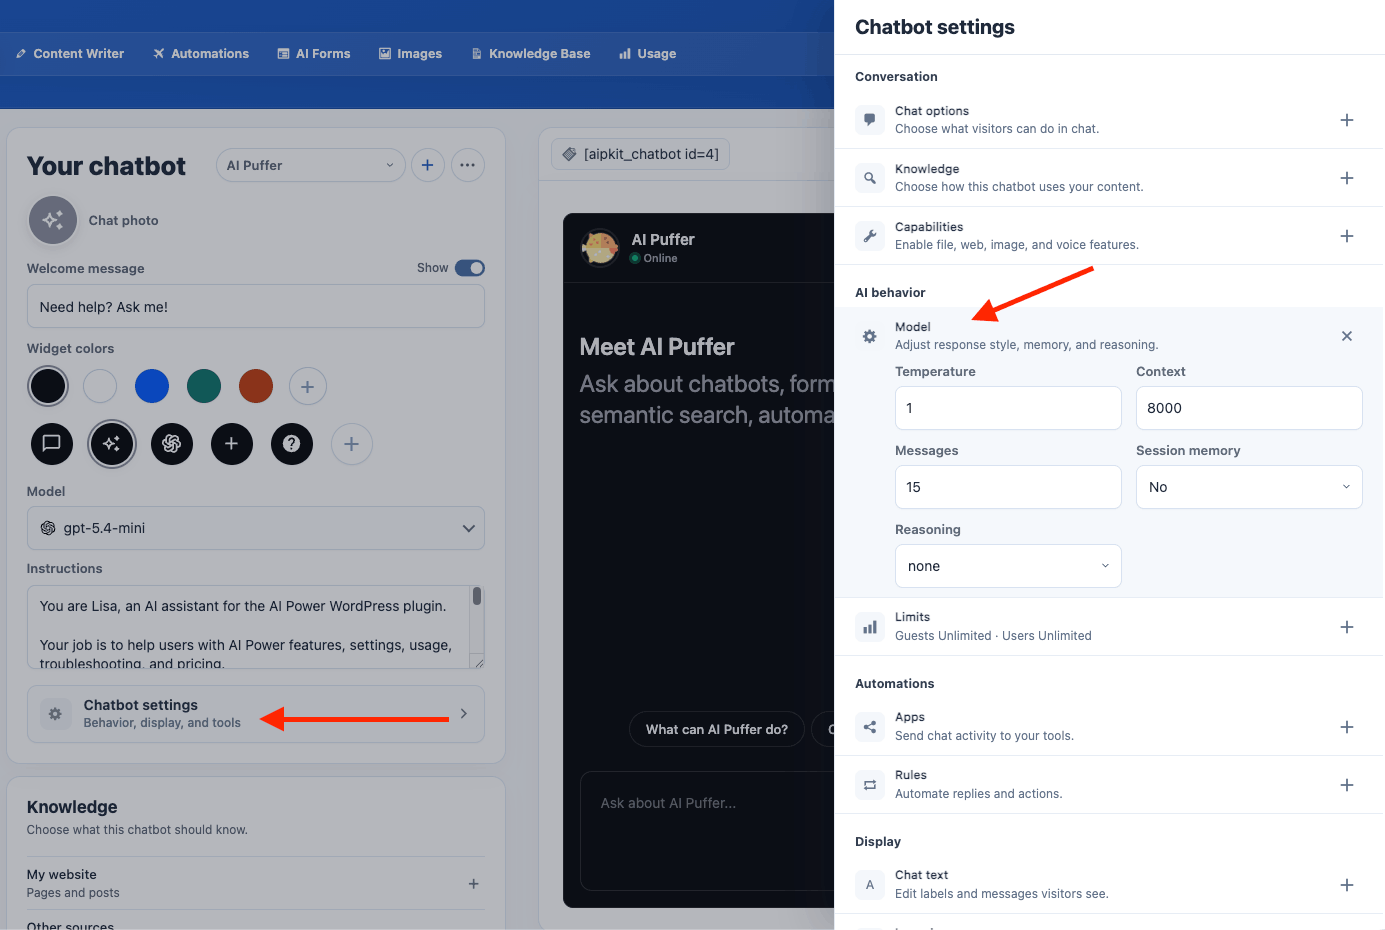
Model and Instructions
Use the main chatbot builder to choose the chatbot model and write instructions. Open Chatbot settings > AI behavior > Model for response tuning.
Knowledge
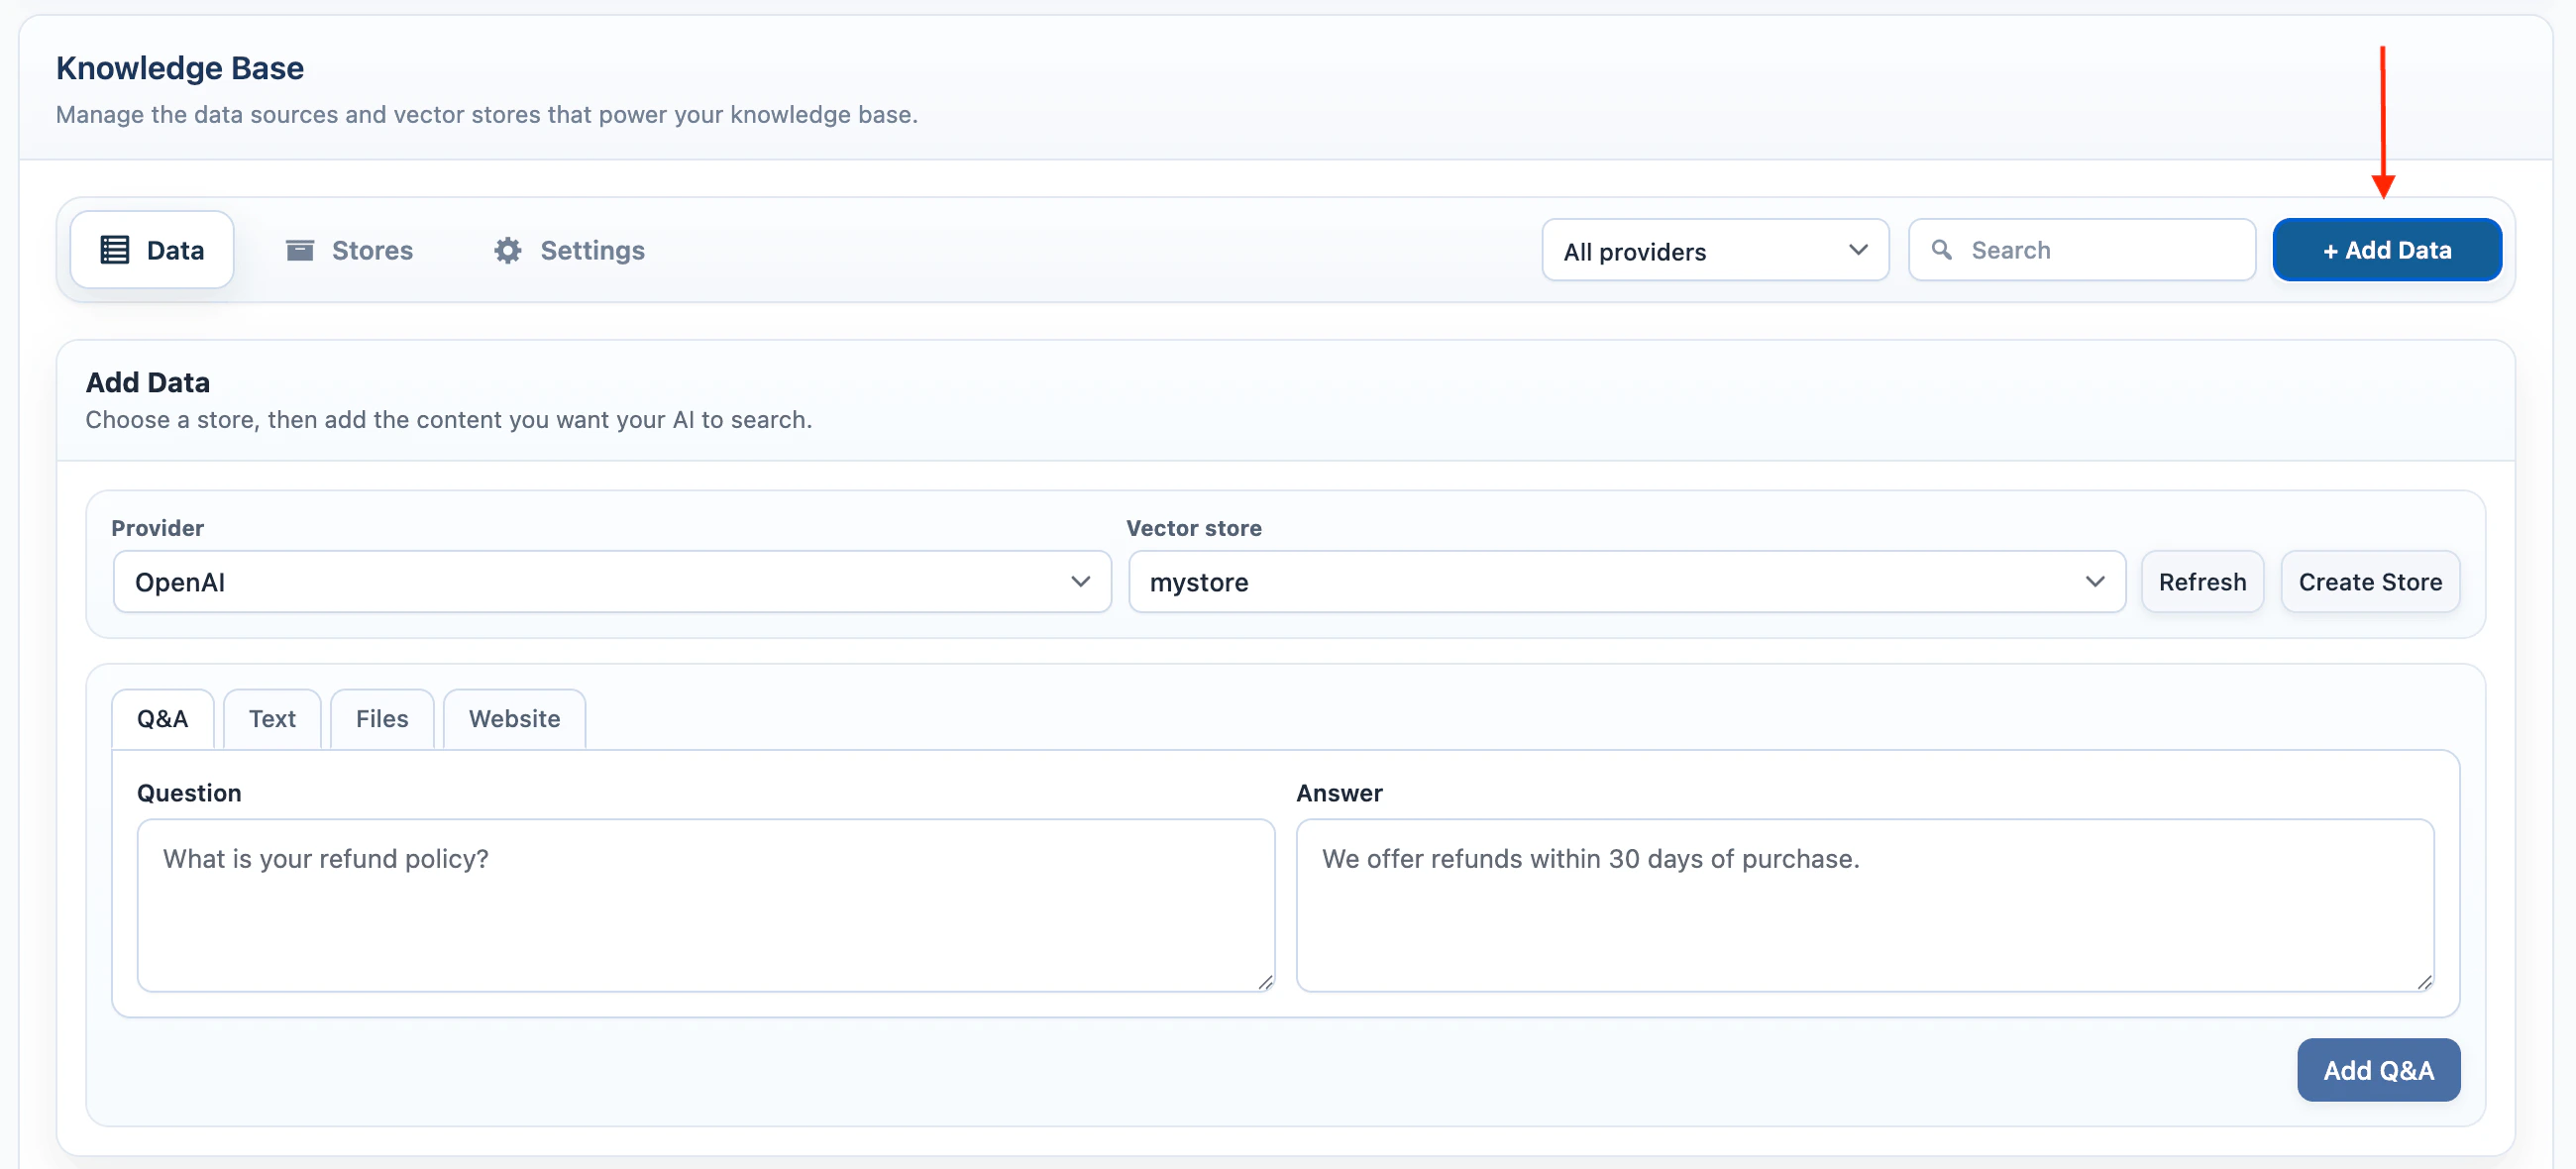
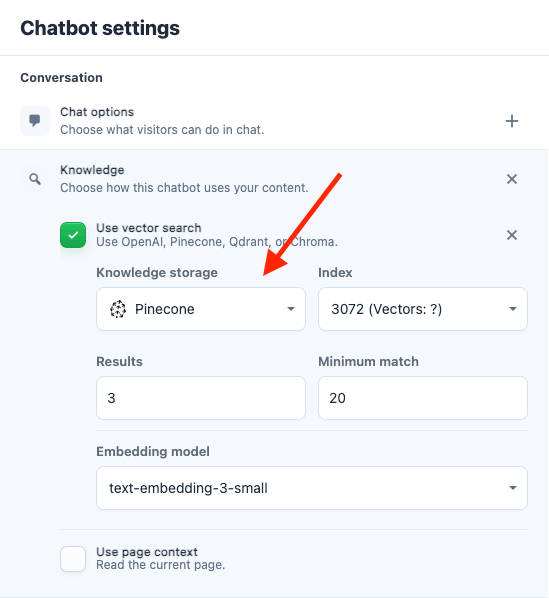
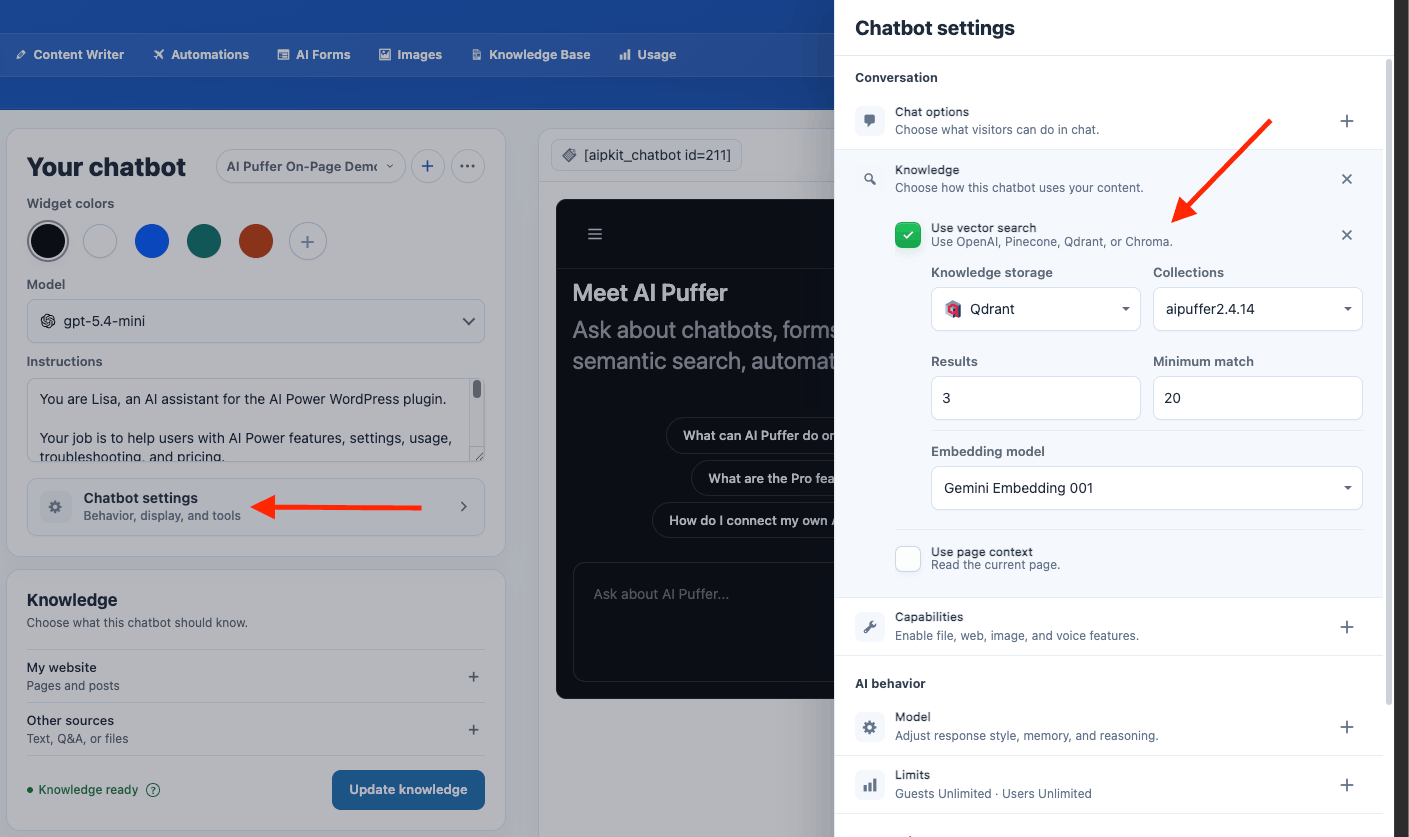
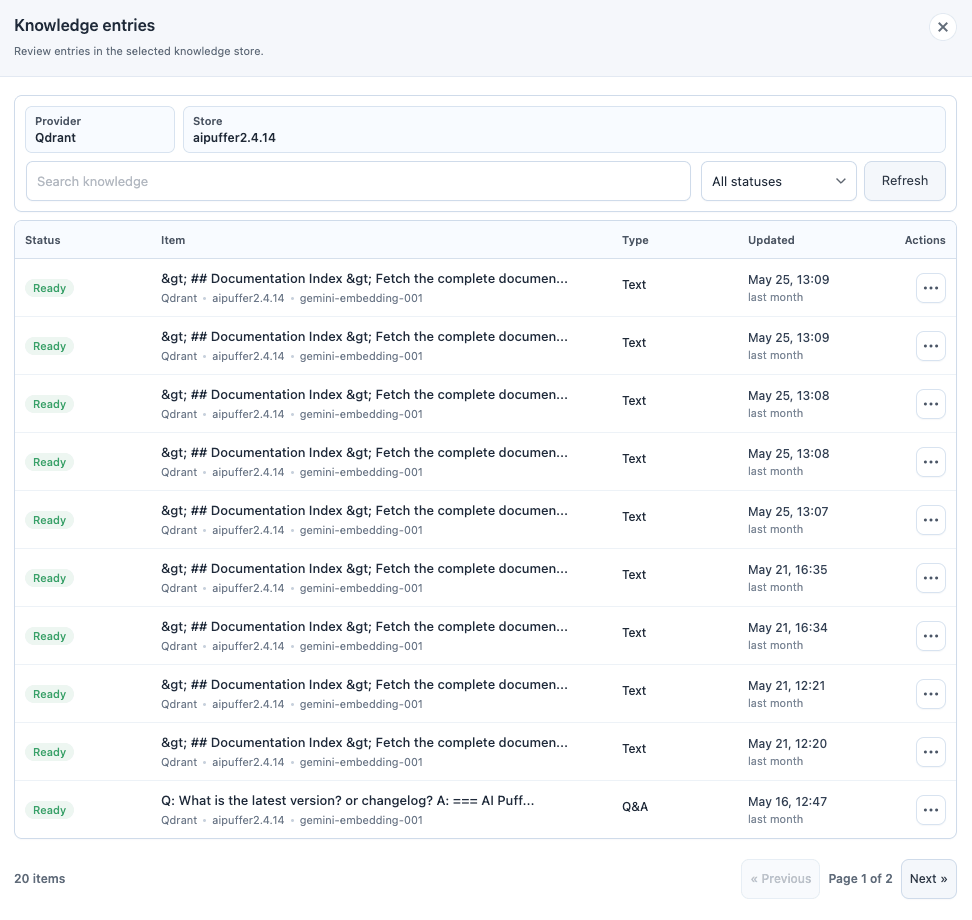
Knowledge controls the information a chatbot can use before it answers. It can read the current page content, search trained vector data, or use both depending on the chatbot setup. Use the main Knowledge card to add website content, text, Q&A, or files for the selected chatbot. Open Chatbot settings > Conversation > Knowledge when you need to choose the retrieval source, vector storage, stores or collections, embedding model, Results, or Minimum match.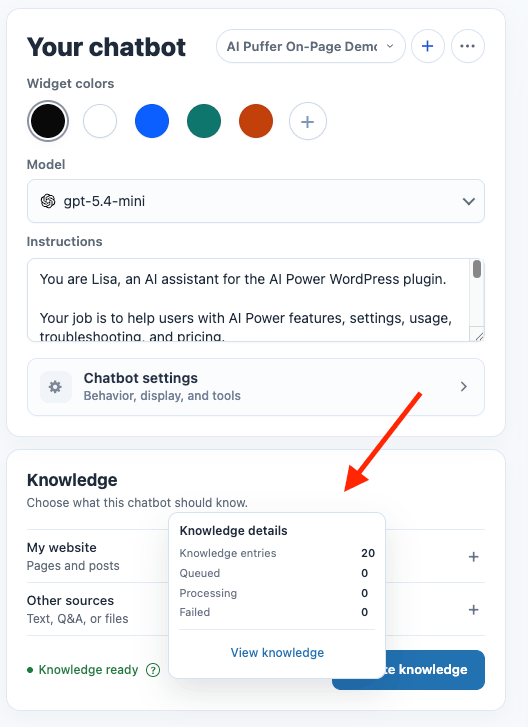
Vector
Vector is the better option when you want to train the chatbot with your own content. AI Puffer converts your content into searchable chunks. When a visitor asks a question, the chatbot retrieves the closest matching chunks and uses them as context for the answer.OpenAI
OpenAI Vector Stores are the simplest option when the chatbot uses OpenAI. To create a store:- Go to AI Puffer > Knowledge Base > Stores.
- Select OpenAI as the provider.
- Click Create Store.
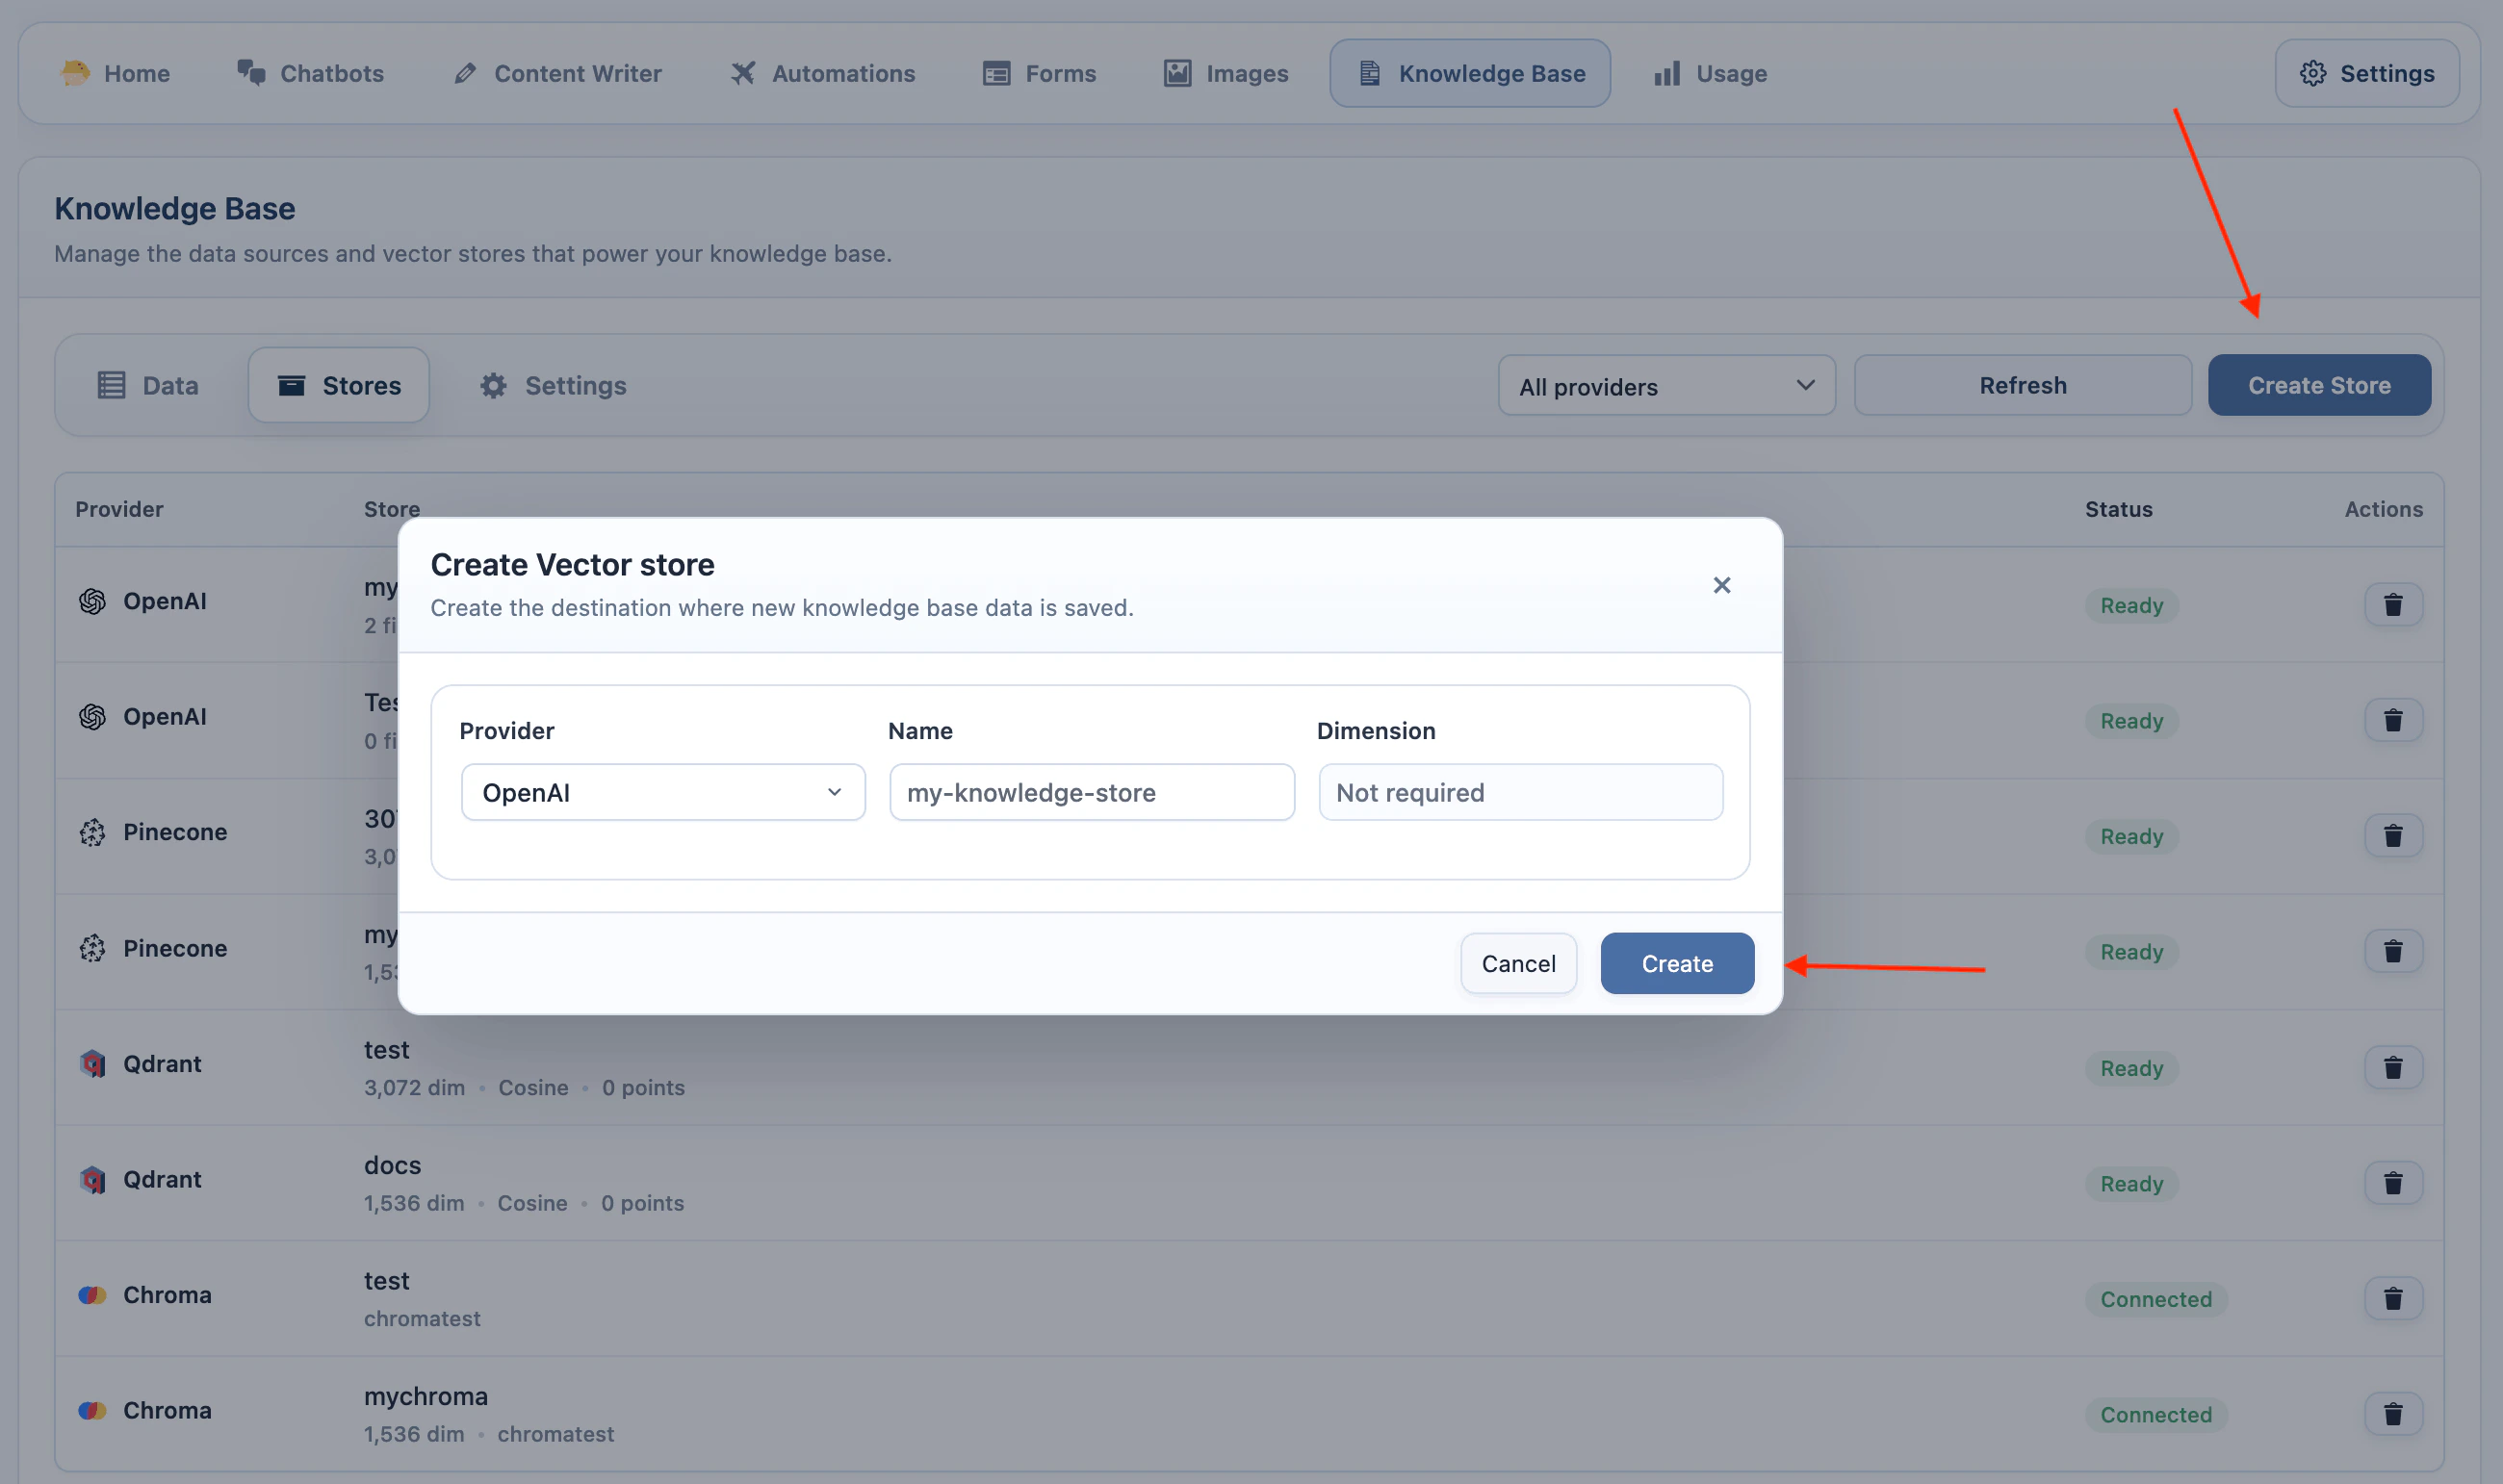
- Enter a store name and create it.
- Go to AI Puffer > Knowledge Base > Data and add data to the store.
- Go to AI Puffer > Chatbots and select the chatbot.
- Open Chatbot settings > Conversation > Knowledge.
- Turn on Use vector search.
- Open the vector search settings.
- Set Knowledge storage to OpenAI.
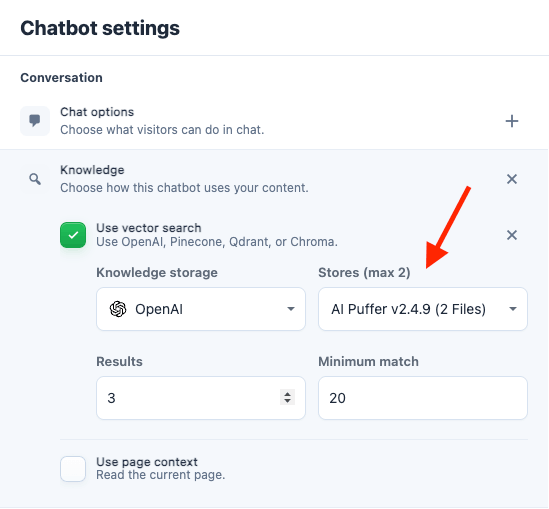
- Select one or two vector stores.
- Save the chatbot.
Pinecone
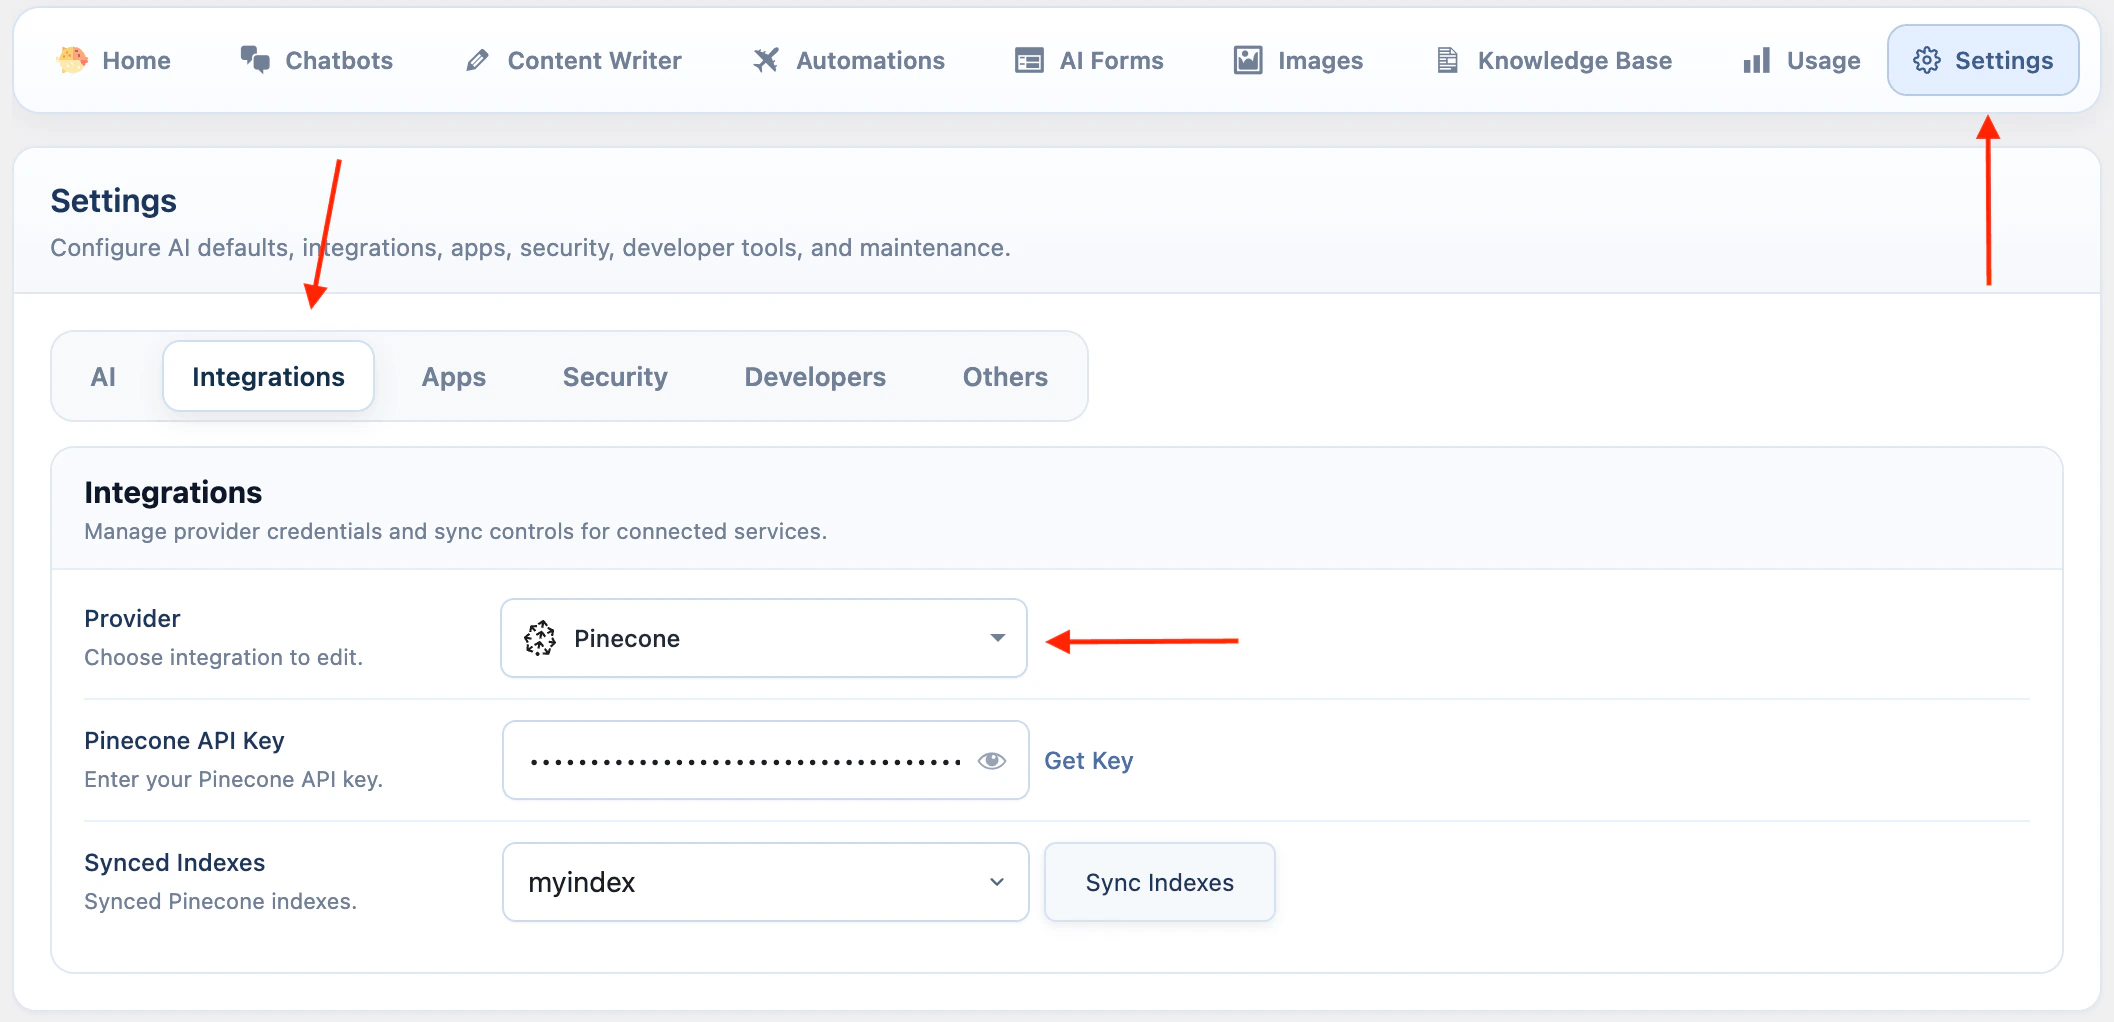
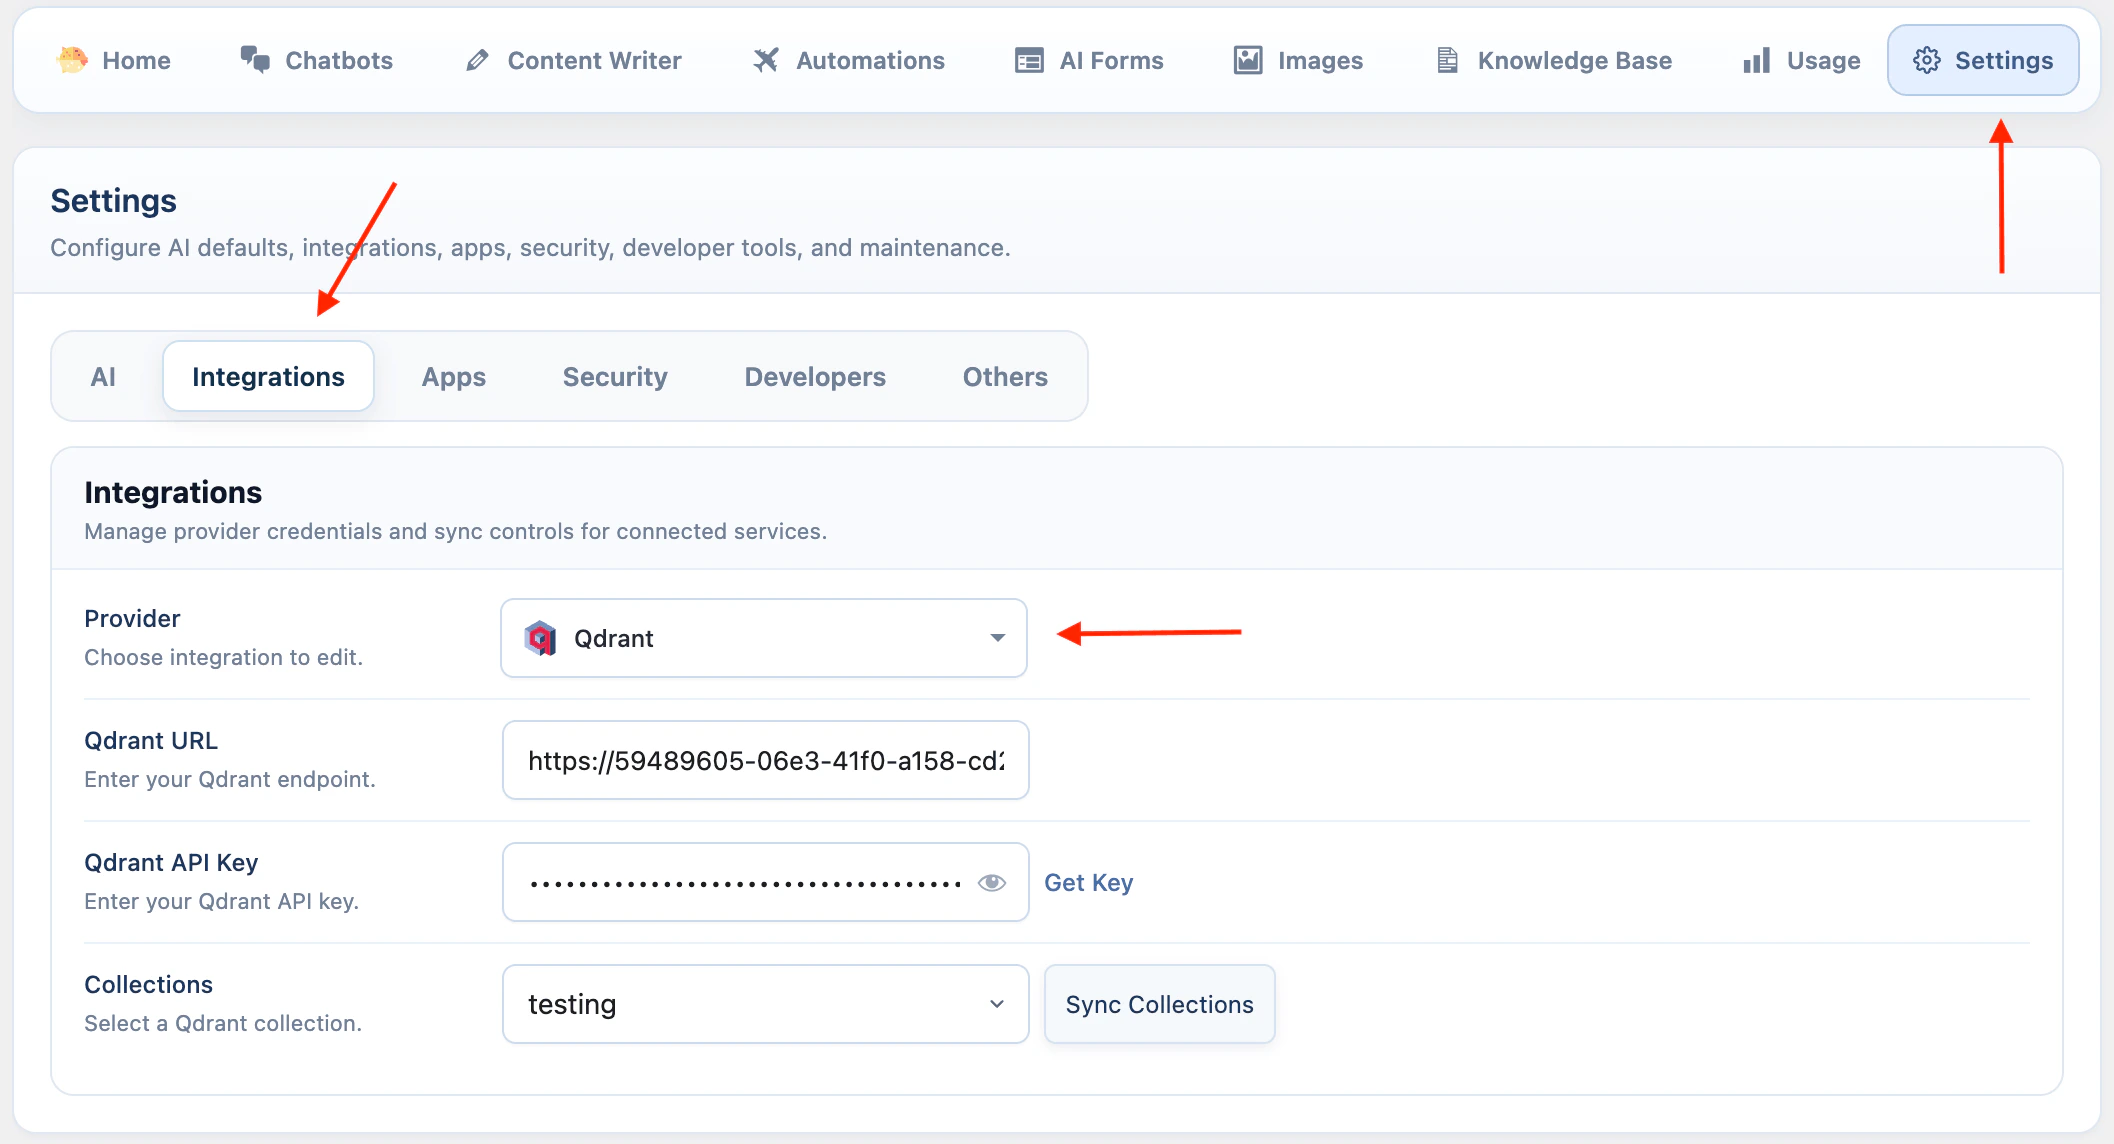
Pinecone stores vectors in an index. AI Puffer creates those vectors with the embedding model you choose. The Pinecone index dimension must match the embedding model. For example, if your index is 3072 dimensions, use a 3072-dimension embedding model. Use the same embedding model when adding data and when enabling Pinecone in the chatbot. To create an index:- Add your Pinecone credentials in AI Puffer > Settings > Integrations.
- Go to AI Puffer > Knowledge Base > Stores.
- Select Pinecone as the provider.
- Select the embedding model you want to use.
- Click Create Store.

- Enter an index name and use the dimension for the selected embedding model.
- Create the index, then add data with the same embedding model.
- Go to AI Puffer > Chatbots and select the chatbot.
- Open Chatbot settings > Conversation > Knowledge.
- Turn on Use vector search.
- Open the vector search settings.
- Set Knowledge storage to Pinecone.
- Select the Pinecone index.
- Select the same embedding provider and model used when you added the data.
- Save the chatbot.
Qdrant
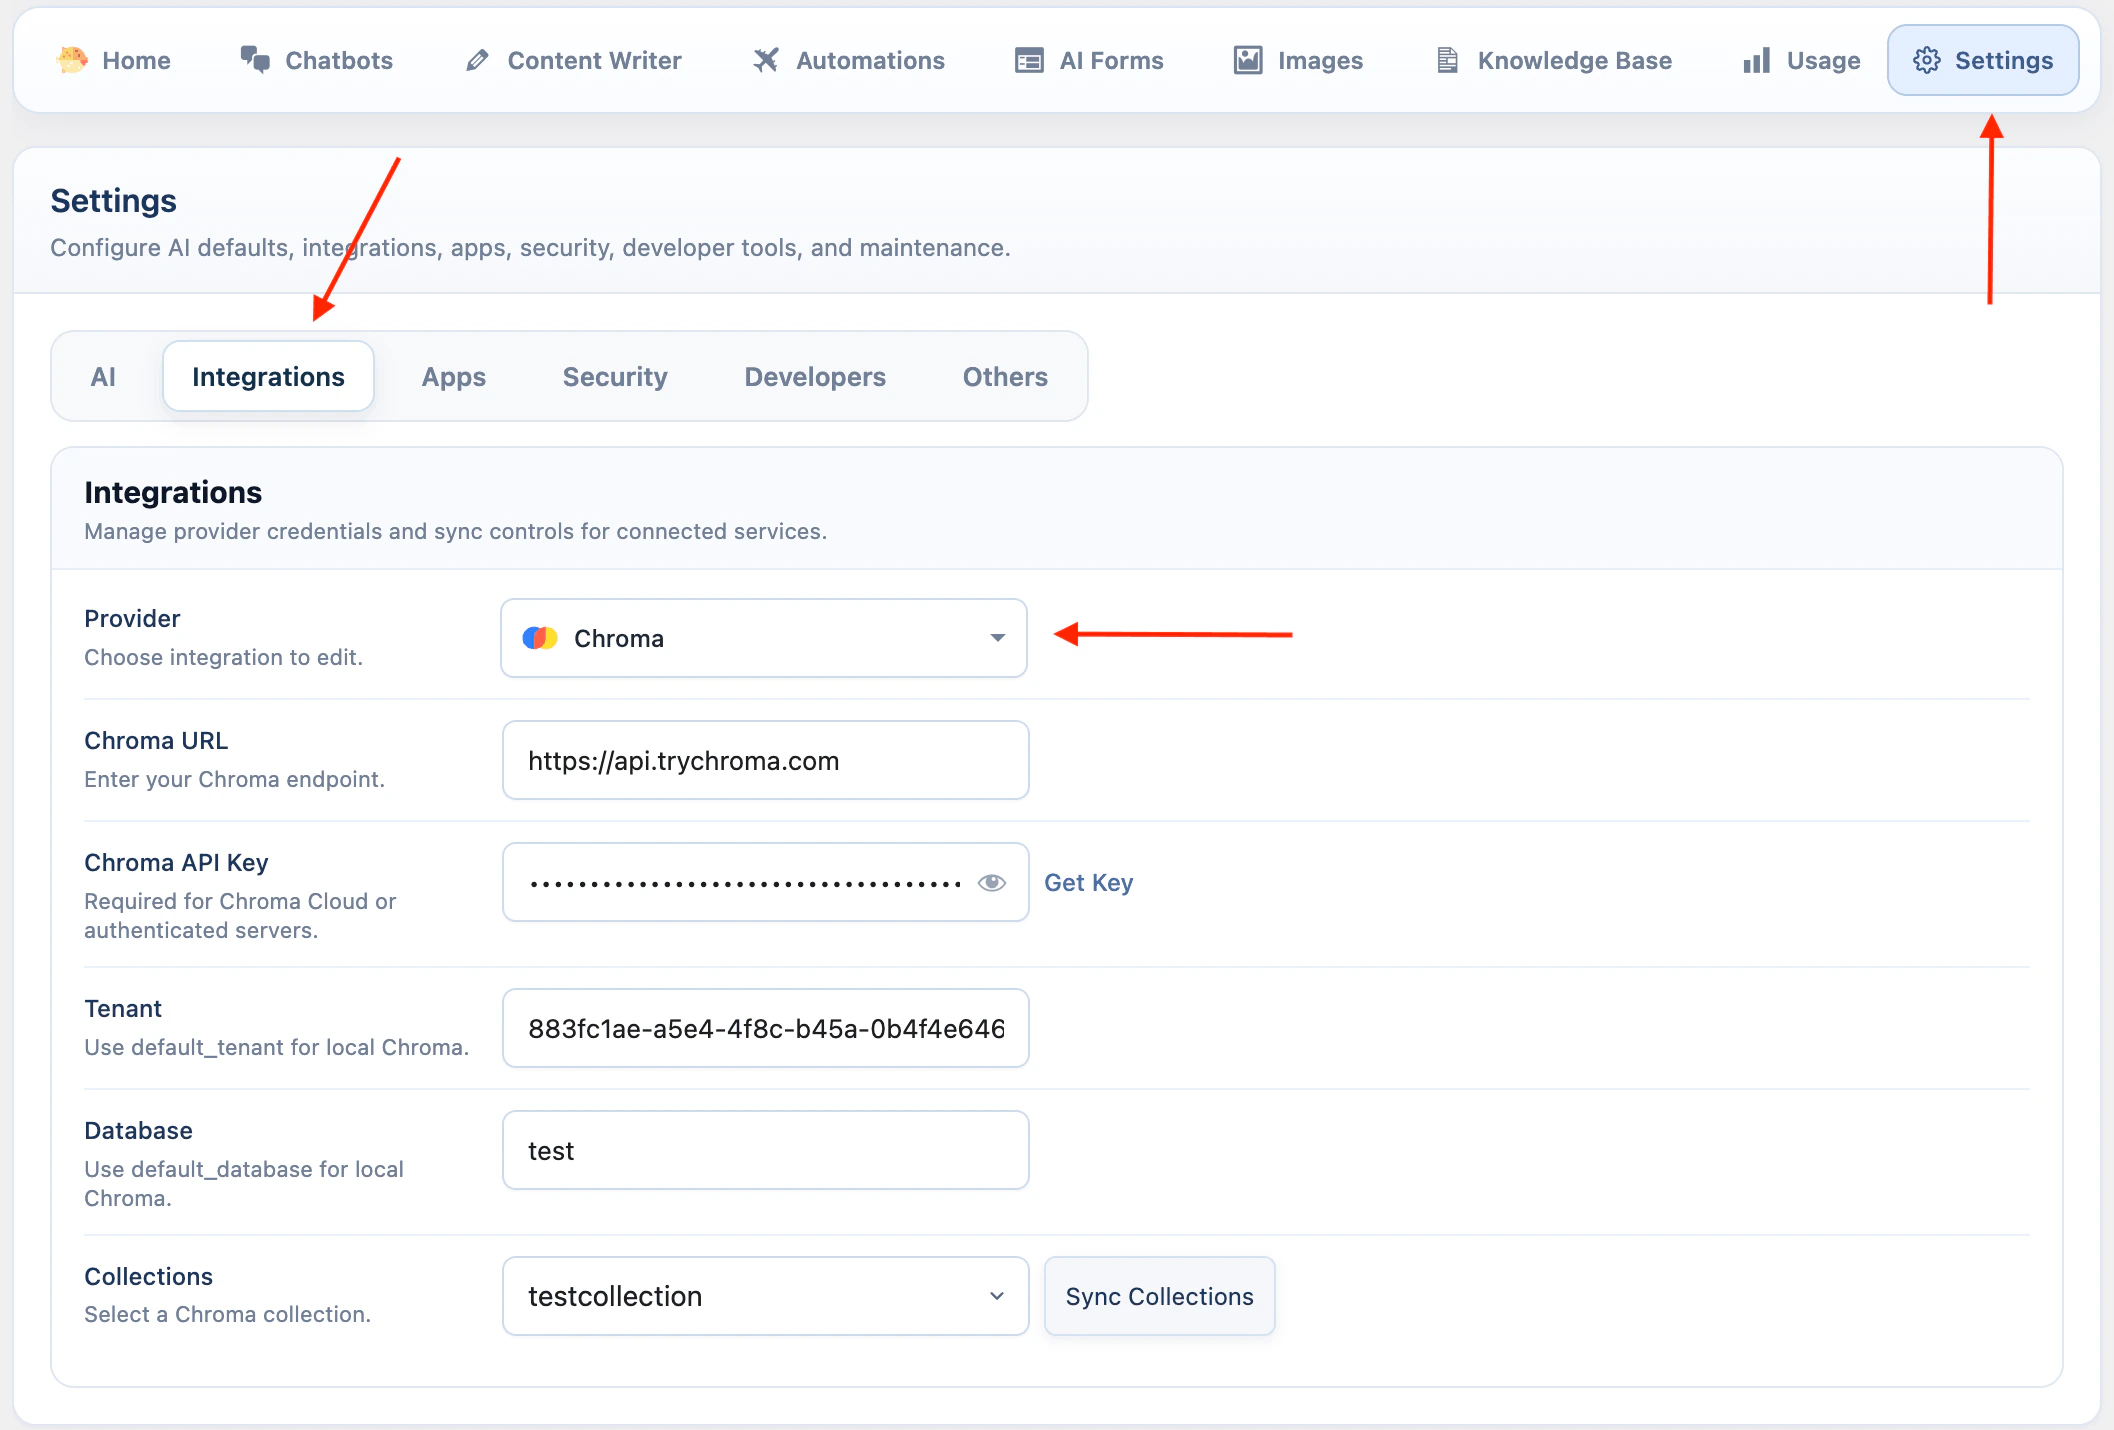
Qdrant stores vectors in collections. AI Puffer creates those vectors with the embedding model you choose. The Qdrant collection size must match the embedding model. For example, if your collection is 3072 dimensions, use a 3072-dimension embedding model. Use the same embedding model when adding data and when enabling Qdrant in the chatbot. To create a collection:- Add your Qdrant URL and API key in AI Puffer > Settings > Integrations.
- Go to AI Puffer > Knowledge Base > Stores.
- Select Qdrant as the provider.
- Select the embedding model you want to use.
- Click Create Store.
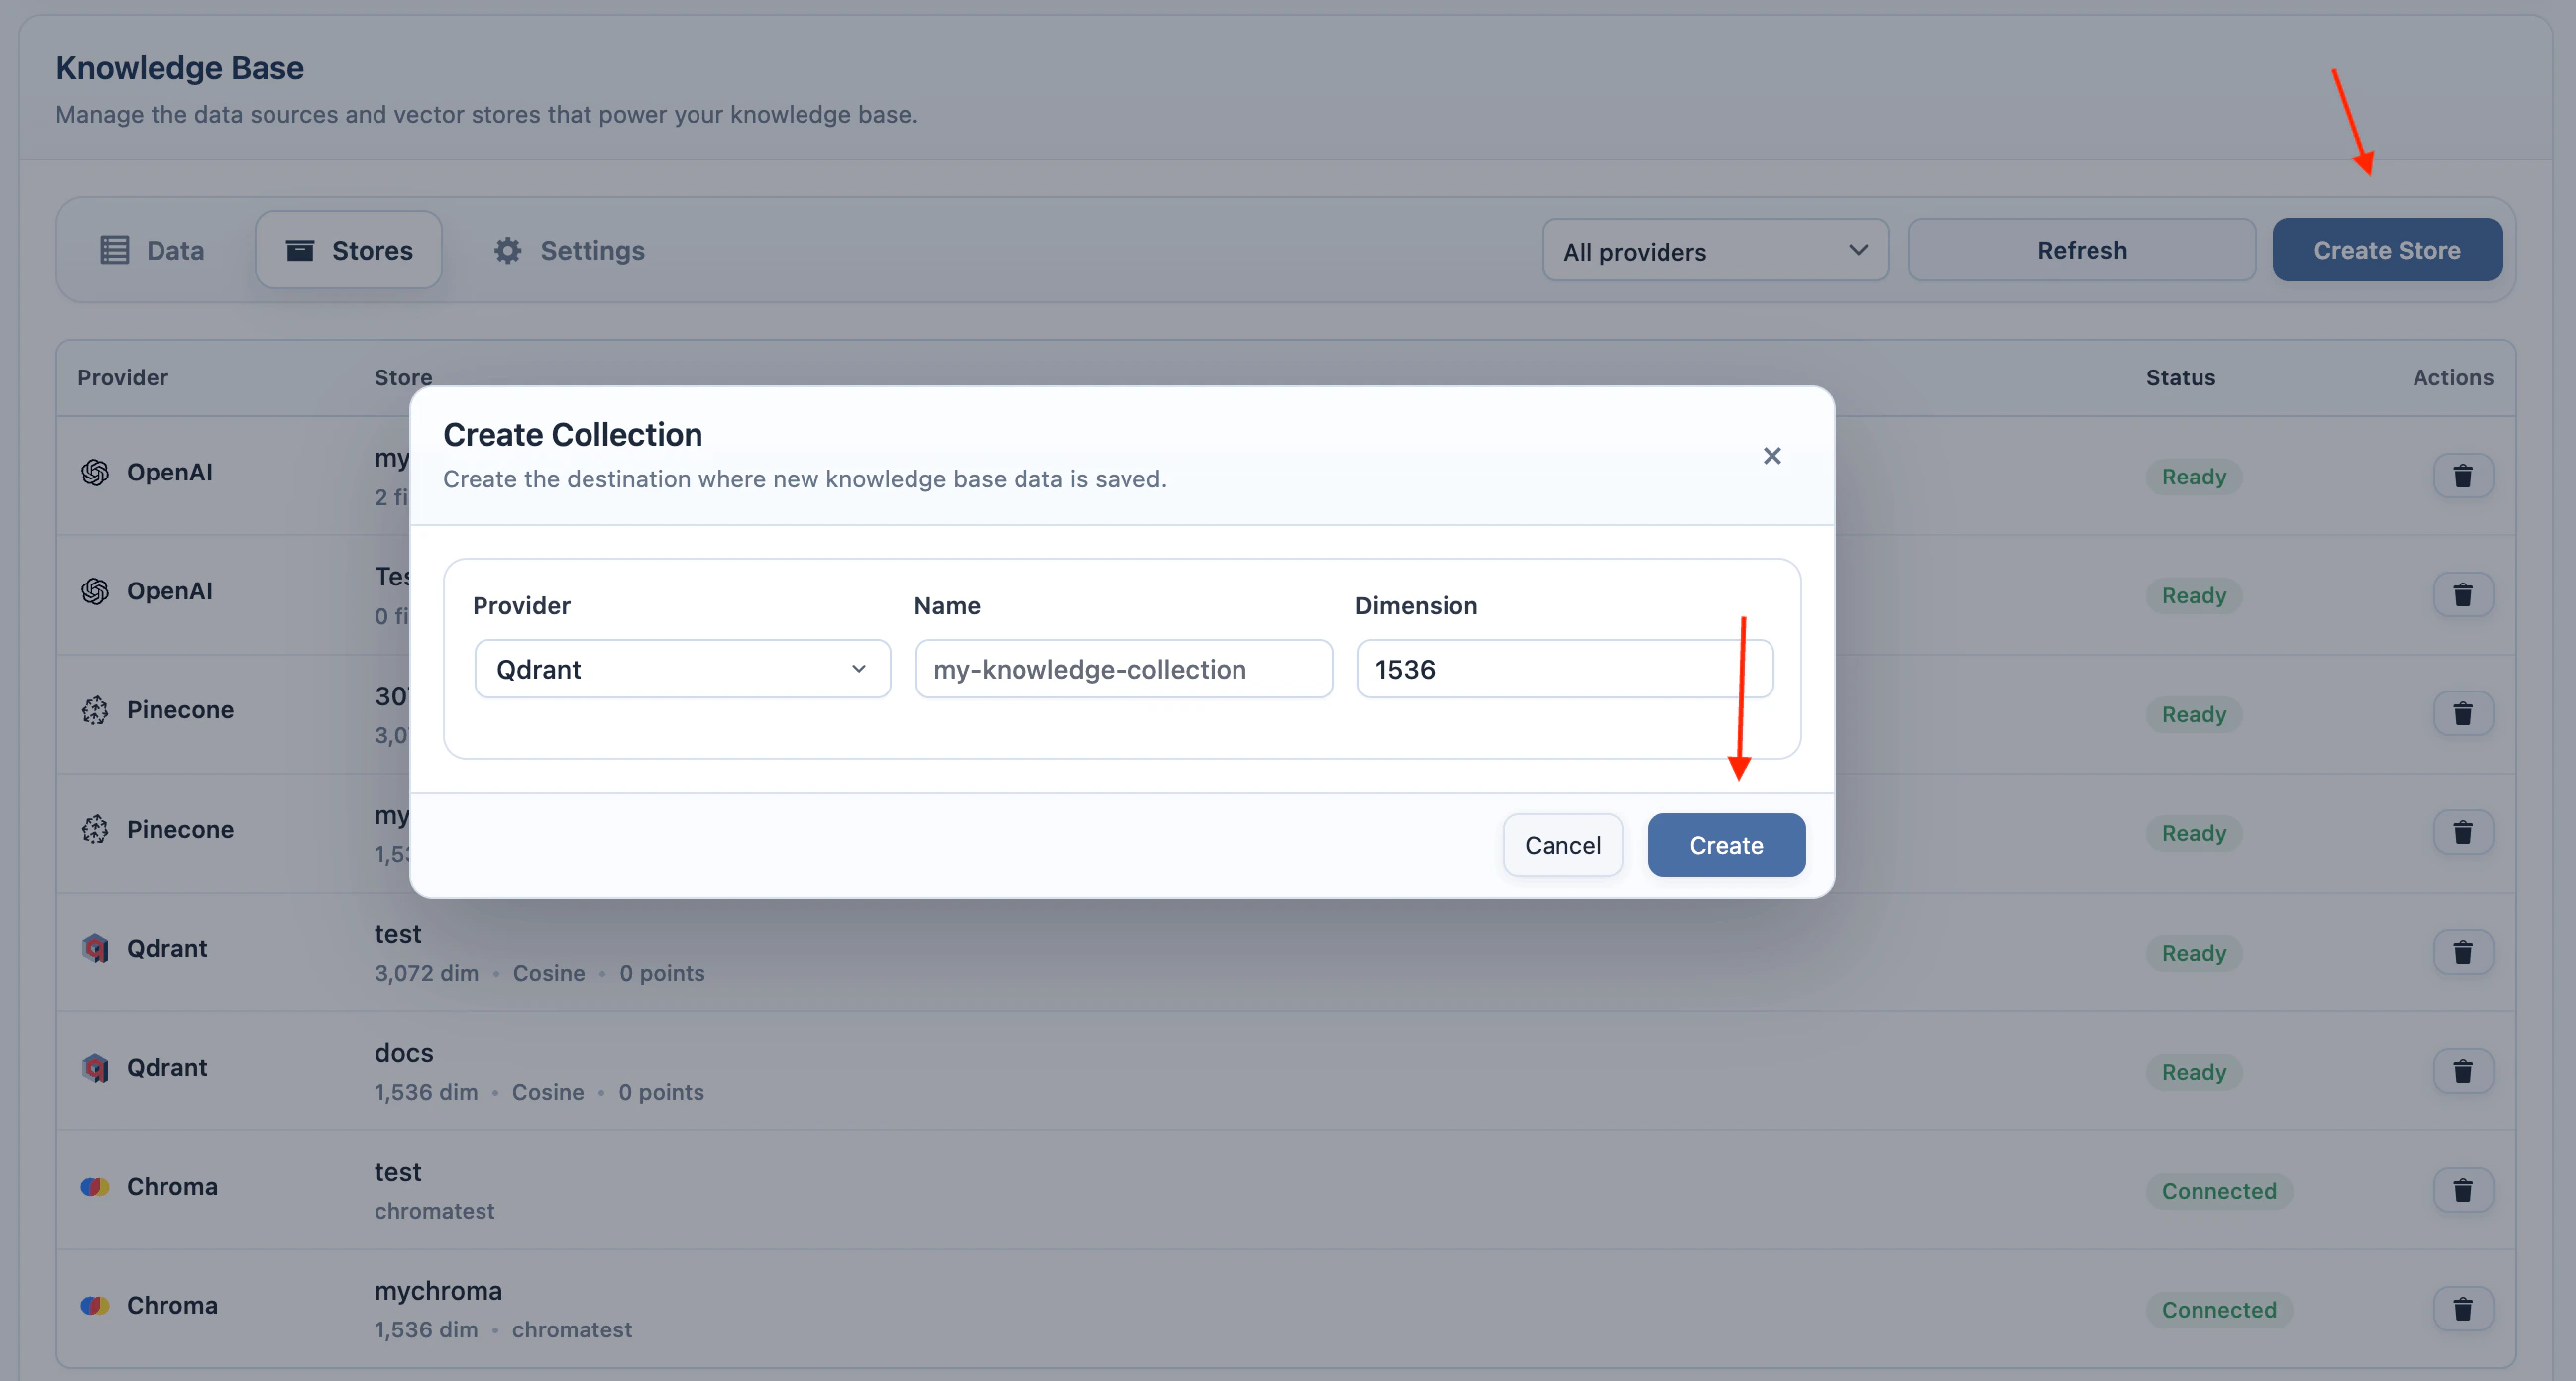
- Enter a collection name and use the dimension for the selected embedding model.
- Create the collection, then add data with the same embedding model.
- Go to AI Puffer > Chatbots and select the chatbot.
- Open Chatbot settings > Conversation > Knowledge.
- Turn on Use vector search.
- Open the vector search settings.
- Set Knowledge storage to Qdrant.
- Select one or more collections.
- Select the same embedding provider and model used when you added the data.
- Save the chatbot.
Chroma
Chroma stores vectors in collections. AI Puffer creates those vectors with the embedding model you choose. Chroma collections do not require a dimension when they are created in AI Puffer, but stored vectors still need a consistent dimension. Use the same embedding model when adding data and when enabling Chroma in the chatbot. To create a collection:- Add your Chroma endpoint, tenant, database, and API key in AI Puffer > Settings > Integrations.
- Go to AI Puffer > Knowledge Base > Stores.
- Select Chroma as the provider.
- Click Create Store.

- Enter a collection name.
- Create the collection, then add data with the same embedding model.
- Go to AI Puffer > Chatbots and select the chatbot.
- Open Chatbot settings > Conversation > Knowledge.
- Turn on Use vector search.
- Open the vector search settings.
- Set Knowledge storage to Chroma.
- Select one or more collections.
- Select the same embedding provider and model used when you added the data.
- Save the chatbot.
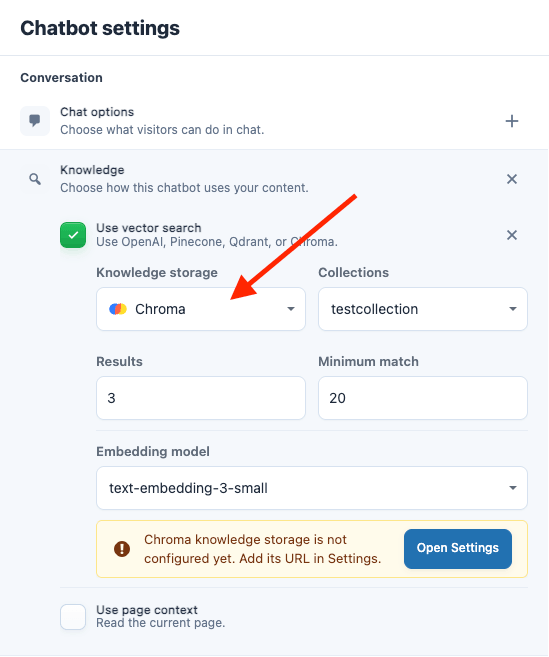
Results and Minimum Match
For OpenAI, Pinecone, Qdrant, and Chroma, use these settings to control how much vector context is added to the answer.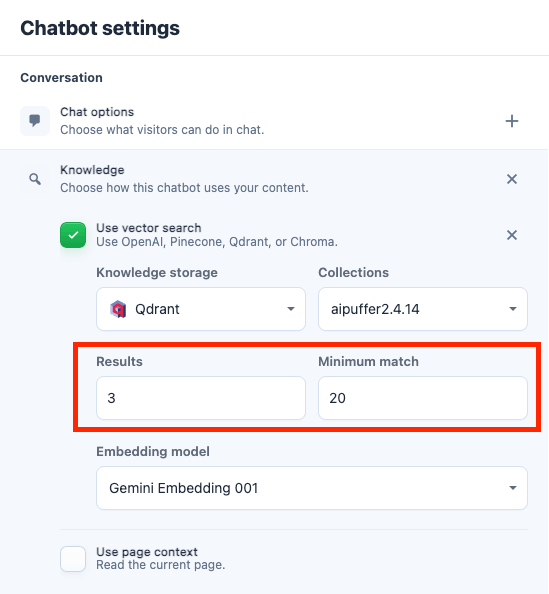

Embedding Models
Pinecone, Qdrant, and Chroma need an because AI Puffer must turn your content and the visitor question into vectors before it can search. OpenAI Vector Stores do not need this setting in AI Puffer. OpenAI handles the vector store search on its side.For Pinecone, Qdrant, and Chroma, use the same embedding model when adding data and when enabling the chatbot knowledge storage.
OpenAI
OpenAI
Google
OpenRouter
OpenRouter
Ollama
Ollama
Azure
Azure
Azure OpenAI embedding deployments are synced from your Azure resource. Use the dimension of the model behind the deployment.
Add Knowledge
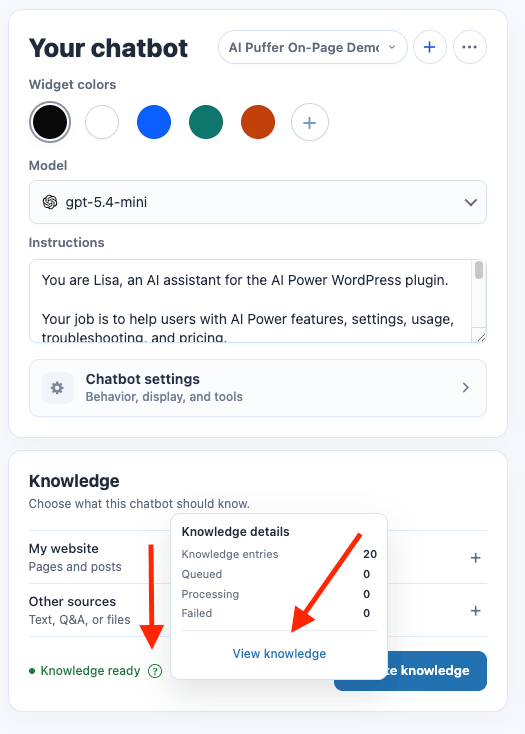
Use the Knowledge card on the chatbot screen to choose what the selected chatbot should know. The card has two source choices: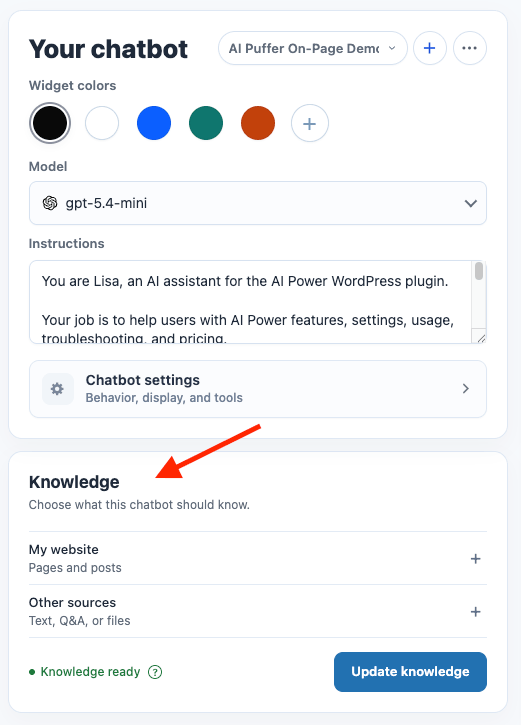
- Go to AI Puffer > Chatbots and select the chatbot.
- Find the Knowledge card.
- Leave My website selected.
- Click Add knowledge to add the default Pages and Posts.
- To change which WordPress content types are included, click the + button on My website.
- Select or unselect content types such as pages, posts, products, or other public post types available on your site.
- Click Add knowledge.
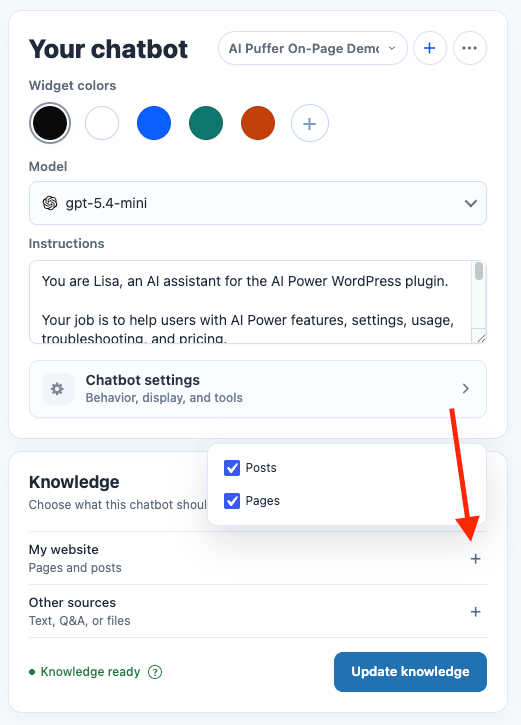
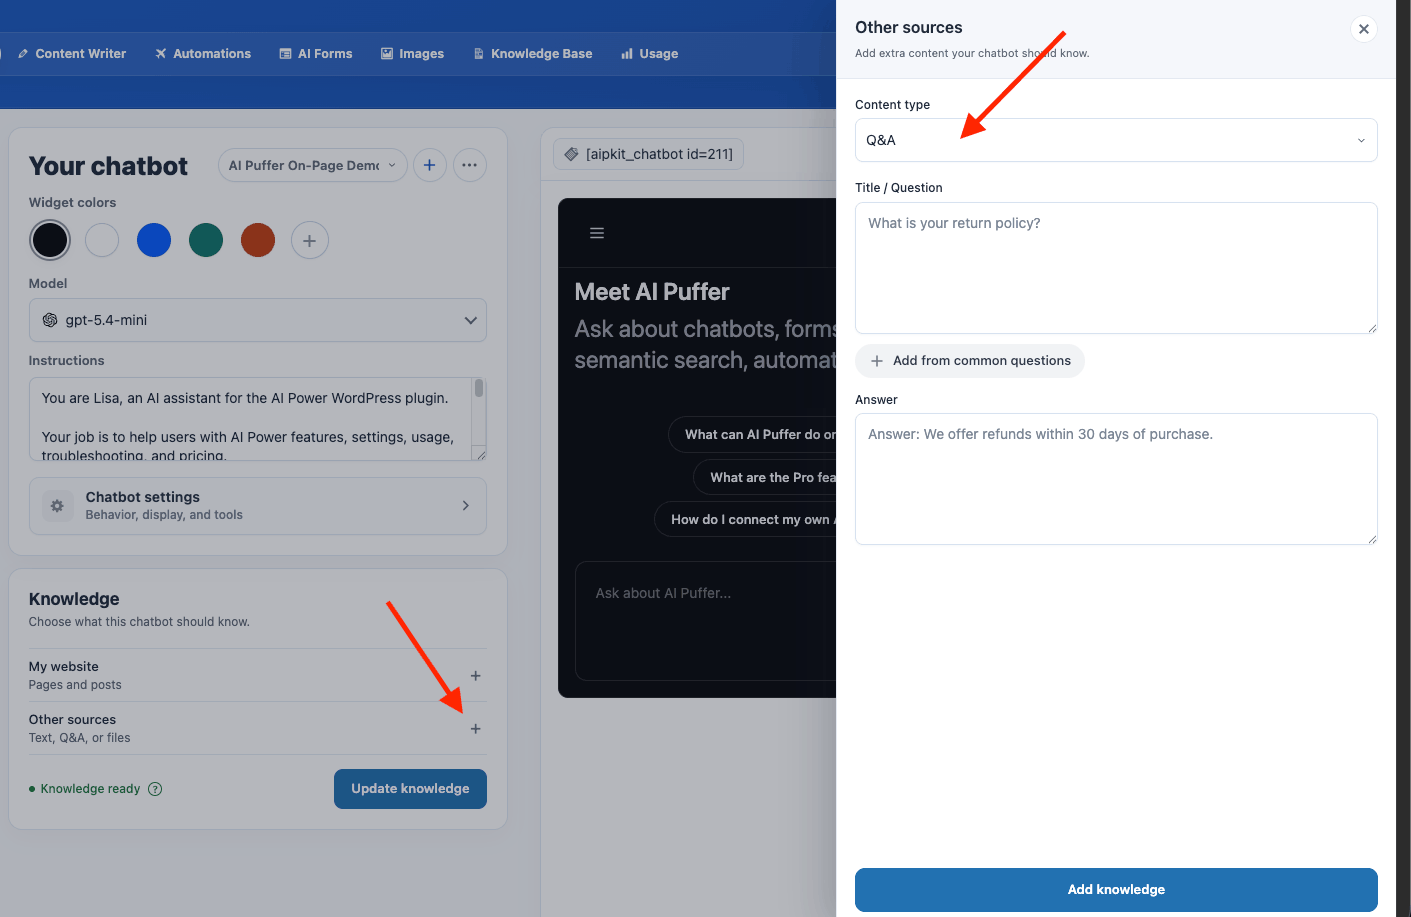
- Click the + button on Other sources.
- Choose Text, Q&A, or Files from Content type.
- For Text, paste the content the chatbot should know.
- For Q&A, enter a Title / Question and Answer. You can also add from common questions.
- For Files, click Choose files and upload
.pdf,.docx,.txt,.md,.csv, or.jsonfiles. - Click Add knowledge. For files, click Upload after choosing files.
Page Context
Adds the current page or post content to the chatbot context. When this feature is enabled, the chatbot will use the current page’s content as part of its contextual understanding. If the page has an excerpt, that excerpt will be used directly as the bot’s context.
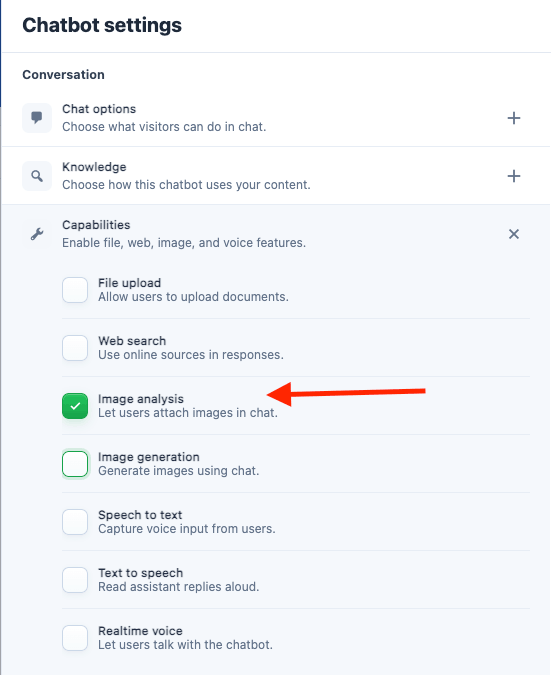
Capabilities
Capabilities are optional features the chatbot can use during a conversation. They let visitors upload files, search the web, attach images, generate images, or use voice features when those options are enabled. Enable only the capabilities you want your chatbot to offer.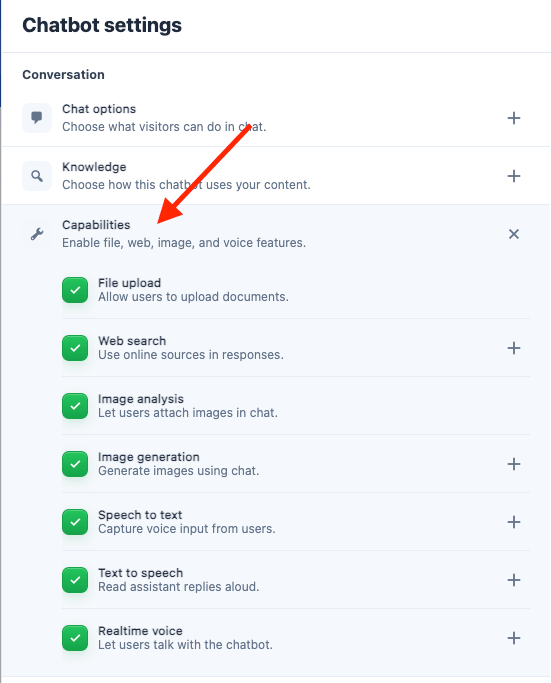
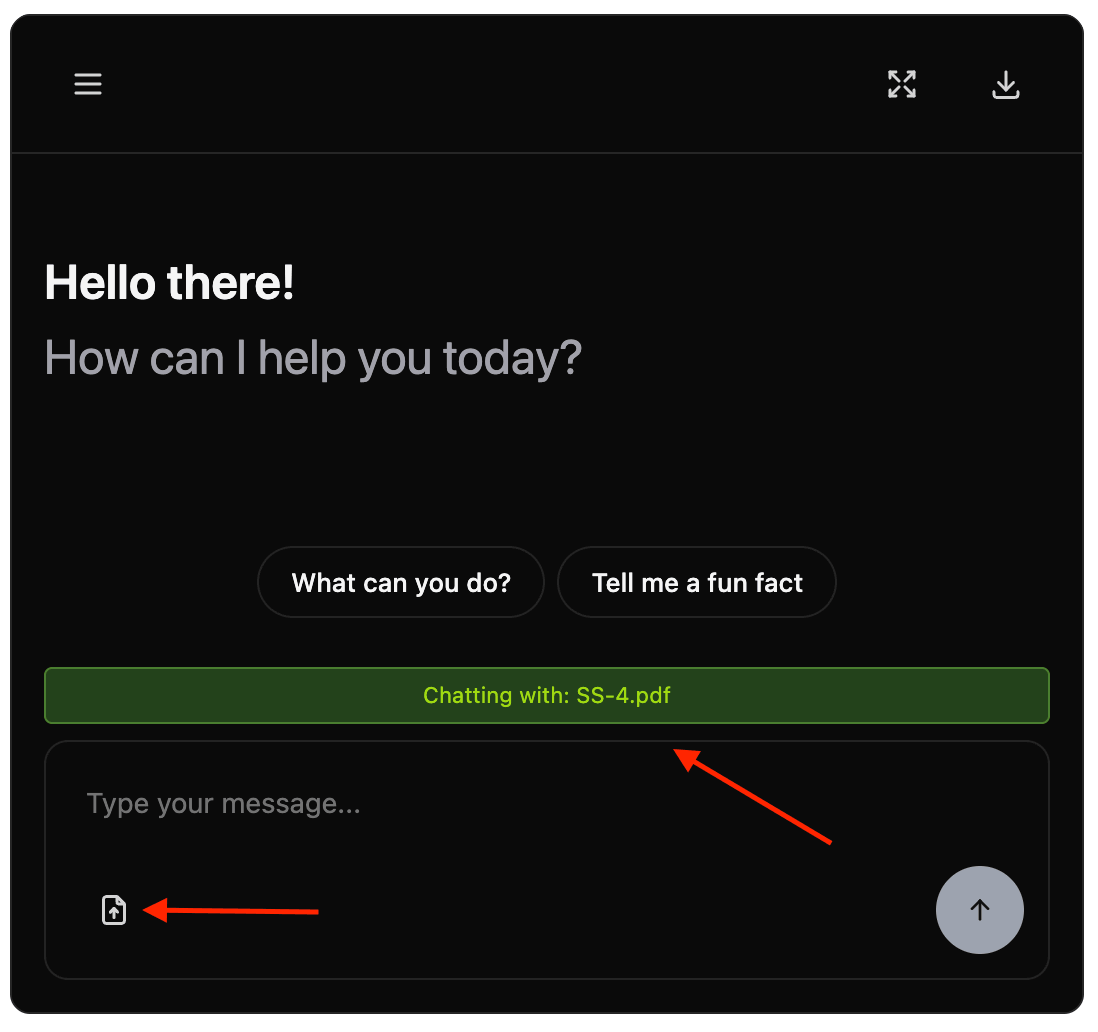
File Upload
File upload lets visitors attach a document to the current chat. AI Puffer reads the file, prepares it for the selected vector provider, and uses the matching file content as context for the visitor’s next messages. File upload uses the chatbot’s Knowledge storage setting: OpenAI, Pinecone, Qdrant, Chroma, or Anthropic Files when the chatbot provider is Anthropic. Visitors can upload.txt and .pdf files. The frontend limit is 20 MB, but your WordPress or server upload limit can be lower.
To enable file upload:
- Go to AI Puffer > Chatbots and select the chatbot.
- Open Chatbot settings > Conversation > Knowledge.
- Turn on Use vector search.
- Configure the Knowledge storage settings.
- Open Chatbot settings > Conversation > Capabilities.
- Turn on File upload.
- Save the chatbot.
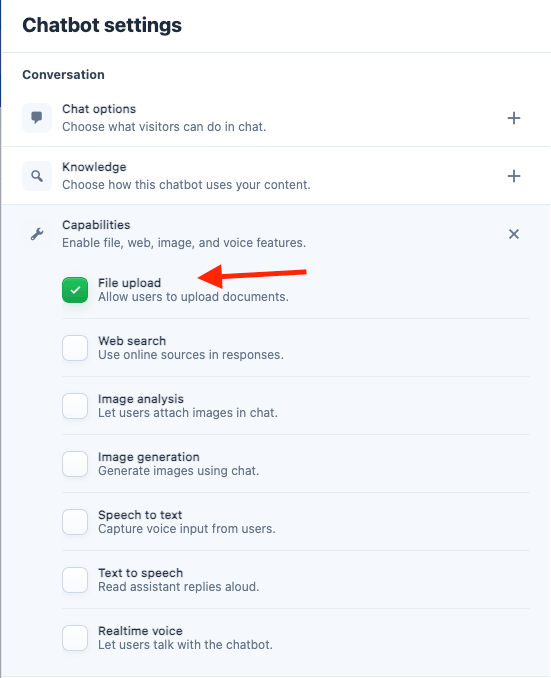
- Test the chatbot on the frontend and upload a
.txtor.pdffile.
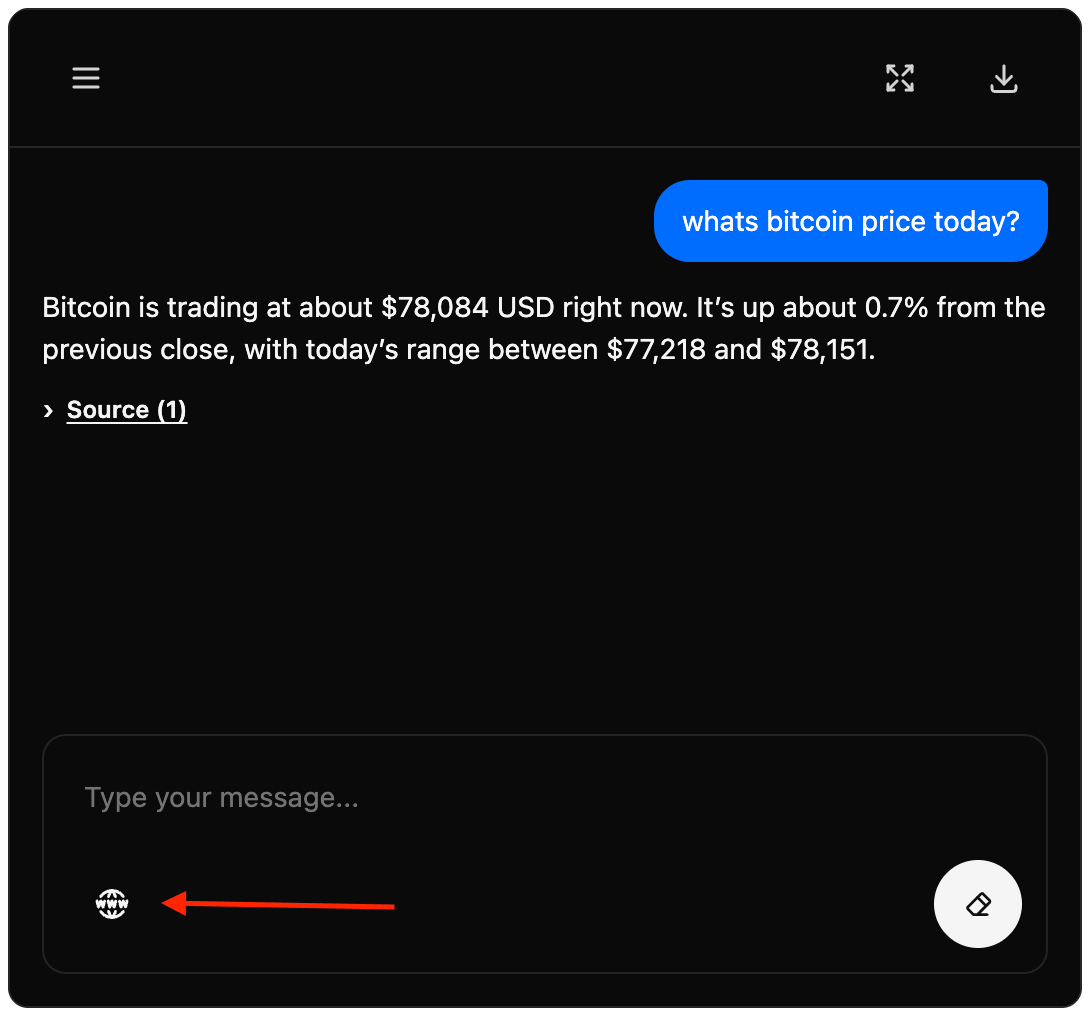
Web Search
Web Search lets a chatbot use online sources while answering. When enabled, the chatbot input shows a web/search toggle on the frontend. If the frontend toggle is off, the chatbot answers without web search even when the capability is enabled in the admin. Web Search is available for OpenAI, Google, Anthropic, OpenRouter, and xAI models that support web search.Web search has two controls: the admin capability setting enables the feature, and the frontend toggle decides whether a specific visitor message uses it.
- Go to AI Puffer > Chatbots and select the chatbot.
- Choose an OpenAI, Google, Anthropic, OpenRouter, or xAI model.
- Open Chatbot settings > Conversation > Capabilities.
- Turn on Web search.
- Open the web search settings.
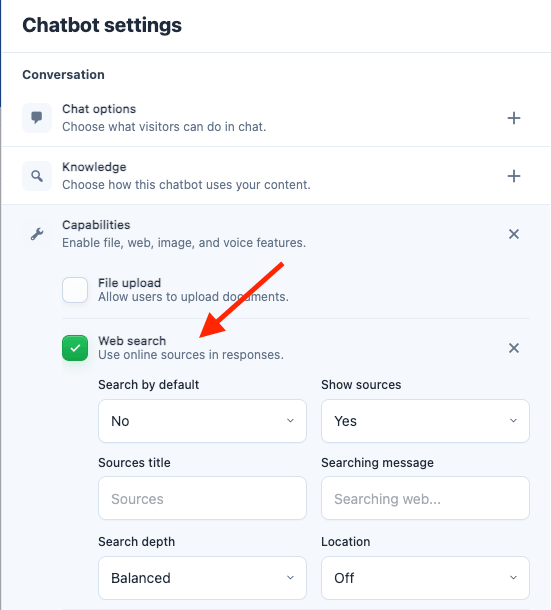
- Configure the provider settings.
- Save the chatbot.
- Test the chatbot on the frontend.
Provider-specific options are shown based on the chatbot engine.
xAI uses the shared web search options above and does not add provider-specific web settings.
- OpenAI
- Google
- Anthropic
- OpenRouter
Images and Vision
Image capabilities cover two separate features:- Image analysis sends an uploaded image to the chatbot model so it can answer questions about the image.
- Image generation creates a new image when the visitor types a configured image command.
Image Analysis
Image analysis lets visitors attach an image to a chat message. The image is sent with the next message to the chatbot’s selected model. Image analysis uses the chatbot’s selected provider and model.Image analysis is model-dependent. If the option is missing or replies fail, choose a vision-capable model and sync models again.
Visitors can upload one image per message, with a 20 MB frontend limit. xAI image analysis accepts JPG/JPEG and PNG files. Other supported providers can also accept WEBP when their model supports it.
To enable image analysis:
- Go to AI Puffer > Chatbots and select the chatbot.
- Select a supported provider and model.
- Open Chatbot settings > Conversation > Capabilities.
- Turn on Image analysis.
- Save the chatbot.
- Test the chatbot on the frontend.
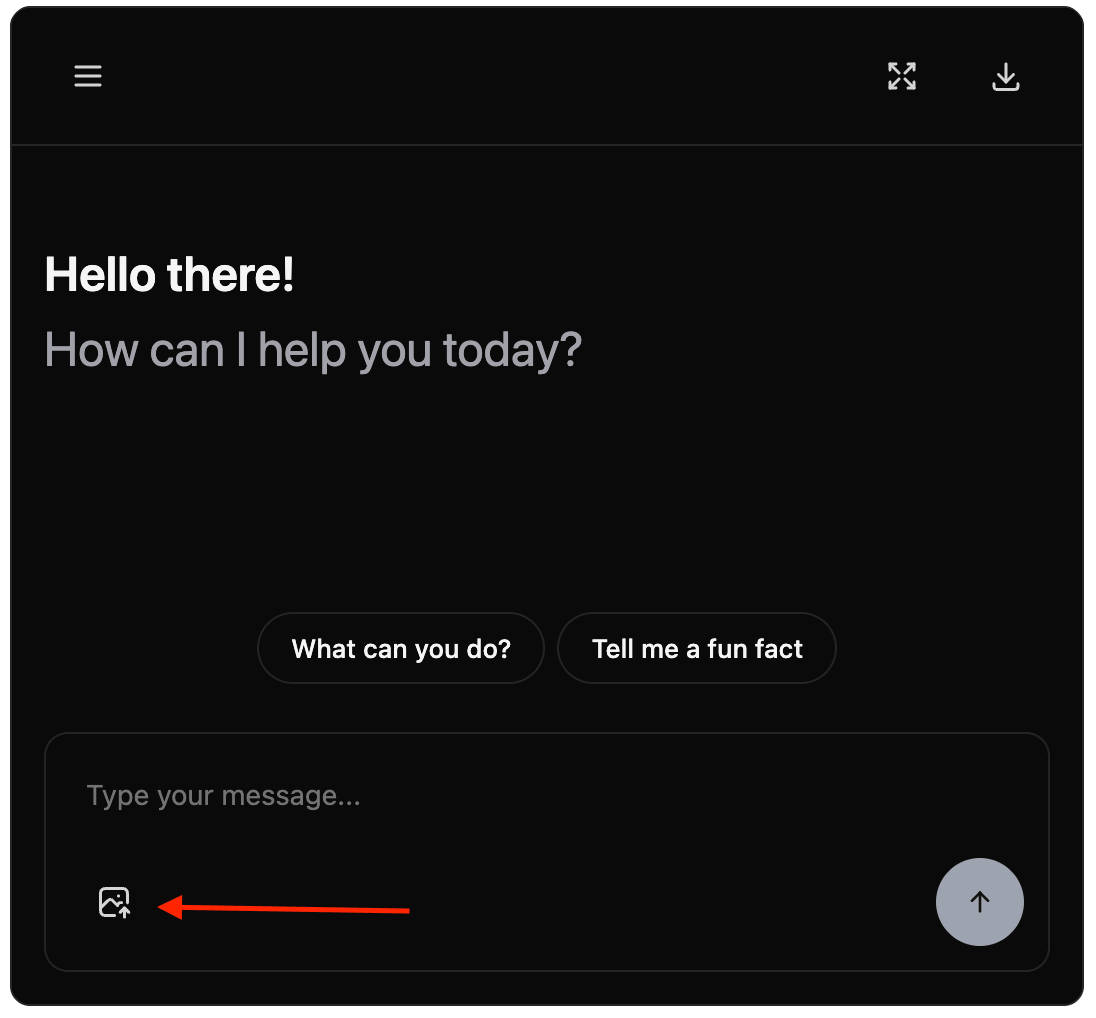
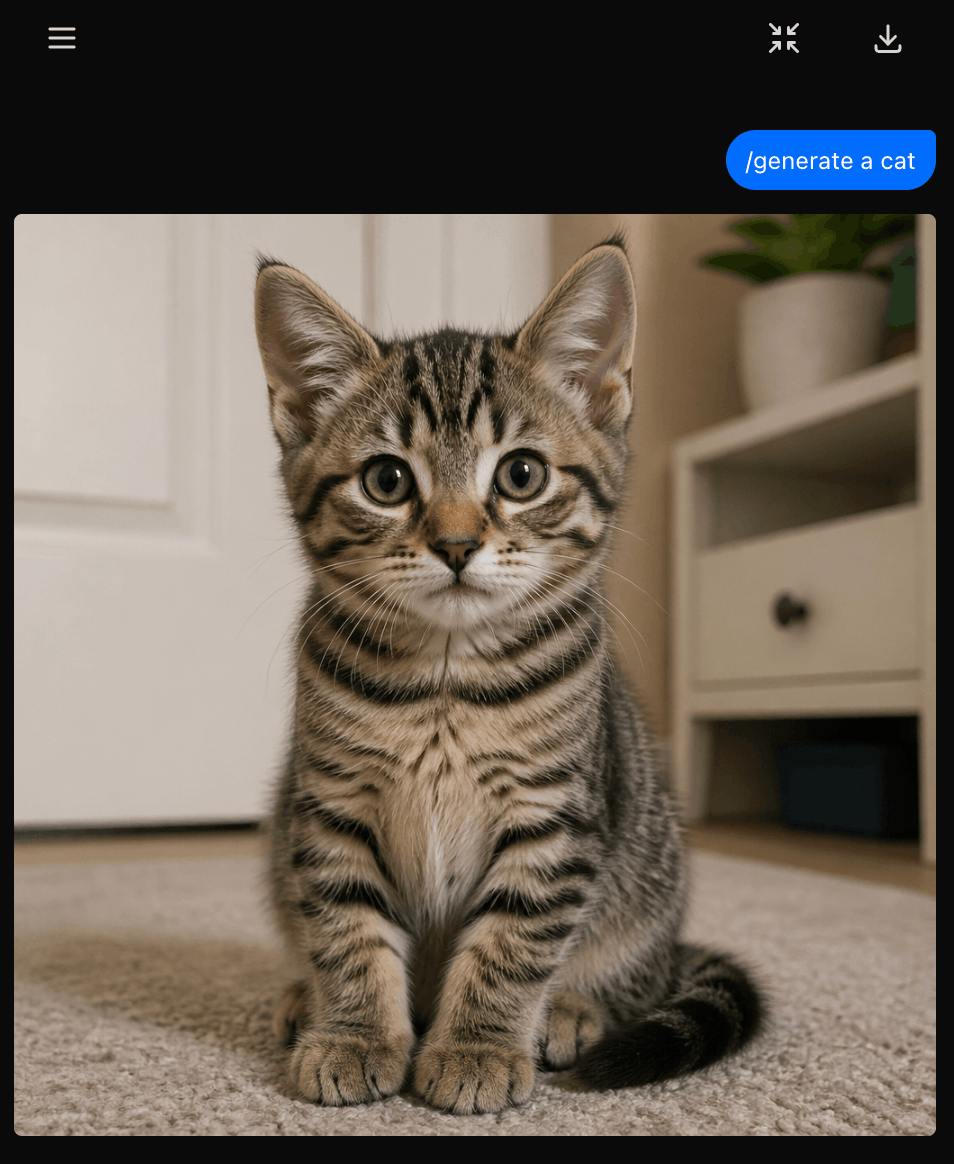
Image Generation
Image generation lets visitors create a new image from a chat command. The visitor types a trigger followed by a prompt, for example:Image generation uses the image model selected in Capabilities, not the chatbot answer model.
The chatbot image generation model list includes those image providers only.
If a model is missing, configure the provider and sync models in AI Providers.
To enable image generation:
- Go to AI Puffer > Chatbots and select the chatbot.
- Open Chatbot settings > Conversation > Capabilities.
- Turn on Image generation.
- Open the image generation settings.
- Select the image model.
- Set the image triggers.
- Save the chatbot.
- Test the command on the frontend.
/. Examples:

Audio and Speech
Audio and speech capabilities are configured per chatbot under Chatbot settings > Conversation > Capabilities.Speech to Text
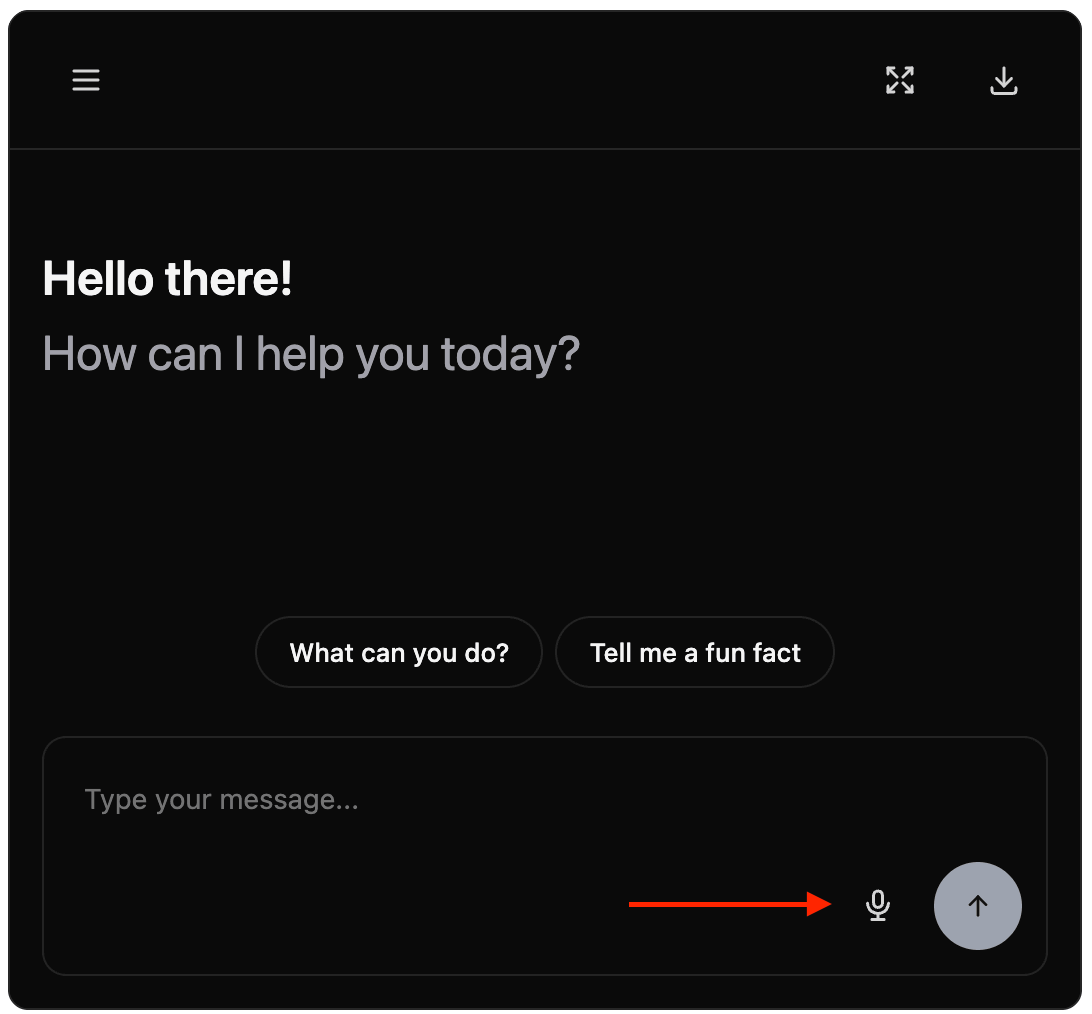
Speech to Text adds a microphone button to the chatbot input. When a visitor clicks the microphone, AI Puffer records the audio in the browser, uploads it to WordPress, sends it to the speech-to-text provider, then submits the transcript as the user message. Speech to Text is currently available for OpenAI.
To enable speech to text:
- Configure OpenAI in AI Providers.
- Go to AI Puffer > Chatbots and select the chatbot.
- Open Chatbot settings > Conversation > Capabilities.
- Turn on Speech to text.
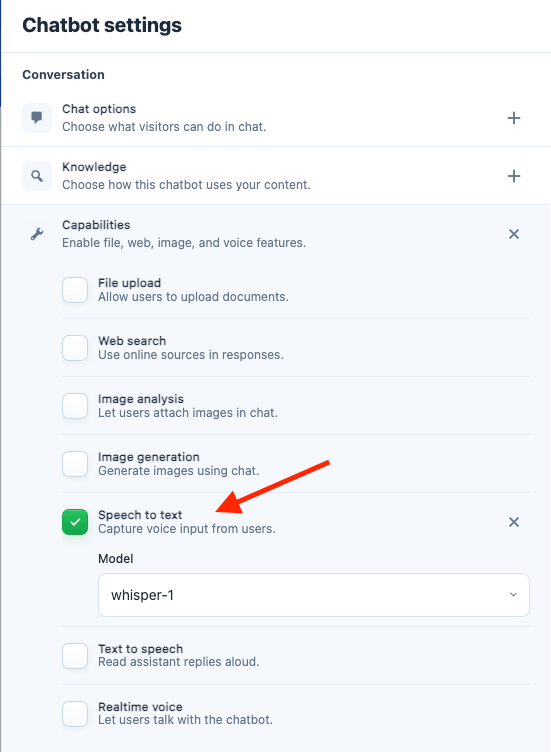
- Select the model if the model selector is shown.
- Save the chatbot and test the microphone on the frontend.
Text to Speech
Text to Speech adds playback controls for assistant replies. When a visitor clicks the play button, AI Puffer sends the assistant reply text to the selected text-to-speech provider and plays the returned audio in the browser. Text to Speech is available for Google, OpenAI, and ElevenLabs.
To enable text to speech:
- Go to AI Puffer > Chatbots and select the chatbot.
- Open Chatbot settings > Conversation > Capabilities.
- Turn on Text to speech.
- Open the text-to-speech settings.
- Select the provider.
- Select the voice and model fields shown for that provider.
- Enable Auto play only if replies should play automatically.
- Save the chatbot and test the play button on an assistant reply.
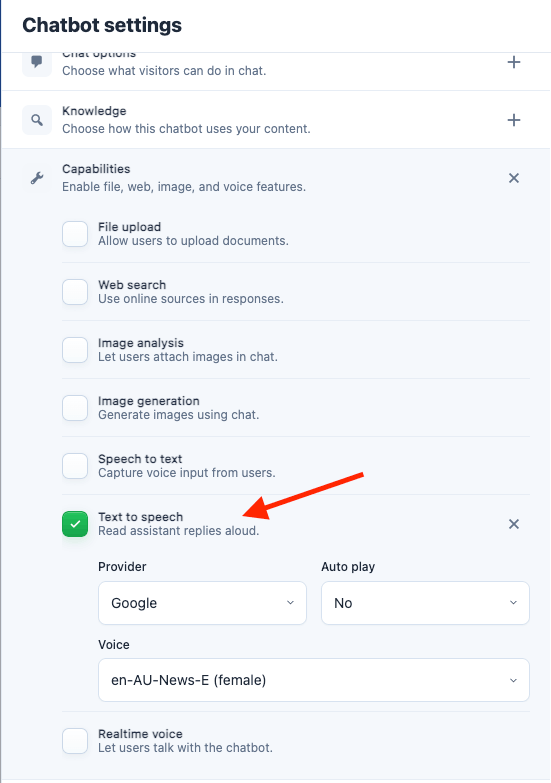
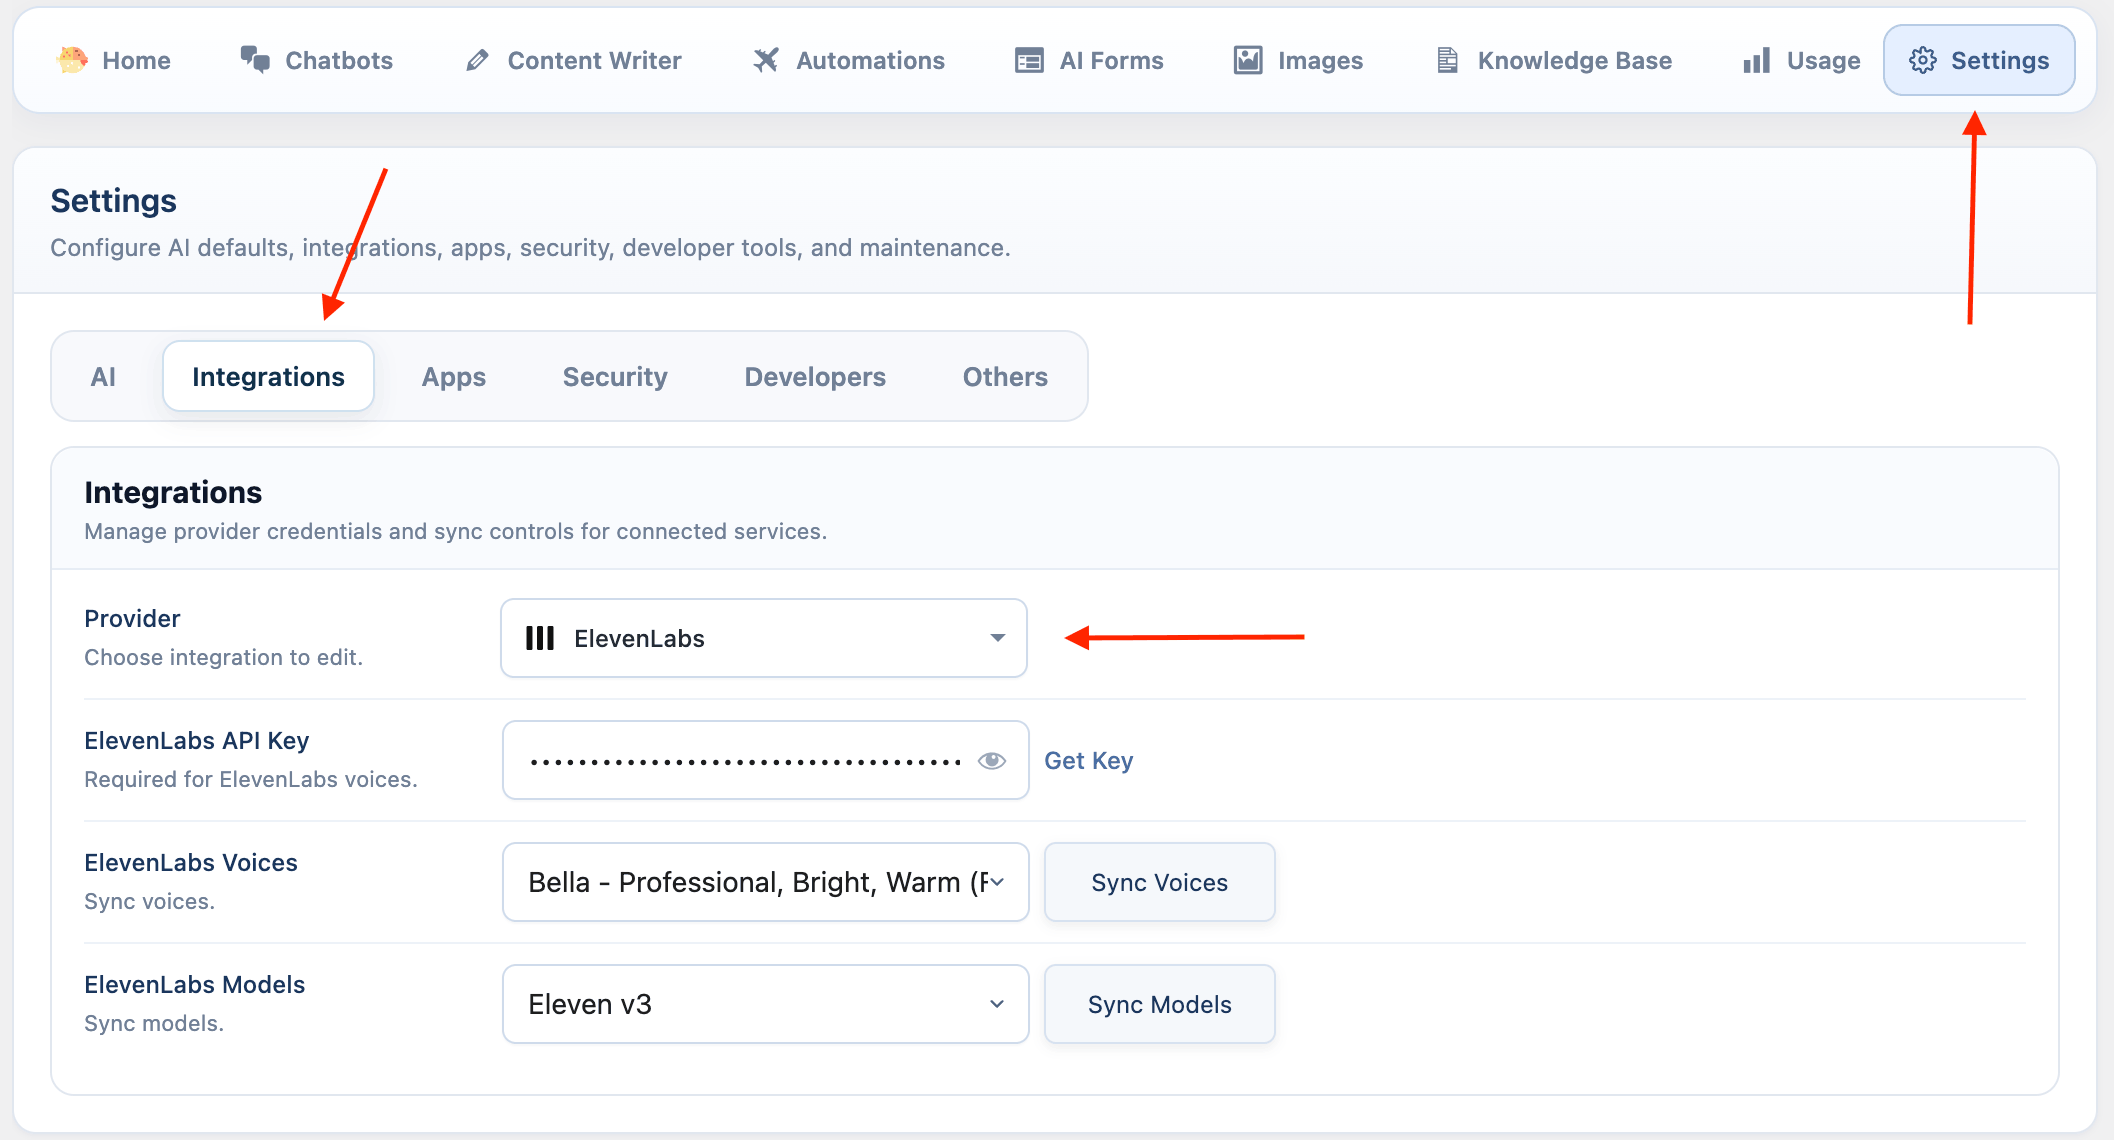
ElevenLabs voices and models appear only after the ElevenLabs API key is saved under Settings > Integrations.
Realtime Voice Agents
Realtime Voice is separate from Speech to Text and Text to Speech. It creates a live session with OpenAI Realtime, streams microphone audio, receives spoken replies, and logs completed turns. Realtime Voice is currently available for OpenAI.
To enable realtime voice:
- Configure OpenAI in AI Providers.
- Go to AI Puffer > Chatbots and select the chatbot.
- Open Chatbot settings > Conversation > Capabilities.
- Turn on Realtime voice.
- Open the realtime voice settings.
- Select the realtime model.
- Select the voice.
- Choose turn detection.
- Save the chatbot and test voice mode on the frontend.
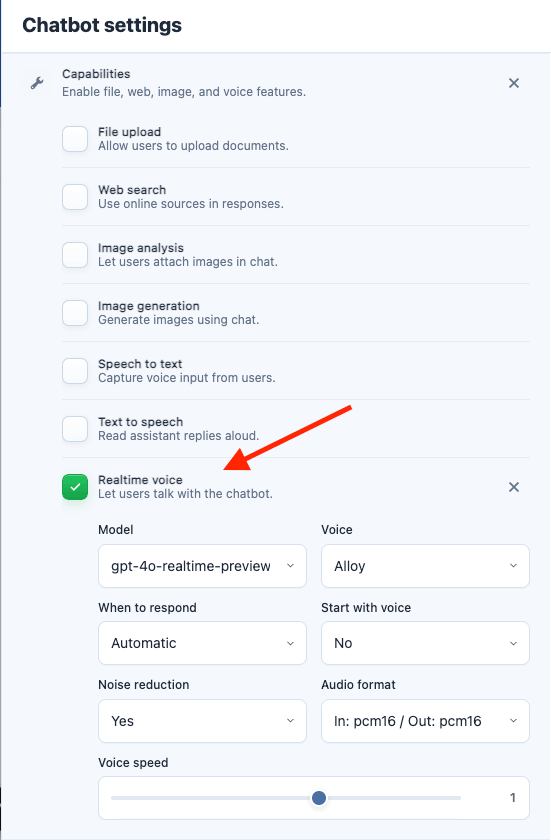
Turn detection options:
Realtime sessions create chat log entries for the user transcript and assistant transcript when a turn completes. If OpenAI returns usage data, AI Puffer records the token usage against the chatbot.
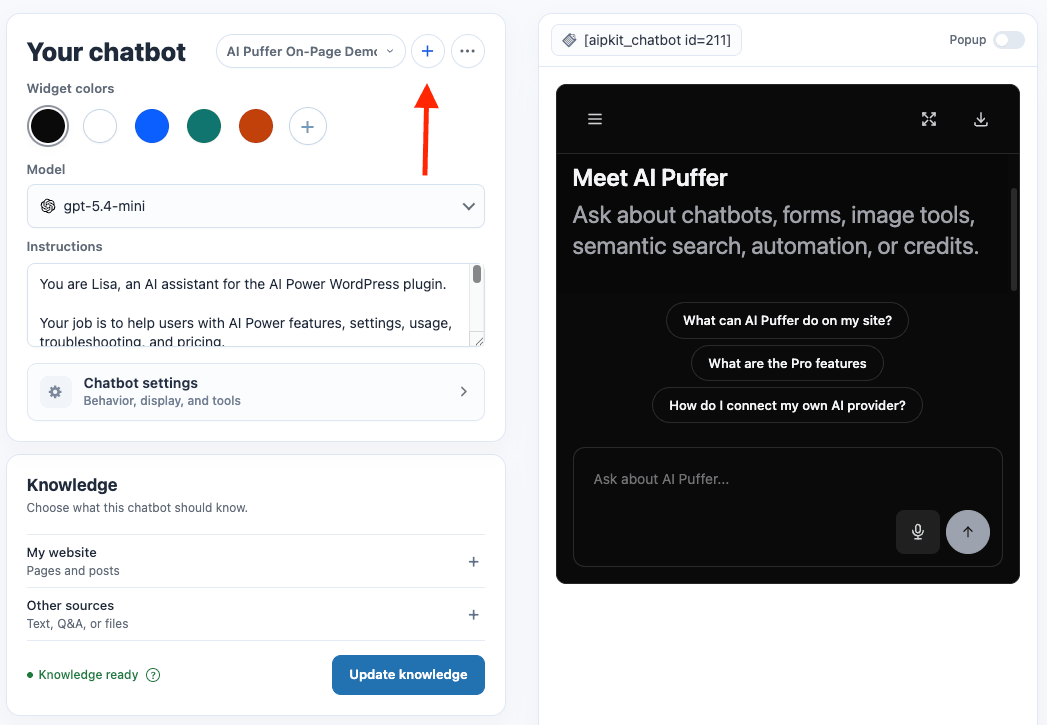
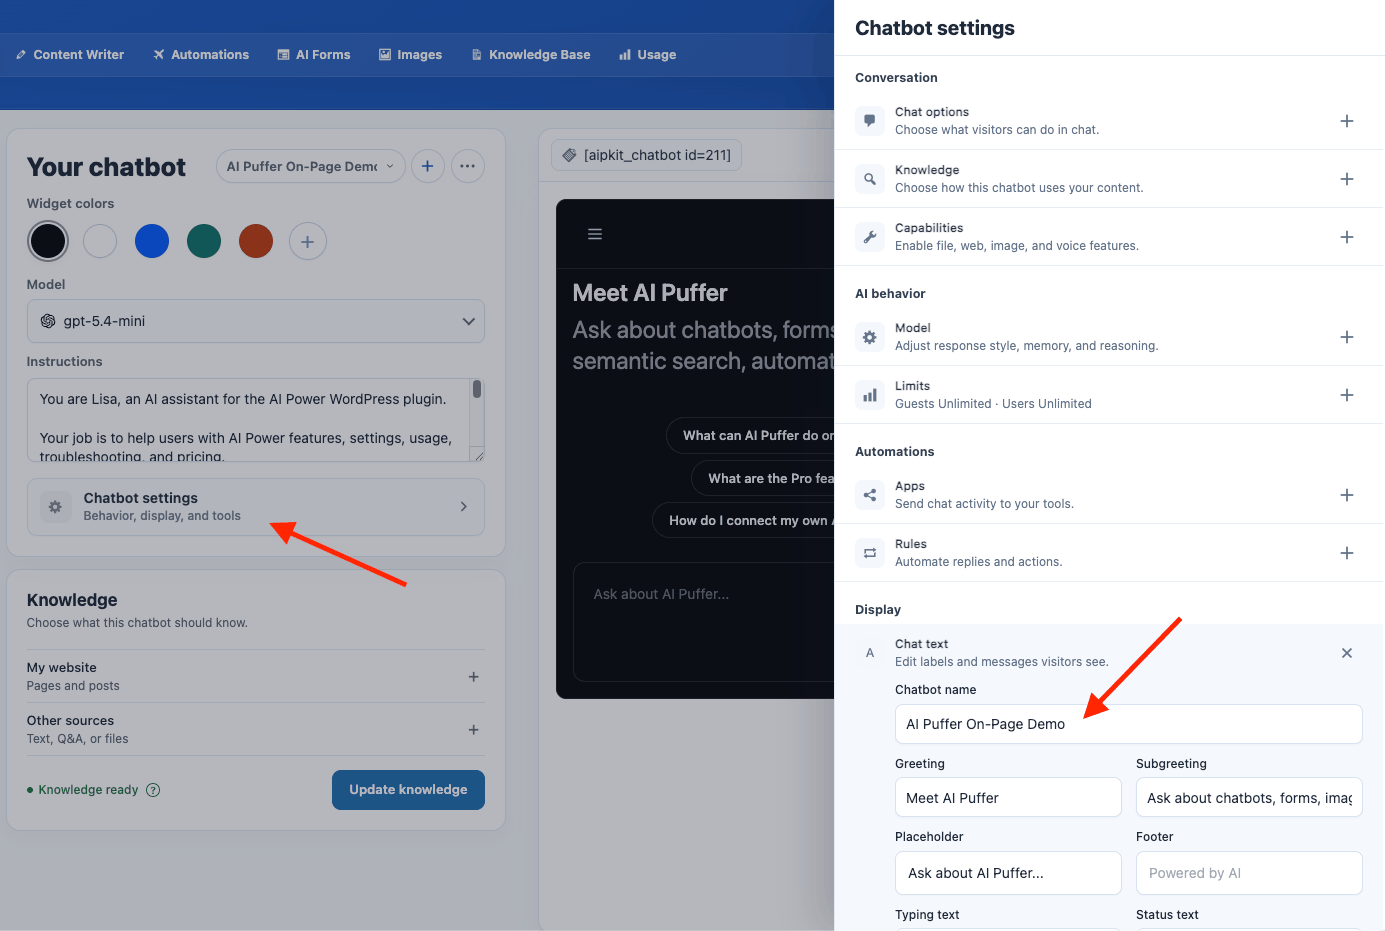
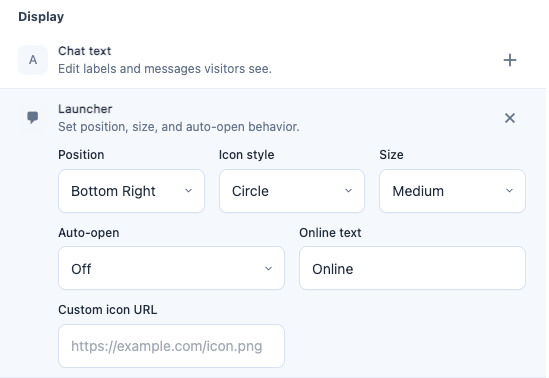
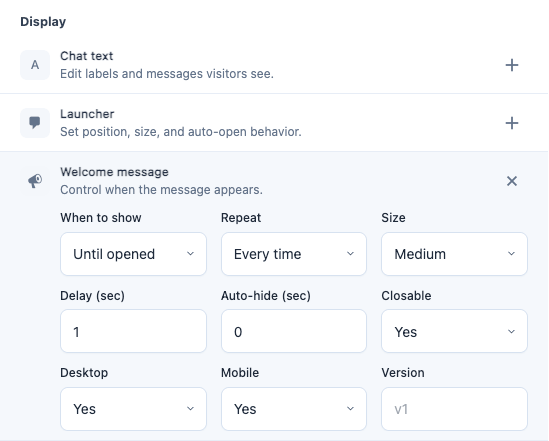
Display
Use the main chatbot screen for quick visual changes such as chat photo, welcome message, widget colors, and launcher icon. Open Chatbot settings > Display for chat text, launcher behavior, welcome-message timing, and publish options.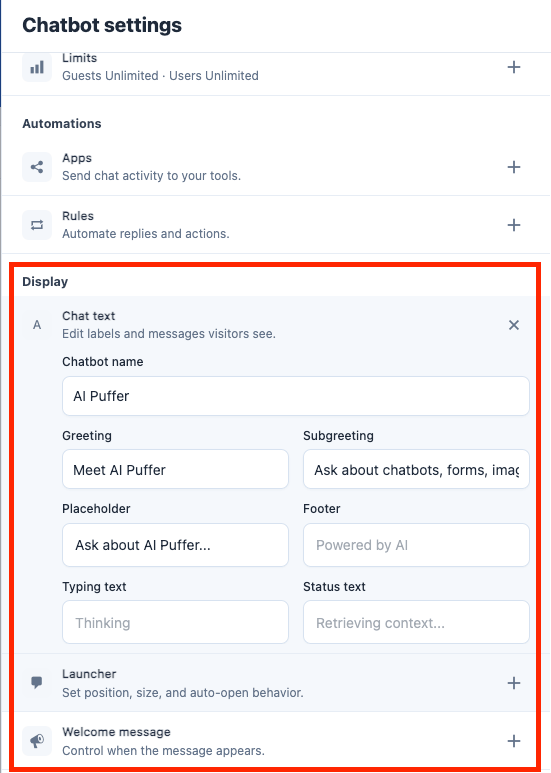
Widget Colors
Choose a color preset from Widget colors on the main chatbot screen. To build your own theme, choose the custom option and open the custom editor. The editor lets you change the main colors, bubble radius, font, inline width, popup width, chat height, and advanced colors for messages, header, footer, input area, buttons, and sidebar. Use Reset to return the custom theme fields to their defaults.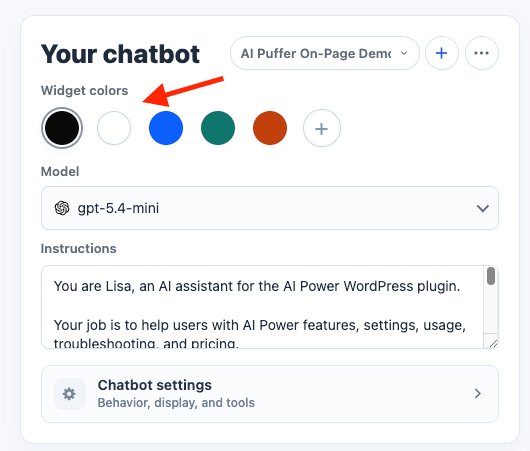
Popup
Popup mode adds a launcher button to the page. When the visitor clicks it, the chatbot opens in a floating chat window. To configure a popup:- Go to AI Puffer > Chatbots and select the chatbot.
- Turn on Popup in the preview bar.
- Turn on Site-wide if the launcher should appear across the site.
- Use the main screen to set the chat photo, welcome message, widget colors, and launcher icon.
- Open Chatbot settings > Display.
- Configure Launcher and Welcome message options.
- Save the chatbot and test it on the frontend.
Chat Options
Open Chatbot settings > Conversation > Chat options to choose which controls appear in the chatbot.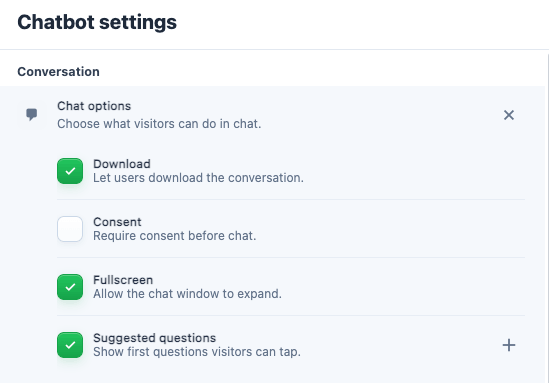
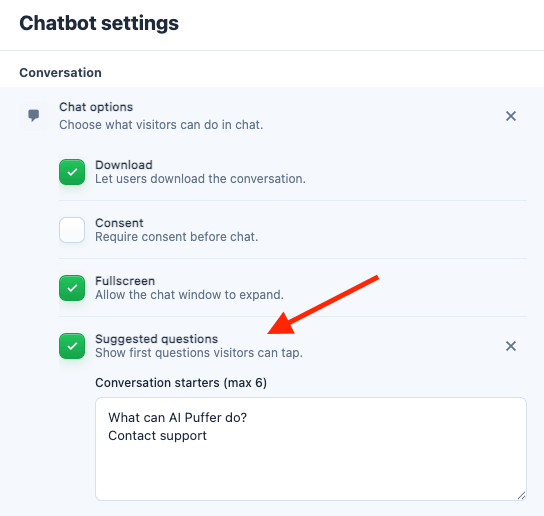
Suggested Questions
Suggested questions are quick prompts shown inside the chatbot before the first message. Use them to help visitors begin with common questions. To enable and customize suggested questions:- Go to AI Puffer > Chatbots and select the chatbot.
- Open Chatbot settings > Conversation > Chat options.
- Enable Suggested questions.
- Click the + settings button for Suggested questions.
- In Conversation starters (max 6), add one question per line.
- Keep the list to 6 questions or fewer.
- Save the chatbot.
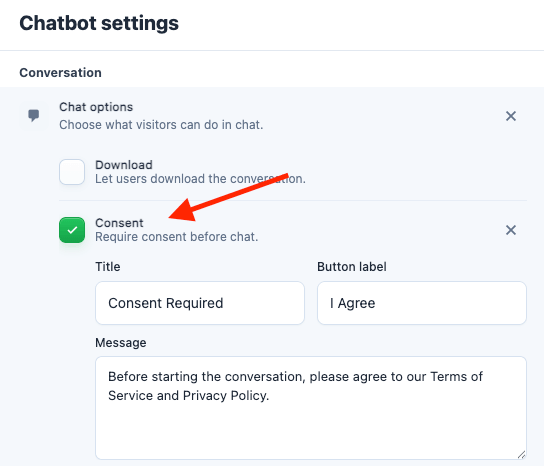
Consent Notice
Consent shows a notice before the conversation starts. The chatbot input stays disabled until the visitor clicks the consent button. To enable and customize the consent notice:- Go to AI Puffer > Chatbots and select the chatbot.
- Open Chatbot settings > Conversation > Chat options.
- Enable Consent.
- Open the consent editor.
- Set the Title.
- Set the Button label.
- Write the Message.
- Save the chatbot.
Text Labels
Open Chatbot settings > Display > Chat text to change the words visitors see in the chatbot.Security and Privacy
Chatbots use both global security settings and chatbot-level controls. Open AI Puffer > Settings > Security.
Set custom block messages for banned words and banned IPs if you want visitors to see specific text.
Chatbot logs include conversation messages, usage data, feedback, and metadata needed for history and reporting. Enable IP anonymization if you do not want full IP addresses stored in logs.
Use IP anonymization when you need usage logs without storing full visitor IP addresses.
- Open AI Puffer > Settings > AI.
- Select OpenAI.
- Open Advanced.
- Set Moderation to Yes.
- Set Moderation Message if you want a custom message when input is blocked.
Limits
Limits control how much a visitor can use this chatbot before AI Puffer stops new messages. AI Puffer checks the visitor’s quota before a chat request starts and records usage after the response. Guests are tracked by session. Logged-in users are tracked on their WordPress account. Leave a quota empty for unlimited usage, or set it to0 to block that group.
Open Chatbot settings > AI behavior > Limits to configure chatbot quota controls.
Quota buttons can link to customer dashboard usage, credits, purchases, the buy credits page, a custom URL, or no button.

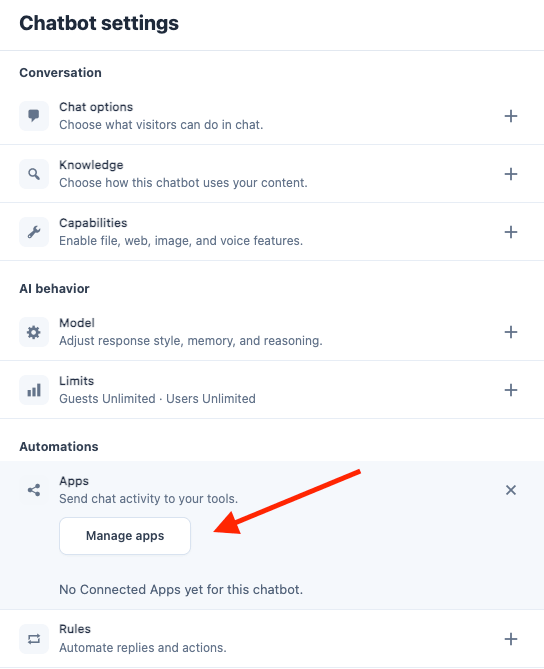
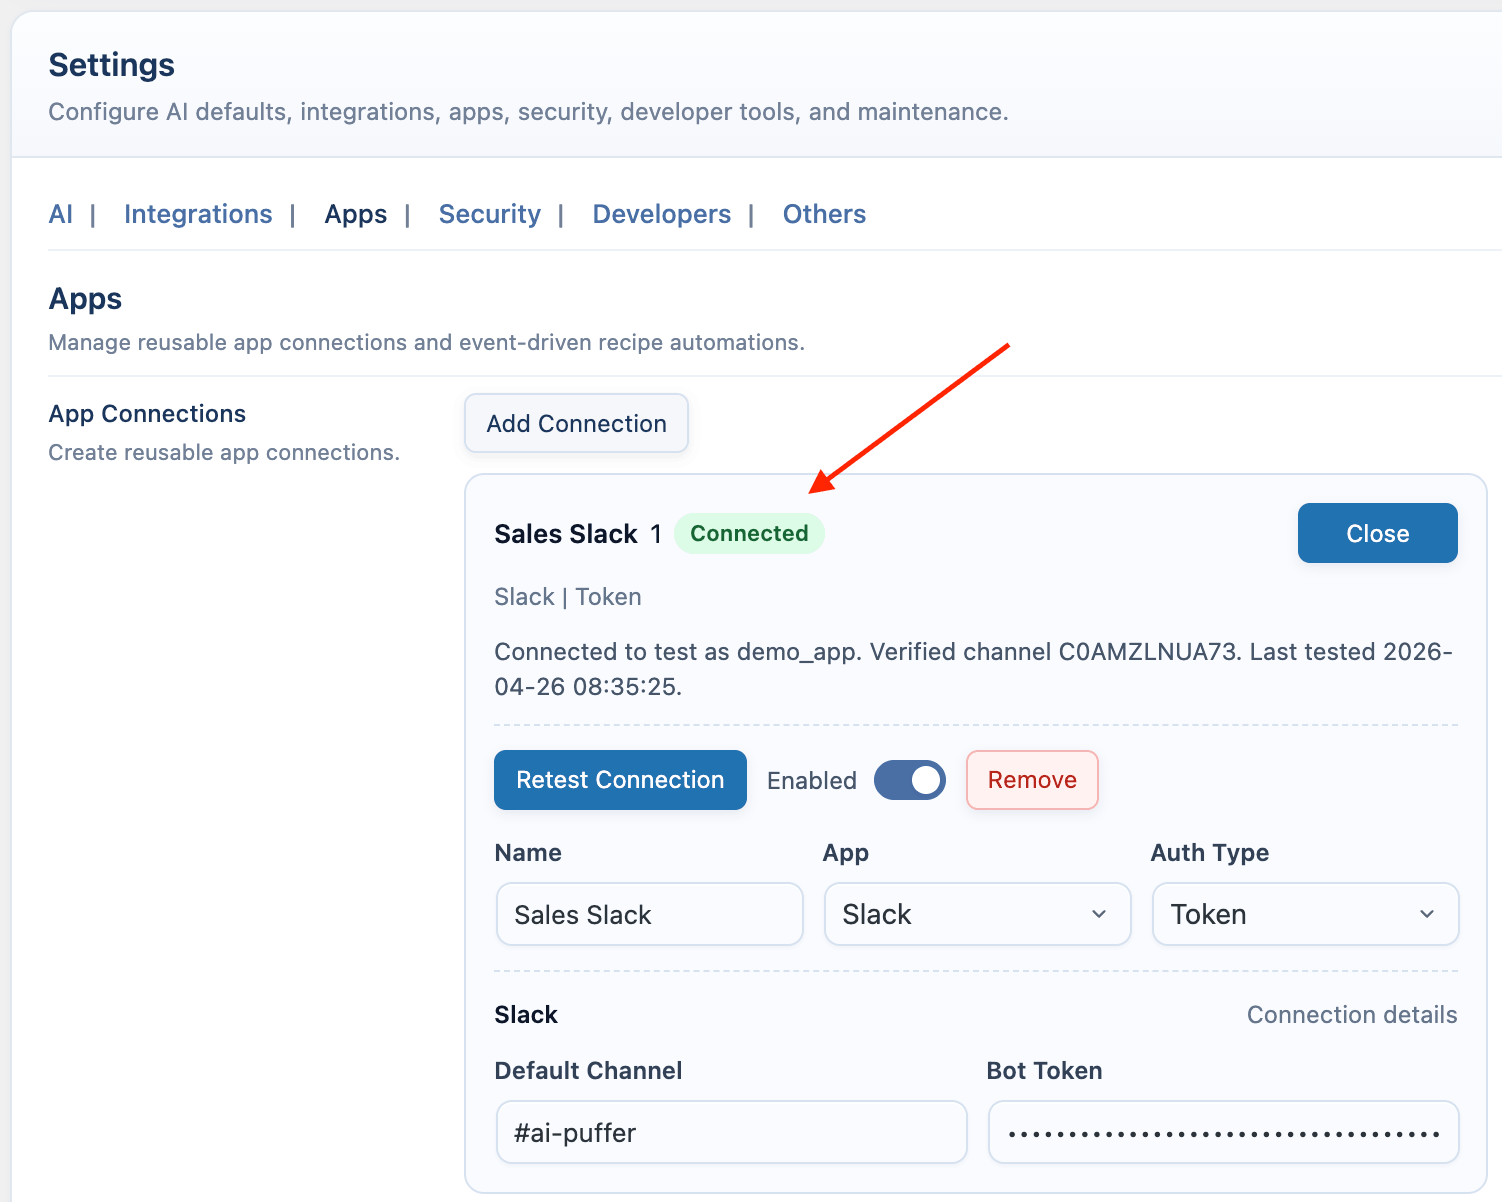
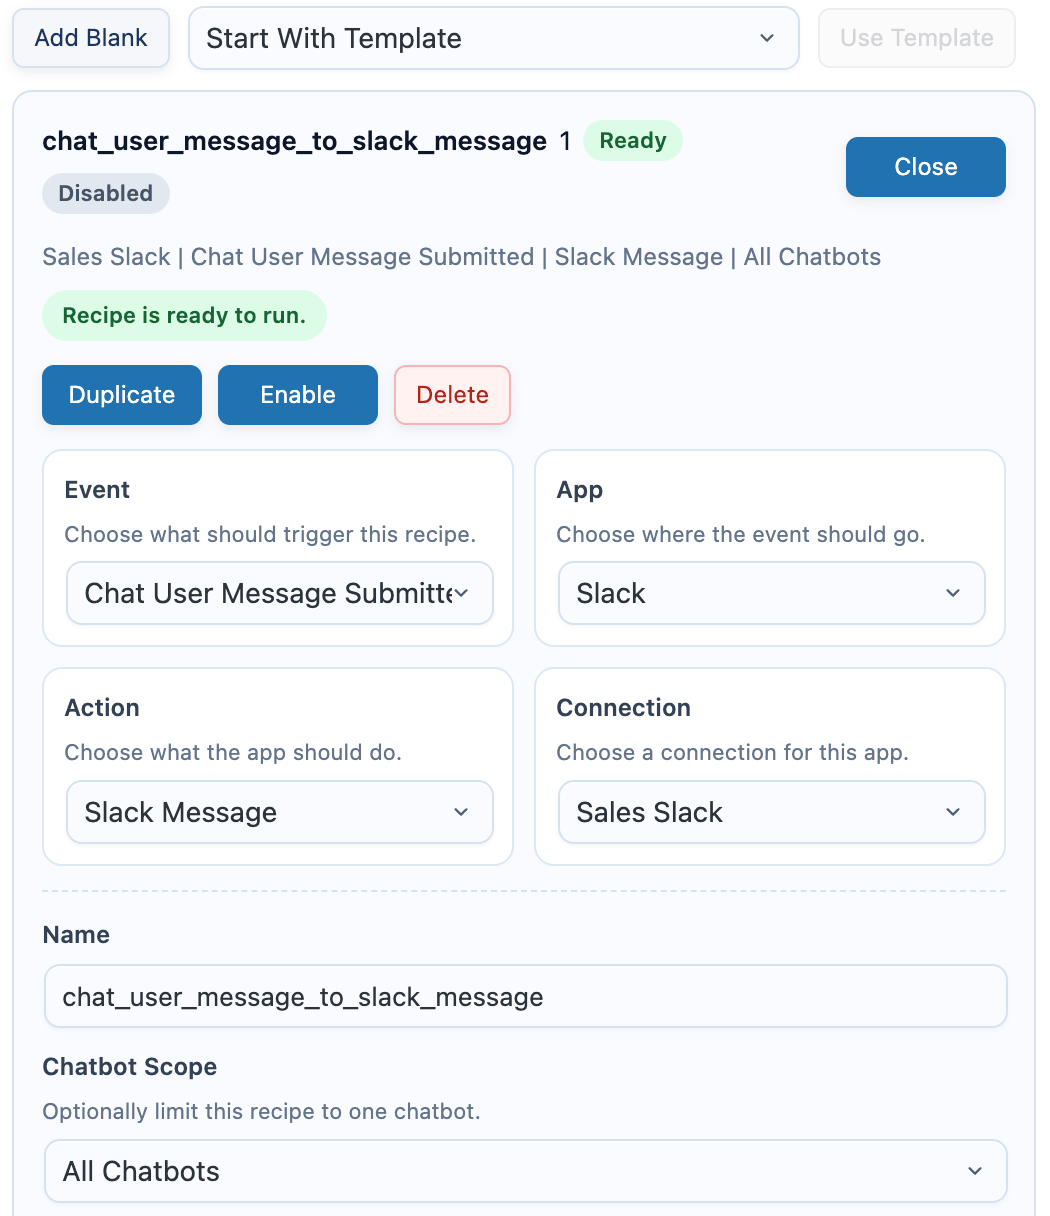
Connected Apps
Use Connected Apps to send chatbot events to external apps.


Use Chatbot Form Submitted for forms created with a chatbot rule’s Display form action. Use AI Form Submitted only for standalone AI Forms from the AI Forms module.
Open AI Puffer > Settings > Apps to create connections and recipes.
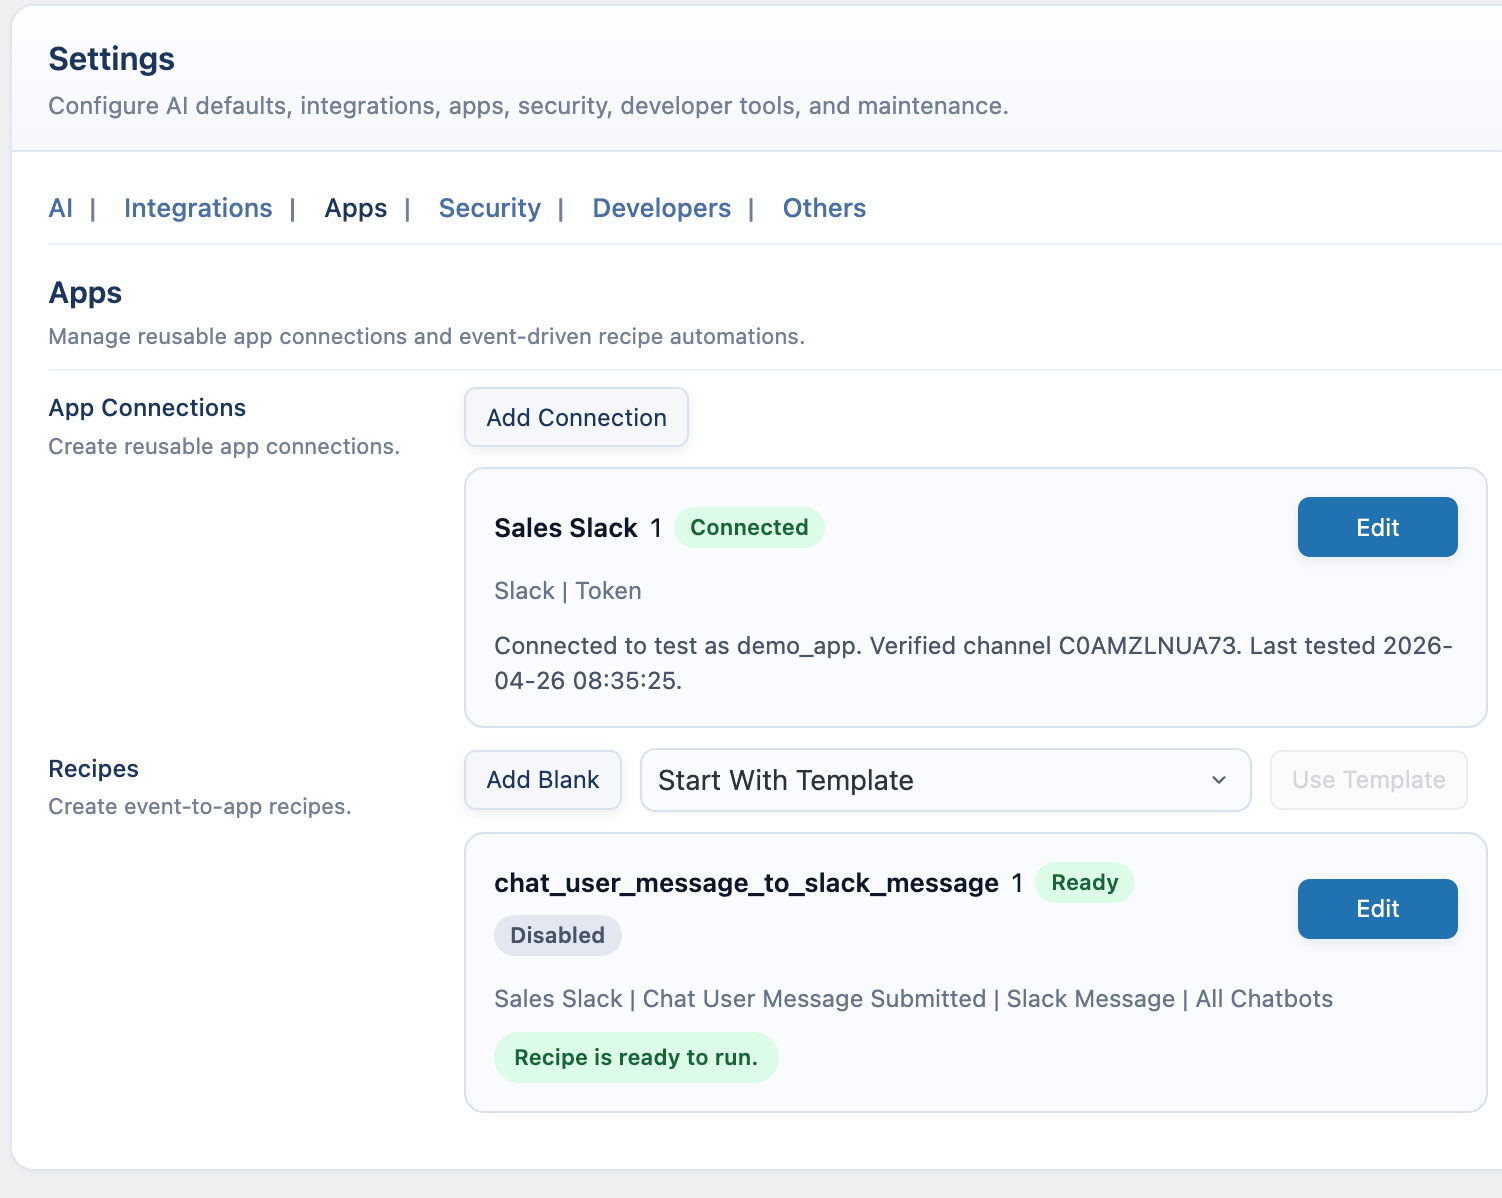
Slack
Use Slack to send chatbot messages, responses, feedback, or session alerts to a channel.- Go to https://api.slack.com/apps.
- Click Create New App.
- Choose From scratch.
- Enter an app name and select the workspace.
- Click Create App.
- Choose one connection method:
- Bot token: open OAuth & Permissions, scroll to Bot Token Scopes, click Add an OAuth Scope, add
chat:write, click Install to Workspace, then copy the Bot User OAuth Token that starts withxoxb-. - Incoming webhook: open Incoming Webhooks, turn on Activate Incoming Webhooks, click Add New Webhook to Workspace, select a channel, then copy the webhook URL.
- Bot token: open OAuth & Permissions, scroll to Bot Token Scopes, click Add an OAuth Scope, add
- If you use a bot token, invite the Slack app to the target channel.
- In WordPress, open AI Puffer > Settings > Apps.
- Create a Slack connection.
- Select Token or Webhook.
- For Token, enter the Bot Token and Default Channel.
- For Webhook, enter the Webhook URL.
- Save the connection.
- For token connections, click Test Connection. AI Puffer posts a temporary Slack message and removes it after the channel is verified.
- Create a recipe, choose a chatbot event, choose Slack Message, map the fields, and enable it.
- Scope the recipe to all chatbots or one chatbot.
- Test from the frontend chatbot.
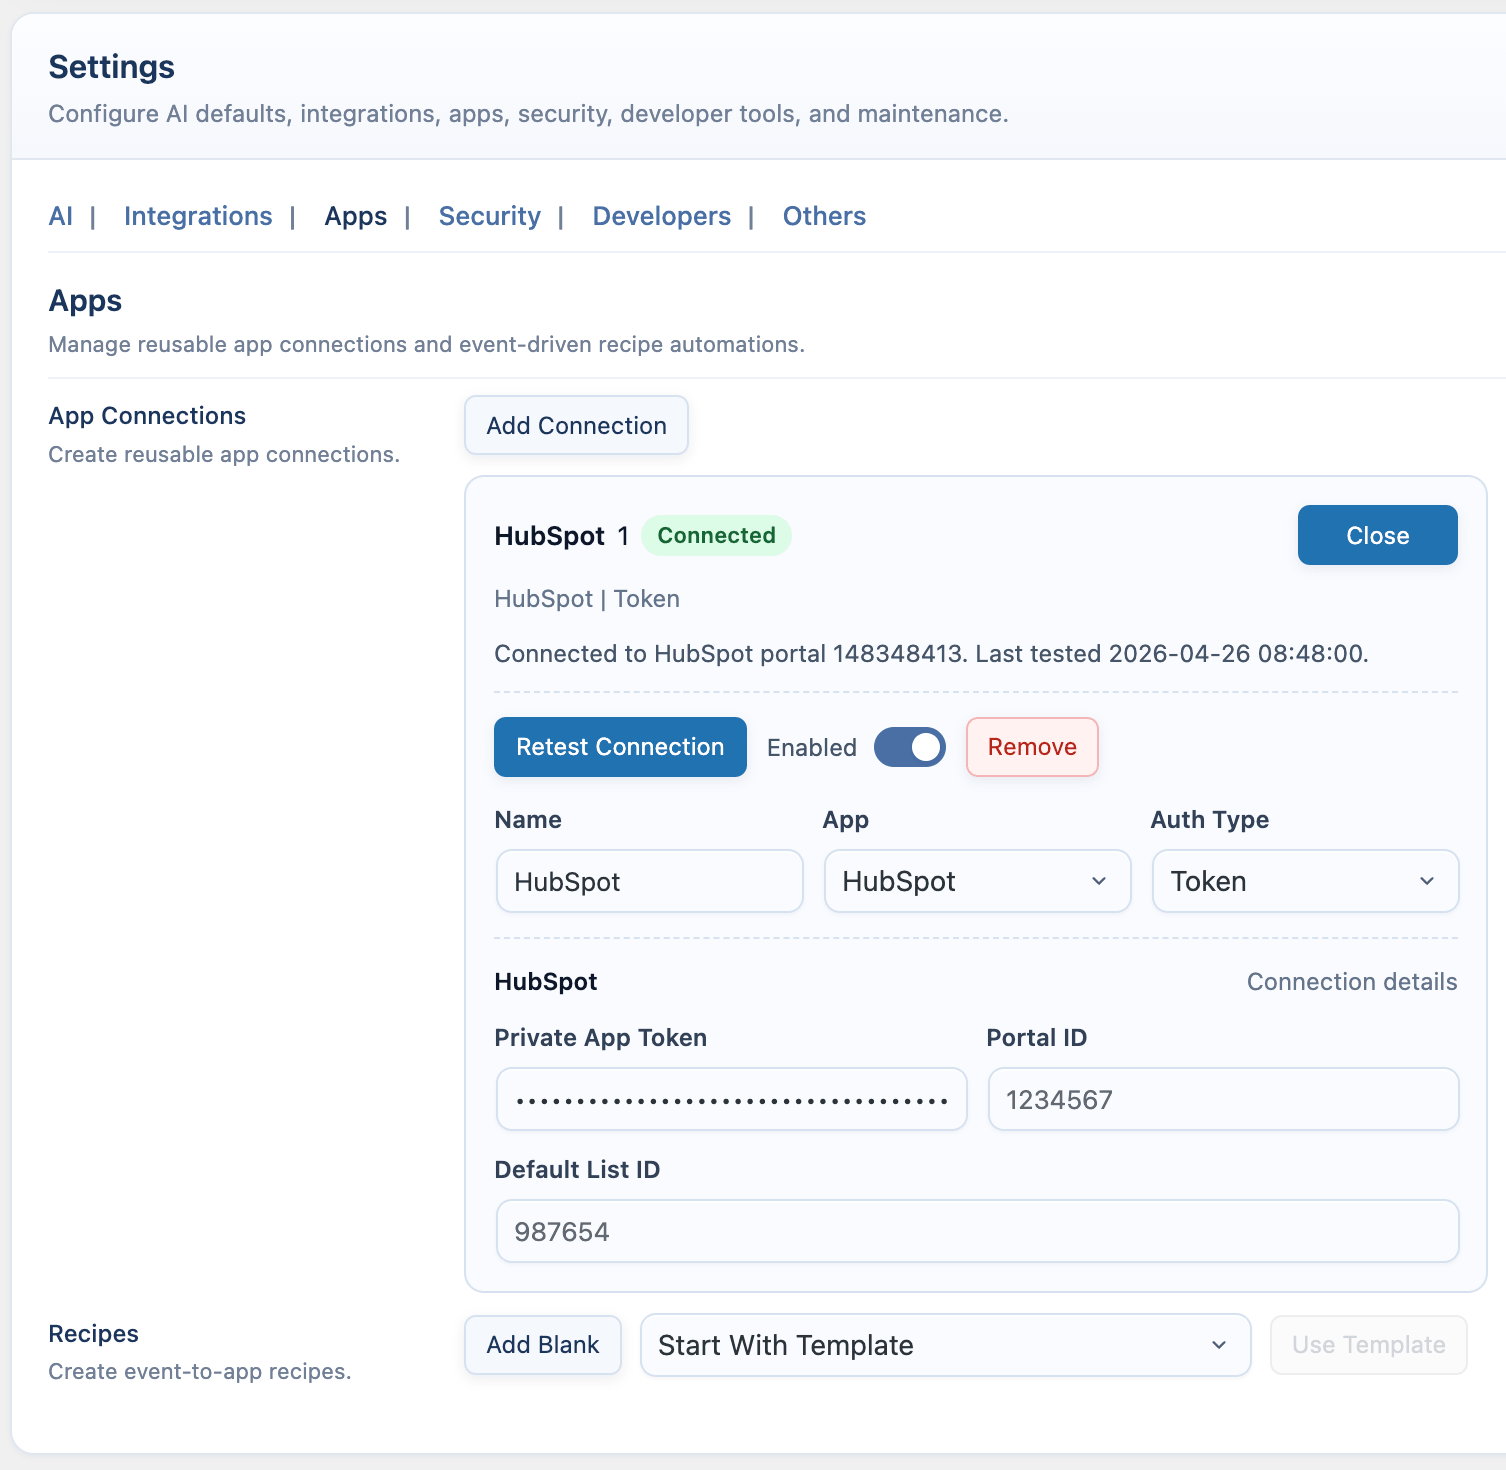
HubSpot
Use HubSpot to create or update contacts from chatbot events when your recipe maps an email address.- Go to https://app.hubspot.com and select your HubSpot account.
- Open Development > Legacy apps.
- Click Create private app.
- Enter an app name.
- Open Scopes.
- Add
crm.objects.contacts.readandcrm.objects.contacts.write. - Create the app.
- Open the app’s Auth tab and copy the private app access token.
- In WordPress, open AI Puffer > Settings > Apps.
- Create a HubSpot connection.
- Enter the Private App Token.
- Add the Portal ID if you want it stored with the connection.
- Save the connection.
- Click Test Connection.
- Create a recipe, choose a chatbot event, choose HubSpot Contact, map Email, and map any other contact fields you need.
- Enable the recipe and test from the frontend chatbot.
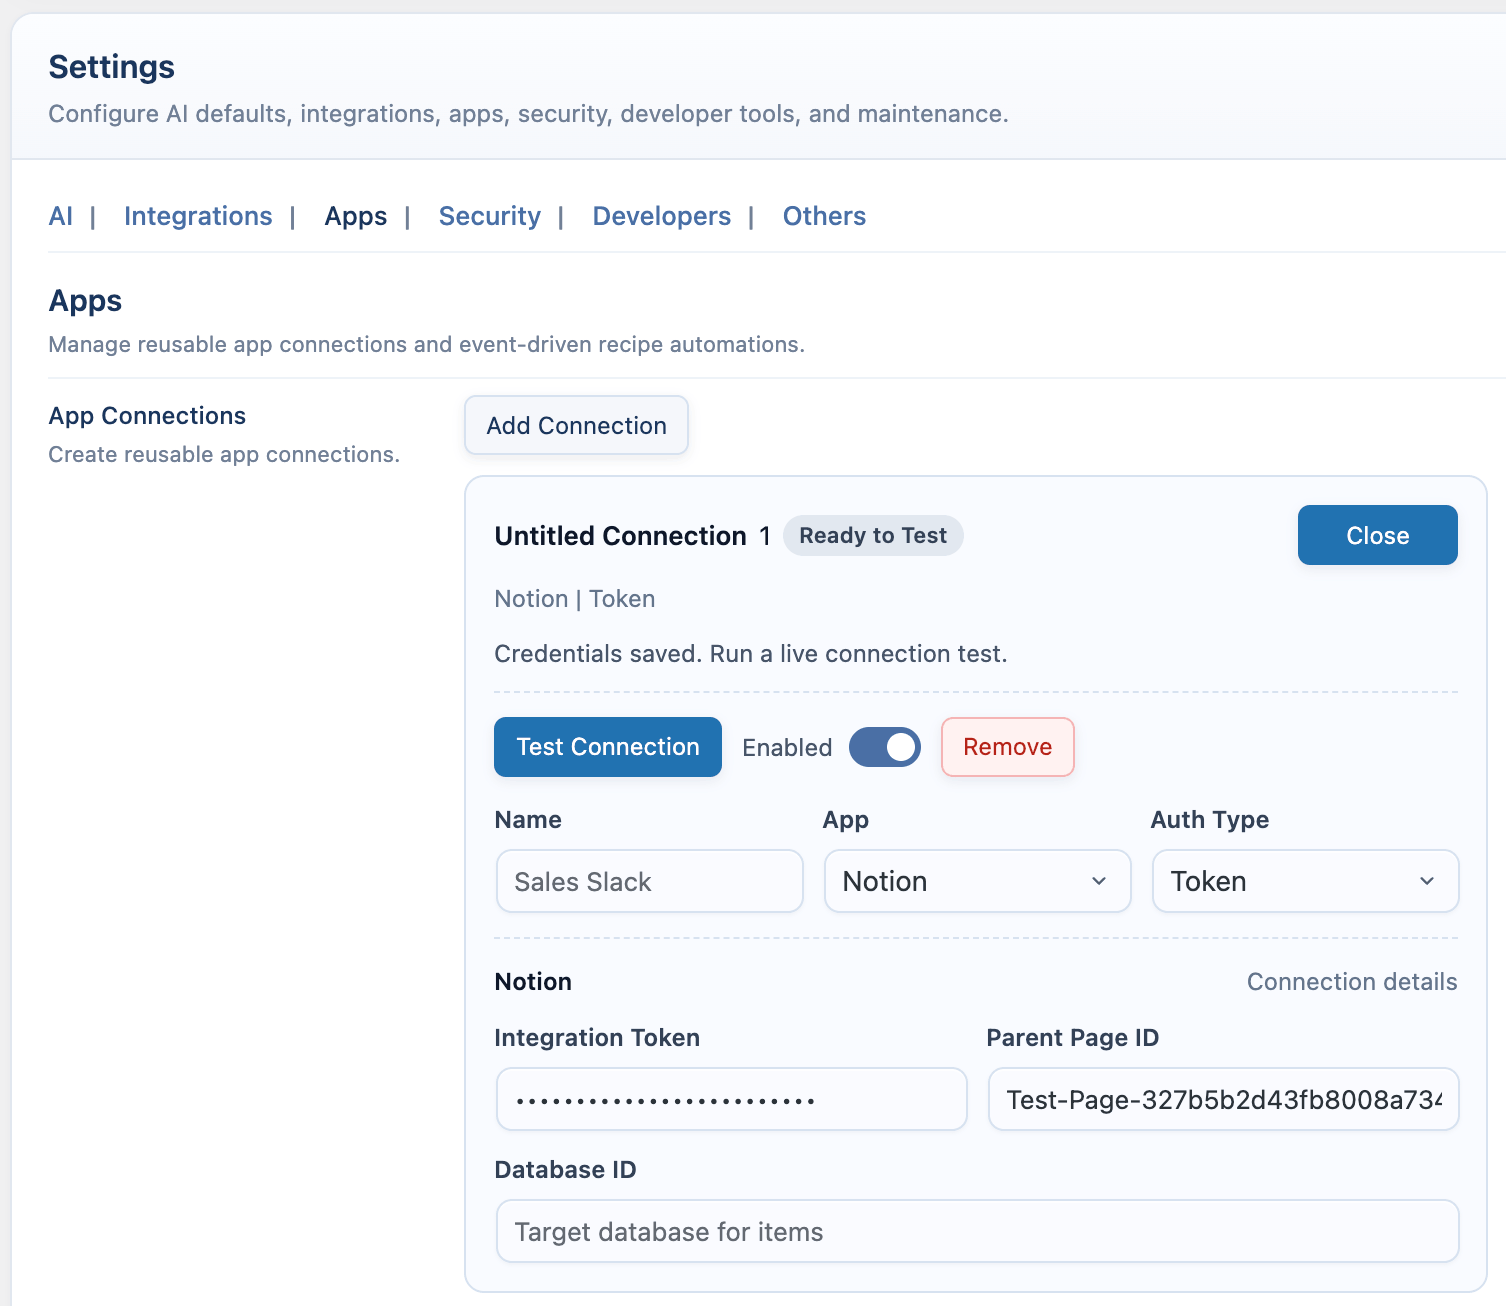
Notion
Use Notion to create pages or database items from chatbot events.- Go to https://www.notion.com/my-integrations.
- Click New integration or Create a new integration.
- Select the workspace and enter an integration name.
- Open the integration’s Configuration tab.
- Copy the Internal Integration Secret.
- In Notion, open the page or database AI Puffer should write to.
- Click the … menu in the top-right corner.
- Select Connections.
- Click + Add connection.
- Search for your integration and select it.
- Confirm access.
- Copy the parent page ID or database ID from the Notion URL.
- In WordPress, open AI Puffer > Settings > Apps.
- Create a Notion connection.
- Enter the Integration Token.
- Enter Parent Page ID for page recipes, or Database ID for database item recipes.
- Save the connection.
- Click Test Connection.
- Create a recipe, choose a chatbot event, choose Notion Page or Notion Database Item, map the fields, and enable it.
- Test from the frontend chatbot.
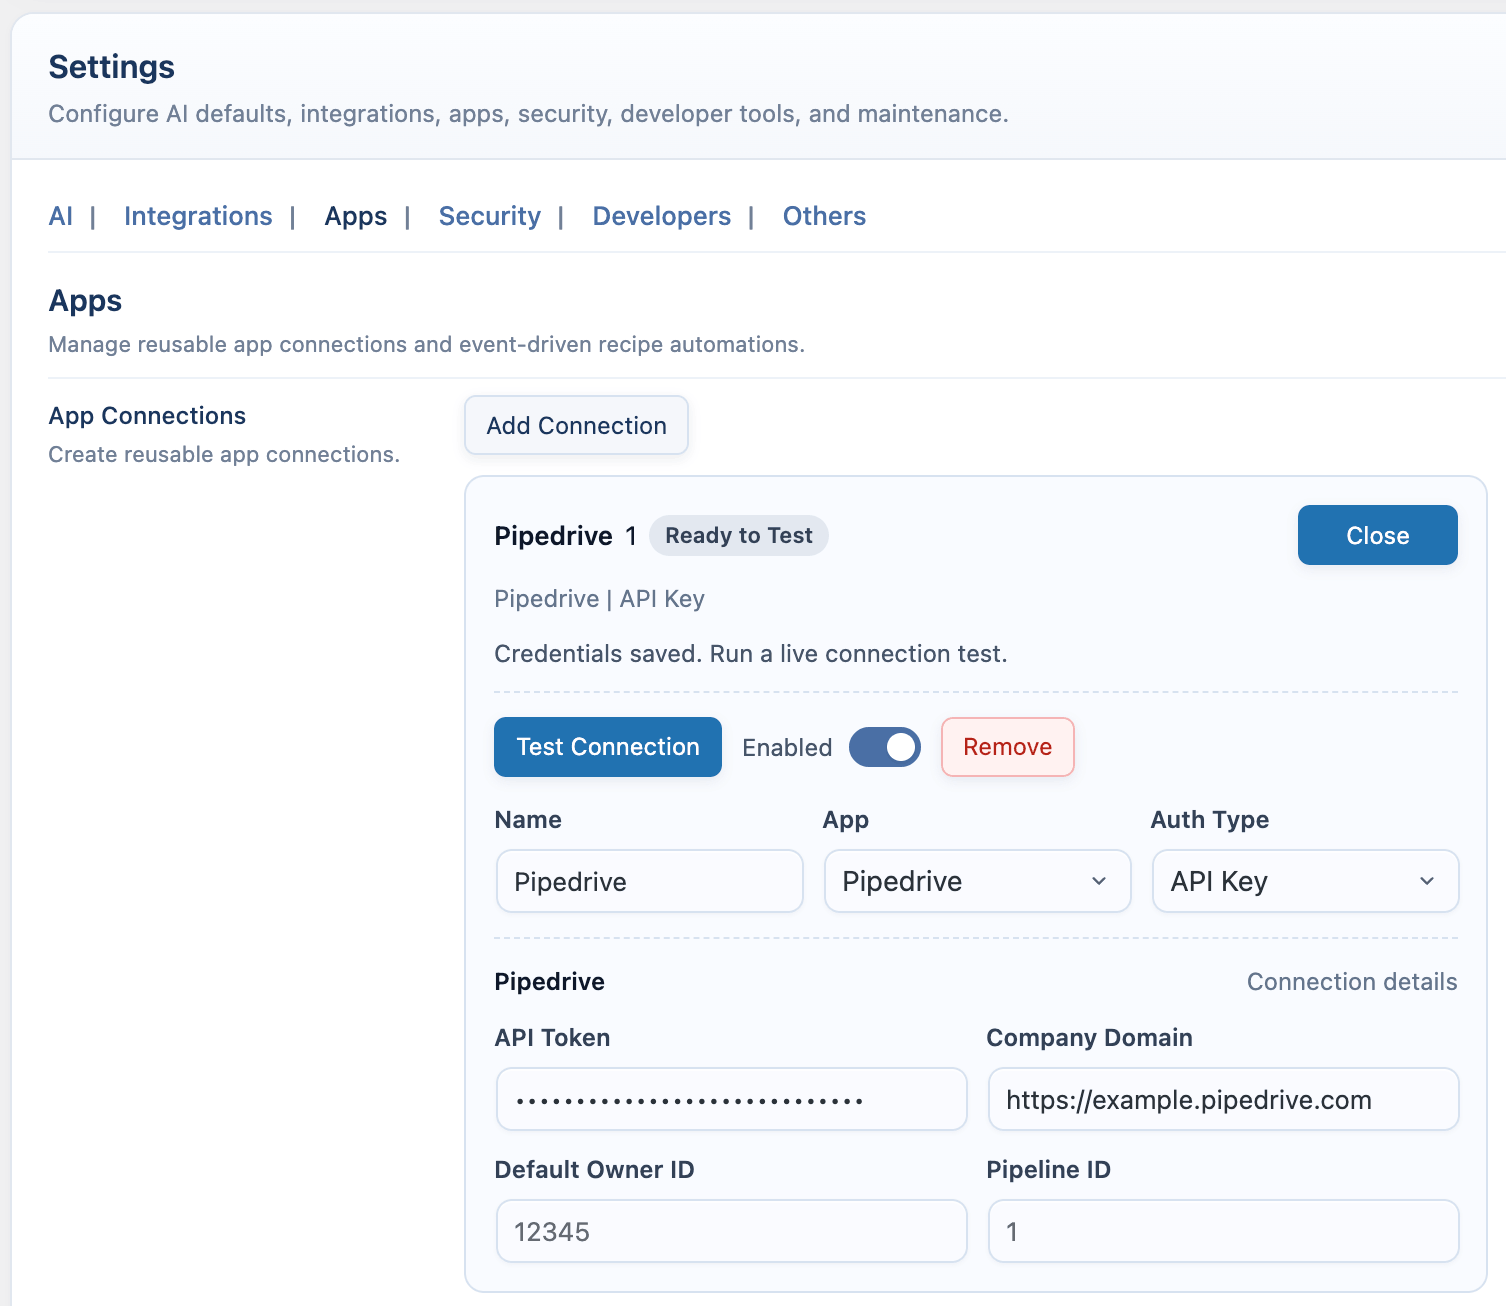
Pipedrive
Use Pipedrive to create or update people from chatbot events when your recipe maps a name.- Go to https://app.pipedrive.com.
- Open your account menu in the top-right corner.
- Open Personal preferences.
- Open the API tab.
- Copy your personal API token.
- Copy your company domain from the browser address. For
https://example.pipedrive.com, the company domain isexample. - In WordPress, open AI Puffer > Settings > Apps.
- Create a Pipedrive connection.
- Enter the API Token and Company Domain.
- Add Default Owner ID or Pipeline ID if your workflow needs them.
- Save the connection.
- Click Test Connection.
- Create a recipe, choose a chatbot event, choose Pipedrive Person, map Name, and map any other fields you need.
- Enable the recipe and test from the frontend chatbot.
Zapier
Use Zapier when you want to send chatbot event data into a Zap.- Go to https://zapier.com/app/editor.
- Click the Trigger step.
- Search for Webhooks by Zapier.
- Select Webhooks by Zapier.
- Set Event to Catch Hook.
- Click Continue.
- In the Test tab, click Copy to copy the webhook URL.
- In WordPress, open AI Puffer > Settings > Apps.
- Create a Zapier connection.
- Enter the Webhook URL.
- Add a Zap Name if you want a label for the connection.
- Save the connection.
- Create a recipe, choose a chatbot event, choose Zapier Webhook, map the fields, and enable it.
- In Zapier, keep the Zap ready to receive a test request.
- Test from the frontend chatbot and confirm the request appears in Zapier.

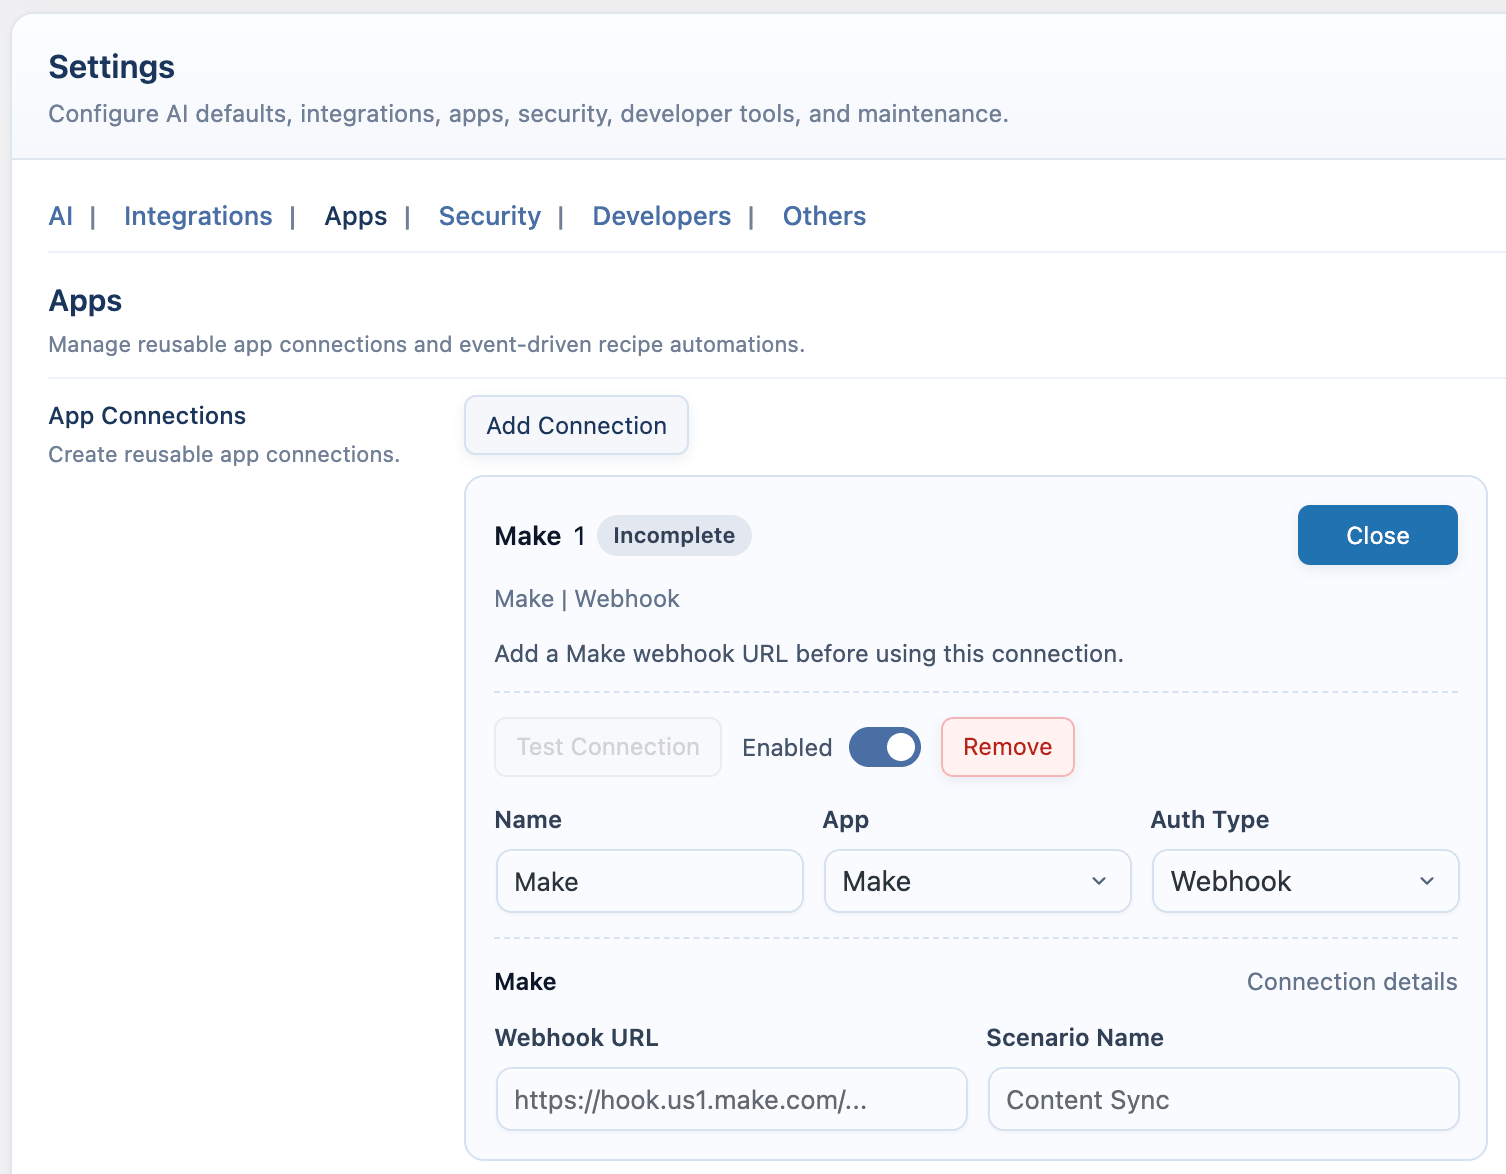
Make
Use Make when you want chatbot events to start a Make scenario.- Go to https://www.make.com/en/login and open Make.
- Create a new scenario.
- Click the large + button.
- Search for Webhooks.
- Select Webhooks > Custom webhook.
- Click Create a webhook.
- Name the webhook and save it.
- Copy the generated webhook URL.
- In WordPress, open AI Puffer > Settings > Apps.
- Create a Make connection.
- Enter the Webhook URL.
- Add a Scenario Name if you want a label for the connection.
- Save the connection.
- Create a recipe, choose a chatbot event, choose Make Webhook, map the fields, and enable it.
- In Make, click Run once so the scenario can receive a test request.
- Test from the frontend chatbot and check the Make scenario history.
n8n
Use n8n when you want chatbot events to start an n8n workflow.- Go to https://app.n8n.cloud or open your self-hosted n8n URL.
- Create a new workflow.
- Add a Webhook node.
- Set HTTP Method to POST.
- Copy the Test URL if you are testing, or the Production URL if the workflow is active.
- In WordPress, open AI Puffer > Settings > Apps.
- Create an n8n connection.
- Enter the Webhook URL.
- Add a Workflow Name if you want a label for the connection.
- Save the connection.
- Create a recipe, choose a chatbot event, choose n8n Webhook, map the fields, and enable it.
- In n8n, click Listen for test event if you used the Test URL, or activate the workflow if you used the Production URL.
- Test from the frontend chatbot and check the n8n execution log.

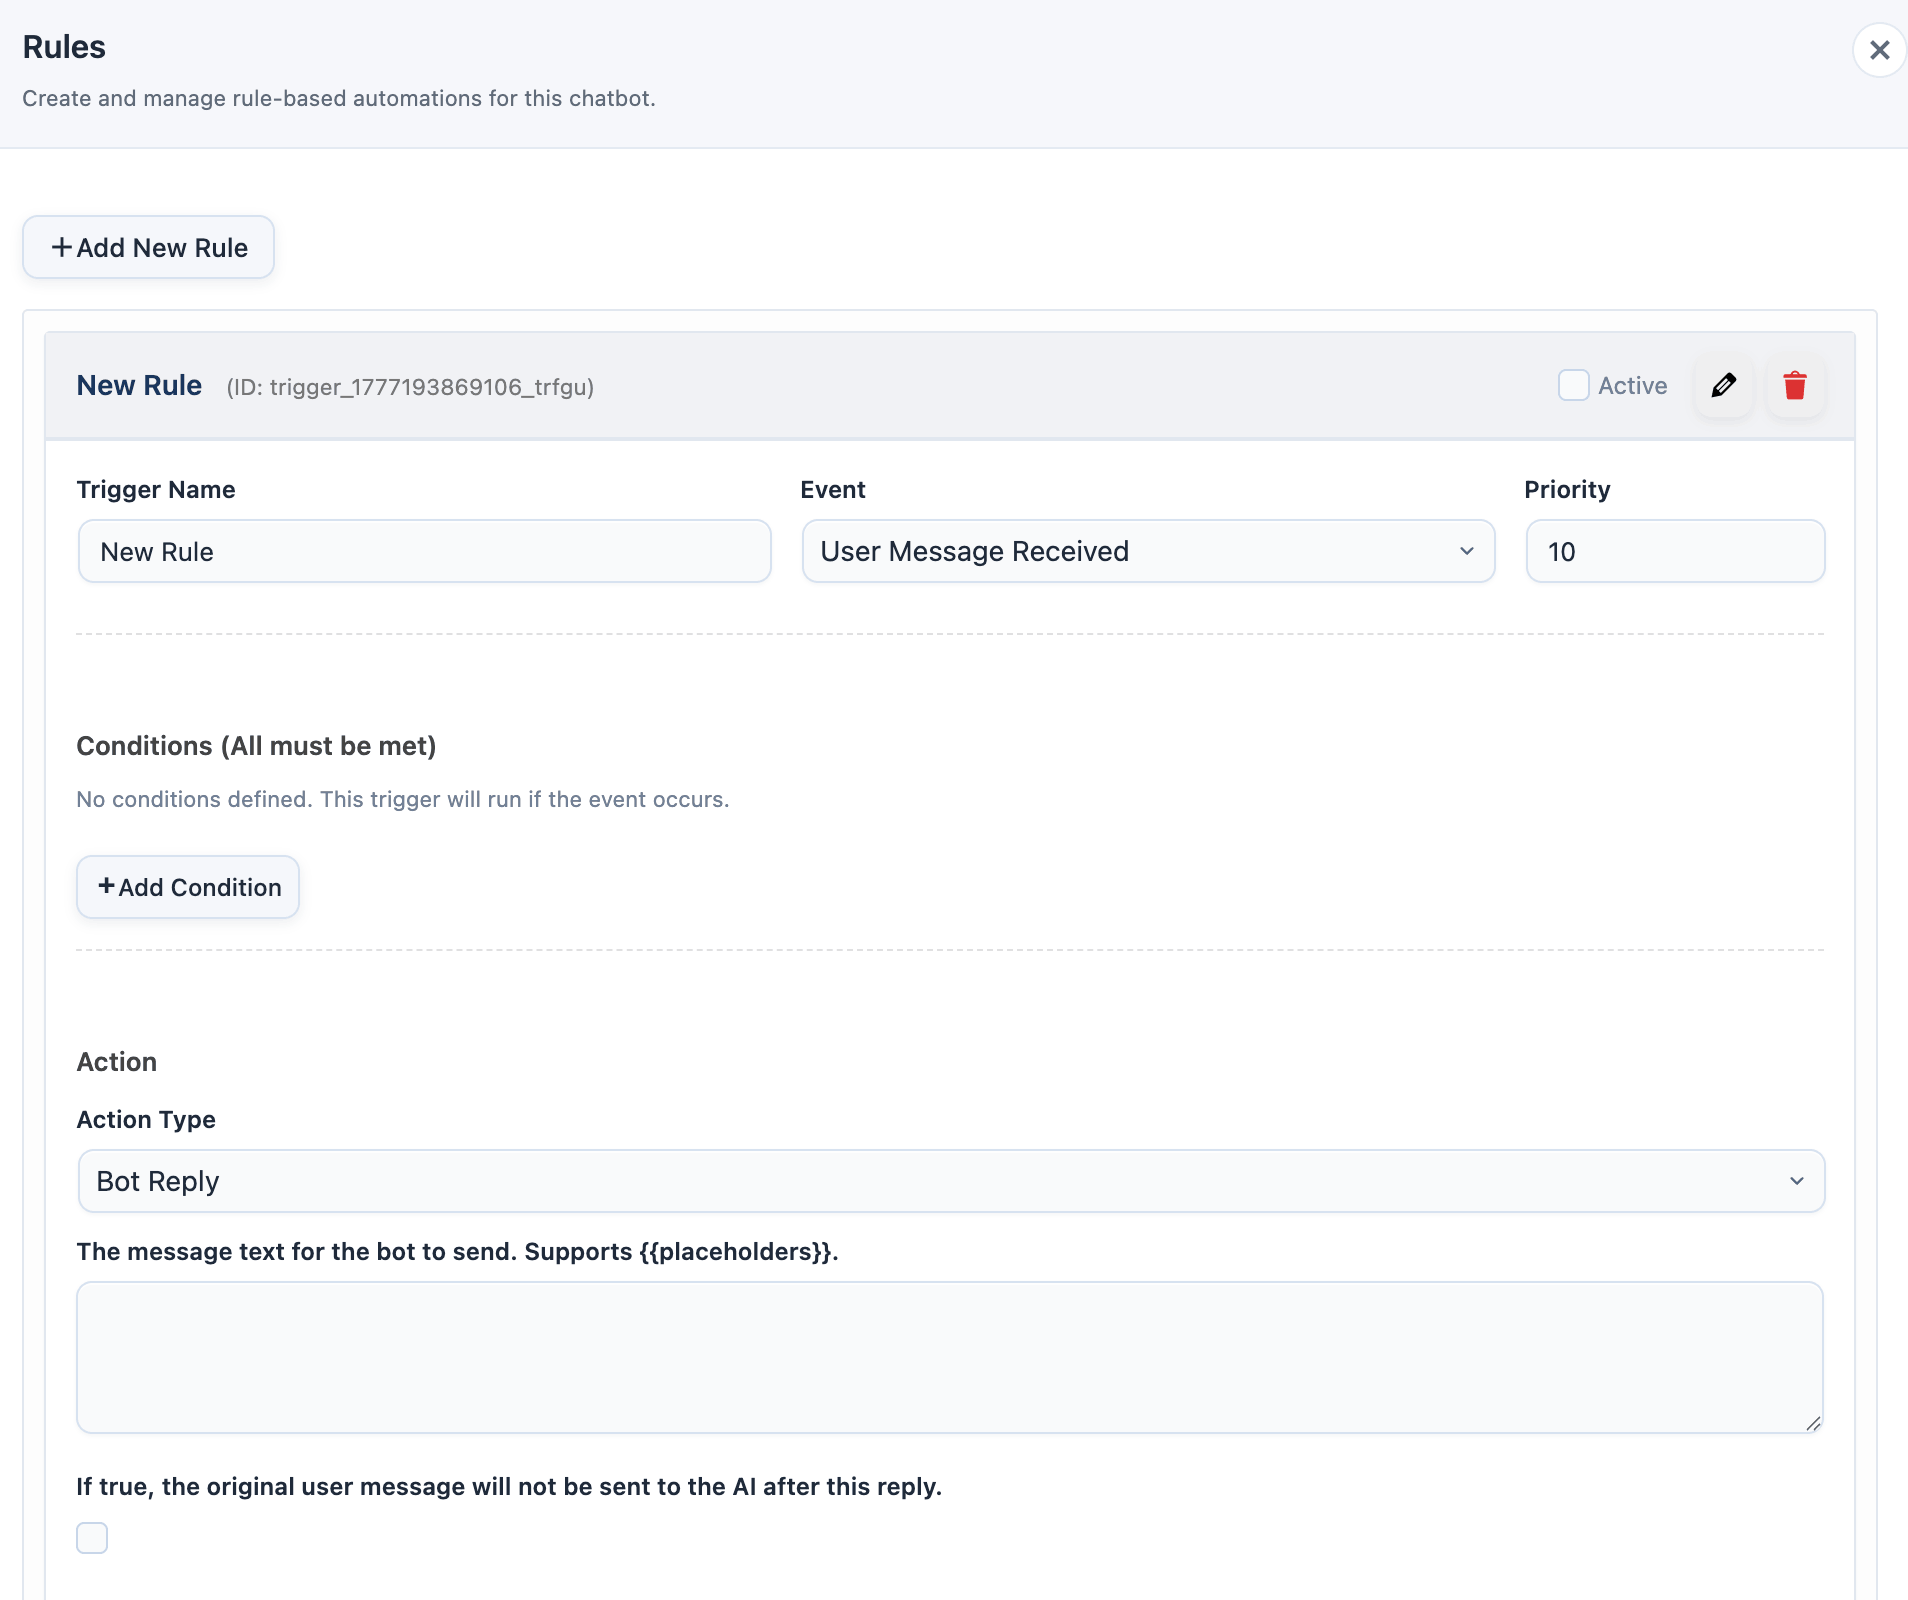
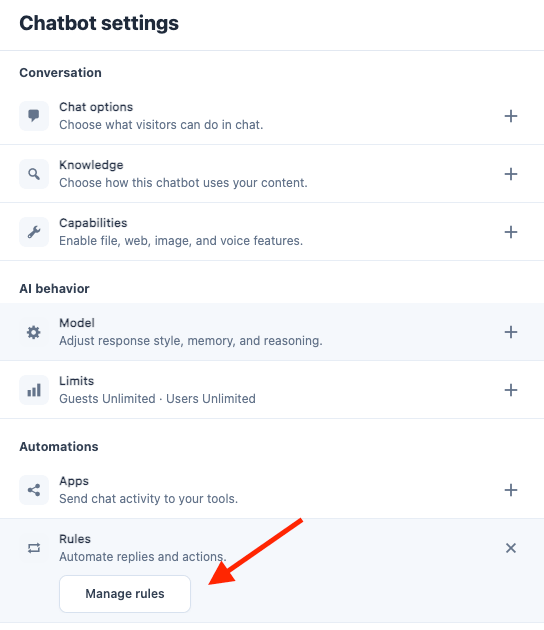
Rules
Rules run inside a chatbot and can react to chatbot events. A rule runs when its event fires, all of its conditions pass, and its action executes. Lower priority numbers run first. Open Chatbot settings > Automations > Rules, then click Manage rules to create or edit chatbot rules.Rule Events
Conditions
Rules can check fields from:
Available operators include equals, contains, starts with, ends with, regex match, empty checks, one-of checks, and numeric comparisons.
Conditions inside one rule use AND logic. To run the same action when either of two different conditions is true, create two rules with the same action.
Actions
Webhook and message fields support placeholders. Form placeholders include submitted data, display values, labels, and individual submitted fields.
Example
Lead Collection
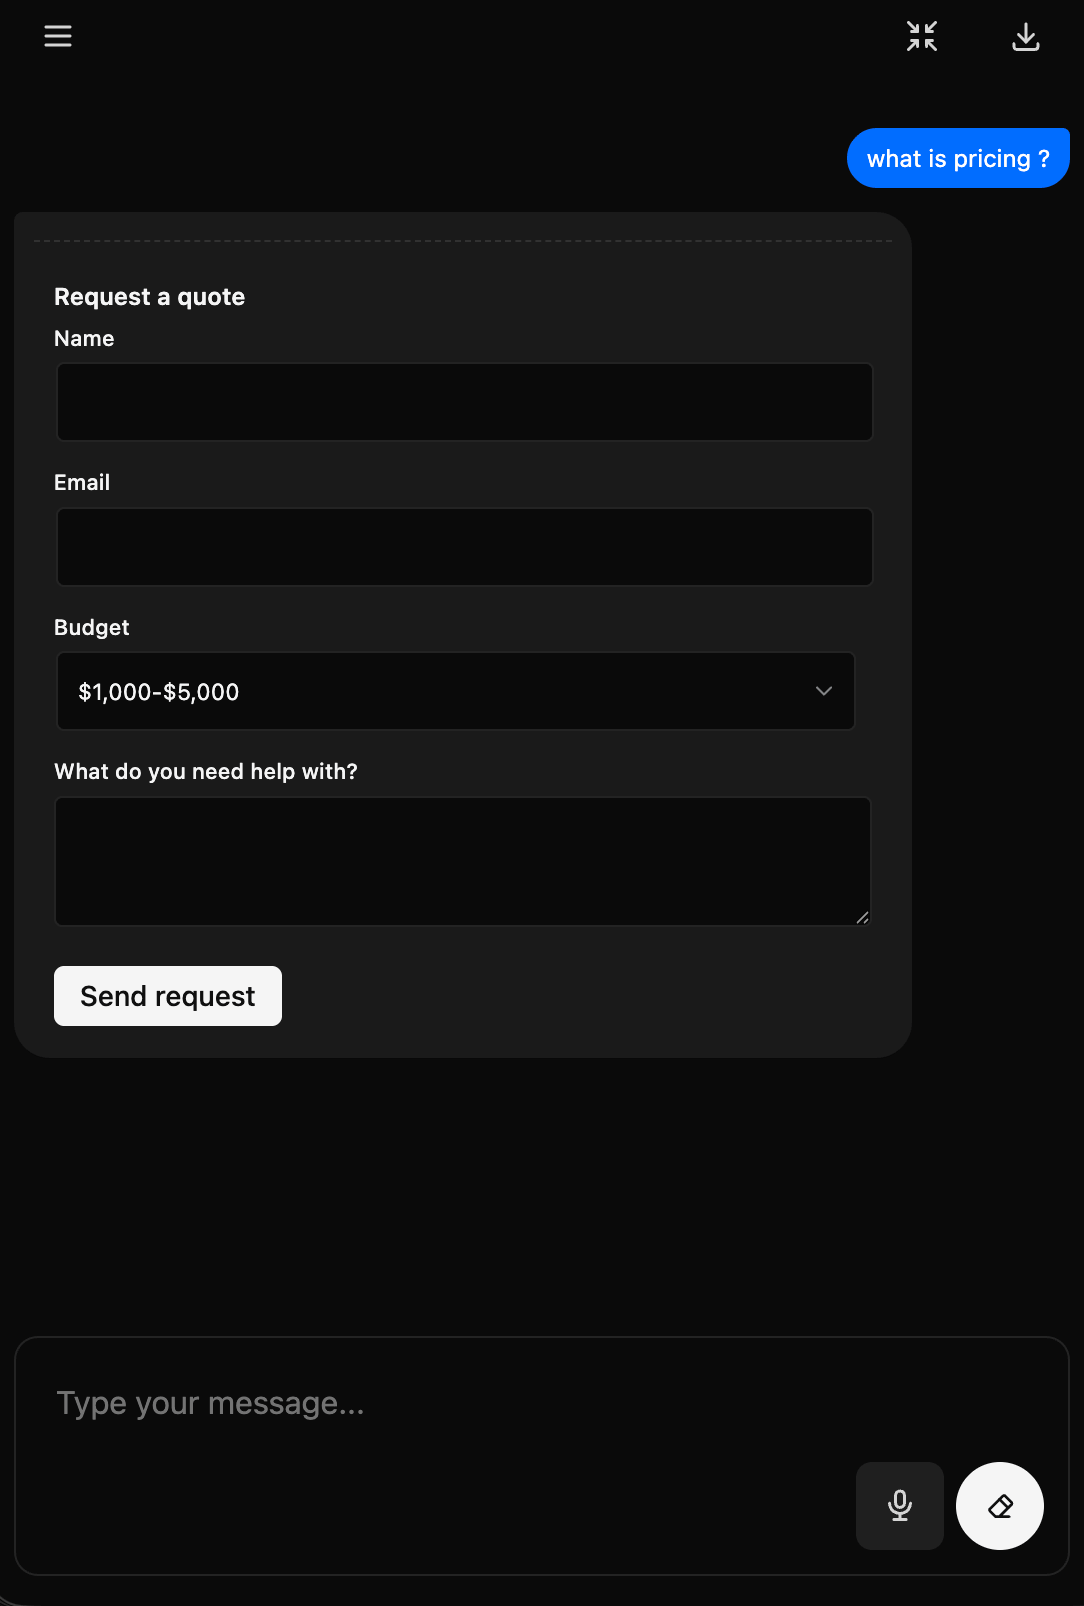
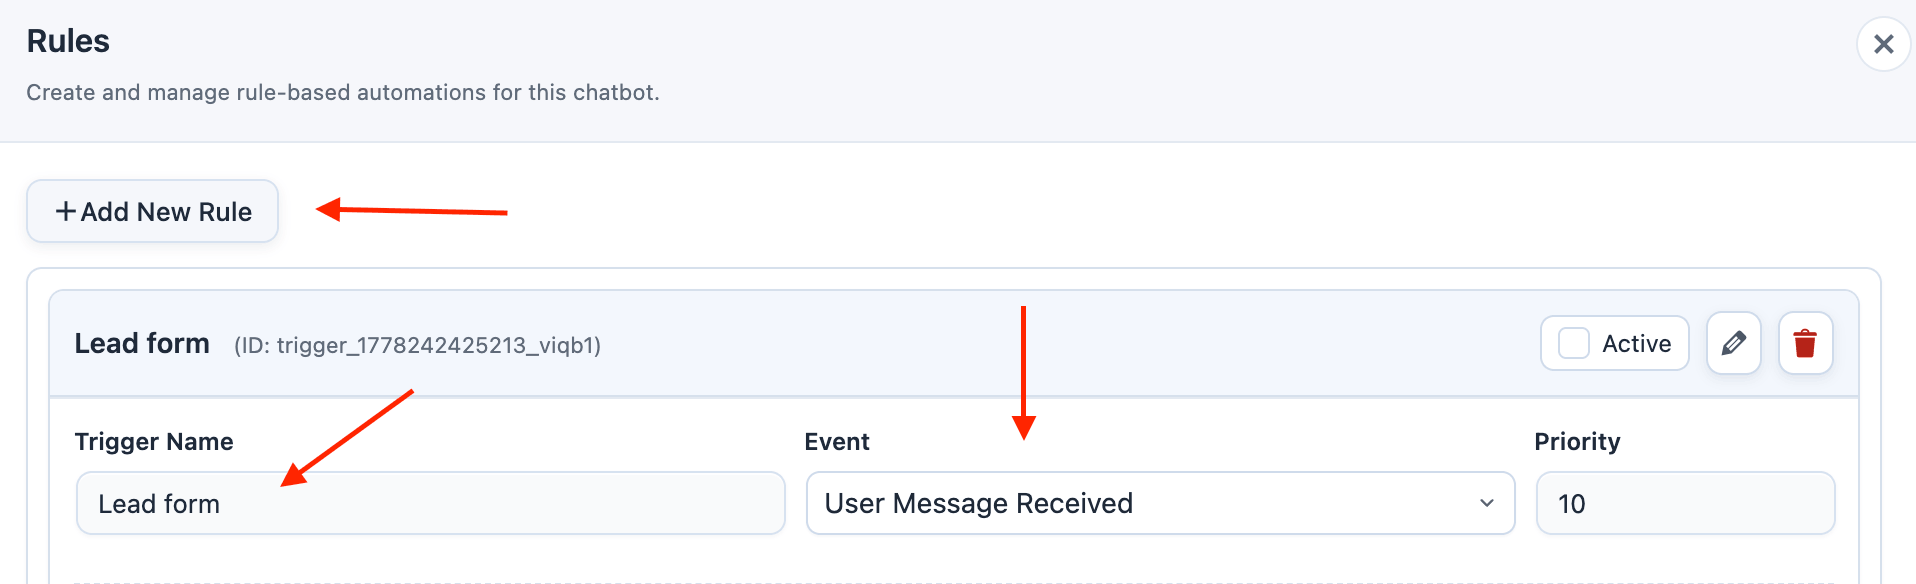
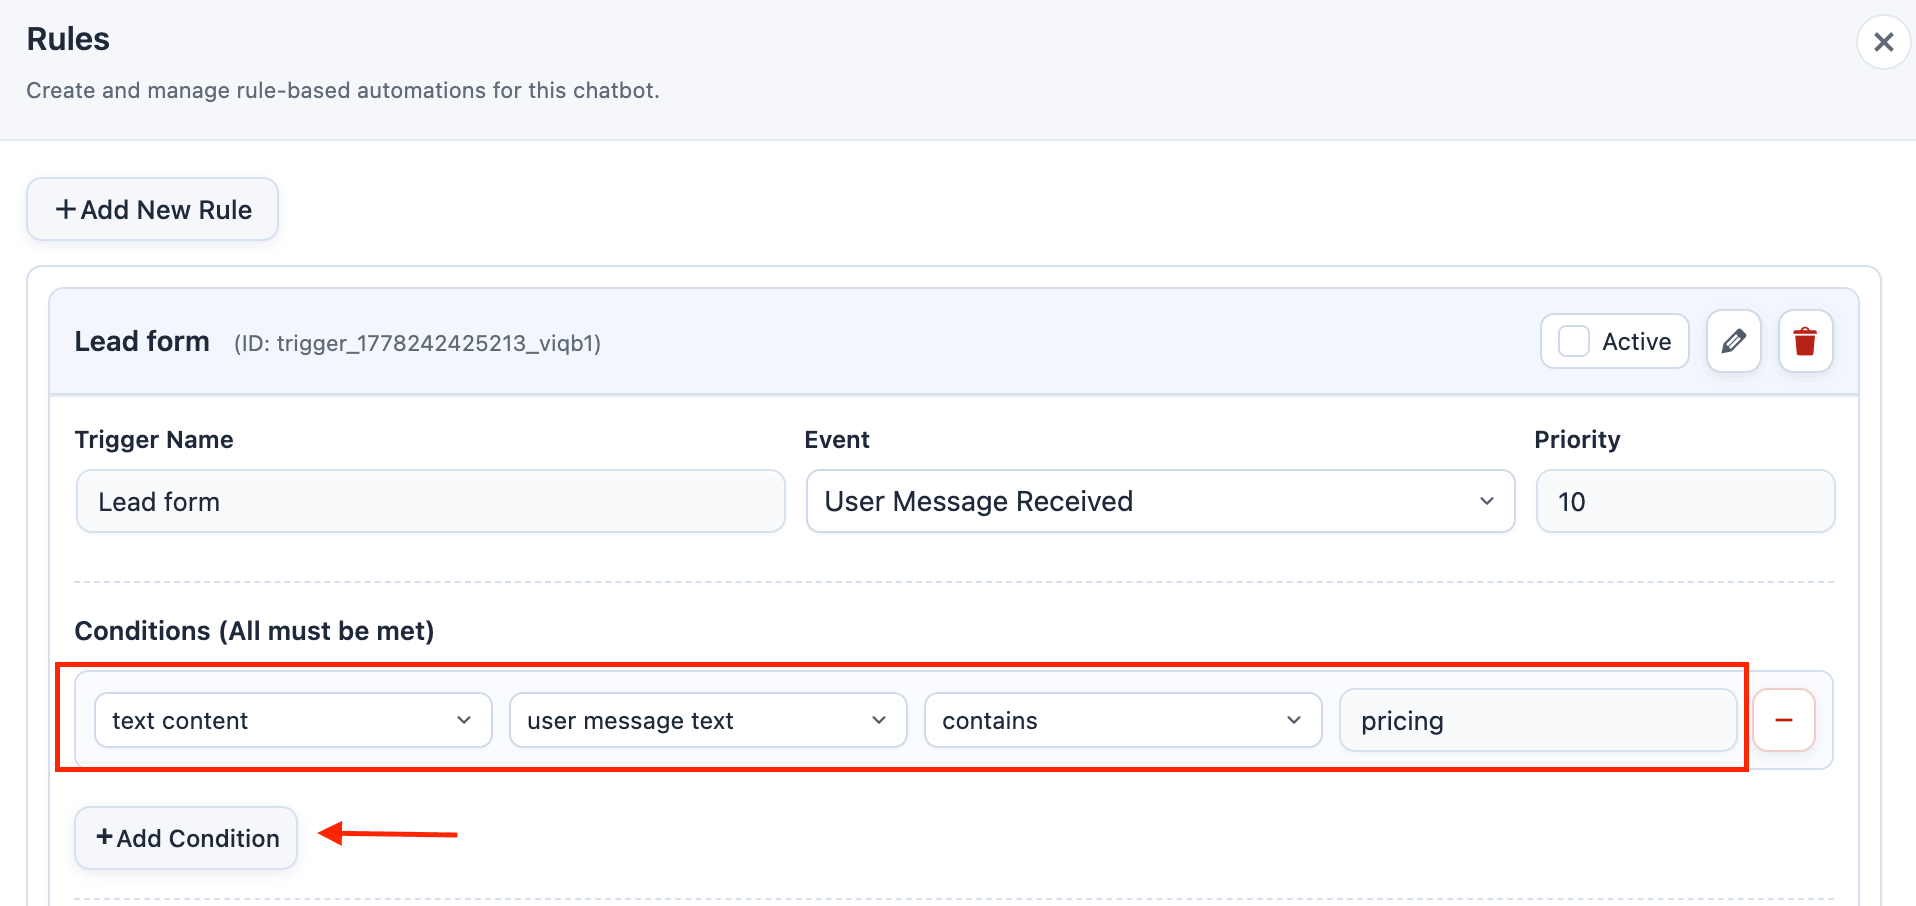
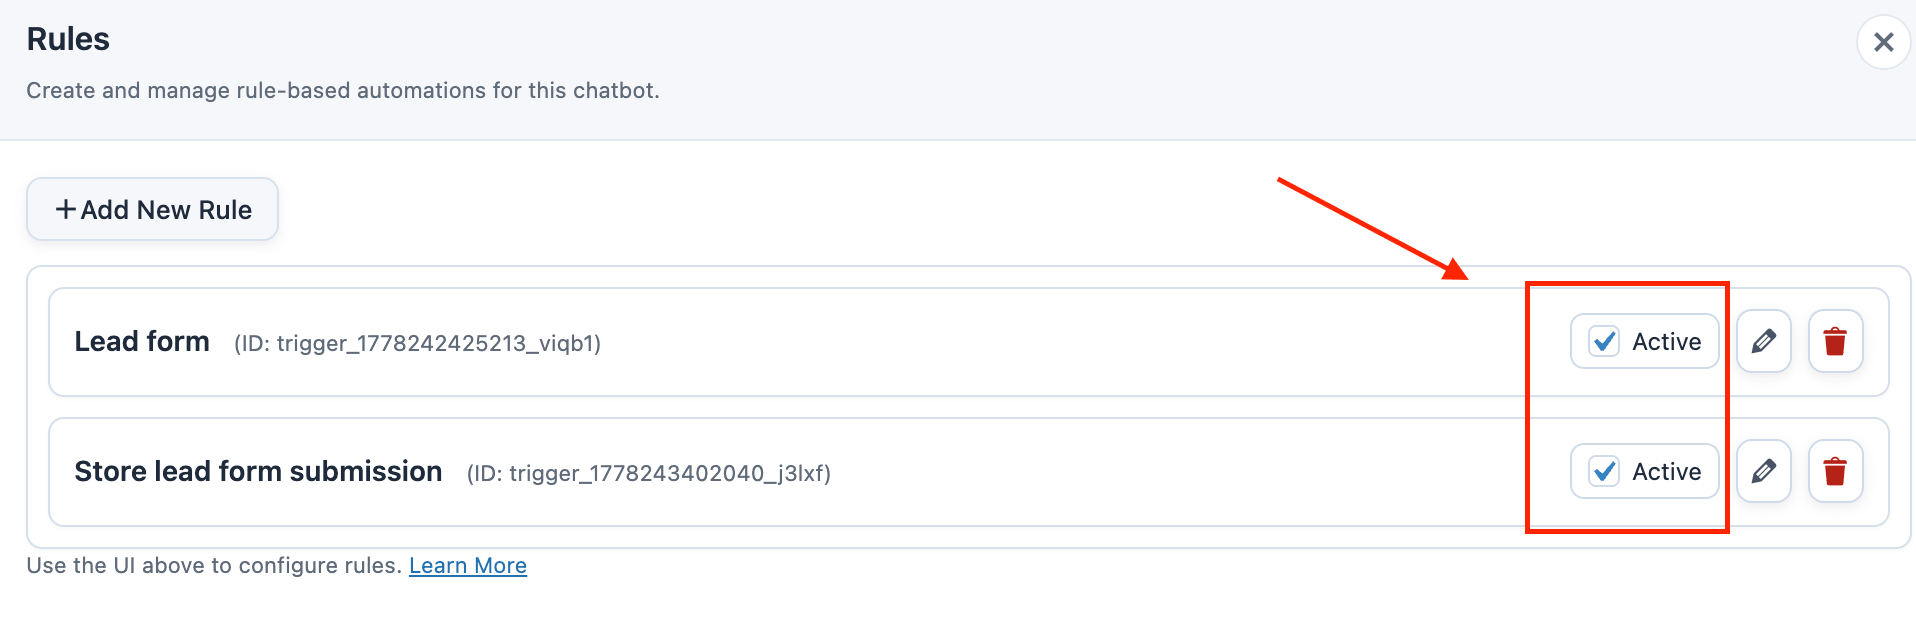
Use Display form when the chatbot should ask for contact details inside the conversation. The form is rendered in the chat, and AI processing pauses for that message while the visitor completes it. If the form was displayed from a User Message Received rule, AI Puffer automatically continues the AI response after a successful form submission. It uses the captured user message, adds the submitted form data as context, and avoids resuming when a form-submission rule already returned a direct bot reply. Show the form when the visitor uses a lead keyword:- Add a rule named Lead form.
- Set Event to User Message Received.
- Add this condition:
- Set Action Type to Display Form.
- Add the form title, such as
Request a quote.
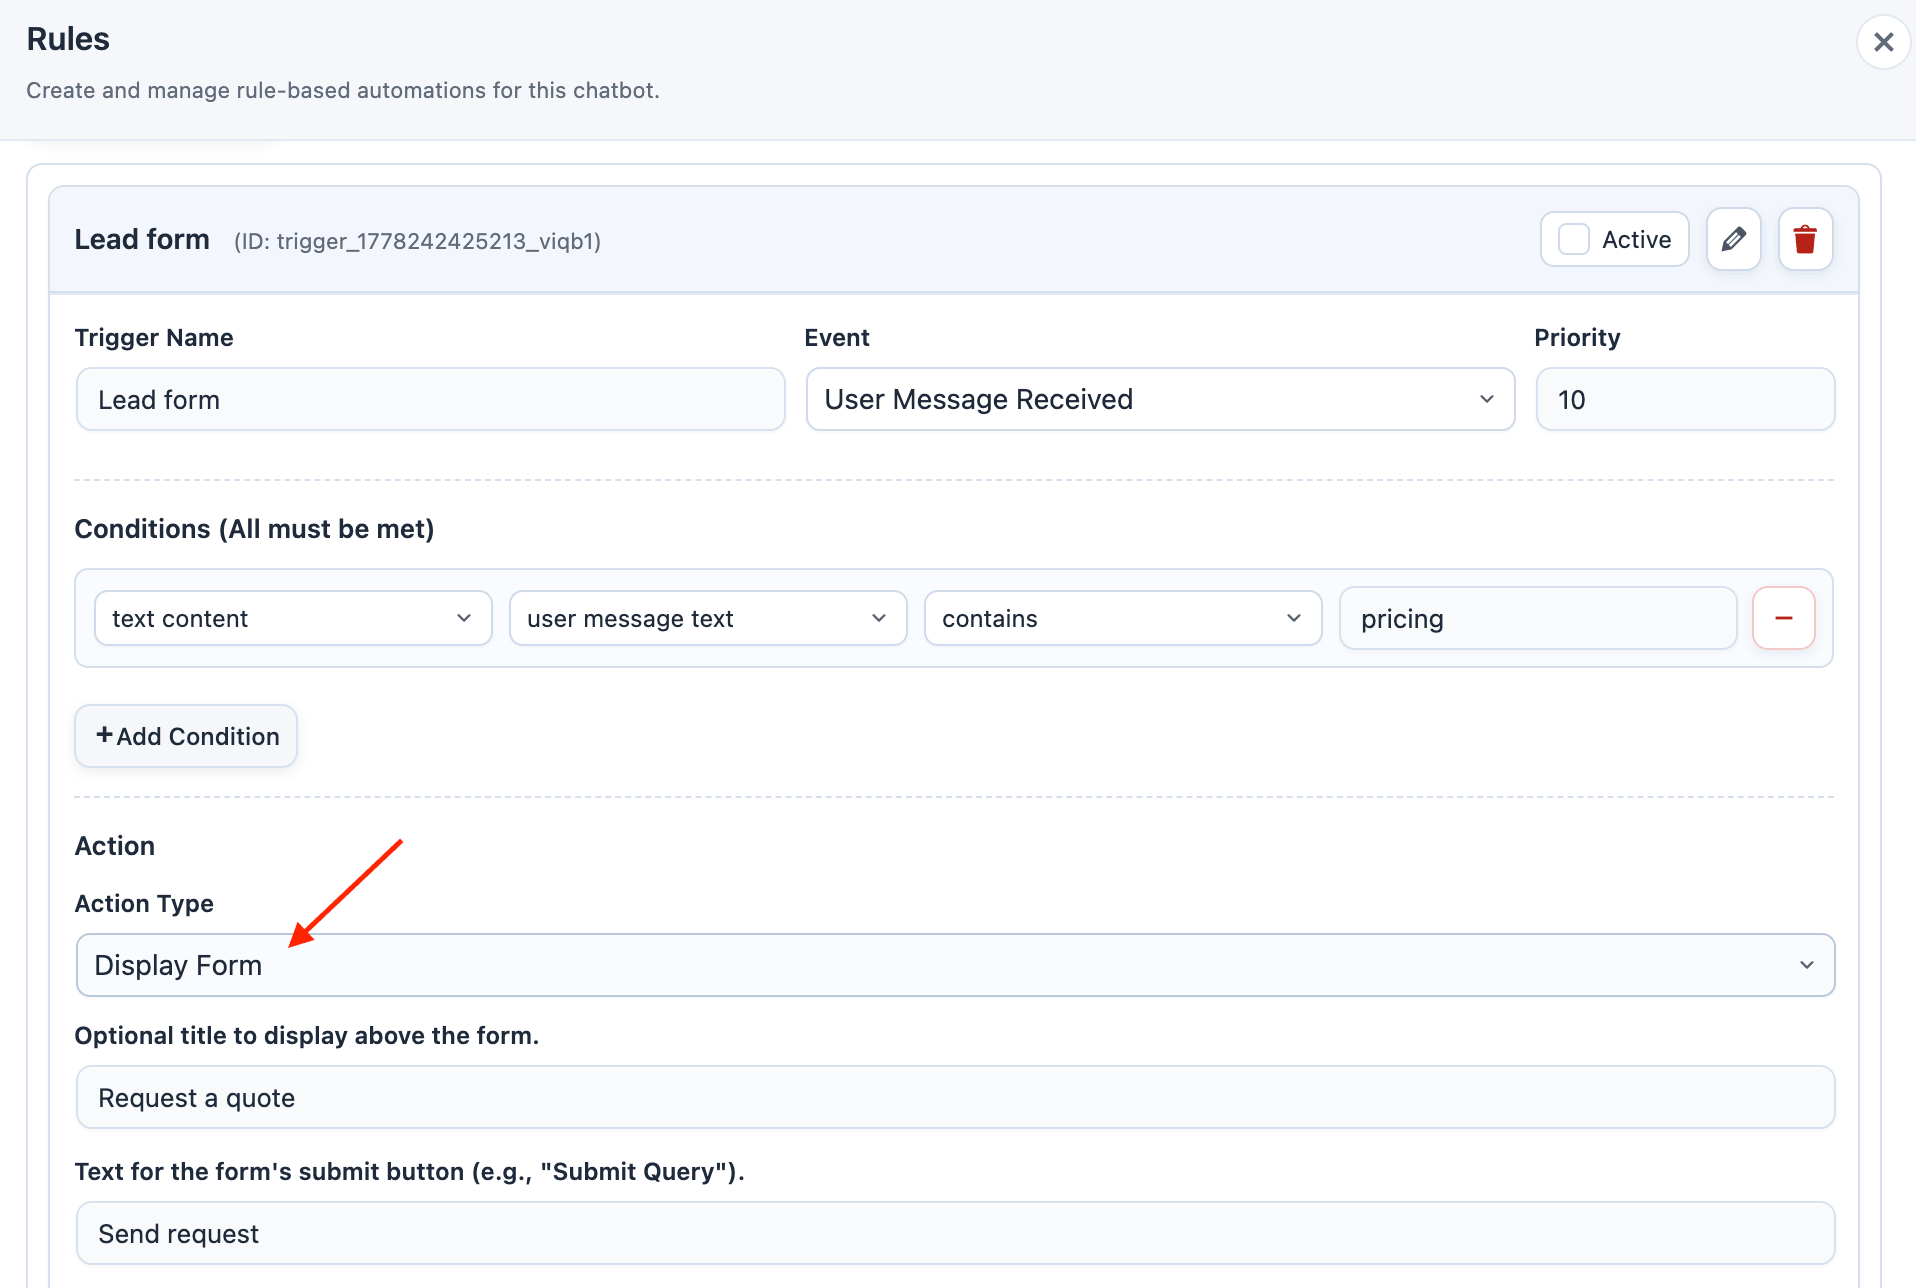
- Add these form elements:
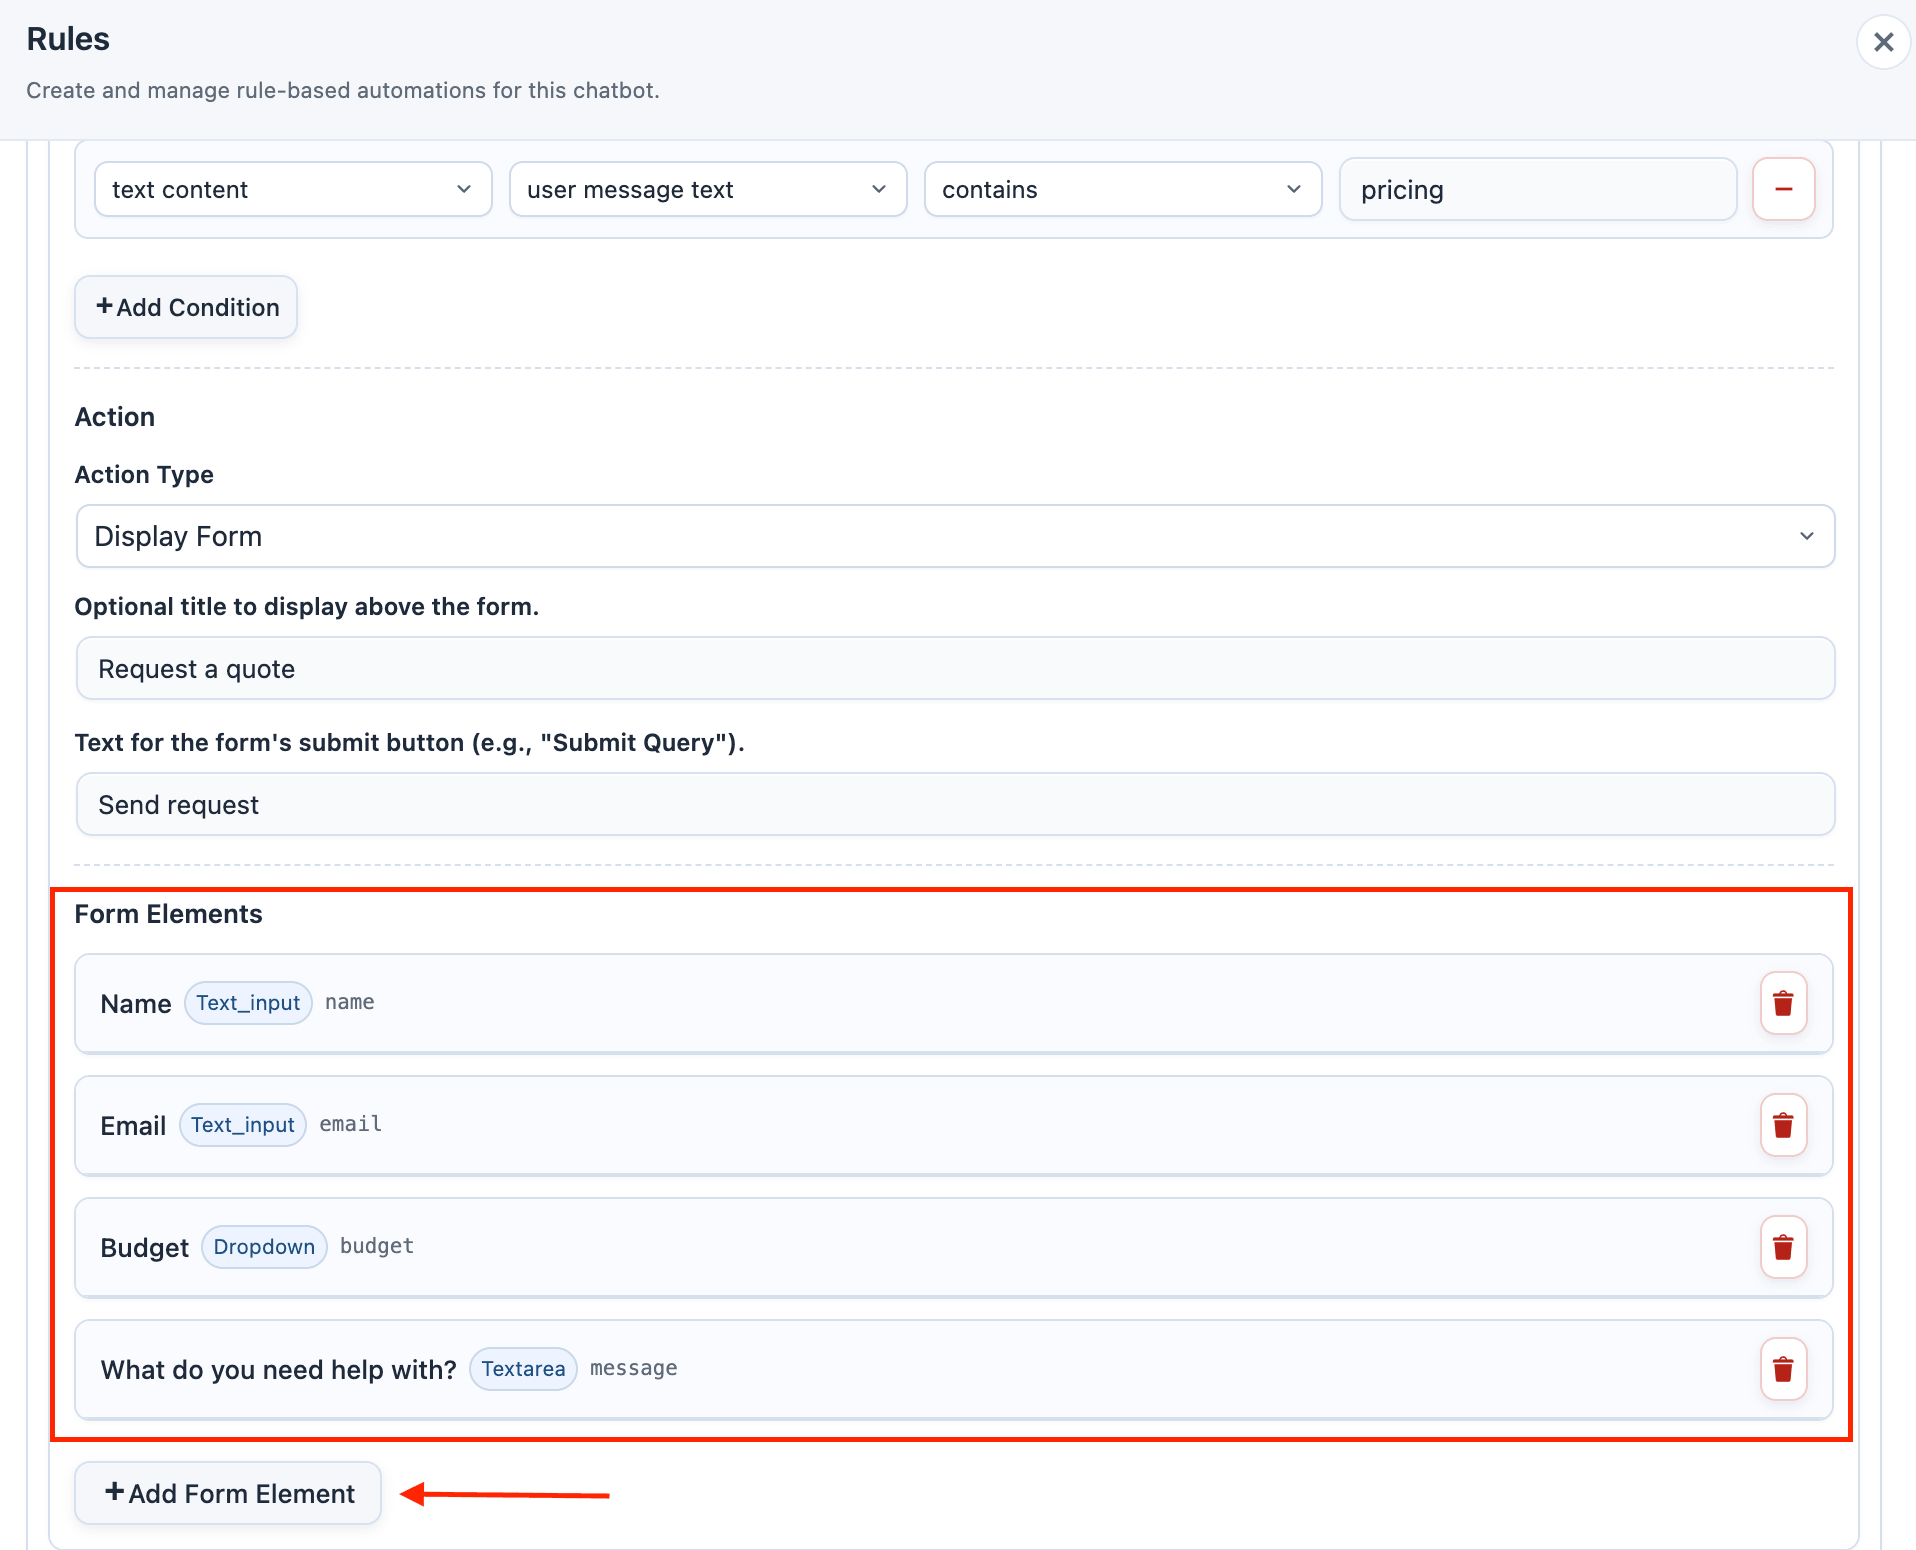
- Set Submit Button Text to
Send request.
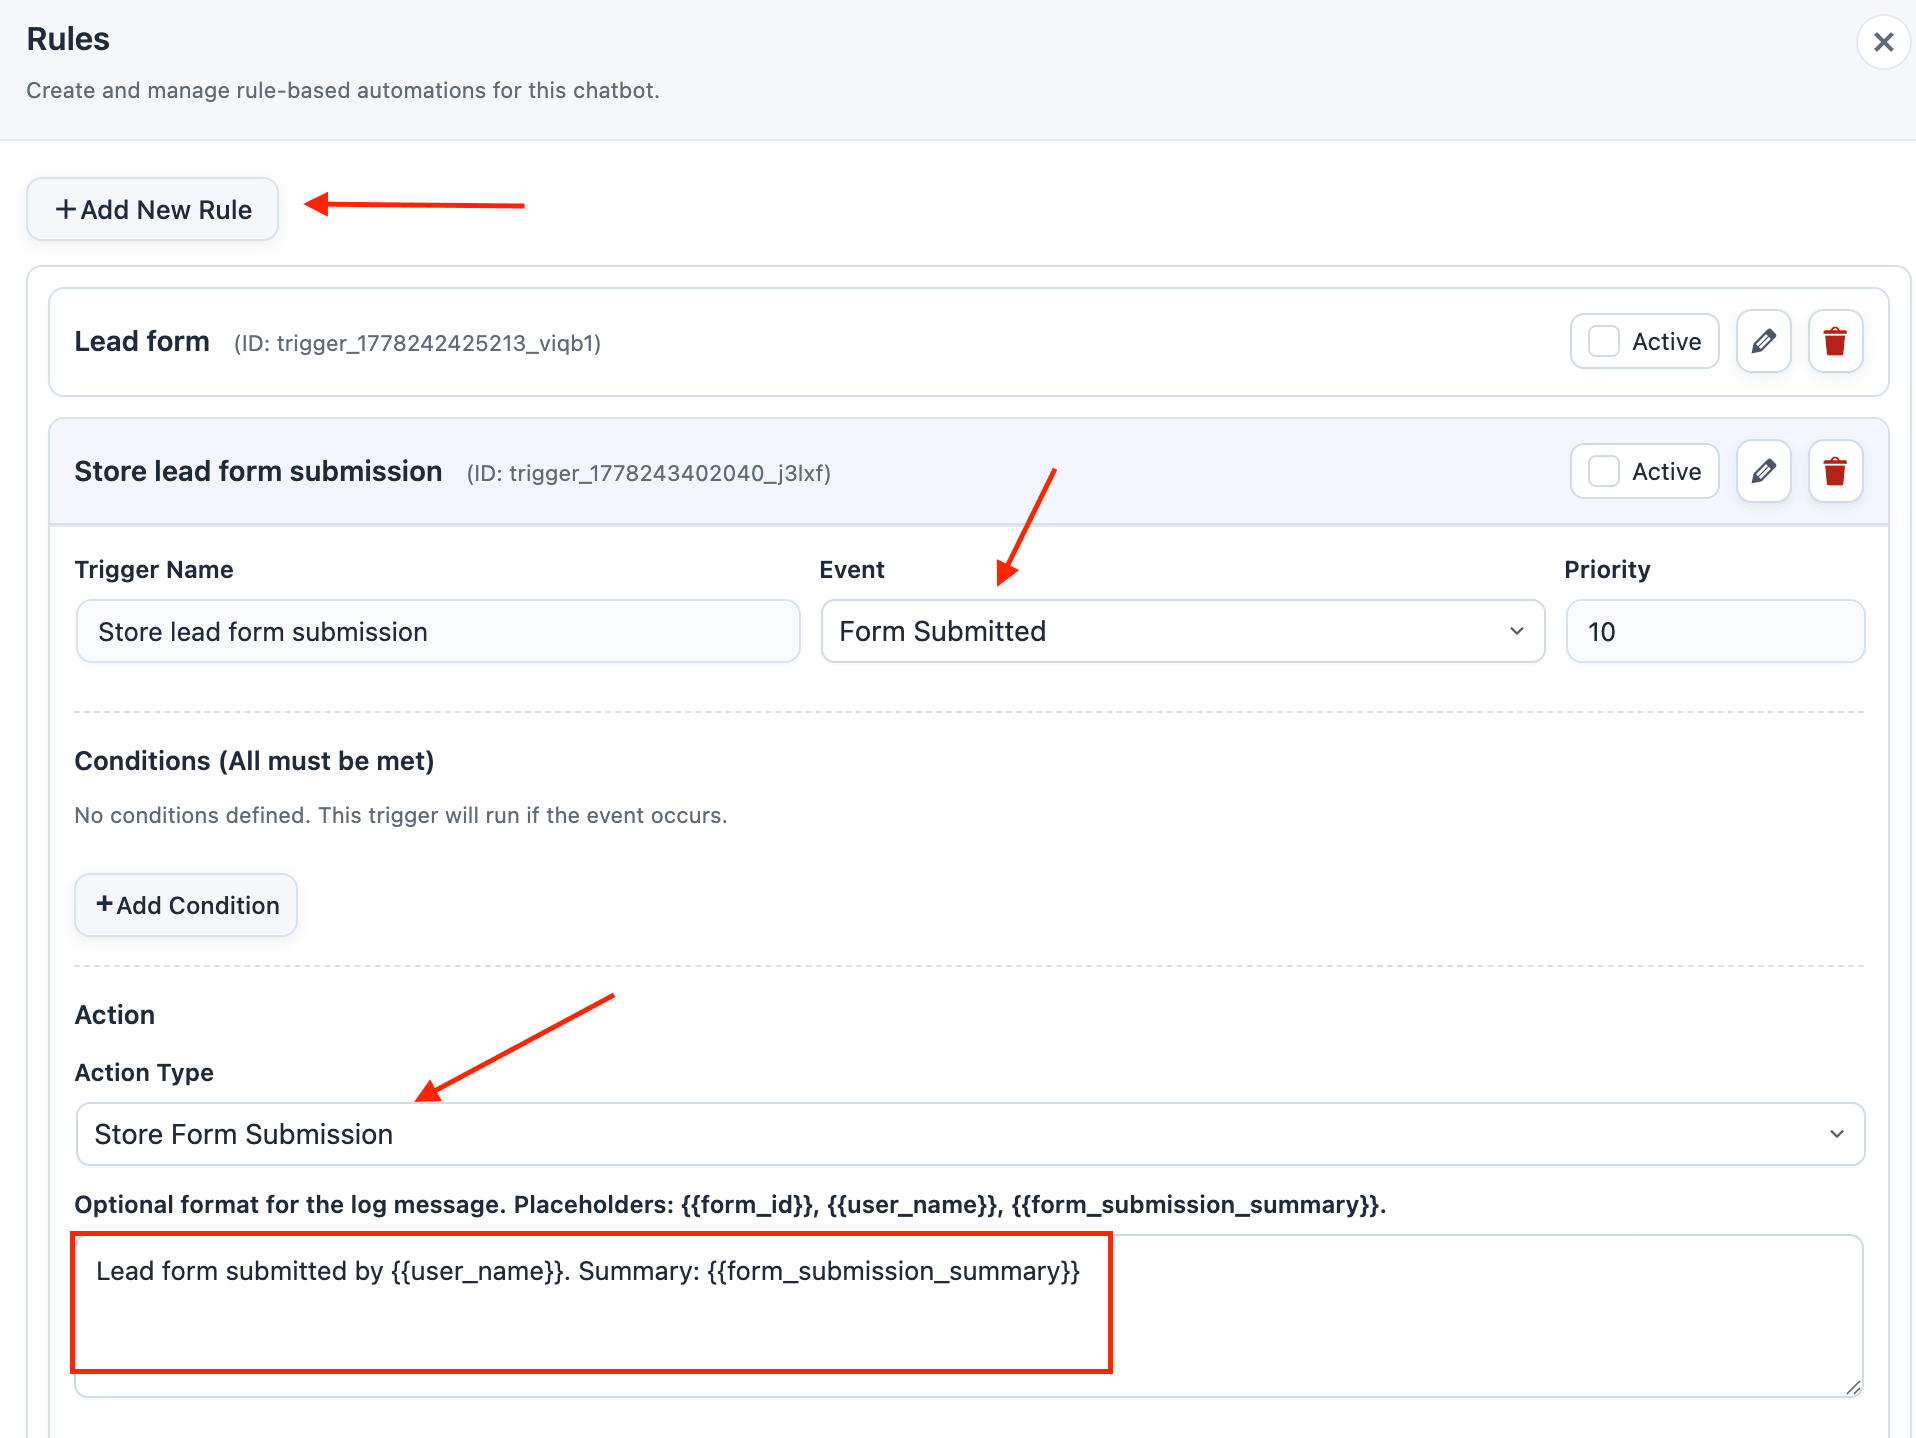
- Add a rule named Store lead form submission.
- Set Event to Form Submitted.
- Leave conditions empty if this chatbot only displays one rule form.
- Set Action Type to Store Form Submission.
- Use this Log Message Format:
data.inputs.email, data.inputs.first_name, data.inputs.last_name, data.inputs.phone, and data.inputs.company.