Styling the Chatbot
You can easily customize the appearance of your chatbot by adjusting its font size, font color, background color, button color, text field background and border colors, user and AI message background colors, width and height, and even the avatars.
| Parameter | Description | Default Value |
|---|---|---|
| Font Size | Adjusts the font size of the chatbot. | 13 |
| Font Color | Changes the font color of the chatbot. | #000000 |
| Background Color | Sets the background color of the chatbot. | N/A |
| Button Color | Alters the color of the buttons. | N/A |
| Text Field Background | Adjusts the background color of the text field. | #ffffff |
| Text Field Border | Sets the border color of the text field. | #ffffff |
| User Background Color | Changes the background color of user messages. | #444654 |
| AI Background Color | Modifies the background color of AI messages. | #343541 |
| Width | Sets the width of the chatbot. | 300 |
| Height | Alters the height of the chatbot. | 400 |
| Use Avatars | Toggles the display of avatars. | N/A |
| AI Avatar | Changes the avatar of the chatbot. | N/A |
| Border Radius - Window | Adjusts the curvature of the chatbot window corners. | 20px |
| Text Field Height | Sets the height of the text input field. | 60px |
| Border Radius - Text Field | Changes the curvature of the text input field corners. | 20px |
| Icons Color | Modifies the color of icons in the download bar. | Blue |
| AI Thinking Text Color | Sets the color of text when AI is processing. | N/A |
| Full Screen Button | Adds a button to toggle the chat window to full-screen mode. | On |
| Download Button | When enabled, this feature adds a download button allowing users to download their chat history. | On |
| Clear Button | Adds a clear button that, when clicked, will clear the chat history and local memory. | On |
All the style settings mentioned above apply both to the shortcode and the widget.
However, the widget has three additional options:
| Parameter | Description |
|---|---|
| Icon | Specifies the widget's icon, displayed on the side of your website. |
| Position | Sets the position of the widget on your website, either left or right. |
| Delay Time | Determines the time (in seconds) before the widget appears on the screen. |
| Close Button | Adds a close (X) icon to the widget, enabling users to close the widget. |
Customizing the Appearance
Here are the steps to adjust the style of your chatbot:
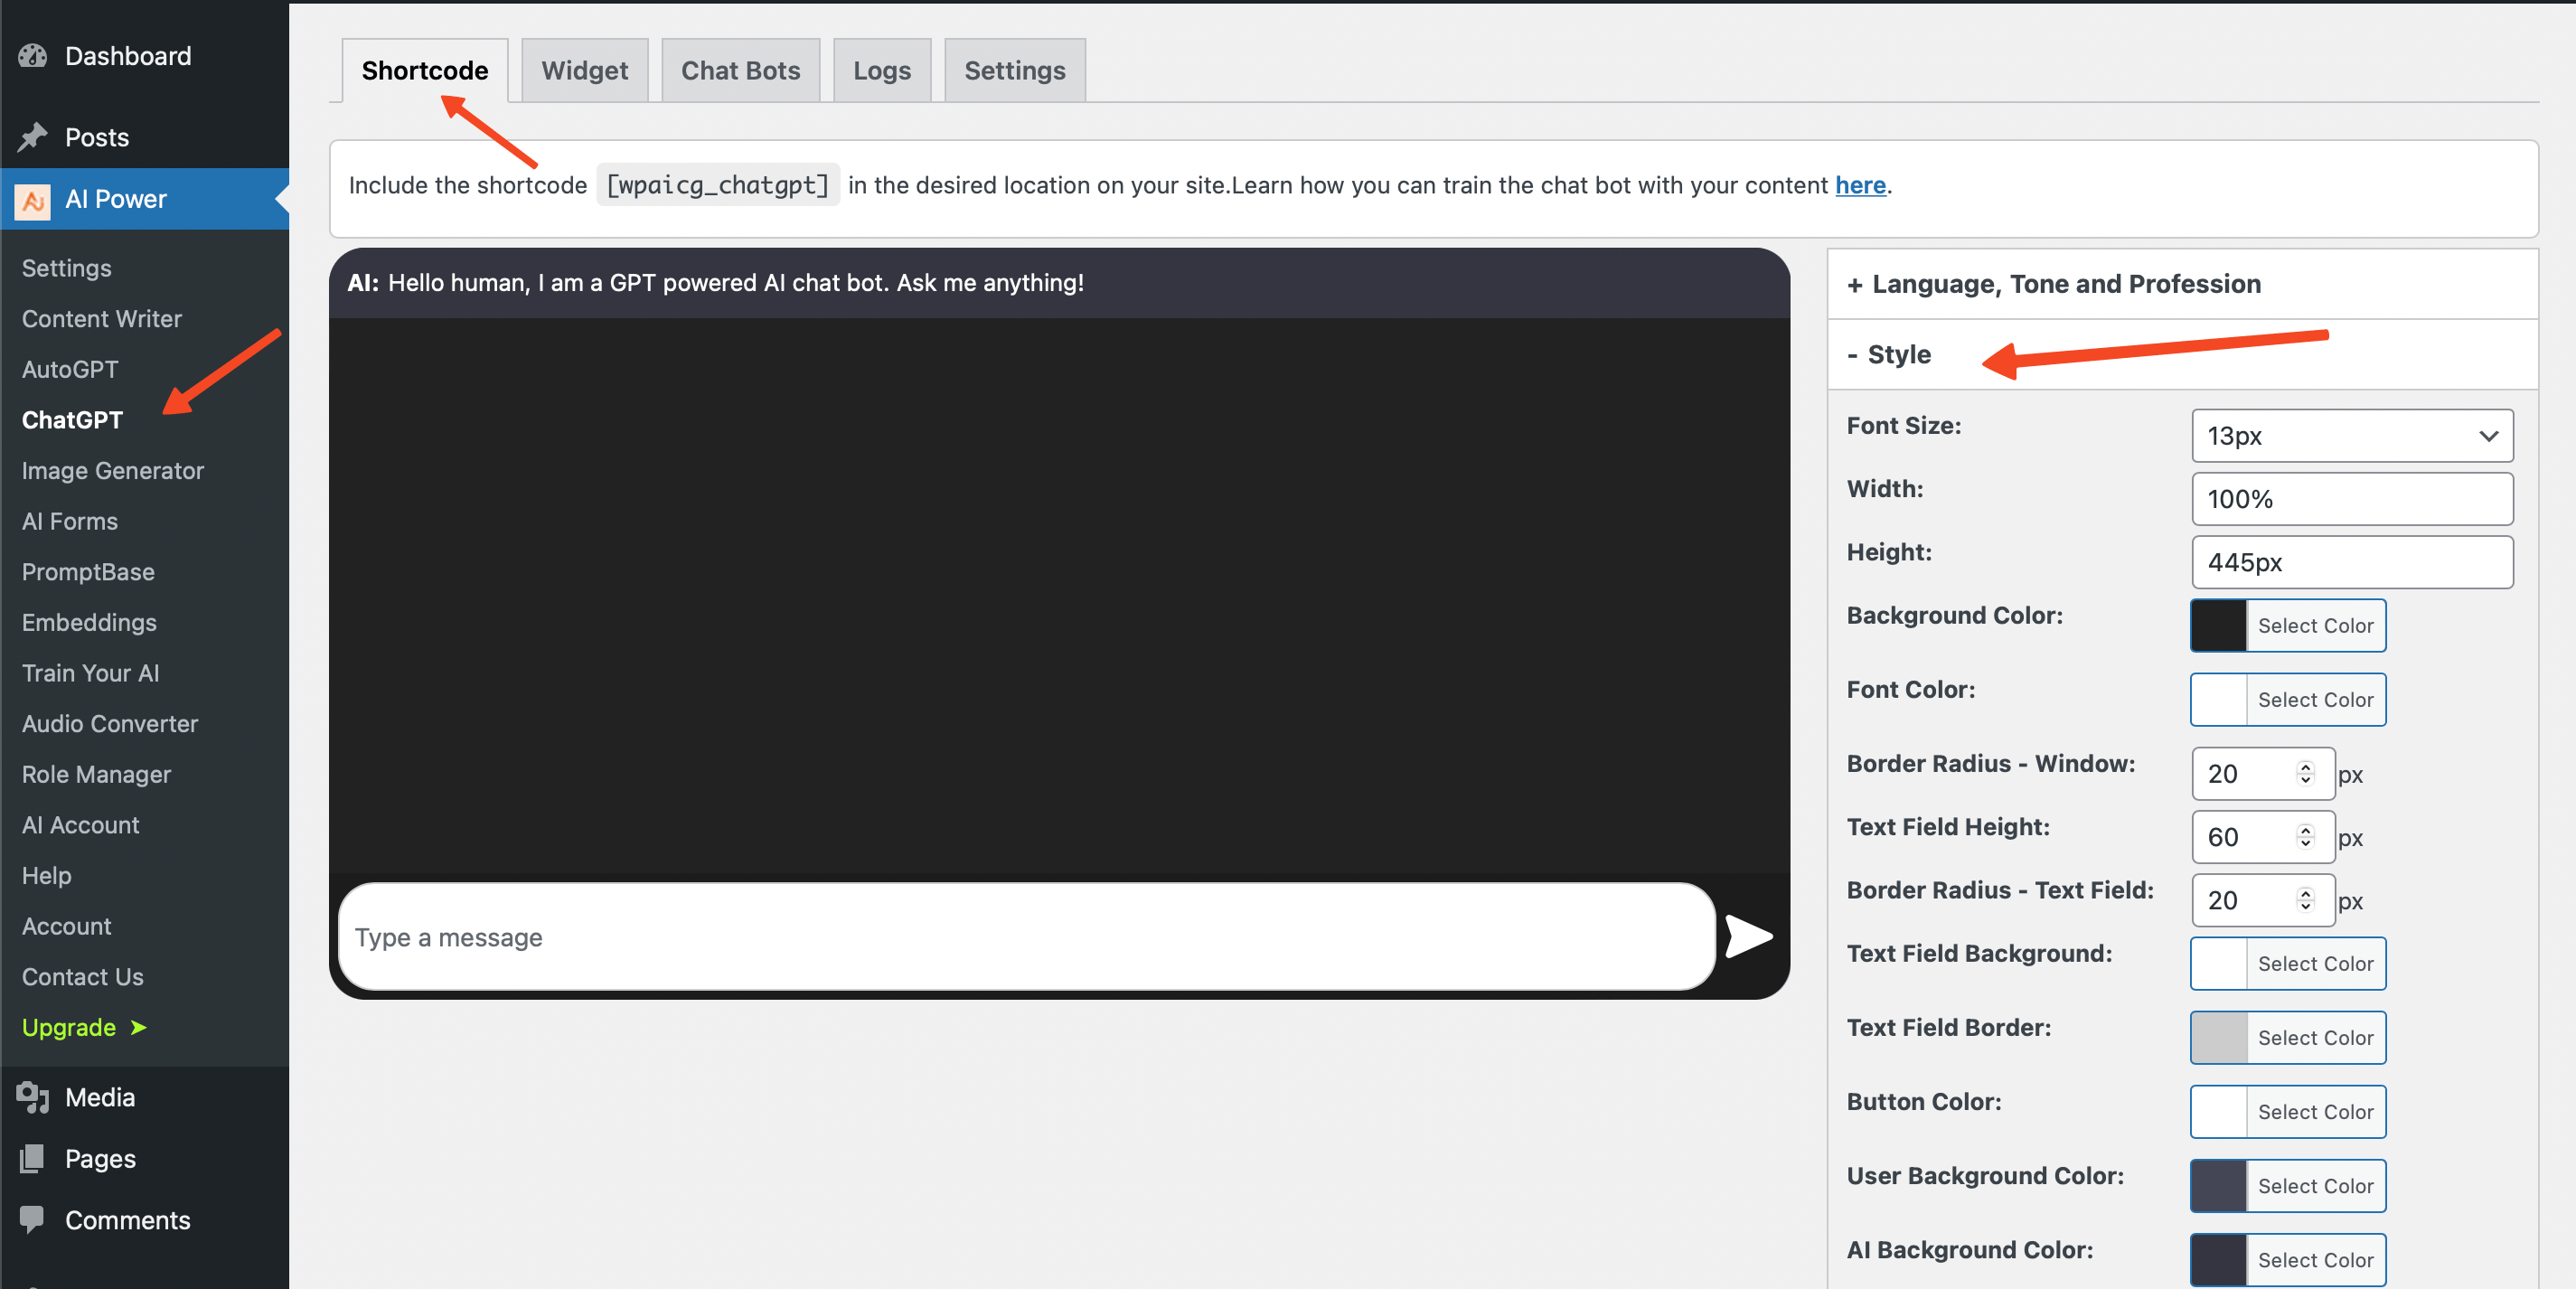
- Shortcode
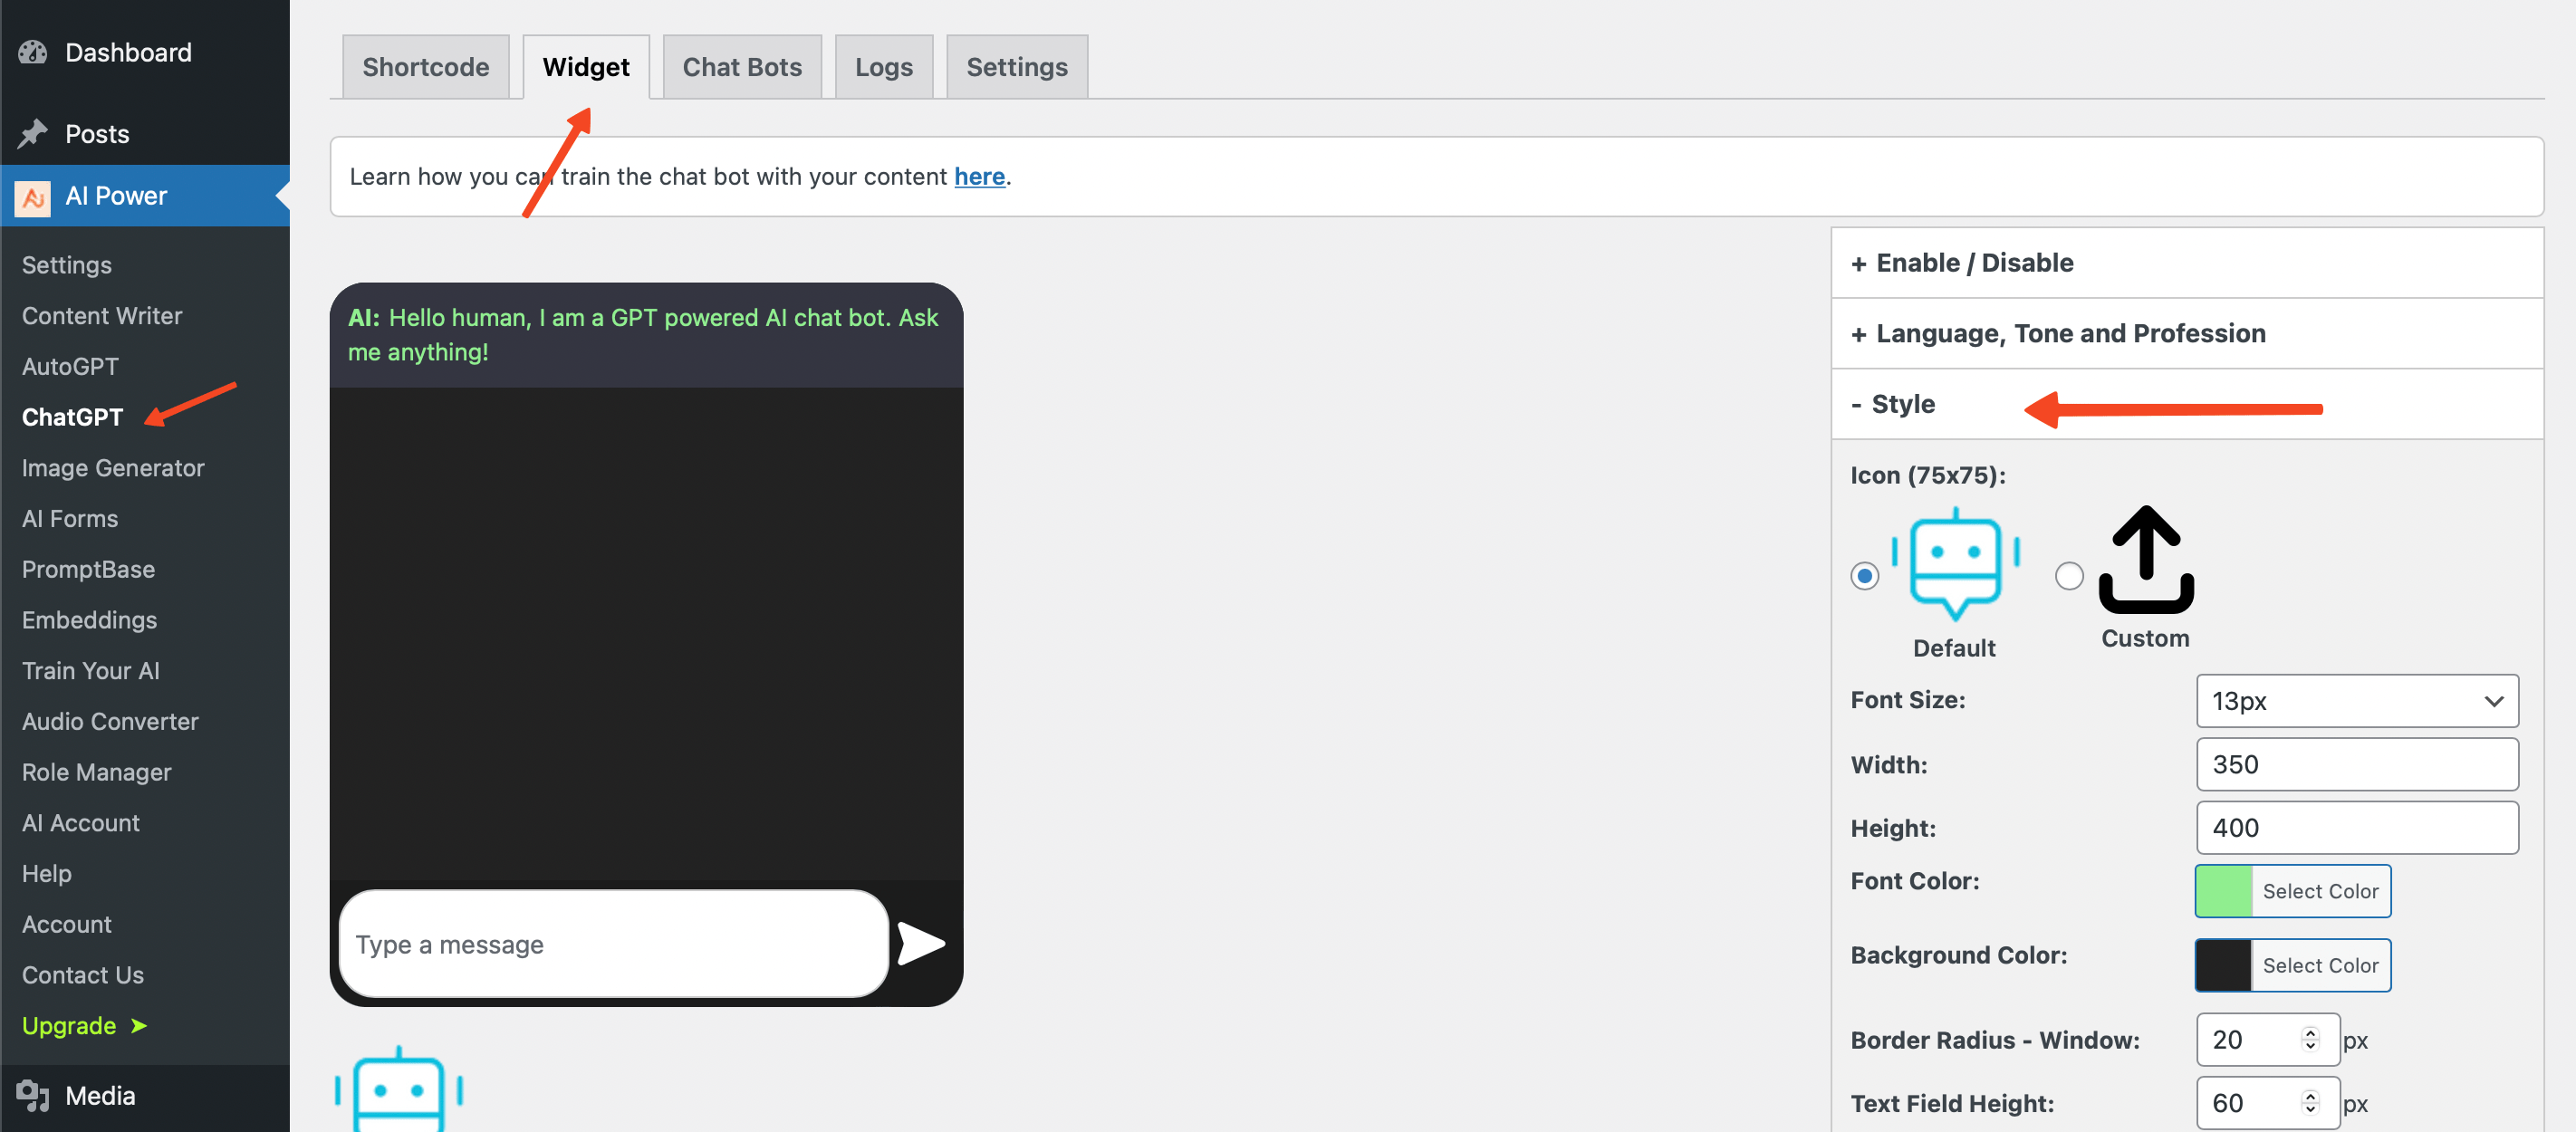
- Widget
- Navigate to the ChatGPT - Shortcode tab in your dashboard.
- Click on the Style tab located on the right side of your screen.
- Adjust the settings as necessary:
- Font Size: Enter a number between 10 and 30 to adjust the chatbot's font size. The default is 13.
- Font Color: Click on the color picker or input a hex code to set the font color of the chatbot. The default color is #000000.
- Background Color: Use the color picker or enter a hex code to set the chatbot's background color.
- Button Color: Use the color picker or enter a hex code to set the color of the chatbot's buttons.
- Text Field Background: Use the color picker or enter a hex code to set the background color of the text input field. The default color is #ffffff.
- Text Field Border: Use the color picker or enter a hex code to set the border color of the text input field. The default color is #ffffff.
- User Background Color: Use the color picker or enter a hex code to set the background color of the user's messages. The default color is #444654.
- AI Background Color: Use the color picker or enter a hex code to set the background color of the AI's messages. The default color is #343541.
- Width: Input a number (in pixels or percentage) to set the width of the chatbot. The default is 300px, and it can be set between 200 and 800px or as a percentage.
- Height: Input a number (in pixels or percentage) to set the height of the chatbot. The default is 400px, and it can be set between 200 and 800px or as a percentage.
- Use Avatars: Toggle this option to enable or disable the display of avatars. If enabled, the chatbot will display the avatars of the user and the AI. If the user is logged in, their avatar will be displayed.
- AI Avatar: Choose the avatar of the chatbot. You can use the default avatar or upload your own. The size must be 40x40px.
- Border Radius - Window: Input a number to adjust the curvature of the chatbot window corners. The default value is 20px.
- Text Field Height: Input a number to set the height of the text input field. The default height is 60px.
- Border Radius - Text Field: Input a number to adjust the curvature of the text input field corners. The default value is 20px.
- Icons Color: Use the color picker or enter a hex code to set the color of the icons in the download bar. The default color is blue.
- AI Thinking Text Color: Use the color picker or enter a hex code to set the color of the text displayed when the AI is processing a response.
- After adjusting the settings, click on the Save button to apply the changes.
- Navigate to the ChatGPT - Widget tab in your dashboard.
- Click on the Style tab located on the right side of your screen.
- Adjust the settings as necessary:
- Widget Icon: This is the icon that will appear on the side of your website to represent the chatbot widget. You can use the default icon or upload a custom icon. The icon should be 75x75px in size.
- Position: This allows you to determine the position of the chatbot widget on your website. You can choose either the left or right side of your website for the widget's position.
- Delay Time: You can input a number into this field to set a delay for the widget's appearance. For instance, if you enter 5, the widget will appear after a 5-second delay. If you want the widget to appear immediately, leave this field empty.
- Font Size: Enter a number between 10 and 30 to adjust the chatbot's font size. The default is 13.
- Font Color: Click on the color picker or input a hex code to set the font color of the chatbot. The default color is #000000.
- Background Color: Use the color picker or enter a hex code to set the chatbot's background color.
- Button Color: Use the color picker or enter a hex code to set the color of the chatbot's buttons.
- Text Field Background: Use the color picker or enter a hex code to set the background color of the text input field. The default color is #ffffff.
- Text Field Border: Use the color picker or enter a hex code to set the border color of the text input field. The default color is #ffffff.
- User Background Color: Use the color picker or enter a hex code to set the background color of the user's messages. The default color is #444654.
- AI Background Color: Use the color picker or enter a hex code to set the background color of the AI's messages. The default color is #343541.
- Width: Input a number (in pixels or percentage) to set the width of the chatbot. The default is 300px, and it can be set between 200 and 800px or as a percentage.
- Height: Input a number (in pixels or percentage) to set the height of the chatbot. The default is 400px, and it can be set between 200 and 800px or as a percentage.
- Use Avatars: Toggle this option to enable or disable the display of avatars. If enabled, the chatbot will display the avatars of the user and the AI. If the user is logged in, their avatar will be displayed.
- AI Avatar: Choose the avatar of the chatbot. You can use the default avatar or upload your own. The size must be 40x40px.
- Border Radius - Window: Input a number to adjust the curvature of the chatbot window corners. The default value is 20px.
- Text Field Height: Input a number to set the height of the text input field. The default height is 60px.
- Border Radius - Text Field: Input a number to adjust the curvature of the text input field corners. The default value is 20px.
- Icons Color: Use the color picker or enter a hex code to set the color of the icons in the download bar. The default color is blue.
- AI Thinking Text Color: Use the color picker or enter a hex code to set the color of the text displayed when the AI is processing a response.
- After adjusting the settings, click on the Save button to apply the changes.
Shortcuts
You can use the Shift + Enter shortcut to create a line break instead of sending a message in the chatbot.
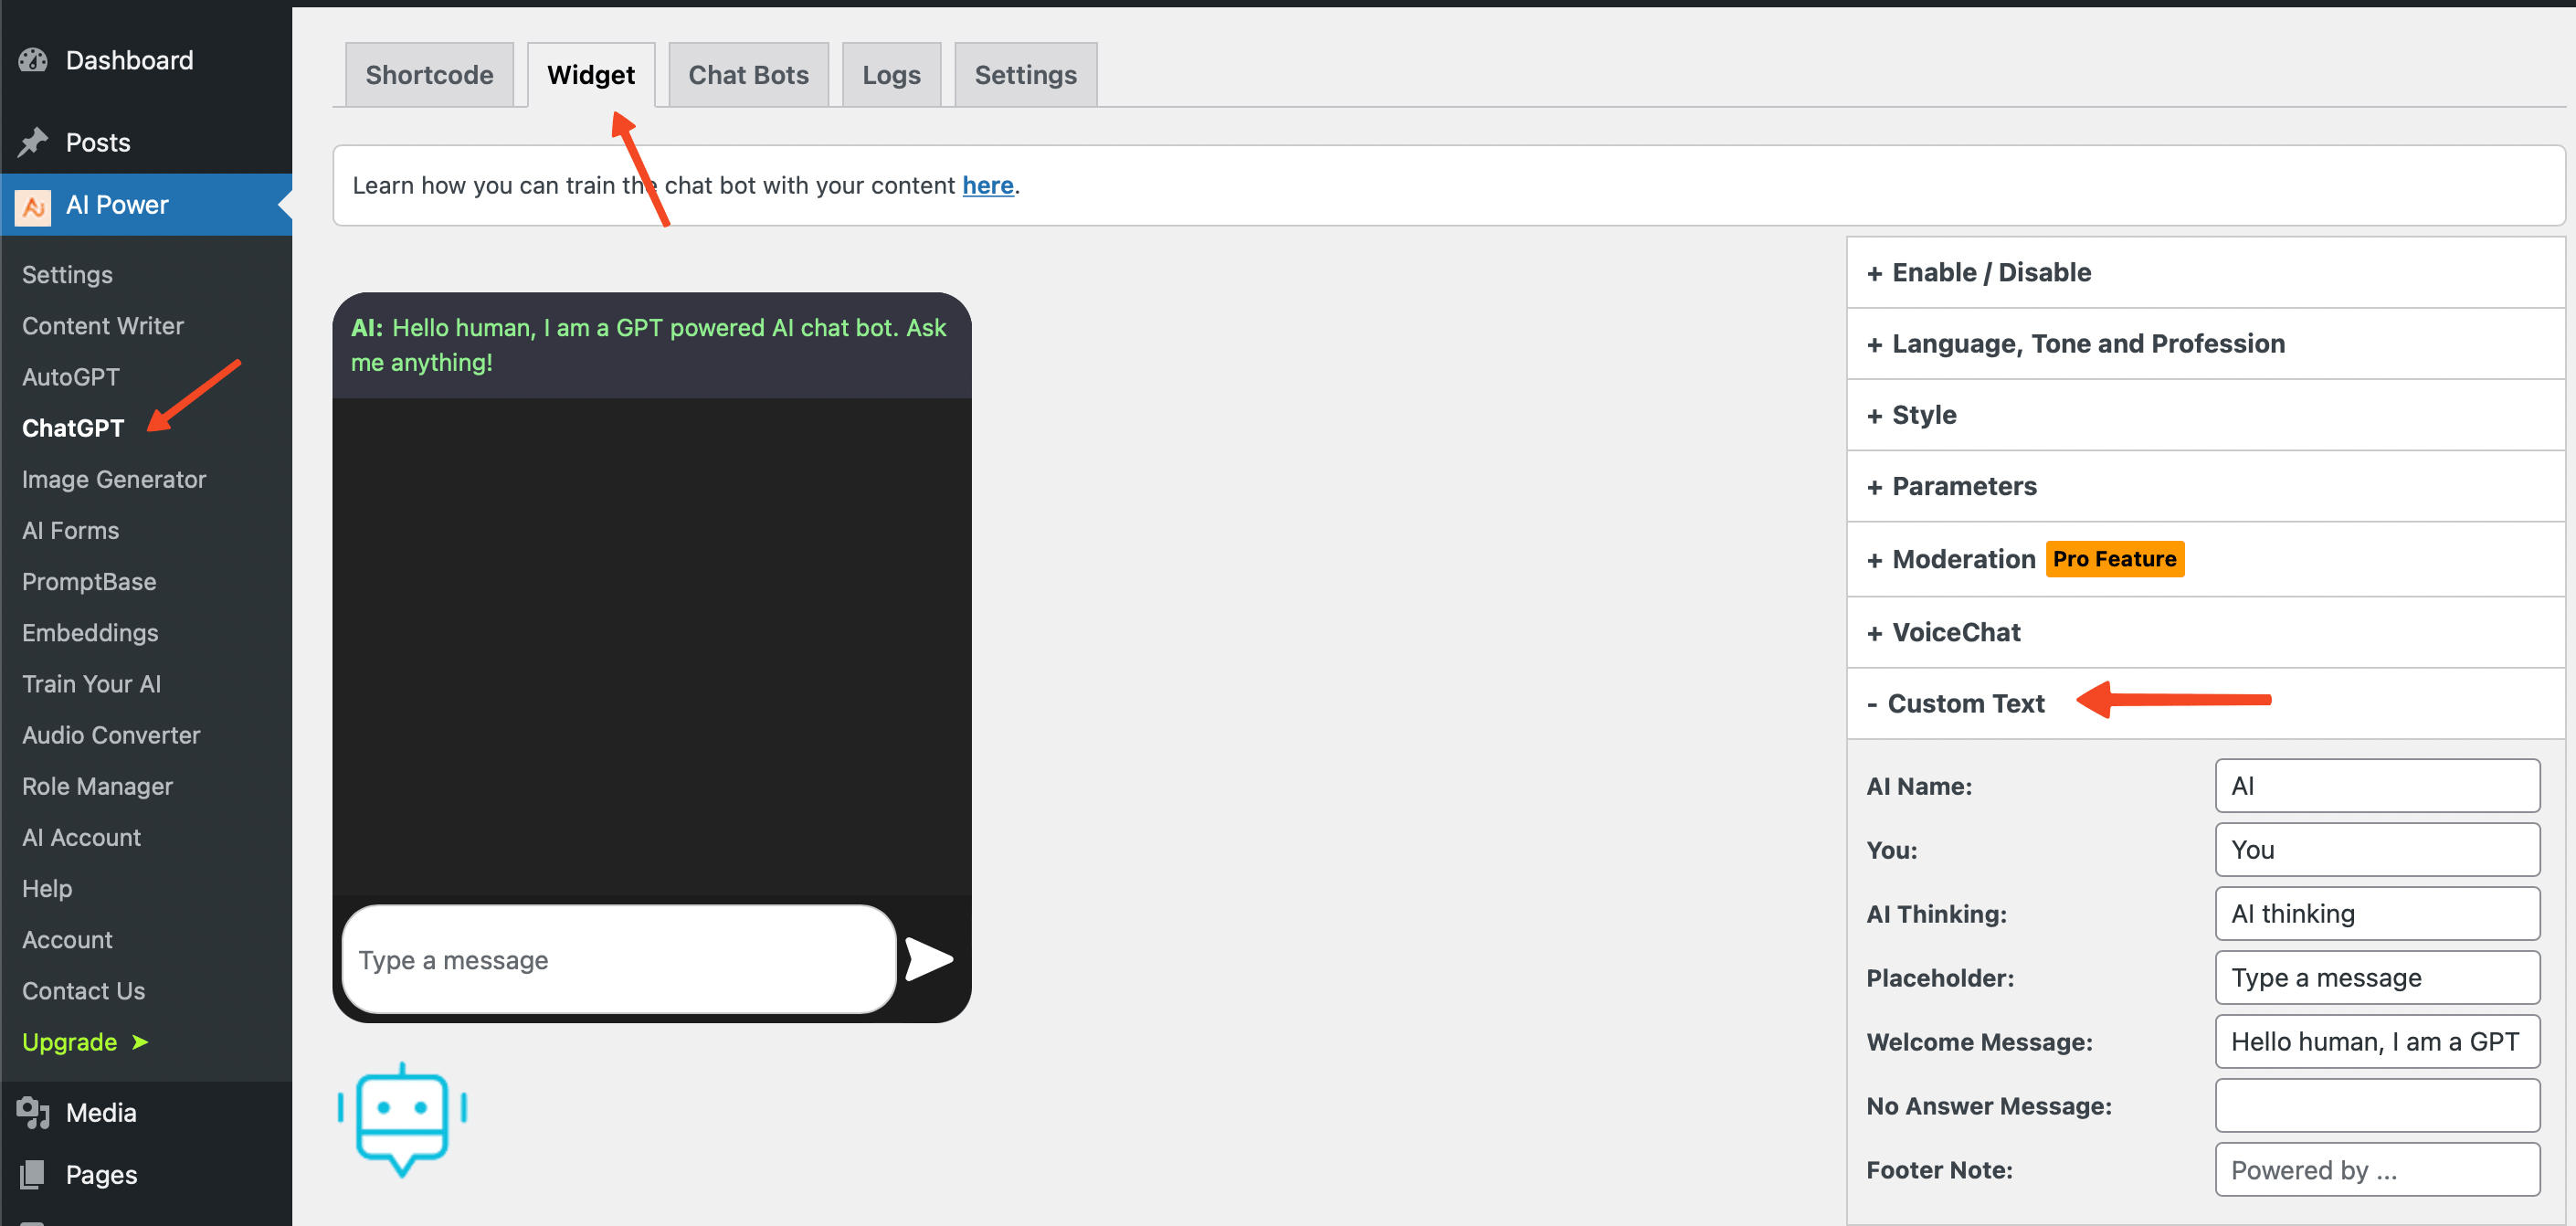
Customization the Text
For a more personalized user experience, you can customize the chatbot's text settings.
Here are some of the text parameters you can adjust:
| Option | Description | Default |
|---|---|---|
| AI Name | Change the name of the AI | "AI" |
| You | Change the name of the user | "You" |
| AI Thinking | Change the text while the AI is thinking | "AI Thinking" |
| Placeholder | Change the placeholder text of the input field | "Type a message" |
| Welcome Message | Change the welcome message of the chatbot | "Hello human, I am a GPT powered AI chat bot. Ask me anything!" |
| No Answer Message | Change the displayed message when the chatbot can't generate a response | Empty |
| Footer Note | Set a note that appears in the chatbot's footer | Empty |
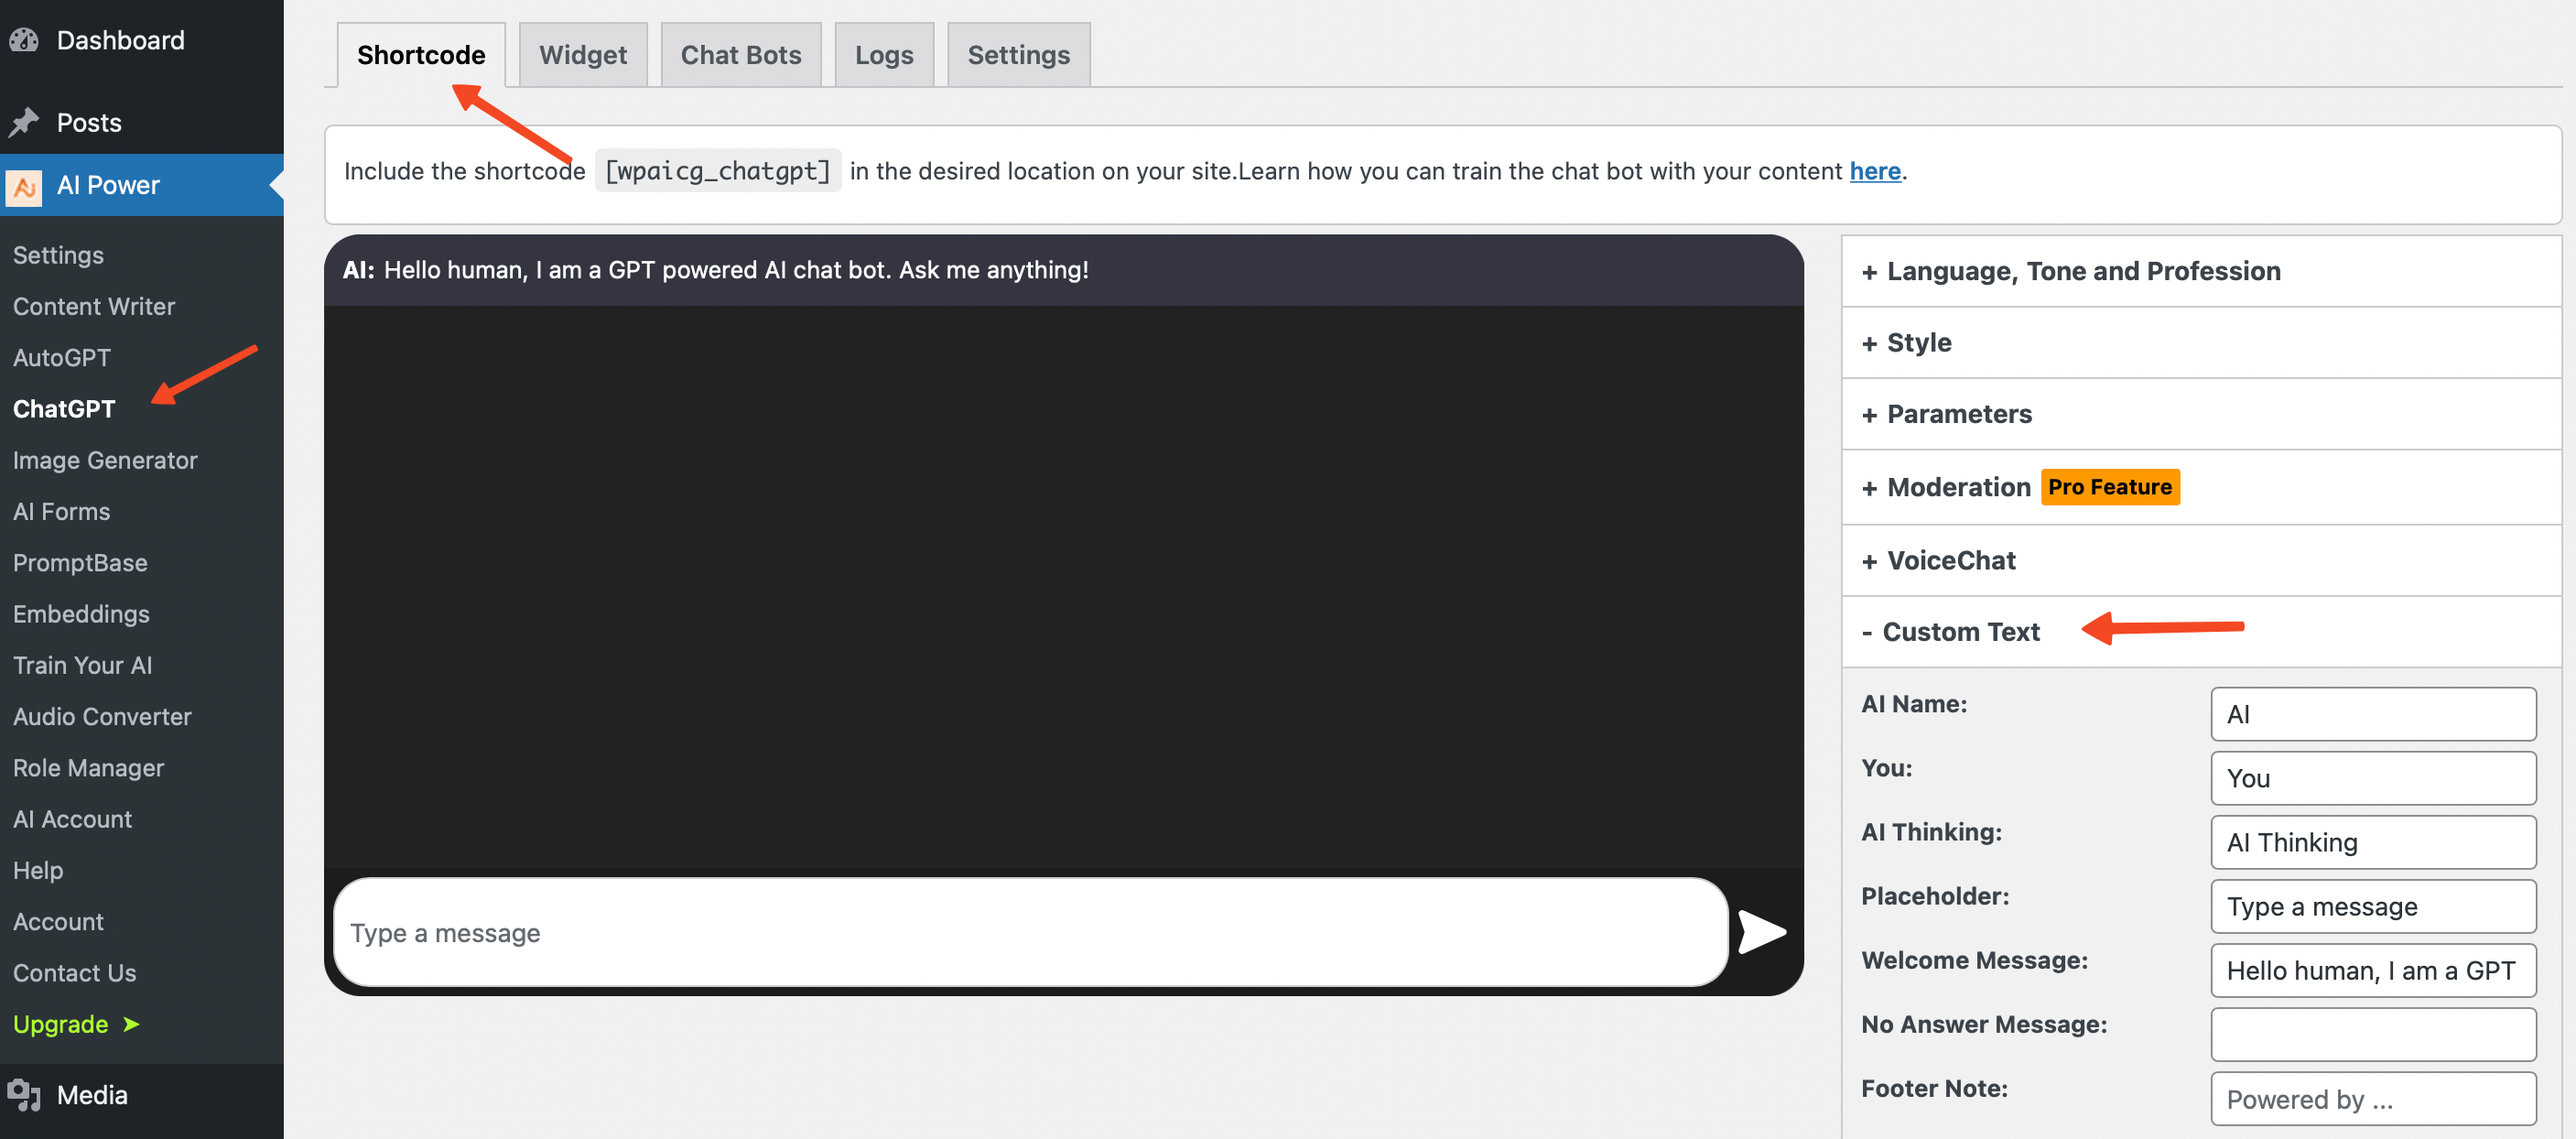
- Shortcode
- Widget
- Navigate to the ChatGPT - Shortcode tab in your dashboard.
- Click on the Custom Text tab located on the right side of your screen.
- Adjust the settings as necessary:
- AI Name: Input a name to personalize the AI. The default is "AI".
- You: Input a name to represent the user. The default is "You".
- AI Thinking: Input custom text to be displayed while the AI is generating a response. The default is "AI Thinking".
- Placeholder: Input custom placeholder text for the input field. The default is "Type a message".
- Welcome Message: Input a custom welcome message for the chatbot. The default is "Hello human, I am a GPT powered AI chat bot. Ask me anything!"
- No Answer Message: In case the chatbot cannot generate a response, input a custom message to be displayed. The default is empty.
- Footer Note: Input a custom note to be displayed in the chatbot's footer.
- After adjusting the settings, click on the Save button to apply the changes.
- Navigate to the ChatGPT - Widget tab in your dashboard.
- Click on the Custom Text tab located on the right side of your screen.
- Adjust the settings as necessary:
- AI Name: Input a name to personalize the AI. The default is "AI".
- You: Input a name to represent the user. The default is "You".
- AI Thinking: Input custom text to be displayed while the AI is generating a response. The default is "AI Thinking".
- Placeholder: Input custom placeholder text for the input field. The default is "Type a message".
- Welcome Message: Input a custom welcome message for the chatbot. The default is "Hello human, I am a GPT powered AI chat bot. Ask me anything!"
- No Answer Message: In case the chatbot cannot generate a response, input a custom message to be displayed. The default is empty.
- Footer Note: Input a custom note to be displayed in the chatbot's footer.
- After adjusting the settings, click on the Save button to apply the changes.